
Impact Plus FC8388 - Vacuum Cleaner PHILIPS - Free user manual and instructions
Find the device manual for free Impact Plus FC8388 PHILIPS in PDF.


| Product Type | Canister Vacuum Cleaner |
| Model | Impact Plus FC8388 |
| Brand | Philips |
| Power Consumption | 2000 W |
| Dustbag Capacity | 3.5 L |
| Filtration | HEPA H13 Filter |
| Dimensions (L x W x H) | 40 x 26 x 20 cm |
| Weight | 4.5 kg |
| Cord Length | 6 m |
| Suction Power Control | Electronic slider on handle |
| Dustbag Type | Paper dustbag (Philips type FC8000) |
| Filter Cleaning | Washable HEPA filter |
| Accessories Included | Crevice tool, upholstery nozzle, combination brush, telescopic tube |
| Cord Rewind | Automatic rewind button |
| Noise Level | 80 dB(A) |
| Wheel Type | Front swivel wheels, rear fixed wheels |
| Maintenance | Change dustbag when full, clean filter every 3 months |
| Safety | Overheating protection, automatic shut-off |
| Repairability | Spare parts available: hose, tube, nozzles, filter, dustbag |
Frequently Asked Questions - Impact Plus FC8388 PHILIPS
User questions about Impact Plus FC8388 PHILIPS
0 question about this device. Answer the ones you know or ask your own.
Ask a new question about this device
Download the instructions for your Vacuum Cleaner in PDF format for free! Find your manual Impact Plus FC8388 - PHILIPS and take your electronic device back in hand. On this page are published all the documents necessary for the use of your device. Impact Plus FC8388 by PHILIPS.
USER MANUAL Impact Plus FC8388 PHILIPS
Register your product and get support at
www.philips.com/welcome
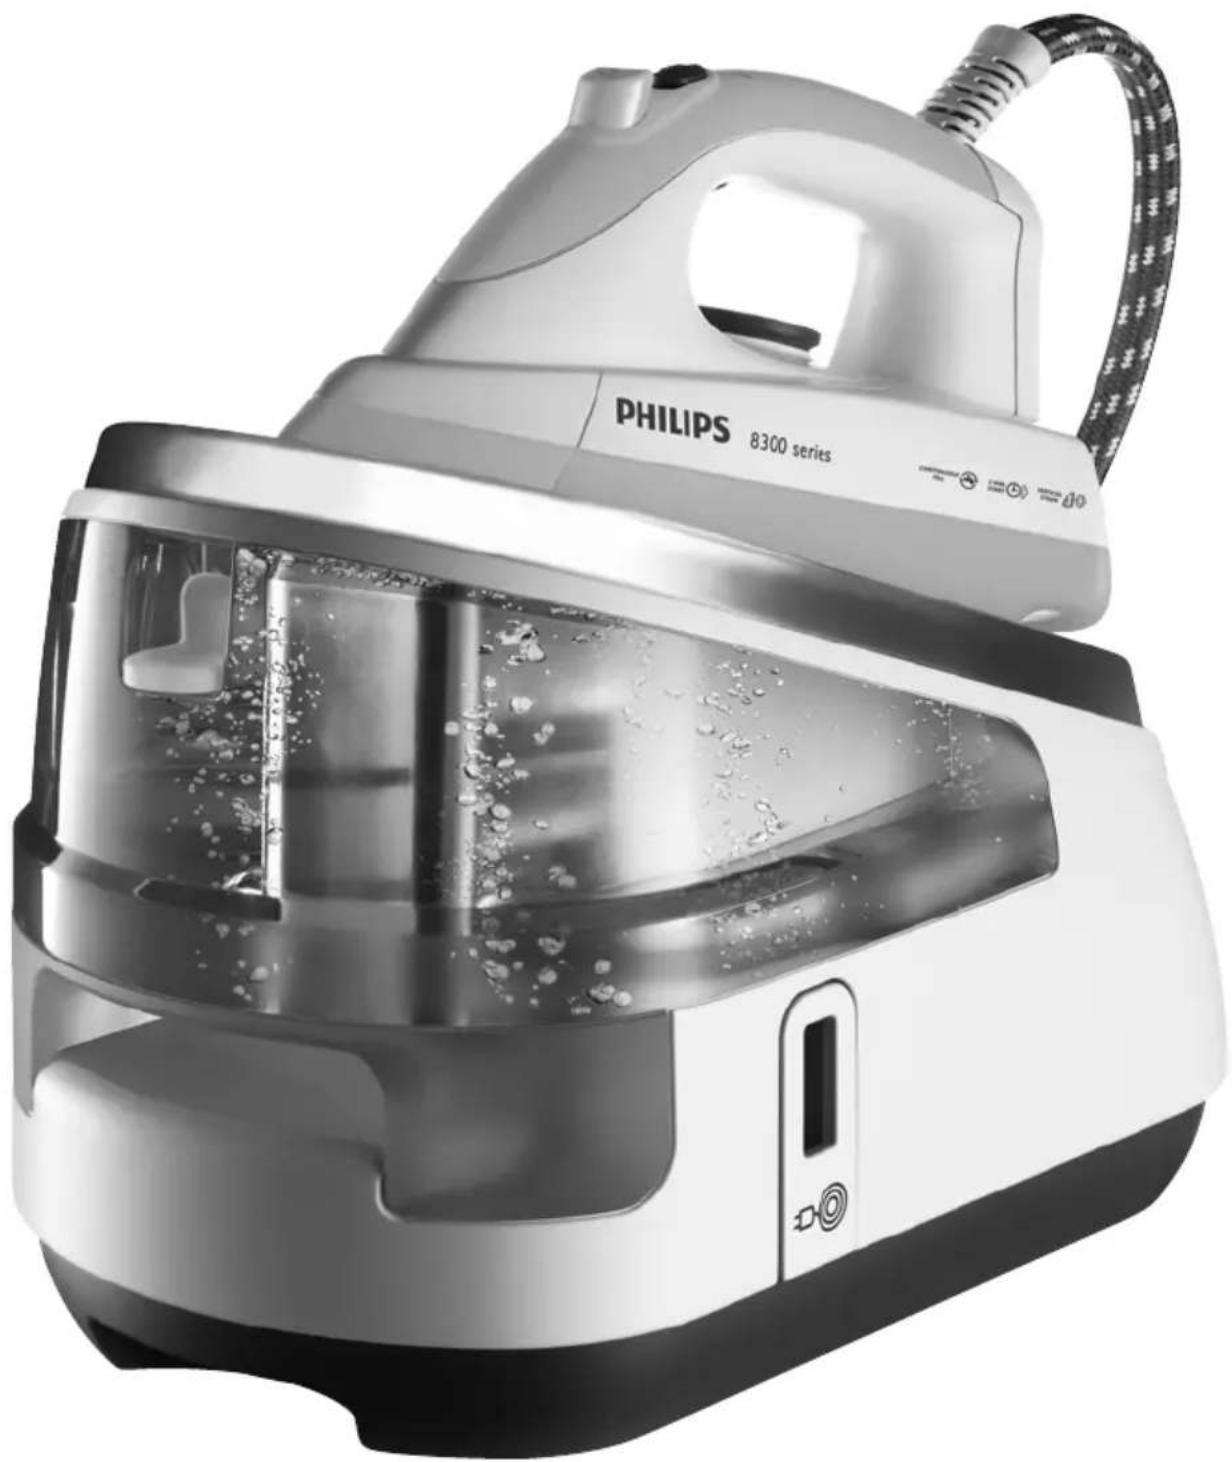
GC8300 series
ENGLISH 6
БЪЛГАРСКИ 17
ČEŠTINA 29
EESTI 40
HRVATSKI 51
MAGYAR 63
ҚАЗАҚША 75
LIETUVIŠKAI 87
LATVIEŠU 98
POLSKI 110
ROMÂNĂ 122
РУССКИЙ 134
SLOVENSKY 147
SLOVENŠČINA 159
SRPSKI 170
УКРАЇНСЬКА 182
Introduction
Congratulations on your purchase and welcome to Philips! To fully benefit from the support that Philips offers, register your product at www.philips.com/welcome.
The powerful pressurised ironing system produces non-stop steam to make ironing easier. Thanks to the large water tank, you can iron without interruption. When the water tank is empty, you can detach it and refill it immediately.
We hope you enjoy using this ironing system.
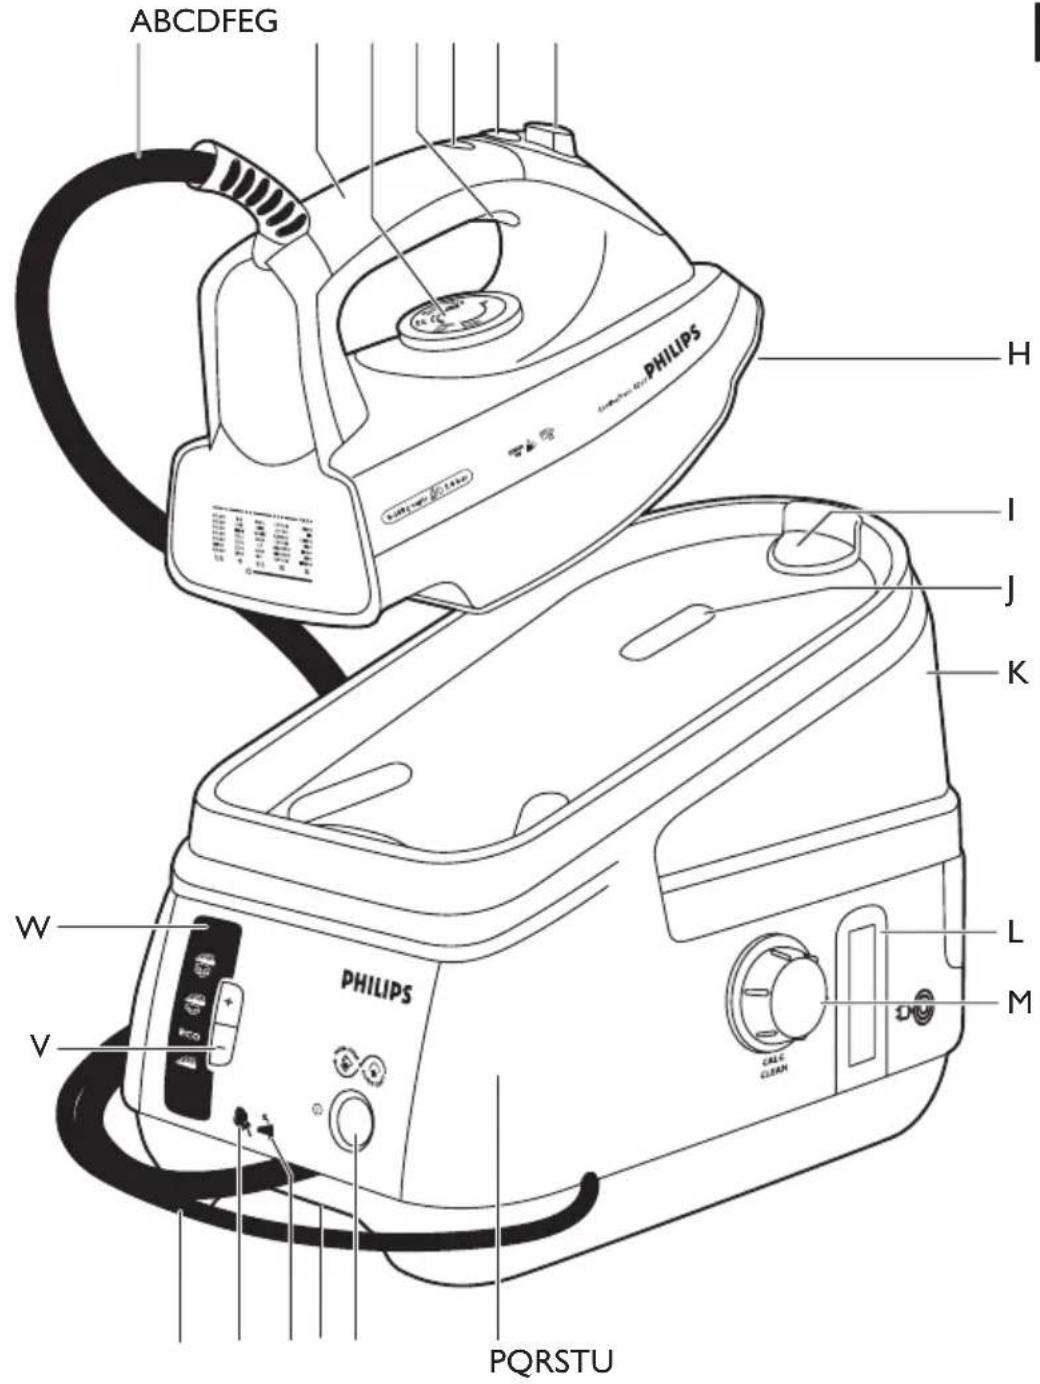
General description (Fig. 1)
A Supply hose
B Handle
C Temperature dial
D Steam trigger
E Temperature light
F Steam lock
G Shot-of-steam button (GC8325/GC8320 only)
H Soleplate
I Safe storage lock (GC8325/GC8320 only)
J Iron stand
K Detachable water tank
L Cord & hose storage hook
M Calc-Clean rinsing cap
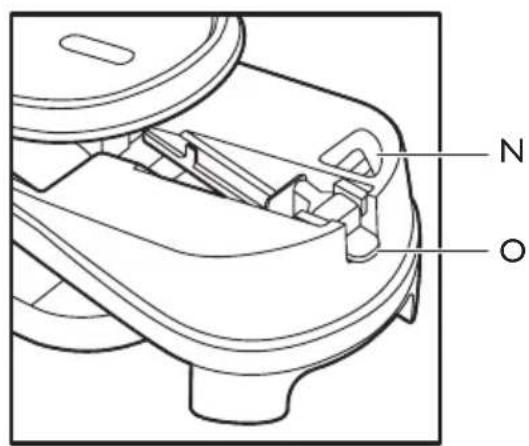
N Filling opening
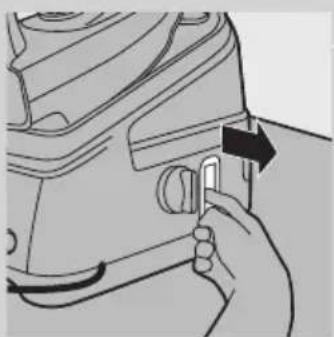
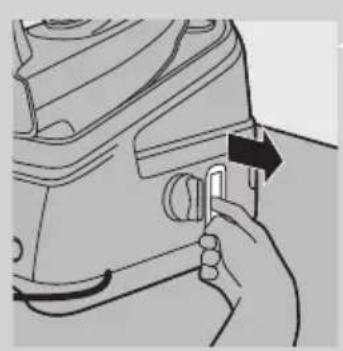
- Water tank release lever
P Steam generator
R Transport handgrip
S Water tank refill light (GC8325/GC8320 only)
T Calc-Clean light (GC8325/GC8320 only)
U Mains cord
V Steam buttons (+/-) (GC8325/GC8320 only)
- = maximum steam
- = moderate steam
- ECO = minimum steam
- = no steam
Q On/off button with power-on light (GC8325/GC8320 only)
W Steam generator control panel with steam light (GC8325/GC8320 only)
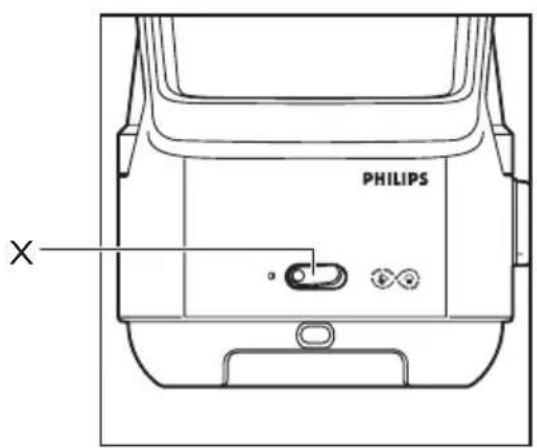
X On/off switch with power-on light (GC8210 only)
Important
Read this user manual carefully before you use the appliance and save it for future reference.
Danger
- Never immerse the iron or the steam generator in water.
Warning
- Check if the voltage indicated on the type plate corresponds to the local mains voltage before you connect the appliance.
- Do not use the appliance if the plug, the mains cord, the supply hose or the appliance itself shows visible damage, or if the appliance has been dropped or leaks.
- If the mains cord or the supply hose is damaged, you must have it replaced by Philips, a service centre authorised by Philips or similarly qualified persons in order to avoid a hazard.
- Never leave the appliance unattended when it is connected to the mains.
- This appliance is not intended for use by persons (including children) with reduced physical, sensory or mental capabilities, or lack of experience and knowledge, unless they have been given supervision or instruction concerning use of the appliance by a person responsible for their safety.
- Children should be supervised to ensure that they do not play with the appliance.
- Do not let the mains cord and supply hose come into contact with the hot soleplate of the iron.
- If steam escapes from under the Calc-Clean rinsing cap when the appliance heats up, switch off the appliance and tighten the Calc-Clean rinsing cap. If steam continues to escape when the appliance heats up, switch off the appliance and contact a service centre authorised by Philips.
- Never remove the Calc-Clean rinsing cap when the steam generator is hot.
- Do not use any other cap on the steam generator than the Calc-Clean rinsing cap that has been supplied with the appliance, as this cap also functions as a safety valve.
Caution
- Only connect the appliance to an earthed wall socket.
- Check the mains cord and the supply hose regularly for possible damage.
- Always place and use the iron and the steam generator on a stable, level and horizontal surface.
- The soleplate of the iron can become extremely hot and may cause burns if touched.
- When you have finished ironing, when you clean the appliance, when you fill or empty the water tank and also when you leave the appliance even for a short while: put the iron on the iron stand, switch off the appliance and remove the mains plug from the wall socket.
- Rinse the steam generator regularly according to the instructions in chapter 'Cleaning and maintenance'.
- This appliance is intended for household use only.
Electromagnetic fields (EMF)
This Philips appliance complies with all standards regarding electromagnetic fields (EMF). If handled properly and according to the instructions in this user manual, the appliance is safe to use based on scientific evidence available today.
Before first use
Note: The iron may give off some smoke when you use it for the first time. This is normal and stops after a short while.
Note: Some particles may come out of the soleplate when you use the iron for the first time. This is normal; the particles are harmless and stop coming out of the iron after a short while.
Note: When you switch on the appliance, the steam generator may produce a pumping sound. This is normal; the sound tells you that water is pumped into the steam generator.
1 Remove any sticker or protective foil from the soleplate and clean the soleplate with a soft cloth.
Preparing for use

1 Place the steam generator on a stable and level surface, e.g. on the hard part of the ironing board or on a table.
Filling the detachable water tank
You can fill the water tank at any time during use.
Do not put hot water, perfume, vinegar, starch, descaling agents, ironing aids or other chemicals in the water tank.
Do not overfill the water tank, otherwise water may spill out of the filling opening when you reinsert the water tank.

1 Remove the detachable water tank from the steam generator.
2 Fill the water tank with tap water up to the MAX indication.
Note: If the tap water in your area is very hard, we advise you to mix it with an equal amount of distilled water.
3 Slide the water tank firmly back into the steam generator ('click').
Note: If the water tank is not properly placed, the iron does not produce any steam.
Water tank refill light (GC8325/GC8320 only)
When the water tank is empty, the water tank refill light starts flashing and steam ironing is no longer possible.
1 Remove the water tank and fill it.
2 Put the water tank back into the steam generator.
The iron is ready for steam ironing again.
Setting the temperature
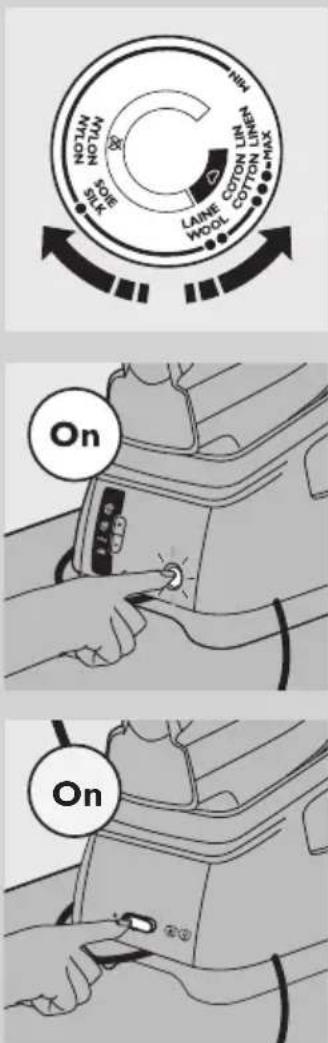
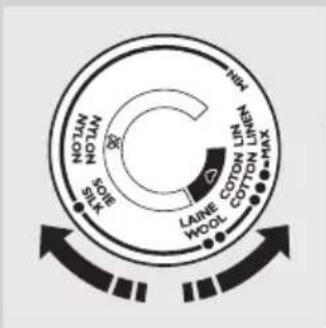
1 Check the laundry care label of the article to be ironed to determine the required ironing temperature.
- ● for synthetic fabrics (e.g. acrylic, viscose, polyamide) and silk
- ●● for wool
- ●●● for cotton
- MAX for linen
2 To set the required ironing temperature, turn the temperature dial to the appropriate position.
3 Put the mains plug in an earthed wall socket.
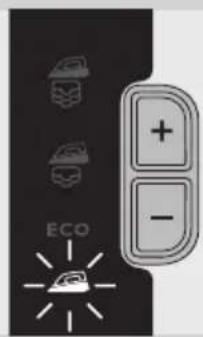
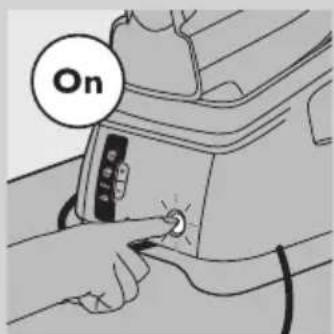
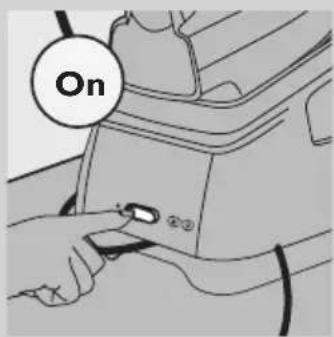
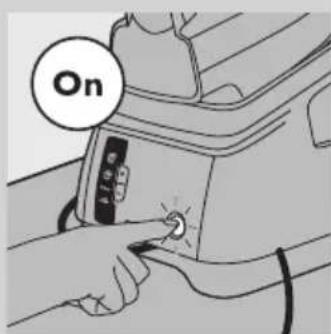
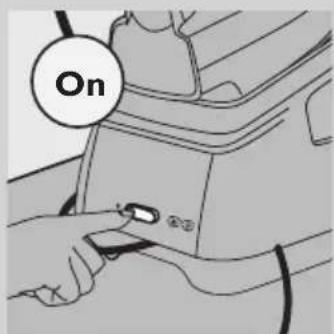
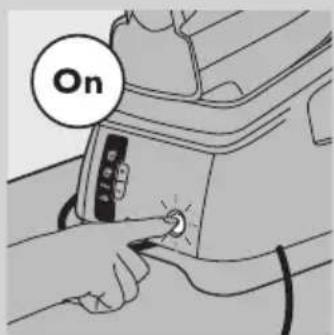
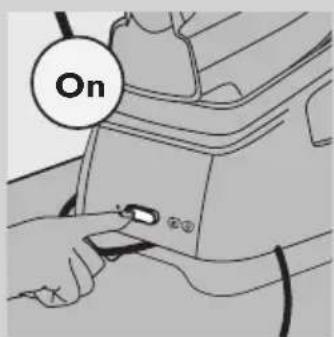
4 Switch on the appliance.
- GC8325/GC8320 only: Press the on/off button once.
The power-on light of the on/off button goes on.
The temperature light on the iron goes on. When the iron has reached the set temperature, the temperature light goes out.
Note: During ironing, the temperature light goes on from time to time. This indicates that the iron is heating up to the set temperature.
The steam light starts flashing. After approx. 2 minutes, the steam light stays on continuously to indicate that the steam generator is ready for steam ironing.
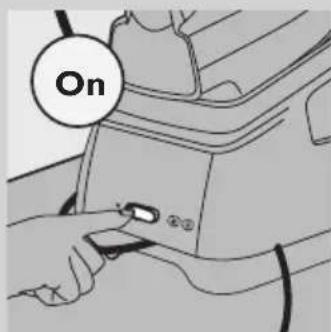
- GC8210 only: Set the on/off switch to 'on'.
The power-on light in the on/off switch goes on.
The temperature light on the iron goes on. When the iron has reached the set temperature, the temperature light goes out.
Note: During ironing, the temperature light goes on from time to time. This indicates that the iron is heating up to the set temperature.
After approx. 2 minutes, the steam generator is ready for steam ironing.
Tips
- If you do not know what kind or kinds of fabric an article is made of, determine the right ironing temperature by ironing a part that is not visible when you wear or use the article.
- If the fabric consists of various kinds of fibres, always select the temperature required by the most delicate fibre, i.e. the lowest temperature. For example: if a fabric consists of 60% polyester and 40% cotton, it must be ironed at the temperature indicated for polyester (●) and without steam.
- Start ironing the articles that require the lowest ironing temperature, i.e. those made of synthetic materials.
- If you set a lower temperature during ironing, wait until the iron has cooled down to the set temperature before you continue ironing. To make the iron cool down faster, simply press the steam trigger or iron a piece of cloth.
Using the appliance
Steam ironing
The supply hose may become hot during a long ironing session.

Note: The system may occasionally produce a pumping sound during steam ironing. This is normal and tells you that water is pumped into the steam generator.
1 Make sure there is enough water in the water tank.
2 Make sure the appliance is plugged in and switched on (see chapter 'Preparing for use').
3 Set the required ironing temperature (see chapter 'Preparing for use').
Steam ironing is only possible at ironing temperatures higher than ●●.
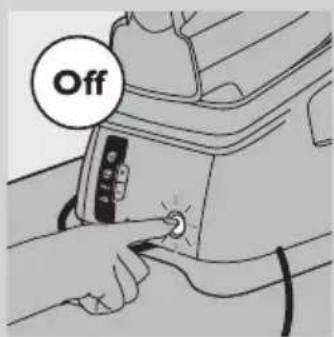
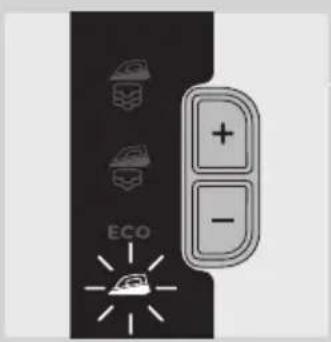
4 GC8325/GC8320 only: Set the required steam setting with the + and - buttons on the steam generator control panel.
for maximum steam (temperature setting MAX). for moderate steam (temperature settings ●●● to MAX). ECO for minimum steam (temperature settings ●● to MAX).
for no steam (temperature settings ● to MAX).
The steam light flashes to indicate that the steam generator is heating up.
After approx. 2 minutes, the steam light stays on continuously to indicate that the steam generator is ready for steam ironing.
Note: During ironing, you can adjust the steam setting with the + and - steam buttons. It takes a few moments before the amount of steam is adjusted.
5 Press the steam trigger to start steam ironing.
When you put down the iron during ironing, put it on its heel or on the iron stand.
The opening and closing of the steam valve in the steam generator causes a clicking sound. This is normal.
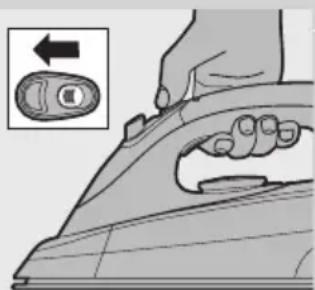
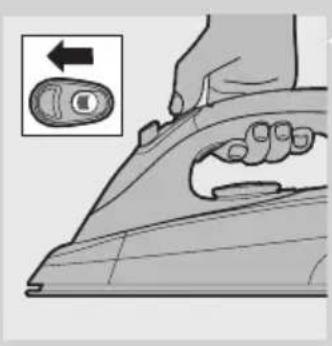
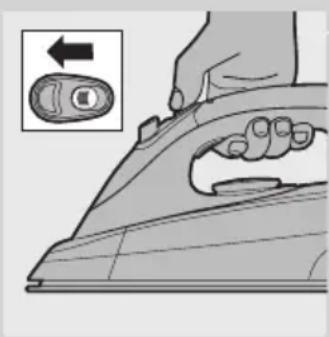
Steam lock function
The steam lock allows you to steam iron non-stop without having to press the steam activator continuously.
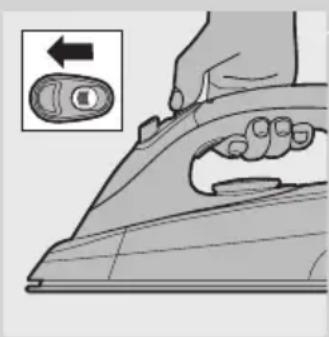
- When you slide the steam lock forwards, the iron produces steam continuously. To stop steaming, slide the steam lock backwards.
- When the steam lock is deactivated, the iron only produces steam when you press the steam trigger.
Note: Release the steam lock when you put the iron on its heel or on the iron stand. This prevents that hot steam escapes from the iron or that the iron stand gets wet.
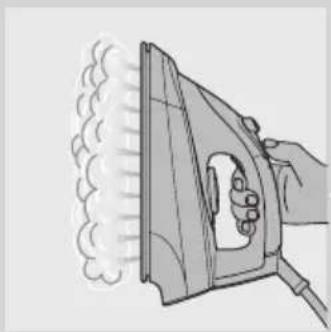
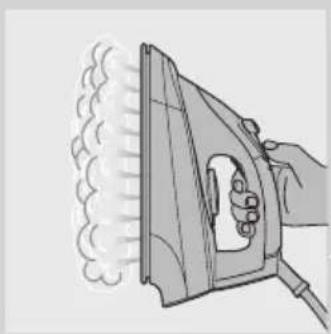
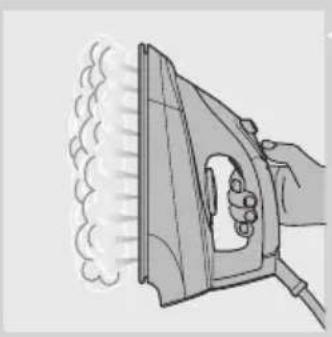
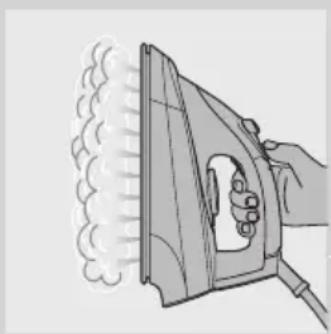
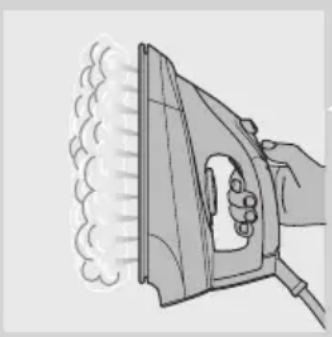
Vertical steaming
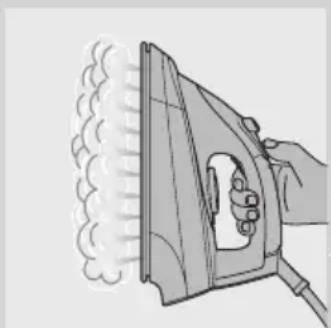
Never direct the steam at people.
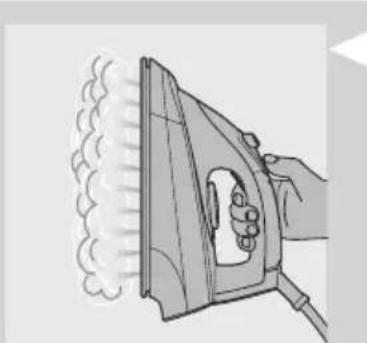
1 Hold the iron in vertical position and press the steam trigger to steam iron hanging curtains and clothes (jackets, suits, coats).
Shot of steam (GC8325/GC8320 only)
A powerful shot of steam helps to remove stubborn creases.
1 Set the temperature dial to a position between ●●● and MAX.

2 Press the shot-of-steam button.
Note: Use the shot-of-steam function intermittently. If water droplets come out of the soleplate, let the iron heat up for at least one minute before you use the shot-of-steam function again.
Ironing without steam
There are one or two ways to iron without steam:
- All types: Simply start ironing without pressing the steam trigger.
- GC8325/GC8320 only: Select steam setting (no steam) and start ironing.
Tips
- When you steam iron woollen fabrics, shiny patches may occur. To prevent this, use a dry pressing cloth or turn the article inside out and iron the reverse side.
- Silk, woollen and synthetic materials: iron the reverse side of the fabric to prevent shiny patches.
- Iron velvet and other fabrics that tend to acquire shiny patches in one direction only (along with the nap) while you apply very little pressure.
- Do not use steam when you iron coloured silk. This could cause stains.
Cleaning and maintenance
After ironing
1 Put the iron on the iron stand (see chapter 'Storage') and switch off the appliance.
2 Remove the mains plug from the wall socket and let the appliance cool down.
3 Wipe scale and any other deposits off the soleplate with a damp cloth and a non-abrasive (liquid) cleaner.
4 Clean the upper part of the iron and the outside of the steam generator with a moist cloth.
5 Empty the water tank after cleaning.
Calc-Clean function

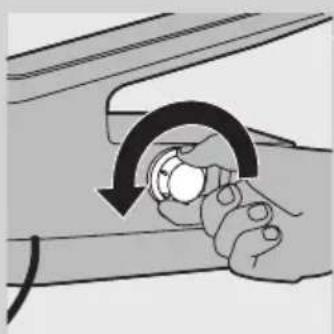
Never remove the Calc-Clean rinsing cap when the steam generator is hot.
VERY IMPORTANT: Rinse the steam generator once a month or after every 10 times of use, to prevent damage to the appliance and for optimal steaming performance.
1 Unplug the appliance and let it cool down for 2 hours.
2 Remove the detachable water tank.
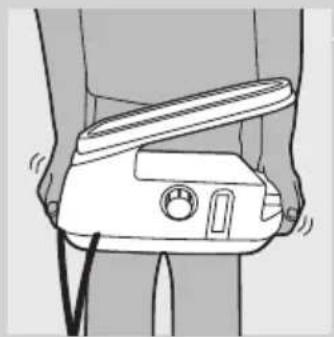
3 Hold the steam generator with both hands and shake well.
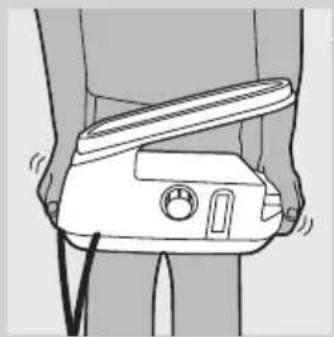
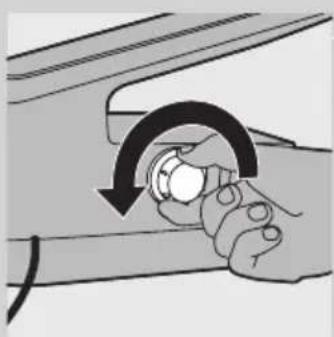
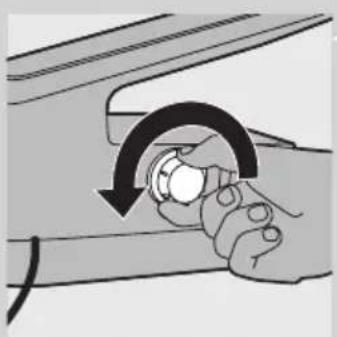
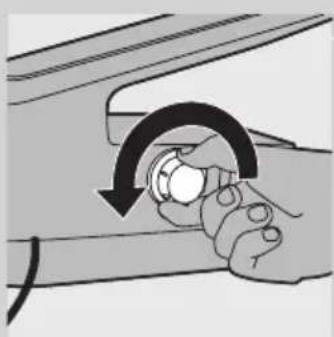
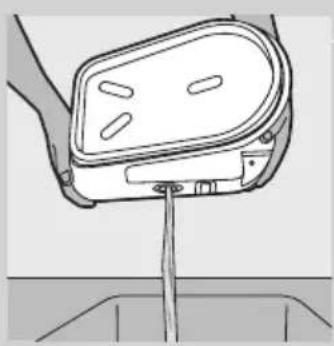
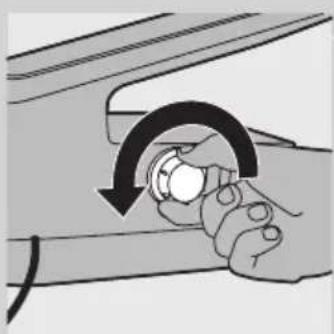
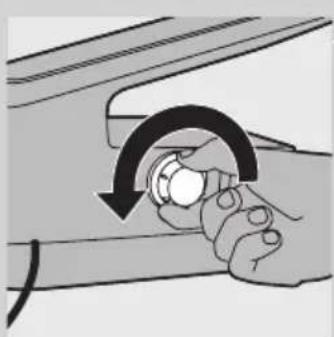
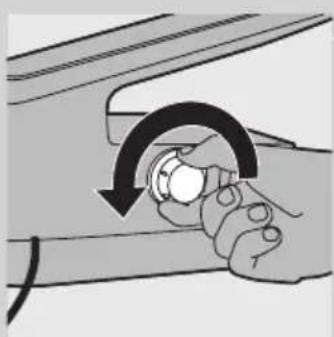
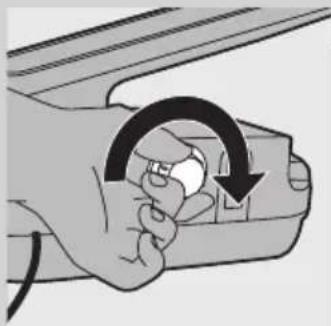
4 Turn the steam generator on its side with the Calc-Clean rinsing cap facing upwards, and remove the Calc-Clean rinsing cap.
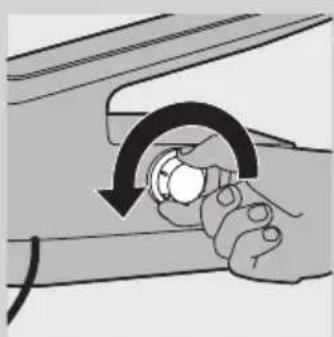
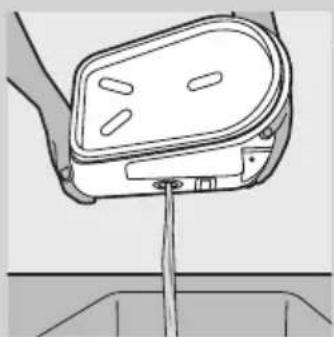
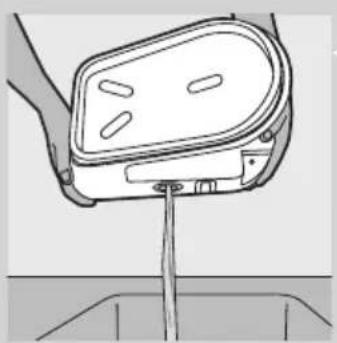
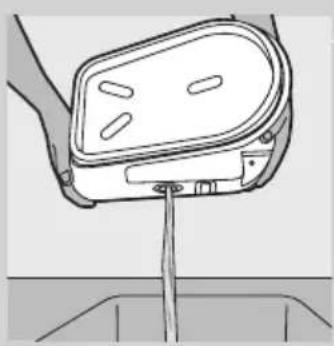
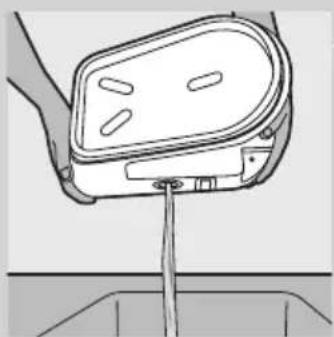
5 Empty the steam generator into the sink.
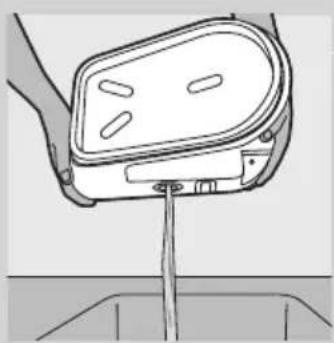

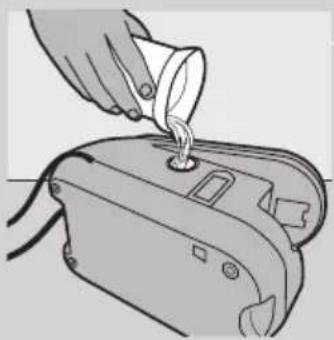
6 Fill the steam generator with fresh water and shake again.
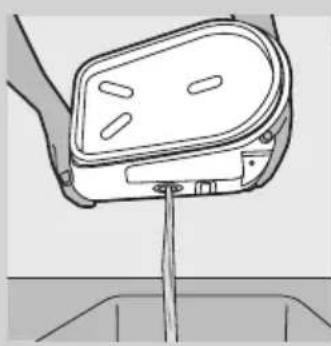
7 Empty the steam generator into the sink again.
8 Repeat steps 6 & 7 twice to obtain the best result.

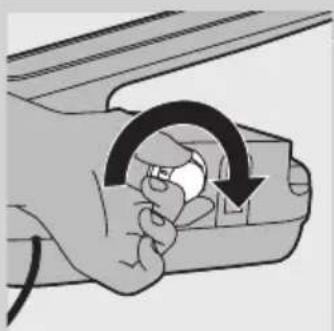
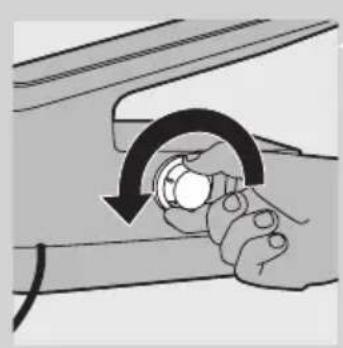
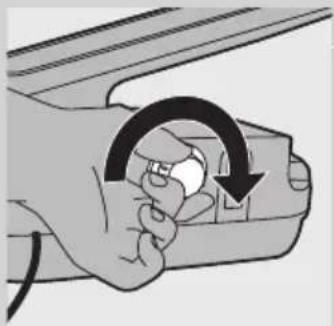
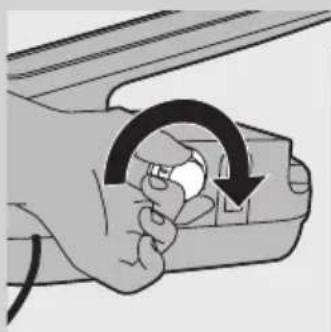
9 Screw the Calc-Clean rinsing cap tightly back onto the steam generator.

Calc-Clean light (GC8325/GC8320 only)
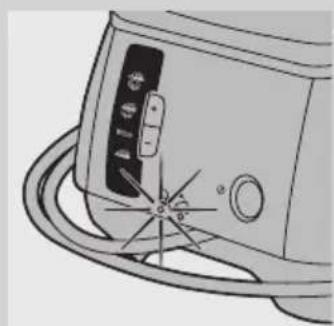
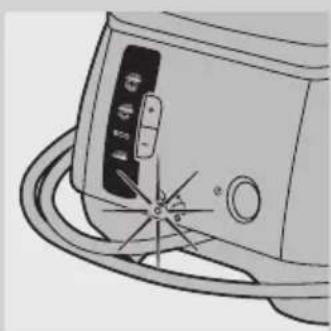
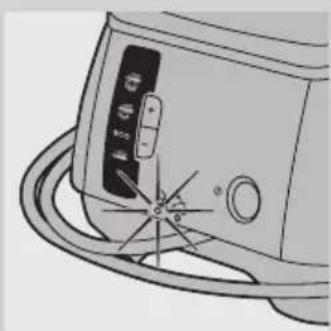
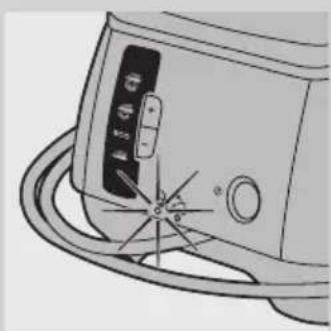
1 The Calc-Clean light flashes for 30 seconds when it is time to rinse the steam generator.
The steam generator does not heat up during these 30 seconds.
2 Switch off the appliance immediately and let it cool down.
Do not use the Calc-Clean function when the steam generator is hot.
3 Use the Calc-Clean function as described above.
Storage
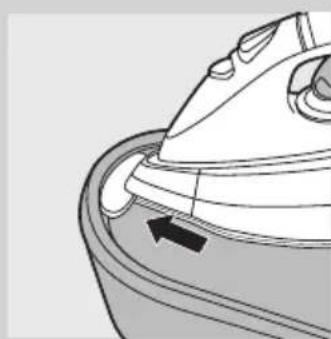
Always let the appliance cool down before you store it.
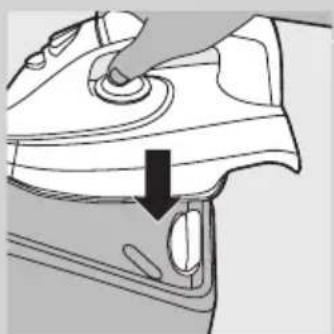
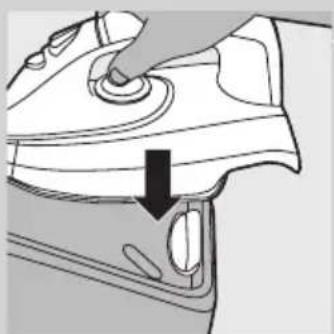
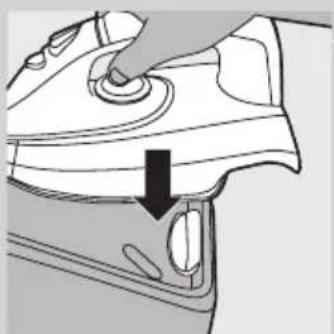
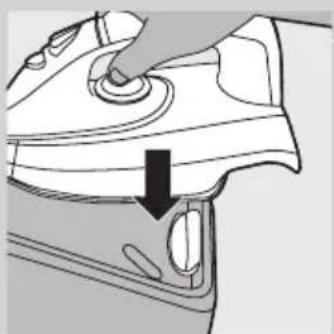
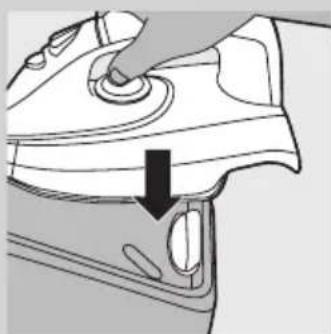
1 GC8325/GC8320 only: Insert the tip of the iron into the safe storage lock on the stand.
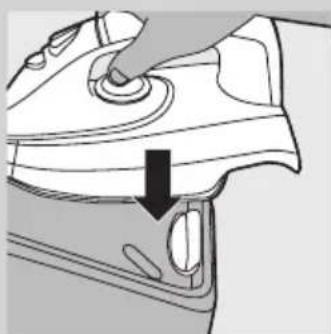
2 GC8325/GC8320 only: Press down the back of the iron firmly ('click').
3 Empty the water tank.
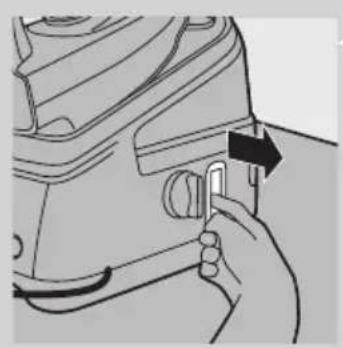
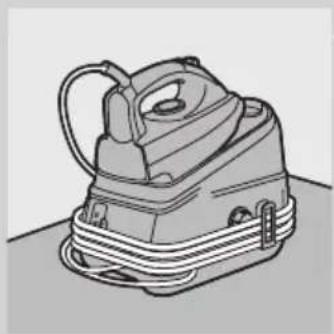
4 Pull out the cord & hose storage hook.

5 Secure the supply hose and mains cord.
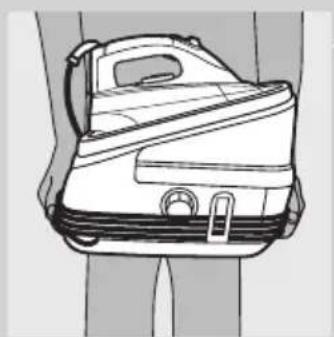
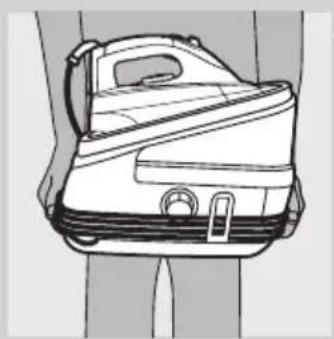
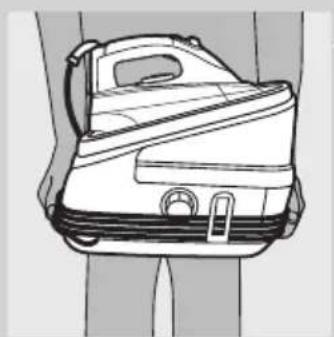
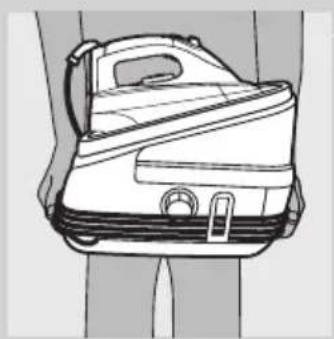
6 To move the appliance, carry it by the handgrips on either side of the steam generator.
Environment

- Do not throw away the appliance with the normal household waste at the end of its life, but hand it in at an official collection point for recycling. By doing this, you help to preserve the environment.
Guarantee & service
If you need service or information or if you have a problem, please visit the Philips website at www.philips.com or contact the Philips Consumer Care Centre in your country (you find its phone number in the worldwide guarantee leaflet). If there is no Consumer Care Centre in your country, go to your local Philips dealer.
Troubleshooting
This chapter summarises the most common problems you could encounter with the appliance. If you are unable to solve the problem with the information below, contact the Consumer Care Centre in your country.
Problem Cause Solution
| The appliance does not become hot. | There is a connection problem. Check the mains cord, the plug and the wall socket. | |
| You have not switched on the appliance. GC8325/GC8320: Press the on/off button. GC8210: set the on/off switch to 'on'. | ||
| The set temperature is too low. Set a higher temperature. | ||
| Smoke comes out of my new iron when I switch it on. | Some parts of the appliance have been lightly greased in the factory and may initially give off some smoke when heated. | This phenomenon is normal and ceases after a short while. |
| The iron does not produce any steam. | There is not enough water in the water tank. | Fill the water tank. See chapter 'Preparing for use', section 'Filling the detachable water tank'. |
| The steam generator has not heated up sufficiently. | Wait approx. 2 minutes. GC8325/ GC8320 only: wait until the steam light stays on continuously. | |
| The set ironing temperature is too low for steam ironing. | Set a temperature of ●● or higher. | |
| GC8325/GC8320 only: You have set steam setting (no steam). | Set steam setting ECO, (moderate steam) or (maximum steam). | |
| You have not placed the water tank properly in the steam generator. | Place the water tank properly in the steam generator ('click'). | |
| When the iron is set to a very high temperature, the steam produced is dry and hardly visible. It is even less visible when the ambient temperature is relatively high and it is entirely invisible when the temperature is set to MAX. | Set the iron to a lower temperature, e.g. ●●, to check if the iron actually produces steam. | |
| Water droplets come out of the soleplate. | The set temperature is too low for steam ironing. | Set a temperature of ●● or higher. |
| When you start steam ironing and when you stop steam ironing for a while, the steam still present in the supply hose cools down and condenses into water. This causes water droplets to come out of the soleplate. | This is normal. When you start ironing or when you continue ironing after an interruption, hold the iron over an old cloth and press the steam trigger. Wait until steam instead of water comes out of the soleplate. | |
Problem Cause Solution
| Flakes and impurities come out of the soleplate or the soleplate is dirty. | Impurities or chemicals present in the water have deposited in the steam vents and/or on the soleplate. | Clean the soleplate with a damp cloth. |
| The appliance produces a pumping sound. | Water is pumped into the steam generator. | This is normal. |
| The pumping sound does not stop. Unplug the iron immediately and contact an authorised Philips service centre. | ||
| The iron produces steam continuously. | The steam lock has been set to 'on'. Set the steam lock to 'off' if you only want to obtain steam when you press the steam trigger (see section 'Steam lock function'). | |
| Dirty water comes out of the soleplate. | Too much scale and minerals have accumulated inside the steam generator. | Rinse the steam generator. See chapter 'Cleaning and maintenance'. |
| Steam escapes from under the Calc-Clean rinsing cap when the appliance heats up. | You have not tightened the Calc-clean rinsing cap properly. | Switch off the appliance, tighten the Calc-Clean rinsing cap and switch on the appliance again. If steam continues to escape when the appliance is heating up, switch off the appliance and contact a service centre authorised by Philips. |
| The iron does not produce enough steam/the amount of steam decreases and increases during steam ironing. | When the appliance pumps water into the steam generator, the steam amount sometimes decreases. This is probably when you think that the iron does not produce enough steam. However, this is a normal phenomenon and the steam output normalises within a few seconds. | To optimise the steam output, release the steam lock when you do not need steam and when you put down the iron. |
| Wet spots appear on the fabric during ironing. | The wet spots that appear on the fabric after you have steam ironed for some time may be caused by steam that has condensed onto the ironing board. Iron the wet spots without steam for some time to dry them. If the underside of the ironing board is wet, wipe it with a piece of dry cloth. | To prevent steam from condensing onto the ironing board, use an ironing board with a wire mesh top. |
| GC8325/GC8320 only: Water droplets come out of the soleplate when I use the shot-of-steam function. | Steam may have condensed in the hose, the temperature may have been set below ●●● or the appliance may not be ready for steam ironing. | Make sure the temperature is set to ●●● or higher. Steam iron for a few seconds before you use the shot-of-steam function. |
YBOA





4 Vysuňte háček na kabel a hadici.


2 Vajutage aurujoa pahvaku nupule.
Enne kui seadme hoiustate, laske sel alati jahtuda.
1 Mudelid GC8325/GC8320: sisestage triikraua ots alusel olevasse turvalisse hoiustuslukku.
1 Odvojite spremnik za vodu od generatora pare.
2 Napunite spremnik za vodu do oznake MAX.
- ● za sintetiku (akril, viskoza, poliamid) i svilu
- ●● vuna
- ●●● pamuk
- MAX za lan
2 Kako biste postavili odgovarajuću temperaturu glačanja, regulator temperature okrenite u odgovarajući položaj.
3 Priključite utikač u uzemljenu zidnu utičnicu.
4 Uključite aparat.
- Samo GC8325/GC8320: Jednom pritisnite gumb za uključivanje/isključivanje.
Poklopac za Calc-Clean ispiranje nemojte uklanjati dok je generator pare vruć.

4 Okrenite generator pare na stranu s poklopcem za Calc-Clean ispiranje okrenutim prema gore i skinite poklopac za Calc-Clean ispiranje.
HRVATSKI58

5 Ispraznite generator pare u sudoper.
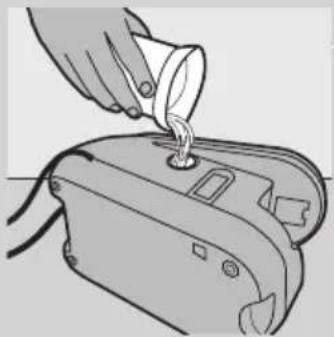
6 Napunite generator pare svježom vodom i ponovo ga protresite.

7 Vodu iz generatora pare ponovo izlijte u sudoper.
9 Poklopac za Calc-Clean ispiranje čvrsto pritegnite na generator pare.

Indikator Calc-Clean (samo GC8325/GC8320)
1 Kada dođe vrijeme za ispiranje generatora pare, indikator Calc-Clean treperi 30 sekundi.
1 Samo GC8325/GC8320: Umetnite vrh glačala u zaustavni utor za sigurno spremanje na postolju.

2 Samo GC8325/GC8320: Stražnji dio glačala čvrsto pritisnite prema dolje ("klik").
3 Ispraznite spremnik za vodu.

4 Izvucite kukicu za spremanje kabela i crijeva.

5 Pričvrstite crijevo za dovod pare i kabel za napajanje.

6 Aparat nosite pomoću ručki s obje strane generatora pare.
Zaštita okoliša

- Aparat koji se više ne može koristiti nemojte odlagati s uobičajenim otpadom iz kućanstva, nego ga odnesite u predviđeno odlagalište na recikliranje. Time ćete pridonijeti očuvanju okoliša.
Jamstvo i servis
U slučaju da vam je potreban servis ili informacija ili imate neki problem, posjetite web-stranicu tvrtke Philips, www.philips.com, ili se obratite centru za potrošače tvrtke Philips u svojoj državi (broj telefona nalazi se u priloženom međunarodnom jamstvu). Ako u vašoj državi ne postoji centar za potrošače, obratite se lokalnom prodavaču proizvoda tvrtke Philips.
Rješavanje problema
U ovom poglavlju opisani su najčešći problemi s kojima biste se mogli susresti prilikom korištenja aparata. Ako ne možete riješiti problem uz informacije u nastavku, obratite se centru za korisničku podršku u svojoj državi.
Problem Uzrok Rješenje
| Aparat se ne zagrijava. | Problem je u napajanju. Provjerite kabel, utikač i zidnu utičnicu. | |
| Niste uključili aparat. GC8325/GC8320: Pritisnite gumb za uključivanje/isključivanje. GC8210: prekidač za uključivanje/isključivanje postavite na “on” (uključeno). | ||
| Postavili ste prenisku temperaturu. Postavite višu temperaturu. | ||
| Iz novog glačala izlazi dim kada ga uključim. | Neki dijelovi glačala su malo podmazani u tvomici i zbog toga malo dime prilikom zagrijavanja. | To je normalno i ubrzo će prestati. |
| Glačalo ne proizvodi paru. | U spremniku nema dovoljno vode. Napunite spremnik za vodu. Pogledajte poglavlje “Priprema za korištenje”, odjeljak “Punjenje spremnika za vodu”. | |
| Generator pare nije se dovoljno zagrijao. | Pričekajte oko 2 minute. Samo GC8325/ GC8320: pričekajte dok indikator pare ne počne stalno svijetliti. | |
| Postavljena temperatura glačanja preniska je za glačanje s parom. | Postavite temperaturu od ●● ili višu. | |
| Samo GC8325/GC8320: Postavili ste postavku pare (bez pare). | Postavite postavku pare ECO, (umjerena količina pare) ili (najveća količina pare). | |
Problem Uzrok Rješenje
| Spremnik za vodu niste ispravno stavili u generator pare. | Spremnik za vodu ispravno stavite u generator pare (“klik”). | |
| Ako je temperatura glačanja postavljena na vrlo visoku vrijednost, para je vrlo suha i skoro nevidljiva. Još je manje vidljiva ako je temperatura okoline visoka, a potpuno nevidljiva ako je temperatura glačanja postavljena na MAX. | Postavite temperaturu glačanja na nižu vrijednost, npr. ●●, kako biste provjerili proizvodi li glačalo paru. | |
| Iz površine za glačanje kapa voda. | Postavljena temperatura je preniska za glačanje s parom. | Postavite temperaturu od ●● ili višu. |
| Kada glačate s parom i privremeno prekinete, para preostala u crijevu za dovod pare se ohladi i kondenzira. To uzrokuje kapanje vode iz površine za glačanje. | To je normalno. Kada počnete glačati ili kada nastavite glačati nakon kratkog prekida, držite glačalo iznad stare krpe i pritisnite gumb za paru. Pričekajte da iz površine za glačanje počne izlaziti para umjesto vode. | |
| Komadići kamenca i prljavštine ispadaju iz površine za glačanje ili je površina za glačanje prljava. | Nečistoće ili kemikalije u vodi nakupile su se otvorima za paru i/ili na površini za glačanje. | Očistite površinu za glačanje vlažnom krpom. |
| Aparat proizvodi zvuk pumpanja. | Voda se potiskuje u generator pare. To je potpuno normalno. | |
| Zvuk pumpanja ne prestaje. Odmah izvucite kabel iz napajanja i kontaktirajte ovlašteni servis tvrtke Philips. | ||
| Glačalo neprestano proizvodi paru. | Gumb za zaključavanje pare postavljen je u položaj “on” (uključeno). | Gumb za zaključavanje pare postavite na ‘off’ (isključeno) ako želite paru samo prilikom pritiska gumba za paru (pogledajte odjeljak “Funkcija za zaključavanje pare”). |
| Prljava voda izlazi is površine za glačanje. | U generatoru pare se nakupilo previše kamenca i minerala. | Isperite generator pare. Pogledajte poglavlje “Čišćenje i održavanje”. |
| Prilikom zagrijavanja aparata para izlazi ispod poklopca za Calc-Clean ispiranje. | Niste dovoljno pritegnuli poklopac za Calc-Clean ispiranje. | Isključite aparat, učvrstite poklopac za Calc-Clean ispiranje i ponovo uključite aparat. Ako para i dalje izlazi prilikom zagrijavanja aparata, isključite ga i obratite se ovlaštenom servisu tvrtke Philips. |
Problem Uzrok Rješenje
| Glačalo neproizvodi dovoljnopare / za vrijeme glačanja s paromkoličina parese smanjuje ipovećava. | Kada aparat potiskuje vodu ugenerator pare, količina pare seponekad smanjuje. Vjerojatno jeto onda kada mislite da glačalo neproizvodi dovoljno pare. Međutim,to je normalna pojava i u roku odnekoliko sekundi dovod pare senormalizira. | Za optimiziranje proizvodnje pareoslobodite prekidač kada vam para nijepotrebna i kada spušate glačalo. |
| Za vrijeme glačanja na tkanini sepojavljuju vlažnemrlje. | Vlažne mrlje koje se pojavljuju natkanini nakon glačanja s parom mogubiti rezultat kondenziranja pare nadasci. Izglačajte vlažne točke bez parekako biste ih osušili. Ako je donjastrana daske vlažna, obrišite je krpom. | Kako biste spriječili kondenziranje pare nadasci, koristite dasku sa žičanom mrežom. |
| Samo GC8325/GC8320: Kapi vodeizlaze iz površineza glačanje prilikomkorištenja funkcijeza mlaz pare. | Para se možda kondenzirala u crijevu,možda je temperatura postavljenaispod ●●● ili aparat možda nijespreman za glačanje s parom. | Provjerite je li temperatura postavljena na●●● ili višu razinu. Prije korištenja funkcijeza mlaz pare prvo neko vrijeme glačajtes parom. |
Bevezetés


Көлбөү бу шығару




priës padëdami i saugojimo vietą, palaukite, kol prietaisas atvës.

5 Iztukšojiet tvaika ğeneratoru virs izlietnes.

6 Piepildiet tvaika generatoru ar svaigu üdeni un atkal labi sakratiet.
7 Iztukšojiet tvaika ğeneratoru atkal izlietnē.
Calc-Clean lampina (tikai modeliem GC8325/GC8320)
2 Tikai modeliem GC8325/GC8320: Nospiediet stingri lejup gludekla aizmuguri (atskan klikškis).
3 lztukšojiet ūdens tvertni.







Naparovanie vo zvislej polohe
2 Len modely GC8325/GC8320: Pevne zatlačte zadnú stranu žehličky („cvaknutie“).
4 Vytiahnite háčik na uloženie kábla a hadice.
1 Generator pare postavite na stabilno in ravno podlago, na primer na trdi del likalne deske ali na mizo.
1 Odstranite snemljivi zbiralnik za vodo z generatorja pare.
2 Zbiralnik za vodo napolnite z vodo iz pipe do oznake MAX.

2 Temperaturni regulator nastavite na primerno temperaturo likanja tako, da ga premaknete na primerno oznako temperature.
3 Vstavite omrežni vtikač v ozemljeno stensko vtičnico.
4 Vklopite aparat.
- Samo GC8325/GC8320: Pritisnite gumb za vklop/izklop.
Indikator vklopa na gumbu za vklop/izklop zasveti.
Zasveti indikator temperature na likalniku. Ko likalnik doseže nastavljeno temperaturo, indikator temperature preneha svetiti.
Opomba: Med likanjem se občasno vklopi indikator temperature. To pomeni, da se likalnik segreva do nastavljene temperature.
Indikator za izpust pare začne utripati. Po približno dveh minutah začne indikator za izpust pare neprekinjeno svetiti, kar pomeni, da je generator pare pripravljen za likanje s paro.
- Samo GC8210: Stikalo za vklop/izklop nastavite na "vklop".
Indikator vklopa na stikalu za vklop/izklop zasveti.
Zasveti indikator temperature na likalniku. Ko likalnik doseže nastavljeno temperaturo, indikator temperature preneha svetiti.
Opomba: Med likanjem se občasno vklopi indikator temperature. To pomeni, da se likalnik segreva do nastavljene temperature.
Po približno dveh minutah je generator pare pripravljen za likanje s paro.
Nasveti
2 Pritisnite gumb za močan izpust pare.

7 Znova izpraznite generator pare v pomivalno korito.
8 Za optimalne rezultate dvakrat ponovite koraka 6 in 7.
Preden aparat shranite, ga pustite, da se ohladi.
1 Samo GC8325/GC8320: Vstavite konico likalnika v zaklep za varno shranjevanje na stojalu.
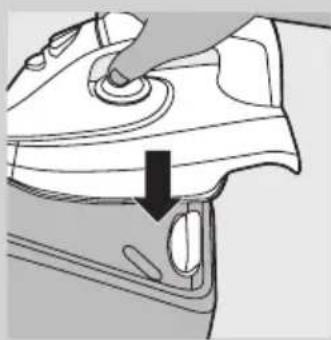
2 Samo GC8325/GC8320: Zadnji del likalnika trdno pritisnite navzdol ("klik").
3 Izpraznite zbiralnik za vodo.
4 Izvlecite zapenec za shranjevanje kabla in cevi.

5 Shranite dovodno cev in omrežni kabel.
6 Če želite premestiti aparat, ga primite za ročaja na obeh straneh generatorja pare.
Okolje

1 Postavite posudu za paru na stabilnu ravnu površinu, tj. na čvrst deo daske za peglanje ili na sto.
1 Uklonite odvojivi rezervoar sa posude za paru.
2 Rezervoar napunite vodom iz slavine do maksimalnog nivoa.
Napomena: Ukoliko je voda u vašem području izrazito tvrda, savetujemo da je pomešate sa jednakom količinom destilovane vode.
3 Vratite rezervoar na posudu za paru („klik“).
Napomena: Ako posuda za vodu nije propisno postavljena, pegla neće proizvoditi paru.
Indikator da rezervoar za vodu treba dopuniti (samo modeli GC8325/GC8320)
Kada je posuda za vodu prazna, indikator počinje da treperi i nije više moguće peglati sa parom.
1 Skinite posudu za vodu i nalijte vodu.
2 Vratite posudu za vodu na posudu za paru.
▶Pegla je ponovo spremna za peglanje sa parom.
Podešavanje temperature


1 Pogledajte etiketu odevnog predmeta da biste odredili potrebnu temperaturu za peglanje.
- ● za sintetičke tkanine (npr. akril, viskoza, poliamid) i svilu
- ●● za vunu
- ●●● za pamuk
- MAKS. za lan
2 Da biste podesili potrebnu temperaturu za peglanje, okrenite regulator temperature u odgovarajući položaj.
3 Uključite utikač u utičnicu sa uzemljenjem.
4 Uključite aparat.
- Samo GC8325/GC8320: Pritisnite jednom dugme za uključivanje/isključivanje.
Indikator napajanja na prekidaču za uključivanje/isključivanje se uključuje.
DUključuje se indikator temperature. Kada pegla dostigne podešenu temperaturu, indikator temperature će se isključiti.
Napomena: Tokom peglanja indikator temperature se uključuje s vremena na vreme. To pokazuje da se pegla zagreva do podešene temperature.
Indikator pare počinje da treperi. Nakon 2 minuta indikator pare ostaje uključen što znači da je posuda za paru spremna za peglanje sa parom.
- Samo model GC8210: Podesite prekidač za uključivanje/isključivanje na „on“ (uključeno).
Indikator napajanja na prekidaču za uključivanje/isključivanje se isključuje.
DUključuje se indikator temperature. Kada pegla dostigne podešenu temperaturu, indikator temperature će se isključiti.
Napomena: Tokom peglanja indikator temperature se uključuje s vremena na vreme. To pokazuje da se pegla zagreva do podešene temperature.
Nakon 2 minuta posuda za paru je spremna za peglanje sa parom.
Saveti
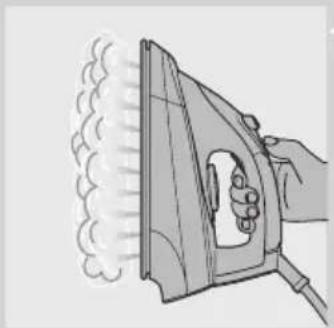
Vertikalno peglanje parom
Snažan "mlaz" pare pomaže u uklanjanju većih nabora.
1 Podesite regulator temperature u položaj između ●●● i MAX.
2 Pritisnite dugme za mlaz pare.
Napomena: Funkcija mlaza pare koristi se sa pauzama. Ako iz grejne ploče izlaze kapi vode, pustite peglu da se greje najmanje jedan minut pre nego što ponovo koristite funkciju mlaza pare.
Peglanje bez pare
Postoje jedan ili dva načina za peglanje bez pare:
- Svi modeli: Peglanje počnite ne pritiskajući prekidač za ispuštanje pare.
- Samo GC8325/GC8320: Izaberite postavku pare (bez pare) i započnite peglanje.
Saveti
- Kada peglate vunenu odeću peglom na paru, mogu se pojaviti sjajni tragovi. Koristite suvu krpu preko koje ćete peglati ili prevrnite odevni predmet na naličje i tako ga peglajte.
- Svila, vuneni i sintetički materijali: peglajte naličje tkanine da biste izbegli sjajne tragove.
- Somot i druge tkanine na kojima mogu da ostanu sjajni tragovi treba peglati samo u jednom pravcu (niz dlačice), uz veoma slab pritisak.
- Nemojte koristiti paru kada peglate obojenu svilu. To bi moglo prouzrokovati mrlje.
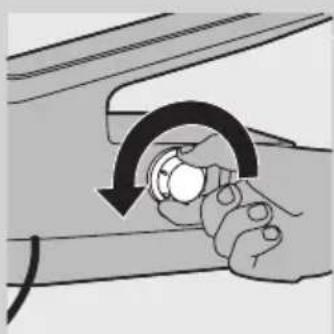
4 Okrenite posudu za paru na stranu tako da čep za Calc-Clean ispiranje bude okrenut prema gore i izvadite čep za Calc-Clean ispiranje.
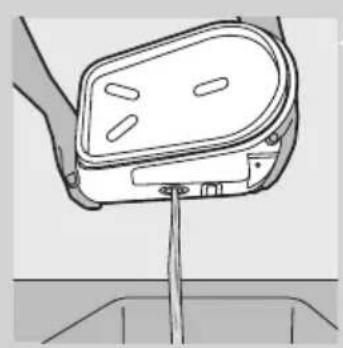
5 Ispraznite posudu za paru.

6 Nalijte čistu vodu u posudu za paru i ponovo je protresite.
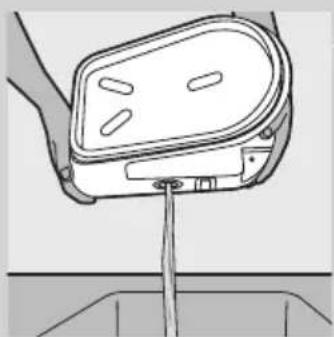
7 Ponovo ispraznite posudu za paru.
9 Čvrsto zategnite čep za Calc-Clean ispiranje na posudi za paru.
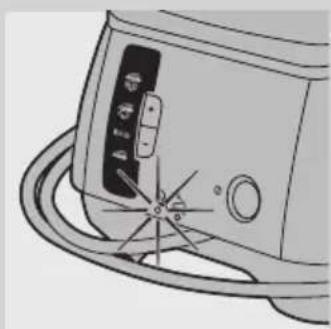
Calc-Clean indikator (samo GC8325/GC8320)
1 Indikator Calc-Clean treperi 30 sekundi kada je potrebno isprati posudu za paru.
Tokom tih 30 sekundi posuda za paru se ne zagreva.
2 Odmah isključite aparat i ostavite ga da se ohladi.
2 Samo GC8325/GC8320: Čvrsto pritisnite zadnji deo pegle nadole („klik“).
3 Ispraznite posudu za vodu.

4 Izvucite kukicu za odlaganje kabla i creva.

5 Odložite crevo za dovod i kabl za napajanje
Викид пари (лише GC8325/GC8320)

- INTRODUCTION
- GENERAL DESCRIPTION (FIG. 1)
- IMPORTANT
- DANGER
- WARNING
- CAUTION
- ELECTROMAGNETIC FIELDS (EMF)
- BEFORE FIRST USE
- PREPARING FOR USE
- FILLING THE DETACHABLE WATER TANK
- WATER TANK REFILL LIGHT (GC8325/GC8320 ONLY)
- SETTING THE TEMPERATURE
- TIPS
- USING THE APPLIANCE
- STEAM IRONING
- STEAM LOCK FUNCTION
- VERTICAL STEAMING
- SHOT OF STEAM (GC8325/GC8320 ONLY)
- IRONING WITHOUT STEAM
- CLEANING AND MAINTENANCE
- AFTER IRONING
- CALC-CLEAN FUNCTION
- CALC-CLEAN LIGHT (GC8325/GC8320 ONLY)
- STORAGE
- ENVIRONMENT
- GUARANTEE & SERVICE
- TROUBLESHOOTING
- YBOA
- HRVATSKI58
- INDIKATOR CALC-CLEAN (SAMO GC8325/GC8320)
- ZAŠTITA OKOLIŠA
- JAMSTVO I SERVIS
- RJEŠAVANJE PROBLEMA
- BEVEZETÉS
- КӨЛБӨҮ БУ ШЫҒАРУ
- CALC-CLEAN LAMPINA (TIKAI MODELIEM GC8325/GC8320)
- NAPAROVANIE VO ZVISLEJ POLOHE
- NASVETI
- OKOLJE
- INDIKATOR DA REZERVOAR ZA VODU TREBA DOPUNITI (SAMO MODELI GC8325/GC8320)
- PODEŠAVANJE TEMPERATURE
- SAVETI
- VERTIKALNO PEGLANJE PAROM
- PEGLANJE BEZ PARE
- CALC-CLEAN INDIKATOR (SAMO GC8325/GC8320)
- ВИКИД ПАРИ (ЛИШЕ GC8325/GC8320)
Brand : PHILIPS
Model : Impact Plus FC8388
Category : Vacuum Cleaner