
HR6641 - Steam cleaner PHILIPS - Free user manual and instructions
Find the device manual for free HR6641 PHILIPS in PDF.


| Product type | Steam cleaner |
| Brand | Philips |
| Model | HR6641 |
| Dimensions (L x W x H) | 30 x 20 x 25 cm |
| Weight | 2.5 kg |
| Power supply | 220-240 V, 50/60 Hz |
| Power | 1500 W |
| Water tank capacity | 0.4 L |
| Heat-up time | 30 seconds |
| Main functions | Steam cleaning, disinfection, degreasing |
| Included accessories | Floor nozzle, fine nozzle, window squeegee, microfiber cloth |
| Maintenance | Regular descaling recommended |
| Cleaning | Machine-washable cloths |
| Safety | Automatic shut-off in case of overheating, child lock |
| Spare parts | Replacement cloths, water tank, nozzles |
| Repairability | Repairability score: 8/10 |
| Warranty | 2 years |
Frequently Asked Questions - HR6641 PHILIPS
User questions about HR6641 PHILIPS
0 question about this device. Answer the ones you know or ask your own.
Ask a new question about this device
Download the instructions for your Steam cleaner in PDF format for free! Find your manual HR6641 - PHILIPS and take your electronic device back in hand. On this page are published all the documents necessary for the use of your device. HR6641 by PHILIPS.
USER MANUAL HR6641 PHILIPS
English Page 4
- Keep page 3 open when reading these operating instructions.
Français Page 6
natural_image
Illustration of a hand connecting a cable to a mechanical component with a red arrow indicating direction (no text or symbols)




English
Important
- Before using the first time remove any sticker or protective foil from the soleplate. Clean the soleplate with a soft cloth.
• Always unplug the iron and place it on the iron stand when leaving, even when only for a short while. - Some parts of the iron have been slightly greased and as a result the iron might slightly smoke when switched on for the first time. After a short while, however, this will cease.
- In contrast to the steam cleaner the steam iron is not protected against splashing water.
General description (fig. 1)
A Steam activator (press-in for steam-ironing)
B Temperature dial (rotate)
© Pilot light "Soleplate heating-up"
D Soleplate
E Supply hose with ball swivel for maximum ironing convenience
Making the iron ready for use
- Make the steam cleaner ready for use as described in the instructions for use.
- Connect the iron (fig. 2). Also now remember to secure with the ring.
- Place the iron on its rear end.
- Switch on the steam cleaner by pressing the On/Off switch (fig. 3).
- Also press the "Ironing" switch on the steam cleaner (fig. 4).
Ironing temperature
- Always check first if a label with ironing instructions is attached to the article to be ironed. Follow these ironing instructions in all cases.
- If ironing instructions are missing but you know the kind of fabric, then see the table for recommended ironing temperatures.
- After the pilot light (C) has gone out and come on again you can start ironing.
- During ironing the pilot light will come on from time to time. When this happens, the soleplate is being heated-up to the required temperature again. You can continue ironing.
- The table is valid for the fibre materials only. If some kind of finish has been applied (gloss, wrinkle, relief etc.), the textile can best be ironed at a lower temperature.
- First sort out the fabrics according to ironing
temperature: wool with wool, cotton with cotton, etc.
- The iron heats up quickly, but it cools down slower. Therefore, start ironing the articles requiring the lowest temperature such as those made of synthetic fibres. Then progress to the higher temperatures.
- If the article is made of a mixture of different fibres, you must always select the lowest ironing temperature of the composition of those fibres.
(E.g. an article consisting of "60% polyester and 40% cotton" should be ironed at the temperature indicated for polyester (●) and without steam.)
If you do not know what kind(s) of fabric(s) the article has been made of, find a spot which will be invisible when wearing or using the article to try out the ironing temperature. (Always start at a low temperature and increase to one which gives the required results.)
- Pure woollen fabrics (100% wool) may be pressed with steam. It is recommended to use a dry pressing cloth.
When steam-ironing woollen fabrics, shining of the fabric may occur. This can be prevented by turning the article inside out and ironing the inside.
- Velvet and other textures which rapidly acquire shiny spots should be ironed in one direction only (with the nap), applying only light pressure. Always keep the iron moving.
- Iron the reverse side of synthetic materials and silk to prevent shining spots. When ironing coloured silk, it is not advisable to use steam as this may cause stains.
Steam ironing
- As indicated on the temperature dial (B) and the table, steam-ironing is only possible at higher ironing temperatures, so set the temperature dial to ●● or ●●●.
| Table | |||
| Tabel with ironing instructions | Kind of fabric | Temperature dial | Steam ironing |
 |  |  | - |
 | Synthetic e.g. acetatet, acrylic, viscose, polyamide, polyester Silk | MINI I•I I | |
 Wool Wool | I•••I | ||
 | Cotton Linen | I•••MAX | |
 | Please note:This article cannot be ironed! | ||
- Select the required ironing temperature with the temperature dial (fig. 5).
- After a few minutes, pilot light (C) will go out. This indicates that the soleplate has reached the set temperature.
- While the soleplate is heating up, condensation (drops of water) may occur. Just let the soleplate heat up a little longer.
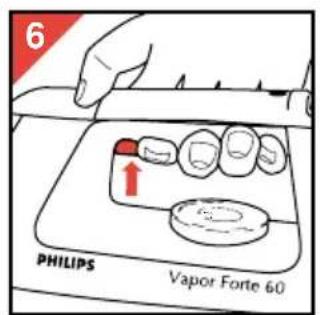
- While steam-ironing keep the steam activator (A) pressed-in (fig. 6).
It may take a few seconds before steam is emitted from the soleplate.
- If the room temperature is higher than approx. 20 °C (68 °F), the steam will be almost invisible.
Do not hold your hand close below the soleplate to check the steam production.
Steaming in a vertical position
Hanging curtains and clothing (jackets, woman's suits, coats) can be steamed by holding the iron in a vertical position (fig. 7).
Dry-ironing
- For ironing without steam, do not press-in the steam activator (fig. 8).
If you wish to dry-iron only, there need not be any water in the water tank.
If this is the case do not press switch "On/Off" ①, but only press switch "Ironing"
Guarantee and service
For guarantee conditions and further information: see the folder with your steam cleaner.
Français
Important
Brand : PHILIPS
Model : HR6641
Category : Steam cleaner