
ZXP3 - Card printer ZEBRA - Free user manual and instructions
Find the device manual for free ZXP3 ZEBRA in PDF.


| Product Type | Card Printer |
| Brand | Zebra |
| Model | ZXP3 |
| Dimensions (W x D x H) | Approximately 201 mm x 397 mm x 215 mm |
| Weight | Approximately 6.8 kg (15 lbs) |
| Power Supply | 100-240 VAC, 50/60 Hz, auto-switching |
| Print Technology | Direct-to-card thermal transfer |
| Print Speed | Up to 750 cards/hour (monochrome), 180 cards/hour (color) |
| Print Resolution | 300 dpi (11.8 dots/mm) |
| Card Capacity (Input Feeder) | Up to 100 cards (0.030 in/0.76 mm thickness) |
| Card Capacity (Output Hopper) | Up to 45 cards |
| Supported Card Types | PVC, composite PVC, PET, ABS, special laminates |
| Interface | USB 2.0, Ethernet (optional) |
| Maintenance | Periodic cleaning of printhead and rollers using cleaning cards |
| Safety Features | Overheat protection, door interlock switch, FCC, CE, UL certified |
| Spare Parts | Printhead, cleaning kit, ribbon cartridges, rollers |
| Repairability | Field-replaceable printhead and rollers; service manual available |
| Supplies | Zebra True Colours ribbon YMCKO, monochrome ribbons, cleaning cartridges |
| Operating Temperature | 15°C to 35°C (59°F to 95°F) |
| Humidity | 20% to 80% non-condensing |
| Warranty | Standard 1 year limited warranty |
Frequently Asked Questions - ZXP3 ZEBRA
User questions about ZXP3 ZEBRA
0 question about this device. Answer the ones you know or ask your own.
Ask a new question about this device
Download the instructions for your Card printer in PDF format for free! Find your manual ZXP3 - ZEBRA and take your electronic device back in hand. On this page are published all the documents necessary for the use of your device. ZXP3 by ZEBRA.
USER MANUAL ZXP3 ZEBRA
natural_image
Stylized white zebra head logo on black background, enclosed in a rounded square (no text or symbols)ZEBRA ZXP Series 3™
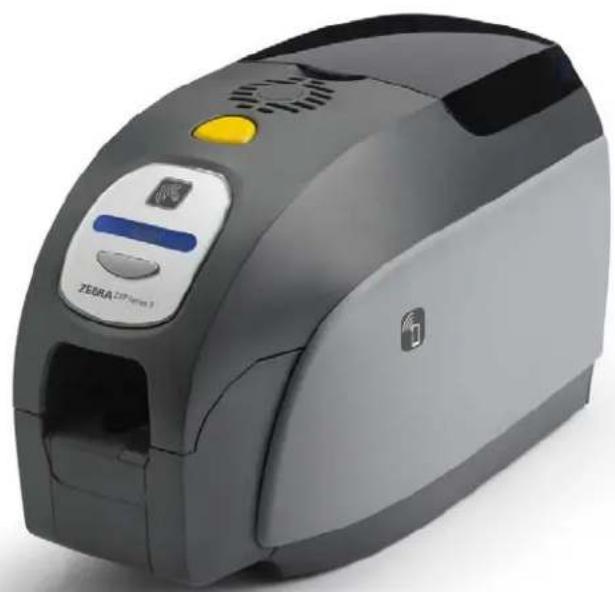
natural_image
Exterior view of a Zebra ZIP scanner (no visible text or symbols on the device body)User's Manual
Copyright Notice
© 2014 ZIH Corp.
This document contains information proprietary to Zebra Technologies Corporation. This document and the information contained within is Copyrighted by Zebra Technologies Corporation and may not be duplicated in full or in part by any person without written approval from Zebra.
While every effort has been made to keep the information contained within current and accurate as of the date of publication, no guarantee is given that the document is error-free or that it is accurate with regard to any specification. Zebra Technologies Corporation reserves the right to make changes, for the purpose of product improvement, at any time.
Trademarks
ZXP Series 3 is a trademark and Zebra is a registered trademark of Zebra Technologies Corporation. Windows is a registered trademark of Microsoft Corporation in the United States and other countries. All other trademarks or registered trademarks are marks of their respective holders.
Product Disposal
Product Disposal Information • Do not dispose of this product in unsorted municipal waste. This product is recyclable, and should be recycled according to your local standards. For more information, please our web site at: http://www.zebra.com/environment
Contents
1 • Getting Started .... 1
ZXP Series 3 Part Numbers. 2
Features, Controls, and Indicators. 3
Rear Panel Connectors 4
Multi-Function LCD Panel 5
2 • Printer Installation....9
Unpacking Your Card Printer 9
Installing the Printer 10
Setting up the Printer 10
Connecting Power 11
Connecting the Printer to your Computer.... 12
Viewing Printer Information 13
Installing the Windows Printer Driver 14
Installing the USB Printer Driver 14
Installing the Ethernet Printer Driver 19
Setting Up a Network Printer 24
Printer Pooling 28
3 • Printer Setup 31
Printer Features 31
Loading Ribbon Cartridge 32
Loading Cards 34
Card Hopper.... 36
Printing a Test Card 37
Typical Printer Operation 38
Creating a Sample Card.... 38
Printing the Sample Card. 38
4 • Printer Settings and Adjustments ..... 39
Introduction....39
Printer Properties 40
General Tab 41
Sharing Tab 42
Ports Tab 43
Advanced Tab. 44
Color Management Tab 45
Security Tab 46
Device Settings Tab 47
Printing Preferences 51
Card Setup Tab. 52
Encoding Tab 65
About Tab 68
5 • Cleaning 69
Cleaning the System. 69
When to Clean 69
How to Clean 70
Cleaning the Printhead....71
6 • Troubleshooting ..... 73
Introduction....73
Troubleshooting Procedures....74
LCD Panel Warnings and Error Messages....74
Print Quality Issues. 78
7 • Technical Specifications....85
Printer Specifications 85
ISO Standard Card Dimensions 89
Compliance Information 90
A • Advanced Sharing 93
B·Magnetic Encoder Option 103
C • Smart Card Options ..... 107
D·Half-Panel Ribbon Operation....113
E • CardSense Single Card Feed Mode.... 119
F • Enclosure Lock Option.... 125
G·Worldwide Support....127
Getting Started
This manual contains installation and operation information for the Zebra ZXP Series 3 Card Printer, manufactured by Zebra Technologies Corporation.
The printer provides full color dye sublimation or monochrome thermal transfer printing on standard 2.125 inch by 3.375 inch (54 mm by 86 mm) PVC or PVC Composite plastic 10-mil to 40-mil cards. The integrated card feeder and flipper minimizes printer size while maximizing performance. Zebra ZXP Series 3 Load-N-Go™ ribbon cartridges are used with an integrated card cleaning roller for easy ribbon changing or replacement. A variety of options (some of which can be factory-installed or field-installed as upgrades) are available, making the printers configurable for varied application environments:
- Magnetic Encoder
• USB only or USB and 10/100 Ethernet - Contact + Contactless MIFARE Smart Card
- Contact Station
• Security (Enclosure Lock)
• C a r ^TM d singlecanl feed mode
Its auto-switching 100 \~ 240 Volts AC, 50 \~ 60 Hz external power supply uses interchangeable power cords for maximum flexibility.
This manual describes single- and dual-sided ZXP Series 3 Card Printers. References to “the printer” in this document apply to either single-sided or the dual-sided printer models.
1: Getting Started
ZXP Series 3 Part Numbers
ZXP Series 3 Part Numbers
The Part Number of a particular Zebra ZXP Series 3 Card Printer is shown on a label affixed to the bottom of the printer; that Part Number identifies the specific configuration for that printer. This chart shows the configurations that are available:
| PART NUMBER DESCRIPTION | |
| Z 3 _ - _ _ _ _ _ _ _ _ _ _ _ _ _ _ | BASE UNIT |
| _ 1 - _ _ _ _ _ 2 _ _ _ _ _ _ | Single - Sided |
| _ 2 - _ _ _ _ 2 _ _ _ _ _ | Dual - Sided |
| SMART CARD OPTIONS | |
| _ _ - 0 _ _ _ 2 _ _ _ _ _ | None |
| _ _ - A _ _ _ 2 _ _ _ _ _ | PC / SC Contact Encoder + Contact |
| _ _ - E _ _ _ 2 _ _ _ _ | Contact Station, NOTE |
| MAG ENCODER OPTIONS | |
| _ _ - 0 _ _ _ _ _ _ _ _ | None |
| _ _ - M _ _ 2 _ _ _ _ _ | ISO HiCo/LoCo Mag S/W-selectable |
| SECURITY OPTIONS, NOTE | |
| _ _ - 0 _ _ _ _ _ _ _ | None |
| _ _ - 0 _ A _ _ _ _ _ _ | Enclosure Lock: Includes 2 keys, |
| _ _ - A _ A _ _ _ _ _ _ | Enclosure Lock: Includes 2 keys, |
| _ _ - E _ A _ _ _ _ _ | Enclosure Lock: Includes 2 keys, |
| INTERFACE OPTIONS | |
| _ _ - 0 _ _ _ _ _ _ | USB Only |
| _ _ - C _ _ _ _ _ _ | USB & 10 / 100 Ethernet, see NOTE |
| SOFTWARE / KIT | |
| _ _ - 0 _ _ _ _ _ _ | None |
| _ _ - G _ _ _ _ _ | Starter Kit: Monochrome ( Incl: 1 Monochrome Ribbon,200 PVC Cards ) |
| _ _ - H _ _ _ _ _ | Starter Kit: Color ( Incl: 1 YMCKO |
| _ _ - I _ _ _ _ _ | Starter Kit: Dual-Sided Color ( Incl: 1 YMCKOK Ribbon,200 PVC Cards ) |
| MISCELLANEOUS | |
| _ _ - 0 0 0 _ _ | None |
| _ _ - 2 _ _ _ _ | Z XP Series 3 Release 2.0 |
| COUNTRY CODE (power cord option) | |
| _ _ - 0 0 _ | No power cords |
| _ _ - A P _ | Britain |
| _ _ - US _ | Americas |
| _ _ - BR _ | Brazil |
| _ _ - EM _ | EMEA (Europe, the Middle East, and Africa) |
| _ _ - CN 0 0 | China |
| _ _ - IN 0 0 | India |
| CUSTOM CODE | |
| _ _ - 0 0 | State / Province / Project / Other |
| ACCESSORIES | |
| 105862-001 | CardSenseTM single card feed option, see NOTE |
| 105999-301 | Cleaning Kit: 4 printer-path and 4 feeder cleaning cards |
NOTE: Field-Upgradeable Option
Features, Controls, and Indicators
The picture below points out some of the printer's external features; see Section 3 for an interior view.

- Card Feeder Cover - Opening the Card Feeder Cover gives access to the automatic card feeder. The translucent cover allows you to when the card supply is running low. The feeder has a 100-card capacity (30-mil cards).
- Lid Release Button - Pressing the Lid Release Button allows the printer's lid to swing open. This gives internal access for changing the Ribbon Cartridge, changing Cleaning Rollers, and cleaning the printer.
- Multi-Function LCD Display Panel - The Multi-Function LCD Display Panel displays printer status information. Messages also alert the user of the need for action and indicate certain fault conditions.
- Multi-Function Control Button - The Multi-Function Control Button initiates several functions; these are described in the appropriate sections of this document.
- Card Hopper - Front-side Card Hopper has a 45-card capacity. Note that ZXP Series 3 Card Printers with a Smart Card Option have a different Card Hopper; refer to Appendix C for details.
- Quick Help QR Code - The QR code launches web-based help pages to find user videos for simple set-up and maintenance instructions; go to http://www.zebra.com/zxp1-info for details.
- Zebra Print Touch - This touch point uses NFC technology to provide key information about the printer; go to http://www.zebra.com/nfc for details.

1: Getting Started
Rear Panel Connectors
Rear Panel Connectors
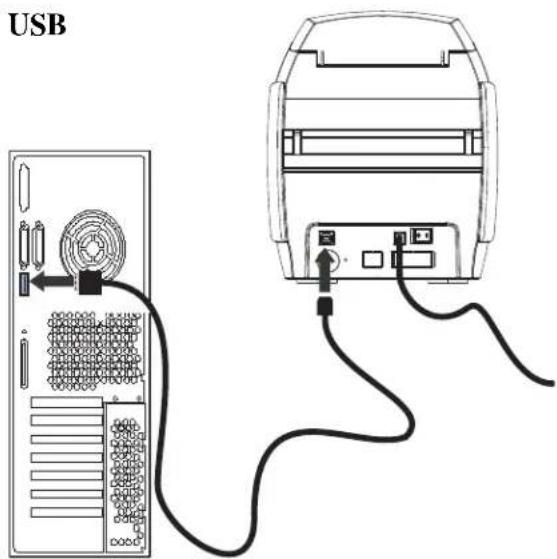
Standard USB Connection
The figure below shows the rear of the Printer with the USB interface.

Ethernet Connection
The figure below shows the rear of the printer with the standard USB interface with the Ethernet and DB-9 Smart Card Contact Station Options.

The Ethernet Connector has two LED status indicators:
• Power LED (amber): When illuminated, indicates power is on.
- Link LED (green): When illuminated, indicates valid Printer-Ethernet connectivity.
Multi-Function LCD Panel
Your printer is equipped with a Multi-Function LCD Panel to provide printer status information. The readout is controlled by the Multi-Function Control Button directly below the viewing window.
Multi-Function LCD Panel messages fall into three categories: Operational, Warning, and Error.
Operational Messages
Operational Messages are displayed during the Printer's normal operation.
| OPERATIONAL |
| CARD READY |
| CLEANING PRINTER |
| CLOSE FEEDER DOOR |
| CONTACT ENCODING |
| CONTACTLESS ENCODING |
| DOWNLOADING DATA |
| DOWNLOADING FIRMWARE |
| EMPTY FEEDER THEN CLOSE COVER |
| FEED LONG CLEANING CARD IN EXIT |
| INITIALIZING |
| INSERT CARD |
| INSERT FEEDER CLEANING CARD |
| MAG ENCODING |
| PRINTING BLACK |
| PRINTING CYAN |
| PRINTING MAGENTA |
| PRINTING MONO |
| PRINTING OVERLAY |
| PRINTING YELLOW |
| PUSH BUTTON TO CONTINUE |
| READY |
| REMOVE FEEDER CLEANING CARD |
| REMOVE LONG CLEANING CARD |
| REMOVE RIBBON THEN CLOSE LID |
| SINGLE CARD READY-PRINT OR EJECT |
1: Getting Started
Multi-Function LCD Panel
Warning Messages
Warning messages alert the operator to action that should be taken; the printer will generally continue operation.
| WARNINGS (Printer will still operate) |
| CHECKING RIBBON |
| CLEAN PRINTER |
| CLOSE LID |
| ENCODING ERROR |
| FLASH ERROR |
| INVALID MAGNETIC DATA |
| READING ERROR |
Error Messages
Error messages are displayed when a situation causes the printer to stop operating. Depending on the cause of the error message, restarting the printer or curing the displayed Error may return the printer to operational status, or the printer may require troubleshooting and repair.
| ERRORS (Printer will not operate) |
| CHECK RIBBON |
| COMMAND ERROR |
| COVER OPEN |
| LID OPEN |
| MECHANICAL ERROR |
| OUT OF CARDS |
| OUT OF RIBBON |
| PARAMETERS ERROR |
Icons
Throughout this manual, different icons highlight important information, as follows:

Note • Indicates information that emphasizes or supplements important points of the main text.

Important • Advises you of information that is essential to complete a task, or points out the importance of specific information in the text.

Provides an example or scenario to demonstrate or clarify a section of text.

Electrostatic Discharge Caution • Warns you of the potential for electrostatic discharge.

Electric Shock Caution • Warns you of a potential electric shock situation.

Hot Surface • Warns you of a situation where excessive heat could cause a burn.

Caution • Advises you that failure to take or avoid a specific action could result in physical harm to you, or could result in physical damage to the hardware.
1.1 Zebra Supplies
Genuine Zebra supplies meet stringent quality standards and are recommended for optimal printing quality and proper printer performance; see http://www.zebra.com/supplies for details.
ZXP Series 3 printers are designed to work only with Zebra ZXP Series 3 True Colours® ix Series high-performance ribbons.

natural_image
Stylized white animal head logo on gray background (no text or symbols)Printer Installation
Unpacking Your Card Printer
Your ZXP Series 3 Card Printer ships in a cardboard carton, protected by foam inserts and a protective anti-static bag. Keep all packaging material in case you need to move or re-ship the printer.
Step 1. Before opening and unpacking the printer, inspect the carton to ensure that no damage occurred during shipment.
Step 2. Ensure that you have a clean and nearly dust free environment for proper operation and storage of the printer.
Step 3. Unlatch and remove the handle, open the carton, and remove the box containing the printer accessories from the shipping carton.
Step 4. Remove the foam packing material from the top of the printer.
Step 5. Lift the printer out of the carton by holding it on both sides of the bottom and lifting the printer gently from the carton.
Step 6. Make sure the following accessories are included with your printer:
a. Software CD-ROM
b. Quick Start Guide
c. Power Cords (one or two depending on the configuration)
d. Power Supply
e. USB Printer Cable
If any items are missing, please contact your dealer. To reorder; refer to Appendix G of this manual.

2: Printer Installation
Installing the Printer
Installing the Printer
Setting up the Printer
Step 1. Place the printer in a location that allows easy access to all sides. The printer should never be operated while resting on its side or upside down.
Step 2. Remove the yellow CAUTION label from the back of the printer.

natural_image
Diagram of a hand pressing down on a device panel with a yellow button (no text or symbols)Step 3. Ensure that the printer's power switch is in the OFF (O) position.

natural_image
Line drawing of a hand inserting a component into a device casing, with no visible text or symbolsConnecting Power

Caution • Limit electrical power supplied to the printer to 24 VDC. Limit excess current draw to 16 amps or less, using an associated circuit breaker or other such device. Never operate the printer in a location where operator, computer, or printer can get wet. Personal injury could result. The printer must be connected to an earthed electrical power supply and properly protected against electrical surges and grounding faults. The power supply pack can only be replaced by the same product from the manufacturer.

Caution • Do not power the printer with USB attached to your computer at this time. THE DRIVER WILL PROMPT YOU WHEN IT IS TIME TO PLUG IN AND POWER UP YOUR PRINTER.
Step 1. Insert the power supply plug into the power socket, attach the power cord (120VAC or 230VAC) to the power supply, then plug the power cord in to a grounded electrical socket of the proper voltage and type.

Step 2. Ensure that the printer's power switch is in the OFF (O) position.

2: Printer Installation
Installing the Printer
Connecting the Printer to your Computer
Step 1. If your printer has only the USB interface, attach the included USB cable to your computer and the printer.
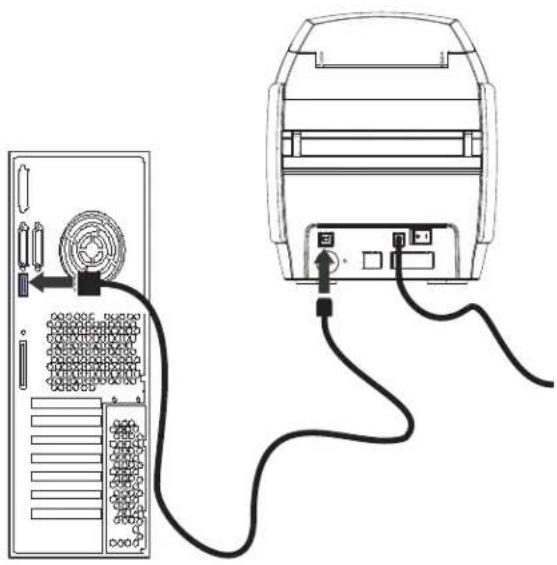
natural_image
Diagram showing two connected devices: a tower case with cable and a front-mounted device with cables (no text or symbols)Step 2. If your printer has the optional Ethernet interface (as well as the USB interface), connect either the USB cable to printer and computer or the Ethernet cable to the printer and the Ethernet network.

Important • Do not connect both the USB and the Ethernet interfaces at the same time!

Viewing Printer Information
To check the configuration parameters of the printer without being connected to a computer:
Step 1. Ensure that the printer power switch is in the OFF (O) position.
Step 2. While holding down the Control Button, place the printer power switch in the ON ( | ) position. The LCD Display Panel will glow blue.

Step 3. Keep pressing the Control Button and observe the LCD Display Panel show Initializing and CHECKING RIBBON.
Step 4. When the PRINTER INFO message appears in the display panel, momentarily release and press the Control Button to display the first parameter: Model Name.
Step 5. Continue to tap the Control Button to advance through the parameters and cycle back to the beginning:
a. Model Name (including the printer configuration)
b. Serial Number
c. Firmware Version
d. Head Resistance
e. X & Y Offset (front)
f. X & Y Offset (back)
g. EC Offset (front and back)
h. Ribbon Type
i. Smart Offset
j. IP Address (note this address for Ethernet installation; see page 19)
k. Mask
1. Gateway
m. DHCP (enabled or disabled)
Step 6. A long press of the Control Button (about 1 second) will escape the sequence. Idle time of 15 seconds will also escape the sequence.

2: Printer Installation
Installing the Windows Printer Driver
Installing the Windows Printer Driver
Installing the USB Printer Driver

Note • To install the Ethernet driver, see page 19.
Step 1. If not already done, connect power to the printer. Turn power OFF.
Step 2. Connect the USB port on the rear of the printer to the computer's USB port.
Step 3. Ensure that the Printer's power switch is in the OFF (O) position.
Step 4. Insert the User Documentation and Drivers CD into the CD drive of the host computer. The Main Menu will open.
Step 5. From the Main Menu, click Install Zebra Printer Driver.
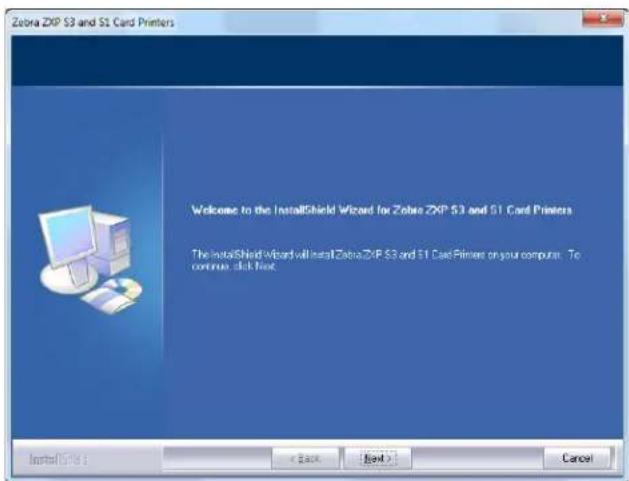
Step 6. The InstallShield Wizard window will open. To proceed with the installation, click the Next button.
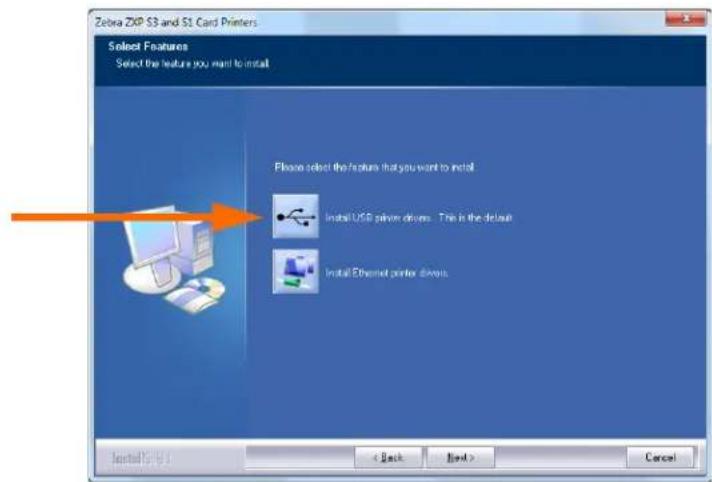
Step 7. Select Install USB printer drivers, and click the Next button.
Step 8. Ensure that the Printer's power switch in the OFF (O) position; and then click the OK button.

Step 9. This will bring up the License Agreement window. To proceed with the installation, click the Yesbutton.

2: Printer Installation
Installing the Windows Printer Driver
Step 10. This will bring up the Setup Type window. Select Complete to install all program features, and click the Next button.

Step 11. This will bring up the Select Program Folder window. Type in a new folder name or select one from the existing folders list, and click the Next button.

Step 12. Observe the Setup Status window.

Step 13. The Congratulations window will appear.
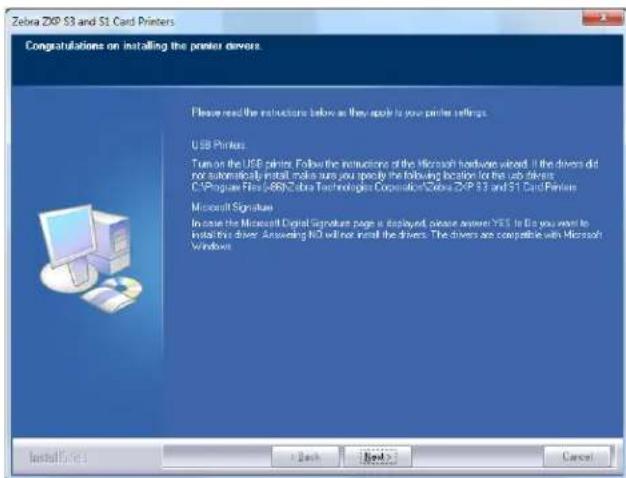
Step 14. At this point, turn on your printer; and then click the Next button. The Windows New Hardware Found wizard will find the printer.
2: Printer Installation
Installing the Windows Printer Driver
Step 15. When the InstallShield Wizard Complete window appears, click the Finish button.

Step 16. This completes the USB driver installation.
Note • You may need to change the card setup (card orientation, ribbon type, etc.), encoding, overlay, and/or black panel settings via the Printer Driver; see Printing Preferences on page 51.
Note • You may also need to set the card thickness adjustment to the thickness of the cards being used; see Loading Cards on page 34.

Installing the Ethernet Printer Driver

Note • To install the USB driver, see page 14.

Important • The Ethernet Network must be configured correctly, with the Printer and the host computer on the same subnet mask. If you are not sure how to verify this or change the configuration, consult someone knowledgeable on Ethernet Networks.
Step 1. If not already done, connect power to the printer. Turn power ON.
Step 2. Connect the Ethernet port on the rear of the printer to the Ethernet network connection or directly to the computer's Ethernet port.
Step 3. Ensure that the Printer's power switch in the ON ( | ) position.
Step 4. Insert the User Documentation and Drivers CD into the CD drive of the host computer. The Main Menu will open.
Step 5. From the Main Menu, click Install Printer Driver.
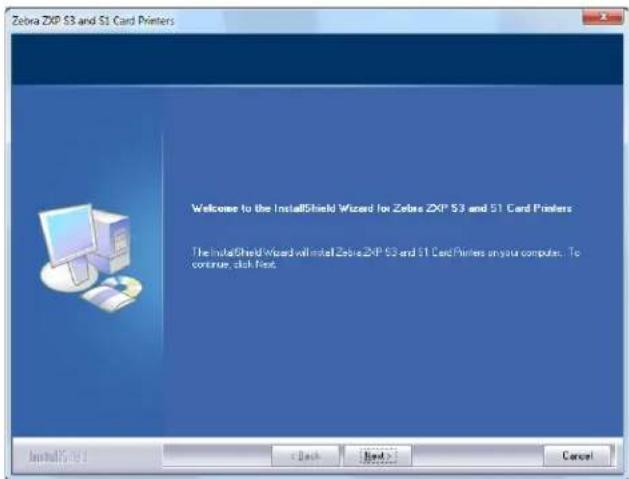
Step 6. The InstallShield Wizard window will open. To proceed with the installation, click the Next button.
2: Printer Installation
Installing the Windows Printer Driver
Step 7. Select Install Ethernet printer drivers, and click the Next button.
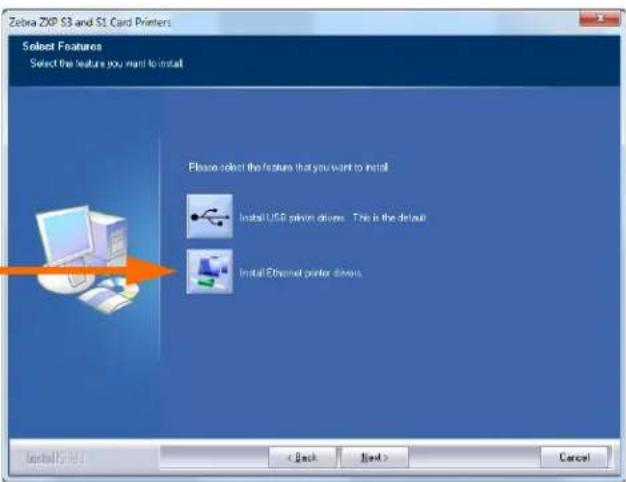
Step 8. This will bring up the License Agreement window. To proceed with the installation, select the I accept the terms of the license agreement option, and then click the Next button.

Step 9. This will bring up the Setup Type window. Select Complete to install all program features, and click the Next button.


Important • To get the printer's IP Address, see Viewing Printer Information on page 13.
Step 10. Select the Zebra ZXP Series 3 Printer radio button (circled below), and click the Refresh button.

Step 11. Setup will find and list all the Zebra ZXP Series 3 Printers on the network. Select the printer from the list (if listed), or enter the IP Address (arrow above); and click the Next button.
2: Printer Installation
Installing the Windows Printer Driver
Step 12. This will bring up the Select Program Folder window. Type in a new folder name, or select one from the existing folders list; and click the Next button.

Step 13. Observe the Setup Status window.
Step 14. When the Congratulations window will appears, click the Next button.

Step 15. When the InstallShield Wizard Complete window appears, click the Finish button.

Step 16. This completes the Ethernet driver installation.
Note • You may need to change the card setup (card orientation, ribbon type, etc.), encoding, overlay, and/or black panel settings via the Printer Driver; see Printing Preferences on page 51.
Note • You may also need to set the card thickness adjustment to the thickness of the cards being used; see Loading Cards on page 34.


2: Printer Installation
Setting Up a Network Printer
Setting Up a Network Printer
Use this procedure if you have already installed an Ethernet printer on your system (refer to Section 2), and you want to install a second Ethernet printer on the network via the Microsoft Add Printer Wizard.
Step 1. Click on the Start button, then select Devices and Printers.
Step 2. Observe the Devices and Printers window.

Step 3. Click on the Add a printer option in the Taskbar (arrow above).
Step 4. Observe the What type of printer do you want to install window.

Step 5. Select Add a local printer (arrow above), and click the Next button.
Step 6. Observe the Choose a printer port window.

Step 7. Select the Create a new port radio button (1st arrow above).
Step 8. From the dropdown menu, select Standard TCP/IP Port (2nd arrow above).
Step 9. Click on the Next button.
Step 10. Observe the Type a printer hostname or IP address window.

Step 11. Enter the IP address of your printer in the Hostname or IP address text box (circled above). Note that the Port name will automatically be filled in when you enter the IPAddress. Do not change the Port Name.
Step 12. Ensure that the Query the printer ... checkbox is selected (arrow above).
Step 13. Click on the Next button.

2: Printer Installation
Setting Up a Network Printer
Step 14. Observe the Install the printer driver window.
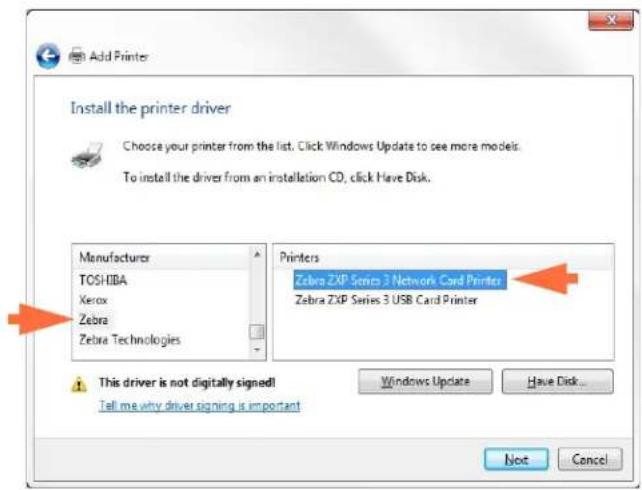
Step 15. Select the Manufacturer and the Printer (arrows above).
Step 16. Click on the Next button.
Step 17. Observe the Which version of the driver do you want to use window.
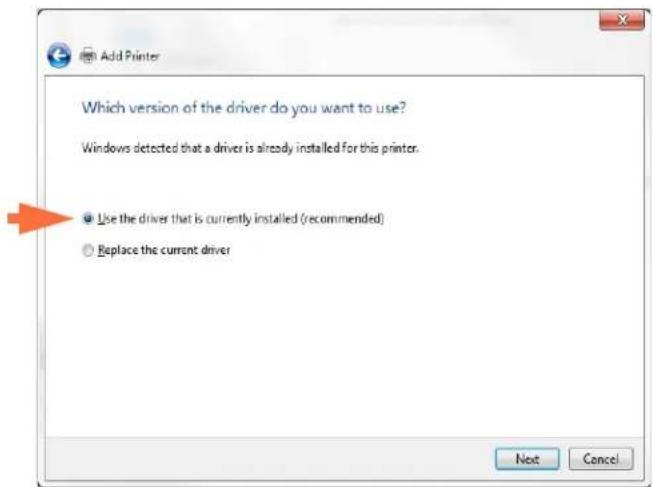
Step 18. Select the Use the driver that is currently installed radio button (arrow above).
Step 19. Click the Next button.
Step 20. Observe the Type a printer name window.
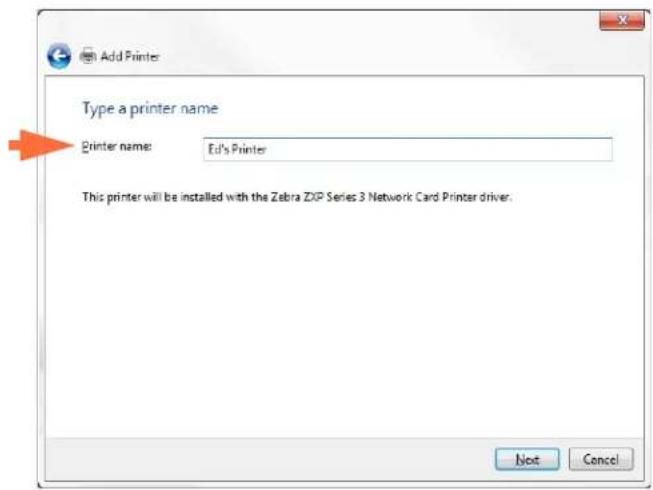
Step 21. Enter the printer name: use the default name, or add more information to indicate the printer location; e.g., Ed's Printer, Mike's Office, Room 33, etc.
Step 22. Click the Next button.
Step 23. Observe the You've successfully added ... window.

Step 24. If appropriate, select the Set as the default printer checkbox (arrow above).
Step 25. Click on the Finish button to complete the Add Printer Wizard.
You have successfully installed the network printer.
Printer Pooling
Setting Up Printer Pooling
Printer Pooling is a standard feature of Windows, which lets you spread the printed output across a pool of several printers. In this example, we will install and setup the three network printers to be used for pooling.
Step 1. Before proceeding to pool the printers, test them individually, and be sure they are configured similarly. Specifically, check the following:
- Ribbon panel configuration (ribbon type, and what prints on which side of the card).
- Mag encoding configuration.
- Black extraction configuration (if applicable).
Step 2. Access the Ports Tab.
To access the Ports tab, select Start > Devices and Printers. Right click on the Zebra ZXP Series 3 USB Card Printer listing. Select Printer properties > Ports.
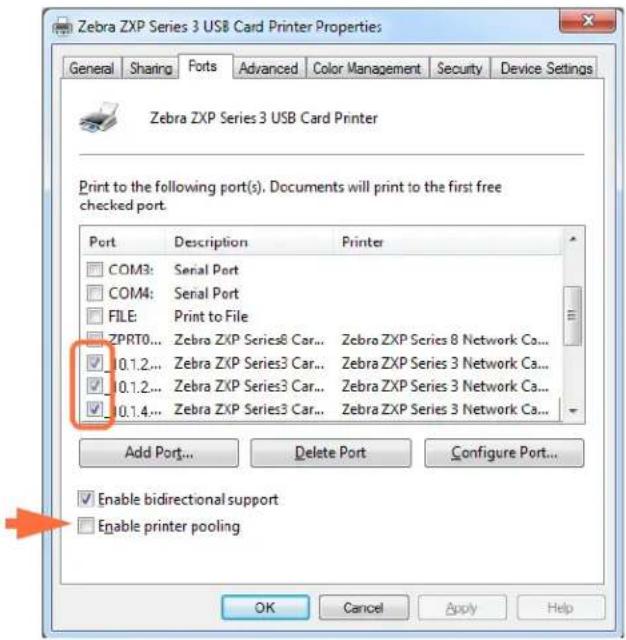
Step 3. Select the three network printers by selecting the associated checkbox (circle above).
Step 4. Select the Enable printer pooling checkbox (arrow above).
Step 5. Click the Apply button, then click the OK button.
Using Printer Pooling

Important • Send print jobs to the printer pool, not to an individual printer.
When the first printer has taken as many jobs as it can handle (that being two jobs - one to be printed immediately, the other waiting), the following jobs “spill over” to the second printer, and then to the third printer.
Note that if you are only printing two jobs, they would both go to the first printer. Pooling is a spill-over methodology. It does not balance printer usage.
Once the pool has been set up, maintenance and configuration changes should be done through the menus for each individual printer, not through the pool (which can produce undesirable results).

Important • The effect of any maintenance and/or changes can (and should) be tested by sending print jobs separately to each printer, not to the pool.

natural_image
Stylized white animal head logo on gray background (no text or symbols)Printer Setup
Printer Features
The following shows an interior view of the ZXP Series 3 Card Printer.
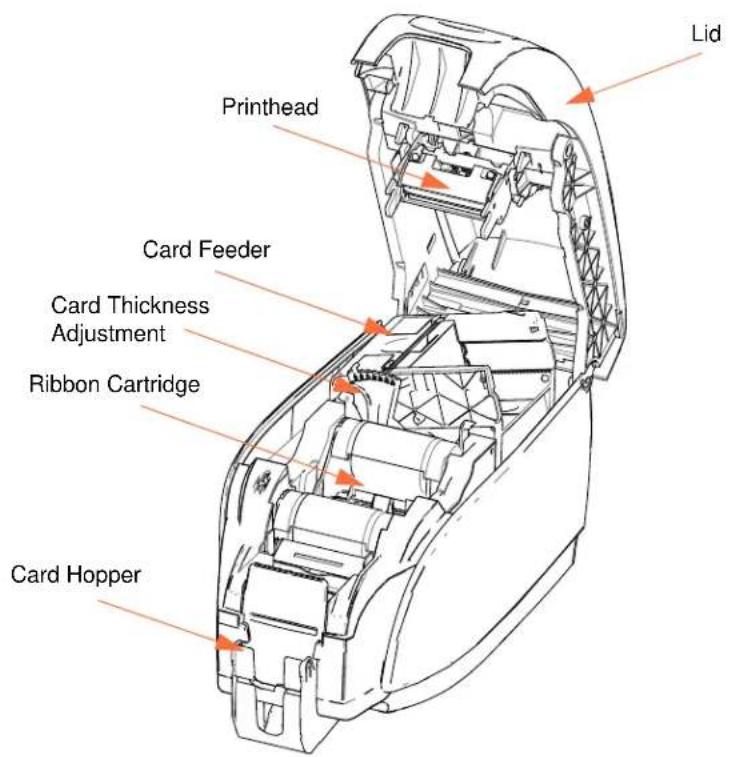

3: Printer Setup
Loading Ribbon Cartridge
Loading Ribbon Cartridge
The Printer requires approved ribbon cartridges. The Resin Thermal Transfer and Dye Sublimation ribbons are specifically designed for your Printer.
- Only use Zebra i Series ribbons designed to work with ZXP Series 3 Card Printers.
- Each ribbon cartridge includes an integrated adhesive cleaning roller assembly that is used to clean the cards entering the printer. Improper cleaning will reduce printer life and degrade print quality
- When the ribbon is completely used, change the whole cartridge assembly.

Electrostatic Discharge Caution • DO NOT TOUCH the printhead or the electronic components on the printhead. Discharge of electrostatic charge from the human body or other surfaces can damage the printhead or other electronic components
Step 1. Open printer lid by pressing the Cover Release button on the top of your printer.
Step 2. Peel protective wrapper from the adhesive cleaning roller by gently pulling on the tape. Discard the protective wrapper.

Step 3. Insert the ribbon cartridge with the cleaning roller facing down, so the gears on the ends of the rollers fit into the appropriate slots.

natural_image
Technical line drawing of a mechanical assembly with internal components and a downward arrow indicating a process (no text or symbols present)Step 4. Close the printer lid and push down until you hear an audible click.

Note • After the lid is closed, the ribbon automatically synchronizes when the printer power is on.
Loading Cards
Card Feeder
The card feeder is used for loading cards, it can hold up to 100 cards of 30-mil thickness. The card feeder is located under the card feeder cover of the Printer

Caution • Hold the cards by the edges only. DO NOT touch print surfaces as this can reduce print quality.
Step 1. Set the card thickness adjustment (arrow below) to the number corresponding to the thickness of the cards being loaded. Note that the thickness adjustment ranges from 10 mils to 40 mils.

Step 2. Open the card feeder cover.
Step 3. Slide the card guide all the way to the right until it locks in place with an audible click.

natural_image
Technical line drawing showing a hand using a tool to adjust or install a mechanical component, with no visible text or symbols.
Caution • Hold the cards by the edges only. DO NOT touch print surfaces as this can reduce print quality.
Step 4. Remove the wrapper from the card stack.
Step 5. Examine the cards, and discard any cards with damaged edges.
Step 6. Holding the card stack by its sides, fan the cards (like flexing a deck of playing cards) at least once from each end, so as to separate all the cards.
Step 7. Restore the card stack to its original squared-off condition.
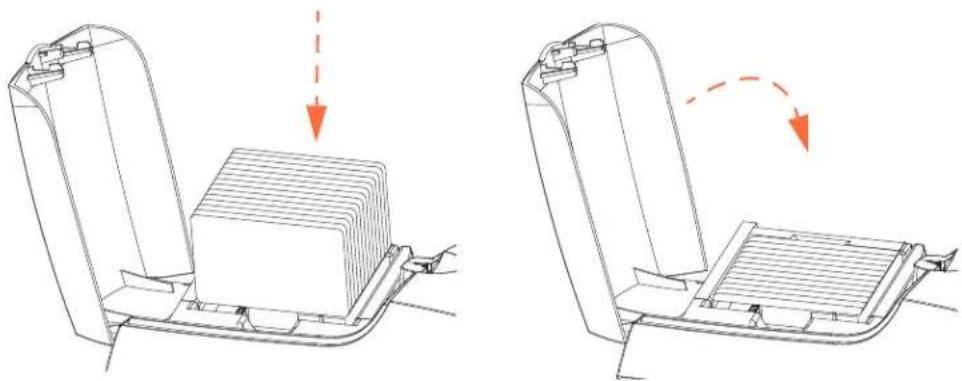
Step 8. Place the stack of cards into the card feeder. When loading magnetic stripe cards or contact smart cards, see Appendix B or Appendix C respectively for proper card orientation.
natural_image
Technical line drawings of a mechanical component with two views showing internal structure and motion arrows (no text or symbols)Step 9. Close the card feeder cover. When card feeder cover is closed, the card guide locking mechanism will be released automatically.

3: Printer Setup
Loading Cards
Card Hopper
Step 1. Raise the printer lid, and pull the card hopper down to place it in its functional position.

natural_image
Technical line drawing of a mechanical device with internal components and a hand holding a handle (no text or symbols)Step 2. When not using the printer, place the card hopper back in its closed position to protect the printer from dust.
Printing a Test Card
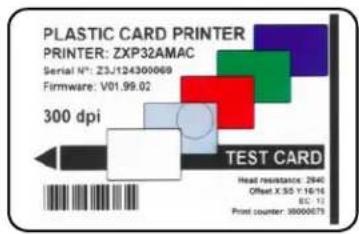
With ribbon cartridge and cards loaded, your printer is ready to print. To check the operation of the printer, you should print a test card.
Step 1. Select Start > Devices and Printers. Right click on the Zebra ZXP Series 3 Card Printer listing. Select Printer properties > Device Settings; and click on the Toolsbutton.
Step 2. Observe the Tools window.

Step 3. From the Print Test Card dropdown menu, select the desired test card (circled above).
Step 4. Click on the Print button (arrow above) to print the selected test card; see sample test cards below.
Standard: Printer Parameters: Encoder Parameters:


3: Printer Setup
Typical Printer Operation
Typical Printer Operation
The ZXP Series 3 Card Printer can be used with your software application program, using the Drivers on the CD provided with your Printer; refer to Installing the Windows Printer Driver on page 14.
Creating a Sample Card
Before you begin a new printing session, print a sample card to ensure that the cards will be printed correctly. Follow the steps below to print your first card.
Step 1. Open a new Microsoft Word document.
Step 2. If the Zebra Printer was not set as the default printer, select the ZXP Series 3 Card Printer as the default.
Step 3. From the Microsoft Word document., set the Page Layout:
a. Size: 3.14 in x 2.13 in (86 mm x 54 mm) Card
b. Orientation: Portrait or Landscape
c. Margins: Top, Bottom, Left, and Right = 0 (zero).
Step 4. The card appears as a Microsoft Word document.
Step 5. Design a card with both black and colored text and with colored images similar to the sample card shown below.
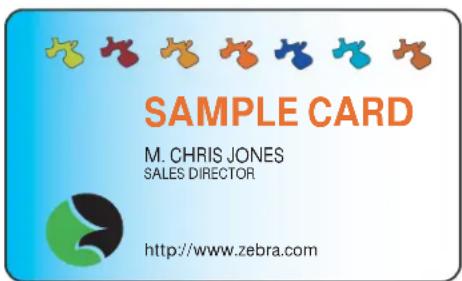
Printing the Sample Card
Once you complete creating your sample card, you are ready to print. Ensure your printer has a True Colours ^TM Card Printer Ribbon Cartridge installed and there is card stock in the card feeder. See Section 3 for instructions on installing the ribbon and loading the cards.
Step 1. Print your sample card to the ZXP Series 3 Card Printer.
Step 2. Once the printing is completed, remove the sample card from the card hopper; and check for any discrepancies. For quality issues, see Troubleshooting on page 73.
Step 3. If the sample card is correct, your printer is ready to produce more cards.
Printer Settings and Adjustments
Introduction
This section describes the settings and adjustments that can be made to your ZXP Series 3 Printer Driver:
Printer Properties....40
Printing Preferences 51

4: Printer Settings and Adjustments
Printer Properties
Printer Properties

Note • The screen shots shown in this section are for a printer using the USB interface. If you are using the Ethernet interface, the screens will refer to the “Network Printer.” Screen shots may also look different depending on your Operating System.
Access to Card Printer Properties varies depending on your Operating System (OS); e.g., for Windows 7, select Start > Devices and Printers. Right click on the Zebra ZXP Card Printer listing, then select Printer properties.

General Tab 41
Sharing Tab. 42
Ports Tab. 43
Advanced Tab. 44
Color Management Tab 45
Security Tab 46
Device Settings Tab 47
The OK button applies and saves the settings.
The Cancel button exits Printer Properties. Changes made are abandoned.
The Apply button applies, but does not save, the settings.
The Help button enables you to view a corresponding page of help information.
General Tab
The General tab shows the selected printer and lists the features of the printer.

- Location - Lets you specify where the printer is located.
- Comment - Lets you specify general information about the printer, such as the type of print device and who is responsible for it. Once set, these fields can be displayed by applications.
- Model - Specifies the name of the printer driver installed.
- Features - Specifies whether various options are available on the printer.
The Printing Preferences button takes you to Printing Preferences used to set selected configuration parameters; see Printing Preferences on page 51.
The Print Test Page button sends the standard Windows test page to the printer.

4: Printer Settings and Adjustments
Printer Properties
Sharing Tab
On the Sharing tab, you can choose to share the printer over the network and install additional drivers to accommodate different operating systems. See Appendix A for the various printer sharing options allowed and the configurations required.

Printer sharing tasks that you can perform include:
- To share a printer, select the Share this printer checkbox; and specify a name for the shared resource. Click the OK button when you are finished.
- To change the shared name, simply enter a new name in the Share name field; and click the OK button.
- To quit sharing a printer, deselect the Share this printer radio button. Click the OK button when you are finished.
Drivers: If this printer is shared with users running different versions of Windows, you may want to install additional drivers, so that the users do not have to find the print driver when they connect to the shared printer.
For Printer Sharing Configurations and Advanced Sharing Settings, refer to Appendix A for details.
Ports Tab
Use the Ports tab to specify the computer port to which the printer is connected. This will have been established at the initial installation of the printer, and will not normally require attention.
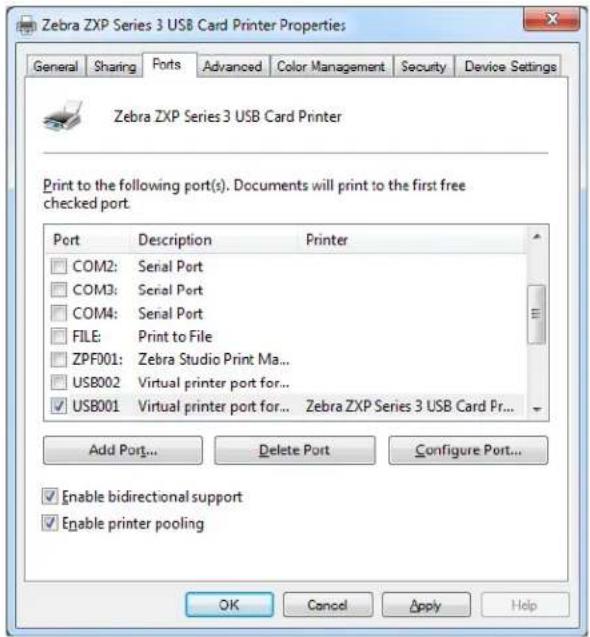
An exception to this is if you wish to use printer pooling, the ability to distribute print jobs to multiple printers; see Printer Pooling on page 28 for details.
To enable printer pooling, select the Enable printer pooling checkbox and the Enable bidirectional support checkbox, then check the additional ports boxes. Each port should have a single Zebra printer installed on it. All the pooled printers must be identical models with the same configuration (e.g., all with YMC front, K back); and each must have its own printer driver installed.
Now, when you print to the “main printer” (that is, whichever printer you right-clicked in Devices and Printers to get to this screen), this printer will get print jobs until it has buffered as many jobs as it can take. The remaining jobs will then “spill over” to other printers until all printers in the pool are busy.

4: Printer Settings and Adjustments
Printer Properties
Advanced Tab
The Advanced tab determines the spooling (queuing) of print jobs and determines how spooled jobs are handled relative to the most recent job.

You can make the printer always available by selecting the Always available radio button, or you can limit availability by selecting the Available from radio button and specifying the "Available from" and "To" times. Click the Apply button, and then the OK button.
- To enable spooling: Select the radio button labeled Spool print documents so program finishes printing faster.
- Select Start printing after last page is spooled if you want the entire document to be spooled before printing begins. This option ensures that the entire document is sent to the print queue before printing. If for some reason printing is canceled or not completed, the job will not be printed.
- Select Start printing immediately if you want printing to begin immediately when the print device is not already in use. This option is preferable when you want print jobs to be completed faster or when you want to ensure that the application returns control to users as soon as possible.
• To disable spooling: Select the radio button labeled Print directly to the printer.
Printing Defaults: When the printer is set up as a network printer on a server, Printing Defaults needs to be used to set the printer options. The values from this screen will be filled into the Windows Drivers when they are installed on local PCs with the Add Printer Wizard.
Color Management Tab
This is the standard Windows color management screen, showing user access to various printer control options.

4: Printer Settings and Adjustments
Printer Properties
Security Tab
This is the standard Windows security screen, showing user access to various printer control options.

Device Settings Tab
The Device Settings tab provides device information, security status, and printer usage.

Device Information
- M o d e l : Specifies the printer model number.
- Fw version: Specifies the installed firmware version.
- Serial number: Specifies the printer serial number.
- Ribbon type: Specifies the ribbon installed in the printer.
- Head resistance: Specifies the printhead resistance value.
- Mag encoder: Specifies if this option is present.
- Panels printed: Shows the total number of panels printed for the lifetime of the printer.
- Remaining count: Shows the remaining card count for the ribbon installed. For monochrome ribbons, this will display Unknown.
• Smart card: Specifies if a smart card encoder is present and type of encoder.
Click on the Save/Restore button to save your printer and/or driver settings. You can later restore those saved settings; see Page 48 for details.
Click on the Tools button to access a dialog box that allows you to test and communicate with the printer; see Page 49 for details.
4: Printer Settings and Adjustments Printer Properties
Save/Restore
Dialog box for saving printer and driver settings or restoring previously saved settings.
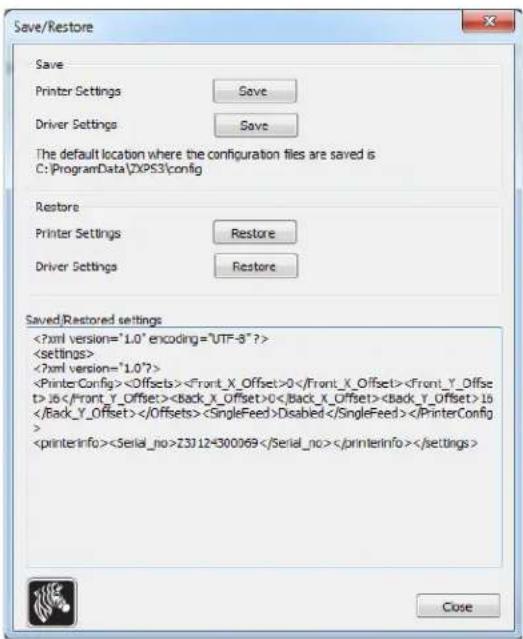
To save settings:
Step 1. Click on the appropriate Save button (Printer Settings or Driver Settings).
Step 2. Observe a browse window showing the default location where the configuration files are saved. The location depends on the Operating System; e.g., for Windows 7, C:\Program Data\ZXPS3\config.
Step 3. Enter an appropriate file name, and click the Save button. Note: A prefix, P_ or D_, will be added to the file name for printer settings and driver settings respectively.
Step 4. Your selected settings (Printer Settings or Driver Settings) will be saved.
To restore settings:
Step 1. Click on the appropriate Restore button (Printer Settings or Driver Settings).
Step 2. Observe a browse window showing the default location where the configuration files are saved. The location depends on the Operating System; e.g., for Windows 7, C:\Program Data\ZXPS3\config.
Step 3. Select the desired file, and click the Open button. Note that prefixes P_ and D_ indicate printer settings and driver settings respectively.
Step 4. Your selected settings (Printer Settings or Driver Settings) will be restored.
Tools
Dialog box for testing and communicating with the printer.

- Command to send to printer - Enter a printer command (all capitals without the leading escape character) in the top edit box; e.g., MI MO, which will pick and eject one card. Then click on the Execute button. Printer Status will show the status of the command. Contact Zebra Technical Support for a complete list of the printer commands.
- Print test card - Select the desired test card type from the dropdown menu: Standard, Printer Parameters, and Encoder Parameters. Click on the Print button to print the selected test card.
- Cleaning - Select the desired cleaning to be performed from the dropdown menu: Printer only or Magnetic encoder. Click on the Clean button to run the cleaning process.
- Offset setting - Enter the Front and Back X and Y direction offsets, and click on the Set Offsets button to set the offsets for printing the card.
• Firmware download: see Page 50 for details.
- Send file - This command will allow a .prn or .txt file to print.
- The .prn file must be created with a Zebra printer driver using the same ribbon as present in the printer.
- The .txt file must contain firmware commands only with only one command per line. The first line must only contain MASTER; the last line must only contain SLAVE.

4: Printer Settings and Adjustments
Printer Properties
Firmware Download
This option is used to install the ZXP Series 3 firmware, downloaded from the Zebra web site at http://www.zebra.com under Drivers & Downloads. Ensure that you download the correct firmware file for the printer model.

Important • Do not turn off the power to the printer until the process is done and the OCP displays READY. If the download process is interrupted, the printer will not operate.
Step 1. Download the firmware from Zebra web site (http://www.zebra.com), and save it to a location you can easily find.
Step 2. In the Tools window, click on the Select File button.

Step 3. From the Browse window, "find" and select the firmware file (BIN file type) you downloaded in step 1; and click on the Open button.
Step 4. Click on the Start Firmware Download button to install the firmware.
Step 5. Wait while the firmware downloads and installs, and then wait while the printer resets and initializes.
Step 6. When the installation is complete, the Status field will display Firmware Downloaded Successfully.
Printing Preferences

Note • The screen shots shown in this section are for a printer using the Ethernet interface. The screens refer to the “Network Card Printer.” If you are using the USB interface, the screens will refer to the “USB Card Printer.” If you are using a network driver on a server, set the parameters from the Advanced Tab, Printing Defaults.
Access to Card Printing Preferences varies depending on your Operating System (OS); e.g., for Windows 7, select Start > Devices and Printers. Right click on the Zebra ZXP Card Printer listing, then select Printing preferences.
![Zebra ZXP Series 3 USB Card Printer Printing Preferences Card Setup Encoding About Printing options Orientation Landscape Print on both sides Yes Rotate 180° [None] Monochrome conversion Auto Printing Mode Print Copics 1 Auto detect start of image for half panel ribbons Single Feed options Current Status Card feeder Apply Ribbon info and options Ribbon type Ribbon combination YMCKO HS 200 Front YMCKO, Back YMCKO Front K Panel Back K Panel Front Overlay Back Overlay Options... Options... Varnish... Varnish... Job Log XiImage ControlRestore Defaults OK Cancel Apply Help](/content/2026/06/1289914/images/363d86a252e9e161098616c5ce1ef413498a6b2388ab17af9846fb45204fa40f.jpg)
Card Setup Tab....52
Encoding Tab 65
About Tab 68
Click on the Job Log button to create and manage a database of card transactions; see Job Log on page 62 for details.
Click on the Image Control button to adjust the image colors; see Image Control on page 64 for details.
The OK button applies and saves the settings.
The Cancel button exits Printer Properties. Changes made are abandoned.
The Apply button applies, but does not save, the settings.
The Help button enables you to view a corresponding page of help information.

4: Printer Settings and Adjustments
Printing Preferences
Card Setup Tab
Card Setup tab allows the user to adjust selected card and print job parameters.
![Zebra ZXP Series 3 USB Card Printer Printing Preferences Card Setup Encoding About Printing options Orientation Landscape Print on both sides Yes Rotate 180° [None] Monochrome conversion Auto Printing Mode Print Copies 1 ✓ Auto detect start of image for half panel ribbons Single Feed options Current Status Card feeder Apply Ribbon info and options Ribbon type Ribbon combination YMCKO HG 200 Front YMCKO, Back YMCKO Front K Panel Options... Back K Panel Options... Front Overlay Varnish... Back Overlay Varnish... Job Log XiImage Control Restore Defaults OK Cancel Apply Help](/content/2026/06/1289914/images/2fe1f28a468dd7eed24c19c4811fdf2eb2487bf3025a545d3c5ce439c96ea83c.jpg)
- Printing options
- Orientation: Selection for portrait or landscape printing.

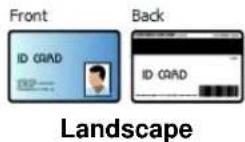
- Print on both sides: Selection for single-sided or dual-sided printing.
- Rotate 180 ^0 : Selection for rotating the image 180°. The options are None, Front, Back, and Front & Back.

- Monochrome Conversion: Specifies the method of monochrome conversion used in printing. Different selections have different effects on the way the image is printed. The options are Diffusion, Halftone, Barcode, Text Mode, and Auto.
- Diffusion: Error diffusion is used primarily where you have a full color (RGB image with 8 bits per pixel) or full gray (single color but still 8 bits per pixel) that you need to print with binary printing (can only print full-on or full-off; i.e., 1 bit per pixel). Typically preferred over halftoning (see below) for most images.

natural_image
Portrait of a person with long hair (no text or symbols visible)- Halftone: To simulate gray in graphics, halftones are printed. Halftones are arrays of dots arranged in a grid (e.g., 6x6 or 8x8) to represent each image pixel as a shade of gray. For dark gray, more grid dots are black. For light gray, more grid dots are white As the grid size goes up so does the number of possible output levels, 6x6 cell has 36 possible output levels while 8x8 has 64. But as cell size increases, there is a corresponding decrease in resolution.

natural_image
Portrait of a woman with long hair, wearing a collared top (no text or symbols visible)- Barcode: This is the simplest method for converting from 8 bits per pixel to 1 bit per pixel.

natural_image
Black-and-white portrait of a woman with long hair (no text or symbols visible)For example, the input pixel can be a value from 0 to 255. If the threshold is 128, any pixel over 128 becomes full on (1); and any pixel that is less than 128 becomes full off (0). This mode works best for text, barcodes, line art, logos -- everything except continuous-tone pictures.
- Text Mode: This mode can be used when you have black anti-aliased text. Black anti-aliased text is typically black in the center; but on the edges, it has shades of gray that get lighter as you move out from the center of the text. This anti-aliased text will have a softer looking edge that is less sharp than non anti-aliased text.

natural_image
Portrait of a woman with long hair, wearing a collared top (no text or symbols visible)- Auto (default): This mode analyzes the image and optimizes the conversion (diffusion, halftone, barcode, or text mode) automatically.
4: Printer Settings and Adjustments
Printing Preferences
- Monochrome Conversion SUMMARY
- Diffusion/Halftoning: Use on pictures. Image content dictates if error diffusion or halftoning would look best. For the majority of time, diffusion is better.
- Barcode: Use on text, barcodes, line art, and simple graphics.
- Text Mode: Use with black anti-alised text.
- Printing Mode - Sets the type of printing required:
- Print.
- Encode Only (use this when magnetic encoding is the only function desired, printing will not occur).
- Copies - Sets the number of copies of cards printed.
- Auto detect start of image for half panel ribbons - Enabled only when a half-panel ribbon is installed. Automatically detects the edge of the color image to be printed; see Appendix D for setting the edge manually.
- Single Feed options (refer to Appendix E for details on the single-card feed mode)
- Card feeder: The printer will attempt to a pull a card from the Card Feeder. If the Card Feeder is empty, the printer will generate an OUT OF CARDS error message.
- Single feeder slot: For each print job, the printer will generate an INSERT CARD message. Any cards in the Card Feeder will not be used.
- Auto feed: The printer will attempt to feed cards from Card Feeder first. If Card Feeder is empty, the printer will generate an INSERT CARD message. No OUT OF CARDS error message will be generated.
- Ribbon info and options
- Ribbon type displays the type of ribbon installed in the printer. Tagged ribbons (e.g., YMCKO) are detected and displayed automatically. Untagged ribbons (Black Monochrome and White Monochrome) must be selected from the dropdown menu. Note that the type of monochrome ribbon selected is critical -- white monochrome ribbon will not print acceptably with Black Monochrome selected.
- Ribbon combination is based on ribbon type; for example:
YMCKOK
- Front YMCKO, Back K.
- Front YMC, Back KO.
- Front YMCKO, Back YMCKO.
Depending on the printer model and ribbon combination selected, the Black Panel Options and Overlay Varnish Options buttons are enabled; see Page 55 and Page 61 respectively.
Black (K) Panel
Black Panel Options
The Black Panel Options pop-up window allows you to manage and configure the use of the Black Panel (K panel) when the selected Ribbon Combination shows the K panel on the same side as the Y, M, and C panels (e.g., YMCKO Front).
Select a Ribbon Combination that has YMC and K all on the same side. The Front K Extraction... and/or Back K Extraction... buttons will become active.
The figure below shows settings for the front side of the card; settings for the back side of the card are identical.

To set how the printer prints the black areas of color images, several selections must be made:
- Select black panel extraction type:
- Disable black extraction does not use the K panel for any part of the image. This selection will have the effect of rendering all black images as YMC composite.
- Print YMC composite and K black uses both the K panel and the Y, M, and C panels to print the portions of the image that are identified as black. This selection will result in a dark, black image; but the edges will be smooth (due to YMC printed under the K), not the sharp edges typically desired for a barcode.
- Print all black data uses only the K panel to print the portions of the image that are identified as being black. Note that the areas that are identified as black are based on the threshold selections made in the black level area in the black extraction from color images area; see Page 57.
4: Printer Settings and Adjustments
Printing Preferences
- Apply black extraction on:
Option 1. Black text applies black extraction to areas of the image identified as text; e.g., company name, address.
Zebra Technologies
Option 2. Black graphics applies black extraction to areas of the image identified as graphics primitives; e.g., lines, circles, rectangles, area fills, etc.

natural_image
Simple geometric diagram with two nested rectangles (no text or symbols)Option 3. Black color bitmaps applies black extraction to areas of the image identified as monochrome bitmap data contained in a color bitmap image.

natural_image
Portrait of a woman with long dark hair wearing a pink top (no text or symbols visible)Option 4. Black monochrome bitmaps applies black extraction to areas of the image identified as monochrome data in a bitmap; e.g., logos.

natural_image
Stylized zebra head logo inside a rounded square frame (no text or symbols)- Black extraction from color images:
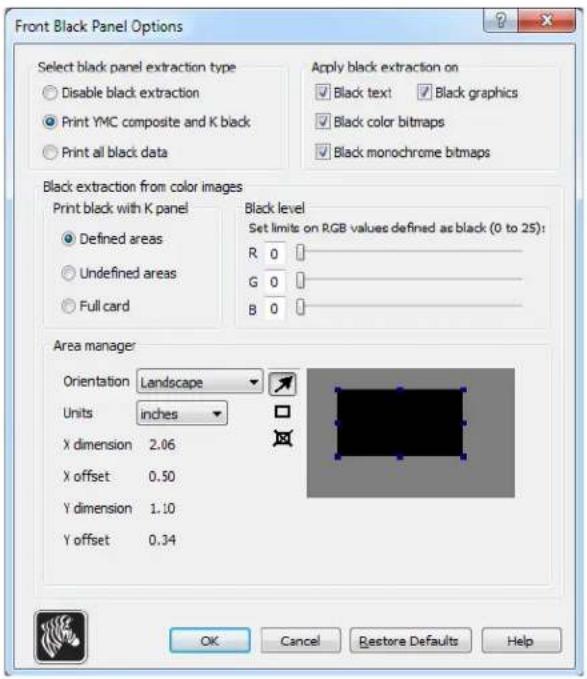
- Print black with K panel:
- Defined areas applies black extraction to areas of the image inside of the zones specified in the Area manager.
- Undefined areas applies black extraction to areas of the image outside of the zones specified in the Area manager.
• Full card applies black extraction to the entire image.
- Black level: Every dot of a printed image has an RGB color value that ranges from 0, 0, 0 (pure black) to 255, 255, 255 (pure white). The black level setting allows the user to specify the threshold value for any given dot to be treated as black. The maximum setting is R25, G25, B25.

4: Printer Settings and Adjustments
Printing Preferences
- Area manager: This option is enabled when either the Defined areas (extract inside the zone) or the Undefined areas (extract outside the zone) radio button is selected.

- Orientation: The Orientation selection sets the image orientation to either Portrait or Landscape.
- Units: The Units selection sets the units to either inches or mm (millimeters). The X-dimension, X-offset, Y-dimension, and Y-offset reflect these units.
To create a zone: Select the rectangle icon, click on an area of the image to establish the first corner of the zone, drag the cursor until the zone is the desired size and shape, then release the mouse button. Note that multiple zones can be defined.
To select, move, or resize a zone: Select the arrow icon, click on a zone to select it, then drag it to move it, or drag on the edges to resize it.
To delete a zone: Select the rectangle icon with an "X" through it then click on the zone that you want to delete.
Black Panel Print Overview
This section covers special handling of black data specified on the “Black Panel (K)” tab and applies only to surfaces of the card on which both YMC (color) and K (black) are to be printed.

Zebra Technologies

Reasons and Behavior for Black Panel Extraction
To print black during the print process, equal amounts of process colors Y, M, and C (printer ribbon panels) are delivered, with maximum intensity, to create a near-black image.
- However, this “composite” image appears as a dark shade of gray and not machine readable. For example, a visually-black barcode printed with Y, M and C will not be detectable by most barcode readers and is not a true Visible Black color.
- The remedy for this is to “extract the black.” In other words, print the same text, graphics, or barcode, using the K (black) panel, on top of the YMC barcode. (You can also choose to print only in K, omitting YMC from that region.)
Depending on the application used to design the card layout, different elements of the card image may be identified in different ways to the printer driver. The printer driver needs to recognize four types of basic elements:
- Black text
- Black (monochrome) graphics -- lines, circles, rectangles, and area fills
- Black (within) color bitmap images
- Black monochrome bitmap images
These elements may not always be sent to the driver as expected. For example, a barcode may be sent as black text, a series of black area fills, or a black monochrome bitmap. Results will depend on the application used to create the card design. Another variable, again controlled by the card design application, is the precedence (stacking order) of the various element types in the event that one or more of them overlap.
4: Printer Settings and Adjustments
Printing Preferences
If the printer is set up to print both YMC and K on the same side, text, lines and pixels, area fills and monochrome bitmaps, if (and only if) designated black by the application, can be directed to the K panel. For that to happen, the graphic type in question has to be selected on the "Black Panel (K)" tab. For text, lines and pixels, area fills and monochrome bitmaps the designation "black" means just that (0, 0, 0). Near-black doesn't qualify.
In the Black Panel (K) tab, the “element selection” portion is straightforward – simply designate any or all of the four graphic types to be printed in K, either K alone, or over process black (YMC).
Black extraction is quite different. It applies only to the fourth graphic type – the color bitmap image. To perform black extraction, the driver generates a K image by looking for black features (pixels) in the color bitmap, that is, instances where all three YMC values are at, or close to, the maximum (full intensity). Each such true-black or near-black instance generates a corresponding cluster of black pixels in the extracted image, which will be printed with the K (black) panel either on top of the YMC image, or replacing it entirely – your choice.
A problem that can arise when K is extracted from an entire card image is over-emphasis of every black cluster; e.g., dark hair in a portrait photo or scenic background. K overprinting in such areas can be displeasing. To deal with this, set up exclusion zones within which no extraction is performed. Six such areas are provided for on each side of the card, independently. In the default state, all areas are null (0,0 offsets, and zero size).
There is a choice of black extraction within the defined areas or outside the defined areas; see Print black with K panel: on page 57 for details.
Overlay Varnish Options
The Overlay Varnish Options window allows you to manage and configure the use of the Overlay when the selected Ribbon Combination shows the O panel (e.g. YMCKO).
The figure below shows settings for the front side of the card; settings for the back side of the card are identical.

Select the overlay varnish type - Option selection for applying overlay varnish ribbon to a card. Default setting is full edge-to-edge varnish.
There are various varnish options. A preview pane is shown for each selection.
• Full overlay varnish - Applies an edge-to-edge overlay.
- No overlay - Does not apply any overlay.
- Selected area overlay varnish - Applies the overlay inside the area specified by the user. When this option is selected, position the Left, Right, Top, and Bottom overlay edges via the Buttons (circled above).
- Selected area blank - Applies the overlay outside the area specified by the user. When this option is selected, position the Left, Right, Top, and Bottom overlay edges via the ☐ buttons (circled above).
- Bitmap-based overlay varnish - Applies a user-defined bitmap (.bmp file extension) in the overlay panel. When selected, click the Browse button; in the browse window, find the desired monochrome bitmap (1 bpp); and click the Open button.
- Smartcard ISO - Does not apply overlay in the area of the ISO standard Smart Card contacts.
- Smartcard AFNOR - Does not apply overlay in the area of the AFNOR standard Smart Card contacts. AFNOR stands for Agence Française de Normalisation, a standardization organization based in France.
- Magnetic Stripe - Does not apply overlay in the area of the ISO standard Magnetic Stripe.

4: Printer Settings and Adjustments
Printing Preferences
Job Log
The Job Log is a utility that builds a database of card transactions in the printer's host computer. The Job Log records the data encoded on the card's magnetic stripe, together with date, time, and the printer's serial number.
The data set can be uploaded at any time to a central archive, thus providing a means for security officers to validate a card by comparing it with tamper-proof real data.
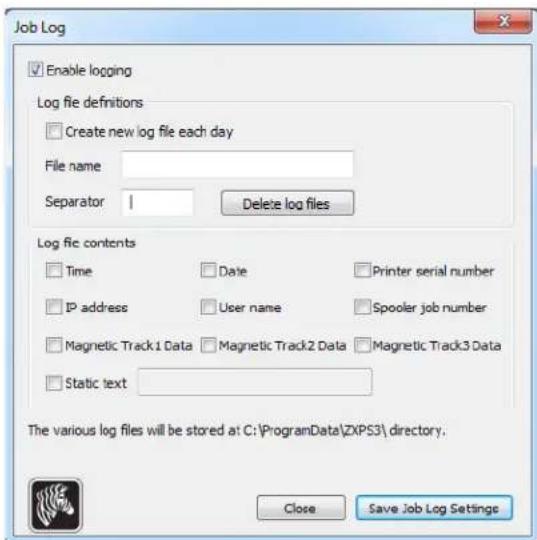
- Enable logging - If this box is checked, the logging feature is enabled.
-
Log File Definition - Choose one of the following options:
-
If the "Create new log file each day" box is unchecked, the data is saved to a log file of your choice (Filename).
- If the box is checked, the data is saved to log file ZXPLog with the day's date; e.g., ZXPLog_2011_8_17.
- In addition to the Filename, you may wish to enter a special field Separator Character. The default field Separator Character is "|".
- Log File Contents - The Log File Contents group selects the data to be logged in the file you specified above. The data will be logged in the order displayed on the screen, each field being separated by the character specified in the Logfile Definition, Separator.
Log File Contents selections include:
- Time: Logs the time a which the card was sent to the printer in the HH:MM:SS format. The 24-hour clock is used, so 13:00:00 = 1:00 pm, and 05:00:00 = 5:00 am.
- Date: Logs the date the card was sent to the printer in the MM/DD/YYYY format.
- Printer serial number: Logs the serial number of the printer that printed the card.
- IP address: Logs the IP address of the PC that sent the card to the printer.
- User name: Logs the username of the person submitting the card print job.
- Spooler job number: Logs the number which the card print job was assigned in the Windows print spooler.
- Magnetic Track 1, 2, 3 Data: Logs the data sent to the printer to be encoded on the card's magnetic stripe.
- Static text: Adds to the record text in the box to the right, 16 characters maximum.

Note • The location of the log files depends on the Operating System; e.g., for Windows 7, C:\ProgramData\ZXPS3\ directory.
The Delete log files button deletes the log files.
The Save Job Log Settings button saves the Job Log settings.

4: Printer Settings and Adjustments
Printing Preferences
Image Control

Note • Printed colors can appear different than displayed colors; the following controls allow you to optimize the printed results.
Allows you to adjust the image colors; these adjustments apply to the entire card, not just photographic image.

- Intensity - increase or decrease the image intensity by moving the Black, Yellow, Magenta, and Cyan slider bars left or right. This will change the overall lightness or darkness of the image. Move the slider to the right (0 to 100) to increase the intensity and to the left (0 to -100) to decrease the intensity. Note that color ribbon wrinkling can be eliminated by reducing the intensity.
Use the Restore Defaults button to reset the settings to the driver defaults.
Encoding Tab
The Encoding tab dialog box is for setting Magnetic Encoder parameters. This feature is not enabled if the printer does not have the magnetic encoder option.
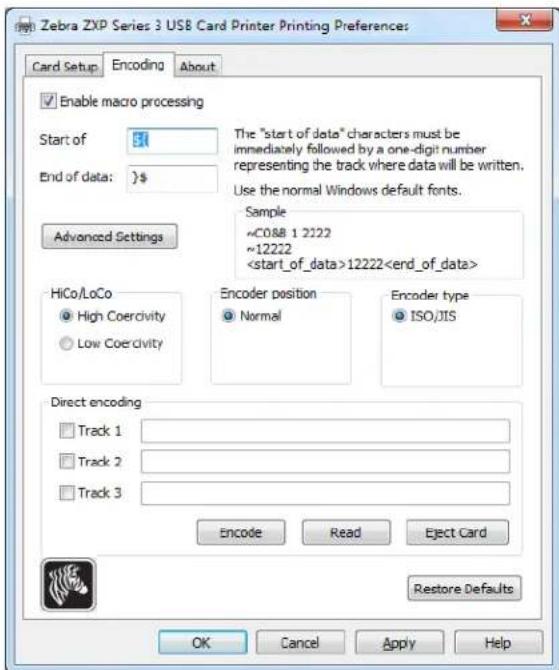
- Enable macro processing - This option is used to set the encoding preamble and other magnetic encoder parameters.
- Start of Data - Beginning of the data string for the encoder. Note that Start of Data characters must be immediately followed by a one-digit number representing desired track where the data will be written. Use the normal Windows default fonts.
- End of Data - Ending of the data string for the encoder.
- Advanced Settings - Click on the Advanced Settings button for additional encoding options; for details, see Advanced Settings on page 67.
- HiCo/LoCo - Select the type of coercivity of magnetic stripe cards to be used.
• Encoder Position - Select the printer encoder position: Normal.
- Encoder Type - Select the type of encoder: ISO/JIS. Note that JIS is not implemented.

4: Printer Settings and Adjustments
Printing Preferences
- Direct Encoding - For writing data and reading encoded data.

Track selection:
- To read encoded data: Click on the checkboxes to select the desired track(s), click on the Read button, and validate the data read.
- To write data: Click on the checkboxes to select the desired track(s), enter the data to be written, and click on the Encode button.
- To eject the card: Click on the Eject Card button to eject the card.
The Restore Defaults button to reset the settings to the original values.
Advanced Settings
Advanced Settings provides advanced configuration capabilities and tools to manage magnetic encoder operation. This option is primarily used for Non-ISO encoding.

- Track: Select the track you want to configure.
- Track Settings:
- Mode: Select ISO1, ISO2, ISO3, 3 bit, 4 bit, 5 bit, 6 bit, or 7 bit.
- Density: Select 75 bpi or 210 bpi for the tracks.
- Start/Stop Character (For Non-ISO encoding only): Enter an ASCII value for the Start and Stop characters.
- Encoding Start Position (For Non-ISO encoding only): Enter the encoding start position in millimeters (mm).
- Character Parity (For Non-ISO encoding only): Choose the Character Parity you want to work with -- No parity, Even parity, or Odd parity.
- LRC Parity (For Non-ISO encoding only): Choose the LRC Parity you want to work with -- No parity, Even parity, or Odd parity.
Click the Restore Defaults button to reset the settings to the original values.

4: Printer Settings and Adjustments
Printing Preferences
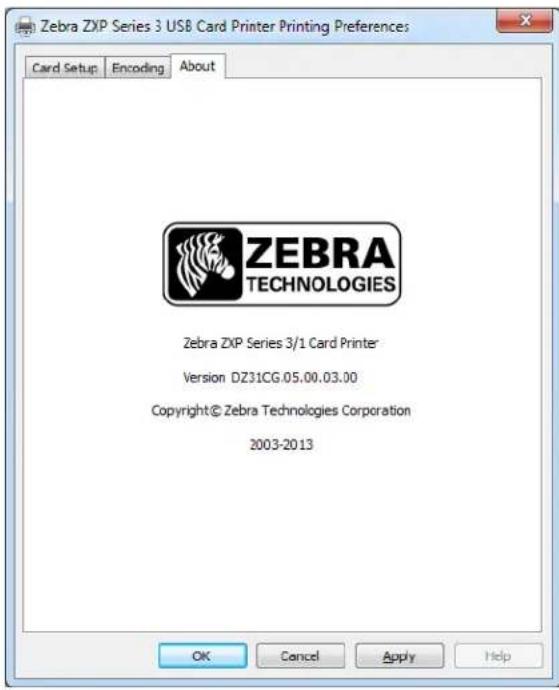
About Tab
This tab specifies the Printer Model, the Driver Version, and the Zebra Technologies Corporation Copyright.
Cleaning the System

Caution • PROTECT YOUR FACTORY WARRANTY!
The recommended maintenance procedures must be performed to maintain your factory warranty. Other than the recommended cleaning procedures described in this manual, allow only Zebra authorized technicians to service the ZXP Series 3 Card Printer.
NEVER loosen, tighten, adjust, or bend, etc., a part or cable inside the printer.
NEVER use a high-pressure air compressor to remove particles in the printer.
When to Clean
Clean the Printer when:
• Print quality has been degraded.
• The LCD panel displays the message CLEAN PRINTER.
How to Clean
Step 1. Place the printer power switch in the ON ( | ) position, and then press and hold the Multi-Function Control Button for 5 seconds.
Step 2. When the cleaning cycle is initiated, the LCD message REMOVE RIBBON THEN CLOSE LID will display.

Step 3. After the ribbon is removed and the lid is closed, the message EMPTY FEEDER THEN CLOSE COVER will display.
Step 4. If the lid is opened and closed without removing the ribbon, the REMOVE RIBBON THEN CLOSE LID message will remain.
Step 5. Once the ribbon is removed and the cover is closed, the firmware will eject any card inside the printer. The message EJECTING CARD will display.
Step 6. The LCD will display FEED LONG CLEANING CARD. When the presence of the cleaning card is sensed, the rollers will take the card into the printer.
Step 7. When the cleaning process is done, the printer will eject the cleaning card. If the card sensor still senses the cleaning card, the message REMOVE LONG CLEANING CARD will display.
Step 8. Once the long cleaning card is no longer sensed by the card exit sensor, the message INSERT FEEDER CLEANING CARD will display. Open the feeder cover, and insert the feeder cleaning card.
Step 9. When the feeder cleaning card has been sensed by the feeder card sensor, the message CLOSE FEEDER COVER will display.
Step 10. When feeder cleaning is complete, the message REMOVE FEEDER CLEANING CARD will display.
Step 11. After the card is removed, the LCD will display READY. You may now reload the ribbon and cards and continue printing.
Cleaning the Printhead
Use of the cleaning cards will normally do an adequate job of cleaning the printer. However, a separate Printhead cleaning, using swabs, can remove more stubborn deposits when print anomalies persist. To avoid deposits, only use foam-tipped swabs.

Caution • Never use a sharp object to scrape deposits from the printhead. Permanent damage to the printhead will result
Step 1. Place the printer power switch in the OFF (O) position.
Step 2. Open the printer lid by pressing the cover release button, and open the cover fully to reveal the Printhead mounted on the inside of the cover.

natural_image
Technical line drawing of a mechanical device interior showing internal components and a hand adjusting parts (no text or symbols)Step 3. Clean the Printhead by moving an alcohol-moistened swab tip side-to-side across the Printhead elements. Only use moderate force.
Step 4. Allow two to three minutes for the printhead to dry before placing the printer power switch in the ON ( | ) position.
Step 5. To reorder swabs, refer to the Media List on the Windows Drivers and User Documentation CD supplied with this printer.

natural_image
Stylized white animal head logo on gray background (no text or symbols)Troubleshooting
Introduction
The objective of troubleshooting is to relate a problem to an associated assembly or system function, in order to most efficiently isolate and repair the problem. Typically, this involves determining the failure symptom and then checking one or more possible causes of the failure.
In general, for a given failure symptom one or more possible causes are listed, with suggested corrective action to take. These causes should be checked and corrective actions taken in the order given; they are listed in order of likelihood and complexity.
6: Troubleshooting
Troubleshooting Procedures
Troubleshooting Procedures
LCD Panel Warnings and Error Messages
The following tables show possible causes and solutions to symptoms related to improper operation. Check the table when experiencing any loss of operation or print quality.
| PANEL WARNINGS (printer will still operate) | ||
| Problem / Symptom Description or Cause Possible Solution | Note | |
| CHECKING RIBBON Printer is determining type of ribbon installed. | No action required -- status message only. | |
| CLEAN PRINTER | Printer cleaning required. | Refer toCleaning the Systemon page 69. |
| CLOSE LID The lid is open. Make sure that the lid is completely | and securely closed. | |
| ENCODING ERROR May be incorrect card type. Check that you are using the correct magnetic card type (for low or high coercivity encoding). | ||
| FLASH ERROR | A flash error occurred. | Reset the Printer, and try printing the card again. |
| INVALID MAGNETIC DATA | The magnetic data may be invalid. | Check data format. |
| READING ERROR | A reading error occurred. | Reset the Printer, and try printing the card again. |
Note: If the problem persists, contact Technical Support; see Worldwide Support on page 127.
| ERROR MESSAGES (printer will not operate) | ||
| Problem / Symptom Description or Cause Possible Solution | Note | |
| CHECK RIBBON Wrong type of ribbon | on may be installed. Ribbon for PIXX will not work.Ribbon may be improperly installed. | Install proper ribbon.Reload ribbon cartridge. Refer to Loading Ribbon Cartridge on page 32. |
| COMMAND ERROR | A command error occurred. | Reset the Printer, and try printing the card again. |
| COVER OPEN The cover is open. Make sure that the cover is | completely and securely closed. | |
| LID OPEN The lid is open. Make sure that the lid is completely | and securely closed. | |
| MECHANICAL ERROR Check that you are using the correct card type.Check that ribbon is loaded correctly.Check for card jam in card flipper. | See Technical Specifications on page 85.Refer to Loading Ribbon Cartridge on page 32 for details.Open the lid, release the card feeder by pressing the finger tab lever to the left of the card thickness adjustment (arrow below), raise the card feeder, and remove any jammed cards from the card flipper. Note that you may need to rotate the card flipper by hand to access the jammed cards. | |
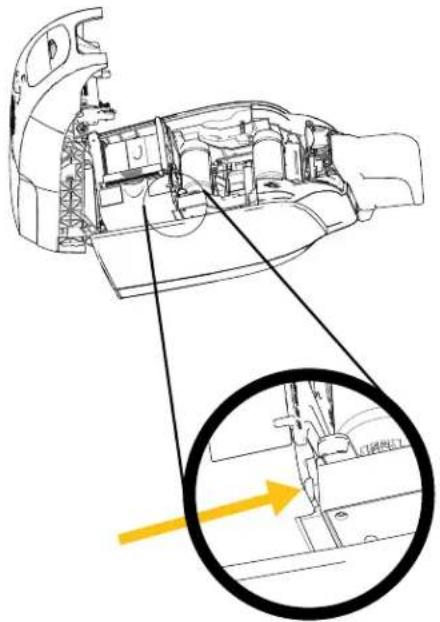 | ||
Note: If the problem persists, contact Technical Support; see Worldwide Support on page 127.
6: Troubleshooting
Troubleshooting Procedures
| ERROR MESSAGES (printer will not operate) | ||
| Problem / Symptom Description or Cause Possible Solution | Note | |
| MECHANICAL ERROR(continued) | The card feeder feeds two cards completely onto the feeder.The card feeder partially feeds the second card, thereby blocking flipper operation.The card feeder does not feed a card. This may be because two cards are stuck together or a leading edge is damaged.The card feeder does not feed a card; and it is not due to stuck-together cards, damaged cards, or cards that were not fanned. | Calibrate the Card Load Sensor via the !SAP 1 command. For command implementation, refer toToolson page 49.The card thickness adjustment (arrow below) should be closed one or two clicks, one click at a time.Remove the card, fan the card stack, and return the cards to the card feeder.The card thickness adjustment (arrow below) should be opened one or two clicks, one click at a time. |
| OUT OF CARDS Check for cards in | the card feeder.Card did not feed. | If no cards present, load cards; then press the Panel Button for 1 second. The printing job will restart.1. Verify that the card thickness adjustment (arrow below) is set to the thickness of the cards being used.2. Fan the card stack to ensure that cards are not stuck together.3. Remove the first card in the stack, and check if the edge is damaged; discard if it is.4. Open the card thickness adjustment one or two detent clicks. |
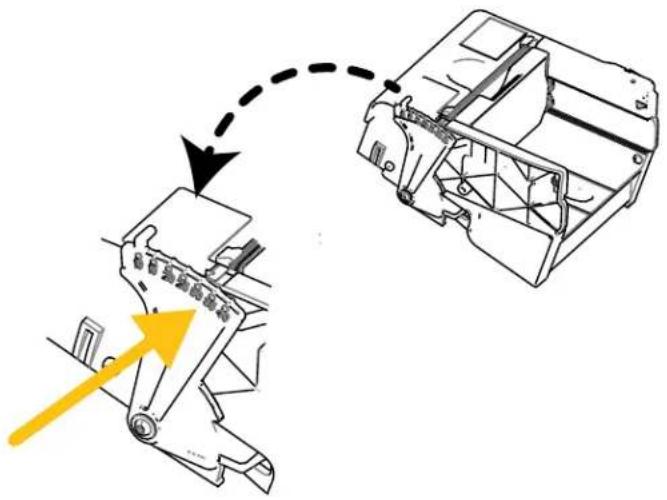 | ||
Note: If the problem persists, contact Technical Support; see Worldwide Support on page 127.
| ERROR MESSAGES (printer will not operate) | ||
| Problem / Symptom Description or Cause Possible Solution | Note | |
| OUT OF RIBBON Check ribbon. May be defective or entirely used. | Load a new ribbon cartridge. Refer to Loading Ribbon Cartridge on page 32 for details. | |
| PARAMETERS ERROR | A parameter error occurred. | Reset the Printer, and try printing the card again. |
Note: If the problem persists, contact Technical Support; see Worldwide Support on page 127.
6: Troubleshooting
Troubleshooting Procedures
Print Quality Issues
This section will help you resolve print quality problems.
The print quality is dependent on several factors. The two most important factors that will increase your print quality are cleanliness and card stock.
To diagnose and fix print quality problems, follow the troubleshooting procedures below:
Small spots 79
Non-printing horizontal lines (white) 80
Pale or inconsistent results - - - - - - - - - - - - - - - - 81
Blurry printed image - - - - - - - - - - - - - - - - - - 82
No printing 83
Example • Small spots
Small spots appear on the printed card with a non-printed area or a different color.

natural_image
Abstract pattern with diagonal striped background and scattered white shapes (no text or symbols)Possible Cause:
- Contamination on the card surface.
Solutions:
- Check that cards are stored in a dust free environment.
- Use a different supply of cards.
Possible Cause:
- Dust inside the printer and/or dirty Cleaning Roller.
Solutions:
- Clean the printer. Refer to Cleaning the System on page 69.
- Check that the protective cover was removed from the ribbon cartridge cleaning roller. Refer to Loading Ribbon Cartridge on page 32.
6: Troubleshooting
Troubleshooting Procedures
Example • Non-printing horizontal lines (white)
There are non-printing horizontal lines (white) on the card surfaces.
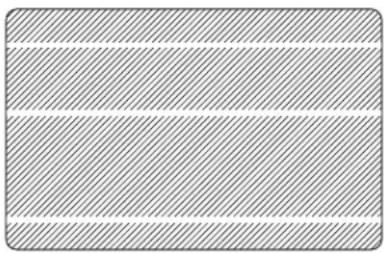
natural_image
Pure geometric pattern with diagonal hatching and horizontal lines, no text or symbols presentPossible Cause:
- Ribbon cartridge is not correctly positioned.
Solutions:
- Ensure that the ribbon is properly rolled onto the ribbon cores of the cartridge and that there are no wrinkles in the ribbon.
- Replace ribbon cartridge. Refer to Loading Ribbon Cartridge on page 32.
Possible Cause:
- Printhead is dirty.
Solutions:
- Clean the Printhead. Refer to Cleaning the Printhead on page 71.
Possible Cause:
- Printhead elements are damaged (e.g., scratched or burnt).
Solutions:
- Call Zebra Customer Service for Printhead replacement information; see Worldwide Support on page 127.
Possible Cause:
- Loose printhead data cable connection.
Solutions:
- Ensure that the cable connection at the Printhead is secure.
Example • Pale or inconsistent results
Printing shows very pale or inconsistent results.

natural_image
Plain rectangular background with diagonal striped pattern (no text or symbols)Possible Cause:
- Ribbon cartridge have been stored improperly or is damaged.
Solution:
- Change ribbon cartridge, and print again. Refer to Loading Ribbon Cartridge on page 32.
Possible Cause:
- Cards may not meet specifications. Refer to Technical Specifications on page 85.
Solution:
- Use a different supply of cards.
Possible Cause:
- Dust or embedded contamination on elements of the Printhead.
Solution:
- Clean the Printhead. Refer to Cleaning the Printhead on page 71.
Possible Cause:
- Printing on wrong side of writable back cards.
Solution:
- Reverse direction of cards in feeder.
Possible Cause:
- Improperly adjusted print intensity/density.
Solution:
- Adjust the print intensity/density. Refer to Image Control on page 64.
6: Troubleshooting
Troubleshooting Procedures
Example • Blurry printed image
Printing shows blurry printed image.

Possible Cause:
- Ribbon cartridge may not be correctly positioned.
Solution:
- Check that the ribbon is properly rolled onto the ribbon cores of the cartridge, with no wrinkles.
- Replace ribbon cartridge, making sure it locks in place, and print again. Refer to Loading Ribbon Cartridge on page 32.
Possible Cause:
- Ribbon may not be synchronized on the correct color panel position.
Solution:
- Open lid, then close lid to synchronize ribbon.
Possible Cause:
- Cards may not meet specifications. Refer to Technical Specifications on page 85.
Solution:
- Use a different supply of cards.
Possible Cause:
- Dust or embedded contamination inside the printer.
Solution:
- Clean the Rollers and the Printhead. Refer to Cleaning the System on page 69 and Cleaning the Printhead on page 71 respectively.
Example • No printing
No printing on the card.

natural_image
Empty white rectangle with black border (no text or symbols)Possible Cause:
- Ribbon cartridge may not be installed in the printer.
Solution:
- Check for ribbon cartridge in the printer. Refer to Loading Ribbon Cartridge on page 32.
Possible Cause:
- Cards may not meet specifications. Refer to Technical Specifications on page 85.
Solution:
- Use a different supply of cards.
Possible Cause:
- Cable on Printhead may be disconnected.
- Printhead elements may be scratched or burnt.
Solution:
- Call Service for Printhead repair or replacement information; see Worldwide Support on page 127.

natural_image
Stylized white animal head logo on gray background (no text or symbols)Technical Specifications
Printer Specifications
Specifications are provided for reference and are based on printer tests using Zebra brand consumables. Results may vary in actual application settings or when using other than recommended Zebra supplies. Zebra recommends always qualifying any application with thorough testing.
Standard Features
- T r u e ^® iX Series ^TM ZXPu3 high-performance ribbons with intelligent media technology
- High capacity, Eco-Friendly Load-N-Go ^TM drop-in ribbon cartridges
• Z R ^TM a host-based image processing
• Auto calibration of ribbon - USB V2.0 connectivity
- Microsoft Certified Windows drivers
• Energy Star Certified - Print Touch NFC tag for online Printer documentation access
• 100-card covered feeder (30 mil)
• 45-card capacity output hopper (30 mil)
• 16-character LCD operator control display
• 300 dpi (11.8 dots/mm) print resolution - Two-year warranty on printer
- Two-year (unlimited passes) original printhead
• One-year hot swap (U.S. only) - Secure lock slot
7: Technical Specifications
Printer Specifications
Printing Specifications
• Dye-sublimation thermal transfer direct to card
• Full color or monochrome printing
- Single- or dual-sided printing
- Edge-to-edge printing on standard CR-80 media
Printing Throughput
Printing throughput (cards/hour) based on click-to-drop printing, average print coverage, with USB connectivity. Times may vary depending on the computer and configurations.
- 700 cph monochrome single-sided
• 195 cph single-sided YMCKO
• 140 cph dual-sided YMCKOK
Encoding Options and Specifications
- Magnetic stripe encoder – ISO 7811 (new and re-encoded, tracks 1,2, and 3, high and low coercivity, stripe down, 30-mil card only
• * Smart card contact station ISO 7816 - * Combined MIFARE ^ ISO 14443 (13.56 MHz) and ISO 7816 Contact Encoder Specifications – PC/SC and EMV level 1 certified (50-card capacity [30 mil] external output hopper)
• Encoding over USB and Ethernet
Optional Features
• * Built-in 10/100 Ethernet connectivity
- * CardSense™ single-card feed mode
- ZebraCare™ extended product warranty programs
- * Lockable enclosure with obscure output bin
Communications Interfaces
- USB V2.0 (cable included) - standard
• * Built-in 10/100 Ethernet - optional
Card Compatibility
NOTE: For optimum print quality and printer performance, use of Zebra genuine supplies is recommended.
• Card Thickness: 10-40 mil
- Card Size: CR-80, ISO 7810 format, Type ID-1, 2.12" (54 mm) x 3.38" (86 mm)
- Card Material: PVC and PVC composite
• Smart Card Contact: ISO 7816-1,2,3,4
- Smart Card Contactless: MIFARE® ISO 14443A/B
- Spot color/monochrome print image only is supported on < 20 mil card thickness
* Field upgradeable options
Supplies Specifications
The ZXP Series 3 printer is designed to work only with Zebra True Colours ix Series, ZXP Series 3 high-performance ribbons.
- Zebra ix Series media-intelligent technology automatically detects and authenticates the ribbon
- Integrated cleaning roller included on each ribbon
• Media Starter Kit (single-sided): 1 YMCKO ribbon, 200 30-mil PVC cards, 1 cleaning roll
• Cleaning Kit: 4 print engine cleaning cards and 4 feeder cleaning cards, 1000 images
True Colours ix Series, ZXP Series 3 Ribbon options:
| Ribbon Description | Standard Cartridge Image Count | New High Capacity Eco Cartridge Image Count (1) |
| YMCKO 200 280 | ||
| 1/2 YMCKO 250 400 | ||
| YMCKOK 265 230 | ||
| KdO 500 700 | ||
| KrO 500 700 | ||
| Black Monochrome 1000 2000 | ||
| Red Monochrome 1000 1700 | ||
| Blue Monochrome | 1000 1700 | |
| Gold Monochrome | 1000 1600 | |
| Silver Monochrome | 1000 1600 | |
| White Monochrome | 850 | 1400 |
(1) Requires Firmware Release 2.0 or greater
Preventative Maintenance
Zebra recommends cleaning the printer on a regular basis using standard Zebra printer parts and cleaning supplies; see Section 5 for details.
Drivers Supported
Microsoft Windows Certified Printer Drivers:
- Windows XP, Vista, Server 2003, Server 2008
- Windows 7 (32-bit and 64-bit compatible)
- Windows 8 (32-bit and 64-bit compatible)
Refer to http://www.zebra.com for up-to-date listing of supported environments
Physical Specifications (standard model)
• Height: 9.3 in (236 mm)
• Width: 7.9 in (200.7 mm)
• Depth: 14.5 in (368 mm)
• Weight: 12.2 lbs (5.53 kg)
7: Technical Specifications
Printer Specifications
Electrical Specifications
• Auto-switching single-phase AC power
- Operating range: 90-132VAC and 190-264VAC RMS.
• Frequency range: 47-63 Hz.
- Power requirement is 100W max continuous and 607W peak (for 450 output power
- FCC Class A
Environmental Specifications
- Operating Temperature: 60^ to 86^ (15°C to/30°C)
- Storage Temperature: 23^ to 158^ (-5°C to 70°C)
- Operating Humidity: 20% to 65% non-condensing
• Storage Humidity: 20% to 70% non-condensing
• Media Storage: - Temperature: 41F to 77F (5C to 30C)
- Humidity: 35% to 65% non-condensing
- Store in dark location
Agency Approvals
Zebra ZXP Series 3 Card Printer complies with following applicable directives and standards for the ITE: Residential, Commercial & Light Industry environments
• For US/Canada/Mexico/Australia&NZ
- FCC Class A, cfr47, Part 15 Subpart J
- FCC 15.257 2008, Part 15 Subpart C
- Canadian STD RSS-210
- NOM-ETL (Mexico)
- IEC 60950-1:2005+A1:2009 Safety Standard (TUV & NRTL)
- C-Tick (Australia) Electromagnetic Radiation Standard
• For Europe :
- Applicable Directives and Supporting Standards:
2004/108/EC EMC Directive, EN55022:2010 Class A, EN55024:2010, EN61000-3-2:2006+A2:2009, EN61000-3-3:2008, 2006/95/EC LVD Directive, EN60950-1:2006+A11:2009+A1:2010+A12:2011, CB Scheme
- RFID Enabled
Applicable Directives and Supporting Standards:
99/5/EC R&TTE Directive, EN 301 489-3 V1.4.1, EN 300 330 V1.5.1
ISO Standard Card Dimensions
Dimensions for Plain Card ISO Standard 7810
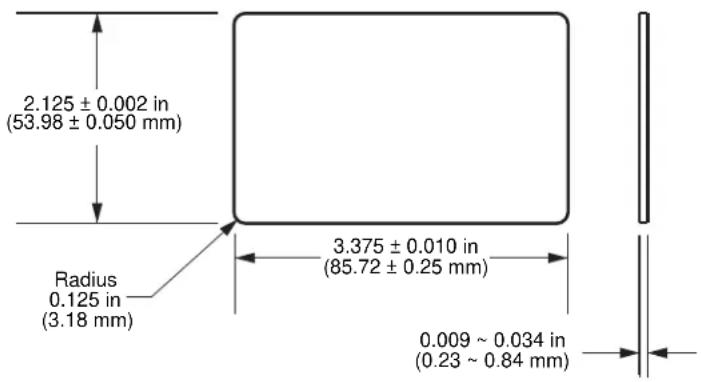
Dimensions for Magnetic Stripe Card ISO Standard 7811

Contact Location for Smart Card ISO Standard 7816

other
| Dimension | Value (in mm) | |---|---| | Overall Width | 0.757 | | Height | 1.124 | | Base Width | 0.403 | | Total Width | 0.782 | | Total Height | 19.23 | | Total Base Width | 28.55 | | Total Height | 10.25 | | Total Base Height | 19.87 |Compliance Information
FCC Compliance Statement
This device complies with Part 15 rules. Operation is subject to the following two conditions:
- This device may not cause harmful interference, and
- This device must accept any interference received, including interference that may cause undesired operation.
This equipment has been tested and found to comply with the limits for Class A Digital Devices, pursuant to Part 15 of the FCC Rules. These limits are designed to provide reasonable protection against harmful interference when the equipment is operated in a commercial environment. This equipment generates, uses, and can radiate radio frequency energy and, if not installed and used in accordance with the product manuals, may cause harmful interference to radio communications. Operation of this equipment in a residential area is likely to cause harmful interference, in which case the user will be required to correct the interference at his own expense.
The user is cautioned that any changes or modifications not expressly approved by Zebra Technologies could void the user's authority to operate the equipment. To ensure compliance, this printer must be used with Shielded Communication Cables.
FCC Radiation Exposure Statement (RLAN)
This equipment complies with FCC radiation exposure limits set forth for an uncontrolled environment.
Important
- The radio must be installed with a minimum 20cm separation between the user and the antenna.
- The radio must not be co-located or used in simultaneous transmitting condition with another radio.
- The host system shall have a label to indicate that the system contains a certified module. An example is "Contains FCC ID : XXXXX, IC ID: YYYYY".
Canadian DOC Compliance Statement
This Class A digital apparatus complies with Canadian ICES-003.
European Union and EFTA
The Class 2 RLAN may be operated in the following countries with the restrictions and limitations indicated below.
| AT BE BG CY CZ DK EE | ||||||
| FI FR DE GR HU IE IT | ||||||
| LV LT LU MT NL | PL PT | |||||
| RO SK SI | ES | SE GB | ||||
| IS | LI | NO CH | ||||

Important Notice:
Operation in band 5150 - 5350 MHz shall be restricted to indoor use.
Japanese Notification
日本:総務省(MIC)認証マーク
natural_image
Stylized white animal head logo on gray background (no text or symbols)APPENDIX A
Advanced Sharing
Printer Sharing Configurations
This section covers:
Microsoft Driver Support Matrix 94
Client / Server Printer sharing support Matrix 95
Microsoft Driver Support Matrix
| Supported Windows Drivers Microsoft OS ^1 | One-to-One | One-to-Many | Many-to-One | Many-to-Many | Printer Pooling ^2 |
| 1 Printer - 1 Host | 1 Host - Many Printers | Multiple Hosts (Drivers) - One Printer | Multiple Hosts (Drivers) - Many Printers | ||
| Windows 8 (32-bit) Yes | Yes Yes Yes Yes | ||||
| Windows 8 (64-bit) Yes | Yes Yes Yes Yes | ||||
| Server 2008 (64-bit) Yes | Yes Yes Yes Yes | ||||
| Server 2008 (32-bit) Yes | Yes Yes Yes Yes Yes | ||||
| Server 2003 Yes Yes Yes | |||||
| Windows 7 (64-bit) Yes | Yes Yes Yes Yes | ||||
| Windows 7 (32-bit) Yes | Yes Yes Yes Yes | ||||
| Vista (64-bit) | Yes | ||||
| Vista (32-bit) | Yes | ||||
| Windows XP | Yes | Yes | Yes | Yes | Yes |
Client / Server Printer sharing support Matrix
The following Matrix shows the tested configurations between various Microsoft OS in a shared Client / Server print environment. See http://www.zebra.com for the latest driver and supported configurations.
| Sharing Matrix Windows OS Driver Clients | |||||
| Windows OS Server (Driver Host) | Win 8 (32-bit) | Win 8 (64-bit) | Win 7 (32-bit) | Win 7 (64-bit) | Win XP |
| Windows 8 (32-bit) Yes | Yes Yes Yes | ||||
| Windows 8 (64-bit) | Yes Yes Yes | Yes Yes | |||
| Server 2012 | Yes Yes Yes | Yes Yes | |||
| Server 2008 (64-bit) Yes | Yes Yes Yes | Yes | |||
| Server 2008 (32-bit) | Yes Yes Yes | Yes Yes | |||
| Server 2003 | Yes Yes Yes | ||||
| Windows 7 (64-bit) | Yes Yes Yes | ||||
| Windows 7 (32-bit) | Yes Yes | ||||
| Windows XP(All Editions)SP 2 and above | Yes | ||||
1 Driver installed on individual Client PC's
2 Printer Pooling Sharing not supported.
Advanced Sharing Settings
This section covers the following Advanced Sharing Settings:
Installing and setting up a Windows 2008 Server----96
Advanced Sharing Settings for Windows Server 2008 R2- - - - - - - - - - 97
Home or Work Network Settings: 97
Public Network Settings: 98
Advanced Sharing Settings for Windows Server 2008 - - - - - - - - - 99
Advanced Sharing Settings for Windows 7----100
Home or Work Network settings: 100
Public Network Settings: 101
Installing and setting up a Windows 2008 Server
- Install a new server OS, Windows 2008 Server 64-bit.
- Log in as Admin user with password.
- Check the following services by running the command "Services.msc" from the Start->Run menu, and make sure the following services are started/running:
a. SSDP Discovery –
b. Function discovery resource publication.
c. UPnP device host-
d. DNS Client.
- The services mentioned above should be running to ensure that the following network settings are saved and take effect.
Advanced Sharing Settings for Windows Server 2008 R2
Home or Work Network Settings:
Change sharing options for different network profiles
Windows creates a separate network profile for each network you use. You can choose specific options for each profile.
Home or Work

Network discovery
When network discovery is on, this computer can see other network computers and devices and is visible to other network computers. What is network discovery?
Turn on network discovery
Turn off network discovery
File and printer sharing
When file and printer sharing is on, files and printers that you have shared from this computer can be accessed by people on the network.
Turn on file and printer sharing
Turn off file and printer sharing
Public folder sharing
When Public folder sharing is on, people on the network, including homegroup members, can access files in the Public folders. What are the Public folders?
Turn on sharing so anyone with network access can read and write files in the Public folders
Turn off Public folder sharing (people logged on to this computer can still access these folders)
Password protected sharing
When password protected sharing is on, only people who have a user account and password on this computer can access shared files, printers attached to this computer, and the Public folders. To give other people access, you must turn off password protected sharing.
Turn on password protected sharing
Turn off password protected sharing
Public Network Settings:
Public (current profile)

Network discovery
When network discovery is on, this computer can see other network computers and devices and is visible to other network computers. What is network discovery?
Turn on network discovery
Turn off network discovery
File and printer sharing
When file and printer sharing is on, files and printers that you have shared from this computer can be accessed by people on the network.
Turn on file and printer sharing
Turn off file and printer sharing
Public folder sharing
When Public folder sharing is on, people on the network, including homegroup members, can access files in the Public folders. What are the Public folders?
Turn on sharing so anyone with network access can read and write files in the Public folders
Turn off Public folder sharing (people logged on to this computer can still access these folders)
Password protected sharing
When password protected sharing is on, only people who have a user account and password on this computer can access shared files, printers attached to this computer, and the Public folders. To give other people access, you must turn off password protected sharing.
Turn on password protected sharing
Turn off password protected sharing
Advanced Sharing Settings for Windows Server 2008
| Network (Public network) | Customize | |
| Access | Local only | |
| Connection | Local Area Connection | View status |
23 Sharing and Discovery
| Network discovery | Custom |
| File sharing | On |
| Public folder sharing | On (password required) |
| Printer sharing | On (password required) |
| Password protected sharing | On |
Show me all the files and folders I am sharing
Show me all the shared network folders on this computer
Advanced Sharing Settings for Windows 7
Home or Work Network settings:
Network discovery
When network discovery is on, this computer can see other network computers and devices and is visible to other network computers. What is network discovery?
Turn on network discovery
Turn off network discovery
File and printer sharing
When file and printer sharing is on, files and printers that you have shared from this computer can be accessed by people on the network.
Turn on file and printer sharing
Turn off file and printer sharing
Public folder sharing
When Public folder sharing is on, people on the network, including homegroup members, can access files in the Public folders. What are the Public folders?
Turn on sharing so anyone with network access can read and write files in the Public folders
Turn off Public folder sharing (people logged on to this computer can still access these folders)
Media streaming
When media streaming is on, people and devices on the network can access pictures, music, and videos on this computer. This computer can also find media on the network.
Media streaming is on.
Choose media streaming options...
File sharing connections
Windows 7 uses 128-bit encryption to help protect file sharing connections. Some devices don't support 128-bit encryption and must use 40- or 56-bit encryption.
Use 128-bit encryption to help protect file sharing connections (recommended)
- Enable file sharing for devices that use 40- or 56-bit encryption
Password protected sharing
When password protected sharing is on, only people who have a user account and password on this computer can access shared files, printers attached to this computer, and the Public folders. To give other people access, you must turn off password protected sharing.
Turn on password protected sharing
© Turn off password protected sharing
HomeGroup connections
Typically, Windows manages the connections to other homegroup computers. But if you have the same user accounts and passwords on all of your computers, you can have HomeGroup use your account instead. Help me decide
Allow Windows to manage homegroup connections (recommended)
Use user accounts and passwords to connect to other computers
Public Network Settings:
Network discovery
When network discovery is on, this computer can see other network computers and devices and is visible to other network computers. What is network discovery?
Turn on network discovery
Turn off network discovery
File and printer sharing
When file and printer sharing is on, files and printers that you have shared from this computer can be accessed by people on the network.
Turn on file and printer sharing
Turn off file and printer sharing
Public folder sharing
When Public folder sharing is on, people on the network, including homegroup members, can access files in the Public folders. What are the Public folders?
Turn on sharing so anyone with network access can read and write files in the Public folders
Turn off Public folder sharing (people logged on to this computer can still access these folders)
A: Advanced Sharing
Media streaming
When media streaming is on, people and devices on the network can access pictures, music, and videos on this computer. This computer can also find media on the network.
Choose media streaming options...
File sharing connections
Windows 7 uses 128-bit encryption to help protect file sharing connections. Some devices don't support 128-bit encryption and must use 40- or 56-bit encryption.
Use 128-bit encryption to help protect file sharing connections (recommended)
○ Enable file sharing for devices that use 40- or 56-bit encryption
Password protected sharing
When password protected sharing is on, only people who have a user account and password on this computer can access shared files, printers attached to this computer, and the Public folders. To give other people access, you must turn off password protected sharing.
Turn on password protected sharing
Turn off password protected sharing
Appendix B
Magnetic Encoder Option
Introduction
This section contains information on the additional operations of the ZXP Series 3 Card Printer with an optional Magnetic Encoder.
This section covers:
Encoder Settings (Driver) 104
Media Loading Orientation.... 104
Magnetic Encoder Cleaning 104
Magnetic Encoding Type 105
Encoder Settings (Driver)
The Encoder Settings dialog box is used for setting various Magnetic Encoder parameters. This feature is not enabled if the printer does not have the magnetic encoder option; see Encoding Tab on page 65 for details.
Media Loading Orientation

Caution • ONLY USE cards that comply with ISO 7810 & 7811 standards for magnetic stripe cards. The magnetic stripe must be flush to the surface of the card to work properly. Never use cards which have taped-on magnetic stripes.

Note • Zebra-approved HiCo & LoCo PVC cards are available. (Reference ZXP Series 3 Card Printer Media List.)
When loading cards with magnetic stripes into the card feeder, please ensure that the magnetic stripe is facing the left side of the printer, and closest to the bottom edge of the card feeder.
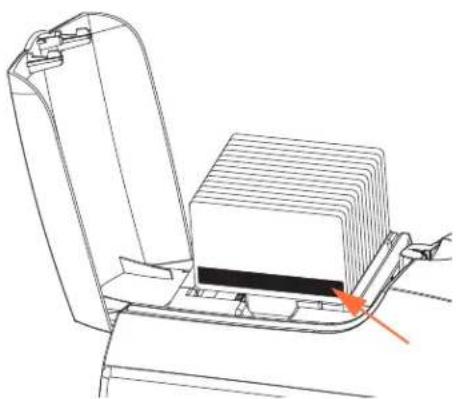
natural_image
Technical line drawing of a mechanical component with a highlighted section and an orange arrow pointing to a specific area (no text or symbols present)Magnetic Encoder Cleaning
Use the standard cleaning card process as described in Section 5, Cleaning. This cleans the most important parts of the printer; including the Printhead, Transport Roller, and Magnetic Stripe Encoder.
Magnetic Encoding Type
ISO (Default)
The encoder reads and writes standard ISO track data formats in standard ISO track locations. The following shows the three standard ISO tracks.

Each track can be encoded and decoded with ASCII characters in the standard default ISO data formats:
| Track Density (BPI) | Bits per character | Character parity | Length (characters) | LRC parity | Start sentinel | End sentinel | Start sentinel offset |
| 1 210 7 Odd 76 Even % ? 0.293" (7.4 mm) | |||||||
| 2 | 75 | 5 | Odd | 37 | Even | ; | ? 0.293" (7.4 mm) |
| 3 | 210 | 5 | Odd | 104 | Even | ; | ? 0.293" (7.4 mm) |
The magnetic encoder can read or encode up to 3 tracks of digital information onto CR-80 cards incorporating a HiCo or LoCo magnetic stripe in the ISO 7811 format.
Encoding for the three tracks uses the ISO 7811 format.
- Track 1 uses 210 BPI (bits per inch) encoding in the International Air Transport Association (IATA) format of 79 alphanumeric characters, at 7 bits per character.
- Track 2 uses 75 BPI encoding to store 40 numeric characters at 5 bits per character in American Banking Association (ABA) format.
- Track 3 uses 210 BPI encoding of 107 numeric characters at 5 bits per character in THRIFT format.
The ISO data formats include a preamble (all zeros), a start character, data (7-bit or 5-bit as specified by ISO), a stop character, and a longitudinal redundancy check (LRC) character. The 7-bit data format has 6 bits of encoded data and a parity bit. The 5-bit data format has 4 bits of encoded data and a parity bit.
The ISO data formats include a data field separator (or delimiter) that allows parsing of the encoded track data. An example of separate data fields would be the ABA data format (Track 2) that includes a Primary Account Number (PAN) field and an account information field (for expiration date, country code, etc.).

natural_image
Stylized white animal head logo on gray background (no text or symbols)APPENDIX C
Smart Card Options
Introduction
This Appendix contains information on the additional operations of a Printer equipped with one or more of the available Smart Card options
Smart Cards can have a built-in microcomputer and/or memory to store fingerprints, voice recognition patterns, medical records, and other such data. All other printer operations remain the same as the standard models.
This section covers:
Card Hopper 108
Contact Smart Cards 109
Contactless Smart Cards....110
Contact Station 111
Card Hopper
The Card Hopper is positioned on the front of the Printer and receives the printed cards.
Step 1. Install the Card Hopper by inserting the four tabs on the hopper into the four slots on the front of the Printer.

natural_image
Technical line drawing of a mechanical device interior with a highlighted component (no text or symbols)Step 2. Ensure that the Card Hopper locks securely in place.

natural_image
Technical line drawing of a mechanical assembly (no text or symbols visible)Contact Smart Cards
Contact Smart Cards have a pad of contacts on the surface of the card that connects to the circuitry embedded into the card.
Encoding data onto Smart Cards and reading the data previously encoded on them is totally under control of the application software; no operator action is required. If you experience any problems with encoding or reading data, refer to the users manual or other documentation for the application software.
All other printer operations remain the same as the standard models.
Media Loading Orientation for Contact Smart Cards
Place the cards in the Card Feeder in the correct orientation with the gold-plated Smart Card contacts at the top surface of the cards as shown. Ensure that the cards are seated properly in the feeder.

natural_image
Line drawing of a device interior with orange arrows indicating a process or operation, no text or symbols present.Printing on Contact Smart Cards
When designing material to be printed on Contact Smart Cards, be sure the printing will not be on the contact area.
Contactless Smart Cards
Rather than using a contact pad, Contactless Smart Cards use various short-range radio technologies to “connect” to the printer. The printer moves the card to an antenna location on the card path, and the encoding or decoding occurs.
All other printer operations remain the same.
Media Loading Orientation for Contactless Smart Cards
For Contactless Smart Cards, orientation is not a consideration.
Printing on Contactless Smart Cards
When designing material to be printed on Contactless Smart Cards, be sure the printing will not be on the smart chip area; i.e., the printing on either side of the card must not be on top of or underneath the smart chip area.
By looking at an un-printed card very carefully, it is possible to the chip location (as in the figure on the left below). If you print in that area, results will be unsatisfactory (in the figure on the right, the “star” should have been a single solid color).

natural_image
Simple diagram with a gray square and an orange arrow pointing to it, on a white background (no text or symbols)
natural_image
Yellow star icon on white background, no text or symbols presentSmart Chip Location
Contact Station
Smart Card Interface
When a command to the printer interface sends a card to the Smart Card Contact Station, the printer connects the Smart Card Contact Station to the female DB-9 connector on the rear of the printer.

DB-9 Connector (detail)
An attached external Smart Card Programmer can be used to program Smart Card chips. The following table shows the Smart Card Contact Points.
| Pin | Smart Card Contact Points | DB-9 | Smart Card Contact Points |
| 1 C1 (VCC) 6 C6 (Vpp) | |||
| 2 C2 (Reset) 7 C7 (I/O) | |||
| 3 C3 (Clock) 8 C8 (RFU) | |||
| 4 | C 4 | 9 | ( GND when chip is at station) |
| 5 C5 (GND) |
F

natural_image
Stylized white animal head logo on gray background (no text or symbols)Appendix D
Half-Panel Ribbon Operation
Introduction
Half-Panel YMCKO Color Ribbons are used if you do not need full color printing over the entire surface of a card. These ribbons have half panels of YMC for ID pictures, logos, etc., for printing a 38mm wide window on the front of the card. The remaining panels are full-size black resin and clear overlay so black text and protection can be applied over the entire surface of the card. The position of the half panel is adjustable.
The command is HALF p1 where p1 sets the start position of the print window. The position of the window is with respect to the leading edge of the card; i.e., the edge of card which exits the printer first. To reset the driver, the command is simply HALF without the p1 parameter.
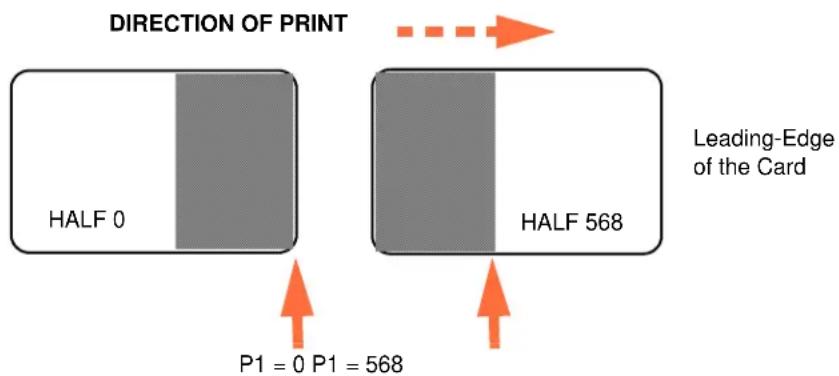
Parameters p1 ranges from -38 to 1024. Values below 0 will move the window off the leading edge of the card, and values over 568 will move the window off the trailing edge of the card. Note that 12 points = 1mm.
Setup and Operation
Step 1. Install a Half-Panel YMCKO Ribbon Cartridge; see Loading Ribbon Cartridge on page 32.
Step 2. Configure Driver Printing Preferences:
a. Select Start > Devices and Printers. Right click on the Zebra ZXP Card Printer listing. Select Printing preferences > Card Setup.
![Zebra ZXP Series 3 USB Card Printer Printing Preferences Card Setup Encoding About Printing options Orientation Landscape Print on both sides Yes Rotate 100° [None] Monochrome conversion Auto Printing Mode Print Copies 1 ✓ Auto detect start of image for half panel ribbons Single Feed options Current Status Card feeder Apply Ribbon info and options Ribbon type Fibbon combination YMCKO HS 200 Front YMCKO, Back YMCKO Front K Panel Back K Panel Front Overlay Back Overlay Options... Options... Varnish... Varnish... Job Log XiImage Control Restore Defaults OK Cancel Apply Help](/content/2026/06/1289914/images/27253e2c0c925ef0f27b0dc1d2e2e0e59ee05f7188f0a5a553d6b37d0cd388c9.jpg)
b. Click on the K Panel Options button (arrow above).
c. From the Black Panel Options dialog box, make the following selections (arrows below).

d. Click the OK button to close the Black Panel Options dialog box.
e. Click the OK button to exit Printing Preferences.
Step 3. Set Driver Printer Properties:
a. Select Start > Devices and Printers. Right click on the Zebra ZXP Card Printer listing. Select Printer properties > Device Settings.

b. Click the Tools button (arrow above). This will bring up the Tools dialog box.
Step 4. Enter the half-panel command.
a. From the Tools dialog box, type the command in the "Command to send to printer" field to position the print window on the card; e.g., HALF 0.

b. Click the Execute button. If successful the printer will respond with
c. Click the Close button to close the Tools dialog box.
d. Click the OK button to exit the Printer Properties.
Step 5. From your card printing application, print your card(s).

natural_image
Stylized white animal head logo on gray background (no text or symbols)Appendix E
CardSense Single Card Feed Mode
Introduction
For operating the ZXP Series 3 Card Printer in single card feed mode, the printer requires that the operator install an optional CardSenseSingle Card Feed Kit.
In Single Card Feed Mode, the printer will only accept cards through the front slot, not from the card feeder.
Installing the CardSense Single Card Feed Kit
Step 1. Turn printer power OFF.
Step 2. Open the lid, and remove the ribbon cartridge.

Important • Make sure the Card Hopper remains closed.
Step 3. Install the black roller. Place it between the blue clips just behind the card entry slot, and press the roller straight down so it is fully seated.
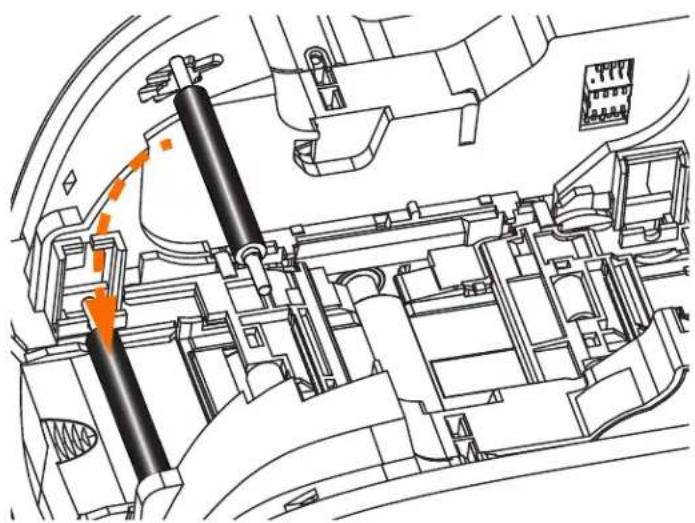
natural_image
Technical diagram of a mechanical assembly with internal components and highlighted parts (no text or labels)Step 4. While holding the roller down, turn power ON. You will hear a loud click as the clips secure the roller.
Step 5. At this point, let go of the roller, and then turn printer power OFF.
Step 6. Open the Cleaning Cartridge. The new Cleaning Cartridge will contain a Cleaning Roller with its protective wrapping.

Step 7. Remove the Cleaning Roller from the Cleaning Cartridge, and then remove the protective wrapper from the Cleaning Roller,
Step 8. Place the Cleaning Roller in the Cartridge, and close the lid.
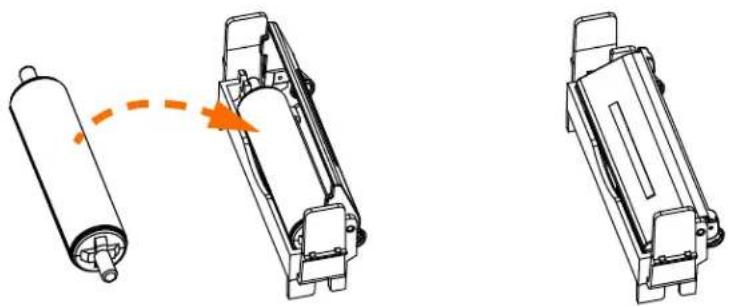
natural_image
Technical line drawing of a mechanical assembly with two views showing internal components and an orange arrow indicating motion (no text or symbols)Step 9. The Cleaning Cartridge is held in place by two clips. While gently squeezing the clips inward, press the cartridge into place. It will seat with a click.

natural_image
Technical line drawing of a mechanical assembly with no visible text or symbolsStep 10. Insert the Ribbon Cartridge with the cleaning roller facing down, so the gears on the ends of the rollers fit into the appropriate slots.
Step 11. Close the printer lid, and push down until you hear an audible click. If you can not close the lid, the cleaning cartridge or the ribbon cartridge may be installed wrong.
Step 12. Place the printer power switch in the ON ( | ) position.
Setting Up the Printer Driver
Card Setup tab allows the user to set the single card feed mode.
To access the Card Setup tab, select Start > Devices and Printers. Right click on the Zebra ZXP Card Printer listing, then select Printing preferences > Card Setup.
![Zebra ZXP Series 3 USB Card Printer Printing Preferences Card Setup Encoding About Printing options Orientation Landscape Print on both sides Yes Rotate 180° [None] Monochrome conversion Auto Printing Mode Print Copies 1 ✓ Auto detect start of image for half panel ribbons Single Feed options Current Status Single feeder slot Apply Card feeder Single feeder slot Ribbon info and opt Basic reed Auto feed Fibbon type Ribbon combination YMCKO HS 200 Front YMCKO, Back YMCKO Front K Panel Back K Panel Front Overlay Back Overlay Options... Options... Varnish... Varnish... Job Log XiImage ControlRestore Defaults OK Cancel Apply Help](/content/2026/06/1289914/images/7506606b09211470b3e7c65d689005bdda8f53b3e4dd5d500f2ab292ab8f1615.jpg)
Step 1. Select the Single feeder slot from the Current Status dropdown menu (arrow above).
Step 2. Click the Apply button, then click the OK button.

Important • You can disable Single Feed Support and return to printing cards from the Card Feeder. You do not have to remove the components of the Single Card Feed Kit in order to operate in normal mode.
Printing a Single Card
Step 1. Cards are inserted one at a time into the slot on the front of the printer. Do not feed more than one card at a time. Note that the card must be fully inserted before printer turns on and accepts the card.

Step 2. The card is printed.
Step 3. The printed card is ejected out through the same (input) slot.

Note • If single-card feeding will be the normal mode of operation, you may select that mode through the driver software. In single card feed mode, the card will not be printed until the print job has been sent to the printer and the card to be printed has been inserted into the single card feed slot

natural_image
Stylized white animal head logo on gray background (no text or symbols)Appendix F
Enclosure Lock Option
Introduction
The Enclosure Lock Option can either be factory-installed or added as an upgrade.
This option ensures that only authorized personnel have physical access to the print media (ribbon and cards). When locked, neither the Lid nor the Card Feeder Cover can be opened.
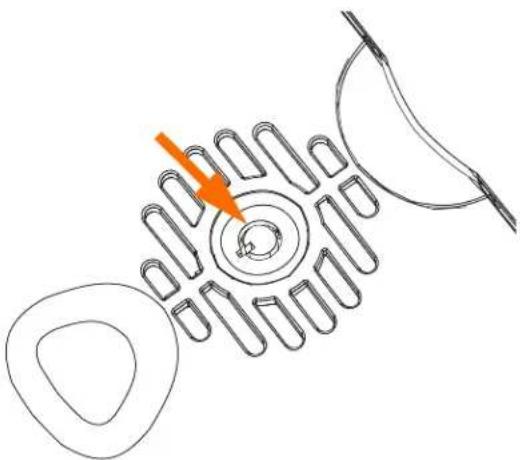
natural_image
Diagram of a mechanical component with multiple curved elements and a highlighted circular feature, no text or symbols present.- Turn the key clockwise to unlock the printer. Note that when unlocked, the key cannot be removed from the lock.
- Turn the key counter-clockwise to lock the printer, then remove the key.

natural_image
Stylized white animal head logo on gray background (no text or symbols)Appendix G
Worldwide Support
For Technical Support or Repair Services, contact the appropriate facility listed below.
North America and Latin America - Technical Support
T: +1 877 ASK ZEBRA (877 275 9327)
+1 847 913 2259
E: ts1@zebra.com
North America and Latin America - Repair Services
Before returning any equipment to Zebra Technologies Corporation for in-warranty or out-of-warranty repair, contact Repair Services for a Repair Order (RO) number. Mark the RO number clearly on the outside of the box. Ship the equipment, freight prepaid, to the address listed below:
Zebra Technologies Repair Services
333 Corporate Woods Parkway
Vernon Hills, IL 60061
webform: www.zebra.com/repair
T: +1 877 ASK ZEBRA (877 275 9327)
E: repair@zebra.com
Europe, Middle East, and Africa - Technical Support
| Language Phone Email | ||
| Arabic | +971 | (0)46058220 |
| Dutch +31 (0)33 450 50 48 ZebraCareBNL@zebra.com | ||
| English (UK) +44 (0)1628 556 | 225 zebraCareUK@zebra.com | |
| (Sweden) | +46 (0)8 594 709 88 | zebraCareUK@zebra.com |
| (South Africa) | +27 (0)11 201 7712 / 0860 393272 | zebracareSA@zebra.com |
| French | +33 (0) 1 53 48 12 74 | zebraCareFR@zebra.com |
| German | +49 (0) 2159 676 870 | zebraCareDE@zebra.com |
| Hebrew | +97 236 498 140 | ZebraCareIL@zebra.com |
| Italian +39 0 2 575 06388 | ZebraCareIT@zebra.com | |
| Polish | +48 223 801 980 | zebraCarePL@zebra.com |
| Russian | +7 495 739 5993 | ZebraCareRU@zebra.com |
| Spanish | +34 (0) 917 992 896 zebraCareES@zebra.com | |
| Turkish | +90 212 314 1010 | zebraCareTR@zebra.com |
zebraCareUA
For further assistance, contact:
Zebra Technologies Card Printer Solutions
Dukes Meadow
Millboard Road, Bourne End
Buckinghamshire SL8 5XF, UK
T: +44 (0) 1628 556 025
F: +44 (0) 1628 556 001
E: cardts@zebra.com
Europe, Middle East, and Africa - Repair Services
Before returning any equipment to Zebra Technologies Corporation for in-warranty or out-of-warranty repair, contact your supplier for a Return Materials Authorization (RMA) number, or contact one of the following repair centers for support and instructions:
| Type of repair and location | Phone Email | |
| Depot Repair in Germany, Austria, Switzerland | +49 (0) 2159 676 870 zebracareDE@zebra.com | |
| Depot Repair in France +33 (0) | 1 53 48 12 74 zebracareFR@zebra.com | |
| Depot and On-Site Repair in UK and Ireland | +44 (0) 1628 556 225 zebracareUK@zebra.com | |
| Depot Repair in South Africa +27 (0) 11 201 7777 - | ||
| Depot Repair in Middle East +971 (0) 46058220 support_dxb@emitac.ae |
For further assistance, contact:
For assistance anywhere in the EMEA, contact After Sales Customer Services at:
T: +44 (0) 177 2 69 3069
E: ukrma@zebra.com
Asia Pacific - Technical Support
Zebra Technologies Asia Pacific Pte. Ltd.
120 Robinson Road
06-01 Parakou Building
Singapore 068913
T: +65 6858 0722
F: +65 6885 0838
E: tsasiapacific@zebra.com
Asia Pacific - Repair Services
Before returning any equipment to Zebra Technologies Corporation for in-warranty or out-of warranty repair, contact Repair Services for a Return Materials Authorization (RMA) number. Repack the equipment in the original packing material, and mark the RMA number clearly on the outside. Ship the equipment, freight prepaid, to either address listed below:
Zebra Technologies Asia Pacific Pte. Ltd.
No.5 Changi North Way Level 3
Singapore 498771
Agility Building
T: +65 6546 2670 ext 3203 and 3204
F: +65 6546 5328
E: APACRepair@zebra.com
Zebra Website
http://www.zebra.com
km.zebra.com (Knowledge Base)


- ZEBRA ZXP Series 3™
- User's Manual
- Copyright Notice
- Trademarks
- Product Disposal
- Contents
- • Getting Started .... 1
- • Printer Installation....9
- • Printer Setup 31
- • Printer Settings and Adjustments ..... 39
- • Cleaning 69
- • Troubleshooting ..... 73
- • Technical Specifications....85
- Getting Started
- 1: Getting Started
- ZXP Series 3 Part Numbers
- Features, Controls, and Indicators
- Rear Panel Connectors
- Standard USB Connection
- Ethernet Connection
- Multi-Function LCD Panel
- Operational Messages
- Warning Messages
- Error Messages
- Icons
- Zebra Supplies
- Printer Installation
- Unpacking Your Card Printer
- 2: Printer Installation
- Installing the Printer
- Setting up the Printer
- Connecting Power
- Connecting the Printer to your Computer
- Viewing Printer Information
- Installing the Windows Printer Driver
- Installing the USB Printer Driver
- Installing the Ethernet Printer Driver
- Setting Up a Network Printer
- Printer Pooling
- Setting Up Printer Pooling
- Using Printer Pooling
- Printer Setup
- Printer Features
- 3: Printer Setup
- Loading Ribbon Cartridge
- Loading Cards
- Card Feeder
- Card Hopper
- Printing a Test Card
- Typical Printer Operation
- Creating a Sample Card
- Printing the Sample Card
- Printer Settings and Adjustments
- Introduction
- 4: Printer Settings and Adjustments
- Printer Properties
- General Tab
- Sharing Tab
- Ports Tab
- Advanced Tab
- Color Management Tab
- Security Tab
- Device Settings Tab
- Device Information
- 4: Printer Settings and Adjustments Printer Properties
- Save/Restore
- Tools
- Firmware Download
- Printing Preferences
- Card Setup Tab
- - Monochrome Conversion SUMMARY
- - Ribbon info and options
- YMCKOK
- Black (K) Panel
- Black Panel Options
- - Apply black extraction on:
- Zebra Technologies
- Black Panel Print Overview
- Reasons and Behavior for Black Panel Extraction
- Overlay Varnish Options
- Job Log
- Image Control
- Encoding Tab
- Track selection:
- Advanced Settings
- About Tab
- Cleaning the System
- Caution • PROTECT YOUR FACTORY WARRANTY!
- When to Clean
- How to Clean
- Cleaning the Printhead
- Troubleshooting
- 6: Troubleshooting
- Troubleshooting Procedures
- LCD Panel Warnings and Error Messages
- Print Quality Issues
- Example • Small spots
- Possible Cause:
- Solutions:
- Example • No printing
- Technical Specifications
- Printer Specifications
- Standard Features
- 7: Technical Specifications
- Printing Specifications
- Printing Throughput
- Encoding Options and Specifications
- Optional Features
- Communications Interfaces
- Card Compatibility
- Supplies Specifications
- Preventative Maintenance
- Drivers Supported
- Physical Specifications (standard model)
- Electrical Specifications
- Environmental Specifications
- Agency Approvals
- ISO Standard Card Dimensions
- Compliance Information
- FCC Compliance Statement
- FCC Radiation Exposure Statement (RLAN)
- Important
- Canadian DOC Compliance Statement
- European Union and EFTA
- Japanese Notification
- APPENDIX A
- Advanced Sharing
- Printer Sharing Configurations
- Client / Server Printer sharing support Matrix
- Advanced Sharing Settings
- Installing and setting up a Windows 2008 Server
- Advanced Sharing Settings for Windows Server 2008 R2
- Home or Work Network Settings:
- Change sharing options for different network profiles
- Public Network Settings:
- Advanced Sharing Settings for Windows Server 2008
- Advanced Sharing Settings for Windows 7
- Network discovery
- File and printer sharing
- Public folder sharing
- Media streaming
- File sharing connections
- Password protected sharing
- HomeGroup connections
- A: Advanced Sharing
- Appendix B
- Magnetic Encoder Option
- Encoder Settings (Driver)
- Media Loading Orientation
- Magnetic Encoder Cleaning
- Magnetic Encoding Type
- ISO (Default)
- APPENDIX C
- Smart Card Options
- Contact Smart Cards
- Media Loading Orientation for Contact Smart Cards
- Printing on Contact Smart Cards
- Contactless Smart Cards
- Media Loading Orientation for Contactless Smart Cards
- Printing on Contactless Smart Cards
- Contact Station
- Smart Card Interface
- DB-9 Connector (detail)
- Appendix D
- Half-Panel Ribbon Operation
- Setup and Operation
- Step 3. Set Driver Printer Properties:
- Appendix E
- CardSense Single Card Feed Mode
- Installing the CardSense Single Card Feed Kit
- Setting Up the Printer Driver
- Printing a Single Card
- Appendix F
- Enclosure Lock Option
- Appendix G
- Worldwide Support
- North America and Latin America - Technical Support
- North America and Latin America - Repair Services
- Europe, Middle East, and Africa - Technical Support
- For further assistance, contact:
- Europe, Middle East, and Africa - Repair Services
- Asia Pacific - Technical Support
- 06-01 Parakou Building
- Asia Pacific - Repair Services
- Zebra Website
Brand : ZEBRA
Model : ZXP3
Category : Card printer