
P330i - Card printer ZEBRA - Free user manual and instructions
Find the device manual for free P330i ZEBRA in PDF.


| Product Type | Direct-to-card printer |
| Brand | Zebra |
| Model | P330i |
| Dimensions (W x D x H) | 6.9 x 14.5 x 9.75 in (175 x 368 x 248 mm) |
| Weight | 12 lbs (5.4 kg) |
| Power Supply | 100-240 V AC, 50/60 Hz |
| Print Method | Direct thermal dye sublimation |
| Print Resolution | 300 dpi (11.8 dots/mm) |
| Print Speed (Single-sided) | Up to 102 cards per hour (full color) |
| Card Thickness | 0.020 to 0.040 in (0.51 to 1.02 mm) |
| Card Size | ISO CR-80 (3.375 x 2.125 in) |
| Interface | USB 2.0 (optional Ethernet) |
| Maintenance | Regular cleaning of print head and rollers; replace ribbon and cleaning cartridge |
| Safety Certifications | UL, FCC, CE |
| Spare Parts Available | Print head, cleaning kit, ribbons, laminator cartridge (optional) |
| Warranty | 1 year limited |
Frequently Asked Questions - P330i ZEBRA
User questions about P330i ZEBRA
0 question about this device. Answer the ones you know or ask your own.
Ask a new question about this device
Download the instructions for your Card printer in PDF format for free! Find your manual P330i - ZEBRA and take your electronic device back in hand. On this page are published all the documents necessary for the use of your device. P330i by ZEBRA.
USER MANUAL P330i ZEBRA
natural_image
Abstract black and white geometric pattern with curved white lines on a black background (no text or symbols)980459-001 Rev C

natural_image
Exterior view of a white and blue handheld scanner (no visible text or symbols)Zebra® P330i & P330m
Card Printer User's Manual
Foreword

natural_image
Abstract black and white pattern with curved white lines on a black background (no text or symbols)This manual contains installation and operation information for the Zebra P330i and P330m Card Printers manufactured by Zebra Technologies Corporation, Camarillo, California.
The only difference between these models is that the P330i supports full-color ribbons (which may include a protective overcoat panel), and the P330m supports monochrome color printing only.
In this manual, references that are specific to the P330i or P330m will be identified as such; references that apply to both models will use the term “the printer.”
Return Materials Authorization
Before returning any equipment to Zebra Technologies Corporation for in-warranty or out-of-warranty repair, contact Repair Administration for a Return Materials Authorization (RMA) number. Repack the equipment in the original packing material and mark the RMA number clearly on the outside. Ship the equipment, freight prepaid, to the address listed below:
- For USA, Latin America, and Asia / Pacific: Zebra Technologies Corporation Zebra Card Printer Solutions 1001 Flynn Road Camarillo, CA. 93012-8706.USA Phone: +1 (805) 578-5001 FAX: +1 (805) 579-1808
- For Europe and Middle East: Zebra Technologies Corporation Zebra Card Printer Solutions Pittman Way, Fulwood Preston, PR2 9ZD Lancashire, U.K. Phone: +44 - 1 - 772 - 797555 FAX: +44 - 1 - 772 - 693000
Copyright Notice
© 2004, 2005 ZIH Corp.
This document contains information proprietary to Zebra Technologies Corporation. This document and the information contained within is Copyrighted by Zebra Technologies Corporation and may not be duplicated in full or in part by any person without written approval from Zebra. While every effort has been made to keep the information contained within current and accurate as of the date of publication, no guarantee is given that the document is error-free or that it is accurate with regard to any specification. Zebra reserves the right to make changes, for the purpose of product improvement, at any time.
Trademarks
P330i and P330m are trademarks and Zebra is a registered trademark of Zebra Technologies Corporation. Windows and MS.DOS are registered trademarks of Microsoft Corp. All other trademarks or registered trademarks are marks of their respective holders.
Product Disposal
Product Disposal Information • Do not dispose of this product in unsorted municipal waste. This product is recyclable, and should be recycled according to your local standards. For more information, please see our web site at: http://www.zebra.com/environment
Declarations of Conformity
CE
| 89/336/EEC modified by 92/31/EEC and 93/68/EEC | EMC Directive | EN 55022 (1998) RF | Emissions control |
| EMC Directive | EN 301489-3 V1.4.1 | RF Emissions and Immunity for radio equipment | |
| EMC Directive EN55024 (2001) | Immunity to Electro-Magnetic Disturbances | ||
| 73/23/EEC modified by 93/68/EEC | Low voltage Directive | EN 60950-1 (2001) Product safety | |
| 1999/5/CE | R&TTE Directive | EN300330-2 V1.1.1 Radio Frequency Interferences | |
For a formal certificate, please contact the Compliance Office at Zebra's Camarillo facility.
EUROPE: Norway Only: This product is also designed for IT power system with phase to phase voltage 230V. Earth grounding is via the polarized, 3-wire power cord.
Models P330i and P330m has been tested and found to comply with the limits for a Class A digital device, pursuant to Part 15 of the FCC Rules. These limits are designed to provide reasonable protection against harmful interference when the equipment is operated in a commercial environment. This equipment generates, uses, and can radiate radio frequency energy and, if not installed and operated in accordance with the P330i and P330m User's Manual, may cause harmful interference to radio communications. Operation of this equipment in a residential area is likely to cause harmful interference in which case the user will be required to correct the interference at his own expense.
Pursuant to Part 15.21 of the FCC Rules, any changes or modifications to this equipment not expressly approved by Zebra may cause harmful interference and void the FCC authorization to operate this equipment.
FCC Radiation Exposure Statement (applicable to 15.247 device only)
This equipment complies with FCC radiation exposure limits set forth for an uncontrolled environment. This equipment should be installed and operated with minimum 20 cm between the radiator and your body. This transmitter must not be collocated or operating in conjunction with any other antenna or transmitter unless authorized to do so by the FCC.
Industry Canada Notice
This device complies with Industry Canada ICES-003 class A requirements.
The Zebra Product Number tells a story:
Here is a quick review of the Zebra Card Printer Series numbering and lettering system for the P330i and P330m Card Printers to help you.
Model numbers include identifiers that specify options using the following lettering conventions:
Throughout this manual, different icons highlight important information, as follows:

Note • Indicates information that emphasizes or supplements important points of the main text.

Important • Advises you of information that is essential to complete a task, or points out the importance of specific information in the text.

Provides an example or scenario to demonstrate or clarify a section of text.

Electrostatic Discharge Caution • Warns you of the potential for electrostatic discharge.

Electric Shock Caution • Warns you of a potential electric shock situation.

Caution • Warns you of a situation where excessive heat could cause a burn.

Caution • Advises you that failure to take or avoid a specific action could result in physical harm to you, or could result in physical damage to the hardware.

Foreword
Declarations of Conformity

natural_image
Technical line drawing of a mechanical device with no visible text or symbolsContents

natural_image
Abstract black and white pattern with curved white lines on a black background (no text or symbols)- Foreword ....iii
Return Materials Authorization....iii
Copyright Notice....iv
Trademarks iv
Product Disposal iv
Declarations of Conformity....iv
1 • Introduction.... 1
Controls, Connectors, and Indicators. 2
LCD Panel 3
2 · Installation and Setup.... 5
General Information 5
Unpacking the Printer. 6
Installing the Print Driver Software and Setting Driver Options ..... 10
Installing the Print Driver 10
Loading a Ribbon....11
Installing the Card Cleaning Cartridge 14
Setting the Card Thickness Control 16
Loading Cards 18
Card Output Hopper.... 20
Connecting the Printer to your Computer.... 21
Connecting Power 22
Printing a Test Card 23
Packing the Printer for Shipment 23
3 • Printing a Card 25
Setting Printer Properties 25
Printing a Sample Card 26
Feeding One Card at a Time 27
4 · Cleaning.... 29
Cleaning the Printer 29
When to Clean 29
How to Clean 30
Cleaning the Print Head. 31
Card Cleaning Cartridge.... 32
When to Replace the Cleaning Roller 32
How To Replace the Cleaning Roller 32
5 · Troubleshooting 35
Print Quality Issues 37
Troubleshooting the Ethernet Connection and Adapter 41
Resetting to Factory Defaults.... 41
Ethernet Adapter Status Indicator 41
Network Status/Activity Indicator 42
6 · Technical Specifications 43
General Specifications 43
Ribbon Specifications.... 43
Card Specifications 43
Bar Codes 44
Fonts 44
Card Dimensions 44
Bi-Directional Communications Interfaces 45
Mechanical Specifications 45
Electrical.... 45
Environmental 45
Options. 45
Appendix A • Magnetic Card Encoder 47
Introduction 47
Media Loading Orientation 47
Sample Encoding Program 48
Magnetic Encoder Cleaning 48
When to Clean 48
How to Clean 48
ISO Standard Encoding 49
Appendix B • Smart Card Contact Station ..... 51
Introduction 51
Media Loading Orientation 51
Smart Card Contact Station Interface.... 52
Appendix C · Connecting to a Network ..... 53
Printer Sharing 53
External Print Server 54
Internal Print Server 54
Appendix D • Worldwide Sales & Support.... 55
Sales and Support Locations 55
Website 56
natural_image
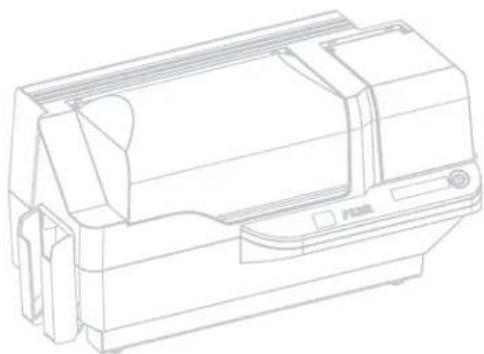
Technical line drawing of a mechanical device with no visible text or symbolsThank you for choosing the Zebra P330i or P330m Card Printer. This manual guides you to efficient start up and operation of your new Card Printer.Printer Features.
The only difference between these models is that the P330i supports full-color ribbons (which may include a protective overcoat panel), and the P330m supports monochrome color printing only.
In this manual, references that are specific to the P330i or P330m will be identified as such; references that apply to both models will use the term “the printer.”
The following shows the main functional features found on your printer.

Controls, Connectors, and Indicators
Your printer has an LCD Display Panel and a Panel Button on the front and a power connector, power switch, and interface connector(s) on the rear panel.


LCD Panel
The LCD Panel can display the following messages:
| Message Mode | |
| Operational | |
| INITIALIZING Scrolling | |
| READY Fixed | |
| DOWNLOADING DATA Fixed | |
| PRINTING MONO Fixed | |
| MAG ENCODING Fixed | |
| CONTACT ENCODING Fixed | |
| PRINTING CYAN | Fixed (These Messages do not apply to the P330m Printer.) |
| PRINTING YELLOW | |
| PRINTING MAGENTA | |
| PRINTING BLACK | |
| PRINTING OVERLAY | |
| DOWNLOADING FW Fixed | |
| CLEANING PRINTER Fixed | |
| Warnings | |
| CLEAN PRINTER | Scrolling |
| REMOVE RIBBON THEN CLOSE HEAD | Scrolling |
| EMPTY FEEDER & PRESS BUTTON | Scrolling |
| LOAD CLEANING CARD IN FEEDER | Scrolling |
| PRESS BUTTON TO CONTINUE | Scrolling |
| FEED LONG CLEANING CARD IN EXIT | Scrolling |
| CLEANING PRINTER Scrolling | |
| ENCODING ERROR (printing stops) | Blinking |
| INVALID MAGNETIC DATA (encoding stops) | Scrolling |
| REMOVE RIBBON | Fixed |
| Errors (Printer will not operate) | |
| OUT OF RIBBON | Blinking |
| MECHANICAL ERROR | Blinking |
| OUT OF CARDS | Blinking |
| PRINT HEAD OPEN | Blinking |

Introduction
Controls, Connectors, and Indicators

natural_image
Technical line drawing of a mechanical component or housing (no text or symbols visible)Installation and Setup

natural_image
Abstract black and white pattern with curved white and black shapes (no text or symbols)General Information
This section will guide you through the installation and setup of your P330i or P330m Card Printer. This consists of the following procedures, which should be performed in the order presented.
- Unpacking the Printer
- Installing the Print Driver Software and Setting Driver Options
- Loading a Ribbon
• Installing the Card Cleaning Cartridge - Setting the Card Thickness Control
- Loading Cards
- Connecting the Printer to your Computer
- Connecting Power
- Printing a Test Card to verify printer operation
The procedure to be followed for Packing the Printer for Shipment is given at the end of this section.
The printer should be placed in a location that allows easy access to all sides. The printer should never be operated while resting on its side or upside down.

Electric Shock Caution • Limit AC power supplied to the printer to 110 \~ 230 volts, 60 \~ 50 Hertz. Limit excess current draw to 16 amps or less, using an associated circuit breaker or other such device. Never operate the printer in a location where operator, computer, or printer can get wet. Personal injury could result. The printer must be connected to an earthed electrical power source and properly protected against electrical surges and grounding faults; the electrical reliability of the printer is based on the reliability of the mains power source and with the earth connection.
The printer's power supply is an internal unit that can only be serviced or replaced by trained and authorized personnel.
Unpacking the Printer
Your Card Printer ships in a carton and protective anti-static bag. Keep all packaging material in case you need to move or re-ship the printer.
-
Inspect the shipping container to ensure that no damage has occurred during shipment. If any damage is apparent, file a claim with the shipper.
-
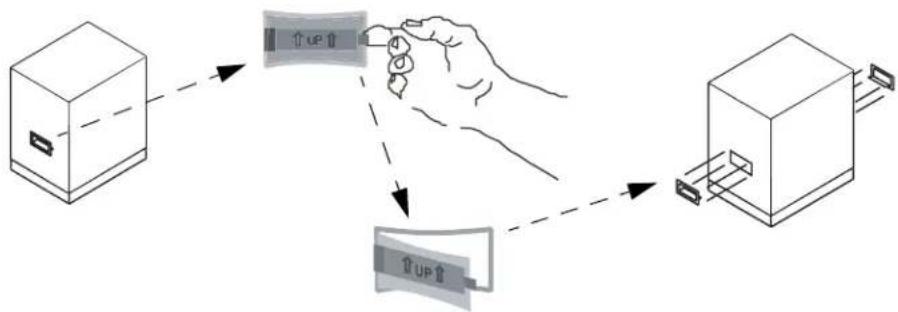
Unlatch and remove the handles on either end of the shipping container, as shown in the figure below.
flowchart
graph TD
    A["Device 1"] --> B["Device 2"]
    B --> C["Device 3"]
    C --> D["Device 4"]
    D --> A
    style A fill:#f9f,stroke:#333
    style B fill:#ccf,stroke:#333
    style C fill:#cfc,stroke:#333
    style D fill:#fcc,stroke:#333
-
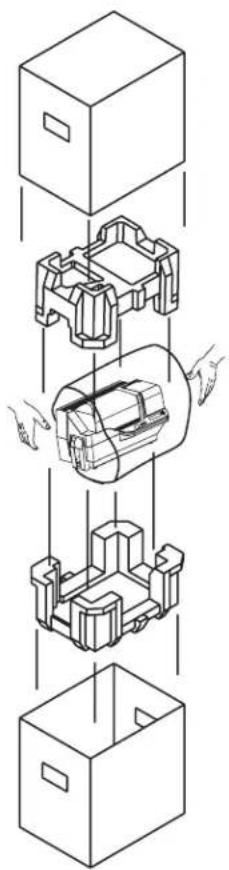
(See the figure on the next page as you perform the following steps.) Lift the upper part of the shipping container off of the lower part (which will still hold the printer and its packing material).
-
Remove the packing material around the top of the printer.
natural_image
Exploded view diagram of a mechanical assembly showing internal components and hand motion (no text or labels)-
Lift the printer out of the carton by holding it with both hands.
-
Please ensure that you have a clean and nearly dust free environment for proper operation and storage of the printer.
-
Make sure the following items are included with your printer:
CD-ROM with Driver Wizard and User's Manual

Card Cleaning Cartridge

Power Cables (2)

natural_image
Two black electrical plug wires with connectors, shown from different angles (no text or symbols visible)USB Cable

Cleaning Kit

natural_image
Pure technical line drawing of a mechanical part with no text or symbolsIf any items are missing, please contact your dealer. To reorder, please refer to Appendix D of this manual.
-
Remove packing tape securing the printer's Main Cover and Card Feeder Cover.
-
Your printer ships with warning tape where the Card Cleaning Cartridge will be installed, and a pad that protects the print head from possible damage in shipment. To remove the tape and pad, follow the following steps:
a. Open the printer's main cover by lifting at its lower front lip.

natural_image
Line drawing of a hand pressing down on a mechanical device (no text or symbols)b. Locate the Print Head protection pad and the Card Cleaning Cartridge location tape (see below).

c. Release the Print Head Carriage by pushing the Print Head Carriage Latch to the left, and raise the Print Head Carriage. It will remain open at about a 45^ angle.


Installation and Setup
Installing the Print Driver Software and Setting Driver Options
d. Remove the print head protection pad. Keep the pad, as well as the other packing material and the shipping carton, in case the printer is shipped or moved. If the original material is lost, a replacement Shipping Kit can be ordered from Zebra; please refer to the Media List on the Windows Drivers and User Documentation CD supplied with this printer.

natural_image
Line drawing of a hand using a pink tool to press or inspect internal components of an open printer (no text or symbols present)Installing the Print Driver Software and Setting Driver Options
Printing with the P330i or P330m Printer requires the Windows Print Driver and your card design/issuing software or printer command level programming through the printer interface. Both models use the same Print Driver.
The printer can be used with any Windows 2000 or Windows XP computer, using the driver provided on CD with the printer.
This section contains information on the printing of a sample card in color (using the 5-panel color ribbon YMCKO and the Windows Print Driver).

Note • If updating the printer driver from a previous version, before installing the updated print driver version, always delete the existing version from your computer.
Installing the Print Driver
To install the Print Driver automatically on all Operating Systems, use the Zebra Install Wizard.

Note • Ensure that you have administrative privileges to perform this installation, or contact your IT department.
The Install Wizard will walk you through the appropriate installation steps. The Wizard will:
- Automatically launch when the driver CD is inserted.
- From the main menu of your documentation CD, select your desired language and then select "DRIVERS" from the subsequent menu. The Install Wizard will walk you through the appropriate steps.
- Delete previous versions of the driver and clean up any necessary Registry entries. You must select "Remove" from the install options to remove any previous driver versions.
Loading a Ribbon
(This paragraph applies only to the P330i, but the ribbon loading steps that follow apply to both models.) i Series Printers require the use of i Series ribbons for full color printing. The Resin Thermal Transfer and Dye Sublimination ribbons for P330i are specifically designed for your P330i Printer.
-
Place the printer power switch in the OFF (0) position.
-
If the printer's Main Cover is closed:
a. Open the printer's Main Cover; lift it by the lip at the bottom front as shown in the figure below left.

natural_image
Technical line drawings of a device with open lid and internal components, no visible text or symbols
Electrostatic Discharge Caution • DO NOT TOUCH the Print Head or the electronic components on the Print Head Carriage. Discharges of electro-static energy that accumulate on the human body or other surfaces can damage the Print Head or other electronic components used in the printer.

Note • Avoid any direct contact with the print head to prevent transfer of oils or contamination. Outside of normal operation, only the Zebra-approved cleaning materials should come in contact with the print head.
b. Raise the Print Head Carriage by pressing the release latch to the left (toward the output hopper) and lifting as shown below to about a 45^ angle. The Print Head Carriage will stay in that position, as shown at the right below.

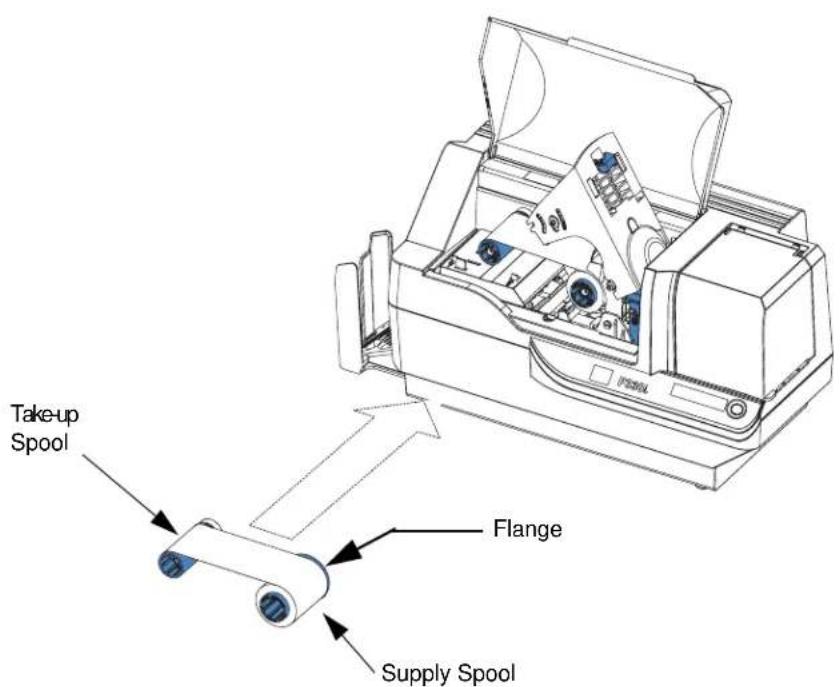
- Locate the Ribbon Supply Spindle and the Ribbon Take-up Spindle (see above). Load ribbon onto the supply spindle (under the print head carriage) flange side in, and load the empty core (with tape attached) onto the take-up spindle. Make sure the ribbon comes off the top of the supply spindle and feeds to the top of the take-up spindle.

Caution • Do not touch the print head if the printer has been in service within the last 10 minutes. It could be very hot and cause a burn.

Electrostatic Discharge Caution • A static discharge is possible if you touch any exposed metal parts. Use of an anti-static wrist strap or comparable anti-static protection is required.
- Gently press the print head carriage down until it is fully lowered, as shown below. Very little force is necessary to perform this step.

natural_image
Line drawing of a printer with a hand inserting a component into the paper (no text or symbols present)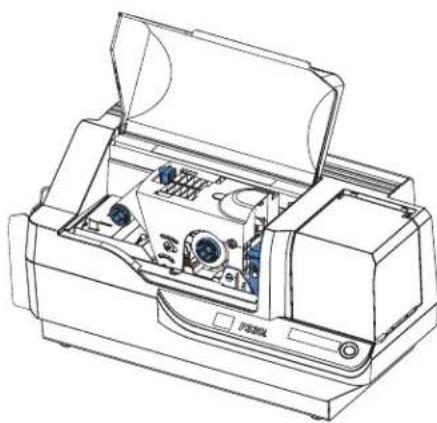
natural_image
Technical line drawing of a printer internal structure with no visible text or symbols
Note • During normal operation (with power connected and turned on), the ribbon would automatically synchronize when the Print Head is restored to its fully-down position. The ribbon would be identified and the corresponding parameters sent to the driver.
Since power is not connected at this point in the Installation and Setup Procedure, nothing will happen when the Print Head Carriage is closed. The ribbon will synchronize when power is turned on.
Installing the Card Cleaning Cartridge
The Card Cleaning Cartridge cleans the cards entering the printer. The Card Cleaning Cartridge consists of a Cartridge Frame and an Adhesive Roller, which are packed together.
- Remove the Cartridge Frame and the Adhesive Roller from their packaging. Insert the Adhesive Roller into the Cartridge Frame, as shown below. To avoid contamination, always hold the frame and the roller by the ends.

natural_image
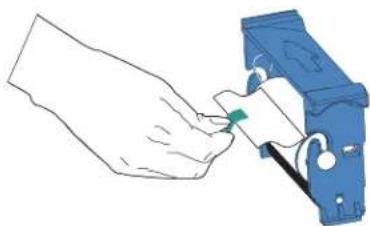
Diagram of a blue industrial machine with a green cover and pipe connection (no text or symbols)- Peel the protective wrapper from the Adhesive Roller.
natural_image
Illustration of a hand using a tool to adjust or install a blue mechanical component (no text or symbols visible)- If the printer's main cover is closed, open it. Locate the area where the Card Cleaning Cartridge will be installed (initially, this area was covered by a warning tape).

- Locate the slot at the rear of the Card Cleaning Cartridge mounting location; see below.
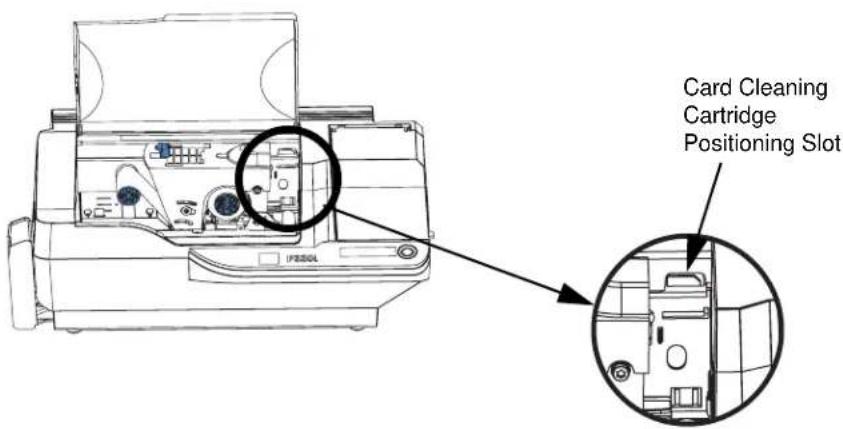
- Hold the Card Cleaning Cartridge by the extended "handle" (so the large arrow on the top is pointing away from you). With the cartridge at about a 30^ angle (pointing downward), insert the lip of the cartridge into the slot, until the cartridge seats against the back wall. Then press the front of the cartridge down until it seats all the way down and latches with an audible "click". See below.

- Close the printer's Main Cover.
Setting the Card Thickness Control
The Card Thickness Control is set by the user to adjust the gap as cards enter the printer, to prevent double-feeds (which could cause a jam) or mis-feeds.

Note • Set the Card Thickness Control before loading cards.
- Open the Card Feeder cover. The cover is hinged; lift it by the lip at the right front corner.

Note • To reduce contamination and ensure better print quality, minimize the time the Card Feeder cover is open.

natural_image
Technical line drawing of a mechanical device with a hand adjusting its part (no text or symbols present)- The Card Thickness Control Lever is at the front of the left-side opening of the Card Feeder area.
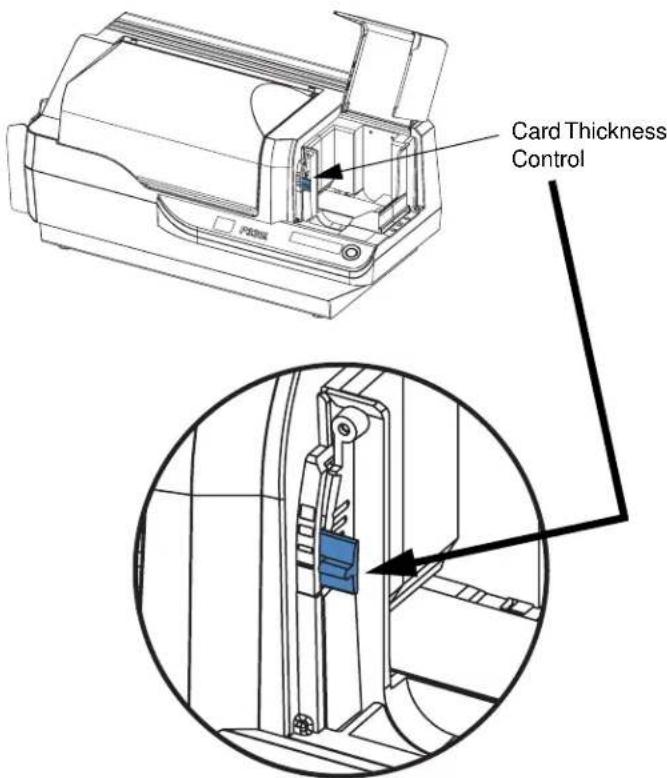
- There are four detents to set the position of the Card Thickness Control. Slide the Card Thickness Control to the position corresponding to the following:
| Detent Position Card Thickness |
| Highest 50 mil (1.27 mm) to 60 mil (1.52 mm) |
| 3rd position 30 mil (0.76 mm) to 50 mil (1.27 mm) |
| 2nd position 20 mil (0.51 mm) to 40 mil (1.02 mm) |
| Lowest 10 mil (0.25 mm) to 20 mil (0.51 mm) |

Note • The overlap in settings above accommodates variations in environmental conditions (especially humidity) and cards from different manufacturers. In general, start at the lowest position and move the lever up until cards feed reliably.

Note • “60 mil” (“1.524 mm”) cards may have a significant variation (over 10%) in the actual thickness of the cards; do not use these cards unless each card has been measured to have a thickness less than 66 mil (1.676 mm).
Loading Cards
This section shows how to load plastic cards into the P330i or P330m Printer. The printer can use cards with a range of thickness from 10 mil (0.25 mm) to 60 mil (1.5 mm).

Note • Do not mix cards of different thicknesses!
The printer can also load and print cards fed individually. Information on this is given in the next chapter.

Note • DO NOT bend cards or touch print surfaces as this can reduce print quality. The surface of the cards must remain clean and dust free. Always store cards in an enclosed container. Ideally, use cards as soon as possible.

Note • For cards with magnetic stripe, refer to Appendix A for loading instructions.
The plastic cards generally come in decks of 100 cards; the Card Feeder can hold a full deck of 100 30-mil cards. Cards sometimes will stick together; this can cause mis-feeding or double-feeding. To avoid this, separate the cards before loading, as described in steps 2 through 4 below.
- If the Card Feeder cover is closed, open it. The cover is hinged; lift it by the lip at the right front corner.

Note • To reduce contamination and ensure better print quality, minimize the time the Card Feeder cover is open.

natural_image
Technical line drawing of a mechanical assembly with a hand operating a component (no text or symbols present)
Caution • Do not touch print surfaces of the cards; this can reduce print quality
-
Remove all wrapping from the card deck.
-
Holding the card deck by the sides, hold it vertically against a flat surface such as a desktop. If the deck is too thick for your hand to hold it comfortably, use about half a deck at a time.

- Push the stack back and forth to an angle of about 45^ from vertical, so as to separate all of the cards.

natural_image
Hand holding a coiled spring or spring with an arrow indicating upward motion (no text or symbols)
Note • Static charges and edge burrs from the card die-cutting process can render individual cards stuck together with significant adhesion force. These cards must be physically separated from each other before inserting into the feeder; if not separated, feeding or printing problems may occur.
- Restore the card stack to its original squared-off condition, and place the cards in the input hopper.

- Note that there will be a "gap" in the card stack, with several cards lying flat and the cards above angled upward, as shown in the exaggerated drawing below. This is normal and ensures proper feeding.


Note • Do not try to eliminate the gap by pressing down on the card stack in the input hopper; this can cause misfeeds.
Card Output Hopper
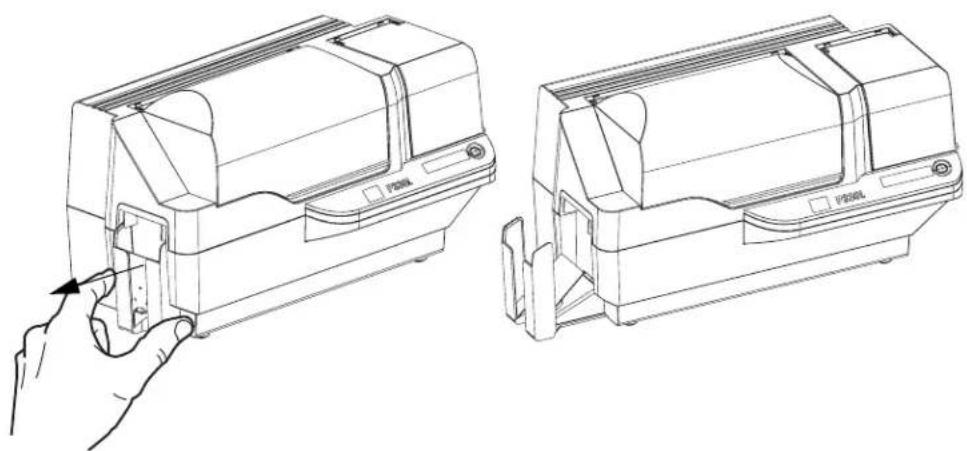
The card output hopper is normally extended to receive the printed cards. The printer may be operated with the card output hopper in its closed position; in this case the cards will not be collected in the output hopper.
- Pull the card output hopper out to place it in its functional position.

Note • The output hopper is a very snug fit to prevent it from moving during shipping or operation; firm force is required to change its position.
natural_image
Technical line drawing of two views of a device with a hand inserting a component (no text or symbols present)-
When not using the printer, slide the card output hopper back into its closed position to protect the printer from dust and protect the output hopper from damage.
-
The output hopper can be completely removed from the printer if necessary by inserting a thin, blunt object (such as a pencil) up through the hole in the bottom of the printer enclosure and pressing (up) to release the hopper while simultaneously pulling the hopper out. To re-install the output hopper, simply slide the output hopper in until it locks in place.
Connecting the Printer to your Computer
The P330i or P330m Printer includes a standard USB interface.
As an option, either printer model can be ordered with a 10/100base-T Ethernet Adapter (in addition to the USB interface). The Ethernet Adapter can also be ordered as an add-on option and installed in the field by a Zebra factory certified technician.
- If using the USB interface, use the supplied USB cable to connect between the USB connector on the printer and a USB port on the computer, as shown below. (Note that the figure below shows the optional Ethernet Adapter directly above the USB Connector; this may not be present on your printer.)

- If your printer includes the optional Ethernet Adapter as well as the standard USB connection, use either the supplied USB cable or a standard Ethernet cable to connect the printer to a corresponding port on the computer or network.

Important • Do not use both USB and Ethernet connections at the same time!

Important • Intermittent or unpredictable operation may occur from unsecured connectors. If damaged, the power cable must be replaced by an exact equivalent.
Connecting Power
The printer includes an internal AC power supply that accepts nominal input voltage in the range from 110 to 230 volts at 50 to 60 Hertz. The power source must be grounded.
Depending on specific model number, your printer will include one or two power cords; use the one that is appropriate for the AC power source connection at your location. If neither has an appropriate connector, AC power cords may be purchased locally; make sure it is a three-wire (grounded) cord.

- Place the Printer's power switch in the OFF (O) position.
- Depending on your local AC voltage, plug the appropriate power cord into the printer's power connector and a grounded AC power source connection.

Caution • If the power cord appears damaged in any way, or if the power cord will not securely plug into the Printer's power connector or the AC power source connection, STOP! Use of a damaged or incorrect power cord could cause equipment damage, result in an electrical fire, or possibly cause injury.
- To turn the Printer on, set the Printer's power switch to the ON ( | ) position.
Printing a Test Card
With ribbon and cards loaded, your printer is ready to print. To check the operation of the printer, you should print a test card. (Printing a test card does not require that the printer be connected to your computer or network, but power must be applied.)
- Set the printer's power switch (on the back of the printer) to the OFF (O) position.
- While pressing the Printer's front panel button (next to the LCD display panel), switch the printer ON ( | ).
- Hold the panel button until the LCD display panel reads "SELF TEST".
- Release the panel button, and the test card will print.
This is an example of the test card:

Packing the Printer for Shipment
If the printer is to be shipped, it is important to use the original packing and shipping material to prevent damage to the Printer. If the original material is lost, a replacement Shipping Kit can be ordered from Zebra; please refer to the Media List on the Windows Drivers and User Documentation CD supplied with this printer.

Note • The specifics of the shipment and the printer's condition may influence which of the following steps are followed; common sense should prevail.
- Remove cards in the card feeder:
a. While the printer still has power applied and is turned on, and is still connected to the host computer, remove cards from the card feeder. The last card may be difficult to remove. If so, use the Eject Card command available through the driver on the host computer to eject the last card that is staged in the feeder.

Caution • Do not physically pull the last card out of the feeder staging area. This could damage the printer and void the warranty, as well as damage the card.
b. Close the Card Feeder Cover.
Installation and Setup
Packing the Printer for Shipment
- If the printer still has power applied and is turned on, and is still connected to the host computer, set the printer's power switch (on the back of the printer) to the OFF (O) position, and disconnect the interface and power cables to the printer.
- Open the Main Cover. Open the Print Head Carriage and remove the Ribbon. (If you wish to save the ribbon for future use, you may want to put it in a plastic bag for storage.)
- Insert the print head protection pad, and close the Print Head Carriage. Remove the Card Cleaning Cartridge and place it in the upper foam insert. Close the Main Cover.
- Slide the Output Hopper in all the way against the Printer.
- Place the Printer in its protective plastic bag.
- Place the lower foam insert in the lower part of the shipping carton.
- Use both hands to carefully place the Printer into the recess in the lower foam insert.
- Place the upper foam insert onto the Printer and gently press it down so it makes a snug fit on the Printer; the top of the upper foam insert should be even with the upper edge of the lower part of the shipping carton.
- Slide the upper part of the shipping carton down over the lower part.
- Insert and close the handles/latches.
3
Printing a Card

natural_image
Abstract black and white pattern with curved white lines on a black background (no text or symbols)Printing with the P330i or P330m Card Printer is similar to printing with any other printer in a Windows environment.
- The Print Driver Software is installed on your computer (see Chapter 2).
- The printer is connected to the power source and the computer (see Chapter 2).
- The printer is selected by either the Operating System or the appropriate application software program.
- Printer Properties are set (the factory default values will be appropriate for many applications).
- Card printing is directed by the appropriate application software program.
Setting Printer Properties
Printer Properties can be set either at the Operating System level or within the application software program used for printing cards.

Note • In the following description of setting Printer Properties, only those properties and options that are suitable for being set by the User are described. The User should not make selections or set parameters unless they are specifically described in this section
Preferences settings can configure the printer for Landscape (wide) or Portrait (tall) printing orientation, and allow the user to verify that the desired ribbon is installed in the printer. (Monochrome ribbons are selected via the drop-down menu.)
If the printer includes the optional magnetic card stripe encoder, encoding parameters and coercivity can be set.
Printer cleaning can be initiated from the Tools window (printer cleaning can also be initiated at the printer; see Chapter 4).
Also from the Tools window, the Test Card can be selected from several pre-loaded styles.
“Single Feed Options” allows Disabling or Enabling Single Feed Support.
- If “Disable Single Feed Support” is selected, when the printer runs out of cards in the feeder, the LCD display will read OUT OF CARDS. To continue, press the panel button.
- If “Enable Single Feed Support” is selected, when the printer runs out of cards in the feeder it will wait until a card is inserted in the single-card slot or cards are loaded in the feeder, and then will automatically continue.
Printing a Sample Card
Sample card designs are installed with the printer driver. Sample cards require Microsoft Word or Microsoft Paint application software. The cards are accessed via the Start menu. Select Start, select Programs, select Zebra Card Printers, and select a sample card, or follow the directions below to design a card.
Follow these steps to design and print your first card:
- Launch Microsoft Word Software. Depending on your computer configuration this may be done by double-clicking an icon on your desktop, or by clicking the Windows Start icon, selecting Programs, and navigating to Microsoft Word
- Go to the File menu and choose Page Setup.
- Select the Paper Size tab, choose Card. Under orientation, select Landscape.
- Select the Margins tab, and set the Top, Bottom, Left, and Right margins to 0 (zero).
- Click OK to close the Page Setup window.
- The card appears on the screen.
- Design a card with both black and colored text and with colored pictures (see example below).


Note • For cards thinner than 20 mils (0.51 mm), the card design must be limited to (1) no more than two 30 mm x 30 mm areas of full color, (2) black information (text and barcode, for example) must cover no more than 50% of the card area, and (3) there must be at least a 5mm unprinted border along all edges.
For cards thicker than 40 mils (1.02 mm), the card design must have at least a 5mm unprinted border along all edges.
For cards with thickness between 20 mils (0.51 mm) and 40 mils (1.02 mm), these restrictions do not apply; full color printing is permitted edge to edge in both directions.
-
Once you are ready to print, go to the File menu and select Print.
-
If the printer was not selected as the default printer, go to the File menu, select Print Setup and choose Zebra P330i Card Printer (or Zebra P330m Card Printer) from the printer names list. Then Close the Print Setup dialog box.
-
The printer will feed in a card and start printing (the data download time will vary depending on the complexity of the card design and the processing speed of your computer).
-
Once the printing job is complete, the card is ejected from the printer.
Feeding One Card at a Time
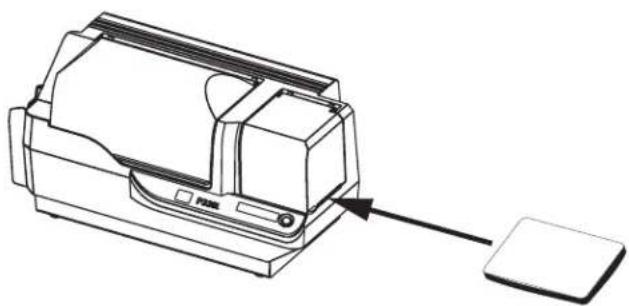
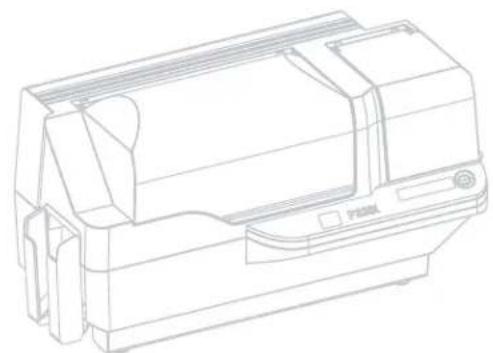
A Manual Feed Slot is available below the Card Input Hopper for feeding single cards. The Card Input Hopper must be empty for single-card feeding to work properly.
-
Open the Card Feeder cover. Verify that there are no cards in the feeder, then close the Card Feeder cover.
-
Insert a single card into the slot below the Card Feeder. Do not feed more than one card at a time.
natural_image
Line drawing of a printer with an arrow pointing to a blank sheet (no text or symbols)
Note • If single-card feeding will be the normal mode of operation, you may select that mode through the driver software. In single-card feed mode, the card will not be printed until the print job has been sent to the printer and the card to be printed has been inserted into the single-card feed slot

Printing a Card
Feeding One Card at a Time
natural_image
Technical line drawing of a mechanical component or housing (no text or symbols visible)
Caution • PROTECT YOUR FACTORY WARRANTY!
The recommended cleaning procedures must be performed to maintain your factory warranty. Other than the recommended cleaning procedures described in this manual, allow only Zebra authorized technicians to service the P330i or P330m Printer.
NEVER loosen, tighten, adjust, bend, etc., any part or cable inside the printer.
NEVER use a high pressure air compressor to remove particles in the printer.
Cleaning the Printer
Clean your printer using Pre-Saturated Cleaning Cards provided. The regular use of these cards will clean and maintain important parts of your printer that cannot be reached, including the Print Head, Transport Rollers, and optional Magnetic Encoder Station.
When to Clean
When the LCD Panel displays the message CLEAN PRINTER.
Approximately every 1000 cards when using 5-panel color ribbon (P330i only), or every 5000 cards when using a monochrome ribbon.
How to Clean

Note • This cleaning procedure uses two cleaning cards. One cleaning card is the size of a regular plastic card, and is referred to as the “cleaning card.” The other is elongated, with a wider section at one end; it is referred to as the “long cleaning card.”
- Leave the Printer power on, or turn it on if it was off.
- Initiate the cleaning process by either of the following methods:
- At the printer, press and hold the panel button for several seconds, until the LCD Panel displays the message REMOVE RIBBON THEN CLOSE HEAD.
- From the computer, enter the Printer Tools software, and click on the CLEAN button. The LCD Panel will display the message REMOVE RIBBON THEN CLOSE HEAD.
- Open the Main Cover, release the Print Head Carriage, and remove the ribbon. Then close the Print Head Carriage. (For details, see Chapter 2.) The LCD Panel will display the message EMPTY FEEDER & PRESS BUTTON.
- Open the Card Feeder Cover and remove cards from the Card Feeder. The last card is difficult to remove; leave it in place. Press the Panel Button on the front of the printer. The card remaining in the feeder will be ejected. The LCD Panel will then display the message LOAD CLEANING CARD IN FEEDER.
- Place a pre-saturated Cleaning Card into the Card Feeder. The Cleaning Card will automatically feed into the printer and the cleaning process will start (there is a several second delay after the Cleaning Card feeds before the cleaning movement starts). While the cleaning process is underway, the LCD Panel will display the message CLEANING PRINTER.
- At the conclusion of this part of the cleaning process, the Cleaning Card will be ejected, and the LCD Panel will display the message PRESS BUTTON TO CONTINUE.
- After the user presses the panel button, the LCD Panel will display the message FEED LONG CLEANING CARD IN EXIT. Insert the long end of the long cleaning card into the card exit (directly above the Output Hopper). If the user inserts a “regular” cleaning card into the card exit, the LCD Panel will display the message INVALID CARD, PRESS BUTTON until the user presses the panel button and inserts the long cleaning card into the card exit.

Note • If the user does nothing at this point (i.e., does not insert the long cleaning card), after a timeout the LCD Panel display will change to CLEAN PRINTER. The printer will be able to print, but the LCD Panel will continue to display CLEAN PRINTER.
This limited cleaning does not do a thorough cleaning, but may be performed if no “long cleaning cards” are available.
To restore the display to READY, you will need to perform a complete cleaning process, using both short and long cleaning cards, from step 2 above through step 9 below.
- The long cleaning card will automatically feed into the printer and the printing process will continue. The LCD Panel will again display the message CLEANING PRINTER.
- When the cleaning process is completed, the long cleaning card will be ejected and the LCD Panel will display the message READY, indicating that the printer is ready to resume normal printing operations.
- Discard both cleaning cards after a single use.

Note • Do not use previously used cleaning cards.
Cleaning the Print Head
A cleaning using the Cleaning Cards usually suffices. However, a separate Print Head cleaning can remove more stubborn deposits when print anomalies persist. To avoid deposits, only use foam-tipped swabs.
- Place the printer power switch in the OFF (O) position.
- Open the Main Cover, release the Print Head Carriage, and remove the ribbon. Leave the Print Head Carriage in its raised position. (For details, see Chapter 2.)
- Clean Print Head by moving an alcohol-moistened swab tip side-to-side across the Print Head elements. Only use moderate force. To re-order swabs, please refer to the Media List on the Windows Drivers and User Documentation CD supplied with this printer.
- The swabs can also be used in a similar manner to clean the optional magnetic encoding head.

Caution • Never use a sharp object or any abrasive to scrape deposits from the print head. Permanent damage to the print head will result.

Caution • Do not touch the print head if the printer has been in service in the last 10 minutes. It could be very hot and cause a burn.
Card Cleaning Cartridge
Your printer includes a Card Cleaning Cartridge. This item cleans the cards entering the printer through the card feeder. To ensure print quality, the cleaning roller requires periodic replacement. New cleaning rollers are included with each ribbon or may be purchased separately. (To reorder, please refer to the Media List on the Windows Drivers and User Documentation CD supplied with this printer.)
Installation of the Card Cleaning Cartridge is described in Chapter 2 and is not repeated in detail here.

Note • Before replacing the Card Cleaning Cartridge or its cleaning roller, clean the Printer using the Cleaning Cards as described earlier in this chapter.
When to Replace the Cleaning Roller
Replace the Cleaning Roller each time you install a new ribbon.
How To Replace the Cleaning Roller
- Open the main cover and locate the Card Cleaning Cartridge.
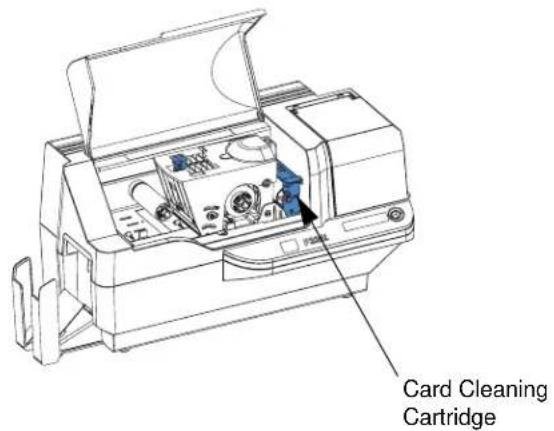
- Gently remove the Card Cleaning Cartridge. Lift the "handle" end, and then pull it away from the printer.

natural_image
Technical line drawing of a printer internal structure with an external component, showing no text or symbols.- Remove the cleaning roller from the Card Cleaning Cartridge and discard.

natural_image
Blue mechanical component with attached circular features and mounting holes (no text or symbols)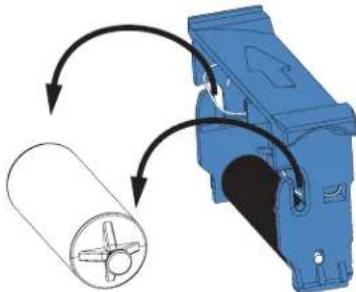
natural_image
Diagram showing a blue mechanical component with a cylindrical part inserted, connected by arrows indicating rotation or assembly (no text or symbols present)- Install new cleaning roller into the Card Cleaning Cartridge. To avoid contamination, always hold the cleaning roller by the ends. (For replacement cleaning rollers, please refer to the Media List on the Windows Drivers and User Documentation CD supplied with this printer.)

natural_image
3D diagram of a blue mechanical component with a green arc and internal structure, connected by wires (no text or symbols)- Peel protective wrapper from the cleaning roller by gently pulling on the tape.
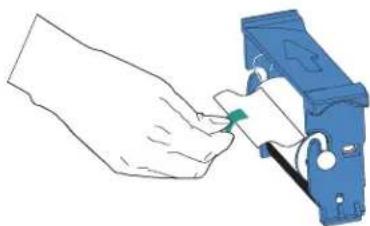
natural_image
Illustration of a hand inserting a small component into a blue mechanical clamp (no text or symbols)
Note • DO NOT touch the adhesive roller surface that contacts the cards.
- Replace the Card Cleaning Cartridge into the printer:
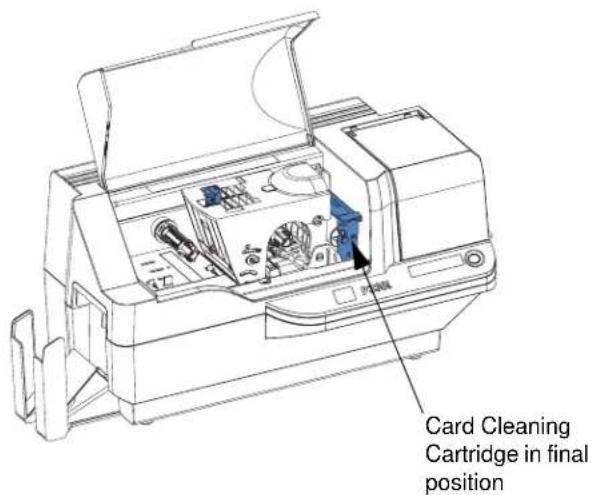
- Close the printer main cover.
5
Troubleshooting
natural_image
Abstract black and white pattern with curved white lines on a black background (no text or symbols)The table on the next page offers causes and solutions to symptoms related to improper operation. Check the table when experiencing any loss of operation or print quality.
| Problem / Description Cause / Solution | |
| The LCD Panel displaysOUT OF CARDSmessage. | 1. Check for cards in the card feeder. If no cards present, load cards.2. Check that Card Thickness Control lever is properly adjusted (see Loading Cards in Chapter 2).3. Press the Panel Button for 1 second. The printing job will restart. |
| The LCD Panel displaysOUT OF RIBBONmessage. | 1. Check ribbon. Replace if defective or entirely used.Ribbon will automatically synchronize and printing will restart with a new card. |
| The LCD Panel displaysPRINT HEAD OPENmessage. | 1. Check that Print Head Carriage is closed and latched. If not, close and latch it. |
| The LCD Panel displaysMECHANICAL ERRORmessage. | 1. Check that you are using the correct card type (see Technical Specifications).2. Check that Card Thickness Control lever is properly adjusted (see Loading Cards in Chapter 2).3. If 2 cards are fed into the printer at the same time:Open cover and remove Card Cleaning Cartridge, empty the Card Feeder, and pull the jammed cards out. Replace the Card Cleaning Cartridge.Remove cards from Card Feeder, separate them as shown in Loading Cards in Chapter 2, and replace.4. Check that ribbon is loaded correctly. |
| The LCD Panel displaysENCODING ERRORmessage. | 1. Check that you are using the correct magnetic card type (for low or high coercivity encoding).2. Verify command syntax.3. Contact Zebra technical support. |
| The LCD Panel displaysCLEAN PRINTERmessage. | 1. Printer cleaning required (see Chapter 4). |
Print Quality Issues
This section will help you resolve print quality problems. The print quality is dependent on several factors. The two most important factors that will increase your print quality are cleanliness and card stock. To diagnose and fix print quality problems, follow the troubleshooting procedures below:

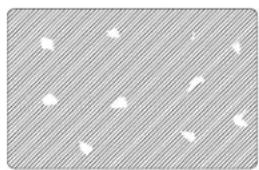
Example 1 • Small spots appear on the printed card with a non-printed area or a different color.
natural_image
Abstract pattern of white arrows on a diagonal striped background (no text or symbols)Possible Cause:
- Contamination on the card surface.
Solutions:
- Check that cards are stored in a dust free environment.
- Use a different supply of cards.
Possible Cause:
- Dust inside the printer and/or dirty Cleaning Roller.
Solutions:
- Perform a Cleaning of the printer (see Chapter 4).
- Replace Cleaning Roller (see Chapter 4).

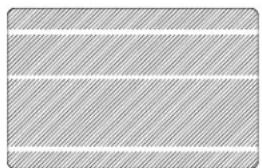
Example 2 • There are non-printing horizontal lines (white) on the card surfaces.
natural_image
Abstract pattern of horizontal gray stripes with white hatching (no text or symbols)Possible Cause:
- Ribbon cartridge is not correctly positioned.
Solutions:
- Ensure that the ribbon is properly rolled onto the ribbon cores of the cartridge and that there are no wrinkles in the ribbon.
- Replace ribbon cassette, making sure it locks in place.
Possible Cause:
- Print Head is dirty.
Solution: - Clean the Print Head
Possible Cause:
- Print Head elements are damaged (e.g., scratched or burnt).
Solution: - Call Zebra Customer Service for Print Head replacement information.

Example 3 • Printing shows very pale, very dark, or inconsistent results

natural_image
Plain gray rectangular background with diagonal striped texture (no text or symbols)Possible Cause:
- Ribbon has been stored improperly or is damaged.
Solution: - Change ribbon and print again.
Possible Cause:
- Cards may not meet specifications.
Solution: - Use a different supply of cards.
Possible Cause:
- Contrast and/or Intensity may be set to incorrect values.
Solution: - Adjust Contrast and/or Intensity values in software.
Possible Cause:
• Head Settings are too low / high.
Solution:
- Adjust Head Settings higher / lower.
Possible Cause:
- Dust or embedded contamination on elements of the Print Head.
Solution: - Perform a Cleaning of the Print Head (see Chapter 4).

Example 4 • Printing shows blurry printed image.
A
Possible Cause:
- Ribbon cartridge may not be correctly positioned.
Solution:
- Check that the ribbon is properly rolled onto the ribbon cores of the cartridge.
- Replace ribbon cartridge, making sure it locks in place, and print again.
Possible Cause:
- Ribbon may not be synchronized on the correct color panel position (model P330i only)
Solution:
- Open the Print Head Carriage, then close it. This will cause the ribbon to re-synchronize.
Possible Cause:
- Cards may not meet specifications.
Solution:
- Use a different supply of cards.
Possible Cause:
- Dust or embedded contamination inside the printer and/or dirty Cleaning Roller.
Solution:
- Clean the Print Head.
- Replace the Cleaning Roller.

Example 5 • No printing on the card.
Possible Cause
- Ribbon may not be installed in the printer.
Solution:
- Check for ribbon in the printer.
Possible Cause
- Cards may not meet specifications.
Solution:
- Use a different supply of cards.
Possible Cause
- Print Head elements may be scratched or burnt.
Solution
- Call Service for Print Head replacement information.

Example 6 • Only one panel of a color ribbon prints. (This applies to the P330i only.)
Possible Cause
• Using the wrong type of ribbon.
Solution:
• Use only i Series ribbons for full color printing.

Note • For optimum print quality, always keep the Main Cover and the Card Feeder Cover of the printer closed.
Troubleshooting the Ethernet Connection and Adapter
Resetting to Factory Defaults
To reset the Ethernet Adapter configuration parameters to the factory defaults, press the Ethernet Switch
and hold it in while turning the printer power on. Keep the Panel Button pressed until the Status Indicator light turns green, then release the Ethernet Switch. To print a configuration card, press and hold the Ethernet Switch until a card starts to print.
Ethernet Adapter Status Indicator
A bi-color Status Indicator displays the operational status of the Ethernet Adapter. The following conditions might occur:
- During normal operation, the LED is solid green for more than 30 seconds. This indicates all the hardware is functioning properly and the Ethernet Adapter has detected the presence of the network. It does not mean the Ethernet Adapter has an IP address or is attached to a printer queue.
-
If the LED is rapidly flashing green (9 times/sec), the Ethernet Adapter has not detected the presence of a network cable. To solve the problem:
-
Verify that the network cable is appropriate for the network and has an RJ-45 connector.
- Turn the printer power off (O). Remove the network cable from the Ethernet Adapter. Plug the network cable back in until you hear a positive click. Check the other end of the cable in the same manner. Turn the printer power on; if the Ethernet Adapter still does not detect a cable, continue.
- Connect the Ethernet Adapter to a known good network connection. If the Ethernet Adapter is still unable to detect the network cable, contact Technical Support for assistance.

Important • Cables with a rating higher than CAT-6 have not been tested.
-
If the LED is slowly flashing green (1 time/sec), the Ethernet Adapter is trying to print a job. If the job does not print, check the following:
-
Verify that the printer has media and ribbon. If the printer is showing any errors, it is unlikely that the Ethernet Adapter can send data to the printer. The LED continues to blink until the printer malfunction is resolved or until the printer is turned off (O).
-
Flashing red indicates the Power On Self Test (POST) is in progress.
-
If the LED is solid red for more than 30 seconds, the Ethernet Adapter has failed the POST. A failed POST can be caused by any of the following:
-
The printer attached to the Ethernet Adapter device is malfunctioning. Turn the printer power off, wait 10 seconds, then turn the printer back on ( | ).
- If the Ethernet Adapter still fails the POST, the Ethernet Adapter has a hardware problem that can be fixed only by replacing or returning the unit. Contact Technical Support for repair or replacement information.
Troubleshooting
Troubleshooting the Ethernet Connection and Adapter
- If the LED is alternately flashing red and green for longer than 2 minutes, the Ethernet Adapter is in firmware-download mode. This means it is waiting for new firmware data to be sent before it continues normal functioning. Perform the following:
- If the Ethernet Adapter was purposely put into firmware-download mode, finish the download with the proper update utility. Contact the Zebra web site at http://www.zebra.com to download this utility.
- Contact Technical Support for help recovering this unit.
Network Status/Activity Indicator
A bi-color Status/Activity LED indicates network speed, established link, and network activity.
- If the LED is off, no link was established.
- If the LED is solid green, a 100Base link is established.
- If the LED is flashing green, a 100Base link is established and network activity has been detected.
- If the LED is solid orange, a 10Base link is established.
- If the LED is flashing orange, a 10Base link was established and network activity has been detected.
Network activity detected by this LED does not mean the activity is data for the print server. The activity is all activity on the network seen on the Ethernet Adapter.
Technical Specifications

natural_image
Abstract black and white pattern with curved white lines on a black background (no text or symbols)General Specifications
• Full color dye-sublimation card printing
• 25 seconds per card single-sided color printing (YMCKO) (P330i only)
• Monochrome thermal transfer printing
Ribbon Specifications
• Patented ribbon core and spindle system
• i Series technology featuring RFID (P330i only)

Note • "i Series" Printers require the use of "i Series" ribbons for full color printing. For more information about Card Media and Ribbons available from Zebra Technologies Corp., please refer to the Media List on the Windows Drivers and User Documentation CD supplied with this printer. (This applies to P330i only.)
Card Specifications
- Types: PVC or Composite
- Card Width/length ISO CR-80 - ISO 7810, 2.125" (54 mm) x 3.375" (86 mm)
• Option: Magnetic Stripe - ISO 7811 - Card thickness: 10-60 mil (0.25-1.5 mm) ± 10%
- Card feeder capacity: up to 100 cards (30mil) (Optional high-capacity feeder: up to 220 cards)
• Card output hopper capacity: 100 cards (30mil)
Bar Codes
• Code 39, Code 128 B & C with & without check digit
• 2 of 5 and 2 of 5 interleaved
- UPC-A, EAN8, and EAN13
- PDF-417 2D bar code and other symbologies available via Windows printer driver
Fonts
- Arial and Arial Bold
- True Type fonts available via Windows Driver
Card Dimensions
ISO Standard 7810 Dimensions for Plain Card

ISO Standard 7811 Dimensions for Magnetic Stripe Card

Contact Location for Smart Card ISO Standard 7816

Bi-Directional Communications Interfaces
- USB
• Built-in Ethernet (optional)
Mechanical Specifications
• Width: 18.2 in (462 mm)
- Depth: 9.4 in (239 mm)
• Height: 10.1 in (256 mm)
• Weight: 15.5 lbs (7 kg)
Electrical
- 110 230 Volts AC ± 10% (100 - 254 V), 60 \~ 50 Hz ± 3Hz (47 - 63 Hz)
• FCC Class A, CE, UL, and CUL approved
Environmental
- Operating Temperature: 60^ to 86^ (15°C to 30°C)
- Operating Humidity: 20% to 65% non condensing
• Storage Temperature: 23 °F to 158°F (-5°C to 70°C)
• Storage Humidity: 20% to 70% non-condensing - Ventilation: Reasonably dust free air environment
Options
• Built-in Ethernet network communications
- Three track magnetic stripe encoder (standard and reverse)
• High capacity feeder (220 30-mil cards)
- Contactless encoding (MIFARE and HID iCLASS)
- Contact encoding (Station and encoder)

Technical Specifications Options

natural_image
Technical line drawing of a mechanical device with no visible text or symbolsMagnetic Card Encoder

natural_image
Abstract black and white pattern with curved white and black shapes (no text or symbols)Introduction
This Appendix includes operation and maintenance requirements for the P330i or P330m Printer with the optional magnetic card stripe encoder. (See Chapter 2 for location of the Magnetic Card Stripe Encoder.)
The magnetic encoder can be set for either high or low coercivity. Use the printer driver to change the encoder setting.
Media Loading Orientation
The magnetic encoder may be installed with the read/write head positioned below the card path. Magnetic Card Stripe Encoder upgrade kits are also available.
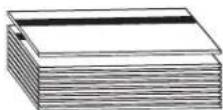
When loading cards with magnetic stripes into the card feeder, please ensure that the magnetic stripe is down and nearer to the rear of the printer.

Also available are Printer models with the Magnetic Read/Write head positioned above the card path. When loading cards into one of these models, ensure that the magnetic stripe is up and nearer to the rear of the printer.
Sample Encoding Program
Refer to the Programmer's Manual (part number 98001-001).

Note • ONLY USE cards that comply with ISO 7810 and 7811 standards for magnetic stripe cards. The magnetic stripe must be flush to the surface of the card to work properly. Never use cards which have taped-on magnetic stripes.
Magnetic Encoder Cleaning
The Magnetic Encoder Read/Write Head is cleaned as part of the printer cleaning process. If the frequency of encoding errors increases, the magnetic encoder head may need cleaning.
When to Clean
When the LCD Panel displays the message ENCODING ERROR at an increasing frequency.
How to Clean
- Leave power on.
- Press and hold the front panel button for a few seconds.
- Open the main cover and release the Print Head Carriage latch, raise the Print Head Carriage, and remove the ribbon. Close the Print Head Carriage.
- Close the main cover.
- Open the Card Feeder cover and remove any cards.
- Insert a Pre-Saturated Cleaning Card (provided) into the slot below the Card Feeder. The cleaning card will feed into the printer and carry out the cleaning process. Repeat the process with a new cleaning card if necessary.
- Additional cleaning of the magnetic head can be accomplished using the alcohol-soaked swabs provided with the printer. Follow the directions given in Section 4.
ISO Standard Encoding
| Track # | Field Separator | Track Density | Valid Characters | # of characters |
| 1 ^ 210 BPI* | Alphanumeric | (ASCII 20~95+) | 79‡ | |
| 2 = 75 BPI* | Numeric | (ASCII 48~62) | 40‡ | |
| 3 = 210 BPI* | Numeric | (ASCII 48~62) | 107‡ |
*Bits per inch
† Except the “?” character
† Including Start, Stop, and LRC characters. Also note that these 3 characters are automatically managed by the magnetic encoder according to the ISO Standard Norms.

Note • Refer to the Card Printer Programmer's Manual for complete programming information.

natural_image
Technical line drawing of a mechanical component or housing (no text or symbols visible)Smart Card Contact Station

natural_image
Abstract black and white pattern with curved white lines on a black background (no text or symbols)This section contains information on the additional operations of a P330i or P330m Printer equipped with the optional Smart Card Contact Station. (See Chapter 2 for location.)
Introduction
Smart Cards can have a built-in microcomputer and/or memory to store fingerprints, voice recognition patterns, medical records, and other such data. The printer may be equipped with an optional contact station for programming Smart Cards (ISO 7816). This printer model responds to commands that position the card at the contact station, where the printer connects to the contacts on the Smart Card. All other printer operations remain the same as the standard models.
Media Loading Orientation
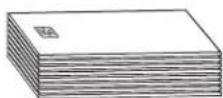
Orient the cards with the gold-plated Smart Card contacts at the top surface of the card and facing to the left.
Smart Card Contact Station Interface
When a command to the printer interface sends a card to the Smart Card Contact Station, the printer connects the Smart Card Contact Station to the female DB-9 connector on the rear of the printer.

natural_image
Technical line drawing of a device rear panel with ports and connectors (no text or symbols)DB-9 Connector location for Smart Card Contact Station
An attached external Smart Card Programmer can be used to program Smart Card chips. The following table shows the Smart Card Contact Points.
| DB-9 Pin | Smart Card Contact Points DB-9 | Pin Smart | Card Contact Points |
| 1 | C1 (VCC) 6 C6 (Vpp) | ||
| 2 | C2 (Reset) 7 C7 (I/O) | ||
| 3 | C3 (Clock) 8 C8 (RFU) | ||
| 4 | C4 (RFU) | 9 (GND when chip is at station) | |
| 5 | C5 (GND) | ||
Connecting to a Network

natural_image
Abstract black and white pattern with curved white lines on a black background (no text or symbols)Card printers can be connected to an Ethernet network in three ways.
Printer Sharing
In printer sharing, the printer is connected locally to the host computer and configured to be shared to other client computers. Client computers connect to the printer over the network through the host computer.

flowchart
graph TD
    A["Computer 1"] --> C["Switch"]
    B["Computer 2"] --> C["Switch"]
    D["Computer 3"] --> C["Switch"]
    E["Computer 4"] --> C["Switch"]
    C --> F["Server"]
    G["Computer 5"] --> F["Server"]
External Print Server
A stand alone device that acts as a server on the network specifically for receiving print jobs and passing them to the printer. Client computers connect to the print server over a network.

flowchart
graph TD
    A["Computer 1"] --> C["Switch"]
    B["Computer 2"] --> C["Switch"]
    D["Computer 3"] --> C["Switch"]
    C --> E["Server"]
    E --> F["Ethernet"]
    F --> G["Server"]
Internal Print Server
Similar to an external print server, except the print server is integrated into the printer. This removes the need for a separate power supply and separate device drivers. This is the simplest way to network a printer.

flowchart
graph TD
    A["Computer 1"] --> C["Server"]
    B["Computer 2"] --> C["Server"]
    D["Computer 3"] --> C["Server"]
    C --> E["Printer"]
Worldwide Sales & Support
Sales and Support Locations
The Americas:
Zebra Technologies, LLC
Card Printer Solutions Headquarters
1001 Flynn Road
Camarillo, CA 93012-8706 USA
Phone: +1 (805) 579 1800
Fax: +1 (805) 579 1808
Toll free in US: (800) 452-4056
e-mail: cards@zebra.com
Europe:
Zebra Technologies Europe Limited
Zebra House
The Valley Centre, Gordon Road
High Wycombe
Buckinghamshire HP13 6EQ, UK
Phone: +44 (0) 870 241 1527
Fax: +44 (0) 870 241 0765
e-mail: eurosales@zebra.com
Latin America Sales Office:
9800 NW 41st Street, Suite 220
Doral, FL 33178 USA
Zebra Technologies Asia Pacific, LLC
16 New Industrial Road
05-03 Hudson TechnoCentre
Singapore 536204
Phone: +65 6858 0722
Fax: +65 6885 0836
e-mail: asiasales@zebra.com
Website
www.zebracard.com


- Zebra® P330i & P330m
- Card Printer User's Manual
- Foreword
- Return Materials Authorization
- Copyright Notice
- Trademarks
- Product Disposal
- Declarations of Conformity
- FCC Radiation Exposure Statement (applicable to 15.247 device only)
- Industry Canada Notice
- Contents
- - Foreword ....iii
- • Introduction.... 1
- · Installation and Setup.... 5
- • Printing a Card 25
- · Cleaning.... 29
- · Troubleshooting 35
- · Technical Specifications 43
- Appendix A • Magnetic Card Encoder 47
- Appendix B • Smart Card Contact Station ..... 51
- Appendix C · Connecting to a Network ..... 53
- Appendix D • Worldwide Sales & Support.... 55
- Controls, Connectors, and Indicators
- LCD Panel
- Introduction
- Installation and Setup
- General Information
- Unpacking the Printer
- Installing the Print Driver Software and Setting Driver Options
- Installing the Print Driver
- Loading a Ribbon
- Installing the Card Cleaning Cartridge
- Setting the Card Thickness Control
- Loading Cards
- Card Output Hopper
- Connecting the Printer to your Computer
- Connecting Power
- Printing a Test Card
- Packing the Printer for Shipment
- 3
- Printing a Card
- Setting Printer Properties
- Printing a Sample Card
- Feeding One Card at a Time
- Cleaning the Printer
- When to Clean
- How to Clean
- Cleaning the Print Head
- Card Cleaning Cartridge
- When to Replace the Cleaning Roller
- How To Replace the Cleaning Roller
- 5
- Troubleshooting
- Print Quality Issues
- Possible Cause:
- Example 3 • Printing shows very pale, very dark, or inconsistent results
- Example 4 • Printing shows blurry printed image.
- A
- Solution:
- Example 5 • No printing on the card.
- Example 6 • Only one panel of a color ribbon prints. (This applies to the P330i only.)
- Troubleshooting the Ethernet Connection and Adapter
- Resetting to Factory Defaults
- Ethernet Adapter Status Indicator
- Network Status/Activity Indicator
- Technical Specifications
- General Specifications
- Ribbon Specifications
- Card Specifications
- Bar Codes
- Fonts
- Card Dimensions
- Bi-Directional Communications Interfaces
- Mechanical Specifications
- Electrical
- Environmental
- Options
- Technical Specifications Options
- Magnetic Card Encoder
- Media Loading Orientation
- Sample Encoding Program
- Magnetic Encoder Cleaning
- ISO Standard Encoding
- Smart Card Contact Station
- Smart Card Contact Station Interface
- Connecting to a Network
- Printer Sharing
- External Print Server
- Internal Print Server
- Worldwide Sales & Support
- Sales and Support Locations
- The Americas:
- Europe:
- Latin America Sales Office:
- 05-03 Hudson TechnoCentre
- Website
Brand : ZEBRA
Model : P330i
Category : Card printer