
AHA9SED - Air conditioner SHARP - Free user manual and instructions
Find the device manual for free AHA9SED SHARP in PDF.
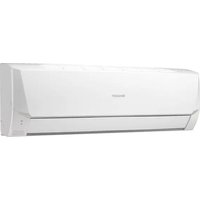


| Product Type | Split wall-mounted air conditioner (cooling and heating) |
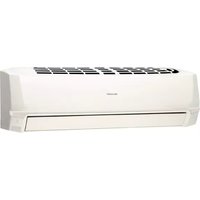
| Model | Sharp AHA9SED |
| Cooling Capacity | 9000 BTU/h (approx. 2.6 kW) |
| Heating Capacity | 9500 BTU/h (approx. 2.8 kW) |
| Indoor Unit Dimensions (W x H x D) | 800 x 290 x 220 mm |
| Outdoor Unit Dimensions (W x H x D) | 700 x 550 x 250 mm |
| Indoor Unit Weight | 10 kg |
| Outdoor Unit Weight | 30 kg |
| Power Supply | 220-240 V, 50 Hz, single phase |
| Operating Modes | Cool, Heat, Fan, Dehumidify, Auto |
| Remote Control | Yes, with LCD display |
| Timer | 24-hour programmable on/off timer |
| Sleep Mode | Yes, gradually adjusts temperature for comfort |
| Auto Swing | Vertical and horizontal louver oscillation |
| Filter Type | Washable, anti-bacterial, and deodorizing filter |
| Filter Cleaning Indicator | Yes, LED indicator on indoor unit |
| Refrigerant | R32 |
| Energy Efficiency Ratio (EER) | 3.5 (approx.) |
| Noise Level (Indoor) | 21-38 dB(A) |
| Noise Level (Outdoor) | 48 dB(A) |
| Maintenance | Clean filter every 2 weeks; check outdoor unit coils annually |
| Safety Features | Overvoltage protection, auto restart after power failure, child lock |
| Spare Parts Available | Remote control, filters, fan motor, PCB, sensors |
Frequently Asked Questions - AHA9SED SHARP
User questions about AHA9SED SHARP
0 question about this device. Answer the ones you know or ask your own.
Ask a new question about this device
Download the instructions for your Air conditioner in PDF format for free! Find your manual AHA9SED - SHARP and take your electronic device back in hand. On this page are published all the documents necessary for the use of your device. AHA9SED by SHARP.
USER MANUAL AHA9SED SHARP
SPLIT TYPE
ROOM AIR CONDITIONER
OPERATION MANUAL
SPLIT-TYPE AIR CONDITIONER
OPERATION MANUAL
INDOOR UNIT
OUTDOOR UNIT
(SMD models)
AH-AP9SMD
AU-A9SMD
AH-AP12SMD
AU-A12SMD
AH-AP18SMD
AU-A18SMD
AH-AP24SMD
AU-A24SMD
(SED models)
AH-A9SED
AU-A9SED
AH-A12SED
AU-A12SED
AH-A18SED
AU-A18SED
AH-A24SED
AU-A24SED

"Plasmacluster" and "Device of a cluster of grapes" are registered trademarks or trademarks of Sharp Corporation.
CONTENTS
- IMPORTANT SAFETY INSTRUCTIONS......EN-1
- PART NAMES ......EN-2 • USING THE REMOTE CONTROL......EN-4
- AUXILIARY MODE ....EN-4 • TIPS ON SAVING ENERGY......EN-4
- BASIC OPERATION......EN-5 • OPERATION CONDITION ......EN-5
- ADJUSTING THE AIR FLOW DIRECTION......EN-6 • POWERFUL JET / SUPER JET OPERATION ....EN-6 • GENTLE COOL AIR......EN-7
- PLASMACLUSTER OPERATION ......EN-7 • COMFORT OPERATION ......EN-8
- BABY MODE OPERATION......EN-8
- TIMER OPERATION ......EN-9
- SELF CLEAN OPERATION......EN-10
- DISPLAY BUTTON......EN-10
- MAINTENANCE ......EN-11
- BEFORE CALLING FOR SERVICE......EN-12
IMPORTANT SAFETY INSTRUCTIONS
WARNING
- Do not pull or deform the power supply cord. Pulling and misuse of the power supply cord can result in damage to the unit and cause electrical shock.
- Be careful not to expose your body directly to the outlet air for a long time. It may affect your physical conditions.
- When using the air conditioner for infants, children, elderly, bedridden, or disabled people make sure the room temperature is suitable for those in the room.
- Never insert objects into the unit. Inserting objects can result in injury due to the high speed rotation of internal fans.
- Ground the air conditioner without fail. Do not connect the grounding wire to gas pipe, water pipe, lightning rod or telephone grounding wire. Incomplete grounding may cause electric shock.
- If anything is abnormal with the air conditioner (ex. a burning smell), stop the operation immediately and turn the circuit breaker OFF.
- The appliance shall be installed in accordance with national wiring regulations. Improper cable connection can cause the power supply cord, plug and the electrical outlet to overheat and cause fire.
- If the supply cord is damaged, it must be replaced by the manufacturer or its service agent or a similarly qualified person in order to avoid a hazard. Use only the manufacture-specified power cord for replacement.
- Do not splash or pour water directly on the unit. Water can cause electrical shock or equipment damage.
- Do not attempt to install/remove/repair the unit by yourself. Incorrect work will cause electric shock, water leak, fire etc. Consult your dealer or other qualified service personnel for the installation/removal/repair of the unit.
CAUTION
- Open a window or door periodically to ventilate the room, especially when using gas appliances. Insufficient ventilation may cause oxygen shortage.
- Do not operate the buttons with wet hand. It may cause electric shock.
- For safety, turn the circuit breaker off when not using the unit for an extended period of time.
- Check the outdoor unit mounting rack periodically for wear and to make sure it is firmly in place.
- Do not put anything on the outdoor unit nor step on it. The object or the person may fall down or drop, causing injury.
- This unit is designed for residential use. Do not use for other applications such as in a kennel or greenhouse to raise animals or grow plants.
- Do not place a vessel with water on the unit. If water penetrates into the unit, electrical insulations may deteriorate and cause electric shock.
- Do not block the air inlets nor outlets of the unit. It may cause insufficient performance or troubles.
- Be sure to stop the operation and turn the circuit breaker off before performing any maintenance or cleaning. A fan is rotating inside the unit and you may get injured.
- This appliance is not intended for use by persons (including children) with reduced physical, sensory or mental capabilities, or lack of experience and knowledge, unless they have been given supervision or instruction concerning use of the appliance by a person responsible for their safety. Children should be supervised to ensure that they do not play with the appliance.
- Make sure to connect the air conditioner to power supply of the rated voltage and frequency. Use of a power supply with improper voltage and frequency can result in equipment damage and possible fire.
- Do not install the unit in a place where inflammable gas may leak. It may cause fire. Install the unit in a place with minimal dust, fumes and moisture in the air.
- Arrange the drain hose to ensure smooth drainage. Insufficient drainage may cause wetting of the room, furniture etc.
- Make sure a leak breaker or a circuit breaker is installed, depending on the installation location, to avoid electrical shock.
INDOOR UNIT
SED models SMD models
1 Inlet (Air) 2 Open Panel 3 Air Filter 4 AUX Button 5 Receiver Window 6 Vertical Airflow Louvre 7 Horizontal Airflow Louvre 8 Outlet (Air) 9 OPERATION Lamp(red) 10 TIMER Lamp (orange Ⓓ)
11 PLASMACLUSTER Lamp (blue (For SMD models only)

OUTDOOR UNIT AU-A9SMD, AU-A9SED

AU-A12SMD, AU-A12SED, AU-A18SMD, AU-A18SED
12 Inlet (Air) 13 Refrigerant Pipe and Cable 14 Drainage Hose 15 Outlet (Air)
REMOTE CONTROL
SED models SMD models

1 TRANSMITTER 2 DISPLAY 3 COMFORT Button 4 POWERFUL JET / SUPER JET Button 5 ON / OFF Button 6 BABY MODE Button (For SMD models only) 7 PLASMACLUSTER Button (For SMD models only) 8 GENTLE COOL AIR Button 9 FAN Button 10 THERMOSTAT Button 11 MODE Button 12 SWING Button (Vertical direction) 13 TIMER OFF Button 14 TIMER ON Button 15 TIMER CANCEL Button 16 SELF CLEAN Button (For SMD models only) 17 RESET Button 18 DISPLAY Button (For SMD models only) 19 SWING Button* (Horizontal direction)
DISPLAY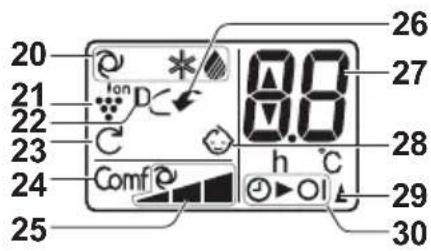
20 MODE Symbols

: AUTO

: COOL

: DRY
21 PLASMACLUSTER Symbol (For SMD models only)
22 GENTLE COOL AIR Symbol
23 SELF CLEAN Symbol (For SMD models only)
24 COMFORT Symbols
25 FAN SPEED Symbols

: AUTO
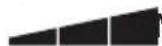
Manual setting
26 POWERFUL JET / SUPER JET Symbol
27 TEMPERATURE Indicator
28 BABY MODE Symbol (For SMD models only)
29 TRANSMITTING Symbol
30 TIMER ON / TIMER OFF Indicator
USING THE REMOTE CONTROL
LOADING BATTERIES
1 Remove the battery cover. 2 Insert two batteries. (AAA(R03)) Make sure the (+) and (-) polarities are correctly aligned. 3 Reinstall the battery cover. 4 Press the RESET button using a thin stick.

NOTE:
- The battery life is approximately 1 year in normal use.
- When replacing the batteries, always change both and use the same type.
- If you will not be using the unit for a long time, remove the batteries from the remote control.
HOW TO USE THE REMOTE CONTROL
Point the remote control towards the receiver window and press the desired button. The unit generates a beep when it receives the signal.
- Make sure nothing, such as curtains, block the signal receiver window. • The signal effective distance is 7 m.

CAUTION:
- Do not expose the receiver window to direct sunlight. This may adversely affect its operation.
- Use of certain fluorescent lamp in the same room may interfere with transmission of the signal.
- Do not leave the remote control in direct sunlight or near a heater. Protect the remote control from moisture and shock.
AUXILIARY MODE
Use this mode when the remote control is not available.
TO TURN ON
Press the AUX button.
- The red OPERATION lamp (☐) will light up and the unit will start operating in the AUTO mode.
- The fan speed and temperature setting are set to AUTO.
TO TURN OFF
Press the AUX button again.
- The red OPERATION lamp (☐) will turn off.

TIPS ON SAVING ENERGY
Below are some simple ways to save energy when you use your air conditioner.
Set the proper temperature
- Setting the temperature lower than necessary during cooling operation will result in increased power consumption.
Block direct sunlight and prevent drafts
- Blocking direct sunlight during cooling operation will reduce power consumption.
- Close the windows and doors during cooling and heating operations.
Keep filter clean to ensure the most efficient operation
Disconnect the power cord from the wall outlet or turn off the circuit breaker when the unit is not used for an extended period time
- The indoor unit still consumes a small amount of power when it is not operating.

1 Press the MODE button to select the operation mode.
![graph LR A["AUTO"] --> B["COOL"] B --> C["DRY"]](/content/2026/06/1288967/images/b9e370c95a77326fd6972e90524045f1fec859c52c4164444bfb1d14d43b4141.jpg)
2 Press the ON / OFF button to start operation.
- The red OPERATION lamp (☐) will light up.
TO TURN OFF
Press the ON / OFF button again.
- The red OPERATION lamp (☐) will turn off.
3 Press the THERMOSTAT button to set the desired temperature.
(AUTO / DRY mode)
The temperature can be changed up to ±2°C from the automatic setting.
(COOL mode)
The temperature setting range: 16-30°C.


4 Press the FAN button to set the desired fan speed.
![graph LR A["AUTO"] --> B["SOFT"] B --> C["LOW"] C --> D["HIGH"]](/content/2026/06/1288967/images/c970f65409240f43626695ffab549ced18c33fecbe4bb667dc09697efea11e2d.jpg)
OPERATION CONDITION
| Mode | Indoor Temp. | Outdoor Temp. | |
| Cooling | Upper limit | 32°C 43°C | |
| Lower limit | 21°C 21°C |
- The built-in safety device may prevent the unit from operating when used out of this range.
- Condensation may form on the air outlet if the unit operates continuously in the COOL or DRY mode when humidity is over 80%.
NOTE:
AUTO MODE
In the AUTO mode, the temperature setting and mode are automatically selected according to the room temperature when the unit is turned on.
DRY MODE
The fan speed is preset to AUTO and cannot be changed.
WHEN POWER FAILURE OCCURS
This air conditioner has a memory function to store settings when a power failure occurs.
After power recovery, the unit will automatically re-start in the same settings which were active before the power failure, except for TIMER, POWERFUL JET / SUPER JET, COMFORT, BABY MODE, SELF CLEAN settings.
ADJUSTING THE AIR FLOW DIRECTION
VERTICAL AIR FLOW DIRECTION
1 Press the SWING button ( ▽ ). • The vertical airflow louvre will swing
2 Press the SWING button (→) again to stop at the desired position.
- The adjustment range is narrower than the swinging range in order to prevent condensation from dripping.

HORIZONTAL AIR FLOW DIRECTION
Hold the horizontal airflow louvre levers and adjust the airflow direction.

CAUTION:
Never attempt to adjust the vertical airflow louvres manually.
- Manual adjustment of the vertical airflow louvre can cause the unit to malfunction.
- When the vertical airflow louvre is positioned at the lowest position in the COOL or DRY mode for an extended period of time, condensation may result.
The air conditioner works at the maximum power and optimum louver direction to make the room cool rapidly.
1 During operation, press the POWERFUL JET / SUPER JET button.
- The remote control will display "√". • The temperature display will go off.
- The vertical airflow louver will be set obliquely downward.
TO CANCEL
Press the POWERFUL JET / SUPER JET button again.
The vertical airflow louvre will return to its original direction.

NOTE:
- The air conditioner will operate at "Extra HIGH" fan speed for 30 minutes, then shift to "HIGH" fan speed.
- You cannot set the temperature or fan speed during POWERFUL JET / SUPER JET operation.
GENTLE COOL AIR
The vertical airflow louvre is set obliquely upward to deliver cool air to the ceiling, avoiding direct airflow.
1. During operation, press the GENTLE COOL AIR button.
The remote control will display "D C ".
TO CANCEL
Press the GENTLE COOL AIR button again.

NOTE:
If you want GENTLE COOL AIR operation in POWERFUL JET / SUPER JET mode, press the GENTLE COOL AIR button during POWERFUL JET / SUPER JET operation.
PLASMACLUSTER OPERATION
(For SMD models only)
Plasmacluster ions released into the room will reduce some airborne mold.
1 During operation, press the PLASMACLUSTER button.
- The remote control will display "ion".
- The blue PLASMACLUSTER lamp (ion) will light up.
TO CANCEL
Press the PLASMACLUSTER button again.
- The blue PLASMACLUSTER lamp (bullet) will turn off.

NOTE:
- Use of the PLASMACLUSTER operation will be memorized, and it will be activated the next time you turn on the unit.
- To perform PLASMACLUSTER operation in FAN only mode, press the PLASMACLUSTER button when the unit is not operating.
The mode symbol of the remote control will go off and the fan speed cannot be set to AUTO.
COMFORT OPERATION
COMFORT OPERATION reduces fluctuation of temperature and humidity by controlling fan speed.
1 During operation, press the COMFORT button.
- The remote control will display "Comf@".
- Fan speed will be automatically controlled.
- Louvre position will be automatically controlled.
TO CANCEL
Press COMFORT button again.

BABY MODE OPERATION
(For SMD models only)
Soft, quiet and clean operation cools a room with well optimized for infants.
1 During operation, press BABY MODE button.
- The remote control will display “💡”.
- Fan speed will be automatically set to LOW or SOFT.
- Louvre will be set to GENTLE COOL AIR operation.
- PLASMACLUSTER will be turned on.
TO CANCEL
Press BABY MODE button again.

NOTE:
- BABY MODE operation is not available in DRY mode.
TIMER OFF
1. Press the TIMER OFF button and set the time as desired.
![graph LR A["0.5h"] --> B["1.0h"] B --> C["1.5h"] C --> D["..."] D --> E["10h"] E --> F["11h"] F --> G["12h"]](/content/2026/06/1288967/images/7c8ed49b1b1c455d4bd961a8015712bba38462f133f951cdd78e2757ee82b72d.jpg)
- The orange TIMER lamp (⏻) will light up.
- The timer setting will count down to show the remaining time.
TO CANCEL
Press the CANCEL button.
- The orange TIMER lamp (⏻) will turn off.


TIMER ON
1. Press the TIMER ON button and set the time as desired.
![graph LR A["0.5h"] --> B["1.0h"] B --> C["1.5h"] C --> D["10h"] D --> E["11h"] E --> F["12h"]](/content/2026/06/1288967/images/94e194ddc11a159de256452788a33851e6f4dc579955713f0d6ac555158141f2.jpg)
- The orange TIMER lamp (💡) will light up.
- The timer setting will count down to show the remaining time.
TO CANCEL
Press the CANCEL button.
- The orange TIMER lamp (⏻) will turn off.

NOTE:
- Timer duration can be set from a minimum of half an hour to a maximum of 12 hours. Up to 9.5 hours, you can set it in half-hour increments, and from 10 to 12 hours, in 1-hour increments.
- The TIMER OFF and TIMER ON cannot be set together.
- When the temperature is set during timer setting, the temperature will show in the display for 5 seconds and then return to the timer display.
- If a power failure occurs while the TIMER is set, the TIMER setting will be cancelled and will not be retrieved even after the power is restored.
TIMER OFF
- When the TIMER OFF is set, the unit automatically adjusts the temperature setting to prevent excessive cooling while you are in sleep. One hour after the TIMER OFF is set, the unit gradually raises the temperature setting by 1°C by repeated ON/OFF operation for your comfortable sleep.
TIMER ON
- The unit will turn on prior to the set time to allow the room to reach the desired temperature by the programmed time. (Awaking function)
SELF CLEAN OPERATION
(For SMD models only)
SELF CLEAN operation will reduce the growth of mold fungus with Plasmacluster ions and dry inside of the unit. Utilize the operation at seasonal change over terms or every 4 months.
1 Press the SELF CLEAN button when the unit is not operating.
• The remote control will display " - The blue PLASMACLUSTER lamp will light up. - The unit will stop operation after 40 minutes.


TO CANCEL
Press the SELF CLEAN button.
- The blue PLASMACLUSTER lamp (🍴️) will turn off.


NOTE:
- You cannot set the temperature, fan speed, air flow direction or timer setting during the SELF CLEAN operation.
- Mold fungus already grown cannot be eliminated by this operation.
DISPLAY BUTTON
(For SMD models only)
Use when the blue PLASMACLUSTER lamp on the unit is too bright. (The red OPERATION lamp and the orange TIMER lamp cannot be turned off.)
1 During operation, press the DISPLAY button.
- The blue PLASMACLUSTER lamp ( ) will turn off.
TO LIGHT UP
Press the DISPLAY button again.

MAINTENANCE
Be sure to disconnect the power cord from the wall outlet or turn off the circuit breaker before performing any maintenance.
CLEANING THE FILTERS
1 Turn off the unit. 2 Remove the filters.
Lift the open panel.
Put the air filters down to remove them.

2 Clean the filters. - Use a vacuum cleaner to remove dust. If the filters are dirty, wash them with warm water and a mild detergent. Dry filters in the shade before reinstalling. 4 Reinstall the filters and close the open panel.
CLEANING THE UNIT AND THE REMOTE CONTROL
- Wipe them with a soft cloth.
- Do not directly splash or pour water on them. It can cause electrical shock or equipment damage.
- Do not use hot water, thinner, abrasive powders or strong solvents.
MAINTENANCE AFTER AIR CONDI- TIONER SEASON
1 Dry the inside of the indoor unit thoroughly by taking the following steps.
(SMD models)
Run the unit in the SELF CLEAN operation mode.
(SED models)
Run the unit in the cool mode with temperature setting of 30° C.
2 Stop the operation and unplug the unit. - Turn of the circuit breaker, if you have one exclusively for the air conditioner. 3 Clean the filters, then reinstall them.
MAINTENANCE BEFORE AIR CONDITIONER SEASON
1. Make sure that the air filters are not dirty. 2. Make sure that nothing obstructs the air inlet or outlet.
The following conditions do not denote equipment malfunctions.
UNIT DOES NOT OPERATE
The unit will not operate if it is turned on immediately after it is turned off. The unit will not operate immediately after the mode is changed. This is to protect the unit. Wait 3 minutes before operating the unit.
ODORS
Carpet and furniture odors that entered into the unit may be sent out from the unit.
CRACKING NOISE
This sound is generated by the friction of the unit expanding or contracting due to a temperature change.
MIST SEEN AT INDOOR AIR OUTLET
In cooling operation, this is caused by the difference between the room air temperature and the air discharged.
THE OUTDOOR UNIT DOES NOT STOP
After stopping the operation, the outdoor unit will rotate its fan for about a minute to cool down the unit.
SWISHING NOISE
The soft, swishing noise is the sound of the refrigerant flowing inside the unit.
(For SMD models only)
ODOR EMITTED FROM THE PLASMACLUSTER AIR OUTLET
This is the smell of ozone generated from the Plasmacluster Ion generator. The ozone concentration is very small, posing no adverse effect on your health. The ozone discharged into the air rapidly decomposes, and its density in the room will not increase.
A LOW BUZZING NOISE
This is a sound of the unit generating Plasma-cluster ions.
Check the following points before calling for service.
The unit does not operate
- Check if the circuit breaker has tripped or the fuse has blown.
The unit does not cool effectively
- Check the filters. If dirty, clean them.
- Check the outdoor unit to make sure nothing is blocking the air inlet or outlet.
- Check the thermostat is proper setting.
- Make sure windows and doors are closed tightly.
The unit does not receive the remote control signal
- Check whether the remote control batteries have become old and weak.
- Try to send the signal again with the remote control pointed properly towards the unit's signal receiver window.
- Check whether the remote control batteries are installed properly.
Please call for service when OPERATION lamp and TIMER lamp on the unit blink.
Table of Contents
Horizontal Airflow Direction
Use the horizontal airflow louver lever to adjust the airflow direction.
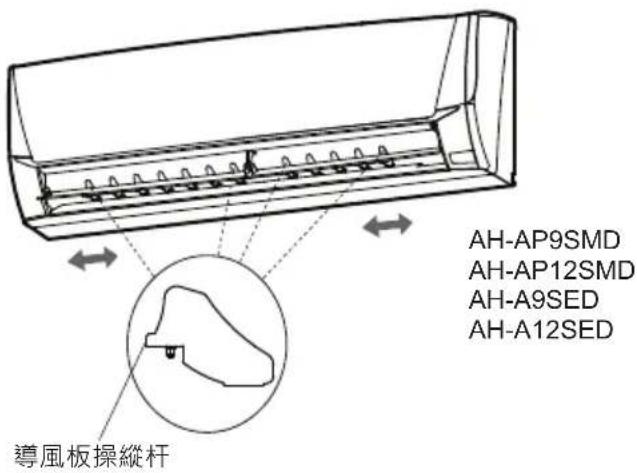
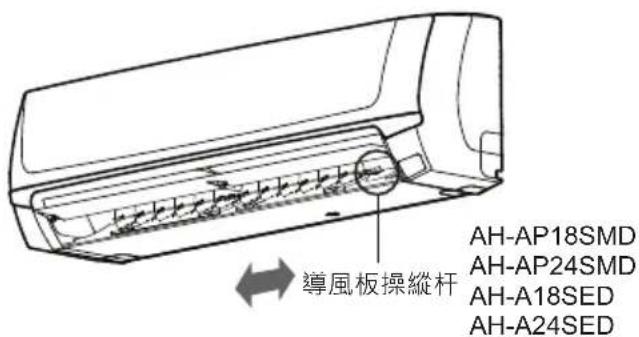
Note:
Do not adjust the vertical airflow louver by hand.
Note:
Maintenance
3 Clean the air filter.

- INDOOR UNIT
- OUTDOOR UNIT
- CONTENTS
- IMPORTANT SAFETY INSTRUCTIONS
- WARNING
- CAUTION
- USING THE REMOTE CONTROL
- LOADING BATTERIES
- NOTE
- HOW TO USE THE REMOTE CONTROL
- POINT THE REMOTE CONTROL TOWARDS THE RECEIVER WINDOW AND PRESS THE DESIRED BUTTON. THE UNIT GENERATES A BEEP WHEN IT RECEIVES THE SIGNAL
- AUXILIARY MODE
- TO TURN ON
- PRESS THE AUX BUTTON
- TO TURN OFF
- PRESS THE AUX BUTTON AGAIN
- TIPS ON SAVING ENERGY
- SET THE PROPER TEMPERATURE
- BLOCK DIRECT SUNLIGHT AND PREVENT DRAFTS
- KEEP FILTER CLEAN TO ENSURE THE MOST EFFICIENT OPERATION
- DISCONNECT THE POWER CORD FROM THE WALL OUTLET OR TURN OFF THE CIRCUIT BREAKER WHEN THE UNIT IS NOT USED FOR AN EXTENDED PERIOD TIME
- AUTO MODE
- DRY MODE
- WHEN POWER FAILURE OCCURS
- ADJUSTING THE AIR FLOW DIRECTION
- VERTICAL AIR FLOW DIRECTION
- HORIZONTAL AIR FLOW DIRECTION
- TO CANCEL
- GENTLE COOL AIR
- DURING OPERATION, PRESS THE GENTLE COOL AIR BUTTON
- PLASMACLUSTER OPERATION
- DURING OPERATION, PRESS THE PLASMACLUSTER BUTTON
- COMFORT OPERATION
- DURING OPERATION, PRESS THE COMFORT BUTTON
- BABY MODE OPERATION
- DURING OPERATION, PRESS BABY MODE BUTTON
- TIMER OFF
- PRESS THE TIMER OFF BUTTON AND SET THE TIME AS DESIRED
- TIMER ON
- PRESS THE TIMER ON BUTTON AND SET THE TIME AS DESIRED
- SELF CLEAN OPERATION
- PRESS THE SELF CLEAN BUTTON WHEN THE UNIT IS NOT OPERATING
- DISPLAY BUTTON
- DURING OPERATION, PRESS THE DISPLAY BUTTON
- TO LIGHT UP
- MAINTENANCE
- CLEANING THE FILTERS
- CLEANING THE UNIT AND THE REMOTE CONTROL
- MAINTENANCE AFTER AIR CONDI- TIONER SEASON
- MAINTENANCE BEFORE AIR CONDITIONER SEASON
- UNIT DOES NOT OPERATE
- ODORS
- CRACKING NOISE
- MIST SEEN AT INDOOR AIR OUTLET
- THE OUTDOOR UNIT DOES NOT STOP
- SWISHING NOISE
- ODOR EMITTED FROM THE PLASMACLUSTER AIR OUTLET
- A LOW BUZZING NOISE
- THE UNIT DOES NOT OPERATE
- THE UNIT DOES NOT COOL EFFECTIVELY
- THE UNIT DOES NOT RECEIVE THE REMOTE CONTROL SIGNAL
- TABLE OF CONTENTS
- HORIZONTAL AIRFLOW DIRECTION
- CLEAN THE AIR FILTER
Brand : SHARP
Model : AHA9SED
Category : Air conditioner