
Sicuro 10 - Smartphone Trevi - Free user manual and instructions
Find the device manual for free Sicuro 10 Trevi in PDF.


| Product type | Smartphone |
| Brand | Trevi |
| Model | Sicuro 10 |
| Dimensions | Approx. 156 x 75 x 8.5 mm |
| Weight | Approx. 180 g |
| Operating system | Android 11 (Go Edition) |
| Display | 6.1 inches, resolution 720x1560 pixels |
| Processor | Quad-core 1.3 GHz |
| RAM | 2 GB |
| Internal storage | 32 GB (expandable via microSD up to 128 GB) |
| Battery | 3000 mAh, removable |
| Rear camera | 8 MP with LED flash |
| Front camera | 5 MP |
| Connectivity | 4G LTE, Wi-Fi 802.11 b/g/n, Bluetooth 4.2, GPS |
| SIM | Dual SIM (Nano-SIM) |
| Sensors | Accelerometer, proximity sensor |
| Care and cleaning | Clean with a soft, dry cloth. Avoid liquids. |
| Security | Lock by password, pattern, or fingerprint |
| Spare parts and repairability | Battery, screen, back cover available separately. Repair possible at authorized center. |
| General information | 2-year warranty. Made in China. Manuals available in multiple languages. |
Frequently Asked Questions - Sicuro 10 Trevi
User questions about Sicuro 10 Trevi
0 question about this device. Answer the ones you know or ask your own.
Ask a new question about this device
Download the instructions for your Smartphone in PDF format for free! Find your manual Sicuro 10 - Trevi and take your electronic device back in hand. On this page are published all the documents necessary for the use of your device. Sicuro 10 by Trevi.
USER MANUAL Sicuro 10 Trevi
TO SET YOUR LANGUAGE DEVICE
- Select "MENU"
- Select the "IMPOSTAZIONI" icon
- Select the number 2 function "CONFIGURAZIONE TELEFONO"
- Select the number 2 “LINGUA” and find their own language from those available.
* For information and updates of this product: www.trevi.it
POUR CONFIGURER LANGUE DE VOTRE APPAREIL:
natural_image
Line drawing of a smartphone showing the front panel and side panel with a button labeled 'USB' (no text or symbols on the device itself)natural_image
Line drawing of a mobile phone's front panel with a button labeled '40%' and an arrow pointing to the screen (no text or symbols beyond basic diagram)natural_image
Line drawing of a mobile phone with a card slot and an arrow pointing to the screen (no text or symbols)natural_image
Two identical geometric shapes with diagonal cross lines, no text or symbols present6. ACCENSIONE, SPEGNIMENTO
To make the best use of your phone, please read this manual carefully. The company launched the phone is user-friendly design and craftsmanship. Powerful file management functions (support T-Flash card). The stylish MP3 Player, Video Player, Handsfree, More convenient to your work and to bring your amateur fun.
1.2 Safety guide
- If your mobile phone is lost or stolen, please contact the telecommunications authorities or a sales agent immediately to have a hold on the phone and the SIM card. This will prevent economic loss caused by unauthorized calls made from your mobile phone.
- When you contact the telecommunications authorities or a sales agent, they will need to know the IMEI number of our mobile phone (remove battery to expose number located on the label on back of phone). Please copy this number and keep in a safe place for future use.
- In order to avoid the misuse of your mobile phone take the following preventative measures:
- Set the PIN number of your mobile phone's SIM card and change this number immediately if it becomes known to a third party.
- Please keep the phone out of sight when leaving it in a vehicle. It is better to carry the phone with you, or lock it in the trunk.
- Set call barring.
1.3 Safety warnings and notices
Before using your mobile phone, read and understand the following notices carefully to ensure you will use it safely and properly.
1.4 General attention
- Only the battery and battery charger specified by our company should be used in your mobile phone. Other product might result in battery leakage, overheating, explosion or fire.
- To avoid your phone malfunctioning or catching fire, please do not violently impact, jolt or throw your phone.
- Please do not place the battery, phone or charger in a microwave oven or high-pressure equipment. Otherwise it could lead to unexpected accidents such as damage to circuit or fire hazard.
- Please do not use your phone near flammable or explosive gases, otherwise it could cause malfunction of your phone or fire hazard.
-
Please do not subject your phone to high temperatures, high humidity or dusty places; otherwise this may lead to the malfunction of your phone.
-
Keep your phone out of the reach of small children. Your phone is not a toy. Children could hurt themselves.
- To avoid your phone falling and malfunctioning or being damaged, please do not place it on uneven or unstable surfaces.
- The apparatus shall not be exposed to dripping or splashing water. No object full of liquid, such as vases, should be placed on the unit.
- No naked flame sources, such as lighted candles, should be placed on the unit.
1.5 Notices when using your phone
- Turn off your mobile phone where the phone is not allowed, such as on the airport or in hospitals. Using the mobile phone in those places may impact the normal operation of electronic devices and medical instruments. Follow relevant regulations when using your mobile phone in those places. Your mobile phone has the auto turn-on feature. Check your alarm clock settings to confirm that your mobile phone will not be turned on automatically during flight.
- Please do not use your mobile phone near the weak signal or high precision electronic devices. RF interference might cause malfunctioning of such electronic devices and other problems. Special tips must be paid near the following equipment: hearing aids, pace makers and other medical electronic devices, fire detectors, automatic doors and other automatic control installations. To find out the effect of mobile phones on a pacemaker or other pieces of electronic medical equipment please contact the manufactures or local sales agents of the equipment.
- Please do not subject the LCD to impact or use the screen to strike things, as this will damage the LCD board and cause leakage of the liquid crystal. There is a risk of blindness if the liquid crystal substance gets into the eyes. If this occurs rinse eyes immediately with clear water (under no circumstances rub your eyes) and go immediately to a hospital for treatment.
- Do not dissemble or modify your mobile phone, as it will lead to damage to the phone such as battery leakage or circuitry failure.
- Under very rare circumstances using the mobile phone in certain model cars may negatively affect the internal electronic equipment. In order to assure your safety under such circumstances please do not use the mobile phone.
- In the event of antenna malfunction, do not use your phone as it could be harmful to human body.
- Avoid letting the phone come into close contact with magnetic objects such as magnetic cards as the radiation waves of the mobile phone may erase the information stored on floppy disks, pay cards and credit cards.
- Please keep small metal objects, such as thumbtacks far away from the receiver. When the receiver is in use it becomes magnetic and may attract these small metal objects and thus these may cause injury or damage the mobile phone.
- Avoid having the mobile phone come into contact with water or other liquids. If liquids enter the phone, this could cause a short circuit, battery leakage or other malfunction.
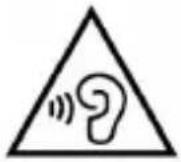
With earphone or headphones use:
To prevent possible hearing damage, limit the amount of time listening at high volumes.
1.6 Notices when using battery
- The battery has a limited service life. The remaining life gets shorter as the times of charging increase. If the battery becomes feeble even after the charging, this indicates the service life is over and you have to use a new specified battery.
- Do not dispose of old batteries with everything domestic garbage. Please dispose of old batteries at the directed places with specific rules for their disposal.
- Please do not throw batteries into a fire, as this will cause the battery to catch fire and explode.
- When installing the battery, do not use force or pressure, as this will cause the battery to leak, overheat, crack and catch fire.
- Please do not use wires, needles or other metal objects to short-circuit the battery. Also, do not put the battery near necklaces or other metal objects as this will cause the battery to leak, overheat, crack and catch fire.
- Please do not solder the contact points of the battery, as this will cause the battery to leak, overheat, crack and catch fire.
- If the liquid in the batteries goes into the eyes, there is a risk of blindness. It this occurs do not rub the eyes, but immediately rinse eyes with clear water and go to the hospital for treatment.
- Please do not disassemble or modify the battery, as this will cause the battery to leak, overheat, crack and catch fire.
- Please do not use or place the batteries near high temperature places such as near a fire or heating vessel as this will cause the battery to leak, overheat, crack and catch fire.
- If the liquid from the battery comes in contact with skin or clothing this could cause burning of the skin. Immediately use clear water to rinse and seek medical tips if necessary.
- If the battery leaks or gives off a strange odor, please remove the battery from the vicinity of the open fire to avoid a fire or explosion.
- Please do not let the battery become wet as this will cause the battery to overheat, smoke and corrode.
- Please do not use or place batteries in places of high temperature such as in direct sunlight, as this will cause the battery to leak and overheat, lower performance and shorten the battery's life.
- Please do not continuously charge for more than 24 hours.
- Replace the battery only with a battery of the same or equivalent type.
1.7 Cleaning and maintenance
- The mobile phone, battery and charger are not water resistant. Please do not use them in the bedroom or other excessively moist areas and likewise avoid allowing them to get wet in the rain.
- Use a soft, dry cloth to clean the mobile phone, battery and charger.
- Please do not use alcohol, thinner, benzene or other solvents to wipe the mobile phone.
- A dirty outlet will cause poor electrical contact, lose of power and even inability to recharge. Please clean regularly.
2. Installing the SIM card and battery
An SIM card carries useful information, including your mobile phone number, PIN (Personal Identification Number), PUK (PIN Unlocking Key), IMSI (International Mobile Subscriber Identity), network information, contacts data, and short messages data.
_Note: After powering off your mobile phone, wait for a few seconds before removing or inserting an SIM card.
Exercise caution when operating an SIM card, as friction or bending will damage the SIM card. Properly keep the mobile phone and its fittings such as the SIM cards beyond children's reach.
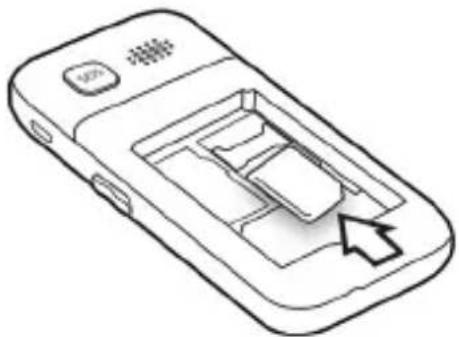
Installation
- Hold the End key for a while to power off the mobile phone.
- Push the rear cover down and remove it.
- Lift the battery and remove it.
- Insert the SIM card into the SIM card slot lightly with the corner cutting of the card aligning to the notch of the slot and the gold plate of the card facing download, till the SIM card cannot be further pushed in.
natural_image
Line drawing of a mobile phone's front panel with a scroll wheel and an arrow pointing to the scroll (no text or symbols)- With the metallic contacts of the battery facing the metallic contacts in the battery slot, press the battery down until it locks into place.
- Using code
The mobile phone and the SIM cards support sorts of passwords, in order to prevent the phone and the SIM cards from being misused. When you are prompted to input any
of the codes mentioned below, just input the correct code and then press the ok key. If you input a wrong code, press the Right soft key to clear it and then input the correct code.
- Phone lock code
The phone lock code may be set to prevent your mobile phone from being misused. In general, this code is provided along with the mobile phone by the manufacturer. The initial phone lock code is set to 0000 by the manufacturer. If the phone lock code is set, you need to input the phone lock code when powering on the mobile phone.
- PIN
The PIN (Personal identification number, 4 to 8 digits) code prevents your SIM card from being used by unauthorized people. In general, the PIN is supplied with SIM card by the network operator. If PIN check is enabled, you need to input the PIN each time when you power on your mobile phone. The SIM card will be locked if you input wrong PIN code for three times.
Unlocking methods as follows:
- Input the correct PUK according to the screen tips to unlock the SIM card.
- Then input the new PIN and press the ok key.
- Input the new PIN again and then press the ok key.
- If the input PUK is correct, the SIM card will be unlocked and the PIN will be reset.
Note: The SIM card will be locked if you input wrong PIN code for three times. To unlock the SIM card, you need to input the PUK. In general, the PUK can be obtained from the network operator.
Note regard the use of micro-SIM adapter on TREVI products
The slots for SIM cards are designed to accommodate only the consideration SIM format. The use of SIM (micro or nano) with its adapter and ‘not recommended as it can cause damage to the device and the micro/nano SIM itself.
Warning:
- Trevi not liable for damages caused by the use of adapters for micro/nano-SIM.
- TREVI reserves the right to refuse free assistance in warranty on defective products that have ‘caused by the use of the SIM adapters for micro/nano-SIM.
- Do not insert memory card into the SIM card slot.

natural_image
Two identical geometric diagrams with intersecting lines, no text or symbols presentNano SIM card with adapter
3. Inserting the micro SD card
To store photos, videos, and music should insert a micro SD external memory.
- Carefully remove the back cover.

natural_image
Line drawing of a mobile phone showing the front panel and keypad (no text or symbols)- Insert the microSD card keeping the surface with the electrical contacts facing down (display side).

- Replace the back cover.
Notes:
- Some card brands may not be compatible with the phone. The use an incompatible memory may be damaged or the card memory itself.
- The appliance only supports memory formatted in FAT. If you enter formatted cards differently the phone will ask you to reformat the memory card.
4. Charging battery
CHARGING THROUGH POWER SUPPLY:
- A device turned off, connect the Micro USB plug of the supplied cable to the Micro USB phone (to use the supplied cable only).
- Connect the USB outlet on the same power supply cable and plug the latter to a standard wall outlet.
- The device will turn on for a few seconds to show the battery icon with it is charging.
- When the battery is fully charged (the icon is no longer moving), disconnect the power supply from the wall outlet and then disconnect the plug from the Micro USB phone.
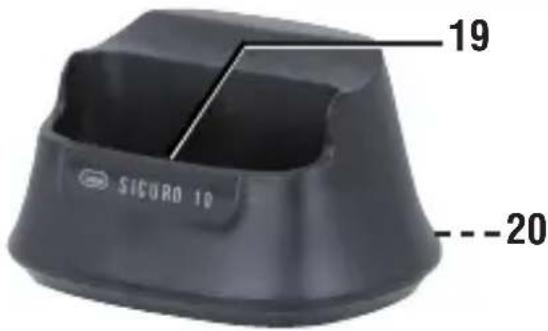
THROUGH RECHARGE "CHARGING BASE" (SUPPLIED):
-
Connect the Micro USB plug of the supplied cable to the Micro USB base (20). Always use the provided cable, other cable with Micro USB socket could not work with this unit.
-
Connect the USB outlet on the same power supply cable and plug the latter to a standard wall outlet, the front Led base will be green.
- Enter the phone turned off inside the base with the keypad facing frontally, the device will switch on for a few seconds to show the battery icon with charging and the front LED of the base will turn red.
- When the battery is fully charged (the icon is no longer moving) the Front led the base will become green again. At this point you can remove the phone from the base and use it normally.
You can also charge your phone by plugging it into a USB port of a computer using, simply, the supplied USB cable.
Notes:
- Use only the Micro USB cable supplied.
- Use only the mains adapter supplied, different power supplies may damage the battery.
- You can use the device even when it is charging, but, for longer life battery, not recommended for use; Furthermore, using the apparatus, the timing of Charging may take longer.
-
While charging the device can increase in temperature, this does not affect performance and machine life.
-
Keys Functions


- Speaker Phone.
- Display.
- Multifunction button, the display shows each time its function.
- Answer a calls.
- Key * (asterisk).
- Metal pins for charging from Cradle.
- Earphone jack (3.5mm).
-8. Key #. - Numeric/letters keys.
- End call and power on/off function (when long press).
- Multifunction button, the display shows each time its function.
- Up, Down navigation keys + confirms - button.
- Micro USB socket.
- Led flashlight indicator
- SOS dialing.
- On/Off switch flashlight function
- Speaker.
- Battery cover.
- Metal pins for phone connection.
- Micro USB socket for adaptor.
6. Icons/Normal Use
The icons displayed at the top of the screen provide information about the status of the device. The icons listed in the table below are most common.
| Icon Description Icon Description | |||
 | licon strength of the network signal |  | The phone stà playing a piece of music |
 | General profile Receiving a new me |  | |
 | Silent user profile active USB |  | |
 | Meeting user Profile Missed calls I |  | |
 | Outdoor user profile Earphones ins |  | |
 | The alarm clock is set and activated |  | No SIM is inserted into the phone |
Standby mode, the function of shortcut keys
Up navigation key: direct access to Shortcuts, you can set its function as following: select Menu -> Settings -> Phone settings -> Dedicated keys -> Up, then press the left navigation key to edit interface to chose the function you want, then press OK.
Down navigation key: direct access to Calculator, you can set its function as following: select Menu -> Settings -> Phone settings -> Dedicated keys -> Down, then press the left navigation key to edit interface to chose the function you want, then press OK.
# key: Long press changing the profiles.
0 key: Long press 3 seconds into the SOS mode.
Function menu Description Dialing Calls
1. Phonebook
The phone offers two memory banks: the SIM card and mobile phone, the phone's storage capacity is 150, the storage capacity of the SIM card is decided by the type of SIM card.
- Enter a number in the standby mode, press the left key to enter the edit save the interface.
- If you saved to the SIM card, the user can edit the name, telephone number.
- If you are saved to the “mobile phone”, the user can edit the name, telephone number.
1.1 Contacts
Select any record in the phone book list will have the following options:
- You can press the answer key to call this number.
• View: View detailed information on the record. - Add new contact: add a new record to Phone or SIM card, the user can edit the name and telephone number.
- Send text message: send a message to the record.
- Edit: Edit the record.
- Delete: delete the record.
- Copy: copy in the same or a different memory and the option to save to the file management.
- Move: move to Phone or SIM card memory.
- Add to Speed Dial:add the number to speed dial list.
1.2 Add new contact
Add a new record to Phone or SIM card, the user can edit the name and telephone number.
1.3 Speed dial
The user can chose the Status on or off and in Set numbers user can edit the speed dial number list, the number can add from the phonebook records or direct insert a new telephone number.
1.4 Phonebook settings
It will have the following options after entering:
- Delete all contacts: Delete all contacts from the SIM card or phone.
- Memory status: The mobile phone store state.
2 Messaging
2.1 Write Message
- In the standby screen, select Menu -> message -> write message. To enter the edit SMS interface, the following: text editing, press the left soft key “Options”, you can choose to send, save, using a template, edit, language, Association options. If you want to delete the contents written by the navigation key to move the cursor to delete the contents of the back, and then press the power button to clear, long press the right soft key to delete all content. When finished, send a message, press the left soft key “OK”.
- Send to: sending a number of interface, direct enter the number you want to send from contacts, call history, add a number. Selection is complete, press the left soft key "OK" to send a message. Select a recipient the option to do the following:
- Send: send a message to the corresponding recipient
- Edit recipient: you can edit the recipient's number.
- Remove recipient: delete the recipient.
- Remove all recipients: delete all the recipients.
- Save:save the message to Drafts.
- Input method: set the language need to edit.
- Advanced: you can chose Insert number or name from phonebook.
- Save: save the massage to Drafts.
2.2 Inbox
In standby screen, select Menu -> Messaging -> Inbox, you can view the SIM card inbox SMS has been received, as the following options:
• View: You can view a received message.
- Reply: You can reply SMS to the sender.
- Call sender: You can call the sender.
- Forward: to forward this message to others.
- Delete: Delete the current SMS.
- Delete All: Delete all SMS in the Inbox.
- Save to phonebook: Add the number in the telephone directory.
2.3 Drafts
Into the Drafts, you can view the message stored in the Drafts, and can conduct the following operations: View, send, edit, delete, delete all.
2.4 Outbox
Into the outbox, you can view all the outbox message here and you also can handle to save
SMS, and can do the following: view, resend, edit, delete, delete all.
2.5 Sent messages
Into the Sent messages, you can view the message stored in the Sent messages, and has the following options:
View, forward, delete, delete all.
2.6 Advance setting
- SMS settings.
- Profile settings.
- SMSC address: setting the number of the SMS center.
- Common settings.
- Delivery report: setting the switch of SMS report.
- Reply path: setting the switch of reply path.
- Save sent message: setting the switch of the storage of sent messages.
- Memory status: The memory status of SIM card and the phone are visible.
- Voicemail server
Each SIM card can be set two voice mail number in the settings, press the "1" key for a longtime to make available to listen to dial voice mail number voice messages. This function should be supported by the network operator
3 Call center
3.1 Call history
- Missed call: Enter the missed call, you can view the list of missed calls
- Dialed calls: To enter the dialed calls, you can view the dialed calls list.
- Received calls: To enter the received phone, you can view the list of received phone.
- Delete call logs: You can choose to delete all the call records.
- Call timers: You can see last call time, dialled calls time and received calls time.
3.2 Call settings
- Call waiting: Set the status to be activated, deactivated, query status. Note: This function depends on the network operator. Please ask the local network operator for more detail.
- Call divert:
The options are “Divert all voice calls”, “Divert if unreachable”, “Divert if no answer”, “Divert if busy”, “Divert all data calls”, “Cancel all diverts”. Note: This function depends on the network operator. Please ask the local network operator for more detail.
- Call barring:
The options are “All voice calls”, “International voice calls”, “International voice calls except to home”, “All voice calls”, “Voice calls when roaming”, “Cancel all”, “Change barring password”.
Note: This function depends on the network operator. Please ask the local network operator for more detail.
- Line switching:
Able to switch line 1 or line 2. - Advanced setting:
Blacklist: You can chose to reject the number calls in blacklist or not, and edit the blacklist number.
Auto radial: Able to open or close the function of auto radial. When it's on, the phone shall redial automatically after you failed dialing.
Call time reminder: The call time will display when calling if it's on.
Answer mode: Able to set answer the call by pressing any key.
4 FM radio
This phone has FM radio function, can be used to listen to the radio.
At the FM interface, you can press the up or down button to change the channels.
Press "*#" to make the voice up or down
Press "5" to switch on or off the FM
Press the left key, you can find:
- Channel list: Edit the channel name and frequency.
- Manual input:View the list of channels.
- Auto search: the automatic search radio stations and save the search channel to channel list.
- Settings: you can set the recording format and quality.
Note: FM reception quality and quantity depend on the specific location.
5. Multimedia
5.1 Audio player
In the music player interface, the up navigation key or #key (increase volume), the down navigation key or *key(decrease volume), 4key key(foward), 6key (next), 5key (stop or play); Music player interface, press “Options” to enter the list of all the songs interface. Options to play music files in the list, update playlists and more.
In Options, enter the settings menu:
- List auto gen: the switch settings.you can make it on or off.
- Repeat: You can set the repeat playback of music:
Off, one or all. - Shuffle: set the playback order, respectively, can be set to open (Random Play) and off (the current list of the order of play).
- Background play: select on or off, the mobile phone in the other user interface (except for video player, camera or recording menu interface) can also play music.
5.2 Image viewer
You can view all the images which store at the memory card.
5.3 Video player
You can play video which store at the memory card.
5.4 Sound recorder
New record: Start recording.
Play: Play a selected record.
List: Enter the list of recordings.
6 Setting
Main menu, select "Settings", you can set up your phone menu options.
6.1 Profile
This phone provides a General mode, silent Mode, Meeting mode and Outdoor mode.
6.1.1 General mode
For each profile, you can enter the "Active/customize" to operate the following options:
- Alert type: can set to ring, vibrate only or vibrate and ring.
- Ring type: can set to repeat or beep once.
- Ring tone: Set a ringing tone.
- Ring tone volume: press up or down key to set the ring volume.
- Message: Set the Message tone.
- Message volume: press up or down key to set the ring volume of message.
- Keypad: You can select the silent, click, tone, human voice tone.
• Key tone volume: press up or down key to set the ring volume of keytone. - System alert: Set system alert on or off.
6.1.2 Silent mode
Activate silent.
6.1.3 Meeting mode
Like the General model.
6.1.4 Outdoor mode
Like the General model.
6.2 Phone settings
• Time and date: the date and time set corresponding.
- Language: set the phone menu display language.
- Pref.input method: You can set the editing language, Association options, the default input method.
• Dedicated keys: you can set shortcuts for up and down keys here.
- Screen auto lock: you can make it off or set 15 seconds or 30 seconds or 1min or 5 mins.
- Wallpaper: you can change the wallpaper via photos stored in the memory card.
• LCD backlight: set the brightness and times
6.3 Security Settings
6.3.1 SIM Security
You can set the phone's menu security options, in order to avoid the illegal use of SIM card. PIN code to prevent the illegal use of your SIM card. If the current PIN code has been closed, select Open to open the PIN code protection, the next boot will ask for your PIN code; if the current PIN code is already open, choose to turn off the PIN code protection can be turned off, select Security Settings -> SIM card lock -> Change password -> PIN code, you can set up a new PIN code, please follow the prompts in order to enter the old PIN, new PIN code and repeat the new PIN code.
- PIN lock: turn on or turn off the SIM card lock. Need to enter the PIN code.
- Change PIN: Change PIN.
6.3.2 Phone security
The phone lock can prevent your phone from unauthorized use.
Select the phone lock can open the phone lock password protection, the next boot will ask for your phone lock code; again to enter a password you can turn off the phone lock password protection
- Change Password: Modify the phone password.
Note: The default phone lock code is 1122, you should change your PIN.
Use this function to restore factory settings, the preset password is1122.
7 Organizer
7.1 Fun
You can play games here.
7.2 File manager
Used for a variety of documents and data storage management. The phone memory card can be used for capacity expansion.
- Select the memory card (memory card is inserted), the following options:
- Open: Go to the next level of the folder list interface
- Format: to format the current memory.
- Details: You can view the memory space information.
7.3 Calendar
Press the left soft key to enter the calendar display, the first line shows the year, month, second row shows the week, the middle section shows the specific date of a month. In a calendar interface, press the up navigation key ,date forward one week, press the right navigation key, date forward one day.
• View: see the events on selected day.
• View all: see all the events added in calendar.
- Add event: can be added to the schedule.
- Delete event: you can chose to delete all events, overdue events or specific period events.
- Jump to date: Enter to find the specified date, it will quickly jump to that date
- Go to today: switch to the current date.
7.4 Alarm
This phone provides five alarm clocks available to users, users may need to be set. Enter the alarm clock editing interface:
- use the 4 or 6 key to select on/off status.
- set the alarm clock time.
- Snooze Time: use 4 or 6 Select the default value or 1-10 minutes.
- Repeat: press the left key to set once, everyday or custom.
- Alarm tone: You can set the alarm tone.
7.5 Calculator
provide users with the calculator function, can add, subtract, multiply, and divide can do the simple calculation.
7.6 Torch
Turn on or off torch key on right side of phone.
7.7 Services
See the SIM card service.
8 SOS
- SOS Switch
Open or close SOS function here
- SOS SMS content
1) Edit SOS message of help content.
2) Set to send this SOS message or not
- SOS number
Can set 5 emergency numbers.
- Alarm sound
Turn on or off the alarm sound for help.
7. Information on disposal of battery
Whatever type of battery used up, it should never be placed in household waste, fire or water. Each type of battery should be collected, recycled or disposed of at an appropriate dedicated collection points.
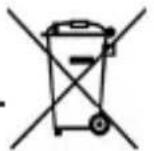

USERS INFORMATION
pursuant to Legislative Decree No. 49 of March 14, 2014
"Implementation of Directive 2012/19/EU on Waste Electrical and Electronic Equipment (RAEE)".
This wheeled bin symbol on the product indicates that at the end of its life must be collected separately from other waste. The user must, therefore, take the remote control integrates the essential components that got to its life to the appropriate differentiated collection centers for electronic and electro-technical waste, or return it to the dealer when purchasing a new appliance of equivalent type, in terms of one to one, or one to zero for equipment having longer side of less than 25 cm. Appropriate separate collection for the decommissioned equipment for recycling, processing and environmentally compatible disposal helps prevent negative impact on the environment and human health and promotes recycling of the materials making up the product. Illegal dumping of the product by the user entails the application of administrative sanctions stated in Legislative Decree n. Legislative Decree No. 49 of March 14, 2014.
TREVI pursues a policy of continuous research and development, the products may have different features from those described.
8 FAQs and solutions
If you have any questions about the phone, please find the solutions from the table below.
| FAQs Causes Solutions | ||
| Poor reception | When you use your phone at poor reception areas, for example, near high rise buildings or base rooms, the radio wave cannot be transmitted effectively. | Avoid this as far as you can. |
| When you use your phone at network traffic congestion, such as working time and off-duty time, the congestion can result in poor reception. | Avoid this as far as you can. | |
| This is related to the distance to base station in question. | You may ask the network service provider to provide service coverage map. | |
| Echoes or noises The trunk line of net | network is in bad condition. It is a regional problem. | Hang off the call and dial again.Choose another better line. |
| In some areas, the call lines are in bad condition. | ||
| Shorter standby time The standby time | time is relevant to network settings. | In poor reception areas, turn off your phone temporarily. |
| Replace the batteries Change with a new battery. | ||
| When no signals are received, your phone will continue searching for base stations, thus consuming a large amount of battery power and reducing standby time. | Use your phone at strong signal areas or Turn off the phone temporarily. | |
| Failed to turn on your phone The battery power is used up. Check the battery power level or charge the battery. | ||
| SIM card error The SIM card is damaged. Contact your network service provider. | ||
| Failed to connect to the network The SIM card is invalid. Contact your network service provider. | ||
| Failed to make a call The call barring feature is used. Cancel the call barring settings. | ||
| PIN code error Enter incorrect PIN codes for three times in succession. | Code for three times in succession. | Contact your network service provider. | |
| Failed to charge the battery The battery or the charger is damaged. | Charge the battery when ambient temperature is lower than -10°C or above 55°C. | Change a new battery or charger. | |
| Charge the battery when ambient temperature is lower than -10°C or above 55°C. | Change the environment. | ||
| Poor connection. Check whether the plug is properly connected. | |||
| ENGLISH | Failed to add contacts to phonebook | The storage space of phonebook is used up. | Delete some contacts from the phonebook. |
| Failed to set up some features Your network not provider the services. | network not provider the services. | Contact your network service provider. | |
1 Les Bases
Vue d'ensemble
natural_image
Line drawing of a mobile phone's front panel showing internal compartments and a directional arrow (no text or symbols)natural_image
Line drawing of a smartphone showing the front panel and side panel with a button labeled 'USB' (no text or symbols on the device itself)natural_image
Line drawing of a mobile phone's front panel showing the internal circuit and keypad (no text or symbols)natural_image
Two identical geometric shapes with diagonal cross lines, no text or symbols presentNano-SIM-Adapter
natural_image
Line drawing of a smartphone showing the front panel and side panel with a button labeled 'USB' (no text or symbols on the device itself)natural_image
Line drawing of a smartphone with an internal device and an arrow pointing to it (no text or symbols)natural_image
Two identical geometric shapes with diagonal cross lines, no text or symbols presentAdaptador Nano SIM
natural_image
Line drawing of a smartphone showing the front panel and side panel with a button labeled 'X3' (no text or symbols on the device itself)SIMPLIFIED EU DECLARATION OF CONFORMITY
Hereby TREVI S.p.a. declares that phone SICURO 10 is in compliance with directive 2014/53/EU.
The full text of the EU declaration of conformity is available at the following internet address:
https://www.trevi.it/dms/zidi/TREVI/DOCSICURO10.pdf
SICURO 10


Trevi S.p.A.
Strada Consolare Rimini-San Marino, 62
47924 RIMINI (RN) Italy
Tel. 0541/756420 - Fax 0541/756430
www.trevi.it - E-mail: info@trevi.it


- TO SET YOUR LANGUAGE DEVICE
- POUR CONFIGURER LANGUE DE VOTRE APPAREIL:
- ACCENSIONE, SPEGNIMENTO
- Safety guide
- Safety warnings and notices
- General attention
- Notices when using your phone
- Notices when using battery
- Cleaning and maintenance
- Installing the SIM card and battery
- Installation
- - Using code
- - Phone lock code
- - PIN
- Note regard the use of micro-SIM adapter on TREVI products
- Warning:
- Inserting the micro SD card
- Notes:
- Charging battery
- CHARGING THROUGH POWER SUPPLY:
- THROUGH RECHARGE "CHARGING BASE" (SUPPLIED):
- Icons/Normal Use
- Standby mode, the function of shortcut keys
- Function menu Description Dialing Calls
- Phonebook
- Contacts
- Add new contact
- Speed dial
- Phonebook settings
- Messaging
- Write Message
- Inbox
- Drafts
- Outbox
- Sent messages
- Advance setting
- Call center
- Call history
- Call settings
- FM radio
- Multimedia
- Audio player
- Image viewer
- Video player
- Sound recorder
- Setting
- Profile
- General mode
- Silent mode
- Meeting mode
- Outdoor mode
- Phone settings
- Security Settings
- SIM Security
- Phone security
- Organizer
- Fun
- File manager
- Calendar
- Alarm
- Calculator
- Torch
- Services
- SOS
- - SOS Switch
- - SOS SMS content
- - SOS number
- - Alarm sound
- Information on disposal of battery
- USERS INFORMATION
- FAQs and solutions
- Les Bases
- Vue d'ensemble
- SIMPLIFIED EU DECLARATION OF CONFORMITY
- SICURO 10
Brand : Trevi
Model : Sicuro 10
Category : Smartphone