
HU4802 - Humidifier PHILIPS - Free user manual and instructions
Find the device manual for free HU4802 PHILIPS in PDF.


| Product type | Natural evaporation air humidifier |
| Brand | Philips |
| Model | HU4802 |
| Dimensions (W x D x H) | 24.5 x 24.5 x 36 cm |
| Net weight | 1.8 kg |
| Tank capacity | 2 liters |
| Power supply | 220-240 V, 50/60 Hz |
| Power consumption | 14 W (max 20 W) |
| Humidification rate | 200 ml/h (Turbo mode) |
| Noise level | 26 dB (Silence) - 41 dB (Turbo) |
| Recommended room size | Up to 25 m² |
| Fan speeds | 3 (Silence, Normal, Turbo) |
| Main functions | Natural humidification, automatic shut-off, night light, water level indicator |
| Filter | Permanent, washable with water |
| Maintenance and cleaning | Clean the tank and filter weekly; empty before prolonged shutdown |
| Safety | Automatic shut-off when tank is empty |
| Spare parts and repairability | Tank, filter, motor available; repairable by authorized technician |
| General information | 2-year warranty; CE certification |
Frequently Asked Questions - HU4802 PHILIPS
User questions about HU4802 PHILIPS
0 question about this device. Answer the ones you know or ask your own.
Ask a new question about this device
Download the instructions for your Humidifier in PDF format for free! Find your manual HU4802 - PHILIPS and take your electronic device back in hand. On this page are published all the documents necessary for the use of your device. HU4802 by PHILIPS.
USER MANUAL HU4802 PHILIPS
Always there to help you
Register your product and get support at www.philips.com/welcome

HU4802
HU4803
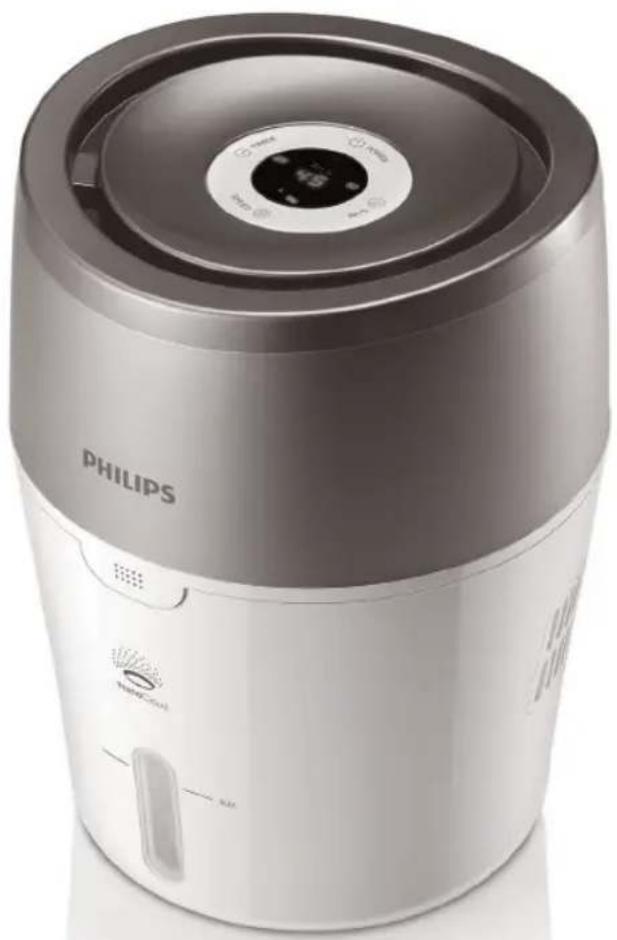
natural_image
Exterior view of a Philips air purifier with control panel and brand logo (no text-heavy elements)User manual 3
Benutzerhandbuch 24
Mode d'emploi 45
Manuale utente 66
Prepare for humidification 8
4 Using the humidifier 9
Understand the humidity indication 9
Understand the healthy air protect
alert and lock 9
Switch the humidifier on and off 10
Clean the water tank 15
6 Clean the humidification filter 16
7 Replacing the humidification filter 18
8 Troubleshooting 20
9 Guarantee and service 22
Order parts or accessories 22
10 Notices 23
Electromagnetic fields (EMF) 23
Compliance with EMF 23
Recycling 23
1 Important
Safety
Read this user manual carefully before you use the humidifier, and save it for future reference.
Danger
- Do not spray any flammable materials such as insecticides or fragrance around the humidifier.
• The water in the water tank is not suitable for drinking. Do not drink this water and do not use it to feed animals or to water plants. When you empty the water tank, pour the water down the drain.
Warning
- Check if the voltage indicated on the bottom of the humidifier corresponds to the local power voltage before you connect the humidifier.
-
If the power cord is damaged, you must have it replaced by Philips, a service center authorized by Philips, or similarly qualified persons in order to avoid a hazard.
-
Do not use the humidifier if the plug, the power cord, or the humidifier itself is damaged.
- This humidifier is not intended for use by persons (including children) with reduced physical sensory or mental capabilities, or lack of experience and knowledge, unless they have been given supervision or instruction concerning use of the humidifier by a person responsible for their safety.
• This appliance is not a toy. Children should be supervised to ensure that they do not play with the humidifier. - Do not block the air inlet and outlet, e.g. by placing items on the air outlet or in front of the air inlet.
Caution
-
If the power socket used to power the humidifier has poor connections, the plug of the humidifier becomes hot. Make sure that you plug the humidifier into a properly connected power socket.
• Always place and use the humidifier on a dry, stable, level, and horizontal surface. -
Do not place anything on top of the humidifier and do not sit on the humidifier.
• Make sure that the humidifier is well assembled/connected every time after you clean it or after you remove the upper cover and/or water tank for refilling. The humidifier must be properly assembled to deliver a good and safe performance. - Only use the original Philips filter specially intended for this humidifier. Do not use any other filter.
- Avoid knocking against the humidifier (the air inlet and outlet in particular) with hard objects.
- Do not insert your fingers or objects into the air outlet or the air inlet to prevent physical injury or malfunctioning of the humidifier.
- Do not use this humidifier when you have used indoor smoke-type insect repellents or in places with oily residues, burning incense, or chemical fumes.
-
Do not use the humidifier near gas appliances, heating devices or fireplaces.
• Always unplug the humidifier after use and before you clean it. -
Do not fill water from the air outlets on top of the humidifier.
- Place the humidifier properly to prevent children from knocking it over.
- Do not use the humidifier in a room with major temperature changes, as this may cause condensation inside the humidifier.
- When the humidifier is not used for a long time, bacteria and mold may grow on the filters. Check the filters before you start using the humidifier again. If the filter is very dirty with dark spots, replace it (see chapter 'Replacing the humidification filter').
- Do not wash the filter in a washing machine or dish washer, otherwise the filter will be deformed.
- The humidifier is only intended for household use under normal operating conditions.
- Clean the water tank and humidification filter every week to keep it clean.
- Only fill the water tank with cold tap water. Do not use ground water or hot water.
- Do not put any substance other than water in the water tank. Do not add fragrance or chemical substance into the water. Use only water (tap, purified, mineral, any sort of potable water).
- If you do not use the humidifier for a long time, clean the water tank and dry the humidification filter..
- If you need to move the humidifier, disconnect the humidifier from the power supply first. Then empty the water tank, and carry the humidifier horizontally.
- Keep the humidity sensor dry. If the sensor gets wet, it could miscalculate the humidity level, and the humidifier could stop working due to miscalculated humidity level.
2 Your humidifier
Congratulations on your purchase, and welcome to Philips!
To fully benefit from the support that Philips offers, register your product at www.philips.com/welcome.
The Philips humidifier brings fresh, humidified air to your house for the health of your family. It offers you advanced evaporation system with NanoCloud technology, using a special humidification filter which adds H2O molecules to the dry air, and produces healthy humid air without formation of water mist. Its humidification filter retains bacteria, calcium and other particles from the water. It delivers only pure humidified air in your home. No more dry air in the winter season or from the air conditioning.
Read this user manual carefully before you install and use the humidifier. Save it for future reference.
What's in the box
Check and identify the contents of your package:

User manual Warranty
3 Getting started
Prepare for humidification
1 Hold by both sides of the upper unit to lift it up.

natural_image
Diagram of a container with a lid and an arrow pointing to a container filled with granular material (no text or symbols)2 Fill the water tank with cold tap water until water reaches the maximum water level indication.

3 Place the upper unit back onto the water tank.
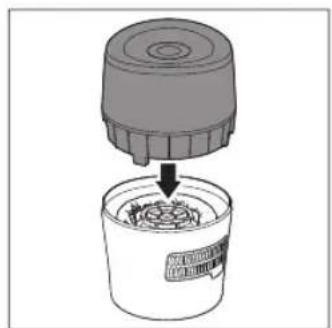
natural_image
Illustration of a container with a lid and a spool of food being inserted (no text or symbols)4 Using the humidifier
Understand the humidity indication
The humidifier is equipped with a built-in humidity sensor. For HU4802, you can set the target humidity level at 40%RH, 50%RH and 60%RH. The color of the humidity indicator light shows whether the set target is reached or not. For HU4803, the actual humidity level is displayed on the center of the control panel from 20%RH to 95%RH.
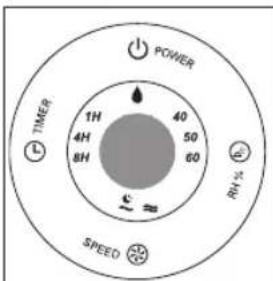
HU4802 HU4803
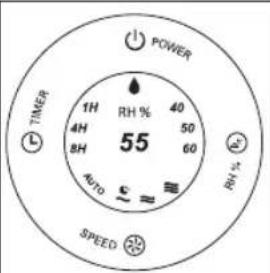

Note
• A comfortable humidity level is from 40RH% to 60RH%.
• The accuracy of the humidity indication is approximately ±10%.
- It takes some time to measure the humidity level in the room.
| Color of the humidity indicator light (HU4802 only) | Humidity level |
| Blue target achieved | |
| Red below target |
The humidity indicator light automatically goes on when the humidifier is switched on.

Note
• The humidity indicator light is only available on HU4802.
- The humidifier is equipped with built-in humidity sensor. When the desired humidity level is reached, the color of the humidity indicator light is in blue. When the humidity level is not reached, the color of the humidity indicator light becomes red.
Understand the healthy air protect alert and lock
The healthy air protect alert gives you a timely warning when the water tank needs refilling. When the water in the tank starts getting low, a red indicator ♦ on the control panel starts blinking to tell you that it is time to refill the tank. It blinks for 30 minutes. After that, the indicator remains on before the water tank is refilled with water.
The healthy air protect lock always ensures that your humidifier does not work without water in the tank. When the water tank is empty and needs to be refilled, the healthy air protect lock shuts off the humidifier after 30 minutes and a red indicator lights up. When you refill the water tank properly, the humidifier is turned on again.

Note
- In sleep mode, the red indicator does not blink, it turns on when the water level is low.
Switch the humidifier on and off
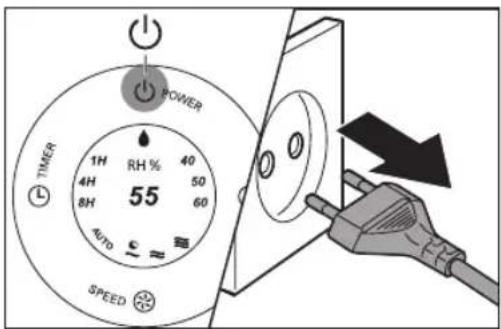
1 Plug the humidifier into the power supply.

natural_image
Illustration of a hand inserting a plug into a wall socket (no text or symbols)2 Press the ⏻ button to switch on the humidifier.

→ For HU4802, the humidity indicator light is on.
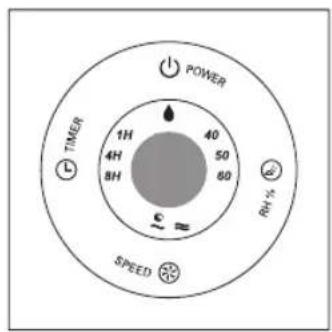
→ For HU4803, the current humidity level is shown.

→ The current fan speed is shown.

3 Press the ⏻ button to switch off the humidifier.

Note
- If the water level in the tank is getting very low, the humidifier stops humidifying. The red indicator light first starts blinking and then remains on.
- The humidifier releases very fine invisible mist, so it is normal that you cannot see the mist.
• AUTO mode is only available for HU4803.
The automatic mode uses the digital sensor to constantly monitor the air humidity. It turns your humidifier on and off whenever needed to ensure the humidity level is constantly at the right level. The default humidity level of the automatic mode is set at 50RH%, but you can change it to your desired humidity level under the automatic mode. Next time when you switch on the humidifier, it will remember your last set humidity level, unless you have removed the plug from the wall socket. In this case the default humidity level is set at 50RH% again.
1 Press the SPEED button to select the AUTO mode.


Tip
- If the desired humidity level is reached, the humidifier changes to a lower fan speed automatically.
- In AUTO mode, the fan speed only varies between \~ and ≈.
Manual
You can manually select the desired fan speed.
1 Press the SPEED button once or more times to select the desired fan speed (AUTO, \~, ≈or ≈


Tip
• AUTO and ≈ modes are only available for HU4803.
- For HU4802 and non-auto modes of HU4803: if the desired humidity level is reached, you can change to a lower fan speed. However, if the desired humidity level is not reached, you can select a higher fan speed to humidify the air quickly.
Sleep mode
In sleep mode, the humidifier operates quietly with dimmed light for your undisturbed sleep.
1 Press the SPEED button once or more times to select sleep mode. In sleep mode, only the speed \~ light is on.
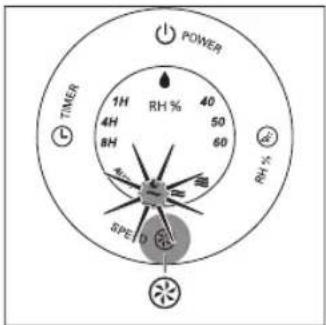
2 To change to another fan speed, simply press the SPEED button again.

Note
- Sleep mode only works at speed \~
- In sleep mode, the red indicator does not blink, but remains on when the water level gets low.
- In sleep mode, you can only set the timer; the humidity level cannot be set, and the humidity light is off.
Set the timer
With the timer function, you can let the humidifier operate for a set number of hours. When the set time has elapsed, the humidifier automatically switches off.
1 Press the TIMER button to activate the timer.
→ The TIMER light (1H, 4H or 8H) goes on.
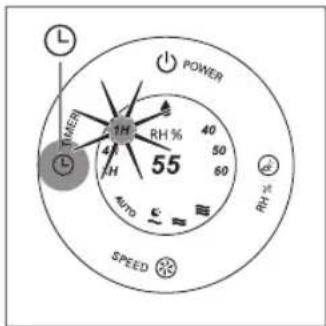
2 Press the TIMER button repeatedly to choose the number of hours you want the humidifier to operate. The corresponding TIMER light goes on.
To deactivate the timer function, press the TIMER button repeatedly until the TIMER light (1H, 4H or 8H) is off.
Set the humidity level

Note
- Make sure that the water tank is filled with water before the humidifier can function (see the chapter 'Get started', section 'Prepare for humidification').
- Press the HUMI button once or more times to set the desired air humidity to 40, 50, 60 percent or no preset level. → The humidity light (40, 50 or 60) of the set humidity level turns on.

For HU4802, The humidity indicator light is in red if the desired humidity level is not reached. It turns blue when the desired humidity level is reached. For HU4803, the actual humidity level is displayed on the center of the control panel.

Tip
- A comfortable humidity level is from 40RH% to 60RH%. You can choose the preferred humidity level at 40%RH, 50%RH or 60%RH..

Note
- If no preset humidity level is selected, the humidifier will stop working when the humidity level reaches 70RH% in non-auto modes and 50RH% in auto mode; for HU4802, the humidity indication light will be off.
Water level
When there is not enough water in the water tank:
• the water level drops and the red indicator light starts blinking.
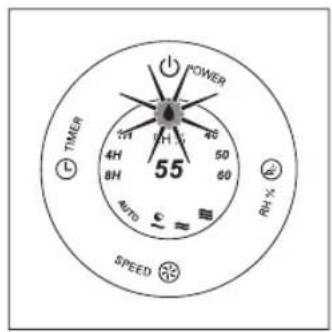
• the humidifier continues to work for 30 minutes and then stops working. You have to refill water into the water tank.

Note
- The humidifier stops humidifying if you do not refill the water after 30 minutes. The red indicator light stops blinking and remains on.
- If the water tank is empty when the humidifier is plugged in and switched on, the red indicator light blinks for 2 minutes and then remains on before the water tank is refilled with water.
• It is normal to find some water left in the tank.
Refill water
Water level can be observed through the transparent water tank window.
1 Switch off the humidifier and unplug it.
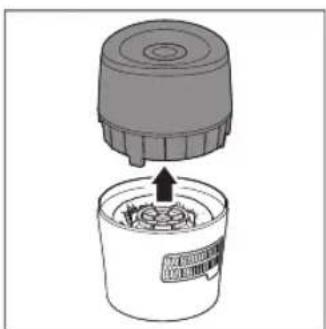
2 Remove the upper unit by holding it at both sides.
natural_image
Diagram of a mechanical device with a lid and base component, showing internal components (no text or symbols)3 Fill the water tank with cold tap water until water reaches the maximum water indication level.


Note
- When filling water, do not exceed the maximum water level, or water might leak from the drain hole and air inlets.
- Do not shake the water tank when moving it, or water might leak from the drain hole and air inlets.
- Do not fill water through the air outlets on top of the humidifier:
4 Place the upper unit back onto the water tank.

natural_image
Diagram of a container with a lid and a downward arrow indicating a process or operation (no text or symbols present)5 Clean your humidifier

Note
• Always unplug the humidifier before you clean it.
- When pouring water from the water tank, make sure to pour water from the opposite side of the drain hole and air inlets.
- Never use abrasive, aggressive, or flammable cleaning agents such as bleach or alcohol to clean any part of the humidifier.
Clean the body of the humidifier
Regularly clean the inside and outside of the humidifier to prevent dust from collecting.
1 Wipe away dust with a soft dry cloth from the body of the humidifier.
2 Clean the air inlet and the air outlet with a soft dry cloth.
Clean the water tank
Clean the water tank every week to keep it hygienic.
1 Take out the humidification filter and the filter support.
2 Fill the water tank for 1/3 with water.
3 Add some mild washing-up liquid to the water in the water tank.
4 Clean the inside of the water tank with a soft clean cloth.
5 Empty the water tank into a sink.
6 Put the humidification filter and the filter support back into the water tank.
6 Clean the humidification filter
Clean the humidification filter every week to keep it hygienic.
1 Switch off the humidifier and unplug it.

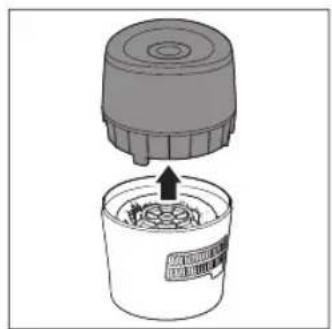
2 Remove the upper unit by holding it at both sides.
natural_image
Diagram of a container with a lid and an arrow pointing to a textured interior (no text or symbols)3 Take out the humidification filter and the filter support from the water tank.

natural_image
Hand-drawn sketch of a container with a lid and an arrow pointing upward (no text or symbols)4 Remove the humidification filter from the filter support.

natural_image
Technical illustration of a mechanical component with a cylindrical top and a base, showing an upward arrow (no text or symbols)5 Soak the humidification filter in tap water for one hour.

6 Rinse the humidification filter under a slowly running tap. Do not squeeze or wring the filter when cleaning.

natural_image
Line drawing of a kitchen sink with a hand washing the cup (no text or symbols)7 Let excess water drip off the humidification filter.
8 Assemble the humidification filter round the filter support.

natural_image
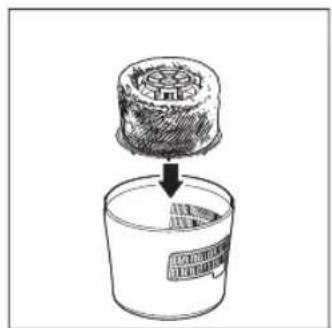
Diagram showing a cylindrical object being lowered into a mechanical component (no text or symbols present)9 Put the humidification filter and the filter support back into the water tank.
natural_image
Hand-drawn sketch of a container with a lid and arrow pointing downward (no text or symbols)10 Put the upper unit back onto the water tank.
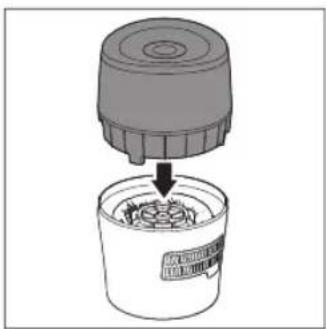
natural_image
Illustration of a container with contents being inserted into a lid (no text or symbols)
Note
- Do not squeeze or wring the filter. This might damage the filter and impact humidification performance. - Do not dry the filter under direct sunlight, unless it is assembled back onto the filter support
7 Replacing the humidification filter
Replace the humidification filter every three months for optimal performance. If the filter is in good condition, you could use it for a longer period of time. Make sure to replace the humidification filter at least once a year.

Note
• Use only Philips original humidification filter HU4102.

Tip
- Register your product at www.philips.com for further information on how to replace your filter.
1 Switch off the humidifier and unplug it.

2 Remove the upper unit by holding it at both sides.

natural_image
Diagram of a mechanical device with a lid and base component, showing internal components (no text or symbols)3 Take out the humidification filter and the filter support from the water tank.
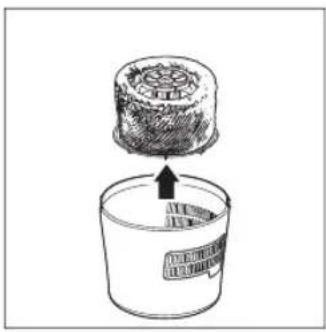
natural_image
Hand-drawn sketch of a container with a lid and an arrow pointing to it, no text or symbols present.4 Remove the humidification filter from the filter support.
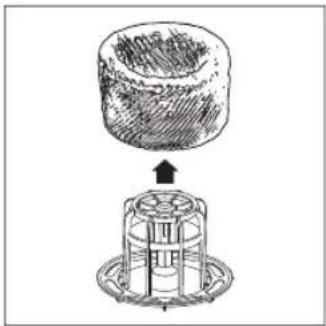
natural_image
Technical illustration of a mechanical assembly with a cylindrical component and a base mount (no text or symbols)5 Remove the packaging material from the new humidification filter.

natural_image
Simple line drawing of a container with an upward arrow indicating flow or movement (no text or symbols)6 Assemble the new humidification filter around the filter support.

natural_image
Diagram showing a cylindrical object being lowered into a mechanical component (no text or symbols present)7 Put the filter and the filter support back into the water tank.
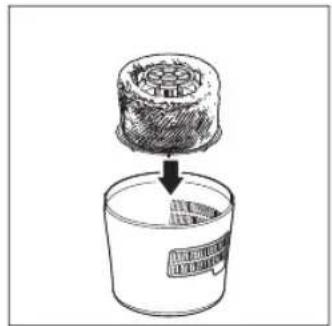
natural_image
Hand-drawn sketch of a container with a lid and arrow pointing to it, no text or symbols present.8 Put the upper unit back onto the water tank.

natural_image
Illustration of a container with a lid and a downward arrow indicating a process or operation (no text or symbols present)
Tip
- You can easily find more information about how to replace the filter in our web page or by calling our Consumer Care Center.
8 Troubleshooting
This chapter summarizes the most common problems you could encounter with the humidifier. If you are unable to solve the problem with the information below, contact the Consumer Care Center in your country.
| Problem Possible solution | |
| The humidifier does not work. | Make sure that there is power supply to the humidifier.Make sure that the water tank is filled with water and the upper unit is placed properly onto the water tank. |
| There is no air humidification. | Make sure that the water tank is filled with water and the upper unit is placed properly onto the water tank.The humidifier will stop working if the current humidity level reaches 70%RH. Humidity level above 70%RH does not make users feel comfortable, so the humidifier automatically turns off to ensure optimal humidification performance. |
| The water tank leaks. | Make sure that the humidifier is not overfilled with water.Make sure that the humidifier is well assembled/connected every time after you clean it or after you remove the upper unit and/or water tank for refilling.Make sure that the water tank is properly placed. If the problem persists, contact the Consumer Care Center in your country. |
| I do not see the current humidity indication change. | Make sure that you have assembled the humidification filter round the filter support.The humidification filter is dirty. Rinse and/or descale the humidification filter (see the chapter 'Clean the humidification filter').Your room might have too much ventilation. Please close doors and windows.Your room size is too big. The recommended room size is 25m2 for both HU4802 and HU4803. |
| There are some white deposits on the humidification filter. | The white deposits are called scale and they consist of minerals from the water. Scale on the humidification filter affects the humidifying performance, however it does not harm your health. Please follow the cleaning instructions in the user manual. |
| The filter turns yellowish after some time. | The yellow deposits is a natural effect of the wick material, and it has no impact on humidification performance. Clean the humidification filter frequently to remove the scale, and replace the humidification filter every three month. |
| There is unpleasant smell coming out from the humidifier. | Make sure that the water tank is filled with water.Clean the humidification filter (see the chapter 'Clean the humidification filter'). |
| No air comes out of the air outlet. | Put the plug of the humidifier into the wall socket and switch on the humidifier. |
| I do not see visible mist coming out of the humidifier. Is it working? | When mist is very fine, it is invisible. This humidifier has a NanoCloud humidification technology, which produces healthy humid air from the outlet area without formation of water mist. Therefore, you cannot see the mist. |
| I want to check whether the humidity sensor works or not. | Gently blow moist air into the humidity sensor. After a while, the humidity indication changes. Note that for HU4802, if the initial humidity indication is already 60 percent, the humidity indication light stays blue when you blow moist air towards the sensor; for HU4803, the indication can show the actual humidity level from 20%RH to 95%RH. |
9 Guarantee and service
If you need information or if you have a problem, please visit the Philips website at www.philips.com or contact the Philips Consumer Care Center in your country (you will find its phone number in the worldwide guarantee leaflet). If there is no Consumer Care Centre in your country, go to your local Philips dealer.
Order parts or accessories
If you have to replace a part or want to purchase an additional part, go to your Philips dealer or visit www.philips.com/support. If you have problems obtaining the parts, please contact the Philips Consumer Care Center in your country (you will find its phone number in the worldwide guarantee leaflet).
10 Notices
Electromagnetic fields (EMF)
This Philips appliance complies with all applicable standards and regulations regarding exposure to electromagnetic fields.
Compliance with EMF
Koninklijke Philips N.V. manufactures and sells many products targeted at consumers, which, like any electronic apparatus, in general have the ability to emit and receive electromagnetic signals.
One of Philips' leading Business Principles is to take all necessary health and safety measures for our products, to comply with all applicable legal requirements and to stay well within the EMF standards applicable at the time of producing the products.
Philips is committed to develop, produce and market products that cause no adverse health effects. Philips confirms that if its products are handled properly for their intended use, they are safe to use according to scientific evidence available today.
Philips plays an active role in the development of international EMF and safety standards, enabling Philips to anticipate further developments in standardization for early integration in its products.
Recycling

Never dispose your product with other household waste. Please inform yourself about the local rules on the separate collection of electrical and electronic products. The correct disposal of your old product helps prevent potentially negative consequences on the environment and human health.
Inhalt
natural_image
Diagram of a container with a lid and an arrow indicating upward motion (no text or symbols)natural_image
Diagram showing a container with contents being inserted into a lid, no text or symbols present
natural_image
Illustration of a hand inserting a plug into a wall socket (no text or symbols)natural_image
Diagram of a container with a lid and an arrow indicating upward movement, no text or symbols presentnatural_image
Diagram showing a container with contents being inserted into a lid, no text or symbols presentnatural_image
Diagram of a container with a lid and an arrow indicating upward motion (no text or symbols)natural_image
Hand-drawn sketch of a container with a lid and an arrow pointing to it, no text or symbols present.
natural_image
Technical illustration of a mechanical component with a cylindrical top and base, showing an upward arrow (no text or symbols)natural_image
Line drawing of a faucet washing a sink with a sponge (no text or symbols)natural_image
Diagram showing a cylindrical object being lowered into a mechanical component (no text or symbols present)natural_image
Hand-drawn illustration of a container with a lid and arrow pointing downward (no text or symbols)natural_image
Illustration of a container with contents being inserted into a lid (no text or symbols)
Anmerkung
natural_image
Diagram of a mechanical device with a lid and base component, showing internal components (no text or symbols)
natural_image
Hand-drawn sketch of a container with a lid and an arrow pointing upward (no text or symbols)natural_image
Technical illustration of a mechanical assembly with a cylindrical component and a base housing (no text or symbols)natural_image
Simple line drawing of a container with an upward arrow indicating flow or movement (no text or symbols)natural_image
Diagram showing a cylindrical object being lowered into a mechanical component (no text or symbols present)natural_image
Hand-drawn illustration of a container with a lid and a downward arrow indicating flow or process (no text or symbols)natural_image
Illustration of a mechanical device pouring liquid into a container (no text or symbols visible)Tipp
natural_image
Diagram of a container with a lid and an arrow pointing to a container filled with granular material (no text or symbols)natural_image
Diagram showing a container with contents being inserted into a lid, no text or symbols presentnatural_image
Illustration of a hand inserting a plug into a wall socket with a black arrow indicating direction (no text or symbols)natural_image
Diagram of a container with a lid and an arrow indicating upward motion (no text or symbols)natural_image
Illustration of a container with contents being inserted into a lid (no text or symbols)natural_image
Illustration of a container with contents and a lid, showing a mechanical component (no text or symbols)natural_image
Hand-drawn sketch of a container with a lid and an arrow pointing upward, no text or symbols present.natural_image
Technical illustration of a mechanical assembly with a cylindrical component and a base housing (no text or symbols)natural_image
Line drawing of a faucet washing a bowl in a kitchen sink (no text or symbols)natural_image
Technical illustration of a mechanical assembly showing a cylindrical component being lowered into a base (no text or symbols)natural_image
Hand-drawn illustration of a container with a lid and arrow pointing downward (no text or symbols)natural_image
Diagram of a container with a lid and a downward arrow indicating a process or operation (no text or symbols present)
Remarque
natural_image
Diagram of a mechanical device with a lid and base component, showing internal components (no text or symbols)natural_image
Hand-drawn sketch of a container with a lid and an arrow pointing to it, no text or symbols present.natural_image
Technical illustration of a mechanical assembly with a cylindrical component and a base mount (no text or symbols)natural_image
Simple line drawing of a container with an upward arrow indicating flow or movement (no text or symbols)natural_image
Diagram showing a cylindrical object being lowered into a mechanical component (no text or symbols present)natural_image
Hand-drawn illustration of a container with a lid and arrow pointing downward (no text or symbols)natural_image
Diagram showing a container with contents being inserted into a lid, no text or symbols present
Conseil
natural_image
Line drawing of a mechanical component with a cylindrical top and flanged base (no text or symbols)Unità superiore

natural_image
Hand-drawn sketch of a cylindrical object with textured surface and a diagonal line (no text or symbols)natural_image
Technical line drawing of a mechanical component with no visible text or symbolsnatural_image
Line drawing of a cylindrical container with internal slots and a label (no text or symbols)Serbatoio acqua
natural_image
Diagram of a mechanical device with a lid and base component, showing internal components (no text or symbols)natural_image
Diagram showing a container with contents being inserted into a lid, no text or symbols presentnatural_image
Illustration of a hand inserting a plug into a wall socket with a circular component (no text or symbols)natural_image
Illustration of a container with contents being inserted into a lid (no text or symbols)natural_image
Illustration of a container with contents being inserted into a lid (no text or symbols)natural_image
Diagram of a container with a lid and an arrow pointing to a lid, showing internal components (no text or symbols)natural_image
Hand-drawn sketch of a container with a lid and an arrow pointing upward, no text or symbols present.natural_image
Technical illustration of a mechanical assembly with a cylindrical component and a base housing (no text or symbols)natural_image
Line drawing of a faucet washing a bowl in a kitchen sink (no text or symbols)natural_image
Diagram showing a cylindrical object being lowered into a mechanical component (no text or symbols present)natural_image
Hand-drawn sketch of a container with a lid and arrow pointing downward (no text or symbols)natural_image
Illustration of a mechanical device pouring liquid into a container (no text or symbols)
Nota
natural_image
Diagram of a container with a lid and an arrow pointing to a lid, showing internal components (no text or symbols)natural_image
Hand-drawn sketch of a container with a lid and an arrow pointing to it, no text or symbols present.natural_image
Technical illustration of a mechanical assembly with a cylindrical component and a base housing (no text or symbols)natural_image
Simple line drawing of a container with an upward arrow indicating flow or movement (no text or symbols)natural_image
Diagram showing a cylindrical object being lowered into a mechanical component (no text or symbols present)natural_image
Hand-drawn illustration of a container with a lid and a downward arrow indicating flow or process (no text or symbols)natural_image
Illustration of a mechanical device with a lid and arrow pointing to a container filled with granular material (no text or symbols)
Suggerimento
natural_image
Diagram of a container with a lid and an arrow indicating upward movement, no text or symbols presentnatural_image
Illustration of a container with contents being inserted into a lid (no text or symbols)92 NL
natural_image
Illustration of a hand inserting a plug into a wall socket with a circular component (no text or symbols)natural_image
Diagram of a container with a lid and an arrow indicating upward motion (no text or symbols)natural_image
Illustration of a container with contents being inserted into a lid (no text or symbols)natural_image
Diagram of a container with a lid and an arrow pointing to a lid, showing internal components (no text or symbols)natural_image
Hand-drawn sketch of a container with a lid and an arrow pointing upward, no text or symbols present.natural_image
Technical illustration of a mechanical assembly with a cylindrical component and a base housing (no text or symbols)natural_image
Line drawing of a kitchen sink with a hand washing the cup (no text or symbols)natural_image
Diagram showing a cylindrical object being lowered into a mechanical component (no text or symbols present)natural_image
Hand-drawn sketch of a container with a lid and arrow pointing downward (no text or symbols)natural_image
Diagram showing a container with contents being inserted into a lid, no text or symbols present
Opmerking
natural_image
Diagram of a mechanical device with a lid and base component, showing internal components (no text or symbols)natural_image
Hand-drawn sketch of a container with a lid and an arrow pointing upward (no text or symbols)natural_image
Technical illustration of a mechanical assembly with a cylindrical component and a base mount (no text or symbols)natural_image
Simple line drawing of a container with an upward arrow indicating growth (no text or symbols)natural_image
Diagram showing a cylindrical object being lowered into a mechanical component (no text or symbols present)natural_image
Hand-drawn sketch of a container with a lid and a downward arrow indicating flow or process (no text or symbols)natural_image
Diagram showing a container with contents being inserted into a granular material, no text or symbols present
Tip
Specifications are subject to change without notice
All rights reserved.

4241 210 79151


- Always there to help you
- Important
- Safety
- Danger
- Warning
- Caution
- Your humidifier
- What's in the box
- Getting started
- Prepare for humidification
- Using the humidifier
- Understand the humidity indication
- Note
- Understand the healthy air protect alert and lock
- Switch the humidifier on and off
- Tip
- Manual
- Sleep mode
- Set the timer
- Set the humidity level
- Water level
- Refill water
- Place the upper unit back onto the water tank.
- Clean your humidifier
- Clean the body of the humidifier
- Clean the water tank
- Clean the humidification filter
- Replacing the humidification filter
- Troubleshooting
- Guarantee and service
- Order parts or accessories
- Notices
- Electromagnetic fields (EMF)
- Compliance with EMF
- Recycling
- Inhalt
- Anmerkung
- Tipp
- Remarque
- Conseil
- Nota
- Suggerimento
- Opmerking
Brand : PHILIPS
Model : HU4802
Category : Humidifier