
Series 1000 S1320 - Razor PHILIPS - Free user manual and instructions
Find the device manual for free Series 1000 S1320 PHILIPS in PDF.


| Product Type | Electric Shaver |
| Brand | Philips |
| Model | Series 1000 S1320 |
| Shaving System | Rotary |
| Number of Shaving Heads | 1 |
| Trimmer | Pop-up Trimmer for Sideburns |
| Power Source | Rechargeable Battery (NiMH) |
| Charging Time | 8 Hours |
| Runtime | 30 Minutes |
| Input Voltage | 100-240 V |
| Waterproof | No (Rinseable Head) |
| Wet & Dry Use | Dry Use Only |
| Cleaning | Rinse under running water |
| Battery Indicator | LED Charge Indicator |
| Travel Lock | No |
| Included Accessories | Protective Cap |
| Replacement Head | Philips SH30 |
| Dimensions (Approx.) | 5.5 x 2.5 x 2.0 inches |
| Weight (Approx.) | 150 g |
| Color | White/Black |
Frequently Asked Questions - Series 1000 S1320 PHILIPS
User questions about Series 1000 S1320 PHILIPS
0 question about this device. Answer the ones you know or ask your own.
Ask a new question about this device
Download the instructions for your Razor in PDF format for free! Find your manual Series 1000 S1320 - PHILIPS and take your electronic device back in hand. On this page are published all the documents necessary for the use of your device. Series 1000 S1320 by PHILIPS.
USER MANUAL Series 1000 S1320 PHILIPS


English 6
Bahasa Indonesia 20
Bahasa Melayu 33
Tiếng Việt 46
ภาษาไทย 58
简体中文 69
繁體中文 80
한국의 91
103 العربية
114 فارسی
הכלה 127
Introduction
Congratulations on your purchase and welcome to Philips! To fully benefit from the support that Philips offers, register your product at www.philips.com/welcome.
General description (Fig. 1)
1 Protection cap
2 Shaving unit
3 Shaving unit release button
4 On/off button
5 Charging light
6 Trimmer (S1520, S1510 only)
7 Trimmer release slide (S1520, S1510 only)
8 Cleaning brush
9 Supply unit (adapter, type HQ850)
10 Small plug
Important safety information
Read this important information carefully before you use the appliance and its accessories and save it for future reference. The accessories supplied may vary for different products.
Danger

- Keep the supply unit dry.
Warning

- The appliance is a Class III construction.
- To charge the battery, only use the detachable supply unit (type HQ850) provided with the appliance.
- The supply unit contains a transformer. Do not cut off the supply unit to replace it with another plug, as this causes a hazardous situation.
- This appliance can be used by children aged from 8 years and above and persons with reduced physical, sensory or mental capabilities or lack of experience and knowledge if they have been given supervision or instruction concerning use of the appliance in a safe way and understand the hazards involved. Children shall not play with the appliance. Cleaning and user maintenance shall not be made by children without supervision.
- Always check the appliance before you use it. Do not use the appliance if it is damaged, as this may cause injury. Always replace a damaged part with one of the original type.
- Do not open the appliance to replace the rechargeable battery.
Caution

- This appliance is not washable. Never immerse the appliance or the charging stand in water and do not rinse it under the tap.
- Only use this appliance for its intended purpose as shown in the user manual.
- For hygienic reasons, the appliance should only be used by one person.
- Never use compressed air, scouring pads, abrasive cleaning agents or aggressive liquids such as petrol or acetone to clean the appliance.
- Do not use the supply unit in or near wall sockets that contain an electric air freshener to prevent irreparable damage to the supply unit.
Electromagnetic fields (EMF)
- This Philips appliance complies with all applicable standards and regulations regarding exposure to electromagnetic fields.
General
- The appliance is suitable for mains voltages ranging from 100 to 240 volts.
- The supply unit transforms 100-240 volts to a safe low voltage of less than 24 volts.
Charging
It takes approx. 8 hours to fully charge the appliance. When you charge the appliance for the first time or after a long period of disuse, let it charge until the charging light lights up continuously. A fully charged appliance provides up to 45 (S1520), 40 (S1510) or 35 (S1320, S1310) minutes of shaving time. The shaving time may be less than 45, 40 or 35 minutes as a result of your shaving behavior, your cleaning habits or your beard type.
Charging with the adapter

1 Put the small plug in the appliance.
2 Put the adapter in the wall socket.
- The charging light shows the charging status of the appliance (see section ‘Charge indications’ in this chapter).
3 After charging, remove the adapter from the wall socket and pull the small plug out of the appliance.
Charge indications

Battery low
- When the battery is almost empty (when there are only 5 or fewer shaving minutes left), the charging light starts to flash orange.
- When the battery is completely empty, the charging light starts to flash orange quickly.

- When you switch off the appliance, the charging light continues to flash orange for a few seconds.
Charging
- When the appliance is charging, the charging light flashes green.

Battery fully charged
- When the battery is fully charged, the charging light lights up green continuously.
Note: After approx. 30 minutes, the charging light goes out to save energy.
Note: When you press the on/off button while the appliance is connected to the wall socket, the charging light lights up to remind you to unplug the appliance before use.
Using the appliance
Note: This appliance can only be used without cord.
Shaving tips & tricks
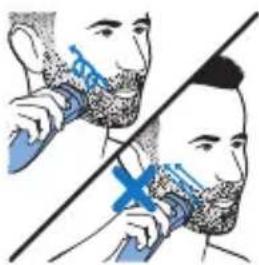
- Make circular movements during use. Circular movements provide better shaving results than straight movements.
- Your skin may need 2 or 3 weeks to get accustomed to the Philips shaving system.
12 English
Switching the appliance on and off

1 To switch on the appliance, press the on/off button once.
2 To switch off the appliance, press the on/off button once.
Shaving

1 Switch on the appliance.
2 Move the shaving heads in circular movements over your skin.
3 After shaving, switch off the appliance.
4 Clean the appliance (see chapter 'Cleaning and maintenance').
Trimming (S1520, S1510 only)
You can use the trimmer to groom your sideburns and moustache.

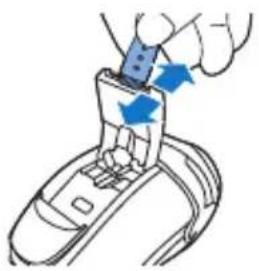
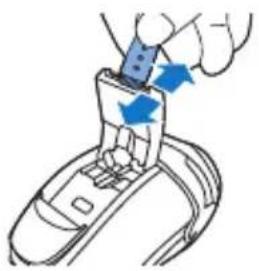
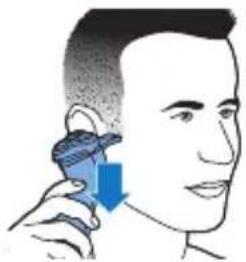
1 Push the trimmer slide downwards to open the trimmer.
2 Switch on the appliance.
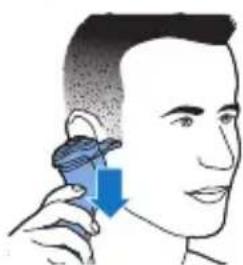
- You can now start trimming.
3 After trimming, switch off the appliance.
4 Clean the trimmer (see chapter 'Cleaning and maintenance').
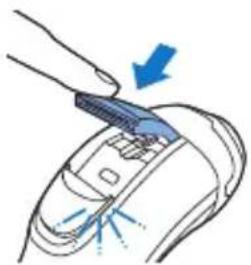
5 Close the trimmer ('click').
Cleaning and maintenance
Danger: This appliance is not washable. Never immerse the appliance in water, nor rinse it under the tap.
Caution: Never use compressed air, scouring pads, abrasive cleaning agents or aggressive liquids such as petrol or acetone to clean the appliance.
- Clean the appliance after every shave for optimal shaving performance.
- Regular cleaning guarantees better shaving performance.
- For the best cleaning results, we advise you to use the Philips Cleaning spray (HQ110).
- Never clean the shaving unit and the hair chamber with a towel or tissue, as this may damage the shaving heads and the coupling spindles.
Cleaning the shaving unit with the cleaning brush
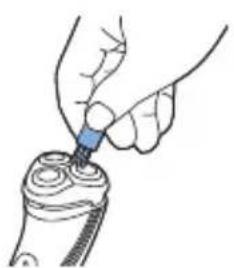
1 Switch off the appliance and make sure it is disconnected from the wall socket.
2 Clean the outside of the shaving unit with the brush supplied.
English

3 Press the release button to open the shaving unit.
4 Clean the inside of the shaving unit and hair chamber with the brush supplied.
5 Close the shaving unit.
Thorough cleaning
Clean the shaving heads thoroughly once a month for optimal performance.

1 Switch off the appliance and make sure it is disconnected from the wall socket.
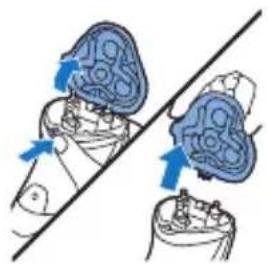
2 Press the release button to open the shaving unit. Pull the shaving unit off the appliance.
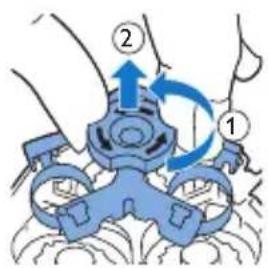
3 Turn the lock anticlockwise and remove the retaining frame.
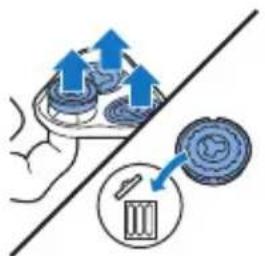
4 Remove and clean one shaving head at a time. Each shaving head consists of a cutter and a guard.
Note: Do not clean more than one cutter and guard at a time, since they are all matching sets. If you accidentally put a cutter in the wrong


shaving guard, it may take several weeks before optimal shaving performance is restored.
- Remove the cutter from the shaving guard and clean it with the brush.
- Clean the inside and outside of the shaving guard with the brush.
5 Put the cutter back into the guard.

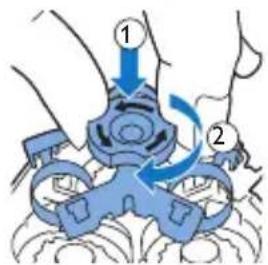
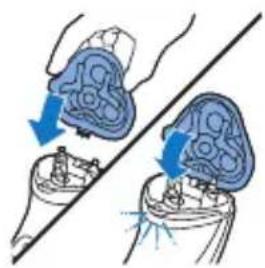
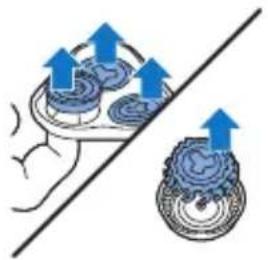
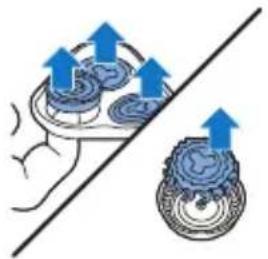
6 Put the shaving heads back into the shaving unit.
Note: Make sure the notches on both sides of the shaving heads fit exactly onto the projections in the shaving head holder.
7 Put the retaining frame back into the shaving unit and turn the lock clockwise.
8 Insert the lug of the shaving unit into the slot in the top of the appliance. Then close the shaving unit ('click').
Note: If the shaving unit does not close smoothly, check if you have inserted the shaving heads properly and if the retaining frame is locked.
Cleaning the trimmer with the cleaning brush (S1520, S1510 only)

Clean the trimmer every time you have used it.
1 Switch off the appliance and make sure it is disconnected from the wall socket.
2 Push the trimmer slide downwards to open the trimmer.
3 Clean the trimmer with the cleaning brush. Brush up and down along the trimmer teeth.
4 Close the trimmer ('click').
Tip: For optimal trimming performance, lubricate the trimmer teeth with a drop of sewing machine oil every six months.
Storage

Put the protection cap on the shaver to prevent damage.
Replacement

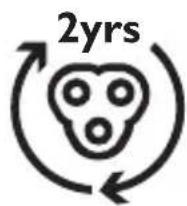
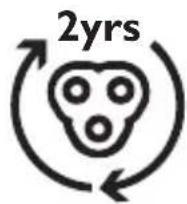
For maximum shaving performance, we advise you to replace the shaving heads every two years. Replace damaged shaving heads immediately. Always replace the shaving heads with original Philips shaving heads (see 'Ordering accessories').
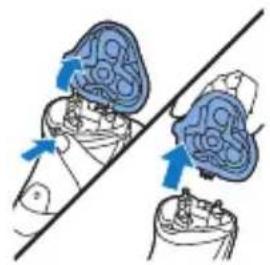
1 Switch off the appliance and make sure it is disconnected from the wall socket.
2 Press the release button to open the shaving unit. Pull the shaving unit off the appliance.

3 Turn the lock anticlockwise and remove the retaining frame.
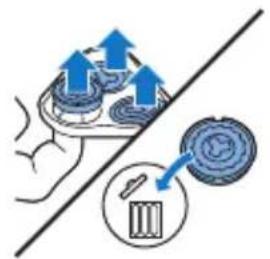
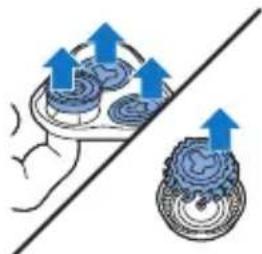
4 Remove the shaving heads from the shaving unit and throw them away.
5 Place new shaving heads in the shaving unit.
Note: Make sure the notches on both sides of the shaving heads fit exactly onto the projections in the shaving head holder.

6 Put the retaining frame back into the shaving unit and turn the lock clockwise.

7 Insert the lug of the shaving unit into the slot in the top of the appliance. Then close the shaving unit ('click').
Note: If the shaving unit does not close smoothly, check if you have inserted the shaving heads properly and if the retaining frame is locked.
Ordering accessories
To buy accessories or spare parts, visit
www.shop.philips.com/service or go to your
Philips dealer. You can also contact the Philips Consumer Care Center in your country (see the worldwide guarantee leaflet for contact details).
The following accessories and spare parts are available:
- SH30 Philips Shaving Heads.
- HQ110 Philips shaving head cleaning spray
Recycling
- Do not throw away the product with the normal household waste at the end of its life, but hand it in at an official collection point for recycling. By doing this, you help to preserve the environment.
Guarantee and support
If you need information or support, please visit www.philips.com/support or read the separate worldwide guarantee leaflet.
Guarantee restrictions
The shaving heads (cutters and guards) are not covered by the terms of the international guarantee because they are subject to wear.
Troubleshooting
This chapter summarizes the most common problems you could encounter with the appliance. If you are unable to solve the problem with the information below, visit www.philips.com/support for a list of frequently asked questions or contact the Consumer Care Center in your country.
Problem Possible cause Solution
| The appliance does not shave as well as it used to. | The shaving heads are damaged or worn. | Replace the shaving heads. See chapter 'Replacement'. |
| Long hairs obstruct the shaving heads. | Clean the shaving heads one by one (see chapter 'Cleaning and maintenance'). | |
| You have not inserted the shaving heads properly. | Make sure the notches on both sides of the shaving heads fit exactly onto the projections in the shaving-head holder (see chapter 'Cleaning and maintenance'). | |
| The appliance does not work when I press the on/off button. | The appliance is connected to the wall socket. | This appliance can only be used without cord. |
| The rechargeable battery is empty. | Recharge the battery (see chapter 'Charging'). | |
| The temperature of the appliance is too high. In this case, the appliance does not work. | As soon as the temperature of the appliance has dropped sufficiently, you can switch on the appliance again. |
Pendahuluan
1 Tancapkan steker kecil ke alat.
2 Tancapkan adaptor ke stopkontak dinding.
Baterai hampir habis
Pengisian daya
- Saat alat diisi daya, lampu pengisian daya berkedip hijau.
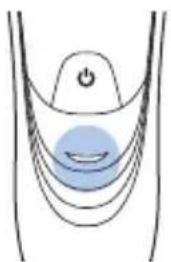
Baterai terisi penuh
Mencukur

3 Putar berlawanan arah putaran jarum jam dan lepaskan bingkai penahan.
3 Putar berlawanan arah putaran jarum jam dan lepaskan bingkai penahan.

- Pastikan unit bekalan sentiasa kering.
Amaran

Bateri lemah
Pengecasan
Pencukuran

3 Pusingkan kunci mengikut arah lawan jam dan tanggalkan rangka penahan.

8 Masukkan cuping unit pencukur ke dalam ruang di bahagian atas perkakas. Kemudian tutup unit pencukur ('klik').
42 Bahasa Melayu

3 Pusingkan kunci mengikut arah lawan jam dan tanggalkan rangka penahan.

7 Masukkan cuping unit pencukur ke dalam ruang di bahagian atas perkakas. Kemudian tutup unit pencukur ('klik').
Chỉ báo sạc
Pin đã được sạc đây

แบตเตอรี่เหลือนอย


Taking place you can get your own home, you can get your own home.
www.philips.com/support
- 保持电源部件干燥。
警告

充电指示
电池已完全充满
您可使用修剪器修剪鬓角和须髭。
5 关闭修剪器(可听到“咔哒”一声)。
清洁和保养
3 按下释放按钮,打开剃须刀头部件。

彻底清洁
3 逆时针方向转动锁装置并卸下固定架。

6 将剃须刀头重新放入剃须刀头部件。

盖上剃须刀保护盖,以防受损。
更换

3 逆时针方向转动锁装置并卸下固定架。

- 電源供應裝置請保持乾燥。
警示

電量不足

電池充滿電
1 開啟產品電源。
您可以使用鬢角刀修整鬢角與鬍髭。
1 將鬢角刀開關往下推即可開啟鬢角刀。
2 開啟產品電源。

- 這時即可開始修整。
3 修剪之後,關閉產品電源。
3 按下釋放鈕,打開電鬍刀組。

徹底清潔
6 將電鬍刀刀頭裝回電鬍刀組。
蓋上電鬍刀保護蓋以避免損壞。
更换
충전 표시

충전
배터리 완전 충전
geme끔하게 청소하기



تحذير
تنبيه
مل الشحن مطلقا-
لما هو موضح في-
دليل المستخدم.
طة شخص واحد-
فقط.
نظيف، أو العوامل -

مغيل مرة واحدة.1.
/إيقاف التشفيل 2
مرة واحدة.
ال crudeة
- م بتشغيل الجهاز
ي حركات دائرية.
د تشفيل الجهاز.3
- "ظيف والصيانة"
أُسفل لفتح وحدة 1
التشنيب.
م بتشغيل الجهاز.
صوت comptقة"5."
التنظيف والصيانة
ج وحدة الحلادقة. 3

الفرشاة المزودة.
الشعر باستخدم 4
ق وحدة الحلاقة.5.
التنظيف التام
وحدة الحلادقة من 2
الجهاز.

- ٢٠٠ إطار الإمساك
د منها على حدة 4.
ونظفها بالفرشاة.
- في وحدة الحلامة.
از. ثم أغلق وحدة 8
الاستبideal

يحدة الحلادقة من 2
الجهاز.
زل إطار الإمساك.

- قة وtglص منها.
ة بوحدة الحلادقة.
، في اتجاه عقارب 6
الساعة.

از. ثم أغلق وحدة 7

هش دار
فرکز دست کاه-
۶۵اه بگذاری د.
- یواری پزنی د.
ان مى دەد (بە-
- قط 5 دقى قە-
اصلاح
- روش کنی د. روش
س تتان جرکت 2
دَهُى د.
خاموش کنید.
"تمیز کردن 49

, اردهید تا باز 1
شود.
روش ن کنی د.
ا شروع کنی د.
خاموش کنی د.
-ن و ن گ که داری 4"
مراجعه کنید.
- ("دای کلیک")
د از پری ز ج دا
شده باشد.
س ارائه شده 2
داه اصلاح باز3
شود.

أَدَاه اصلاح باز 2
بەھهای ساعت 3
میز کنی د. هر 4
و آن را با برس-
تمیز کنید.
را با ی ک برس-
تمیز کنی د.

افظ بگذارید.5.

لاح قرار دهی د.

تىغە را بە سەت بالا و پاىىن برس بزنىد.
د. دن دان ه های 3
4.("کلیک) کدای

نگهداری


תָרְשָׁ
. Class III 11: 17:30- 17:30- - 17:30- - 17:30- - 17:30- - 17:30- - 17:30- - 17:30- - 17:30- - 17:30- - 17:30- - 17:30- - 17:30- - 17:30- - 17
תְרָה

1
תָרִיְה
תְרָה בַרִי הַלְרָה


-
-
. כְרָה אַת הִיָה
-
-
Philips )HQ110(
3

הכלה 4
6
תָבַרְה
הַלְרָׁהִיָהִיָהִיָהִיָהִיָהִיָהִיָהִיָהִיָהִיָהִיָהִיָהִיָהִיָהִיָהִיָהִיָהִם.
1
הכלה 3
7
www.philips.com/support
www.philips.com/support
הכלהה,הכלהה
תְבָרִי הַלְהָה
הכלהה
- Introduction
- General description (fig. 1)
- Important safety information
- Danger
- Warning
- Caution
- Electromagnetic fields (emf)
- General
- Charging
- Charging with the adapter
- Charge indications
- Battery low
- Battery fully charged
- Using the appliance
- Shaving tips & tricks
- 12 English
- Switching the appliance on and off
- Shaving
- Trimming (S1520, S1510 only)
- Cleaning and maintenance
- Cleaning the shaving unit with the cleaning brush
- English
- Thorough cleaning
- Cleaning the trimmer with the cleaning brush (S1520, S1510 only)
- Storage
- Replacement
- Ordering accessories
- Recycling
- Guarantee and support
- Guarantee restrictions
- Troubleshooting
- Pendahuluan
- Baterai hampir habis
- Pengisian daya
- Baterai terisi penuh
- Mencukur
- Amaran
- Bateri lemah
- Pengecasan
- Pencukuran
- 42 Bahasa melayu
- Chỉ báo sạc
- Pin đã được sạc đây
- แบตเตอรี่เหลือนอย
- 警告
- 电池已完全充满
- 清洁和保养
- 彻底清洁
- 更换
- 警示
- 電量不足
- 電池充滿電
- 徹底清潔
- 충전 표시
- 충전
- 배터리 완전 충전
- Geme끔하게 청소하기
- تحذير
- تنبيه
- ال crudeة
- التنظيف والصيانة
- هش دار
- اصلاح
- תָרְשָׁ
- תְרָה
- תָבַרְה
Brand : PHILIPS
Model : Series 1000 S1320
Category : Razor