
SatinShave Prestige BRL170 - Razor PHILIPS - Free user manual and instructions
Find the device manual for free SatinShave Prestige BRL170 PHILIPS in PDF.


| Product Type | Women's Electric Shaver |
| Brand | Philips |
| Model | SatinShave Prestige BRL170 |
| Dimensions | Approx. 15 x 5 x 4 cm |
| Weight | Approx. 200 g |
| Power Source | Rechargeable Lithium-ion battery |
| Charging Time | 1 hour |
| Usage Time | 50 minutes |
| Functions | Wet & dry use, pop-up trimmer, sensitive skin technology |
| Cleaning | Rinse under running water |
| Safety Features | Skin protection guard, hypoallergenic foils |
| Accessories Included | Protective cap, cleaning brush |
| Warranty | 2 years |
| Repairability | Replacement foils and cutters available |
| Water Resistance | IPX5 (splash-proof) |
Frequently Asked Questions - SatinShave Prestige BRL170 PHILIPS
User questions about SatinShave Prestige BRL170 PHILIPS
0 question about this device. Answer the ones you know or ask your own.
Ask a new question about this device
Download the instructions for your Razor in PDF format for free! Find your manual SatinShave Prestige BRL170 - PHILIPS and take your electronic device back in hand. On this page are published all the documents necessary for the use of your device. SatinShave Prestige BRL170 by PHILIPS.
USER MANUAL SatinShave Prestige BRL170 PHILIPS
BRL180, BRL170, BRL160


75% recycled paper
75% papier recyclé
4

2
3

4
5

6

7
8

9





English
Introduction
Congratulations on your purchase and welcome to Philips! To fully benefit from the support that
Philips offers, register your product at www.philips.com/welcome.
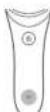
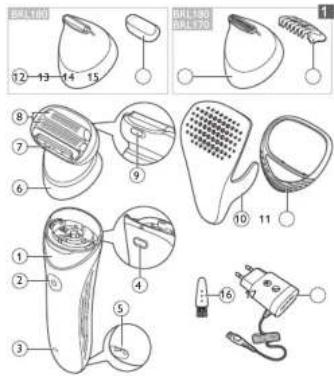
General description (Fig. 1)
1 Handle
2 On/off button
3 Battery indicator
4 Release button
5 Socket for small plug
6 Shaving head
7 Trimmer
8 Foils
9 Foil holder release slide
10 Travel cap with lock
11 Skin stretcher cap
12 Small shaving head (BRL180 only)
13 Protection cap for small shaving head (BRL180 only)
14 Bikini trimmer head (BRL180, BRL170 only)
15 Bikini trimmer comb (BRL180, BRL170 only)
16 Cleaning brush
17 Adapter
Not shown: Pouch
Charging
Note: Charge the appliance fully before you use it for the first time.
Note: This appliance can only be used without cord.
To charge the appliance, insert the small plug into the socket in the bottom of the appliance and put the adapter in the wall socket.
- The charge indicator flashes white (Fig. 2): the appliance is charging. Charging takes up to 1 hour.
- The charge indicator lights up white continuously (Fig. 3): the appliance is fully charged and has a cordless operating time up to 60 minutes.
- The charge indicator does not light up when the appliance is switched on: the appliance contains enough energy to be used.
- The charge indicator flashes orange (Fig. 2): the battery is almost empty and needs to be charged.
Note: If the appliance is fully charged but still connected to the mains, the charge indicator flashes a few times when you press the on/off button. This indicates that you should disconnect the appliance from the mains before you can switch it on.
Quick charge
- When the battery is completely empty and you start charging it, the charge indicator flashes white quickly.
- After approximately 5 minutes, the charge indicator starts flashing white slowly. At this point, the battery contains enough energy to finish your shave.
Using the appliance
Switching the appliance on and off
1 To switch on the appliance, press the on/off button once (Fig. 4).
2 To switch off the appliance, press the on/off button once more.
Attaching and detaching heads
1 To attach a head, press it onto the handle ('click') (Fig. 5).
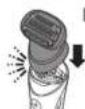
2 To detach a head, press the release button on the back of the appliance (Fig. 6).
Attaching and detaching accessories
1 To attach an accessory, simply snap it onto the head ('click') (Fig. 7).
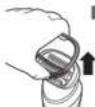
2 To detach an accessory, grab its front and back and pull it upwards off the head (Fig. 8). To detach a comb, pull its back upwards with a fingernail (Fig. 9).
Shaving and trimming
The appliance is suitable for use in the bath or shower, but you can also use it dry. If you want to use creams or body lotion, apply them after you have used the appliance.
Note: The appliance can only be used without cord.
Note: When you use the appliance to trim hairs, use it dry for the best result.
1 Place the appliance on your skin in such a way that the attachment or accessory is in full contact with the skin (Fig. 10).
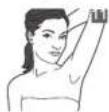
2 When you use the appliance on sensitive areas, stretch the skin with your free hand. When you use the appliance on your underarms, raise your arm and put your hand on the back of your head to stretch the skin (Fig. 11).
3 Move the appliance slowly against the direction of hair growth (Fig. 12).
Note: If you move the appliance over your skin too fast, you may not obtain a smooth result.
Shaving head
You can use the shaving head to shave your legs and body.
Note: Always check the foils before use. If they are damaged in any way, replace them right away (see 'Replacement').
Skin stretcher cap
You can attach the skin stretcher cap onto the shaving head to make the hairs stand upright during shaving. This makes it easier to remove them.
Bikini trimmer head (BRL180, BRL170 only)
You can use the bikini trimmer head to trim hard-to-reach areas in the bikini zone.
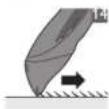
Place the bikini trimmer head flat onto the skin to trim (Fig. 13). Place the bikini trimmer head perpendicularly onto the skin for styling and shaping (Fig. 14).
Bikini trimmer comb (BRL180, BRL170 only)
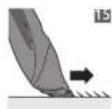
You can attach the bikini trimmer comb onto the bikini trimmer head to trim hairs in the bikini area to a length of 3mm (Fig. 15).
Small shaving head (BRL180 only)
You can use the small shaving head for precision shaving of small areas of your body.
If the hairs in the area to be shaved are longer than 3mm, first pretrim them with the bikini trimmer head.
Place the small shaving head flat onto the skin (Fig. 16).
Cleaning and storage
Keep the adapter dry.
1 Switch off the appliance.
2 Use the cleaning brush to brush away any hairs that have collected under the trimmer of the shaving head.
3 Push the foil holder release slide on the back of the shaving head to the right to remove the foil holder (Fig. 17).
4 Clean all parts of the shaving head with the cleaning brush, except the foils.
5 BRL180 only. To clean the small shaving head, hold the sides of the top part and pull it off the bottom part (Fig. 18). Brush the inside of the top part and the cutter of the bottom part with the cleaning brush (Fig. 19) and then rinse both parts.
6 Rinse the foil holder, heads and accessories under the tap. Shake them firmly to remove water drops.
7 Let all parts dry completely.
8 Place the foil holder back onto the shaving head ('click').
9 Put protection/travel caps or combs on the heads to prevent damage to the heads when you store them.
10 Store the appliance, its heads and accessories in the pouch.
Note: Lubricate trimmer teeth and foils with a drop of sewing machine oil every six weeks for optimal performance.
Replacement
To buy accessories or spare parts, visit
www.shop.philips.com/service or go to your Phillips dealer. You can also contact the Philips Consumer Care Centre in your country (see the worldwide guarantee leaflet for contact details)
For optimal performance, we advise you to replace the foils and cutters of the shaving head every two years. If you use the shaving head twice or more times a week, replace the cutting unit more often. Always replace the foils and cutters with an original set (BRL385).
Français
Introduction
- ENGLISH
- INTRODUCTION
- GENERAL DESCRIPTION (FIG. 1)
- CHARGING
- QUICK CHARGE
- USING THE APPLIANCE
- SWITCHING THE APPLIANCE ON AND OFF
- ATTACHING AND DETACHING HEADS
- ATTACHING AND DETACHING ACCESSORIES
- SHAVING AND TRIMMING
- SHAVING HEAD
- SKIN STRETCHER CAP
- BIKINI TRIMMER HEAD (BRL180, BRL170 ONLY)
- BIKINI TRIMMER COMB (BRL180, BRL170 ONLY)
- SMALL SHAVING HEAD (BRL180 ONLY)
- CLEANING AND STORAGE
- KEEP THE ADAPTER DRY
- REPLACEMENT
- FRANÇAIS
Brand : PHILIPS
Model : SatinShave Prestige BRL170
Category : Razor