
ADF1000 - Deep fryer BESTRON - Free user manual and instructions
Find the device manual for free ADF1000 BESTRON in PDF.


| Product Type | Electric Oil Deep Fryer |
| Brand | Bestron |
| Model | ADF1000 |
| EAN Code | 8711272101000 |
| Release Year | 2020 |
| Country of Origin | China |
| Dimensions (W x D x H) | 30 x 25 x 20 cm |
| Net Weight | 2.5 kg |
| Power Supply | 220-240 V ~ 50/60 Hz |
| Rated Power | 1500 W |
| Oil Tank Capacity | 2.5 L |
| Basket Capacity (Food) | 1 kg |
| Adjustable Thermostat | Yes, from 60 °C to 190 °C |
| Power-on Indicator Light | Yes |
| Temperature Indicator Light | Yes, turns off when temperature is reached |
| Cool Touch Handle | Yes, on basket and lid |
| Removable Odor Filter | Yes, replaceable |
| Non-Stick Tank | Yes, removable |
| Safety – Automatic Shut-Off | Yes, in case of overheating |
| Safety – Overheat Protection | Yes |
| Cleaning – Removable Tank | Yes, dishwasher safe |
| Cleaning – Filter | Hand washable |
| Spare Parts Available | Yes (basket, filter, tank) |
| Repairability | Repairability score 8.5/10 |
| Manufacturer Warranty | 2 years |
Frequently Asked Questions - ADF1000 BESTRON
User questions about ADF1000 BESTRON
0 question about this device. Answer the ones you know or ask your own.
Ask a new question about this device
Download the instructions for your Deep fryer in PDF format for free! Find your manual ADF1000 - BESTRON and take your electronic device back in hand. On this page are published all the documents necessary for the use of your device. ADF1000 by BESTRON.
USER MANUAL ADF1000 BESTRON
natural_image
Abstract black arrow symbol pointing right, no text or symbols presentBESTRON®
ADF1000

natural_image
Line drawing of a standard air fryer with control buttons and a handle (no text or symbols)
Handleiding friteuse

Instruction manual fat fryer

natural_image
Technical illustration of a mechanical device with two views showing a hand operating a tool (no text or symbols present)WERKING - Frituren
natural_image
Diagram showing two kitchen appliances with a hand adjusting their parts, one being adjusted and the other holding a tool (no text or symbols present)natural_image
Line drawing of a hand holding a button on a standard electric toaster (no text or symbols)
natural_image
Line drawing of a kitchen electric fryer with lid open, showing internal components and handle (no text or symbols)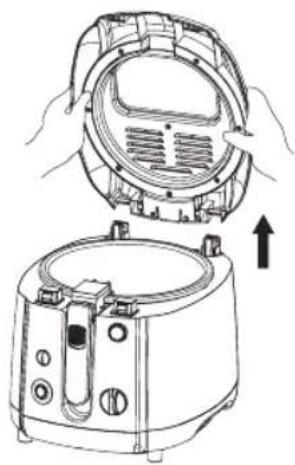
natural_image
Line drawing of a kitchen appliance with a fan and a toaster, showing internal components and a directional arrow (no text or symbols)4
R. Neyman Quality control


natural_image
Technical line drawing of a mechanical device with two views (labeled 1 and 2), showing a hand operating the component (no text or symbols present)natural_image
Diagram showing two kitchen appliances with arrows indicating rotation or adjustment, no text or symbols presentnatural_image
Line drawing of a hand holding a kitchen air fryer with a button (no text or symbols)
natural_image
Line drawing of a kitchen air fryer with lid open, showing internal components and mounting feet (no text or symbols)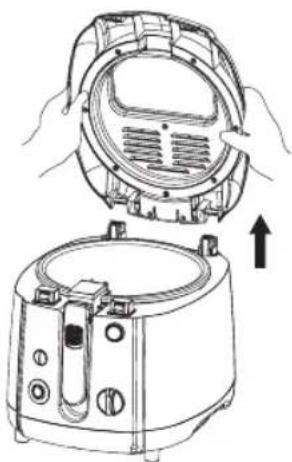
natural_image
Line drawing of a kitchen appliance with a mounted fan and a side view showing the interior (no text or symbols)4
FONCTIONNEMENT - Friture
natural_image
Diagram showing two kitchen appliances with a hand adjusting their parts, no text or symbols presentnatural_image
Line drawing of a hand holding a triangular toaster with a handle (no text or symbols)
natural_image
Line drawing of a kitchen air fryer with lid open, showing internal components and mounting feet (no text or symbols)
natural_image
Line drawing of a toaster oven with hands installing the lid panel (no text or symbols)4
CONDITIONS DE GARANTIE
DÉCLARATION DE CONFORMITÉ CE
R. Neyman
This type of fryer is only suitable for use with oil or liquid fat, and not with solid fat. Using solid fat entails the risk of trapping water in the fat which will cause it to spatter violently when heated up.
Make sure that hot oil or liquid fat never comes into contact with water or moisture. This results in very dangerous situations. Take the following measures and read this manual before using this device.
- Never use the appliance outside
- Never use the appliance in damp rooms (like sheds, bathrooms, etc.)
- Never using solid fats (blocks)
- Only use oil or liquid fats specifically suitable for frying
- Remove ice from frozen food
• Properly dry foods before frying them


CERTAIN PARTS OF THE APPLIANCE MAY GET HOT. DO NOT TOUCH THESE PARTS TO PREVENT BURNING YOURSELF.
SAFETY INSTRUCTIONS - General
- Please read these instructions carefully and retain them for future reference.
• Use this appliance solely in accordance with these instructions. - This appliance can be used by children older than 8 years and persons with reduced physical, sensory or mental capabilities or lack of experience and knowledge, but only if they have been given supervision or instruction concerning use of the appliance in a safe way and understand the hazards involved.
• Children should be supervised to ensure that they do not play with the appliance
• Have any repairs carried out solely by a qualified electrician. Never try to repair the appliance yourself.
SAFETY INSTRUCTIONS - Electricity and heat
- Verify that the mains voltage is the same as that indicated on the type plate on the appliance before use.
• Always plug the appliance into an earthed wall socket.
• Always remove the plug from the wall socket when the appliance is not in use.
• Always remove the plug from the wall socket by pulling on the plug, not the power cord. - Regularly check the appliance's power cord to make sure it is not damaged. Do not use the appliance if the power cord is damaged. Have a damaged power cord replaced by a qualified service department.
- The appliance is fitted with a short power cord to reduce the risk that you become entangled in the loose cord and, in so doing, cause the deep fryer to topple and splash you with hot frying oil.
- Do not use an extension lead.
- Certain parts of the appliance can become hot; do not touch them, as you could burn yourself.
- The appliance needs space to allow heat to escape, thereby avoiding the risk of fire. Make sure that the appliance has sufficient space around it, and does not come in contact with flammable materials. The appliance must not be covered.
- Never use the appliance in the vicinity of flammable materials.
- Make sure that the appliance, the power cord or the plug do not come into contact with heat sources, such as a hot hob or naked flame.
• Make sure that the housing, the power cord and plug do not come in contact with water.
SAFETY INSTRUCTIONS - Use
- Never use the appliance outdoors.
- Never use the appliance in humid rooms.
- Place the appliance on a stable, flat, heat-resistant surface where it cannot fall.
- Do not let the power cord hang over the edge of the draining board, worktop or table.
• Make sure that your hands are dry when you touch the appliance, the power cord or the plug. - Do not pick up the appliance if it falls into water. Remove the plug from the wall socket immediately. Do not use the appliance any more.
- Switch off the appliance and remove the plug from the wall socket in the event of a malfunction during use, and before cleaning the appliance, fitting or removing an accessory, or storing the appliance after use.
• Take extreme care when filling the deep fryer and when opening and closing the lid. The hot vapours, and splashes of hot liquid fat and oil can cause severe burns. - Never leave the appliance unattended when in use.
- Never immerse the housing, the power cord or the plug in water or other liquids.
- Make sure that the appliance has sufficient ventilation whilst in use.
- Never move the appliance when it is switched on or is still hot. Switch off the appliance and wait until it has cooled down before moving it.
- Never switch on the appliance if it does not contain the necessary quantity of frying oil or liquid fat.
• Only use liquid fat or oil which is suitable for deep-frying. Do not use standard margarine or butter. - When filling the deep fryer with oil or liquid fat make sure the level lies between the minimum and maximum levels indicated by the "MIN" and "MAX" marks on the inner pan.
- Make sure that the food is thoroughly dry before you fry it. Moist products can cause severe splashing of the hot oil or liquid fat. To prevent splashes, remove as much ice as possible from frozen food.
- Do not put too much food in the frying basket at one time.
• Thoroughly clean the exterior of the appliance after use.
• This appliance may not be used through an external timer or by means of remote control.
OPERATION - General
The slow cooker is only intended for domestic use, not for professional use.

- Frying basket
- Handle
- Lock
- 'Power' indicator light
- Temperature indicator light
- On/Off switch
-
Temperature control dial
-
Lid
- Window
- Ventilation grill
- Inner pan
- Housing
- Lid release button
- Cord and plug
OPERATION - Using for the first time
- Press the lid release button (13) to open the lid. The lid will automatically open to the vertical position.
- Lift the frying basket's (1) handle (2) to the horizontal position so that it locks into place (see Figure 2). Remove the frying basket from the pan (11).
- Clean the interior and exterior of the housing (12), the lid (8) and the frying basket, and then assemble the deep fryer again (see Cleaning and maintenance).
- Fill the pan (11) with oil or liquid fat (see Replacing oil or liquid fat). The level of the oil or liquid fat must lie between the 'MIN' and 'MAX' marks in the bowl. The maximum quantities are 2 litres.
ATTENTION: Never using solid fats (blocks)
ATTENTION: Only use oil or liquid fats suitable for frying
- Lower the empty frying basket into the deep fryer.
- Close the lid.
- Pull the lock (3) in the handle towards you and lower the handle (see figure 3). The frying basket will be lowered into the bowl (see figure 3).

OPERATION - Frying
- Put the plug (14) into the wall socket, and switch (6) the deep fryer on. The green power supply indicator light (4) will illuminate to indicate that the deep fryer has been switched on.
- Adjust the temperature control dial (7) to the required temperature. The red temperature indicator light (5) will illuminate to indicate that the liquid fat or oil is not yet at the required temperature.
ATTENTION: Properly dry foods before frying them
ATTENTION: When setting the temperature take account into the food you intend to fry. Pre-cooked or pre-fried food (such as deep-freeze chips or potato rissoles) will need to be fried at a higher temperature than food that has not been pre-cooked or pre-fried. See Table 1 on the panel of the deep fryer for an indication of the frying temperatures and times.
Table 1.
| Food Temperature Recommended time | ||
| Fresh fries 190°C 12-15 minutes | ||
| Deep frozen fries Manufacturer's directions Manufacturer's directions | ||
| Scampi (coated with breadcrumbs) 170°C 6-7 m nutes | ||
| Chicken nuggets 190°C 7-8 minutes | ||
| Fillet of fish (with breadcrumbs, or with batter) | 170°C 6-8 minutes | |
| Onion rings 170°C 4-5 minutes |
-
The red temperature indicator light will extinguish once the oil or liquid fat has reached the required temperature.
-
Lift the frying basket's handle (2) to the horizontal position until it locks into place (see Figure 2). Lifting the handle also raises the frying basket (1). Allow the frying basket to drain (keep the lid closed).
- Press the lid release button (13) to open the lid (8), and take the frying basket out of the deep fryer.
- Fill the frying basket with the required food. Do not put too much food in the basket at once (500gr max.)
- Put the frying basket back into the deep fryer. Leave the handle in the horizontal position.
- Close the lid.
- Pull the lock in the handle (3) towards you and lower the handle. The frying basket will be lowered into the oil (see figure 3).

natural_image
Diagram showing two kitchen appliances with a hand adjusting their parts, one being adjusted and the other holding a tool (no text or symbols present)Tip: Use a kitchen timer to set the required frying time.
- Once you have finished frying, lift the handle of the frying basket to raise the frying basket. Allow the frying basket to drain (keep the lid closed).
- Press the lid release button.
- Take the frying basket out of the deep fryer and place the food on a plate, preferably on a piece of paper kitchen towel that will absorb any excess liquid fat.
- The deep fryer will maintain the temperature of the oil at the required setting, and consequently you will be able to fry a second portion when you are ready. Repeat steps 2 through 12.

Switch off the deep fryer when you do not wish to fry a further portion.
- Once you have finished frying switch off the deep fryer and remove the plug from the wall socket.
- Allow the deep fryer to cool.
- Clean the exterior of the housing, and store the deep fryer.
OPERATION - Tips and directions

• Make sure that the food is thoroughly dry before you fry it. Moist products can cause severe splashing of the hot oil or liquid fat.
- Remove as much ice as possible from frozen food; this will prevent splashing.
- Do not fry oven-ready chips.
- Do not fry potatoes that have been stored for too long, or are beginning to develop shoots.
- Do not put too much food in the frying basket at one time.
- You will need to coat some foods with batter or breadcrumbs before you fry them. You can prepare your own breadcrumbs by crumbling toast or rusks.
- Filter the oil or liquid fat at regular intervals to remove any breadcrumbs and particles of food.
• Take extreme care when filling and emptying the deep fryer, and when opening and closing the lid. The inside of the lid and the bowl are both very hot; the hot vapours and splashes of liquid fat or oil can also cause burns.
CLEANING AND MAINTENANCE - General
Clean the appliance and the loose parts thoroughly after each use:
- Switch off the deep fryer, remove the plug from the wall socket, and allow the deep fryer to cool down completely.
- Take the lid off the deep fryer by sliding the vertical lid backwards (see figure 4).

natural_image
Line drawing of a hand holding a button on a square-shaped toaster (no text or symbols)
natural_image
Line drawing of a kitchen air fryer with lid open, showing internal components and handle mechanism (no text or symbols)
natural_image
Line drawing of a toaster oven with lid and front panel, showing hands installing components (no text or symbols)4
- Remove the frying basket from the deep fryer.
- Take the filters out of the lid (see 'Replacing filters'), clean the lid and the frying basket in hot washing-up water or a dishwasher, and then dry thoroughly.
- Pour the oil or liquid fat into a receptacle. Preference is given to handing in frying oil and liquid fat to your municipality; these can be reused for other purposes.
- Remove the remaining oil using absorbent paper kitchen towel.
- Thoroughly clean the inside of the bowl and the housing with hot water to which a little washing-up liquid has been added; do NOT use scourers. Then dry them thoroughly.
- Reassemble the deep fryer.
- Store the deep fryer.
- Refill the deep fryer with oil or liquid fat only when you wish to use the appliance again

- Verify that the appliance is not connected to the power supply before you clean it. Never use corrosive or scouring cleaning agents or sharp objects (such as knives or hard brushes) to clean the appliance.
- Never immerse the housing unit in water or another liquid and never place it under flowing water.
• The housing is not dishwasher-proof.
CLEANING AND MAINTENANCE - Replacing the oil or liquid fat
The quality of the oil or liquid fat deteriorates every time you use the deep fryer. For this reason you will need to replace the oil or liquid fat at regular intervals. Topping up the oil or liquid fat will not improve the quality. Use good quality oil or liquid fat.
ATTENTION: Never using solid fats (blocks)
ATTENTION: Only use oil or liquid fats specifically suitable for frying
Replace the oil or liquid fat when;
- it becomes darker in colour,
- it becomes thicker in consistency,
- small air bubbles are seen that take a long time to disappear; in new, fresh fat the air bubbles are large and they also disappear rapidly,
• the fried food has an unpleasant or strange taste or smell,
• the appliance emits more smoke than usual.
CLEANING AND MAINTENANCE - Replacing the filter
The disposable filter is intended to reduce the smell of frying when using the appliance. They become less effective over the course of time, and for this reason it has to be replaced at regular intervals.
- Press the lip on top of the ventilation cover and remove the ventilation cover.
- Remove the filter.
- Fit new filter (with the black filter at the top).
- Fit the ventilation cover.
THE ENVIRONMENT

- Dispose of packaging material, such as plastic and boxes, in the appropriate waste containers.
When this product reaches the end of its useful life do not dispose of it by putting it in a dustbin; hand it in at a collection point for the reuse of electrical and electronic equipment. Please refer to the symbols on the product, the user's instructions or the packaging.
- The materials can be re-used as indicated. Your help in the re-use, recycling or other means of making use of old electrical equipment will make an important contribution to the protection of the environment.
- Contact your municipality for the address of the appropriate collection point in your neighbourhood.
GUARANTEE TERMS
The importer guarantees the appliance against defects caused by manufacturing and/or material faults for 60 months from the date of purchase, subject to the following conditions.
- No charges will be made for labour costs or materials during the warranty period. Any repairs carried out during the warranty period do not extend the warranty period.
- The importer automatically becomes the owner of any faulty parts that he replaces or a faulty appliance (in the event of replacement of the appliance).
- All claims submitted under warranty must be accompanied by the original bill of sale.
- Claims under warranty must be submitted to the dealer where the appliance was purchased or to the importer.
- The warranty is issued solely to the first purchaser and cannot be transferred.
- The warranty does not cover damage caused by:
a. Accidents, incorrect use, wear and/or neglect.
b. Faulty installation and/or use in a manner contravening the prevailing legal, technical or safety regulations.
c. Connection to a mains voltage other than the voltage specified on the type plate.
d. Unauthorized modifications.
e. Repairs carried out by third parties.
f. Careless transport, i.e. without suitable packaging materials or protection.
- No claims may be made under this warranty for:
a. Losses incurred during transport.
b. The removal or changing of the appliance's serial number. - The guarantee does not cover power cords, lamps or glass parts.
- No claims can be submitted under this warranty for damage other than the repair or replacement of faulty parts. The importer can never be held responsible for any consequential loss or damage or any other consequences, resulting either directly or indirectly from the appliance supplied by the importer.
- In case of claims under guarantee you can contact your dealer where the appliance is purchased. Bestron offers you also the possibility to send the appliance directly to our Service Department. Do not send your appliance without consulting us. The package may be refused and any any costs will be for your account. Please contact the Service Department and they will tell you how to pack and send the appliance.
- This appliance is not suitable for professional use.
SERVICE
If a fault should occur please contact the BESTRON service department: www.bestron.com/service
CE DECLARATION OF CONFORMITY
This product conforms to the essential requirements of the following EU safety directives:
• EMC Directive 2004/108/EC
• Low Voltage Directive 2006/95/EC

R. Neyman Quality control


LEGGERE ATTENTAMENTE LE ISTRUZIONI D'USO E CONSERVARLE CON CURA!
1
natural_image
Technical line drawing of a mechanical device with two views (top and side), showing a hand operating a tool to adjust the component (no text or symbols present)natural_image
Diagram showing two mechanical components with arrows indicating assembly or adjustment, no text or symbols present.natural_image
Line drawing of a hand pressing down on a toaster oven (no text or symbols)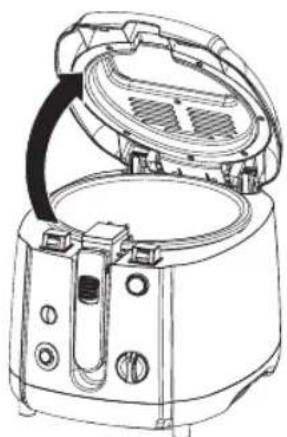
natural_image
Line drawing of a kitchen air fryer with lid open, showing internal components and no text or symbols
natural_image
Line drawing of a kitchen appliance with a lid and front view showing the interior (no text or symbols)4
natural_image
Technical line drawing showing two views of a mechanical device with a hand operating the component (no text or symbols present)natural_image
Diagram showing two kitchen appliances with a hand adjusting their parts, one being adjusted and the other holding a tool (no text or symbols present)natural_image
Line drawing of a hand inserting a button into a kitchen air fryer (no text or symbols)
natural_image
Line drawing of a kitchen air fryer with lid open, showing internal components and handle (no text or symbols)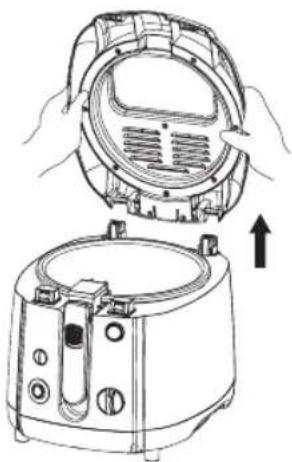
natural_image
Line drawing of a toaster oven with lid and front panel, showing internal components and a rising arrow (no text or symbols)4
natural_image
Line drawing of a standard 3D toaster with handles and front panel (no text or symbols)
BESTRON®
ADF1000
V 171214-07


- BESTRON®
- WERKING - Frituren
- FONCTIONNEMENT - Friture
- CONDITIONS DE GARANTIE
- DÉCLARATION DE CONFORMITÉ CE
- SAFETY INSTRUCTIONS - General
- SAFETY INSTRUCTIONS - Electricity and heat
- SAFETY INSTRUCTIONS - Use
- OPERATION - General
- OPERATION - Using for the first time
- ATTENTION: Never using solid fats (blocks)
- ATTENTION: Only use oil or liquid fats suitable for frying
- OPERATION - Frying
- ATTENTION: Properly dry foods before frying them
- OPERATION - Tips and directions
- CLEANING AND MAINTENANCE - General
- CLEANING AND MAINTENANCE - Replacing the oil or liquid fat
- ATTENTION: Only use oil or liquid fats specifically suitable for frying
- CLEANING AND MAINTENANCE - Replacing the filter
- THE ENVIRONMENT
- GUARANTEE TERMS
- SERVICE
- CE DECLARATION OF CONFORMITY
- LEGGERE ATTENTAMENTE LE ISTRUZIONI D'USO E CONSERVARLE CON CURA!
Brand : BESTRON
Model : ADF1000
Category : Deep fryer