
Avance Collection HR1894 - Juicer PHILIPS - Free user manual and instructions
Find the device manual for free Avance Collection HR1894 PHILIPS in PDF.


| Type of product | Slow Juicer (Masticating) |
| Model | Avance Collection HR1894 |
| Brand | Philips |
| Dimensions (H x W x D) | 40.0 x 20.0 x 25.0 cm |
| Weight | 4.2 kg |
| Power consumption | 150 W |
| Speed | 55 RPM (low speed) |
| Juicing method | Masticating / Cold press |
| Pulp container capacity | 1.2 L |
| Juice container capacity | 0.8 L |
| Feeding tube diameter | 5.5 cm |
| Material | Plastic (BPA-free) and stainless steel |
| Dishwasher safe parts | Yes (all removable parts) |
| Noise level | < 50 dB |
| Safety features | Safety lock, overload protection, non-slip feet |
| Warranty | 2 years |
| Spare parts availability | Yes (via Philips or authorized service centers) |
| Included accessories | Juice container, pulp container, cleaning brush |
| Repair index | 8.0 / 10 |
| Manual language | English (60 pages PDF) |
Frequently Asked Questions - Avance Collection HR1894 PHILIPS
User questions about Avance Collection HR1894 PHILIPS
0 question about this device. Answer the ones you know or ask your own.
Ask a new question about this device
Download the instructions for your Juicer in PDF format for free! Find your manual Avance Collection HR1894 - PHILIPS and take your electronic device back in hand. On this page are published all the documents necessary for the use of your device. Avance Collection HR1894 by PHILIPS.
USER MANUAL Avance Collection HR1894 PHILIPS
Always here to help you / 始终如一地为您提供帮助
Register your product and get support at / 请登录以下网址并得到相应的帮助
www.philips.com/welcome

HR1899
HR1897
HR1896
HR1895
HR1894

natural_image
Black and white photo of a Philips brand hairbrush (no text or symbols visible on the device body)
natural_image
Diagram of three open panels with grid patterns and curved arrows indicating rotation or movement (no text or symbols)| [IMAGE] |  |  | |
 | × | × | √ |
 | √ | √ | √ |


ENGLISH 6
INDONESIA 11
한국어 16
BAHASA MELAYU 21
ภาษาไทย 27
TIÊNG VIÊT 31
繁體中文 36
简体中文 41

50

54
Introduction
Congratulations on your purchase and welcome to Philips! To fully benefit from the support that Philips offers, register your product at www.philips.com/welcome. This Philips Avance slow juicer helps you to get all the goodness of fruits and vegetables into your glass, so that you can enjoy tasty and healthy juices every day. Its innovative technology allows you to extract up to the maximum of fruits and vegetables and to quickly clean the appliance in less than 1 minute. The fully integrated design was developed to take up little space and to give you great results.
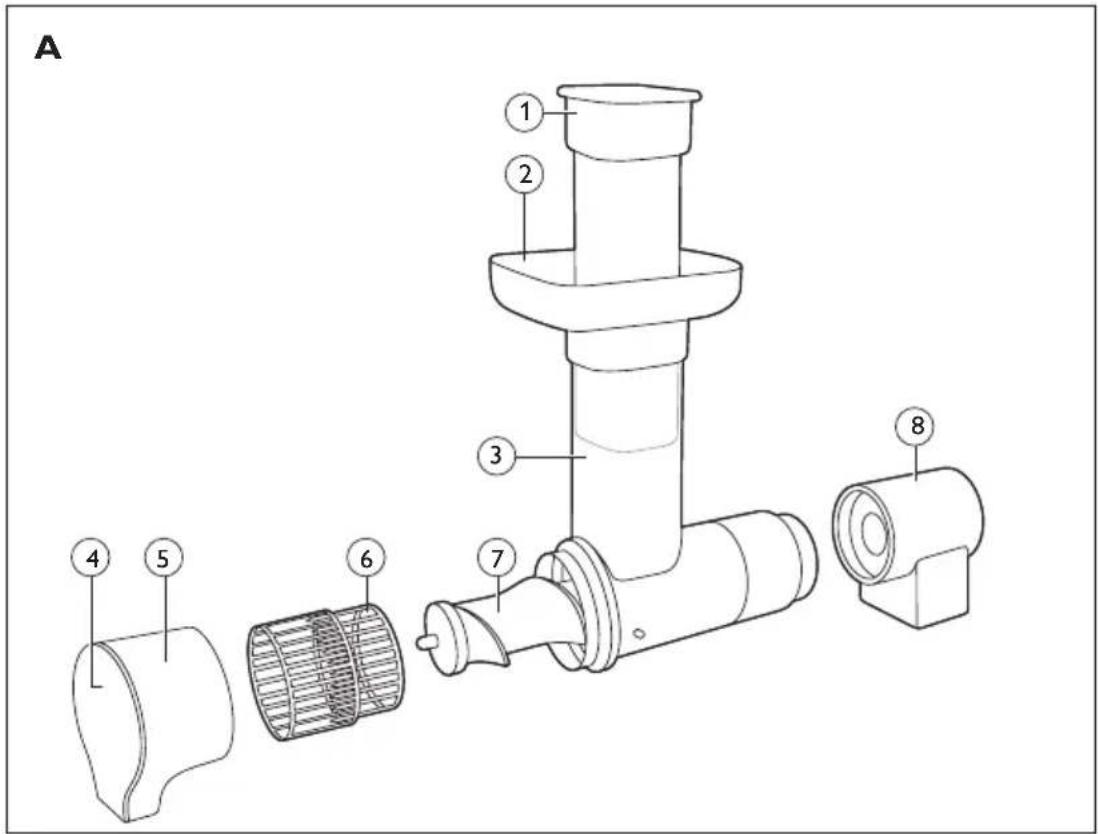
General description (Fig. 1)
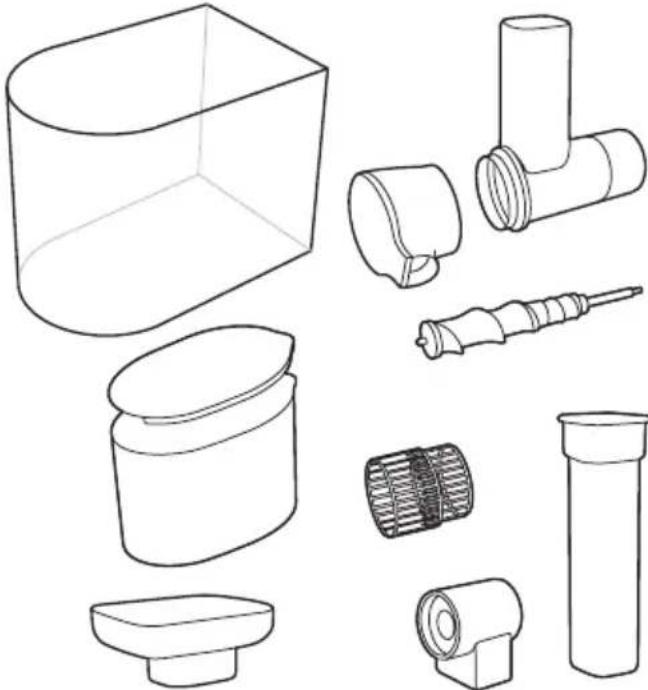
A Juicing unit
- 1 Pusher
- 2 Berry tray
- 3 Feeding tube
- 4 Drip stop
- 5 Spout
- 6 Black two-part filter for clear juice
- 7 Juicing screw
- 8 Pulp outlet
B Motor unit
- 9 Locking clamp
- 10 On/off button with power-on light
- 11 Reverse/Pre-clean button
- 12 Mains cord
- 13 Cord storage facility
- 14 Pulp container
- 15 Safety pins
C Jug (HR1899/HR1897/HR1895 only)
- 16 Juice jug
- 17 Lid of juice jug
Not shown: grey two-part filter for fibre juice (HR1899/HR1897/HR1896 only)
Important
Read this user manual carefully before you use the appliance and save it for future reference.
Danger
- Do not immerse the motor unit in water or any other liquid. Do not rinse it under the tap and do not clean it in the dishwasher.
Warning
- Check if the voltage indicated on the base of the appliance corresponds to the local mains voltage before you connect the appliance.
- Do not use the appliance if the plug, the mains cord or other parts are damaged. If the mains cord is damaged, you must have it replaced by Philips, a service centre authorised by Philips or similarly qualified persons in order to avoid a hazard.
- This appliance is intended for household use only. If the appliance is used improperly or for professional or semi-professional purposes or if it is not used according to the instructions in the user manual, the guarantee becomes invalid and Philips refuses any liability for damage caused.
- This appliance is not intended for use by persons (including children) with reduced physical, sensory or mental capabilities, or lack of experience and knowledge, unless they have been given supervision or instruction concerning use of the appliance by a person responsible for their safety.
- Children should be supervised to ensure that they do not play with the appliance.
- Keep the appliance and its cord out of the reach of children.
- Never reach into the feeding tube with your fingers or an object while the appliance is operating. Only use the pusher for this purpose.
- Always disconnect the appliance from the mains if you leave it unattended or before you assemble, disassemble or clean it.
- Always unwind the mains cord completely before you switch on the appliance.
- Never let the appliance operate unattended.
Caution
- Never use any accessories or parts from other manufacturers or that Philips does not specifically recommend. If you use such accessories or parts, your guarantee becomes invalid.
- Always place the appliance on a stable, level and horizontal surface.
- Do not use the appliance outdoors.
- Avoid contact with moving parts.
- Make sure all parts are assembled properly before you switch on the appliance.
- Only use the appliance when the locking clamp is in locked position.
- Only unlock the locking clamp after you have switched off the appliance and the juicing screw has stopped rotating.
- Do not remove the pulp container when the appliance is operating.
- Cut large ingredients into pieces that fit into the feeding tube. Remove stones, cores, seeds and thick peels from fruits or vegetables before juicing.
- Do not exert too much pressure on the pusher to avoid damage.
- Food colouring can discolour parts. This is normal and has no impact on the performance of the appliance.
- To optimise the lifetime of the appliance, do not use it continuously for more than 30 minutes.
Built-in safety lock
The appliance is equipped with a built-in safety lock. The two safety pins on the motor unit ensure that you can only switch on the appliance if you have placed the juicing unit and the pulp container on the motor unit correctly.
Electromagnetic fields (EMF)
This Philips appliance complies with all applicable standards and regulations regarding exposure to electromagnetic fields.
Before first use
Thoroughly clean all parts before you use the appliance for the first time (see chapter 'Cleaning').
Note: Make sure all parts are completely dry before you start using the appliance.
Preparing for use
Assembling the juicing unit
Always unwind the mains cord completely before you switch on the appliance.
1 Attach the pulp outlet to the juicing unit and turn it clockwise until the arrow (◀) points to the 'locked' indication. (Fig. 2)
2 Insert the juicing screw into the juicing unit (Fig. 3).
3 Assemble the two parts of the filter (Fig. 4).
4 Place the two-part filter over the juicing screw (Fig. 5).
ENGLISH8
Tip: Use the black two-part filter for clear juice. If you prefer cloudy juice with more fibres in it, use the grey two-part filter.
5 Attach the spout to the juicing unit and turn it clockwise until the arrow (◀) points to the 'locked' indication. (Fig. 6)
6 Place the berry tray on the feeding tube (Fig. 7).
Placing the juicing unit onto the motor unit
1 Place the assembled juicing unit onto the motor unit, with the pulp outlet fitting into the opening on the motor unit (Fig. 8).
2 Align the projections on the juicing unit with the recesses in the motor unit. Slide the juicing unit onto the motor unit until it locks into place. (Fig. 9)
3 Press the juicing unit onto the motor unit (1) and then close the locking clamp (2). (Fig. 10)
Note: If the locking clamp cannot be closed, check if the juicing unit is positioned properly with the projections on the juicing unit into the recesses of the motor unit.
4 Slide the pulp container into the motor unit (Fig. 11).
Using the appliance
The appliance only functions if the juicing unit and the pulp outlet are assembled correctly and the locking clamp is locked properly.
1 Wash the fruit and/or vegetables. If necessary, cut them into pieces that fit into the feeding tube.
2 Place a jug or a glass under the spout (Fig. 12).
3 Press the on/off button to switch on the appliance (Fig. 13).
4 Put the pieces of fruit or vegetables in the feeding tube and gently press them down towards the juicing screw with the pusher (Fig. 14).
Never insert your fingers or an object into the feeding tube or juicing unit.
5 When the juice flow has stopped, switch off the appliance and wait until the juicing screw has stopped rotating.
6 Press the pre-clean button to remove the last drops of juice from the juicing unit (Fig. 15).
7 To prevent juice from dripping onto the table, press the drip stop (Fig. 16).
Tips
- Use fresh fruit and vegetables, as they contain more juice. Pineapples, beetroots, celery stalks, apples, cucumbers, carrots, spinach, melons, tomatoes, pomegranates and grapes are particularly suitable for processing in the juicer.
- You do not have to remove thin peels or skins. Only remove peels which you would not eat, e.g. those of oranges, pineapples, kiwis, melons and uncooked beetroots.
- If you want to juice fruits with stones, such as peaches, plums or cherries, remove the stones before juicing.
- When you prepare apple juice, remember that the thickness of the apple juice depends on the kind of apple you use. The juicier the apple, the thinner the juice. Choose a kind of apple that produces the type of juice you prefer.
- Apple juice turns brown very quickly. To slow down this process, add a few drops of lemon juice.
- This juicer can handle starchy fruits such as bananas and mangoes. You can add milk or water directly through the feeding tube.
- Citrus fruits can also be processed with the juicer, remove the white pith of citrus fruits because it has a bitter taste.
Cleaning (Fig. 17)
- The appliance is easier to clean if you do so immediately after use. Look at the cleaning table to see how all parts can be cleaned.
Never use scouring pads, abrasive cleaning agents or aggressive liquids such as alcohol, petrol or acetone to clean the appliance.
Note: All detachable parts are dishwasher-safe and can be safely cleaned under the tap.
1 Switch off the appliance and remove the plug from the wall socket.
2 Open the locking clamp (Fig. 18).
3 Slide the juicing unit off the motor unit (Fig. 19).
4 Remove the pulp container from the motor unit (Fig. 20).
5 Empty the pulp container and rinse it under the tap.
Disassembling and cleaning the juicing unit
1 Remove the pusher from the feeding tube (Fig. 21).
2 Remove the berry tray from the feeding tube (Fig. 22).
3 Turn the juice collector anticlockwise until the arrow (◀) points to the 'open' indication and remove it from the juicing unit. (Fig. 23)
4 Remove the two-part filter and disassemble it (Fig. 24).
5 Remove the juicing screw (Fig. 25).
6 Turn the pulp outlet anticlockwise until the arrow (◀) points to the 'open' indication and remove it from the juicing unit. (Fig. 26)
Storage
1 Wind the mains cord around the cord storage facility in the base of the motor unit (Fig. 27).
2 You can store the pusher, the juice jug and lid, and the berry tray in the pulp container (Fig. 28).
Recycling
Do not throw away the appliance with the normal household waste at the end of its life, but hand it in at an official collection point for recycling. By doing this, you help to preserve the environment.
Ordering accessories
To buy accessories or spare parts, visit www.shop.philips.com/service or go to your Philips dealer. You can also contact the Philips Consumer Care Centre in your country.
Guarantee and support
If you need information or support, please visit www.philips.com/support or read the separate worldwide guarantee leaflet.
Troubleshooting
This chapter summarises the most common problems you could encounter with the appliance. If you are unable to solve the problem with the information below, visit www.philips.com/support for a list of frequently asked questions or contact the Consumer Care Centre in your country.
Problem Solution
| The appliance does not work. | The appliance is equipped with two safety pins. If either the juicing unit or the pulp container has not been placed on the motor unit properly, the appliance does not work. Check whether these parts have been assembled in the right way (see chapter ‘Preparing for use’), but switch off the appliance before you do so. |
| The motor unit gives off an unpleasant smell the first few times the appliance is used. | This is not unusual. If the appliance continues to give off this smell after a few times, check the quantities you are processing and the processing time. |
| The juicing unit cannot be placed onto the motor unit. | Check if the spout is properly attached to the juicing unit. Make sure that the projections on the juicing unit are aligned with the recesses in the motor unit (see fig. 9). |
| The juicing unit is blocked. | Press the pre-clean button for a few seconds. If the juicing unit is still blocked, then switch off the appliance, remove the juicing unit and disassemble all parts. Remove the fruit that is blocking the juicing unit. Then process a smaller quantity. |
| HR1899/HR1897/ HR1896: The power-on light flashes. | The juicing unit is blocked. Press the pre-clean button for a few seconds. If the juicing unit is still blocked, then switch off the appliance, remove the juicing unit and disassemble all parts. Remove the fruit that is blocking the juicing unit. Then process a smaller quantity. |
Pendahuluan
The image is too blurry to recognize any text content.
natural_image
Diagram showing three open panels with grid patterns and curved arrows indicating rotation or movement (no text or symbols)


- Always here to help you / 始终如一地为您提供帮助
- Introduction
- General description (Fig. 1)
- Important
- Danger
- Warning
- Caution
- Built-in safety lock
- Electromagnetic fields (EMF)
- Before first use
- Preparing for use
- Assembling the juicing unit
- ENGLISH8
- Placing the juicing unit onto the motor unit
- Using the appliance
- Tips
- Cleaning (Fig. 17)
- Disassembling and cleaning the juicing unit
- Storage
- Recycling
- Ordering accessories
- Guarantee and support
- Troubleshooting
- Pendahuluan
- The image is too blurry to recognize any text content.
Brand : PHILIPS
Model : Avance Collection HR1894
Category : Juicer