
WP3821 - Water dispenser PHILIPS - Free user manual and instructions
Find the device manual for free WP3821 PHILIPS in PDF.


| Product Type | Water Dispenser (Countertop) |
| Brand | Philips |
| Model | WP3821 |
| Dimensions (W x D x H) | 30 cm x 40 cm x 60 cm (approx.) |
| Weight | 7 kg (approx.) |
| Power Supply | 220-240 V, 50/60 Hz, 850 W |
| Water Tank Capacity | 5 L (cold) / 3 L (hot) |
| Dispensing Modes | Cold, Hot, Room Temperature |
| Temperature Settings | Hot: 85-95°C; Cold: 5-15°C |
| Water Filter | Integrated carbon filter (replaceable) |
| Safety Features | Child lock, anti-drip, overheat protection |
| Material | ABS plastic, stainless steel tank |
| Color | White / Black (depending on variant) |
| Noise Level | < 45 dB |
| Energy Consumption | 0.5 kWh/day (standby), 1.2 kWh/day (active) |
| Cleaning | Descaling every 3 months, removable drip tray |
| Replacement Parts | Water filter, drip tray, tap kit (available online) |
| Certifications | CE, WEEE, RoHS |
Frequently Asked Questions - WP3821 PHILIPS
User questions about WP3821 PHILIPS
0 question about this device. Answer the ones you know or ask your own.
Ask a new question about this device
Download the instructions for your Water dispenser in PDF format for free! Find your manual WP3821 - PHILIPS and take your electronic device back in hand. On this page are published all the documents necessary for the use of your device. WP3821 by PHILIPS.
USER MANUAL WP3821 PHILIPS
Register your product and get support at
www.philips.com/welcome
WP3821
natural_image
Product photo of a Philips water tap wrench and digital display (no text or symbols visible on main components)
natural_image
Diagram of a folded paper or document with grid patterns and directional arrows indicating orientation (no text or symbols)
ENGLISH 6
ESPAÑOL 22
PORTUGUÊS DO BRASIL 39
Introduction
Congratulations on your purchase and welcome to Philips! To fully benefit from the support that Philips offers, register your product at www.philips.com/welcome.
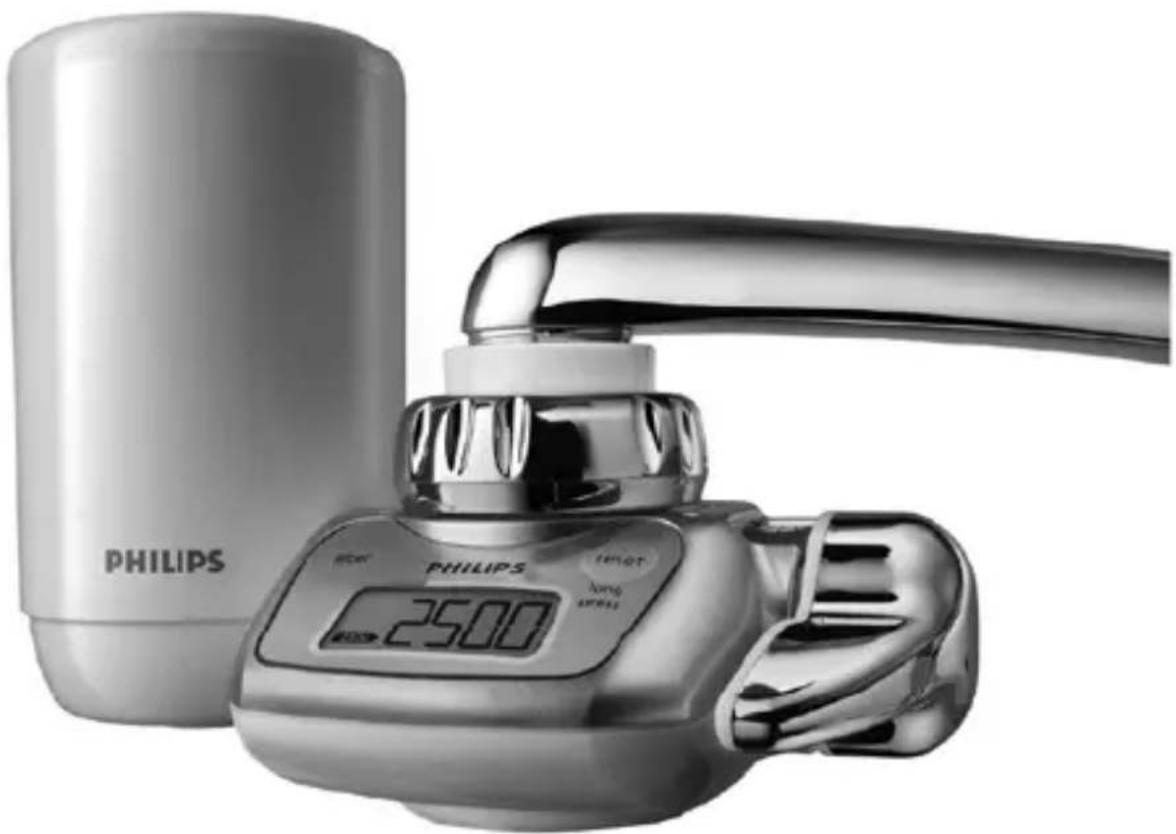
General description (Fig. 1)
A Filter cartridge
B Water purifier housing
C Filter capacity selection button
D Battery low indication
E Selected filter capacity indication
F Remaining filter capacity indication
G Reset button
H Water selection lever
Battery compartment cover
J Stainless steel screen
K Rubber washer
L Adapter
1 A-type
2 B-type
3 C-type
4 D-type
M Attachment nut
N Filtered water outlet
- Unfiltered water inlet
P Granular activated carbon
Q Hollow fibre
R Unfiltered water outlet
Important
Read this user manual carefully before you use the appliance and save it for future reference.
Warning
- This appliance is not intended for use by persons (including children) with reduced physical, sensory or mental capabilities, or lack of experience and knowledge, unless they have been given supervision or instruction concerning use of the appliance by a person responsible for their safety.
- Children should be supervised to ensure that they do not play with the appliance.
Before use
- To prevent quick clogging of the filter cartridge, let the water run at the unfiltered setting for around 5 seconds before every use.
- If the water is highly coloured or turbid due to work on your water network, do not let the water run at the filtered setting until the water is clear.
- Let the water run at the filtered setting for 10 seconds before the first use of the day.
- Let the water run at the filtered setting for 60 seconds before use if you have not used the water purifier for more than two days.
- If you have not used the water purifier for more than two weeks, let the water run at the filtered setting for 2-3 minutes before use. If the filter cartridge emits an unpleasant smell, replace it with a new one.
Water temperature
- Do not let water hotter than 50^ C run through the water purifier, because this may damage the appliance.
- Do not let the water purifier freeze.
Battery
To prevent that the battery leaks, overheats or explodes:
- Do not disassemble the battery.
- Do not charge the battery.
- Do not use a damaged battery.
- Do not expose the battery to water or high humidity levels.
- Do not expose the battery to direct sunlight, high temperatures or fire.
ENGLISH8
- Any liquid leaking from the battery is harmful to eyes and skin. Avoid eye and skin contact.
Applications
- Only use the appliance to filter water that meets drinking water standards at the point of use.
- Do not block the filtered water outlet or connect other devices to it.
- If the water pressure is very high, reduce the water flow of the tap to prevent damage to the cartridge.
- Keep the water purifier away from heat to avoid distortion or breakage.
- Do not tamper with the water purifier.
- Do not remove the filter cartridge while you use water purifier.
- Do not use the water purifier without a filter cartridge.
- Do not place the appliance near a window where it is exposed to direct sunlight.
- This appliance does not soften water.
- Do not use filtered water in aquariums. Tap water, filtered or unfiltered, can be harmful to fish.
- Do not store purified water to avoid contamination. Air contact contaminates purified water quickly. If you want to store purified water, use a clean container and keep it in the refrigerator. Do not keep it in the refrigerator longer than 1 day to avoid contamination.
Features
- Philips' multi-filtration system consists of a primary filter, a secondary filter, a high-tech hollow-fibre membrane filter and a granular activated carbon filter.
-
The hollow fibre membrane contains more than 520 billion micropores that are small enough to remove particles down to 0.1μm. It eliminates 99.99%* of bacteria, rust and other particles larger than the micropore size from your tap water without removing calcium, magnesium and other minerals that are vital to your body. (* tested according to Japanese Water Purifier Association (JWPA) standard).
-
The granular activated carbon removes the unpleasant chlorine smell and taste from your tap water.
- The LCD display on the water purifier shows the current remaining filter capacity. A remaining filter capacity of 0 tells you that you have to replace the filter. Philips' unique cartridge replacement indicator also helps you to determine when to replace the filter.
- The high-speed initial flow rate of 2 litres per minute gives you plenty of clean water instantly.
- The water selection lever offers you a choice of three water flow types: unfiltered spray, unfiltered stream or filtered spray.
- The nine tap-mounting adapters supplied with the water purifier allow easy installation on almost any type of tap.
- The bayonet-type mount ensures quick, easy and secure filter cartridge replacement.
Preparing for use
Inserting the battery
- Before you insert the battery, make sure your hands and the water purifier are dry.
- Keep away from the kitchen sink to prevent the battery from falling down the drain.
- Insert the battery before you install the water purifier on the tap.
1 Use a coin to turn the battery compartment cover on the back of the water purifier in the 'OPEN' direction. Remove the battery compartment cover (Fig. 2).
2 Place the battery (included) in the cover, with the + pole facing the battery compartment cover (Fig. 3).
3 Place the battery compartment cover back onto the water purifier in such a way that the ‘▲’ mark on the cover is aligned with the ‘I’ mark on the water purifier. (Fig. 4)
4 Use a coin to turn the battery cover in the 'CLOSE' direction until the 'I' mark on the cover is aligned with the 'I' mark on the water purifier (Fig. 5).
ENGLISH10
Note: Make sure you align the 'I' marks properly, otherwise water may leak into the battery compartment.
When the battery is properly inserted, the LCD display performs a self-check for approx. 9 seconds. Then the display goes off again.
Before installation
The screw thread of the tap is sharp.
- Before you install the water purifier, make sure all tap-mounting adapters you require are present.
- The tap must have a diameter of 13mm-25mm.
- Determine what type of tap you have and select the appropriate adapter.
- The adapters supplied make the water purifier suitable for almost any kitchen tap. However, the water purifier may not fit some uncommon types of taps.
- The tap water pressure has to be between 0.7kgf/cm ^2 (7 metres of water column) and 3.5kgf/cm ^2 (35 metres of water column). If you use the water purifier at a water pressure outside this range, either the filtered water flow will be extremely low or the water purifier will get damaged.
Installation A-type adapter
- For taps with a round spout with a diameter of 16mm, 17.5mm or 19mm (Fig. 6).
1 Remove the attachment nut and the adapter from the water purifier housing (Fig. 7).
2 Pass the attachment nut over the tap spout (Fig. 8).
3 Place the matching adapter (A-type) over the tip of the spout. The 16mm adapter is packed with the water purifier. If necessary, replace it with the 17.5mm adapter or 19mm adapter to fit the diameter of your tap (Fig. 9).
4 Screw the attachment nut firmly onto the water purifier housing (Fig. 10).
Installation B-type adapter
- For taps with an aerator (threaded on the outside) (Fig. 11).
1 Remove the attachment nut and the adapter from the water purifier (Fig. 7).
2 Remove the aerator cap from the tap and pass the attachment nut over the spout. Take out the original adapter and screw the matching adapter (B-type) onto the tap (Fig. 12).
3 Tighten the adapter further with a coin (Fig. 13).
4 Firmly screw the attachment nut onto the water purifier housing (Fig. 14).
Installation C-type adapter
- For taps with an aerator (threaded on the inside) (Fig. 15).
1 Remove the attachment nut and the adapter from the water purifier housing (Fig. 7).
2 Remove the aerator cap from the tap. Take out the original adapter and screw the matching adapter (C-type) onto the tap through the attachment nut. If water leakage occurs, wind Teflon tape round the screw thread of the adapter before you screw it onto the tap (Fig. 16).
3 Tighten the adapter further with a coin (Fig. 17).
4 Firmly screw the attachment nut onto the water purifier housing (Fig. 18).
Installation D-type adapter
- For taps other than A, B or C. (Fig. 19)
1 Remove the attachment nut and the adapter from the water purifier housing (Fig. 7).
2 Take out the original adapter and screw the D-type adapter onto the water purifier housing. (Fig. 20)
3 Push the water purifier housing onto the tap from below and tighten the 4 screws evenly (Fig. 21).
ENGLISH12
4 Screw the attachment nut firmly onto the water purifier housing (Fig. 22).
Make sure the rubber washer is firmly pushed against the tap to prevent water leakage.
Installing the filter cartridge
1 Make sure the tap is closed.
2 Set the water selection lever to the unfiltered stream position (Fig. 23).
3 Tilt the filter cartridge 90° backwards and insert it into the water purifier housing. (Fig. 24)
4 Pull the cartridge upwards until it is in upright position. (Fig. 25)
5 Air trapped inside the filter cartridge affects the flow rate of the filtered water. To avoid this, slightly open the tap and let water run through the filter cartridge for 30 seconds after you install/replace the filter cartridge. The slow stream of water helps to remove any air trapped in the filter.
Setting the filter capacity
The default filter capacity setting of the water purifier is 1500 litres. Follow the instructions below to set the filter capacity of your filter cartridge. The capacity of the filter cartridge supplied with the WP3821 is 2500 litres.
Note: When you replace the filter cartridge for the first time and any next time, reset the filter capacity as described in section ‘How to reset the filter capacity’ in chapter ‘Replacement’.
1 Make sure that the water purifier housing and the filter cartridge are properly installed.
2 Press the filter capacity selection button.
The default filter capacity of 1500 litres flashes on the display for 4 seconds.
3 Press the filter capacity selection button again until the display shows the capacity of your filter cartridge (1500-2500-900-1500 etc.).
4 Stop pressing the filter capacity selection button when the display shows 2500 litres.
The selected filter capacity and the remaining filter capacity are shown for 5 seconds.
Using the appliance
1 Turn the water selection lever to the desired setting ('click'). The water selection level has 3 settings: filtered spray, unfiltered spray and unfiltered stream. See the sections below.
2 Open the tap.
Filtered spray
Select this setting for drinking, washing vegetables or fruits and for cooking.
1 Turn the water selection lever until the filtered spray symbol is aligned with the indicator (Fig. 26).
Do not let water hotter than 50^ C run through the water purifier at this setting, as this may damage the water purifier.
If you filter water between 35^ C and 50^ C, the water may have an unpleasant smell. The filter cartridge has absorbed this smell during filtering, but releases it again if you filter water hotter than 35^ C.
2 Open the tap.
- Filtered spray comes out of the water purifier.
The display is on and counts down the remaining filter capacity.
Note: The LCD display only shows the remaining filter capacity when you use the water purifier at the filtered spray setting and when the water pressure is more than the minimum required 0.7 kgf/cm^2 (7 meters of water column).
Note: The display is off when you do not use the water purifier and when you use it at the unfiltered spray and unfiltered stream settings.
Unfiltered spray
Select this setting for washing dishes and other jobs that require a gentle water flow.
1 Turn the water selection lever until the unfiltered spray symbol is aligned with the indicator (Fig. 27).
Do not let water hotter than 50^ C run through the water purifier at this setting, as this may damage the water purifier.
Unfiltered stream
Select this setting for a strong water flow.
1 Turn the water selection lever until the unfiltered stream symbol is aligned with the indicator (Fig. 23).
Do not let water hotter than 50^ C run through the water purifier at this setting as this may damage the water purifier.
Cleaning
Never use scouring pads, detergents, abrasive cleaning agents or aggressive liquids such as thinner, alcohol, petrol or acetone to clean the appliance. These substances may cause cracking, discolouration or distortion.
1 Clean the filtered water outlet with a clean toothbrush and wipe off any contamination with a clean moist cloth.
Note: Do not use a used toothbrush, as it may transfer bacteria to the water outlet.
2 Clean the appliance with a moist cloth.
Note: Do not use a brush to clean the display.
3 Regularly clean the stainless steel screen and the unfiltered water inlet under a running tap with a clean and soft brush.
Replacement
Replacing the filter cartridge
New filter cartridges are available under type number WP3911.
Replace the filter cartridge if it is clogged to prevent damage to the water purifier.
No part of the cartridge can be reused. Discard the used cartridge and replace it with a new one.
When to replace the filter cartridge
The actual lifetime of the filter cartridge depends on the quality of the local water and the water pressure. For optimal performance of the water purifier, replace the filter cartridge if one of the following situations occurs:
- The display shows that the remaining filter capacity is 0 litres and keeps flashing.
- The hollow fibre of the filter cartridge (visible through the cartridge window) has turned rust brown or dark grey (see section ‘Cartridge replacement indicator’).
- You have used the filter cartridge for 6 months.
- The volume of purified water decreases substantially.
- The filtered water still has an unpleasant smell or is still turbid after purification.
Cartridge replacement indicator
To help you determine when to replace the filter cartridge, the water purifier and each replacement filter cartridge comes with a self-adhesive colour-coded cartridge replacement indicator. Place this replacement indicator in a convenient place for future reference.
Tip: Remove the cover of the filter cartridge and stick the cartridge replacement indicator to the inside of the cover. Check the colour of the hollow fibre of the filter cartridge through the cartridge window from time to time. If the colour of the filter matches the rust brown or dark grey shown on the cartridge replacement indicator, replace the filter cartridge (Fig. 28).
ENGLISH16
Reduced filter cartridge life
The filter cartridge has a shorter life and should be replaced more frequently in the following situations:
- The water pressure is very low.
- The pipes and water tank are worn.
- The tap water is contaminated due to plumbing activities or cleaning of the water tank.
- When you use cloudy water immediately after heavy rain.
How to replace the filter cartridge
1 To replace the filter cartridge, close the tap and set the water selection lever to the unfiltered stream setting. (Fig. 23)
2 Tilt the used filter cartridge 90^ backwards and pull it off the water purifier housing (Fig. 24).
3 Write down the replacement date on the information label of the new cartridge.
4 Tilt the new filter cartridge 90° backwards and insert it into the water purifier housing.
5 Pull the cartridge upwards until it is in upright position. (Fig. 25)
6 Reset the remaining filter capacity indication, even if it has not yet reached 0.
- Press the reset button for 2 seconds. The previously selected filter capacity flashes on the display.
- If the new filter cartridge has the same capacity, simply wait until the setting stops flashing.
- If the new filter has a different capacity, press the filter capacity selection button and keep it pressed until the display shows the new filter capacity. Then release the button and wait until the new setting stops flashing.
7 The water purifier starts counting down the remaining filter capacity as soon as you use the water purifier at the filtered spray setting.
How to reset the filter capacity
Note: Always reset the filter capacity when you replace the filter cartridge. This is necessary to set the remaining filter capacity back to its initial value (i.e. 2500, 1500 or 900 litres).
1 Press the reset button for 2 seconds
2 Press the filter capacity selection button.
The set filter capacity flashes on the display for 4 seconds.
3 If the new filter cartridge has the same capacity as the old cartridge, simply wait until the setting stops flashing.
4 If the new filter has a different capacity, press the filter capacity selection button again until the display shows the capacity of your filter cartridge (1500-2500-900-1500 etc.).
5 Stop pressing the filter capacity selection button when the display shows the capacity of the new filter cartridge.
The selected filter capacity and the remaining filter capacity are shown for 5 seconds.
Replacing the battery
The battery lasts approximately one year in case of normal domestic use. Replace the battery when the ☐ symbol lights up and flashes. This appliance runs on 1 button-type CR2032 (3V) lithium battery, which is generally available.
1 Remove the water purifier from the tap.
2 Wipe the entire water purifier with a dry cloth.
3 Place the new battery (see ‘Inserting the battery’ in chapter ‘Preparing for use’).
4 Reattach the water purifier to the tap (see the installation instructions for your adapter type in chapter ‘Preparing for use’).
Note: When you replace the battery, the water purifier remembers the remaining filter capacity. If no battery is inserted in the water purifier, the remaining filter capacity is not counted down.
Environment
- Batteries contain substances that may pollute the environment. Do not throw away empty batteries with the normal household waste, but dispose of them in at an official collection point for batteries.
Always remove the battery before you discard and hand in the appliance at an official collection point. - Do not throw away the appliance with the normal household waste at the end of its life, but hand it in at an official collection point for recycling. By doing this, you help to preserve the environment (Fig. 29).
Guarantee & service
If you need service or information or if you have a problem, please visit the Philips website at www.philips.com or contact the Philips Customer Care Centre in your country (you find its phone number in the worldwide guarantee leaflet). If there is no Customer Care Centre in your country, go to your local Philips dealer or contact the Service Department of Philips Domestic Appliances and Personal Care BV.
Troubleshooting
This chapter summarises the most common problems you could encounter with the appliance. If you are unable to solve the problem with the information below, contact the Customer Care Centre in your country.
Problem Solution
Water leaks from the attachment nut.
Perhaps you have not installed the water purifier properly. Reinstall the appliance according to the instructions in this user manual.
Perhaps the attachment nut or the tap-mounting adapter is damaged. Contact an authorised Philips service centre.
Problem Solution
| Perhaps the tap water pressure is higher than specified. | |
| You may need to wind some Teflon tape around the screw thread of the adapter. | |
| The water flow is weak at the unfiltered setting. | Perhaps the stainless steel screen under the rubber washer inside the water purifier housing is clogged. Clean it with a soft brush and rinse it. |
| The water flow is weak at the filtered setting. | Perhaps the filter cartridge is clogged. Replace the filter cartridge. |
| Perhaps the tap water pressure is lower than specified. | |
| Perhaps you are using a filter cartridge whose lifetime has expired. Replace the filter cartridge. | |
| Air may be trapped inside the filter cartridge. This may happen when you install a new filter cartridge. To avoid this, slightly open the tap for 30 seconds immediately after you install/replace the filter cartridge. The slow stream of water removes any air trapped in the filter. | |
| The display is empty after I have replaced the battery. | Perhaps the tap water pressure is lower than specified. |
| Perhaps the poles of the battery point in the wrong direction. Insert the battery in the correct way (see section ‘Inserting the battery’ in chapter ‘Preparing for use’). | |
| Problem Solution | |
| Perhaps the battery compartment cover is not properly fitted. Reattach the battery compartment cover in the correct way (see section ‘Inserting the battery’ in chapter ‘Preparing for use’). | |
| Perhaps the water purifier is set to the unfiltered spray setting or the unfiltered stream setting. In these cases, the display is off. The display only works when the water purifier is set to the filtered spray setting. | |
| The display suddenly goes empty. | Perhaps the battery is low. Replace the battery. |
| Perhaps the filter cartridge is clogged and water flow is extremely slow. Replace the filter cartridge. | |
| The appliance makes a clicking sound when I use it at the filtered spray setting. | The clicking sound comes from the built-in flow meter and is normal. |
Product specifications
| Product name and type number | Pure water on tap WP3821 |
| Type Direct tap mount | |
| Major filter components | Polysulphone hollow-fibre membrane and granular activated carbon |
| Initial water flow rate 2L/min. (water pressure at 1kgf/cm2, water temperature at 20°C) | |
| Chlorine reduction capacity | 2,500L (water density at 2ppm) |
| Turbidity reduction capacity | 3,000L (water turbidity at 2NTU) |
| Filter lifetime Approximately 6 months at 10L a day (the actual lifetime depends on the quality of the local water and the water pressure) | |
| Replacement filter cartridge | WP3911 |
| Minimum water pressure | 0.7kgf/cm2(7 metres of water column/70kPa) |
| Maximum water pressure | 3.5kgf/cm2(35 metres of water column/350kPa) |
| Accessories WP3911 filter cartridge, 9 tap-mounting adapters, cartridge replacement indicator | |
| Battery lithium CR2032 (3V ⋯) | |
| Appliance dimensions 112mm × 144mm × 93mm (H × W × D) | |
| Packaging dimensions 140mm × 170mm × 88mm (H × W × D) | |
| Weight Approximately 450g | |
| Country of origin Japan | |
* Above specifications are according to Japanese JIS S 3201 Standard.
Introducción
natural_image
Illustration of hands using a tool to interact with a device, showing a magnified view of a mechanical component (no text or symbols present)
natural_image
Abstract black and white geometric pattern with vertical stripes on a gray background (no text or symbols)
natural_image
Diagram of a mechanical device with a cylindrical component and a base, showing a rotation arrow (no text or symbols)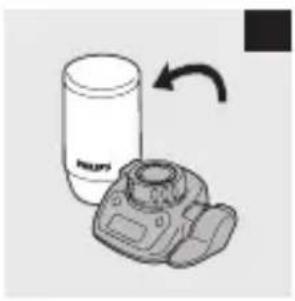
natural_image
Illustration of a camera with a cylindrical device and an attached camera, both showing rotational motion (no text or symbols)
natural_image
Simple line drawing of a road with dashed lane markings inside a circle (no text or symbols)
natural_image
Black circular icon with white road markings, no text or symbols present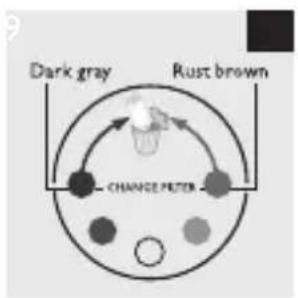


- Introduction
- General description (Fig. 1)
- Important
- Warning
- Before use
- Water temperature
- Battery
- ENGLISH8
- Applications
- Features
- Preparing for use
- Inserting the battery
- ENGLISH10
- Before installation
- The screw thread of the tap is sharp.
- Installation A-type adapter
- Installation B-type adapter
- Installation C-type adapter
- Installation D-type adapter
- ENGLISH12
- Installing the filter cartridge
- Setting the filter capacity
- Using the appliance
- Filtered spray
- Unfiltered spray
- Unfiltered stream
- Cleaning
- Replacement
- Replacing the filter cartridge
- When to replace the filter cartridge
- Cartridge replacement indicator
- ENGLISH16
- Reduced filter cartridge life
- How to replace the filter cartridge
- How to reset the filter capacity
- Replacing the battery
- Environment
- Guarantee & service
- Troubleshooting
- Problem Solution
- Introducción
Brand : PHILIPS
Model : WP3821
Category : Water dispenser