
Nautilus S06HS - Coffee machine Caffitaly - Free user manual and instructions
Find the device manual for free Nautilus S06HS Caffitaly in PDF.


| Product type | Capsule coffee machine |
| Brand | Caffitaly |
| Model | Nautilus S06HS |
| Dimensions (L x W x H) | Approximately 20 x 30 x 35 cm |
| Weight | Approximately 4.5 kg |
| Power supply | 220-240 V, 50/60 Hz, 1400 W |
| Pressure | 15 bar |
| Water tank capacity | 1.2 L |
| Coffee types prepared | Espresso, lungo, cappuccino, latte macchiato |
| Heating system | Thermoblock |
| Steam wand | Yes, for frothing milk |
| Used capsule container | Capacity of 10 capsules |
| Programmable functions | Adjustable water volume, auto shut-off |
| Maintenance | Descaling recommended every 3 months, clean tank and steam wand |
| Safety | Automatic shut-off after inactivity, overheating protection |
| Spare parts | Water tank, drip tray, capsule holder, steam wand |
| Repairability | Repairability index of 7.2/10 |
| Color | Black and silver |
| Warranty | 2 years |
Frequently Asked Questions - Nautilus S06HS Caffitaly
User questions about Nautilus S06HS Caffitaly
0 question about this device. Answer the ones you know or ask your own.
Ask a new question about this device
Download the instructions for your Coffee machine in PDF format for free! Find your manual Nautilus S06HS - Caffitaly and take your electronic device back in hand. On this page are published all the documents necessary for the use of your device. Nautilus S06HS by Caffitaly.
USER MANUAL Nautilus S06HS Caffitaly
natural_image
Line drawing of a laboratory instrument with labeled parts (no text or symbols)English Instruction book
natural_image
Line drawing of a mechanical device with a red arrow indicating a component, no text or symbols present

natural_image
Line drawing of a cup pouring liquid from a bottle, with a green circle labeled '4' in the top-left corner (no text or symbols on the diagram itself)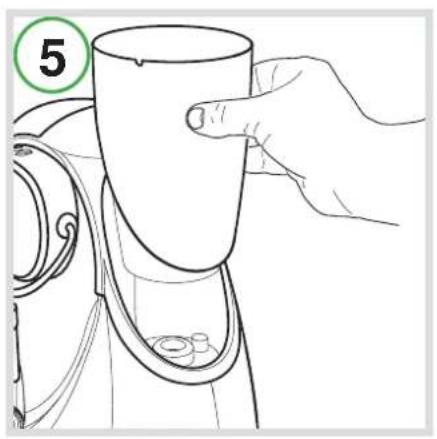
natural_image
Line drawing of a hand holding a cup over a mechanical device (no text or symbols)
natural_image
Line drawing of a hand operating a coffee maker machine with a green circle marker (no text or symbols on the diagram itself)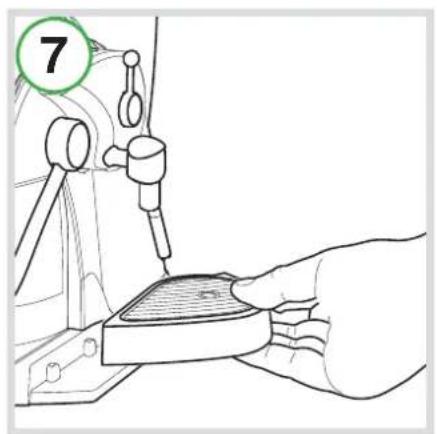
natural_image
Illustration of a hand using a tool to adjust a component, no text or symbols present
natural_image
Line drawing of a coffee machine with a mug and control panel (no text or symbols)
natural_image
Line drawing of a coffee machine with a cup and tray, no text or symbols present
natural_image
Line drawing of a coffee machine with a cup and knife, no text or symbols present
natural_image
Line drawing of a hand pouring liquid into a small bowl using a microscope (no text or symbols)
natural_image
Line drawing of a coffee machine with a cup and cups, no text or symbols present



natural_image
Line drawing of a hand holding a device with a green circle in the corner (no text or symbols)
Italiano
A: "Espresso" button;
B: "Long coffee" button;
C: "Filter coffee" button;
D: "Multifunction" indicator light.
E: Hot water / steam control lever;
F: Capsule compartment;
G: Used capsule drawer;
H: Power on/off switch;
I: Lever for opening / closing capsule compartment;
J: Water tank cover;
K: Water tank;
L: Dispensing spout (adjustable);
M: Hot water / steam dispensing tube;
N: Drip tray;
O: Power cord;
Deutsch
- Follow the instructions (Symbols)......17
- Your Caffitaly System contact ....17
• Safety warnings....18 - Instructions for use and disposal....19
Installation:
- First use or after a long period of disuse....19
• Turning on the appliance....19 - General operating indications....20
Dispensing the product:
- Correct use of the buttons ....20
• Dispensing coffee....21 - Programming the quantity of coffee in a cup ....21
• Dispensing hot water....21 - Preparing cappuccino / Dispensing steam ....22
Cleaning and Maintenance:
- Saving energy ......22
• Daily maintenance....23
• Changing the gasket 23 - Descaling....23
Miscellaneous:
- Troubleshooting....25
• Technical data ....25
Thank you for having chosen our product and for your confidence in our company.
You can savour your favourite hot beverages at any time of the day with our appliance by choosing one of the capsules that Caffitaly System offers you. For example: an espresso, a cocoa-fl avoured beverage or a tea will be ready in just a few seconds.
Follow the instructions (Symbols)
Warning.

is the safety warning symbol.
used to call your attention to potential personal injury hazards.
e by the safety messages provided in order to avoid possible injury or death.

the symbol used to highlight some actions that will optimise use of the appliance.
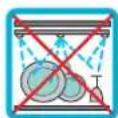
Not dishwasher safe

Cleaning advice
Safety warnings
CAREFULLY read the following instructions!
In this way you will avoid the risk of personal injury and damage to the appliance.
- This appliance is designed for domestic use and similar purposes, for example: staff kitchen areas in shops, offices and other workplaces; in hotels, farm lodges, motels, Bed & Breakfasts and other residential environments.
• Use only Caffi taly System capsules.
- Use of the appliance in any manner other than as directed herein could cause harm to persons and void the guarantee. The manufacturer will not be responsible for injury or damage resulting from improper use of the appliance.
• After removing the packaging, check that the appliance is not damaged. If damage is found, or upon the first sign of a defect (unusual noise or odours), or if any problem occurs inside the appliance, do not use it and contact an Authorised Service Centre.
- The packaging elements (plastic bags, etc.) must not be left within reach of children as they are potential sources of danger.
- Only use the appliance if the power cord is intact. If the cord is damaged, it should be replaced: contact an Authorised Service Centre. Lethal danger of electric shocks.
- Only use and store the appliance indoors. Make sure the electrical elements, plug and cord are dry. Never submerge the appliance in water. Protect the appliance from sprays and drips. Water and electricity together constitute a risk of electrocution.
- Only connect the appliance to power outlets complying with the requirements of the law. Make sure that the power supply voltage matches the rating shown on the data plate, located on the bottom of the appliance.
- The surface on which the machine is installed must be level, solid, stationary and heat resistant; the bearing surface must not exceed an angle of 2^ .
- Do not allow the appliance to be used by children or persons with impaired mental, physical or sensory faculties or insufficient experience and/or skills, unless they are under the careful supervision and guidance of a person responsible for their safety. Children must be kept under supervision to prevent them from playing with the appliance.
- Do not leave the power cord near hot surfaces, sharp edges or other sharp objects.
- Never place your hands inside the capsule compartment. Danger of injury.
• Always close the lever. Never open the lever while a beverage is being dispensed.
- Never remove machine parts, except those indicated in the instructions for daily maintenance.
- Do not insert objects into the openings. This could cause electric shocks! Any operation that is not described in this instruction manual should only be performed by an Authorised Service Centre!
- Do not pull on the power cord to disconnect it. Remove the plug to avoid damaging it.
- Descale the appliance regularly, following the instructions provided. If you do not, the appliance may be damaged.
- Clean the appliance carefully and regularly. If it is not cleaned, the build-up that forms may be hazardous to your health. Unplug the appliance and allow it to cool before cleaning.
- If you do not expect to use the appliance for a long period of time (leaving on vacation, etc.), unplug it.
Instructions for use and disposal

pliance has been manufactured using high quality materials that can be or recycled. Dispose of the appliance in a suitable waste collection centre.
Directions for correct disposal of the product according to European Directive 2002/96/EC and Italian Legislative Decree no. 151 dated 25th July 2005. At the end of its useful life, the product should not be disposed of with unsorted household waste. It should be taken to a suitable selective waste collection centre set up by the local authorities or returned to a retailer who provides this service.
Separate collection of an electrical household appliance avoids a possible negative impact on the environment and health arising from improper disposal and enables the materials it is made of to be recovered so as to achieve significant savings of energy and resources. The crossed-out wheelie bin symbol applied on the product highlights the need to dispose of electric appliances separately. Improper disposal of the product by the user shall be subject to specific administrative sanctions as provided for under current regulations.
The packaging is made from recyclable materials. Contact the relevant authorities for information regarding local legislation.
First use or after a long period of disuse
• Fill the tank with fresh, still water (Fig. 4).
- Plug in the appliance and turn it on (Fig. 13).
• Make sure the lever is closed (Fig. 3).
• As well as buttons A-B-C, warning light D also blinks RED.
- Place a large container (at least 250 ml) under the dispensing spout (Fig. 8).
- Press one of the buttons A-B-C. Wait for the machine to complete the priming cycle and fill with water. Warning light D will switch off.

NOTE: if, at the end of the priming cycle, buttons A-B-C and warning light D continue, repeat the procedures as listed in the previous step.
- Buttons A-B-C will blink simultaneously to indicate that the machine is warming up.
- When buttons A-B-C turn on and remain steadily lit, perform a rinse by pressing button C. Press the button again to perform a second rinse. Wait for the machine to complete the rinse cycle.
- At the end of this operation, empty out the water from the used capsule drawer (Fig. 6).
Turning on the appliance
• Fill the tank with fresh, still water (Fig. 4).
- Switch on the appliance by pressing the power on/off switch (Fig. 14).
- Buttons A-B-C will blink simultaneously to indicate that the machine is warming up. When the buttons turn on and remain steadily lit, the appliance is ready for use.
General operating indications
DESCALING SIGNAL:
- When warning light D blinks YELLOW and the machine beeps 3 times, a descaling cycle should be carried out (see ch. Descaling).
HEATING:
- Buttons A-B-C blink simultaneously.
WHEN THE WATER RUNS OUT DURING OPERATION:
- When warning light D blinks RED and the machine beeps 3 times, the water tank is empty.
• Fill the water tank with fresh, still water (Fig. 4). - Press one of the buttons A-B-C. Wait for the machine to complete the priming cycle and fi ll with water.
- When buttons A-B-C turn on and remain steadily lit, the machine is ready for use.
IF THE LEVER IS RAISED WHILE DISPENSING:
- Raising the lever while dispensing a product (Fig. 1) may cause splashes of hot water. Danger of scalding!
- Warning light D blinks RED and the machine beeps. The appliance will immediately stop dispensing.
- Close the lever (Fig. 3).
- Press one of the buttons A-B-C to reset the alarm.
• The appliance is ready for use again.
Correct use of the buttons
To dispense “Espresso” or “Caffè crema”, use solely buttons A or B (1st and 2nd from the top respectively, lit in WHITE). The same buttons, depending on the quantity, are to be used for dispensing capsules of orzo, ginseng, cocoa or milk. Button C (3rd from the top, lit in BLUE) must be used solely for “Filter Coffee” or “Americano”. This same button can be used for capsules of tea, chamomile tea or herbal tea. Do not use button C for espresso or any other coffee with an intense flavour. In this function the machine is set for low pressure and this reduces the “crema”, diminishes the flavour of the coffee, and could cause a break in the flow.
NOTE: Traces of the product just dispensed may remain in the circuit of the machine. To retain maximum beverage flavour, when changing from one product to another, briefly.
Rinsing is carried out by dispensing a coffee without inserting a capsule.
Dispensing coffee
- Raise the lever to open the capsule compartment (Fig. 1).
- Insert the capsule, pressing it gently into place (Fig. 2).
- Close the lever fully (Fig. 3).
- Place a cup or espresso cup under the coffee dispensing spout (Fig. 9).
- Press and release button A or B, depending on the desired coffee.
- The pressed button will blink. The machine will stop dispensing on reaching the programmed quantity and emit a beep.
- Raise the lever to eject the used capsule into the drawer (Fig. 1).
- Close the lever (Fig. 3).

NOTE: the quantities of coffee dispensed can be programmed according to total taste and the size of the cups or espresso cups used.
To program the quantities, please refer to ch. "Programming the quantity of coffee in a cup".
Programming the quantity of coffee in a cup
- Raise the lever to open the capsule compartment (Fig. 1).
- Insert the capsule, pressing it gently into place (Fig. 2).
- Close the lever fully (Fig. 3).
- Place a cup or espresso cup under the dispensing spout (Fig. 9).
- Press and hold the desired coffee button.
- On reaching the desired amount of coffee, release the button. Now the button is programmed. The quantity of coffee dispensed can be programmed from a minimum of 20 up to a maximum of 250 ml.
- Raise the lever to eject the used capsule into the drawer (Fig. 1).
- Close the lever (Fig. 3).
Dispensing hot water
WARNING! The tube for dispensing hot water reaches very high temperatures: Danger of scalding! The tube must only be handled using the special rubber grip. After each use, clean the tube with a damp cloth.
- Place a metal container under the hot water dispensing pipe (Fig. 10).
- Turn the control lever forwards (Fig. 20). Start dispensing hot water.
• To end dispensing, set the control lever back to its central position (Fig. 21).
- Remove the container of hot water.
Preparing cappuccino / Dispensing steam
WARNING! During preparation there may be some brief splashes of hot water and the steam dispensing tube reaches very high temperatures. Danger of scalding! The tube must only be handled using the special rubber grip. After each use, clean the tube with a damp cloth.
- Place a metal container under the hot water dispensing pipe (Fig. 10).
- Turn the control lever backwards (Fig. 22); this discharges any water left in the circuit.
• After a few seconds, only steam will start to come out; return the control lever to a central position (Fig. 21). Empty the container.
• Half-fill a cup with milk, then immerse the steam tube in the cup (Fig. 11). - Turn the control lever backwards (Fig. 22) to start dispensing steam.
- Move the cup in a slight circular motion to ensure the milk is evenly heated.
- When preparation is complete, return the control lever to a central position (Fig. 21).
- Place the cup under the dispensing spout (Fig. 12) to dispense the coffee into the freshly frothed milk.
NOTE: do not lift the lever while steam is being dispensed. If the lever is lifted, steam dispensing will stop immediately, warning light D begins to blink RED and the machine beeps. To reset the machine, close the lever, return the control lever to a central position (Fig. 21) and press any button.
Saving energy
The machine will automatically reduce consumption after 1 hour of inactivity. Buttons A-B-C blink slowly and sequentially. To restore normal operating conditions, any button or raise the lever. The appliance will start warming up. When buttons A-B-C turn on and remain steadily lit, the machine is ready for use.
Daily maintenance
• Take out the used capsule drawer; empty and rinse it (Fig. 6).
- Remove the drip tray and the grid (Fig. 7). Empty the drip tray. Wash the parts with fresh water.
- Remove the water tank (Fig. 5); empty and rinse it.
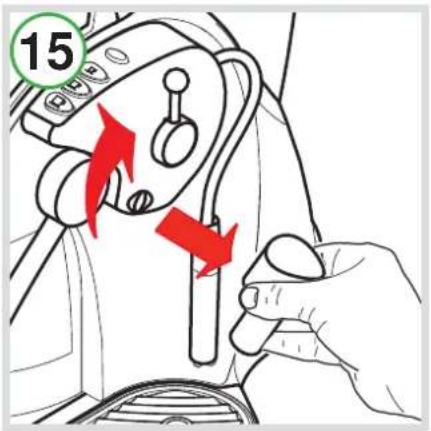
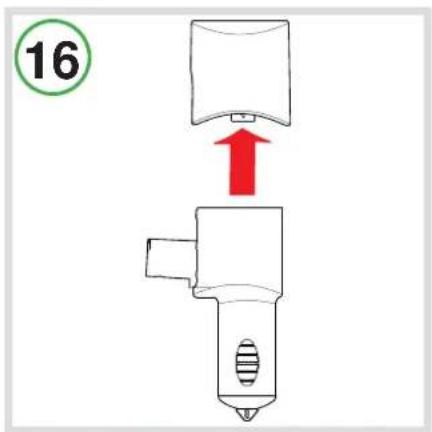
- Gently turn the coffee dispensing spout clockwise by approximately 45^ (Fig. 15) until it comes to a stop, then remove it. Remove the top cover of the coffee dispensing spout (Fig. 16) and wash the components in hot water.
- Remove the outside of the steam dispensing tube and wash it in hot water to remove any milk residue (Fig. 17). Clean the inside using a damp cloth.

Use a soft cloth and a neutral detergent to clean the surfaces of the appliance. Do not use jets of water to clean the appliance.

The plastic parts of the machine, including the water tank, are NOT dishwasher safe.
Changing the gasket
WARNING! If the gasket shows signs of wear (small cuts or cracks, warping, ...) you can replace it easily using the spare gasket supplied in the pack. Perform the following operations only when the machine is cold; contact with the inside surfaces of the machine could cause burns.
- Raise the lever (Fig. 1).
- Find the gasket.
- Remove the worn gasket (Fig. 18), extracting it if necessary with the aid of a screwdriver.
- Insert the new gasket, ensuring that it fi ts snugly in place.
- Close the lever (Fig. 3).
Descaling
Descaling signal: when warning light D blinks YELLOW and the machine beeps 3 times, a descaling cycle should be carried out, as illustrated below.
The machine features an advanced program that monitors how much water is used to dispense beverages. This measurement provides the user with indications as to when the machine needs to be descaled.
It is advisable to use the Cafitaly System descaling agent, designed to comply with the technical characteristics of the machine, in full observance of consumer safety. The descaling agent must be disposed of in compliance with manufacturer instructions and/or with current regulations in force in the country where the appliance is used.
CAREFULLY
read the directions for use on the package of the descaling agent.
Avoid contact with eyes, skin and machine surfaces.
Switch the machine off during descaling, and do not lift the lever.
A person must be present during the operation.
Do not use vinegar: it could damage your machine!
- Switch the machine off by pressing the power on/off switch (Fig. 14).
• Empty and rinse out the used capsule drawer and drip tray (Fig. 6).
- Remove and empty the water tank (Fig. 5).
- Mix the contents of a bottle of Caffitaly System descaling agent with approximately 750 cc. of water (a total of 1 litre) and pour into the tank.
- Place a container (at least 1 litre) under the dispensing spout and the hot water dispensing pipe (Fig. 19).
- Make sure that the lever is lowered (Fig. 3) and that there is no capsule inside the capsule compartment.
• Turn the control lever forwards (Fig. 20).
- Press and hold buttons A and B while switching the machine on by pressing the power on/off switch.
- Button B will light up, while warning light D blinks YELLOW and RED alternately.
- Press button B to start the descaling cycle.
- The machine dispenses the descaling solution at specific intervals (5 doses with a 4 minute pause between each one, for a total duration of about 25 minutes). During this step, when the buttons must not be pressed, warning light D blinks YELLOW and RED alternately.

We recommend emptying the used capsule drawer after the first dispensing cycle, to any water from overfl owing.
- When the first step is over, button B lights up and the machine beeps repeatedly. The water tank is empty.
• Carefully rinse out the water tank and refill it with fresh water (Fig. 4). - Empty and rinse the used capsule drawer, the drip tray and the container used and put them back in position (Fig. 6).
- Press button B to start the rinse cycle.
- Rinse water (about 500 ml) will be run through the machine. During this step, warning light D blinks alternately (twice YELLOW and twice RED).
- When the rinse cycle is complete, the machine beeps and Warning light D is lit steadily in ORANGE.
- Set the control lever back to its central position (Fig. 21).
- The buttons A-B-C blink simultaneously; the machine is warming up. When the buttons turn on and remain steadily lit, the appliance is ready for use.
- Carefully empty and rinse out the water tank and refill it with fresh, still water (Fig. 4).
- Empty and rinse out the used capsule drawer and drip tray (Fig. 6).
Troubleshooting
| PROBLEM | POSSIBLE | CAUSE | SOLUTION |
| No coffee comes out. Warning light D blinks RED. | The water tank is empty. Fill the | tank with fresh water. Press a button to ref ll the circuit. When the buttons remain steadily lit, the appliance is ready for use. | |
| The coffee is not hot enough. | - Cold cups / espresso cups. - Scale build-up in machine. | - Preheat cup. - Descale. | |
| The lever cannot be lowered. | - The used capsule drawer is full. - Capsule stuck inside the machine. | - Empty out the used capsule drawer. - Remove the used capsule. | |
| Warning light D is lit steadily in RED. | Heating problems. Turn off the machine, then turn it back on. If the problem persists, take the machine to an Authorised Service Centre. | ||
| When a button is pressed to dispense coffee, the machine seems to work but then stops without dispensing any coffee, or only dispenses a tiny amount. | Incorrect quantity programming. | Reprogram the quantity associated with that button. See ch. "Programming the quantity of coffee in a cup". | |
| Coffee is dispensed very slowly, and is of poor quality. | Button C was used with an espresso capsule. | Use buttons A or B. | |
Technical data
 | See the data plate on the base of the machine. |
 | Max. 15 bar |
 | < 70dB A |
| [TASO] | About 5 kg |
 | 1.2 litres |
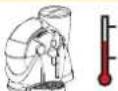 | ambient temperature: 10°C - 40°C |
 | 220 mm 290 mm 332 mm |
The materials and objects in contact with food products comply with the requirements of European Regulation 1935/2004.
INDEX
Einleitung:
Web: www.caffi taly.com
Caffitaly
system
Caffitaly
system
professional

- Italiano
- Deutsch
- Installation:
- Dispensing the product:
- Cleaning and Maintenance:
- Miscellaneous:
- Follow the instructions (Symbols)
- Safety warnings
- Instructions for use and disposal
- First use or after a long period of disuse
- Turning on the appliance
- General operating indications
- DESCALING SIGNAL:
- HEATING:
- WHEN THE WATER RUNS OUT DURING OPERATION:
- IF THE LEVER IS RAISED WHILE DISPENSING:
- Correct use of the buttons
- Dispensing coffee
- Programming the quantity of coffee in a cup
- Dispensing hot water
- Preparing cappuccino / Dispensing steam
- Saving energy
- Daily maintenance
- Changing the gasket
- Descaling
- CAREFULLY
- INDEX
- Einleitung:
Brand : Caffitaly
Model : Nautilus S06HS
Category : Coffee machine