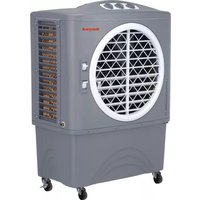
CO48PM - Air Conditioning HONEYWELL - Free user manual and instructions
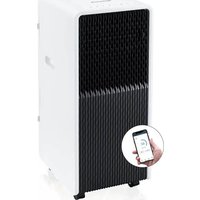
Find the device manual for free CO48PM HONEYWELL in PDF.


| Product type | Portable air conditioner |
| Brand | Honeywell |
| Model | CO48PM |
| Dimensions (H x W x D) | 70 cm x 40 cm x 38 cm |
| Weight | 25 kg |
| Power supply | 220-240 V, 50 Hz |
| Cooling power | 14000 BTU/h (4.1 kW) |
| Dehumidification capacity | 1.5 L/h |
| Noise level | 52 dB(A) |
| Main functions | Cooling, ventilation, dehumidification, night mode, timer, remote control |
| Maintenance and cleaning | Filter cleaning every month, water tank cleaning regularly |
| Safety | Leak protection, automatic shutdown in case of overheating |
| Spare parts available | Filter, water tank, remote control |
| Repairability | Estimated repairability index 6/10 |
| Warranty | 2 years |
| Recommended use | Rooms up to 40 m² |
Frequently Asked Questions - CO48PM HONEYWELL
User questions about CO48PM HONEYWELL
0 question about this device. Answer the ones you know or ask your own.
Ask a new question about this device
Download the instructions for your Air Conditioning in PDF format for free! Find your manual CO48PM - HONEYWELL and take your electronic device back in hand. On this page are published all the documents necessary for the use of your device. CO48PM by HONEYWELL.
USER MANUAL CO48PM HONEYWELL
natural_image
Line drawing of a Honeywell air purifier with mesh grille and control buttons (no text or symbols)Portable Evaporative Air Cooler
for Outdoor & Indoor Use
Read and save these instructions before use
MANUAL DEL PROPIETARIO
www.honeywellaircoolers.com
QUICK START GUIDE

natural_image
Industrial air conditioning unit with water flowing, no visible text or symbolsFill with water and plug into a standard power outlet.
Note: Please make sure the household power voltage matches the product specifications.

natural_image
Interior scene with a washing machine and chairs, no visible text or symbolsPlace near an open door or window.
Note : Evaporative air cooler requires cross ventilation.

natural_image
Black-and-white photo of a woman and child relaxing on a sofa next to a portable air conditioner unit (no visible text or symbols)Turn ON and enjoy the cooling breeze.
Note: Start with LOW speed and gradually increase to higher speed for optimum cooling performance.
Read all instructions carefully before setting up and operating the cooler, and please keep this instruction manual for future reference. This manual is designed to provide you with important information needed to setup, operate, maintain, and troubleshoot your cooler. Failure to follow these instructions may damage and/or impair its operation and void the warranty.
SECTION
PAGE
- THANK YOU 2
- USER TIPS 3
- SAFETY 5
- PARTS DESCRIPTION 8
- USE & OPERATION 9
Control Panel 9
Control Knobs 10
Filling With Water 11 - CLEANING & MAINTENANCE 13
- TROUBLESHOOTING GUIDE ...... 15
- TECHNICAL SPECIFICATIONS 16
- ELECTRICAL WIRING DIAGRAM 17
- SERVICE AND WARRANTY 18
THANK YOU
Congratulations on your purchase of this versatile Honeywell Evaporative Air Cooler. For optimum cooling from your cooler, fill the water tank to maximum level and load ice inside the ice compartment before you turn on your air cooler.
Cooler Location - Indoors (Important - Please Read!)
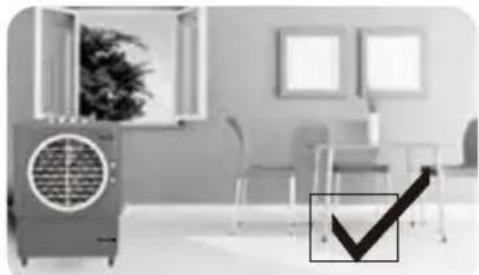
Place the cooler in front of an open door or window. Ensure that there is adequate cross - ventilation in the room by leaving a door or window open opposite the cooler. Following these guidelines will ensure your cooler will work as effectively as possible.
Not an Air Conditioner (Important - Please Read!)
The evaporative air cooler is not an air conditioner as it does not use a compressor or refrigerant gas. It should not be expected to cool as efficiently as a refrigerated air conditioner.
Energy Efficient, No Compressor
Honeywell Evaporative Air Coolers are built to maximize energy efficiency and keep costs low. Warm air is drawn into the cooler through a dust and odor-reducing carbon filter and enters the Honeycomb Cooling Media. Water pumped from the tank pours over the honeycomb media. As the warm air passes through the media, the water absorbs the heat, naturally cooling and humidifying the air. A fan propels the cooled air out into the room. This no-compressor system cools naturally, efficiently and inexpensively.


USER TIPS
Indoor Use
The recommended maximum relative humidity level is 60% or less, which allows a noticeable temperature decrease. The temperature decrease will be greater in drier climates because higher evaporation occurs when the humidity is low.
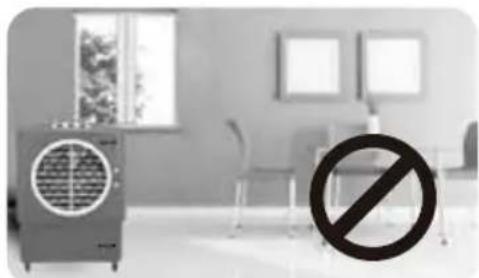
The evaporative air cooler should not be used in enclosed spaces. It must be kept level and there must be water in the water tank. The room should have doors and windows opened to allow free air flow. The evaporative air cooler works best when placed near an open window, so that outside air is drawn into the evaporative air cooler, circulates in the room, then exits via the door. The maximum cooling effect is felt when a person is in the flow of air coming out of the evaporative air cooler.
The evaporative air cooler can also be used to humidify dry air during cool weather. To be used for humidification the windows and doors should be closed to allow the humidified air to accumulate.
natural_image
Interior view of a modern living room with sofa, air conditioner unit, and framed picture (no visible text or symbols)Room with open windows & door (RECOMMENDED)
natural_image
Interior scene with a ventilation unit, a wall-mounted fan, and a prohibition symbol (no text or labels)Room with closed windows & door (NOT-RECOMMENDED)
Outdoor Use
Unit should be placed a minimum 10 inches away from any wall.
NOTE
When the product is used for the first time the Honeycomb Cooling Media will have an odor which will dissipate in a few hours or so of initial use.

READ AND SAVE THESE INSTRUCTIONS:
When using electrical appliances, basic safety precautions should always be followed:
- Your cooler runs on 120 Volt AC, 60 Hz current. Check the household voltage to ensure it matches the appliance's rate specification.
- Before operating the product remove it from its packaging and check that it is in good condition.
- DO NOT operate any product with a damaged cord or plug. We recommend not using an extension cord with this appliance.
- DO NOT run power cord under carpeting, or cover it with rugs or runners. Keep the cord away from areas where it may be tripped over.
• Always unplug the product before refilling the water tank. - Always unplug the appliance from the power source before cleaning, servicing or relocating the unit.
- Remove the power cord from the electrical receptacle by grasping and pulling on the power cord plug-end only, never pull the cord.
- DO NOT use the product in areas where gasoline, paint or other flammable goods and objects are stored.
- When using the COOL setting, check the water tank to ensure that it is full. Operation of this cooler on the COOL setting with an empty tank may result in damage to the water pump.

120V - 60 Hz
SHOCK HAZARD

natural_image
Two symbolic illustrations: a stick figure with a string and a hand holding a resistor (no text or symbols present)
natural_image
Line drawing of a washing machine with decorative arches and mounting feet (no text or symbols)WATER LEVEL INDICATOR
SAFETY
- DO NOT attempt to repair or adjust any electrical or mechanical functions of the cooler, as this may void the warranty.
- DO NOT cover the air inlet or outlet on the appliance as this may cause motor damage.
- DO NOT insert or allow objects to enter any ventilation or exhaust opening as this may damage the product and could cause an electrical shock or fire.
- DO NOT operate with the Honeycomb Cooling Media removed as this will overload and damage the motor.
- DO NOT leave the operating appliance unattended for any extended period of time.
- DO NOT let children play with this appliance, packaging or plastic bags.
- If the unit is damaged or if it malfunctions, do not continue to use it. Refer to the Troubleshooting Guide (page 15) and contact the Customer Service Center.
- Place the unit on a level floor.
- This product is not intended for use in wet or damp locations.
- DO NOT use in bathrooms. Never locate the product where it may fall into a bathtub or other water container.
- Store in a dry area when not in use.
- This appliance is not intended for use by persons (including children or elderly) with reduced physical, sensory or mental capabilities, or lack of experience and knowledge, unless they have been given supervision or instructions concerning the use of the appliance by a person responsible for their safety.
• Always grip the side handles to move the cooler.


SAFETY
- Use Only on GFCI Protected Receptacles.
- Power cords have to be contained. If they must run along the ground, make sure every inch of them is secured so they will not be tripped over.
- The wiring and connections must be waterproof. Be sure the connections (to the air cooler) never get wet. Your unit is waterproof, but everything attached to it must be waterproof, too.
- Set up your unit so it cannot be tripped over or wobble loose. It must rest on a solid support.
Warning: To reduce the risk of fire or electric shock, do not use this appliance with any solidstate speed control device.
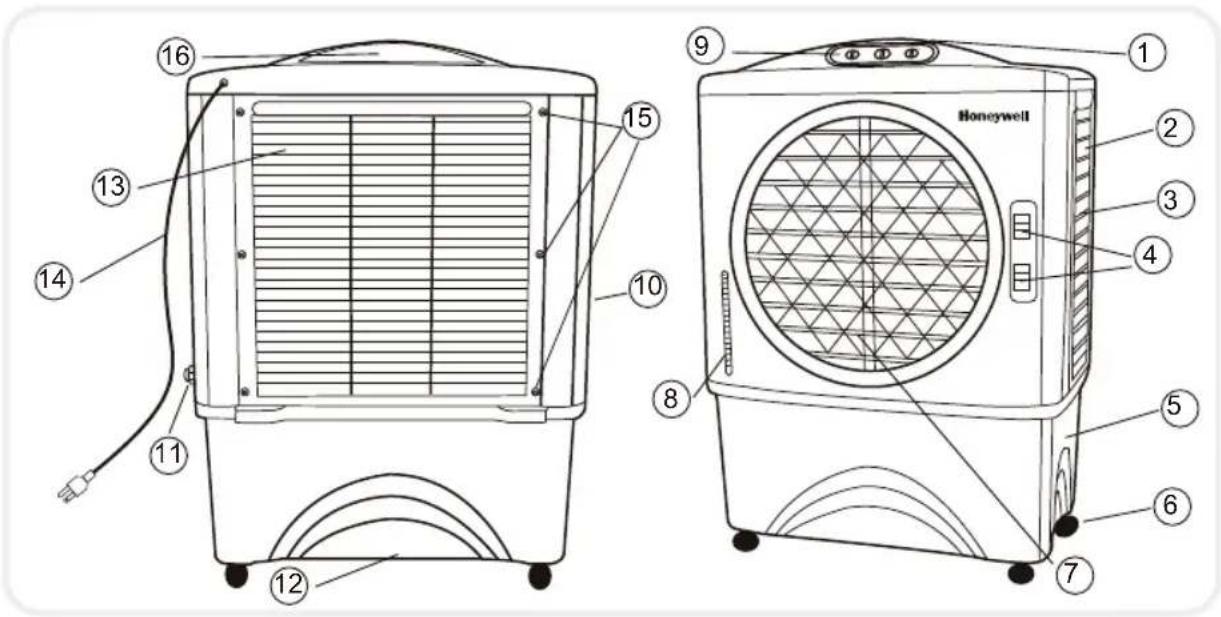
1 Water Inlet and Ice
Loading Compartment
2 Handle
3 Left Honeycomb Panel
4 Lever for Horizontal Louvers
5 Water Tank
6 Casters
7 Horizontal Louvers
8 Water Level Indicator
9 Control Panel
10 Right Honeycomb Panel
11 Continuous Water Supply Connection
12 Drain Plug
13 Backside Honeycomb Panel
14 Power Cord & Plug
15 Rear Grill Removal Screws
16 Water Fill Door
Control Panel

USE & OPERATION
Control Knobs
SPEED / ON - OFF
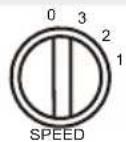
Connect to the power supply and turn the SPEED knob. The fan will start. Change the speed from 1 to 3 (1 for Low, 2 for Medium and 3 for High fan speed). To switch OFF the unit, turn the SPEED knob to 0.
COOL
To begin cooling the desired area, turn the COOL knob to the ON position. The water pump will operate. The cooler air will be felt after the Honeycomb Cooling Media is completely wet.
SWING
Turn the SWING knob to the ON position. The louvers will begin to move from right to left automatically.
Horizontal Louvers
Manually adjust the horizontal louvers to change vertical airflow.



natural_image
Pure technical diagram showing geometric patterns and cross-sections without any text, numbers, or symbolsCAUTION
- Unplug from power when refilling.
Filling With Water
Water can be filled into the air cooler water tank in two ways:
Water Inlet (Manual Refill)
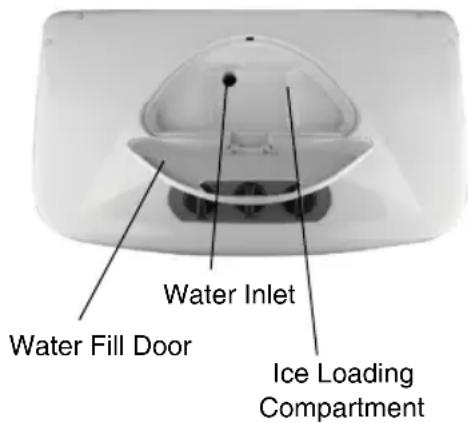
Water / Ice can be put into the tank through the top opening.
There is a hole for water to flow into the tank.
Continuous Water Supply (Auto Water Refill)
Connect a garden hose to the Continuous Water Supply inlet.
Water Inlet (Manual Refill)
- To refill the water tank, pull out the Water Fill Door located on the top of the unit (#16 on Page 8) and fill water to the MAX level, as indicated on the Water Level Indicator (#8 on Page 8).
- Do not fill water above the MAX. water level mark.
- For maximum cooling performance, put ice cubes inside the Ice Loading Compartment located on the top of the Air Cooler (#1 on Page 8).
USE & OPERATION
Continuous Water Supply (Auto Water Refill)
CAUTION
Unplug from power source before filling water.
This automated process eliminates the need to manually refill the water tank.
- Connect the garden hose to the water supply connector (# 11 on Page 8).
- Verify that connections are secure and turn on the water (Maximum water inlet pressure is 0.5 MPa).
- The water tank will refill automatically.
- Plug the unit into the power supply and turn the unit on.
- The water float valve will detect the water level and will automatically start or stop the water flow.

Important
- The cooler is supplied with Honeycomb Cooling Media.
- The cleaning frequency for the Honeycomb Capitalize Media depends on local air and water conditions. In areas where the mineral content of water is high, mineral deposits may build up on the Honeycomb Cooling Media and restrict air flow. Draining the water reservoir and refilling with fresh water at least once a week will help reduce mineral deposits. If mineral deposits remain on the Honeycomb Media, it should be removed and washed under fresh water. It should be cleaned every two months or sooner, depending on your needs.
- Do not run the unit in COOL mode with stale water in the tank. Empty the tank and refill it with fresh water if the water has been standing in the tank for an extended period of time.
- For best results, allow the Honeycomb Cooling Media to dry after each use by turning off the cool function 15 minutes before turning the unit off.

WARNING
- Before cleaning, turn the unit off and disconnect from the power source.
- Use a damp cloth to remove dirt and dust from the outside of the unit.
- Never use abrasive cleaners.
- When the unit is not in use, store it in a dry place, out of direct sunlight.
CLEANING & MAINTENANCE
Draining and Cleaning The Water Tank
- Turn the power OFF and disconnect the air cooler from the power supply.
- Move the unit to a location where it can be drained.
- Remove the drain plug and allow the tank to empty (#12 on Page 8).
- Refill the water tank to maximum level with clean water and drain it completely.
- Fill the water tank and rinse at least 2-3 times before use. After cleaning ensure that the drain plug is back in place. Plug into the power supply and turn on the unit.

Cleaning The Honeycomb Cooling Media
- Turn off the unit, and unplug the power cord from wall outlet.
- Rotate the unit facing the back panel, and locate the the Rear Panel of the unit.
- Grill Removal Screws (#15 on Page 8) - Remove the 6 screws with a screw driver.
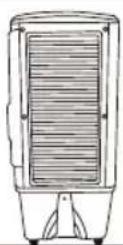
- Pull the rear grill panel until it is completely removed. The cooler has Honeycomb Cooling Media on the right and left panels. The cleaning and removal procedure is the same as the Rear Panel.
- The Honeycomb Cooling Media can now be seen. Clean it with a clean cloth to remove all the dust & dirt particles.
- Once cleaning is finished, reassemble the unit.

PROBLEM POSSIBLE CAUSE SOLUTION
| No discharge of air Cord is not plugged in. | Make sure power cord is plugged in and the supply switch is on. | |
| Power is not ON. | Turn the unit ON by changing the mechanical knob position on the control panel. | |
| Not Cooling / Unit is making noise | Pump is not turned ON. | Turn on COOL function from remote or control panel. |
| Low or no water in tank, when COOL is selected. | Refill water tank. | |
| Damaged Pump or Calcium deposits on blower. | Contact Customer Service Center. | |
| Odors When the Cooler is new. | When the unit is used for the first time, the Honeycomb Cooling Media will have an odor which will dissipate within a few hours of initial use. | |
Customer Support: 1-800-474-2147
TECHNICAL SPECIFICATIONS
MODEL NO. CO48PM
| Voltage | 120 V |
| Frequency | 60 Hz |
| Wattage | 150 Watts |
| Ampere | 1.25A |
| Water Tank Capacity | 10.6 Gallons |
| Cooling Media | Honeycomb |
| Product Dimension (inches) | 24.4(W) X 14.8(D) X 34.8(H) |
| Net Weight | 28.4 lbs |
ELECTRICAL WIRING DIAGRAM

Read all the instructions before attempting to use this product.
This 1 year limited warranty applies to repair or replacement product found to be defective in material or workmanship.
A. This warranty does not apply to any damage resulting from commercial, abusive, unreasonable use or supplemental damage. Defects that are the result of normal wear and tear will not be considered manufacturing defects under this warranty.
JMA NORTH AMERICA LLC IS NOT LIABLE FOR INCIDENTAL OR CONSEQUENTIAL DAMAGES OF ANY NATURE. ANY IMPLIED WARRANTY OF MERCHANTABILITY OR FITNESS FOR A PARTICULAR PURPOSE ON THIS PRODUCT IS LIMITED IN DURATION TO THE DURATION OF THIS WARRANTY.
Some jurisdictions do not allow the exclusion or limitation of incidental or consequential damages or limitations on how long an applied warranty lasts, so the above limitations or exclusions may not apply to you. This warranty gives you specific legal rights, and you also may have other rights which vary from jurisdiction to jurisdiction. This warranty applies only to the original purchaser of this product from the original date of purchase.
B. At its option, JMA NORTH AMERICA LLC will repair or replace this product if it is found to be defective in material or workmanship.
C. This warranty does not cover damage resulting from any unauthorized attempts to repair or from any use not in accordance with the instruction manual.
SERVICE AND WARRANTY
D. Please read the Instruction Manual carefully before setting up or using this product. If you believe this product to be suffering from a manufacturing fault, or if you have inquiries about this product, please contact our Customer Support:
CUSTOMER SUPPORT
JMA North America LLC
Mahwah, New Jersey 07495 USA
Phone : 1-800-474-2147
Email: info@jmana.us
Web: www.honeywellaircoolers.com
When contacting our Customer Support, please have the information below along with the proof of purchase. All warranty requests must be accompanied by a proof of purchase, which is a copy of the original receipt.
Model :
Date of purchase: ....
Purchased from :

natural_image
Illustration of a portable air conditioner unit with a circular vent, connected to a cable (no text or symbols visible)natural_image
Interior scene with a washing machine and chairs, no visible text or symbolsnatural_image
Black-and-white photo of a woman and child relaxing on a couch next to a portable air conditioner unit (no visible text or symbols)natural_image
Interior view of a modern living room with sofa, air conditioner unit, and framed windows (no visible text or symbols)natural_image
Interior scene with a ceiling fan, chair, and a prohibition symbol (no text or symbols present)natural_image
Two symbolic illustrations: a stick figure with a string and a hand holding a broken handle (no text or symbols present)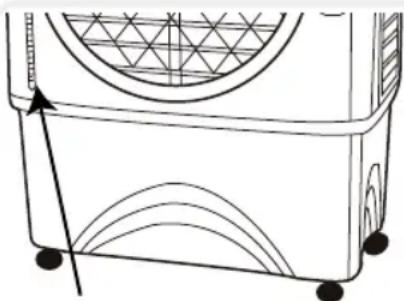
natural_image
Line drawing of a washing machine with decorative arcs and mounting feet (no text or symbols)

NIVEL DEL PISO
REGLAS DE SEGURIDAD
natural_image
Diagram showing a circular structure with internal grid pattern and two vertical panels (no text or symbols)CUIDADO
JMA North America LLC
Mahwah, New Jersey 07495 USA
Phone : 1-800-474-2147
Email: info@jmana.us
Web: www.honeywellaircoolers.com
natural_image
Industrial air conditioner unit with cooling pipes and water spray, no visible text or symbolsnatural_image
Interior scene with a large air conditioner unit, chairs, and framed artwork in the background (no visible text or symbols)natural_image
Black-and-white photo of a woman and child relaxing on a couch next to a portable air conditioner unit (no visible text or symbols)natural_image
Interior view of a modern living room with air purifier, chairs, and wall art (no visible text or symbols)Room with open windows & door (RECOMMENDED)

natural_image
Interior scene with a ventilator and chair, featuring a large 'no' symbol (no text or labels present)Room with closed windows & door (NOT-RECOMMENDED)
REMARQUE
natural_image
Two symbolic illustrations: a stick figure with a string and a hand holding a broken electrical wire (no text or symbols present)
natural_image
Line drawing of a washing machine with decorative arcs and mounting feet (no text or symbols)

RÈGLES DE SÉCURITÉ
natural_image
Diagram showing a circular structure with internal grid pattern and two vertical panels (no text or symbols)UTILISATION ET FONCTIONNEMENT
ATTENTION
PROBLÈME CAUSE POSSIBLE SOLUTION
ASSISTANCE AU CLIENT
JMA North America LLC
Mahwah, New Jersey 07495 USA
Phone : 1-800-474-2147
Email: info@jmana.us
Web: www.honeywellaircoolers.com
JMA North America LLC
Mahwah, New Jersey 07495 USA
Phone : 1-800-474-2147
Email: info@jmana.us
Web: www.honeywellaircoolers.com
December 2013
© 2013 AirTek Int'l Corp. Ltd. All rights reserved.
The Honeywell Trademark is used under license from Honeywell International Inc.
Honeywell International Inc. makes no representations or warranties with respect to this product.
This product is manufactured by Airtek Int'l Corp. Ltd.
Honeywell

- Portable Evaporative Air Cooler
- MANUAL DEL PROPIETARIO
- QUICK START GUIDE
- SECTION
- PAGE
- THANK YOU
- Energy Efficient, No Compressor
- USER TIPS
- Indoor Use
- Outdoor Use
- NOTE
- READ AND SAVE THESE INSTRUCTIONS:
- SAFETY
- Control Panel
- USE & OPERATION
- Control Knobs
- SPEED / ON - OFF
- COOL
- SWING
- Horizontal Louvers
- CAUTION
- Filling With Water
- Water Inlet (Manual Refill)
- Continuous Water Supply (Auto Water Refill)
- Important
- WARNING
- CLEANING & MAINTENANCE
- Draining and Cleaning The Water Tank
- Cleaning The Honeycomb Cooling Media
- TECHNICAL SPECIFICATIONS
- ELECTRICAL WIRING DIAGRAM
- SERVICE AND WARRANTY
- REGLAS DE SEGURIDAD
- CUIDADO
- REMARQUE
- RÈGLES DE SÉCURITÉ
- UTILISATION ET FONCTIONNEMENT
- ATTENTION
Brand : HONEYWELL
Model : CO48PM
Category : Air Conditioning