
Cubo - Cd player/recorder SONORO - Free user manual and instructions
Find the device manual for free Cubo SONORO in PDF.


| Product Type | CD Player/Recorder |
| Brand | Sonoro |
| Model | Cubo |
| Dimensions (W x H x D) | 250 x 120 x 200 mm |
| Weight | 1.5 kg |
| Power Supply | AC 100-240V, 50/60Hz |
| Playback Functions | Play, Pause, Stop, Skip, Repeat, Program, Shuffle |
| Recording Functions | Record from CD to USB/SD, MP3 encoding |
| Radio Tuner | AM/FM with digital tuning and presets |
| Additional Features | Alarm clock, Sleep timer, Headphone jack, USB/SD input |
| Supported Disc Formats | CD, CD-R, CD-RW, MP3 CD |
| Display | LCD with backlight |
| Remote Control | Included |
| Maintenance | Clean lens with CD lens cleaner; wipe exterior with dry cloth |
| Safety Precautions | Do not expose to moisture; keep away from heat sources; use specified power only |
| Spare Parts Available | Remote control, power cord, antenna |
| Reparability | User-replaceable fuse; service by qualified personnel |
| Package Contents | Main unit, remote control, power cord, antenna, user manual |
Frequently Asked Questions - Cubo SONORO
User questions about Cubo SONORO
0 question about this device. Answer the ones you know or ask your own.
Ask a new question about this device
Download the instructions for your Cd player/recorder in PDF format for free! Find your manual Cubo - SONORO and take your electronic device back in hand. On this page are published all the documents necessary for the use of your device. Cubo by SONORO.
USER MANUAL Cubo SONORO
The manufacturer continuously works on the further development of all types and models. We ask for your understanding that changes in the form, configuration and technology of the delivered product may therefore be possible at any time. It is therefore not possible to make claims on the basis of the data, images and descriptions in this operating manual. This document may not, in whole or in part, be reproduced, photocopied or translated without the written consent of the manufacturer.
All rights expressly reserved according to copyright law.
Subject to change.
iPod ® is a trademark or registered trademark of Apple Inc.
Apple is not responsible for the functioning of this device or its adherence to safety guidelines.
Content
1. Safety instructions .... 4
1.1 Never repair the device yourself .... 4
1.2 The CD player .... 4
1.3 Cleaning and storage 4
1.4 Operation 5
1.5 Clock battery 5
1.6 Inserting and removing a disc 5
2. Getting started 6
2.1 Standby / Switching on / Switching off 6
2.2 Connecting headphones 6
2.3 Connecting an external audio device 6
2.4 Connecting the antenna 6
2.5 Adjusting the sound (bass / treble) 6
2.6 Pairing the remote control 6
3. Operating elements and connections....7
4. Setting the basic functions ..... 10
4.1 Setting the time 10
4.2 Choosing 12- or 24-hour time display 10
4.3 Setting display brightness 10
4.4 Mute 10
4.5 Automatic switch-off 10
5. FM radio operation 11
5.1 Setting the stations 11
5.2 Storing and selecting the stations 11
6. Playing CDs.... 11
6.1 Skipping from one track to another 11
6.2 Track search....12
6.3 Repeat 12
6.4 Random 12
6.5 Intro 12
6.6 Programmed playback 12
6.7 Mute 13
6.8 Automatic switch-off ....13
7. iPod ® playback (using optional eDock) 13
8. Alarm mode 14
8.1 Alarm function 14
8.2 Snooze function 14
9. Disposal 15
9.1 Packaging 15
9.2 Device 15
10. Troubleshooting 16
11. Technical data .... 17
12. Warranty claims 19
1. Safety instructions
Place the device on a solid, level surface.
Ensure that
the device is not covered, so that there is always sufficient air circulation;
no direct heat sources (e.g. radiators) are affecting the device;•
the device is not exposed to direct sunlight;
contact with humidity, water or splashed water is avoided (for example, don't place any vases • on the device);
the device is not in the immediate vicinity of magnetic fields (e.g. television sets or speakers);
• there is no open fire (e.g. burning candles) close to or on the device.
Never allow children to use electrical devices unsupervised. Also, keep plastic packaging away from children as it is a suffocation risk. Only connect the device to an easily accessible power outlet nearby. In case you need to quickly disconnect the device from the mains, the outlet must be easily accessible.
1.1 Never repair the device yourself
If there is any damage to the power cable, the power adapter or the device, immediately pull the power plug from the outlet. Never try to open or repair the device yourself. There is a risk of electric shock. In case of a fault, please contact our Service Centre or another suitable technical repair shop.

1.2 The CD player
The CD player is a Class 1 laser product. The device is equipped with a safety system that prevents the emission of dangerous laser radiation during normal use. To avoid eye injuries, never manipulate or damage the safety system of the device.

1.3 Cleaning and storage
Before cleaning, please pull the mains plug out of the outlet. For cleaning use a dry, soft cloth. Solvents and detergents should be avoided, because this can damage the surface or markings of the device. If you intend not to operate the device for a longer period of time, disconnect the power cable from the outlet.
1.4 Operation
Connect the power supply to an easily accessible mains outlet.
1.5 Clock battery
This cubo model has an replaceable battery (CLOCK BATTERY) to allow the clock memory to be saved. In case of a disruption to the power supply, e.g. due to a power outage, your clock settings and alarm times will be stored. The illuminated display and the alarm functions will be switched off. As soon as the power supply is restored, the display will indicate the correct time and the alarm functions are re-activated. In the original state of the device as delivered, there will be a piece of plastic behind the backup battery. Remove this piece of plastic by pulling on it. This will activate the backup battery.
Note: If no backup battery has been inserted, then you will have to re-enter the clock settings and alarm times manually after a power failure. If power failures only occur rarely, then the life expectancy of the battery is essentially only limited by its shelf life. To prevent battery leakage, it should be replaced approximately every two years. To do this, loosen the two screws on the back of the device (see diagram on page 9), replace the battery and then tighten the screws again. The battery is not covered by the warranty.
Batteries contain chemicals, which is why they need to be disposed of according to certain regulations.
Caution! There is an explosion risk if the wrong battery type is used. Please only use a battery of the same or of a comparable type 3V lithium battery, CR2032).
1.6 Inserting and removing a disc
Insert a CD with the printed side face up into the CD compartment. To remove the CD, press OPEN.
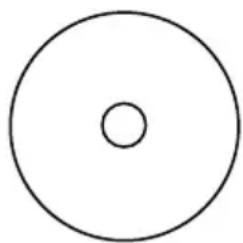
Caution: Never insert a Mini CD / MD-CD (8 cm diameter) into the CD compartment.

2. Getting started
2.1 Standby / Switching on / Switching off
When the device is supplied with power, it will go into standby mode. The time in the display will light up. To switch the device on, press STANDBY. Press STANDBY again to switch the device off.
2.2 Connecting headphones
You can also connect headphones to the device. To do this, connect the headphones to the jack on the rear of the device.
2.3 Connecting an external audio device
You can connect an external audio device, e.g. an MP3 player, iPod ® , Notebook or similar device. Please use a suitable audio cable and connect the external device to the AUX-IN jack on the rear of the cubo. Select AUX mode by pressing the MODE button (AUX will appear on the display).
2.4 Connecting the antenna
Connect the antenna included with the device to the antenna jack (ANTENNA). If the radio reception does not match your expectations, then you can try to improve the reception quality by adjusting the antenna. If you have a rooftop aerial connection, you can also connect this to the antenna jack of the device. Use an antenna connection cable, which you can obtain from a specialist dealer.
2.5 Adjusting the sound (bass / treble)
Press 1. MENU.
Press 2. SKIP until Set-Tone appears on the display.
Press 3. MENU again and set the bass level using the volume controls.
Press 4. SKIP again to set the treble levels.
Confirm your selection by pressing 5. MENU.
2.6 Pairing the remote control
Insert a lithium battery (button cell type CR2032) into the remote control with the +pole 1. facing upwards and close the sliding cover.
Press 2. STANDBY on the device to switch it off.
-
Press and hold REVERSE (SKIP) and VOLUME+ until "Remote" appears in the display.
-
Then press and hold MODE and TUN+ on the remote control to pair the remote control. After pairing is completed, "Pairing" appears on the display.
3. Operating elements and connections
cubo front view:
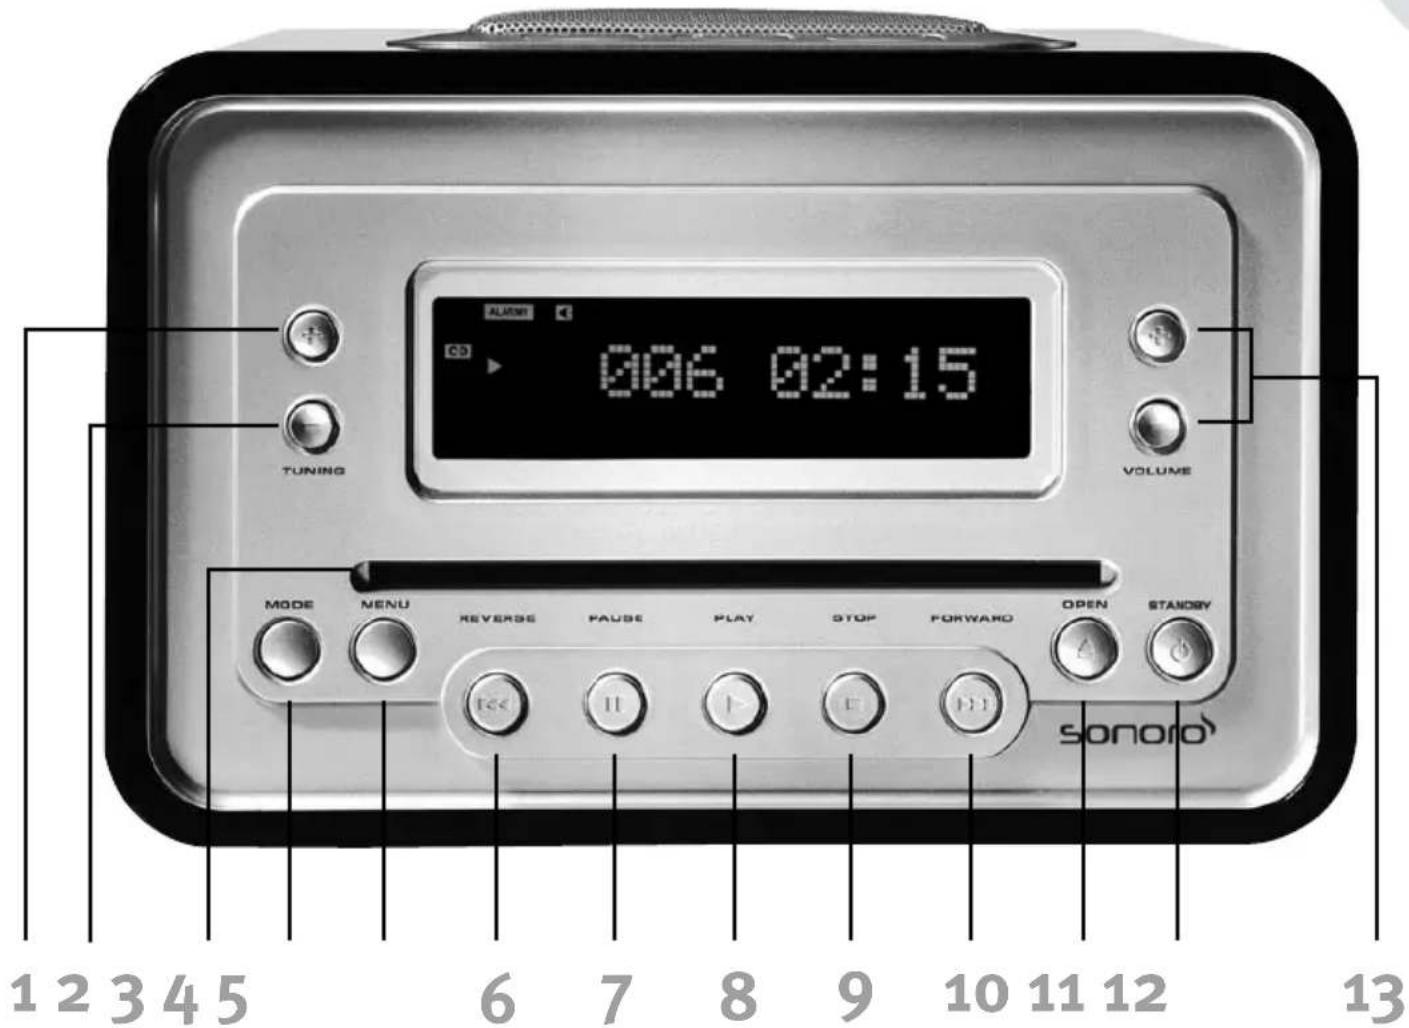
1 Tuning Station search +
2 Tuning Station search -
3 CD compartment
4 Mode Operating mode (FM, CD, iPod, Aux)
5 Menu Settings
6 Reverse (Skip) Play previous track (intro)
7 Pause Pause CD
8 Play Play CD
9 Stop Stop CD playback
10 Forward (Skip) Play next track (intro)
11 Open Eject CD
12 Standby Switch on device and switch to standby mode
13 Volume Set volume +/- in the iPod® operation with eDock (available as an option)
6 Skip Reverse briefly press: play previous track; press and hold: fast rewind within the track
7 Pause Pause playback
8 Play Start playback
9 Stop Select menu; press repeatedly to move to the next higher navigation level
10 Skip Forward briefly press: Play next track; press and hold: fast forward within the track
cubo front view:
cubo rear view:

17 18 19

20 21 22 23 24 26

in radio mode
14, 15, 16 Radio station buttons
in CD mode
14, 15, 16 Direct selection for tracks 1-6
in MP3-CD mode
15 Skip back 10 tracks
16 Skip forward 10 tracks
1 Tuning + next folder / next album
2 Tuning - previous folder / previous album
17 Alarm 1
18 Snooze
19 Alarm 2
20 FM ANTENNA VHF Antenna
21 EXT/IN Antenna selection switch (external/internal)
22 LINE OUT Audio output
23 AUX-IN Connection to audio input
24 CLOCK BATTERY Battery compartment
25 Headphone jack
26 Power supply jack 12 V = 2.5 A
27 iPod ® eDock connector
28 Keylock connecting slot for theft protection
Remote control:

1 Alarm 1
2 Volume Volume control -
3 Volume Volume control +
4 Play Play CD /
Pause Pause CD
5 Standby Switch on device and switch to standby mode
6 Menu Settings
7 Mode Operating mode:
8 Favorite Press repeatedly to switch between preset radio-stations 1-6
9 Stop Stop CD playback
10 Skip Forward Play next track (intro)
11 Skip Reverse Play previous track (intro)
12 Tuning Station search +
13 Tuning Station search -
14 Alarm 2
15 Snooze Mute
in MP3-CD mode
12 Tuning + next folder / next album
13 Tuning - previous folder / previous album
in the iPod® operation with eDock (available as an option)
4 Play Start playback/
Pause Pause playback
9 Stop Select menu; press repeatedly to
move to the next higher navigation level
10 Skip Forward briefly press: Play previous
track; iPod ® : press and hold: fast forward
within the track
11 Skip Reverse briefly press: Play previous
track; iPod ® : Press and hold: fast rewind
within the track
Information regarding pairing the remote control with the device:
The remote control is a high-frequency remote control device. This remote control is already paired to prevent the influence of any other devices. Should it be necessary to pair the remote control again during or after servicing, proceed as described in section 2.6.
4. Setting the basic functions
4.1 Setting the time
Switch the device into standby mode.1.
Press 2. MENU; the time display will flash.
Press 3. MENU again; the hour display will flash.
Set the hour using the volume controls.4.
Press one of the 5. SKIP buttons; the minute display will flash.
Set the minutes using the volume controls.6.
To store the time, press 7. MENU again.
4.2 Choosing 12- or 24-hour time display
Switch the device into standby mode.1.
Press 2. MENU; the time display will flash.
Press one of the 3. SKIP buttons until Set-AP appears on the display.
- Press MENU again and use the SKIP buttons to set the desired format.
Confirm your selection by pressing 5. MENU.
4.3 Setting display brightness
-
Press one of the SKIP buttons until "Display" appears on the display.
-
Press the MENU button again and use the VOLUME buttons to set the desired brightness.
The display will indicate High, Low or Off.
Confirm your selection by pressing 5. MENU.
4.4 Mute
During audio playback, press the Snooze button to mute the sound.
Press the button again to turn the sound back on.
4.5 Automatic switch-off
- While the device is in operation, press MENU and then SKIP repeatedly until SLEEP appears on the display.
- After pressing the MENU button again, you can use the volume controls to set the number of minutes after which the device is to switch off automatically.
- Use the Off setting to deactivate the function.
- Confirm your choice by pressing MENU.
5. FM radio operation
While the device is switched on, use the MODE button to select radio mode. The display indicates the FM radio frequency.
5.1 Setting the stations
Press TUNING+ or TUNING- to manually search for stations or hold the button for two seconds until the automatic station scan starts. If the radio reception is not to your liking, then you can either connect cubo to a rooftop aerial or try to improve the reception quality by adjusting the wire antenna. The tuner's settings are very sensitive. It may be sufficient if you adjust the frequency of your desired station up or down by .05 MHz.
5.2 Storing and selecting the stations
Search for your desired station.1.
Press and hold one of the station buttons above the speaker until a short beeping sound is 2. heard. Now the station is stored at the corresponding position.
To select the station again later, briefly press the corresponding station button.
6. Playing CDs
After you have inserted a CD, the device will automatically change to CD mode and the CD will start playing. This CD player plays Audio Discs including CD-R and CD-R(W). CD-ROM, CD-I, CDV, VCD, DVD or computer CDs cannot be played. The disc reading time may exceed 10 seconds if there are many songs on the disc.
While the CD player reads the content of the CD, “Reading” is shown on the display. The 1. total number of tracks and the entire length of playback (or the total number of albums and tracks in the case of MP3 CDs) are shown.
- If you have inserted an MP3 CD with folders or albums, you can press the buttons 15 or 16 to select the desired folder or album.
- Press one of the SKIP buttons until the desired track number is shown.
- To interrupt playback, press PAUSE. Press PAUSE again to start playback again.
To stop playback, press 5. STOP.
6.1 Skipping from one track to another
To select a specific track on the CD, press one of the SKIP buttons until the desired track number is shown. You can do this during playback or in STOP mode. If you have multiple tracks on an MP3-CD, then you can use the station buttons 5 (15) and 6 (16) to skip forward or back 10 tracks at a time.
6.2 Track search
During playback, press and hold one of the SKIP buttons and the search will start. Let go of the button at the desired position.
6.3 Repeat
During CD playback, press 1. MENU twice.
-
Use the SKIP FORWARD button to select REP 1 (the track currently playing is repeated endlessly) or REP ALL (all tracks are repeated). Confirm your choice by pressing 3. MENU.
-
To end the function, press MENU twice and then press SKIP FORWARD repeatedly until the indicator at the bottom of the display disappears. Then press 5. MENU again to confirm your selection.
6.4 Random
During playback, press 1. MENU twice.
Use the 2. SKIP FORWARD button to select SHUFFLE.
-
Confirm your selection by pressing MENU. All tracks are now played in random order.
-
To end the function, press MENU twice and then press SKIP FORWARD repeatedly until the indicator at the bottom of the display disappears. Then press 5. MENU again to confirm your selection.
6.5 Intro
During playback, press 1. MENU twice.
Use the 2. SKIP FORWARD button to select INTRO.
-
Confirm your selection by pressing MENU. The first 10 seconds of all tracks will now be played.
-
To end the function, press MENU twice and then press SKIP FORWARD repeatedly until the indicator at the bottom of the display disappears. Then press 5. MENU again to confirm your selection.
6.6 Programmed playback
- In STOP mode, press MENU twice.
- Use the SKIP FORWARD button to select PROG.
- Confirm your choice by pressing MENU.
- Now use the SKIP buttons to select the first track.
- Confirm by pressing PLAY.
- Repeat the last two steps until all tracks are stored.
- To start the programmed playback, press MENU again.
-
To interrupt the programmed playback, press STOP.
-
To end the function, press MENU twice and then press SKIP FORWARD repeatedly until the indicator at the bottom of the display disappears.
Then press 10. MENU again to confirm your selection.
6.7 Mute
During audio playback, press the SNOOZE button to mute the sound. Push the button again to turn the sound back on. Mute will appear on the display. While the device is set to Mute, all the other buttons do not function.
6.8 Automatic switch-off
- While the device is in operation, press MENU and then SKIP repeatedly until SLEEP appears on the display.
- After pressing the MENU button again, you can use the volume controls to set the number of minutes after which the device is to switch off automatically.
Use the Off setting to deactivate the function.3.
Confirm your choice by pressing 4. MENU.
7. iPod® playback (using optional eDock)
Connect the eDock to your cubo, as described in the eDock operating manual.
Whilst the device is switched on, use the MODE button to select iPod ® mode. IPOD is shown on the display. If no eDock or no iPod ® is connected, the display will indicate “NO IPOD”.
Press the PLAY button to start or stop playback (Pause). The function of the SKIP buttons is similar to that of CD playback in iPod ® mode. Use the STOP button to get to the respective higher level of your iPod ® (iPod ® not supplied); the display will indicate MENU. In this case the Skip buttons navigate through the individual levels of the iPod ® , the PLAY button confirms your selection. If no entry is made within 6 seconds, your cubo will switch back to normal iPod ® mode. The eDock of course also works with the iPhone, although to do this it has to be switched to Airplane mode.
For details regarding the operation of your iPod ® , please consult your iPod ® operating manual.
8. Alarm mode
8.1 Alarm function
This device allows you to set two different alarm times.
Press and hold one of the two alarm buttons until the time display flashes.1.
- Use the volume controls to select the hour and confirm with the SKIP button. Set the desired minutes using the volume controls.3.
- Confirm your choice by pressing the ALARM button.
- Now use the MODE button to select whether you want to be woken by CD, iPod®, AUX*, FM playback or by a buzzer. If you have selected FM radio as your alarm: Select the desired radio station by pressing 6. one of the radio station buttons (1 - 6) or using the FAVOR button on the remote control.
- If you have selected CD as your alarm: Press the SKIP buttons to select the desired CD track number. You can also select the CD track number directly via the 6 radio station buttons (1 - 6).
- Confirm your choice by pressing the ALARM button. Now use the volume controls to set the desired volume.9.
- Store the alarm mode by pressing the corresponding ALARM button.
* To do this, a device switched to playback must be connected.
To switch the alarm on or off, briefly press STANDBY or the corresponding ALARM button. To interrupt the alarm, briefly press SNOOZE (Snooze mode).
8.2 Snooze function
The SNOOZE time is individually adjustable. Press and hold the SNOOZE button whilst the device is switched off. Select the desired duration and store it by pressing SNOOZE.
During the alarm time you can adjust the snooze time with the VOLUME +/- buttons after pressing the SNOOZE button twice. Confirm the snooze time by pressing the SNOOZE button again.
9. Disposal
9.1 Packaging

Your designer CD radio is packaged to protect against damage in transit. The packaging consists of raw materials and can therefore be reused or recycled.
9.2 Device

At the end of its life span, never dispose of the device in normal household waste. Inquire about possibilities for environmentally safe and proper disposal.
Please remember that your consumer electronic device is subject to the European Directive 2002/96/EC regarding the reduction of electronic waste.
It is therefore not permitted to dispose of this device with normal household waste.
Information and advice regarding the disposal of old devices can be obtained from your • local authority, waste disposal authorities and the retailer from which you purchased this product.
You can deposit your device free of charge at communal collection points.
Correct disposal of old devices will protect the environment and your health.
10. Troubleshooting
Caution! Do not try to repair the device yourself under any circumstances as this will void any warranty claim. Do not open the casing, as there is a danger of electric shock. If there is a malfunction, first check the items listed below before bringing the device in for repair. If you are unable to remedy a defect based on these recommendations, please contact your dealer or our customer service.
"NO DISC" is displayed
Insert a CD•
Make sure the CD has not been inserted upside down•
Wait until any condensation on the optical system has disappeared●
Exchange or clean the CD•
Use a finalised CD-RW or a (correctly formatted) MP3 disc•
Poor reception quality
If the signal is too weak, adjust the antenna or use a rooftop aerial for better reception •
Increase the distance between the cubo and other devices such as a television set or a video recorder
No sound or poor playback quality
Adjust the volume•
Disconnect the headphones from the device•
Ensure that the MP3 CD was recorded within a bit rate of 32-256 kbps with sampling • rates of 48 kHz, 44.1 kHz or 32 kHz
The alarm isn't working
Set the correct time•
Alarm volume is not loud enough•
Activate the alarm•
Remote control does not work correctly or does not work at all
The remote control is too far away from the device; move the remote control closer to the • device.
The battery is empty; replace the battery in the remote control.
- There is reception interference or overlay caused by other frequencies or devices. Do not use any other devices in the 433.92 MHz frequency band. Move the device to a different position.
- The remote control is not paired; proceed as described in section 2.6.
Note: We exclusively use real wood veneers in our products, which ensures a natural appearance and high quality. Veneer is a natural product. Irregularities in the surface structure ensure a natural appearance. This has no effect on the functionality and quality of our products and thus does not represent a basis for claims or complaints.
11. Technical data
Power supply adapter: Ktec, KSAFF1200250W1EU
Input: 100-240V \~ 50/60Hz 0.8A
Output: 12V = 2.5A
Power consumption during standby operation: < 2W
CD player: Class 1 laser
AUX input: 3.5mm stereo jack
RF remote control, type : RC-3
Operating frequency: 433.92 MHz
Battery: Lithium battery, type: CR 2032
Frequency range FM: 87.5 MHz --- 108.0 MHz
Subject to technical changes.
Declaration of Conformity
Manufacturer: sonoro audio GmbH
We hereby declare that on the basis of its design and construction the sonoro cubo meets the fundamental requirements of the EMC Directive 2004/108/EEC, the Low Voltage Directive 2006/95/EEC and the R&TTE Directive 1999/5/EEC, including any changes applicable at the time of this declaration.


12. Warranty claims
The following applies to a guarantee claim without restricting your legal rights:
Guarantee claims can only be lodged within a time period of max. two years, from the • date of purchase.
- Within this warranty period, we will remedy all defects based on material or manufacturing errors either by repairing or replacing the device according to our preference.
Please contact your specialist dealer or send the defective device along with the guaran-tee card and proof of purchase to the service address. No new warranty period begins if the device is repaired or replaced. The guarantee period of two years after the purchase date remains in effect.
- Damages caused by improper use, normal wear-and-tear and defects that only insignificantly affect the value or usability of the device are excluded from the guarantee. If someone other than the technician(s) at the service address authorised by us has interfered with the device, the guarantee is also void.
Warranty card
AU-1310
Surname
Serial number
First name
Street
Postal code and city
Phone
Statement of defects
Signature of purchaser
cubo
Design CD-Radio
Mode d'emploi

sonoro
sonoro audio GmbH
Unter Goldschmied 6
50667 Köln
Allemagne
info@sonoro-audio.com
www.sonoro-audio.com
09/09
12 cm

2. Mise en service
NESSUN MINI CD!

8 cm
12 cm

Gamma di frequenze FM: 87,5 MHz --- 108,0 MHz
12 cm


- CONTENT
- SAFETY INSTRUCTIONS .... 4
- GETTING STARTED 6
- OPERATING ELEMENTS AND CONNECTIONS....7
- SETTING THE BASIC FUNCTIONS ..... 10
- FM RADIO OPERATION 11
- PLAYING CDS.... 11
- IPOD ® PLAYBACK (USING OPTIONAL EDOCK) 13
- ALARM MODE 14
- DISPOSAL 15
- TROUBLESHOOTING 16
- TECHNICAL DATA .... 17
- WARRANTY CLAIMS 19
- SAFETY INSTRUCTIONS
- 1.1 NEVER REPAIR THE DEVICE YOURSELF
- 1.2 THE CD PLAYER
- 1.3 CLEANING AND STORAGE
- 1.4 OPERATION
- 1.5 CLOCK BATTERY
- 1.6 INSERTING AND REMOVING A DISC
- GETTING STARTED
- 2.1 STANDBY / SWITCHING ON / SWITCHING OFF
- 2.2 CONNECTING HEADPHONES
- 2.3 CONNECTING AN EXTERNAL AUDIO DEVICE
- 2.4 CONNECTING THE ANTENNA
- 2.5 ADJUSTING THE SOUND (BASS / TREBLE)
- 2.6 PAIRING THE REMOTE CONTROL
- OPERATING ELEMENTS AND CONNECTIONS
- CUBO FRONT VIEW
- CUBO REAR VIEW
- IN RADIO MODE
- IN CD MODE
- IN MP3-CD MODE
- REMOTE CONTROL
- IN THE IPOD® OPERATION WITH EDOCK (AVAILABLE AS AN OPTION)
- SETTING THE BASIC FUNCTIONS
- 4.1 SETTING THE TIME
- 4.2 CHOOSING 12- OR 24-HOUR TIME DISPLAY
- 4.3 SETTING DISPLAY BRIGHTNESS
- 4.4 MUTE
- 4.5 AUTOMATIC SWITCH-OFF
- FM RADIO OPERATION
- 5.1 SETTING THE STATIONS
- 5.2 STORING AND SELECTING THE STATIONS
- PLAYING CDS
- 6.1 SKIPPING FROM ONE TRACK TO ANOTHER
- 6.2 TRACK SEARCH
- 6.3 REPEAT
- 6.4 RANDOM
- 6.5 INTRO
- 6.6 PROGRAMMED PLAYBACK
- 6.7 MUTE
- 6.8 AUTOMATIC SWITCH-OFF
- IPOD® PLAYBACK (USING OPTIONAL EDOCK)
- ALARM MODE
- 8.1 ALARM FUNCTION
- 8.2 SNOOZE FUNCTION
- DISPOSAL
- 9.1 PACKAGING
- 9.2 DEVICE
- TROUBLESHOOTING
- TECHNICAL DATA
- DECLARATION OF CONFORMITY
- WARRANTY CLAIMS
- WARRANTY CARD
- CUBO
- DESIGN CD-RADIO
- SONORO AUDIO GMBH
- MISE EN SERVICE
- NESSUN MINI CD
Brand : SONORO
Model : Cubo
Category : Cd player/recorder