
GF250HL - Deep fryer INVENTUM - Free user manual and instructions
Find the device manual for free GF250HL INVENTUM in PDF.

| Product type | Electric deep fryer |
| Model | GF250HL |
| Brand | Inventum |
| Capacity | Approximately 2.5 L of oil |
| Power | 1800 W |
| Power supply | 220-240 V ~ 50/60 Hz |
| Dimensions (WxDxH) | Approximately 25 x 30 x 28 cm |
| Weight | Approximately 2.5 kg |
| Body material | Stainless steel and heat-resistant plastic |
| Basket type | Removable metal basket with insulated handle |
| Temperature control | Adjustable thermostat from 150°C to 190°C |
| Heating indicator | Power and temperature indicator light |
| Main functions | Traditional deep frying with basket, odor-reducing tank |
| Safety | Automatic shut-off in case of overheating, cool-touch handle |
| Cleaning | Removable tank and basket, dishwasher safe |
| Spare parts | Replacement basket, filter, gasket available |
| Repairability | Repairability index not provided, accessible parts |
| Included accessories | Frying basket, removable lid |
| General information | Instruction manual included, 2-year warranty |
Frequently Asked Questions - GF250HL INVENTUM
User questions about GF250HL INVENTUM
0 question about this device. Answer the ones you know or ask your own.
Ask a new question about this device
Download the instructions for your Deep fryer in PDF format for free! Find your manual GF250HL - INVENTUM and take your electronic device back in hand. On this page are published all the documents necessary for the use of your device. GF250HL by INVENTUM.
USER MANUAL GF250HL INVENTUM
natural_image
Black INVENTUM air fryer with control knob and side panel (no visible text or symbols on device body)- Safety instructions page 12
- Appliance description page 15
- Before first use page 15
- Hot air frying page 15
- Settings page 16
- Cleaning & maintenance page 18
- Troubleshooting page 18 Guarantee & after sales Service page 37
Deutsch
1 safety instructions
- Please read these instructions before operating the appliance and retain for future use.
- Attention! Avoid touching hot surfaces of the appliance when the appliance is in use.
- Never cover the air inlet and the air outlet openings when the appliance is in use.
- Always put the ingredients in the basket, to prevent them from touching the heating elements.
- Never fill the pan with oil as this may cause a fire hazard.
- Never immerse the appliance, power cord and plug in water or any other liquid to protect against electrical hazards.
- The appliance is intended solely for domestic use within the home.
- Before plugging into a socket, check that the voltage in your home corresponds with the voltage printed on the bottom of the appliance.
- This appliance shall not be used by children from 0 to 8 years. This appliance can be used by children over the age of 8 and above if they are continuously supervised.
- This appliance can be used by people with reduced physical, sensory or mental capabilities or lack of experience or knowledge, if they have been given supervision or instruction concerning use of the appliance in a safe way and understand the hazards involved. Keep the appliance and its cord out of reach of children aged less than 8 years.
- Cleaning and maintenance shall not be made by children.
- Children should be supervised to ensure that they do not play with the appliance.
- Never use the appliance if it is not working properly, or if it has been damaged. Any intervention other than cleaning and normal maintenance by the customer must be carried out by an approved service centre.
- Always carry out regular checks of the power cord to ensure no damage is evident. Should there be any signs that the cord is damaged in the slightest degree, the entire appliance should be returned to the Customer Service Department.
- For your own safety, only use the accessories and spare parts from the manufacturer which are suitable for the appliance.
• Always return the appliance after a malfunction, or if it has been
damaged in any manner to the Customer Service Department for examination, repair or adjustment as special purpose tools are required.
- Never let the power cord of the appliance hang over the edge of a table or counter, touch hot surfaces or become knotted.
- Only connect the appliance to an earthed wall socket. Always make sure the plug is inserted into the wall socket properly.
- Never unplug it from the socket by pulling on the cable.
- Always ensure that your hands are dry before handling the plug, switch or power cord.
- The appliance is not intended to be operated by means of an external timer or a separate remote-control system.
- Never place this appliance on or near a hot gas or electric burner or where it could touch a heated oven or microwave. Do not allow this appliance to touch curtains, wall coverings, clothing, dishtowels or other flammable materials during use.
- Do not place the appliance against a wall or against other appliances. Leave at least 10 cm free space on the back and sides and 10 cm free space above the appliance. Do not place anything on top of the appliance.
- Never leave the appliance unattended when in use.
- Attention! During hot air frying, hot steam is released through the air outlet openings. Keep your hands and face at a safe distance from the steam and from the air outlet openings. Also be careful of hot steam and air when you remove the pan from the appliance.
- After using the appliance, the metal cover inside is very hot, avoid to contact the hot metal inside after cooking.
• Always use the appliance on a secure, dry, level surface. - This appliance is only intended to be used in household and not in:
- staff kitchen areas, in shops, offices and other working environments;
- by clients in hotels, motels and other residential type environments;
- Bed and Breakfast type environments
- farm houses.
- Unplug the appliance as soon as you have finished using it and when you are cleaning it.
- Let the appliance cool down for approx. 30 minutes before you handle or clean it.
- Make sure the ingredients prepared in this appliance come out golden-yellow instead of dark or brown. Remove burnt remnants.
- Should you decide not to use the appliance anymore, make it inoperative by cutting the power cord after removing the plug from
the socket. We also recommend making all potentially dangerous parts of the appliance harmless, particularly for children who might be tempted to play with it.
- If the appliance is used for other purposes than intended, or is it not handled in accordance with the instruction manual, the full responsibility for any consequences will rest with the user. Any damages to the product or other things are not covered by the warranty.
- Legislation requires that all electrical and electronic equipment must be collected for reuse and recycling. Electrical and electronic equipment marked with the symbol indicating separate collection of such equipment must be returned to a municipal waste collection point.
overheating protection
The appliance has an overheating protection system. If the inner temperature control system is invalid, the overheating protection is automatically turned on and the appliance can no longer be used. Unplug the power cord, let the appliance cool down and contact an Inventum service point or your supplier.
automatic switch-off
The appliance is equipped with a timer. When the timer has counted down to 0, the appliance produces a bell sound and switches off automatically. To switch off the appliance manually, turn the timer knob anticlockwise to 0. Note: if you pull out the pan during cooking, the appliance will be switched off automatically too (the timer will still count down).
electromagnetic fields (EMF)
The appliance complies with all standards regarding electromagnetic fields (EMF).
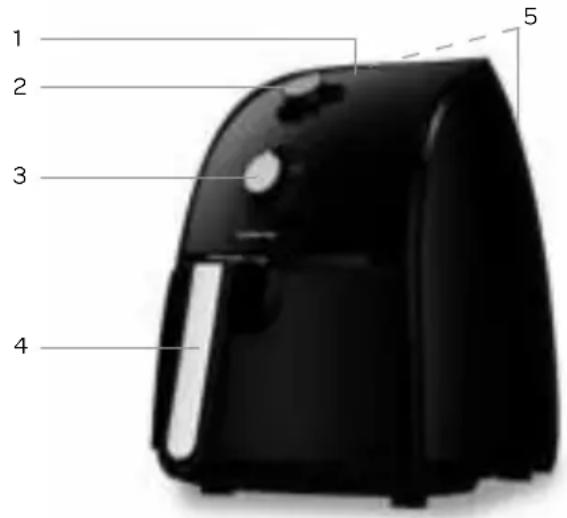
2 appliance description
- Control light (on/off) - red Thermostat light - green
- Timer knob
- Temperature knob
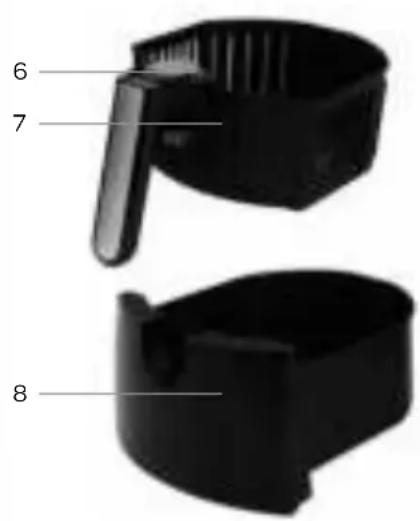
- Handle basket
- Air inlet openings
- Unlock button - basket
- Basket
- Pan
3 before the first use
Before you use the appliance for the first time, please do as follows: Carefully unpack the appliance and remove all the packaging material and stickers. Keep the material (plastic bags and cardboard) out of reach of children. Check the appliance after unpacking for any visible damage, possible from transportation.
Clean the basket and the pan with warm soapy water and a sponge. Note: you can also clean these parts in the dishwasher.
Wipe the interior and exterior with a damp cloth and dry thoroughly.
This is an air fryer that functions on hot air. Do not fill the pan with oil or frying fat.
- Place the appliance on a stable and heat resistant surface.
- Place the basket properly in the pan.
- Place the pan into the appliance.
NOTE: the pan must be placed correctly, otherwise the appliance doesn't work! - Plug the appliance into an earthed wall socket.
Do not fill the pan with oil or any other liquid.
Do not place anything on top of the appliance.
Do not put anything on the air inlet on the sides of the appliance, this disrupts the airflow and has a negative affect to the hot air frying result.
4 hot air frying
The air fryer can prepare a large range of ingredients. See the section SETTINGS for an indication of the timing and temperature settings.
- Check that the voltage in your home corresponds with the voltage printed on the bottom of the appliance and plug the fryer into an earthed socket.
- Carefully pull the pan out of the air fryer by the handle.
- Place the ingredients in the basket. Attention: never exceed the recommended amount or fill the basket over the maximum, as this could affect the quality of the end result.
-
Slide the pan back into the air fryer properly. Never use the pan without the basket. If the pan is not placed into the air fryer correctly, the appliance will not function.
Caution: do not touch the pan during and sometime after use, as it gets very hot. Only hold the pan by the handle. -
Turn the temperature knob to the required temperature. An indication of the correct temperatures can be found in the section SETTINGS.
-
Determine the required preparation time for the ingredients with the table in the section SETTINGS.
-
To switch on the appliance, turn the timer knob to the required preparation time.
Tip: add 3 minutes to the preparation time when the appliance is cold.
If you want to preheat the appliance without ingredients, turn the timer knob to more than 3 minutes and wait until the thermostat light goes out (after aproxx. 3 minutes). Then remove the pan, fill the basket and turn the timer knob to the required preparation time.
- The on/off control light and the thermostat light go on.
- The timer starts counting down the set preparation time.
- During the hot air frying process, the thermostat light lights up and goes out from time to time. This indicates that the heating element is switched on and off to maintain a constant temperature.
- Excess oil from the ingredients is collected on the bottom of the pan.
- Some ingredients require shaking halfway through the preparation time. Take the pan out of the appliance by the handle and shake it with the ingredients. Then slide the pan back into the air fryer and continue to bake.
Attention: do not press the unlock button on the handle.
- When you hear the timer signal, the set preparation time has elapsed. Pull the pan out of the appliance and place it on a heat-resistant surface.
Note: you can also switch off the appliance manually. To do this, turn the temperature knob to 0, or pull out the pan directly.
- Check if the ingredients are ready.
If the ingredients are not ready yet, simply slide the pan back into the appliance and set the timer to a few more minutes.
- To remove small ingredients (e.g. fries), press the basket release button and lift the basket out of the pan.
Do not turn the basket upside down with the pan still attached to it, as any excess oil that has been collected on the bottom of the pan will leak onto the ingredients.
After hot air frying, the pan and the ingredients are hot. Depending on the type of the ingredients in the air fryer, steam may escape from the pan.
After hot air frying, the pan and the inside metal cover are hot, avoid touching these parts.
-
Empty the basket into a bowl or onto a plate. Use a pair of tongs to lift the ingredients out of the basket with large or fragile ingredients.
-
When a portion of ingredients is ready, the air fryer is instantly ready for preparing another portion.
5 settings
The chart in the chapter will help you to select the best settings for the ingredients you want to prepare.
Attention: these settings are indications. As ingredients differ in origin, size, shape as well as brand, we cannot guarantee the best setting for your ingredients.
Because the rapid hot air technology instantly reheats the air inside the appliance, pulling the pan briefly out of the appliance during hot air frying barely disturbs the process.
TIPS
- Smaller ingredients usually require a slightly shorter preparation time than larger ingredients.
- A larger amount of ingredients only requires a slightly longer preparation time, a smaller amount of ingredients only requires a slightly shorter preparation time.
- Shaking smaller ingredients a few times starting halfway through the preparation time optimizes the end result and can help prevent unevenly fried ingredients.
- Do not prepare extremely greasy ingredients such as sausages in the air fryer.
- Snacks that can be prepared in a oven can also be prepared in the air fryer.
- GF250HL: The optimal amount for preparing crispy fries is 500 grams. The maximum amount is 800 grams.
GF400HL: The optimal amount for preparing crispy fries is 700 grams. The maximum amount is 1500 grams. - Use pre-made dough to prepare filled snacks quickly and easily. Pre-made dough also requires a shorter preparation time than home-made dough.
- Place a baking tin or oven dish in the air fryer if you want to bake a cake or quiche or if you want to fry fragile ingredients or filled ingredients.
- You can also use the air fryer to reheat ingredients. To reheat ingredients, set the temperature to 150°C for up to 10 minutes.
| Min-max amount (g) GF250HL | Time (min.) GF250HL | Min-max amount (g) GF400HL | Time (min.) GF400HL | Temperature (°C) | Shake/turn over | Add oil | |
| Potatoes & fries | |||||||
| Thin frozen fries 300-700 14 | 27 300-1200 14 | 32 200 3 x shake 12 tbsp | |||||
| Thick frozen fries 300-700 16 | 30 300-1200 16 | 36 200 3 x shake 12 tbsp | |||||
| Home-made fries (8x8 mm) | 300-800 | 18-32 | 300-1500 | 18-38 | 200 | 3 x shake | 1 tbsp |
| Home-made potato wedges | 300-800 | 14-28 | 300-1500 | 14-32 | 180 | 3 x shake | 1 tbsp |
| Home-made potato cubes 200-600 | 12-22 200-100 | 12-30 180 | x shake 1 tbsp | ||||
| Rosti 100-250 10-20 100 | -400 10-25 180 | ||||||
| Potato gratin 200-500 12-22 | 200-800 12-30 | 200 | |||||
| Meat & poultry | |||||||
| Steak 100-500 8-12 100 | -700 8-15 180 | x turn over | |||||
| Pork chops | 100-500 10- | 14 100-700 | 10-18 180 | x turn over | |||
| Hamburger | 100-500 | 7-14 | 100-700 | 7-18 | 180 | 1 x turn over | |
| Drumsticks | 100-500 18- | 22 100-700 18-25 | 180 | 1 x turn over | |||
| Chicken breast | 100-500 | 10-15 | 100-700 | 10-16 | 180 | 1 x turn over | |
| Snacks | |||||||
| Spring rolls | 100-400 | 8-10 | 100-600 | 8-12 | 200 | 1 x turn over | 12 tbsp |
| Frozen chicken nuggets | 100-500 | 6-10 | 100-700 | 6-12 | 200 | 3 x shake | 12 tbsp |
| Frozen fish fingers | 100-400 | 6-10 | 100-600 | 6-12 | 200 | 1 x turn over | |
| Sausage roll | 100-500 | 13-15 | 100-700 | 13-18 | 200 | ||
| Frozen bread crumbed cheese snacks | 100-400 | 8-10 | 100-600 | 8-12 | 180 | 1 x turn over | |
| Stuffed vegetables | 100-400 | 8-12 | 100-600 | 8-15 | 180 | ||
| Baking | |||||||
| Cake | 300 | 20-25 | 400 | 20-30 | 160 | ||
| Quiche | 400 | 20-22 | 600 | 20-28 | 180 | ||
| Muffins | 300 | 15-18 | 400 | 15-20 | 200 | ||
| Sweet snacks | 400 | 10-20 | 600 | 10-25 | 160 | ||
Note: add 3 minutes to the preparation time when you start frying while the air fryer is still cold.
home-made fries
To make home-made fries, follow the steps below:
- Peel the potatoes and cut them into sticks.
- Wash the potato sticks thoroughly and dry them with kitchen paper.
- Pour half a tablespoon in a bowl and place the sticks on top. Mix until the sticks are coated with oil.
- Remove the sticks from the bowl with your fingers or a kitchen utensil so that excess oil stays behind in the bowl. Put the sticks in the basket. Note: do not tilt the bowl to put all the sticks in the basket in one go. Any excess oil will end up on the bottom of the pan.
- Fry the potato sticks according to the instructions in this chapter.
tips
- To reduce the weight, you can remove the basket from the pan and shake just the basket. To do so, pull the pan out of the appliance, place it on a heat-resistant surface and press the button of the handle.
- If you set the timer to half the preparation time, you hear the timer signal when you have to shake the ingredients. However, this means that you have to set the timer again to the remaining preparation time after shaking.
- If you set the timer to full preparation time, there is no timer signal during cooking before finishing, you can pull out the pan at any time to check the ingredients cooking condition, the power will shut down automatically and resume after sliding the pan back into the appliance (Attention: the timer still is counting down).
Clean the appliance after every use.
Before cleaning the air fryer, leave it to cool down completely.
Do not touch the hot metal inside before cleaning immediately after frying.
Do not use metal kitchen utensils or abrasive cleaning materials to clean the pan and the basket, as this may damage the non-stick coating.
- Unplug the appliance and leave the air fryer to cool down completely.
Note: remove the pan to let the air fryer cool down more quickly.
-
Wipe the outside of the appliance with a moist cloth.
-
Clean the pan and the basket with hot water, some washing-up liquid and a non-abrasive sponge. The pan and the basket are dishwasher-safe.
A degreasing liquid can be used to remove any remaining dirt.
Note: fill the pan with hot water and some washing-up liquid and let it soak for 10 minutes to remove tough dirt.
- Clean the inside of the appliance with hot water and a soft sponge.
- Clean the heating element with a soft cleaning brush to remove any food residues. Do not use washing-up liquid. This can give a tang to the ingredients.
Never immerse the appliance, power cord and plug in water or any other liquid to protect against electrical hazards.
Before storing the air fryer, let the appliance completely cool down and unplug it. Check whether all the parts are clean and dry. Store the air fryer in a clean and dry place.
7 troubleshooting
| Problem Possible cause Solution | ||
| The air fryer does not function. The appliance is not plugged in. Plug the appliance in an earthed wall socket. | ||
| The ingredients fried with the air fryer are not done. | The amount of ingredients in the basket is too big. | Put smaller batches of ingredients in the basket. Smaller batches are fried more evenly. |
| The set temperature is too low. Turn the temperature knob to the required temperature setting (see chapter 5 - SETTINGS) | ||
| The preparation time is too short. Turn the timer knob to the required preparation time (see chapter 5 - SETTINGS) | ||
| The ingredients are fried unevenly in the air fryer. | Certain types of ingredients need to be shaken halfway through the preparation time. | Ingredients that lie on top of or across each other (e.g. fries) need to be shaken halfway through the preparation time (see chapter 5 - SETTINGS). |
| Fried snacks are not crispy when they come out of the air fryer. | The snacks are meant to be fried in a traditional deep fat fryer. | Use oven snacks or lightly brush some oil onto the snacks for a crispier result. |
| The pan will not slide properly into the appliance. | There are too much ingredients in the basket. | Do not fill the basket beyond in full. Keep the indicated amounts in the table in chapter 5 - SETTINGS. |
| The basket is not placed correctly in the pan. | Push the basket into the pan until you hear a click. | |
| White smoke is coming out of the appliance. | You are preparing greasy ingredients. When you fry greasy ingredients in the air fryer, a large amount of oil will leak into the pan. The oil produces white smoke and the pan may heat up more than usual. This does not affect the appliance or the end result. | |
| The pan still contains grease residues from the previous use. | White smoke is caused by grease heating up in the pan, make sure you clean the pan properly after each use. | |
| Fresh fries are fried unevenly in the air fryer. | You did not use the right type of potato. Use fresh potatoes and make sure they stay firm during frying. | |
| You did not rinse the potato sticks properly before you fried them. | Rinse the potato sticks properly to remove starch from the outside of the sticks. | |
| Fresh fries are not crispy when they come out of the air fryer. | The crispiness of the fries depends on the amount of oil and water in the fries. | Make sure the potato sticks are dried properly before you add the oil. |
| Cut the potato sticks smaller for a crispier result. | ||
| Add a bit more oil for a crispier result. | ||
- This product is guaranteed for a period of 2 years from the date of purchase against mechanical and electrical defect.
- Guarantee can only be given if proof of purchase (e.g. till receipt) can be shown. Therefore keep it in a safe place. The guarantee period starts at date of purchase.
• Guarantee is not valid in case of:
- normal wear;
- damage through misuse use or when the instructions were not followed correctly;
- lack of maintenance;
- not following the operation- and safety instructions;
- incompetent montage or repairs made by yourself or others;
- using accessories and spare parts which are not suitable for the appliance;
for assessment by our technical department.
• The guarantee is not valid for:
- normal wear;
- external cables;
- (interchangeable) signal- and controllamps for assessment by our technical department.
after sales service
Return to your supplier of send the appliance, including a copy proof of purchase and description of the complaint, stamped to:
When the guarantee is no longer valid or when the period of guarantee has passed, we will charge any costs that flow out of an assessment and/or repairing.
On request we will supply a statement before repairing. Without requesting a statement, we assume that you, by sending the appliance, automatically order to repair the appliance.
A guarantee period of two months is valid for repairs done by our technical department and the used spare parts, counting from the repairdate. When a malfunction occurs within this period which directly flows out of the repairs and the used spare parts, the consumer has the right of repairs without any costs.
Garantie
twitter.com/inventum1908
facebook.com/inventum1908
youtube.com/inventum1908


- Deutsch
- safety instructions
- overheating protection
- automatic switch-off
- electromagnetic fields (EMF)
- appliance description
- before the first use
- This is an air fryer that functions on hot air. Do not fill the pan with oil or frying fat.
- hot air frying
- Attention: do not press the unlock button on the handle.
- settings
- TIPS
- home-made fries
- Before cleaning the air fryer, leave it to cool down completely.
- Do not use metal kitchen utensils or abrasive cleaning materials to clean the pan and the basket, as this may damage the non-stick coating.
- Never immerse the appliance, power cord and plug in water or any other liquid to protect against electrical hazards.
- troubleshooting
- after sales service
- Garantie
Brand : INVENTUM
Model : GF250HL
Category : Deep fryer