
NS-SW210 - Loudspeaker YAMAHA - Free user manual and instructions
Find the device manual for free NS-SW210 YAMAHA in PDF.


| Product Type | Active subwoofer |
| Brand | Yamaha |
| Model | NS-SW210 |
| Speaker | 20 cm (8 inches) cone |
| Output Power | 100 W (RMS) |
| Frequency Response | 30 Hz – 200 Hz |
| Impedance | 6 Ω |
| Dimensions (W x H x D) | 350 x 430 x 380 mm |
| Weight | 11 kg |
| Power Supply | 220-240 V ~ 50/60 Hz |
| Power Consumption | 60 W (operation), < 0.5 W (standby) |
| Main Features | Volume adjustment, low-pass filter, adjustable phase, line input, auto standby |
| Inputs | 1 x RCA (L/R), 1 x high level (terminal block) |
| Cabinet Material | MDF with black finish |
| Cleaning | Soft dry cloth, do not use chemicals |
| Safety | Do not block vents, do not expose to moisture |
| Spare Parts and Repairability | Amplifier and speaker replaceable by a professional |
| Included Accessories | Power cable, user manual |
Frequently Asked Questions - NS-SW210 YAMAHA
User questions about NS-SW210 YAMAHA
0 question about this device. Answer the ones you know or ask your own.
Ask a new question about this device
Download the instructions for your Loudspeaker in PDF format for free! Find your manual NS-SW210 - YAMAHA and take your electronic device back in hand. On this page are published all the documents necessary for the use of your device. NS-SW210 by YAMAHA.
USER MANUAL NS-SW210 YAMAHA
CAUTION: Read this before operating your unit
Please read the following operating precautions before use. YAMAHA will not be held responsible for any damage and/or injury caused by not following the cautions below.
- To assure the finest performance, please read this manual carefully. Keep it in a safe place for future reference.
- Install this unit in a cool, dry, clean place - away from windows, heat sources, sources of excessive vibration, dust, moisture and cold. Avoid sources of humming (transformers, motors). To prevent fire or electrical shock, do not expose this unit to rain or water.
- Never open the cabinet. If something drops into the set, contact your dealer.
- The voltage to be used must be the same as that specified on the rear panel. Using this unit with a higher voltage than specified is dangerous and may cause a fire and/or electric shock.
- To reduce the risk or fire or electric shock, do not expose this unit to rain or moisture.
- Do not use force on switches, controls or connection wires. When moving the unit, first disconnect the power plug and the wires connected to other equipment. Never pull the wires themselves.
- When not planning to use this unit for a long period (i.e., vacation, etc.), disconnect the AC power plug from the wall outlet.
- To prevent lightning damage, disconnect the AC power plug when there is an electric storm.
- Since this unit has a built-in power amplifier, heat will radiate from the rear panel. Place the unit apart from the walls, allowing at least 20cm of space above, behind and on both sides of the unit to prevent fire or damage. Furthermore, do not position with the rear panel facing down on the floor or other surfaces.
- Do not cover the rear panel of this unit with a newspaper, a tablecloth, a curtain, etc., in order not to obstruct heat radiation. If the temperature inside the unit rises, it may cause fire, damage to the unit and/or personal injury.
- Do not place the following objects on this unit: Glass, china, small metallic, etc. If glass, etc., falls as a result of vibrations and breaks, it may cause bodily injury.
A burning candle etc.
If the candle falls as a result of vibration, it may cause fire and bodily injury.
A vessel containing water
If the vessel falls as a result of vibration and water spills, it may cause damage to the speaker, and/or you may get an electric shock.
WARNING
TO REDUCE THE RISK OF FIRE OR ELECTRIC SHOCK, DO NOT EXPOSE THIS APPLIANCE TO RAIN OR MOISTURE.
- Do not place this unit where foreign material, such as dripping water. It might cause fire, damage to this unit, and/or personal injury.
- Never put a hand or a foreign object into the YST port located on the right side of this unit. When moving this unit, do not hold the port, as it might cause personal injury and/or damage to this unit.
- Never place a fragile object near the YST port of this unit. If the object falls or drops as a result of the air pressure, it may cause damage to the unit and/or personal injury.
- Never open the cabinet. It might cause an electric shock, since this unit uses a high voltage. It might also cause personal injury and/or damage to this unit.
- When using a humidifier, be sure to avoid condensation inside this unit by allowing enough space around this unit or avoiding excess humidification. Condensation might cause fire, damage to this unit, and/or electric shock.
- Super-bass frequencies reproduced by this unit may cause a turntable to generate a howling sound. In such a case, move this unit away from the turntable.
- This unit may be damaged if certain sounds are continuously output at high volume level. For example, if 20 Hz - 50 Hz sine waves from a test disc, bass sounds from electronic instruments, etc., are continuously output, or when the stylus of a turntable touches the surface of a disc, reduce the volume level to prevent this unit from being damaged.
- If you hear distortion (i.e., unnatural, intermittent “rapping” or “hammering” sounds) coming from this unit, reduce the volume level. Extremely loud playing of a movie soundtrack’s low frequency, bass-heavy sounds or similarly loud popular music passages can damage this speaker system.
- Vibration generated by super-bass frequencies may distort images on a TV. In such a case, move this unit away from the TV set.
- Do not attempt to clean this unit with chemical solvents as this might damage the finish. Use a clean, dry cloth.
- Be sure to read the “TROUBLESHOOTING” section regarding common operating errors before concluding that the unit is faulty.
- Install this unit near the wall outlet and where the AC power plug can be reached easily.
- Secure placement or installation is the owner's responsibility. YAMAHA shall not be liable for any accident caused by improper placement or installation of speakers.
Be sure to allow spaces of at least 20 cm above, behind and on both sides of the unit.
• VOLTAGE SELECTOR
(Asia and General models only)
The voltage selector switch on the rear panel of this unit must be set to your local main voltage BEFORE plugging this unit into the AC main supply. Voltages are 110-120/220-240 V AC, 50/60 Hz.
This unit is not disconnected from the AC power source as long as it is connected to the wall outlet, even if this unit itself is turned off. In this state, this unit is designed to consume a very small quantity of power.
This unit features a magnetically shielded design, however, there is still a chance that placing it too close to a TV set might impair picture color. Should this happen, move this unit away from the TV set.
For U.K. customers
If the socket outlets in the home are not suitable for the plug supplied with this appliance, it should be cut off and an appropriate 3 pin plug fitted. For details, refer to the instructions described below.
Note: The plug severed from the mains lead must be destroyed, as a plug with bared flexible cord is hazardous if engaged in a live socket outlet.
SPECIAL INSTRUCTIONS FOR U.K. MODEL
IMPORTANT:
THE WIRES IN MAINS LEAD ARE COLOURED IN ACCORDANCE WITH THE FOLLOWING CODE:
Blue: NEUTRAL
Brown: LIVE
As the colours of the wires in the mains lead of this apparatus may not correspond with the coloured markings identifying the terminals in your plug, proceed as follows: The wire which is coloured BLUE must be connected to the terminal which is marked with the letter N or coloured BLACK. The wire which is coloured BROWN must be connected to the terminal which is marked with the letter L or coloured RED. Make sure that neither wire is connected to the earth terminal of a three pin plug.
For Canadian Customers
To prevent electric shock, match wide blade of plug to wide slot and fully insert.
This Class B digital apparatus complies with Canadian ICES-003.
Information for Users on Collection and Disposal of Old Equipment

This symbol on the products, packaging, and/or accompanying documents means that used electrical and electronic products should not be mixed with general household waste.
For proper treatment, recovery and recycling of old products, please take them to applicable collection points, in accordance with your national legislation and the Directives 2002/96/EC.
By disposing of these products correctly, you will help to save valuable resources and prevent any potential negative effects on human health and the environment which could otherwise arise from inappropriate waste handling.
For more information about collection and recycling of old products, please contact your local municipality, your waste disposal service or the point of sale where you purchased the items.
[Information on Disposal in other Countries outside the European Union]
This symbol is only valid in the European Union. If you wish to discard these items, please contact your local authorities or dealer and ask for the correct method of disposal.
CONTENTS FEATUI
FEATURES.... 1
SUPPLIED ACCESSORIES.... 1
ATTACHING THE NON-SKID PADS .... 1
PLACEMENT.... 2
CONTROLS AND THEIR FUNCTIONS.... 2
CONNECTIONS.... 3
Connecting to line output (pin jack) terminals of the amplifier 3
Plug in the subwoofer to the AC outlet.... 3
ADJUSTING THE SUBWOOFER BEFORE USE.... 3
Frequency characteristic.... 3
ADVANCED YAMAHA ACTIVE SERVO
TECHNOLOGY II.... 4
TROUBLESHOOTING.... 4
SPECIFICATIONS.... 5
ES
- This subwoofer employs Advanced Yamaha Active Servo Technology II, which Yamaha has developed for the production of higher quality, super-bass sound. (Refer to page 4 for details on Advanced Yamaha Active Servo Technology II.) This super-bass sound adds a more realistic, theater-in-the-home effect to your audio system.
- This subwoofer can be easily added to your existing audio system by connecting to either the speaker terminals or the line output (pin jack) terminals of the amplifier.
- This subwoofer system is equipped with a linear port unique to Yamaha that provides smooth bass response during playback, minimizing extraneous noise not included in the original input signal.
SUPPLIED ACCESSORIES
After unpacking, check that the following parts are contained.
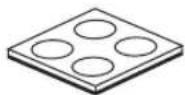
Non-skid pads
ATTACHING THE NON- SKID PADS
To enjoy the high sound quality, stabilize the subwoofer using the non-skid pads.
Attach the provided non-skid pads in the four corners of the underside of the subwoofer to prevent the subwoofer from moving as a result of vibration, etc.

PLACEMENT
A
![graph TD A["Square"] --> B["Arrow to bottom"] C["Square"] --> D["Arrow to top"] E["Square"] --> F["Arrow to bottom"]](/content/2026/06/1283394/images/25d597772a89a51255a9eee52ce9725cf084b0aa246eaafc72819d132621c54e.jpg)
B
![graph TD A[" "] --> C[" "] B[" "] --> C[" "]](/content/2026/06/1283394/images/fdb39f681f78d7faa69a3cb02eeb6695429f8d4ddab0ff0a3e44b4e3336087ed.jpg)
( : subwoofer, : front speaker)
The subwoofer will have a good effect on your audio system.
Using the subwoofer, it is recommended to place it on the outside of either the right or the left front speaker. (See fig. A.) The placement shown in fig. B also possible, however, if the subwoofer system is placed directly facing the wall, the bass effect may suffer due to cancellation of direct and reflected sounds. To prevent this from happening, place the subwoofer system at an angle, as in fig. A
Note
There may be a case that you cannot obtain enough super-bass sounds from the subwoofer when listening in the center of the room. This is because “standing waves” have developed between two parallel walls and cancel the bass sounds.
In such a case, place the subwoofer at an oblique angle to the wall. It also may be necessary to break up the parallel surfaces by placing bookshelves, etc. along the walls.
CONTROLS AND THEIR FUNCTIONS
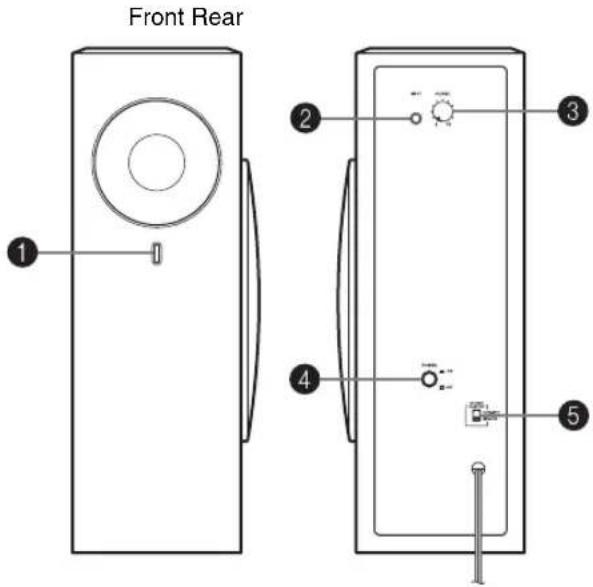
① Power indicator
Lights up Green when the POWER switch is turned ON; turns off when the POWER switch is turned OFF.
② INPUT (FROM AMPLIFIER) terminal
Used to connect the subwoofer with the subwoofer terminal of the amplifier. (Refer to "CONNECTIONS" for details.)
③ VOLUME control
Adjusts the volume level. Turn the control clockwise to increase the volume, and counterclockwise to decrease the volume.
④ POWER switch
Press this switch to the ON position to turn on the power to the subwoofer. Press this switch again to set it to the OFF position to turn off the power of the subwoofer.
⑤ VOLTAGE SELECTOR switch
(Asia and General models only)
If the preset setting of the switch is incorrect, set the switch to the proper voltage (110-120/220-240V) of your area.
Consult your dealer if you are unsure of the correct setting.
WARNING
Be sure to unplug the subwoofer before setting the VOLTAGE SELECTOR switch correctly.
CONNECTIONS
Caution: Unplug the subwoofer and other audio/video components before making connections.
Connecting to line output (pin jack) terminals of the amplifier
To connect to an amplifier (or AV receiver), connect the SUBWOOFER terminal on the rear of the amplifier (or AV receiver) to the INPUT terminal of the subwoofer.
Amplifier (The rear panel of various amplifiers may differ in appearance.)

Plug in the subwoofer to the AC outlet
After all connections are completed, plug the subwoofer and other audio/video components into AC outlets.

ADJUSTING THE SUBWOOFER BEFORE USE
Before using the subwoofer, adjust the subwoofer to obtain the optimum volume balance between the subwoofer and the front speakers by following the procedure described below.

1 Set the VOLUME control to minimum (0).
2 Turn on the power of all the other components.
3 Make sure that the POWER switch is set to the ON position.
* The Power indicator lights up in green.
4 Play a source containing low-frequency components and adjust the amplifier's volume control to the desired listening level.
5 Increase the volume gradually to adjust the volume balance between the subwoofer and the front speakers. To enjoy natural bass sound, keep the subwoofer volume at a level where it is barely distinguishable from other speakers.
6 Adjust the volume of the entire sound system using the amplifier's volume control.
Note
It is recommended to set the VOLUME control about in the middle position when using in a multi channel home theater system.

Frequency characteristic
This subwoofer's frequency characteristic
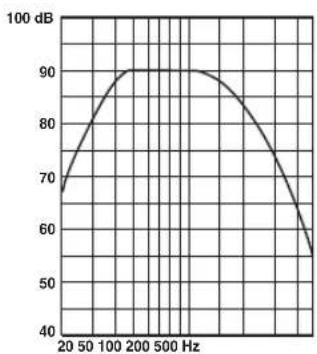
* This diagram does not depict actual frequency response characteristics.
ADVANCED YAMAHA ACTIVE SERVO TECHNOLOGY II
In 1988, Yamaha brought to the marketplace speaker systems utilizing YST (Yamaha Active Servo Technology) to give powerful, high quality bass reproduction. This technique uses a direct connection between the amplifier and speaker, allowing accurate signal transmission and precise speaker control.
As this technology uses speaker units controlled by the negative impedance drive of the amplifier and resonance generated between the speaker cabinet volume and port, it creates more resonant energy (the “air woofer” concept) than the standard bass reflex method. This allows for bass reproduction from much smaller cabinets than was previously possible.
Yamaha's newly developed Advanced YST II adds many refinements to Yamaha Active Servo Technology, allowing better control of the forces driving the amplifier and speaker. From the amplifier's point of view, the speaker impedance changes depending on the sound frequency. Yamaha developed a new circuit design combining negative-impedance and constant-current drives, which provides a more stable performance and clear bass reproduction, without any murkiness.
![graph TD A["High-amplitude bass sound"] --> B["Cabinet"] B --> C["Air woofer (Helmholtz resonator)"] C --> D["Port"] D --> E["Advanced impedance Converter"] E --> F["Active Servo Processing Amplifier"] F --> G["Signals"] F --> H["Signals of low amplitude"]](/content/2026/06/1283394/images/5382f81a01b866e065e6c93a5028890b71e3c2aa0db49c5be4d4d5f37e65e4a9.jpg)
TROUBLESHOOTING
Refer to the chart below if this unit does not function properly. If the problem you are experiencing is not listed below, or if the instructions given below do not help, disconnect the power cord and contact an authorized YAMAHA dealer or service center.
| Problem Cause What to Do | ||
| Power is not supplied even though the POWER switch is set to the ON position. | The power plug is not securely connected. | Connect it securely. |
| No sound. The volume is set to minimum. | Raise the volume up. | |
| Speaker cables are not connected securely. | Connect them securely. | |
| Sound level is too low. A source sound with little bass frequency content is being played. | Play a source sound with bass frequencies. | |
| It is influenced by standing waves. Reposition the subwoofer or break up parallel surfaces by placing bookshelves, etc., along the walls. | ||
SPECIFICATIONS
Type .....Advanced Yamaha Active Servo Technology II
Driver....16 cm (6.5") cone woofer Magnetic shielding type
Amplifier Output (100 Hz, 5 ohms, 10% THD) 50 W
Frequency Response.... 30 Hz - 160 Hz
Power Supply
USA and Canada models....AC 120V, 60 Hz U.K. and Europe models ....AC 230V, 50 Hz Australia model ....AC 240V, 50 Hz China model ....AC 220V, 50 Hz Korea model ....AC 220V, 60 Hz Asia and General models .....AC 110-120/220-240 V, 50/60 Hz
Power Consumption 40 W
Dimensions (W × H × D) 166 mm × 450 mm × 366 mm (6-9/16" × 17-3/4" × 14-7/16")
Weight 10 kg (22 lbs. 1 oz.)
Please note that all specifications are subject to change without notice.
Taking care of the subwoofer
- When you wipe this unit, do not use chemical solvents (e.g., alcohol or thinners, etc.): this might damage the finish. Use a clean, dry cloth. For difficult soils, dampen a soft cloth in water, wring it out, and then wipe with the cloth.
- (For polish-finished model) Bumping the surface of the instrument with metal, porcelain, or other hard objects can cause the finish to crack or peel. Use caution.
Limited Guarantee for European Economic Area (EEA) and Switzerland
Thank you for having chosen a Yamaha product. In the unlikely event that your Yamaha product needs guarantee service, please contact the dealer from whom it was purchased. If you experience any difficulty, please contact Yamaha representative office in your country. You can find full details on our website (http://www.yamaha-hifi.com/ or http://www.yamaha-uk.com/ for U.K. resident).
The product is guaranteed to be free from defects in workmanship or materials for a period of two years from the date of the original purchase. Yamaha undertakes, subject to the conditions listed below, to have the faulty product or any part(s) repaired, or replaced at Yamaha's discretion, without any charge for parts or labour. Yamaha reserves the right to replace a product with that of a similar kind and/or value and condition, where a model has been discontinued or is considered uneconomic to repair.
Conditions
- The original invoice or sales receipt (showing date of purchase, product code and dealer's name) MUST accompany the defective product, along with a statement detailing the fault. In the absence of this clear proof of purchase, Yamaha reserves the right to refuse to provide free of charge service and the product may be returned at the customer's expense.
- The product MUST have been purchased from an AUTHORISED Yamaha dealer within the European Economic Area (EEA) or Switzerland.
- The product must not have been the subject of any modifications or alterations, unless authorised in writing by Yamaha.
- The following are excluded from this guarantee:
a. Periodic maintenance and repair or replacement of parts due to normal wear and tear.
b. Damage resulting from:
(1) Repairs performed by the customer himself or by an unauthorised third party.
(2) Inadequate packaging or mishandling, when the product is in transit from the customer. Please note that it is the customer's responsibility to ensure the product is adequately packaged when returning the product for repair.
(3) Misuse, including but not limited to (a) failure to use the product for its normal purpose or in accordance with Yamaha's instructions on the proper use, maintenance and storage, and (b) installation or use of the product in a manner inconsistent with the technical or safety standards in force in the country where it is used.
(4) Accidents, lightning, water, fire, improper ventilation, battery leakage or any cause beyond Yamaha's control.
(5) Defects of the system into which this product is incorporated and/or incompatibility with third party products.
(6) Use of a product imported into the EEA and/or Switzerland, not by Yamaha, where that product does not conform to the technical or safety standards of the country of use and/or to the standard specification of a product sold by Yamaha in the EEA and/or Switzerland.
(7) Non AV (Audio Visual) related products.
(Products subject to “Yamaha AV Guarantee Statement” are defined in our website at http://www.yamaha-hifi.com/ or http://www.yamaha-uk.com/ for U.K. resident.)
-
Where the guarantee differs between the country of purchase and the country of use of the product, the guarantee of the country of use shall apply.
-
Yamaha may not be held responsible for any losses or damages, whether direct, consequential or otherwise, save for the repair or replacement of the product.
-
Please backup any custom settings or data, as Yamaha may not be held responsible for any alteration or loss to such settings or data.
-
This guarantee does not affect the consumer's statutory rights under applicable national laws in force or the consumer's rights against the dealer arising from their sales/purchase contract.
-
Where the guarantee differs between the country of purchase and the country of use of the product, the guarantee of the country of use shall apply.
- Yamaha may not be held responsible for any losses or damages, whether direct, consequential or otherwise, save for the repair or replacement of the product.
- Please backup any custom settings or data, as Yamaha may not be held responsible for any alteration or loss to such settings or data.
- This guarantee does not affect the consumer's statutory rights under applicable national laws in force or the consumer's rights against the dealer arising from their sales/purchase contract.
ACCESSOIRES FOURNIS.... 1
FIXATION DES PATINS ANTIDÉRAPANTS .... 1
DISPOSITION 2
PRÉSENTATION DES COMMANDES ET DE LEURS FONCTIONS .... 2
BRANCHEMENTS 3
DISPOSITION
A
![graph TD A["Square"] --> B["Arrow to bottom"] C["Square"] --> D["Arrow to top"] E["Square"] --> F["Arrow to bottom"]](/content/2026/06/1283394/images/732d16638fee8f1200924a7b5fbb21c1f8e80673981e2ce2876abc1514bb8764.jpg)
B
![graph TD A[" "] --> C[" "] B[" "] --> C[" "]](/content/2026/06/1283394/images/7ede3e8ee326ee6c755030eecc47e5056da3c6a79b0446830c8b00cb21896650.jpg)
Type .....Technologie Advanced Yamaha Active Servo II
PLATZIERUNG
A
![graph TD A["Square"] --> B["Arrow to bottom"] C["Square"] --> D["Arrow to top"] E["Square"] --> F["Arrow to bottom"]](/content/2026/06/1283394/images/08c09c218d7dea5ca7ff0155f6e2b8c0c380bd11ca5ef6b8d68515166b090c06.jpg)
B
![graph TD A[" "] --> C[" "] B[" "] --> C[" "]](/content/2026/06/1283394/images/7e7bd5433475090931d8a73acdeecf3952f63e3073af1620b620fab1c7c23c79.jpg)
( : Subwoofer, : Frontlautsprecher)
① Netzanzeige
JUSTERING AV SUBWOOFERHÖGTALAREN INNAN
BRUK....3
PLACERING
A
![graph TD A["Square"] --> B["Arrow to bottom"] C["Square"] --> D["Arrow to top"] E["Square"] --> F["Arrow to bottom"]](/content/2026/06/1283394/images/3e50984a16d95fcb765aca237005d012172e3fa8ac6063c91dea34d3b183dd6f.jpg)
B
![graph TD A[" "] --> C[" "] B[" "] --> C[" "]](/content/2026/06/1283394/images/b253e0a70c8ef002ee24854186a250e542130b6e3a470949a25a6167fd349717.jpg)
① Driftindikator
JUSTERING AV SUBWOOFERHÖGTALAR EN INNAN BRUK
POSIZIONAMENTO
A
![graph TD A["Square"] --> B["Arrow to bottom"] C["Square"] --> D["Arrow to top"] E["Square"] --> F["Arrow to bottom"]](/content/2026/06/1283394/images/c7977bd38c07519af94a48eb4faa250af8cc4d3740d9ecf71e12016497c3cc4b.jpg)
B
![graph TD A[" "] --> C[" "] B[" "] --> C[" "]](/content/2026/06/1283394/images/8c5ed36838aea5f15707872e18d8b05e8caed8c6797f072192d50ed8555552c8.jpg)
Dimensioni (L × A × P) .....166 mm × 450 mm × 366 mm
Peso....10 kg
UBICACIÓN
A
![graph TD A["Square"] --> B["Arrow to bottom"] C["Square"] --> D["Arrow to top"] E["Square"] --> F["Arrow to bottom"]](/content/2026/06/1283394/images/8e26f1b19f93fdac0189ab7a4ca633ba9079acd8b5ffd21159fc4d2729fde114.jpg)
B
![graph TD A[" "] --> C[" "] B[" "] --> C[" "]](/content/2026/06/1283394/images/d0b2172e9cdb55398b308708b5a5975300f2186aff7669c25e01c6d4a23cea03.jpg)
( : altavoz de ultragraves, : altavoz delantero)
OPSTELLING
A
![graph TD A["Square"] --> B["Arrow to bottom"] C["Square"] --> D["Arrow to top"] E["Square"] --> F["Arrow to bottom"]](/content/2026/06/1283394/images/2f2d57f6d85ccb263fd1e471f9f9c34a6f68852cd0b25d23d14bb1511e7bce50.jpg)
B
![graph TD A[" "] --> B[" "] C[" "] --> B[" "] D[" "] --> B[" "]](/content/2026/06/1283394/images/0361a9b4465298c72e35535bdcaef448b1dc0cd3bd369dde14eb1866aa28c613.jpg)
① Spanningsindicator
Type .....Advanced Yamaha Active Servo Technology II
Driver....Conuswoofer van 16 cm Type: magnetische afscherming
Uitgangsvermogen versterker (100 Hz, 5 ohm, 10% THD) ....50 W
Frequentieweergave 30 Hz - 160 Hz
Spanningsvereisten
РАЗМЕЩЕНИЕ
A
![graph TD A["Square"] --> B["Arrow to bottom"] C["Square"] --> D["Arrow to top"] E["Square"] --> F["Arrow to bottom"]](/content/2026/06/1283394/images/78d0c474537dffc3a960e37288d56255a97249240f00258161382ff91f6b9ec3.jpg)
B
![graph TD A[" "] --> C[" "] B[" "] --> C[" "]](/content/2026/06/1283394/images/0640556948dcb2b5b5a4fd99b8ebf44e277689d29989f35f06875876f73b1a29.jpg)
① Индикатор питания
- CAUTION: READ THIS BEFORE OPERATING YOUR UNIT
- WARNING
- VOLTAGE SELECTOR
- FOR U.K. CUSTOMERS
- SPECIAL INSTRUCTIONS FOR U.K. MODEL
- IMPORTANT
- FOR CANADIAN CUSTOMERS
- INFORMATION FOR USERS ON COLLECTION AND DISPOSAL OF OLD EQUIPMENT
- CONTENTS FEATUI
- ES
- SUPPLIED ACCESSORIES
- ATTACHING THE NON- SKID PADS
- PLACEMENT
- NOTE
- CONTROLS AND THEIR FUNCTIONS
- CONNECTIONS
- CONNECTING TO LINE OUTPUT (PIN JACK) TERMINALS OF THE AMPLIFIER
- PLUG IN THE SUBWOOFER TO THE AC OUTLET
- ADJUSTING THE SUBWOOFER BEFORE USE
- FREQUENCY CHARACTERISTIC
- ADVANCED YAMAHA ACTIVE SERVO TECHNOLOGY II
- TROUBLESHOOTING
- SPECIFICATIONS
- POWER SUPPLY
- TAKING CARE OF THE SUBWOOFER
- LIMITED GUARANTEE FOR EUROPEAN ECONOMIC AREA (EEA) AND SWITZERLAND
- CONDITIONS
- DISPOSITION
- PLATZIERUNG
- ① NETZANZEIGE
- PLACERING
- JUSTERING AV SUBWOOFERHÖGTALAR EN INNAN BRUK
- POSIZIONAMENTO
- UBICACIÓN
- OPSTELLING
- SPANNINGSVEREISTEN
- РАЗМЕЩЕНИЕ
Brand : YAMAHA
Model : NS-SW210
Category : Loudspeaker