
Centrika 177 - Juicer ARIETE - Free user manual and instructions
Find the device manual for free Centrika 177 ARIETE in PDF.


| Type | Centrifugal juicer |
| Model | Centrika 177 |
| Brand | Ariete |
| Power Consumption | 800 W |
| RPM | 12000 rpm |
| Capacity | 1.5 L pulp container, 1 L juice jug |
| Dimensions | 30 x 25 x 35 cm |
| Weight | 3.5 kg |
| Cord Length | 1.2 m |
| Material | Stainless steel blade, plastic body |
| Speed Settings | 2 speeds (low/high) |
| Pulp Ejection | Automatic |
| Anti-Drip Function | Yes |
| Safety Lock | Yes, arm lock |
| Non-Slip Feet | Yes |
| Dishwasher Safe Parts | Yes (excluding motor base) |
| Cleaning Brush Included | Yes |
| Spare Parts Availability | Yes, through Ariete service |
| Warranty | 2 years |
Frequently Asked Questions - Centrika 177 ARIETE
User questions about Centrika 177 ARIETE
0 question about this device. Answer the ones you know or ask your own.
Ask a new question about this device
Download the instructions for your Juicer in PDF format for free! Find your manual Centrika 177 - ARIETE and take your electronic device back in hand. On this page are published all the documents necessary for the use of your device. Centrika 177 by ARIETE.
USER MANUAL Centrika 177 ARIETE
natural_image
Line drawing of a modern kitchen blender with handle and side blades (no text or symbols)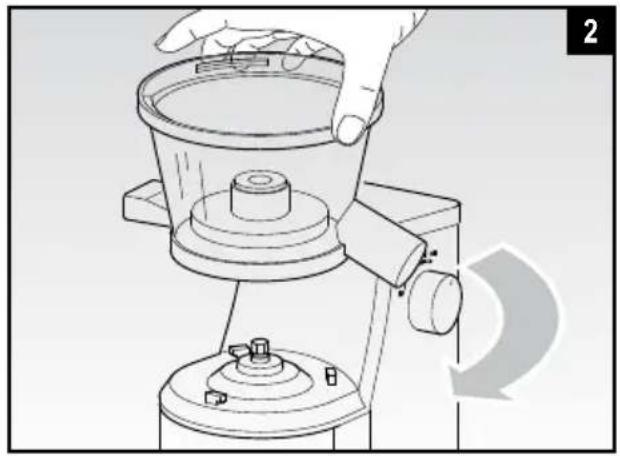
natural_image
Line drawing of a hand operating a microscope with a curved arrow indicating rotation (no text or symbols)

natural_image
Illustration of a kitchen blender with a hand placing it down, showing internal components and a close-up view (no text or symbols)
natural_image
Illustration of a hand pouring liquid into a mechanical component (no text or symbols)
natural_image
Line drawing of a hand operating a mechanical device with a handle and base mount (no text or symbols)
natural_image
Line drawing of a blender with a side cup and handle, no text or symbols present
natural_image
Line drawing of a kitchen brush and blender with no text or symbols
natural_image
Technical line drawing of a mechanical component with a highlighted section and arrow (no text or symbols)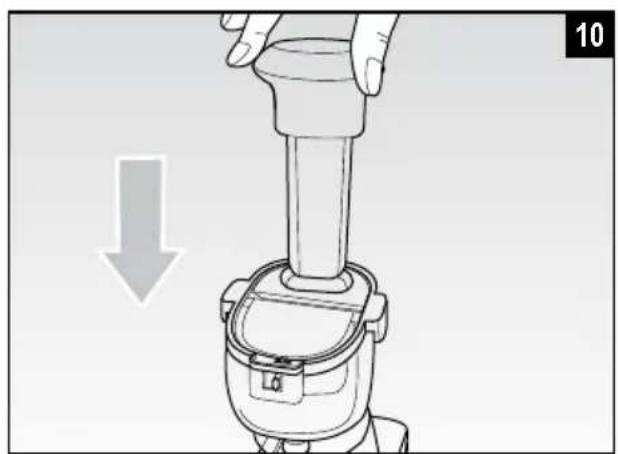
natural_image
Illustration of a hand holding a cylindrical device with a downward arrow indicating compression or disassembly (no text or symbols present)SIMBOLOGIA
The information in this manual is marked as follows:
| SYMBOL | DESCRIPTION |
 | HAZARD for children |
 | Electrical HAZARD |
 | HAZARD from other causes |
 | CAUTION possible damage to materials |
IMPORTANT SAFEGUARDS
READ THESE INSTRUCTIONS BEFORE USE.
DO NOT THROW AWAY THESE INSTRUCTIONS
This appliance conforms to the directives 2006/95/EC and EMC 2004/108/EC, and to the regulations (EC) No. 1935/2004 of 27/10/2004 regarding material in contact with foods.

HAZARD for children

Appliances can be used by persons with reduced physical, sensory or mental capabilities or lack of experience and knowledge if they have been given supervision or instruction concerning use of the appliance in a safe way and if they understand the hazards involved.
This appliance shall not be used by children. Keep the appliance and its cord out of reach of children.
Children shall not play with the appliance.
In the event that you decide to dispose of the appliance, we advise you to make it • inoperative by cutting off the power cord. We also recommend that any parts that could be dangerous be rendered harmless, especially for children, who may play with the appliance or its parts.
Packaging must never be left within the reach of children since it is potentially - dangerous.

- To dispose of product correctly according to European Directive 2009/96/CE, please refer to and read the provided leaflet enclosed with the product.

Electrical HAZARD

Make sure that the voltage on the appliance rating plate corresponds to that of the • mains electricity.
- Never leave the appliance unattended when connected to the power supply; unplug it after every use.
Always make sure that your hands are thoroughly dry before using or adjusting the • switches on the appliance, or before touching the power plug or power connections.
Even when the appliance is not operating, unplug it from the power socket and • wait for moving parts to stop before inserting or removing individual parts or before cleaning.
The appliance is not designed for continuous operation. Allow the motor to cool down • after 2 minutes of uninterrupted operation.
Do not allow the power cord to dangle from the edge of the table or work surface. • Never place the power cord or the appliance on hot surfaces.
If using extension cords, they need to be suitable for the power of the appliance so as to prevent risks to the operator and for the safety of the environment. Unsuitable extension cords may lead to operating anomalies.

HAZARD from other causes

Never place the appliance on or close to sources of heat.
Always place the appliance on a flat, level surface during use.
Never leave the appliance exposed to the elements (rain, sun, etc....).
• Make sure that the power cord does not come into contact with hot surfaces.
- Never use the appliance in any way other than that described in this manual.
The juicer extracts juice from soft and peeled fruit and vegetables. Do not use the • appliance for crushing other foods such as chocolate, ice cubes, nuts, etc.
- Peel fruit with thick or non-edible skin (melons, mangos, kiwis, etc. ...).
Before proceeding to use the juicer, remove all stones and large seeds from the •
fruit (oranges, peaches, apricots, plums, cherries, etc...).
Fruit and vegetables need to be washed with care.
Never touch parts when they are moving and never place hands or kitchen utensils • inside the filling chute. Only use the special pusher (A).
Always use the pusher (A) to push the food into the juicer: never use fingers.
NEVER PLACE THE APPLIANCE BODY, PLUG OR POWER CORD IN WATER • OR OTHER LIQUIDS; ALWAYS WIPE CLEAN WITH A DAMP CLOTH.
Never use the appliance if the power cord or plug are damaged or if the appliance • itself is faulty; in this case, take it to your nearest Authorised Assistance Centre.
All repairs, including the replacement of the power cord must only be performed by the Ariete Assistance Centre or by Ariete authorised technicians so as to prevent all risks.
This appliance is designed for HOME USE ONLY and may not be used for commercial or industrial purposes.

CAUTION possible damage to materials

Never use the appliance if the filter (B) is damaged.
The use of non-original parts or parts which are not recommended by the manu-facturer can compromise the safety and performance of this appliance.
To unplug the appliance, grip the plug and remove it directly from the power socket. • Never pull the power cord to unplug the appliance.
Any changes to this product that have not been expressly authorised by the manu-facturer may lead to the user's guarantee being rendered null and void.
DESCRIPTION OF THE APPLIANCE
A Presser
B Lid with "apple chute"
C Pressing screw
D Filter
E Filter support
F Bowl
G Juice dispense with closure cap
H I-O-C dial
I Juice container
L Brush
B Motor base
N Pulp container
O Pulp ejecting spout
OPERATING INSTRUCTIONS
Appliance assembly
WARNING: After having removed the appliance from its package, before using it for the first time, thoroughly wash all parts that will come into contact with food using water and mild soap.
Put the motor base (M) onto a stable, flat surface. Make sure the surface is easily accessible.
Place the bowl (F) onto the base (M) and rotate it clockwise until a click is heard (Fig. 2).
Put the filter holder (E) into the bowl (F) (Fig. 3).
- Insert the filter (D) into the corresponding filter holder (E), making sure the two references on the bowl (F) and on the filter itself (D) are aligned (Fig. 4).
Put the pressing screw (C) inside the filter (D), by rotating it until it is properly positioned in the filter (Fig. 5).
- Position the lid (B) onto the bowl (F) by ensuring it is properly inserted on the upper pin of the pressing screw (C). Rotate it anti-clockwise so that the side tab fits perfectly in the corresponding motor base slot (M) (Fig. 6).
Put the container (I) underneath the juice dispensing spout (G) (Fig. 7).
Place the pulp container (N) underneath the ejecting spout (O) (Fig. 8).
Open the top door of the apple chute on the lid (B) through the apposite lever (Fig. 9).
- Put the food previously prepared into the apple chute on the lid (B) and position the food presser (A) close to the corresponding housing (Fig. 10). According to personal requirements, insert whole fruit or vegetable with proper dimensions into the apple chute (B). Close the top door through the apposite lever (Fig. 9).

WARNING: The filter (D) has small sharp blades for chopping food. Be careful not to get hurt while removing or cleaning the filter.

WARNING: Should the lid (B) and the bowl (F) be mounted improperly, the juicer does not start. In this case the motor does not run, even though the switching on dial (H) is in "I" position. Make sure all components are properly mounted before use.
Switching on
Plug in appliance.
- Position the switching on dial (H) to "I". The motor start running. Open the cap on the juice dispensing spout (O).
- Let the food presser (A) slide in the corresponding housing on the lid (B) and slightly press to bring food towards the filter (D). Do not put too much food into the appliance and do not excessively press on the food presser (A).
By rotating the switching on dial (H) to “C”, the motor changes the direction of rotation for a better juice extraction.

WARNING: Do not quickly rotate the switching on dial (H) from "I" to "", but remain in "O" position for few seconds.

WARNING: This appliance is not designed to work in a continuous mode. Let the motor cool down after 2 minutes of continuous functioning.
- Once having processed the first load of food, repeat the above steps to make some other juice, otherwise remove the container.
- To make sure the appliance goes on working properly, prevent the pulp container (N) from being overfilled. Empty the container, if necessary:
√ Switch the appliance off, by bringing the switching on dial (H) to "O", and then unplug it.
√ Carefully remove the pulp container (N) from under the related spout (O).
√ Carefully empty the pulp container (N) and place it back under the related spout (O).
NOTE: To make pulp container cleaning easier (N), put a plastic bag into the container itself. This operation is also useful to prevent the pulp from splashing out of the container rim.
- After use, switch the appliance off, close the cap on the juice dispensing spout (G), disconnect the power plug and remove the container (I) to serve the juice.
- Keep the juice in the fridge by covering the container (I).

WARNING: Use the juice in the fridge within 24 hours.
• Clean immediately after use
USE TIPS
It is recommended to always use fresh fruit and vegetable.
- Try to mix different kinds of fruit, e.g. apples, pears, oranges, pineapples, or vegetables, as tomatoes, celery, carrots, to obtain delicious and nourishing juices.
- When squeezing not very juicy fruit (e.g. banana), alternate with juicy fruit or vegetables to make extraction easier.
- In case of long herbs (e.g. wheat herb), cut them into 3 cm. long pieces to prevent them from twisting around the screw. In case of frozen fruit, completely defrost it in advance.
- In case of big amount of juice, it can be kept in the fridge in a close container but, as it contains no preservatives, consume it within 24 hours.

ATTENTION: The appliance is equipped with a motor protection system which switches it off after few minutes of continuous operation. When this interruption occurs, put the dial back to 0 and unplug the appliance to reset it. After few minutes (at least 5), plug the machine in again and restart it.
CLEANING AND MAINTENANCE
- To start preparing another juice, it is possible to clean the appliance quickly, when it is working, by pouring water into the lid (B), after having positioned a suitable container underneath the juice dispenser (G).
- After use, proceed with cleaning by removing all components, carrying out the assembly instruction above described in reverse order.

WARNING: Should the bowl (F) be locked and cannot be removed from the motor base (M), rotate the switching on dial (H) to "○" by keeping it in this position for 3-5 seconds. Repeat these steps 2-3 times. Remove the bowl (F) by rotating it anticlockwise.
Use a clean and soft cloth only for cleaning the motor base (M).
The components may be cleaned using warm water and any dish detergent.
- It is recommended indeed to clean the stainless steel filter (D) under running water using the appropriate brush (L) supplied. Do not damage it.

WARNING: In order to make filter cleaning easier, after use, let it immersed in warm water with a little dish detergent for 10 minutes.

WARNING: Never put the motor base (M) or all components in the dishwasher.
ATTENTION: After cleaning, let it completely dry before mounting.
SYMBOLES
O Bec expulsion pulpe
MODE D'EMPLOI
BESCHRIJVING VAN HET APPARAAT
A Persje
- SIMBOLOGIA
- IMPORTANT SAFEGUARDS
- READ THESE INSTRUCTIONS BEFORE USE.
- DO NOT THROW AWAY THESE INSTRUCTIONS
- HAZARD for children
- Electrical HAZARD
- HAZARD from other causes
- CAUTION possible damage to materials
- DESCRIPTION OF THE APPLIANCE
- OPERATING INSTRUCTIONS
- Appliance assembly
- Switching on
- USE TIPS
- CLEANING AND MAINTENANCE
- SYMBOLES
- MODE D'EMPLOI
- BESCHRIJVING VAN HET APPARAAT
Brand : ARIETE
Model : Centrika 177
Category : Juicer