
PowerTouch PT877 - Razor PHILIPS - Free user manual and instructions
Find the device manual for free PowerTouch PT877 PHILIPS in PDF.


| Product Type | Electric Razor |
| Brand | Philips |
| Model | PowerTouch PT877 |
| Cutting Technology | Rotary Blades |
| Number of Heads | 3 floating heads |
| Shaving System | PowerTouch with micro-grooves |
| Height Adjustment | Adjustment wheel (5 positions) |
| Battery Type | Lithium-ion |
| Battery Life | 45 minutes |
| Charging Time | 1 hour |
| Quick Charge | Yes (5 minutes for a shave) |
| Charge Indicator | 3-level LED |
| Wet/Dry Use | Washable under water |
| Cleaning | Rinse under running water |
| Dimensions (L x W x H) | 15 x 5 x 3 cm |
| Weight | 200 g |
| Power Supply | Rechargeable via mains adapter |
| Package Contents | Razor, adapter, cleaning brush, storage case |
| Spare Parts Available | Shaving heads and replacement blades |
| Warranty | 2 years |
Frequently Asked Questions - PowerTouch PT877 PHILIPS
User questions about PowerTouch PT877 PHILIPS
0 question about this device. Answer the ones you know or ask your own.
Ask a new question about this device
Download the instructions for your Razor in PDF format for free! Find your manual PowerTouch PT877 - PHILIPS and take your electronic device back in hand. On this page are published all the documents necessary for the use of your device. PowerTouch PT877 by PHILIPS.
USER MANUAL PowerTouch PT877 PHILIPS
Always here to help you
Register your product and get support at
www.philips.com/welcome


natural_image
Close-up of a Philips electric shaver with three rotary dials and a red handle (no text or symbols visible)PT927
PT927CC
PT925
PT923
PT923CC
PT920
PT877
PT876
PT875
PT870
User manual
PHILIPS

natural_image
Simple line drawing of an open book with a grid layout and an arrow pointing to the page (no text or symbols)
ENGLISH 6
DANSK 22
DEUTSCH 39
ΕΛΛΗΝΙΚΑ 56
ESPAÑOL 74
SUOMI 91
FRANÇAIS 108
ITALIANO 125
NEDERLANDS 142
NORSK 159
PORTUGUÊS 176
SVENSKA 193
TÜRKÇE 210
Introduction
Congratulations on your purchase and welcome to Philips! To fully benefit from the support that Philips offers, register your product at www.philips.com/welcome.
Please read this user manual, as it contains information about the wonderful features of this shaver as well as some tips to make shaving easier and more enjoyable.
General description (Fig. 1)
A Shaver
1 Protection cap
2 Shaving unit
3 Shaving unit release button
4 Trimmer
5 Trimmer release slide
6 Shaver on/off button
7 Shaving head symbol
8 Battery symbol
B Charging stand (PT927/PT925/PT923/PT920/PT876/PT875 only)
C Adapter
D Jet Clean System (PT927CC/PT923CC only)
1 Locking lever
2 Shaver holder
3 Cleaning chamber release button
4 Jet Clean System on/off button
5 Cleaning symbol and 'fluid low' symbol
6 Battery symbol
E Jet Clean solution (HQ200)
F Cleaning brush
G Storage pouch (PT927CC/PT927/PT925/PT923CC/PT920/PT876 only)
Note: You can find the type number on the back of the shaver.
Important
Read this user manual carefully before you use the shaver, the Jet Clean System (PT927CC/PT923CC only) and the charging stand (PT927/PT925/PT923/PT920/PT876/PT875 only). Save the user manual for future reference.
Danger
- Keep the adapter dry.
Warning
- The adapter contains a transformer. Do not cut off the adapter to replace it with another plug, as this causes a hazardous situation.
- The shaver and the Jet Clean System are not intended for use by persons (including children) with reduced physical, sensory or mental capabilities, or lack of experience and knowledge, unless they have been given supervision or instruction concerning use of these appliances by a person responsible for their safety.

natural_image
No sign depicting a faucet with a diagonal line and a diagonal line, indicating no restrictions or absence of any other symbols.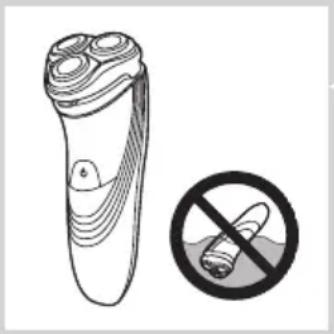
natural_image
Illustration of a pair of electric shakers with a prohibition symbol (no text or labels)
- .Children should be supervised to ensure that they do not play with the shaver and the Jet Clean System.
- Always unplug the shaver before you clean it under the tap.
Caution
- Never immerse the shaver in water.
- Never immerse the Jet Clean System or the charging stand in water nor rinse it under the tap.
- Do not use the shaver in the bath or in the shower.
- Never use water hotter than 80^ C to rinse the shaver.
- Be careful with hot water. Always check if the water is not too hot, to prevent your hands from getting burnt.
- The shaver, the Jet Clean System, the charging stand and the other accessories are not dishwasher-proof.
- Water may leak from the socket at the bottom of the shaver when you rinse it. This is normal and not dangerous because all electronics are enclosed in a sealed power unit inside the shaver.
- Do not use the shaver, Jet Clean System, adapter, charging stand or any other part if it is damaged, as this may cause injury. Always replace a damaged adapter, charging stand or part with one of the original type.
- Use, charge and store the shaver and the Jet Clean System at a temperature between 10^ C and 35^ C.
- Always place and use the shaver and the Jet Clean System on a surface that is fluid-resistant.
- Only use the adapter, charging stand and accessories supplied.
- Always put the protection cap on the shaver to prevent damage and to avoid dirt accumulation in the shaving heads.
- Only use the Jet Clean System with the original Jet Clean solution (HQ200).
- Always place the Jet Clean System on a stable, level and horizontal surface to prevent leakage.
- When the Jet Clean System is ready for use, do not move it to prevent leakage.
- The Jet Clean System thoroughly cleans but does not disinfect your shaver, therefore do not share the shaver with others.
- Empty the cleaning chamber of the Jet Clean System and clean the cleaning chamber thoroughly by rinsing it with hot tap water every 15 days.
- If the shaver and the Jet Clean System are subjected to a major change in temperature, pressure or humidity, let them acclimatise for 30 minutes before you use them.

natural_image
Simple black-and-white icon of a faucet with raindrops (no text or symbols)Compliance with standards
- This Philips appliance complies with all applicable standards and regulations regarding exposure to electromagnetic fields (EMF) can be safely cleaned under the tap.
General
- The appliance is equipped with an automatic voltage selector and is suitable for mains voltages ranging from 100 to 240 volts.
- The adapter transforms 100-240 volts to a safe low voltage of less than 24 volts.
Charging
It takes approx. 1 hour to fully charge the shaver.
When you charge the shaver for the first time or after a long period of disuse, let it charge until the white battery lights up continuously. A fully charged shaver provides up to 60 (PT927CC/PT927/ PT925/PT923/PT923CC/PT920) or 50 shaving minutes (PT877/PT876/PT875/PT870). The shaving time may be less than 60(PT927CC/PT927/PT925/PT923/PT923CC/PT920) or 50 shaving minutes (PT877/PT876/PT875/PT870) as a result of your shaving behaviour, your cleaning habits or your beard type.
Charge indications

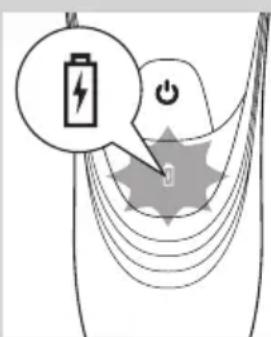
Battery low
- When the battery is almost empty (when there are only 5 or fewer shaving minutes left), the battery light starts to flash orange.
- When you switch off the shaver, the battery light continues to flash orange for a few seconds.
Quick charging
- When you start charging the empty battery, the battery light flashes white and orange.
Note: When the battery light flashes white and orange towards only white, you can have a quick shave of three minutes.
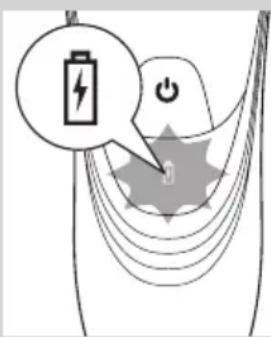
Charging
- When the shaver is charging, the battery light flashes white.
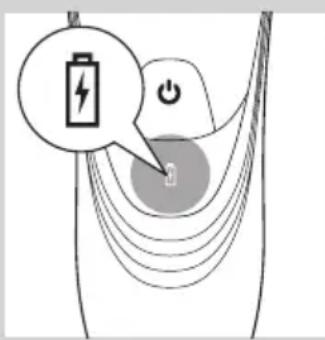
Battery fully charged
- When the battery is fully charged, the battery light lights up white continuously.
Note: After approx. 30 minutes, the battery light goes out to save energy.
Charging with the adapter
Do not charge the shaver in a closed pouch (PT927CC/PT927/PT925/PT923CC/PT923/PT920/PT877 only).
1 Put the small plug in the shaver.
2 Put the adapter in the wall socket.
The battery symbol show the charging status of the shaver (see section ‘Charge indications’ in this chapter).
Charging in the charging stand (PT927/PT925/PT923/PT920/PT876/PT875 only)

natural_image
Close-up of a handheld electronic device with a black arrow pointing to a circular base labeled 'Neu' and 'R', no text or symbols present.1 Put the small plug in the charging stand.
2 Put the adapter in the wall socket.
3 Place the shaver in the charging stand.
The battery symbol show the charging status of the shaver (see section ‘Charge indications’ in this chapter).
Charging in the Jet Clean System (PT927CC/PT923CC only)

natural_image
Illustration of a hand holding a plug inserted into a device component (no text or symbols visible)1 Put the small plug in the Jet Clean System.
2 Put the adapter in the wall socket.
3 Place the shaver without protection cap upside down in the shaver holder.
Note: The shaver cannot be placed in the Jet Clean System when the protection cap is on the shaving unit.

natural_image
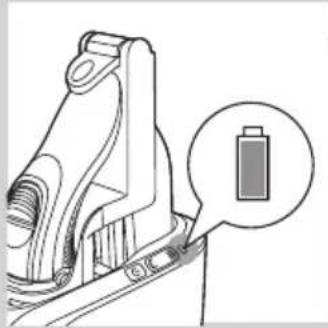
Diagram of a mechanical device with a battery icon and lightning bolt symbol (no text or labels)4 Push down the locking lever completely to lock the shaver into place.
The battery symbol on the Jet Clean System flashes to indicate that the shaver is being charged.
Note: When the Jet Clean System is performing the cleaning program, the battery symbol is out.
natural_image
Technical line drawing of a mechanical component with a magnified inset showing a battery symbol (no text or labels)When the battery is fully charged, the battery symbol on the Jet Clean System lights up continuously.
Note: After approx. 30 minutes, the battery symbol goes out to save energy.

natural_image
Illustration of two hand-painted mechanical components, one being cut with a black arrow and the other holding a tool (no text or symbols)5 To remove the shaver from the Jet Clean System, move the locking lever upwards until it does not go any further and remove the shaver.
Using the shaver
Note: You can also use the appliance directly from the mains. Simply connect the shaver to the mains.
Shaving

natural_image
Illustration of a person using a handheld device to clean another's face (no text or symbols present)1 Press the on/off button once to switch on the shaver.
2 Move the shaving heads over your skin. Make circular movements.
- Your skin may need 2 or 3 weeks to get accustomed to the Philips shaving system.
3 Press the on/off button once to switch off the shaver.
4 Clean the shaver (see chapter 'Cleaning and maintenance').
Trimming
You can use the trimmer to groom your sideburns and moustache.
1 Press the on/off button once to switch on the shaver.

natural_image
Diagram of a hairbrush with black arrows indicating direction (no text or symbols)2 Push the trimmer slide downwards to open the trimmer. ▶You can now start trimming.

natural_image
Diagram of a device being inserted into a component, showing a tool and arrow indicating direction (no text or symbols present)3 After trimming, close the trimmer and switch off the shaver.
Cleaning and maintenance
Never use compressed air, scouring pads, abrasive cleaning agents or aggressive liquids such as petrol or acetone to clean the shaver, the charging stand (PT927/PT925/PT923/PT920/PT876/PT875 only) and the Jet Clean System (PT927CC/PT923CC only).
- The best and most hygienic way to clean the shaver is in the Jet Clean System (PT927CC/PT923CC only). You can also rinse the shaver under the tap or clean it with the cleaning brush supplied.
- Clean the shaver after every shave for optimal shaving performance.
- Regular cleaning guarantees better shaving performance.
- For the best cleaning results, we advise you to use the Philips Cleaning spray (HQ110) and (PT927CC/PT923CC only) the Jet Clean solution (HQ200).
- Be careful with hot water. Always check if the water is not too hot, to prevent your hands from getting burnt.
Note: Water may leak from the socket at the bottom of the shaver when you rinse it. This is normal and not dangerous because all electronics are enclosed in a sealed power unit inside the shaver.
Cleaning the shaving unit under the tap

natural_image
Illustration of a mechanical assembly with arrows indicating direction (no text or symbols)1 Switch off the shaver and disconnect it from the mains.
2 Press the release button to open the shaving unit.
3 Rinse the shaving unit and hair chamber under a hot tap for 30 seconds.
Be careful with hot water. Always check if the water is not too hot, to prevent your hands from getting burnt.
ENGLISH ^12

natural_image
Diagram of a medical procedure showing fluid flow through a tube into a cross-sectional view (no text or labels)- Rinse the hair chamber and the inside of the shaving unit.

natural_image
Illustration of a medical procedure showing fluid flow from a bottle into a patient's foot (no text or symbols)- Rinse the outside of the shaving unit.
4 Close the shaving unit and shake off excess water.
Be careful not to hit the shaving unit against anything while shaking off excess water.
Never dry the shaving unit and the hair chamber with a towel or tissue, as this may damage the shaving heads and the coupling spindles.
5 Open the shaving unit again and leave it open to let the shaver dry completely.
Cleaning the shaving unit with the cleaning brush
natural_image
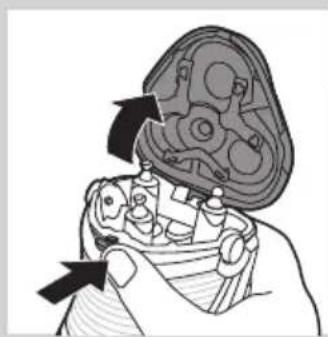
Diagram of a mechanical assembly with arrows indicating direction (no text or symbols present)1 Switch off the shaver and disconnect it from the mains.
2 Press the release button to open the shaving unit.

natural_image
Diagram of a mechanical component with an arrow indicating upward motion (no text or symbols present)3 Pull the shaving unit off the shaver.

4 Turn the lock anticlockwise (A) and remove the retaining frame (B).

natural_image
Illustration of a hand holding a tray with three circular objects and upward arrows, no text or symbols present.5 Remove and clean one shaving head at a time. Each shaving head consists of a cutter and a guard.
Note: Do not clean more than one cutter and guard at a time, since they are all matching sets. If you accidentally mix up the cutters and guards, it may take several weeks before optimal shaving performance is restored.
- Remove the cutter from the shaving guard and clean it with the brush.

natural_image
Illustration of two hands using a tool to clean a mechanical component, with no visible text or symbols.- Clean the inside and outside of the shaving guard with the brush.
6 Put the shaving heads back into the shaving unit.

natural_image
Illustration showing a hand holding a container with a checkmark and a checkmark on a surface, alongside a molecular model (no text or symbols present)Note: Make sure that the projections of the shaving heads fit exactly into the recesses.
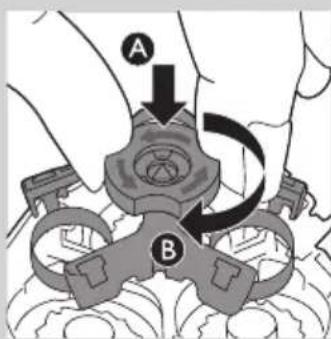
7 Put the retaining frame back into the shaving unit (A) and turn the lock clockwise (B).

natural_image
Diagram showing two views of a mechanical component with arrows indicating direction (no text or symbols)8 Insert the lug of the shaving unit into the slot in the top of the shaver. Then close the shaving unit.
Note: If the shaving unit does not close smoothly, check if you have inserted the shaving heads properly and if the retaining frame is locked.
Cleaning the shaving unit in the Jet Clean System (PT927CC/PT923CC only)
The Jet Clean System cleans the shaving unit.
Preparing the Jet Clean System for use
Note: Fill the cleaning chamber before first use and when the 'fluid low' symbol flashes to indicate that the fluid level is too low. When the fluid level drops below the minimum level, the cleaning symbol and the 'fluid low' symbol start to flash and the shaver holder returns to its starting position

natural_image
Line drawing of a soap dispenser with water level indicators (no text or symbols)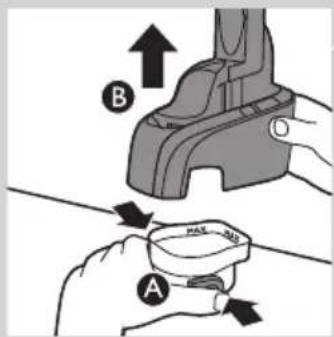
natural_image
Illustration of hands using a tool to remove or apply a small bowl, with no text or symbols present.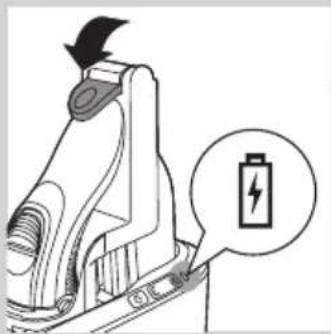
natural_image
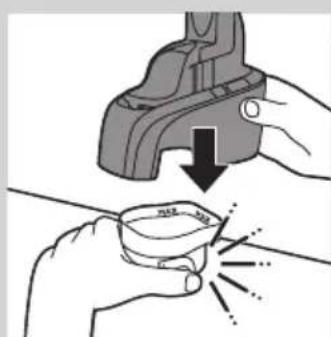
Diagram of a battery charger with an arrow indicating direction and a battery icon (no text or symbols)1 Simultaneously press the release buttons on both sides of the cleaning chamber (A). Then lift the Jet Clean System off the cleaning chamber (B).
The cleaning chamber remains behind.
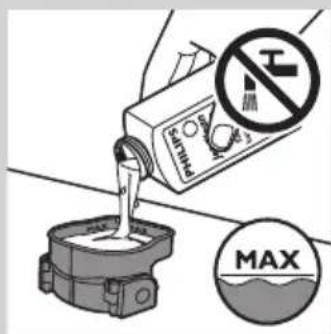
2 Unscrew the cap from the bottle with Jet Clean solution (HQ200) and remove the airtight seal.
3 Fill the cleaning chamber with Jet Clean solution (HQ200) up to the MAX indication.
Note: Make sure the cleaning chamber is always filled above the MIN indication.
4 Place the Jet Clean System back onto the cleaning chamber ('click'). Make sure that the release buttons snap back into place.
When the cleaning chamber is filled with Jet Clean solution, do not move it to prevent leakage.
5 Put the small plug in the Jet Clean System and put the adapter in the wall socket.
The shaver holder automatically moves to its highest position. The Jet Clean System is now ready for use.
Using the Jet Clean System
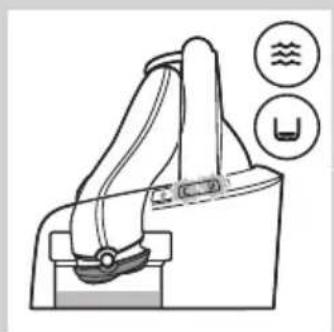
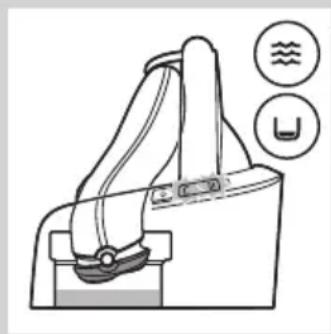
1 Place the shaver without protection cap upside down in the shaver holder. Push down the locking lever completely to lock the shaver into place.
The battery symbol on the Jet Clean System goes on to indicate that the shaver is being charged.
Note: The shaver cannot be placed in the Jet Clean System when the protection cap is on the shaving unit.

natural_image
Diagram of a robotic arm with a power button and arrow indicating action (no text or symbols present)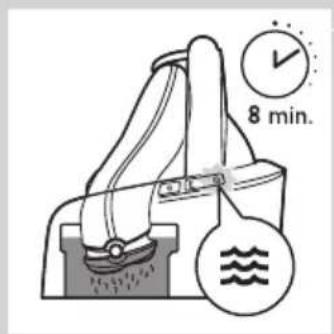
natural_image
Diagram of a mechanical device with labeled parts and symbols (no readable text or labels)

natural_image
Illustration of a hand holding a small object with a curved handle, no text or symbols present2 Press the on/off button on the Jet Clean System to start the cleaning program.
The battery symbol on the Jet Clean System goes out.
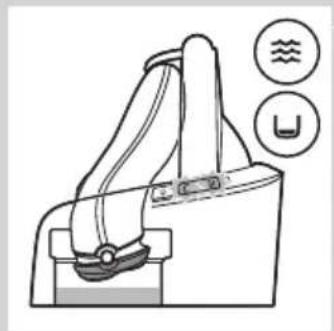
During the cleaning program, the cleaning symbol starts to flash and the shaver is automatically lowered into the cleaning fluid.
The shaver automatically switches on and off several times and moves up and down.
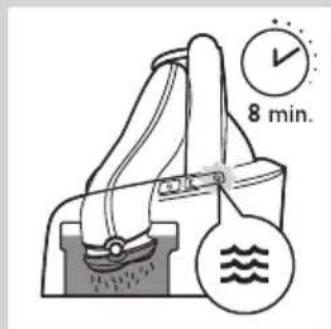
The cleaning symbol flashes throughout the cleaning program, which takes approx. 8 minutes.
After the cleaning program, the battery symbol on the Jet Clean System goes on to indicate that the shaver is being charged.
Note: If you press the on/off button of the Jet Clean System during the cleaning program, the program aborts and resets. In this case, the cleaning stops flashing and the shaver holder returns to its starting position. The shaver may still be wet and dirty, because the cleaning program has not been finished.
Note: If you remove the adapter from the wall socket during the cleaning program, the program aborts. The shaver holder remains in its current position. When you put the adapter back into the wall socket, the shaver holder moves to its highest position.
Note: When the fluid level drops below the minimum level, the cleaning symbol and the 'fluid low' symbol start to flash with intervals and the shaver holder returns to its starting position
Cleaning the Jet Clean System
Empty the cleaning chamber and clean it thoroughly by rinsing it with hot tap water every 15 days if you use the Jet Clean System daily. Otherwise empty and clean the cleaning chamber at least once a month.
1 Clean the outside of the Jet Clean System with a moist cloth.
Never immerse the Jet Clean System in water, nor rinse it under the tap.
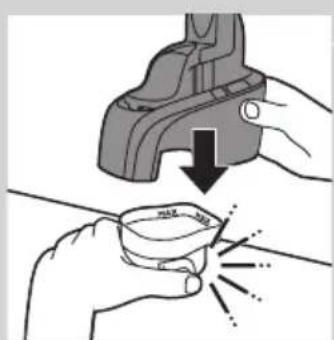
2 Simultaneously press the release buttons on both sides of the Jet Clean System (A). Then lift the Jet Clean System off the cleaning chamber (B).
The cleaning chamber remains behind.
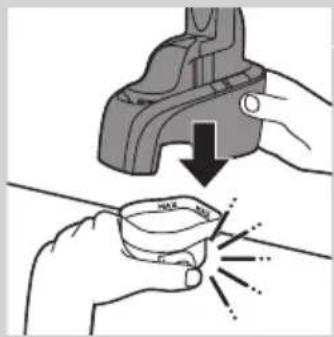
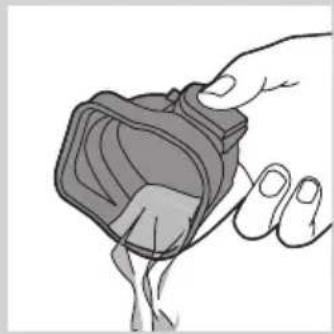
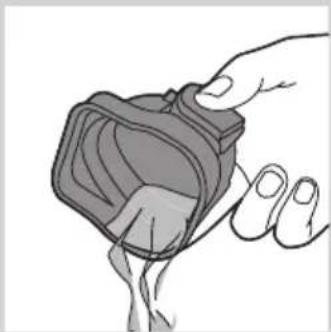
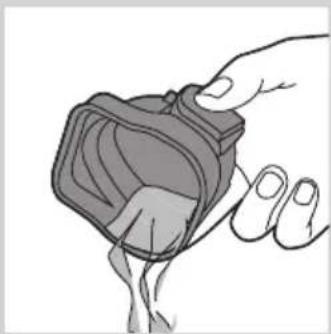
3 Pour any remaining cleaning fluid out of the cleaning chamber.
You can simply pour the cleaning fluid down the sink, this is not harmful to the environment.
4 Rinse the cleaning chamber under a hot tap.
Be careful with hot water. Always check if the water is not too hot, to prevent your hands from getting burnt.
The cleaning chamber is not dishwasher-proof.

5 Fill the cleaning chamber with Jet Clean solution (HQ200) up to the MAX indication.
Note: Make sure the cleaning chamber is always filled above the MIN indication.
natural_image
Illustration of hands using a tool to lift a cup, showing motion and impact (no text or symbols)6 Place the Jet Clean System back onto the cleaning chamber ('click'). Make sure that the release buttons snap back into place.
Cleaning the trimmer with the cleaning brush

natural_image
Diagram of a hairdryer with a brush and lever mechanism (no text or symbols)Clean the trimmer every time you have used it.
1 Switch off the shaver and disconnect it from the mains.
2 Push the trimmer slide downwards to open the trimmer.
natural_image
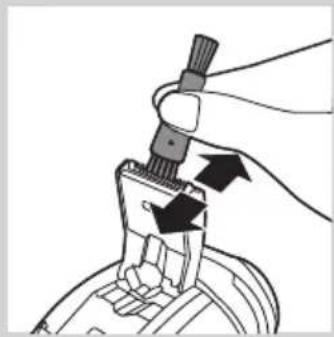
Illustration of a hand using a tool to adjust or install a component, with arrows indicating motion (no text or symbols present)3 Clean the trimmer with the short-bristled side of the cleaning brush. Brush up and down along the trimmer teeth.
4 Close the trimmer ('click').

Tip: For optimal trimming performance, lubricate the trimmer teeth with a drop of sewing machine oil every six months.
Storage

natural_image
Diagram of a hand turning a circular component into a base, showing three concentric rings and a top hat (no text or symbols)There are several ways to store the shaver or to take it with you when you travel:
- Put the protection cap on the shaver after use to prevent damage and to avoid dirt accumulation in the shaving heads.
- Store the shaver in the pouch supplied (PT927CC/PT927/PT925/PT923CC/PT923/PT920/PT876 only).
- Store the shaver in the charging stand (PT927/PT923/PT920/PT876/PT875 only).
- Put the shaver in the Jet Clean System (PT927CC/PT923CC only). Make sure the protection cap is not on the shaving unit.
Note: If you do not want the shaver to charge while it is stored it in the Jet Clean System, just leave the locking lever in upright position.
Replacement

natural_image
Diagram of a hairbrush with a circular icon highlighting the inner shell (no text or symbols present)For maximum shaving performance, we advise you to replace the shaving heads every two years.
Replacement reminder
The shaving head symbol will light up to indicate that the shaving heads need to be replaced. Replace damaged shaving heads right away. Only replace the shaving heads with original HQ9 Philips Shaving Heads (PT927CC/PT927/PT925/PT923CC/PT923/PT920) or HQ8 Philips Shaving Heads (PT877/PT876/PT875/PT870).

natural_image
Illustration of a hand holding a mechanical component with arrows indicating movement (no text or symbols)1 The shaving head symbol lights up orange continuously.
2 Switch off the shaver. Disconnect the shaver from the mains and remove it from the Jet Clean System (PT927CC/PT923CC).
3 Press the release button to open the shaving unit.
4 Pull the shaving unit off the shaver.
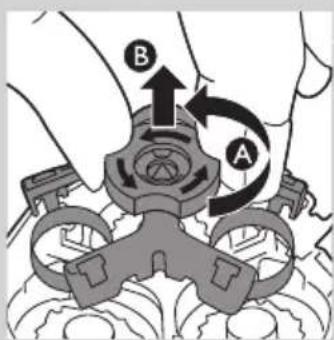
5 Turn the lock anticlockwise (A) and remove the retaining frame (B).
6 Remove the shaving heads and place new ones in the shaving unit.

natural_image
Illustration showing a hand holding a tray with food items, alongside a molecular structure with checkmark indicators (no text or symbols)Note: Make sure that the projections of the shaving heads fit exactly into the recesses.
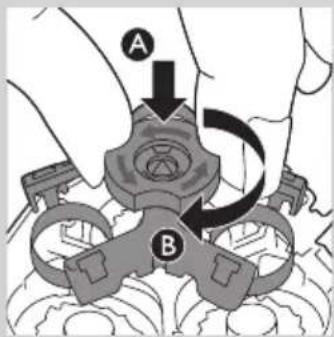
7 Put the retaining frame back into the shaving unit (A) and turn the lock clockwise (B).

natural_image
Diagram showing two mechanical components with arrows indicating movement or assembly (no text or symbols)8 Insert the lug of the new shaving unit into the slot in the top of the shaver. Then close the shaving unit.

Note: If the shaving unit does not close smoothly, check if you have inserted the shaving heads properly and if the retaining frame is locked.
9 Press and hold the on/off button for 5 seconds to reset the replacement reminder on the shaver. The orange light goes out.
Ordering accessories
To retain the top performance of your shaver, make sure you clean it regularly and replace its shaving heads at the recommended time.

Shaving heads
- We advise you to replace your shaving heads every two years. Always replace with HQ9 Philips Shaving Heads (PT927CC/PT927/PT925/PT923CC/PT923/PT920) or HQ8 Philips Shaving Heads (PT877/PT876/PT875/PT870).
Cleaning
- PT927CC/PT923CC only: use Jet Clean solution (HQ200) for regular cleaning of the shaving heads.
- Use Cleaning spray (HQ110) to clean the shaving heads thoroughly.
Environment

natural_image
Symbol of a waste bin with crossed lines indicating no waste, and a solid black rectangle below (no text or labels)- Do not throw away the shaver and the Jet Clean System (PT927CC/PT923CC only) with the normal household waste at the end of their life, but hand them in at an official collection point for recycling. By doing this, you help to preserve the environment.
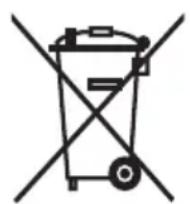
- The built-in rechargeable shaver battery contains substances that may pollute the environment. Always remove the battery before you discard or hand in the shaver at an official collection point. Dispose of the battery at an official collection point for batteries. If you have trouble removing the battery, you can also take the appliance to a Philips service centre. The staff of this centre will remove the battery for you and will dispose of it in an environmentally safe way.
Removing the rechargeable shaver battery
Only remove the rechargeable battery when you discard the shaver. Make sure the rechargeable battery is completely empty when you remove it.
1 Disconnect the shaver from the mains, remove it from the Jet Clean System (specific types only) or remove it from the charging stand (specific types only).
2 Let the shaver operate until it stops.
3 Undo the screws in the back of the shaver and in the hair chamber.
4 Remove the front panel and the back panel.
5 Bend the 6 hooks aside and take out the power unit.
Be careful, the hooks are sharp.
6 Remove the battery.
Be careful, the battery strips are sharp.
Do not put the shaver back into the plugged-in Jet Clean System (specific types only) or charging stand (specific types only) after you have removed the rechargeable battery.
Do not connect the shaver to the mains again after you have removed the rechargeable battery.
Guarantee and support
If you need information or support, please visit www.philips.com/support or read the worldwide guarantee leaflet.
Guarantee restrictions
The shaving heads (cutters and guards) are not covered by the terms of the international guarantee because they are subject to wear.
Troubleshooting
This chapter summarises the most common problems you could encounter with the appliance. If you are unable to solve the problem with the information below, visit www.philips.com/support for a list of frequently asked questions or contact the Consumer Care Centre in your country.
Problem Possible cause Solution
| The shaver does not shave as well as it used to. | The Jet Clean System (PT927CC/PT923CC only) has not cleaned the shaver properly because the cleaning fluid in the cleaning chamber is soiled or the cleaning fluid level is too low. | Clean the shaver thoroughly before you continue shaving. If necessary, clean and refill the cleaning chamber (see chapter ‘Cleaning and maintenance’). |
| The shaving heads are damaged or worn. | Replace the shaving heads (see chapter ‘Replacement’). | |
| Long hairs obstruct the shaving heads. | Clean the shaving heads one by one (see section ‘Cleaning the shaving unit with the cleaning brush’ in chapter ‘Cleaning and maintenance’). | |
| You have not inserted the shaving heads properly. | Make sure that the projections of the shaving heads fit exactly into the recesses (see section ‘Cleaning and maintenance’). | |
| The shaver does not work when I press the on/off button. | The rechargeable battery is empty. | Recharge the battery (see chapter ‘Charging’) or connect the shaver to the mains. |
Problem Possible cause Solution
| The temperature of the shaver is too high. In this case, the shaver does not work. | As soon as the temperature of the shaver has dropped sufficiently, you can switch on the shaver again. | |
| The shaver is not entirely clean after I clean it in the Jet Clean System (PT927CC/PT923CC only). | The cleaning fluid in the cleaning chamber is soiled. | Empty and rinse the cleaning chamber (see chapter ‘Cleaning and maintenance’). |
| The cleaning fluid level is too low. If the fluid volume in the cleaning chamber drops below the minimum level during the cleaning program, the program aborts.The cleaning symbol and the ‘fluid low’ symbol flash at intervals and the holder returns to its starting position. | Refill the cleaning chamber with cleaning fluid up to the MAX level (see chapter ‘Cleaning and maintenance’). | |
| You have used another cleaning fluid than the original Philips cleaning fluid. | Only use Jet Clean solution HQ200. | |
| You have not closed the locking lever of the Jet Clean System properly, or you have not placed the shaver in the Jet Clean Shaver properly. In these cases the Jet Clean System starts to operate, but the cleaning program is not performed properly. | Place the shaver without protection cap in the Jet Clean System properly. Close the locking lever properly. | |
| The Jet Clean System (PT927CC/PT923CC only) does not work when I press the on/off button. | The Jet Clean System is not connected to the mains. | Put the small plug in the Jet Clean System and put the adapter in the wall socket. |
| Water leaks from the shaver after cleaning. | This is normal and not dangerous. During rinsing some water may collect between the power unit and the housing. After rinsing this water flows out through the socket. The power unit is completely watertight so water cannot reach the electronic parts of the shaver. Your shaver continues to be absolutely safe. | |
Introduktion
natural_image
Prohibition sign showing a faucet crossed out by a diagonal line, indicating no leakage or disinfection (no text present)
natural_image
Illustration of a pair of electric shakers with a prohibition symbol (no text or labels)natural_image
Prohibition sign with a faucet and diagonal line, no text or symbols presentnatural_image
Simple black-and-white icon of a faucet with raindrops (no text or symbols)Lavt batteriniveau
Opladning

natural_image
Close-up of a handheld electronic device with a black arrow pointing to a circular base labeled 'Neu' and 'TUS', no readable text or symbols beyond labels.natural_image
Illustration of a hand holding a plug inserted into a device (no text or symbols visible)natural_image
Diagram of a mechanical device with a battery icon and directional arrow, no text or symbols presentnatural_image
Technical line drawing of a mechanical component with a magnified inset showing a battery symbol (no text or labels)natural_image
Illustration of two hand-painted tool tips on a diagonal line, showing mechanical assembly (no text or symbols)natural_image
Illustration of a person using a handheld device to clean another (no text or symbols present)natural_image
Diagram of a hairbrush with a brush and handle, showing internal components (no text or symbols)natural_image
Diagram of a hand using a tool to adjust or install a device component, with arrows indicating the process (no text or symbols present)natural_image
Illustration of a hand holding a mechanical component with arrows indicating movement or force (no text or symbols present)natural_image
Diagram of a medical procedure showing fluid flow through a tube into a cross-sectional view (no text or labels)natural_image
Illustration of a medical procedure showing fluid flow from a bottle onto a patient's foot (no text or symbols)natural_image
Illustration of a hand holding a mechanical component with arrows indicating direction (no text or symbols)natural_image
Diagram of a mechanical component with an arrow indicating direction, showing internal structure and assembly (no text or symbols)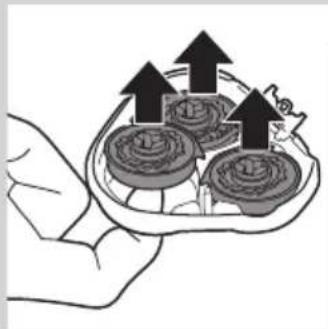
natural_image
Illustration of a hand holding a tray with three round food items and upward arrows, no text or symbols present.
natural_image
Illustration of two hands using a tool to adjust a mechanical component, no text or symbols present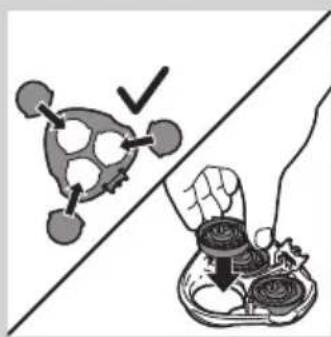
natural_image
Illustration showing a molecular structure with a checkmark and a hand holding a tray of food items (no text or symbols)
natural_image
Diagram showing two mechanical components with arrows indicating motion, no text or symbols presentnatural_image
Diagram of a mechanical device with labeled parts and icons (no readable text or symbols)natural_image
Illustration of hands using a tool to lift a cup, showing motion and shading (no text or symbols)natural_image
Diagram of a battery charger mechanism with a lightning bolt symbol (no text or labels)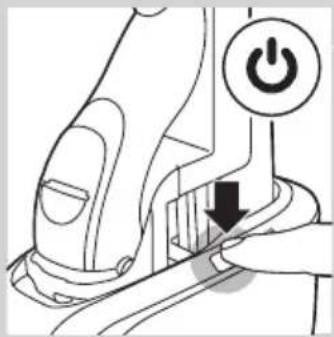

natural_image
Line drawing of a handbag with buttons and icons (no text or symbols)natural_image
Illustration of a hand holding a small object with a curved handle, no text or symbols presentnatural_image
Illustration of hands using a tool to lift a cup, showing motion and shading (no text or symbols)natural_image
Diagram of a hairdryer with black arrows indicating direction (no text or symbols)natural_image
Illustration of a hand holding a tool with arrows indicating motion or force (no text or symbols)natural_image
Diagram of a hand turning a three-pin electric shaver with a top handle (no text or symbols)natural_image
Illustration of a hand holding a three-pin electric shaver with a circular diagram highlighting the blade (no text or symbols present)natural_image
Illustration of a hand holding a mechanical component with arrows indicating movement (no text or symbols)natural_image
Diagram showing two views of a mechanical component with arrows indicating direction (no text or symbols)
natural_image
Symbol of a trash bin with crossed lines indicating no waste or discharge, and a solid black rectangle below (no text or labels)
natural_image
Prohibition sign showing a faucet without a shower, enclosed in a circle (no text or symbols)
natural_image
Illustration of a pair of electric shakers with a prohibition symbol (no text or labels)
natural_image
Simple black-and-white icon of a faucet with raindrops (no text or symbols)Normerfüllung
Akku fast leer
Schnelles Aufladen
Laden
natural_image
Close-up of a handheld electronic device with a black arrow pointing to a circular base labeled 'Neu' and 'R', no text or symbols present.natural_image
Illustration of a hand holding a tool interacting with a mechanical component (no text or symbols visible)natural_image
Diagram of a battery holder with an arrow indicating direction and a battery icon (no text or symbols)natural_image
Technical line drawing of a mechanical component with a magnified inset showing a battery (no text or symbols present)natural_image
Two mechanical clamps performing a tool manipulation operation, showing hand positioning and tool movement (no text or symbols)natural_image
Illustration of a person using a handheld device to clean another's face (no text or symbols present)natural_image
Diagram of a hairbrush with a scroll wheel and directional arrows indicating motion (no text or symbols)natural_image
Diagram of a hand using a tool to adjust or install a device component, with arrows indicating the process (no text or symbols present)natural_image
Diagram of a mechanical assembly with arrows indicating direction (no text or symbols present)natural_image
Diagram of a medical procedure showing fluid flow through a tube into a device (no text or labels)natural_image
Illustration of a mechanical device pouring liquid into a container (no text or symbols)natural_image
Diagram of a mechanical assembly with arrows indicating direction (no text or symbols present)natural_image
Diagram of a mechanical component with an arrow indicating upward motion, no text or symbols presentnatural_image
Illustration of a hand holding a tray with three circular objects and upward arrows, no text or symbols present.natural_image
Illustration of two hands using a pipette to clean a mechanical component, no text or symbols present
natural_image
Illustration showing a molecular structure with a checkmark and a hand holding coins (no text or symbols present)natural_image
Diagram showing two views of a mechanical component with arrows indicating direction (no text or symbols)natural_image
Diagram of a washing machine handle with water level indicators (no text or symbols)natural_image
Illustration of hands using a tool to lift a cup, with a magnifying glass nearby (no text or symbols)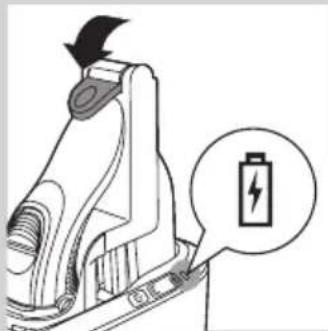
natural_image
Diagram of a mechanical device with a battery icon and arrow indicating direction (no text or symbols)
natural_image
Diagram of a mechanical device with a power button and arrow indicating action (no text or symbols present)
natural_image
Diagram of a hand pump mechanism with water level indicators (no text or symbols)
natural_image
Illustration of a hand holding a small object, possibly a device or container, with no visible text or symbols.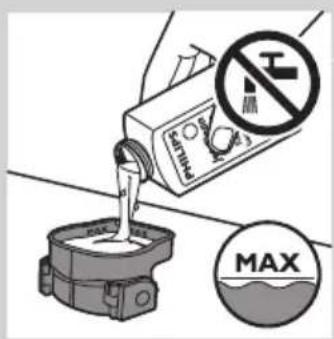

natural_image
Illustration of hands using a tool to lift a cup, showing motion and impact (no text or symbols)natural_image
Diagram of a hairbrush with directional arrows indicating movement or operation (no text or symbols present)natural_image
Illustration of a hand holding a tool with arrows indicating motion or force (no text or symbols)natural_image
Diagram of a hand turning a leaf with three circular cutouts, showing mechanical components (no text or symbols)Ersatz
natural_image
Diagram of a hairbrush with a circular icon highlighting the innermost ring (no text or symbols present)
natural_image
Illustration of a hand holding a mechanical component with arrows indicating movement (no text or symbols)

natural_image
Illustration of a hand holding a tray with food items, separated by a diagonal line (no text or symbols)
natural_image
Diagram showing two views of a mechanical component with arrows indicating direction (no text or symbols)
natural_image
Symbol of a waste bin with crossed lines indicating no waste, and a solid black rectangle below (no text or labels)natural_image
Prohibition sign showing a faucet crossed out by a diagonal line, indicating no leakage or disinfection (no text present)
natural_image
Illustration of a pair of electric shakers with a prohibition symbol (no text or labels)
natural_image
Prohibition sign showing a faucet crossed out by a diagonal line, indicating no fire or water discharge (no text present)Κίνδυνος
natural_image
Simple black-and-white icon of a faucet with raindrops, no text or symbols present.Γρήγορη φόρτιση
Φόρτιση
natural_image
Close-up of a medical device with a black arrow pointing to a circular component labeled 'Hearl' (no text or symbols on the device itself)natural_image
Illustration of a hand inserting a plug into a device component (no text or symbols visible)natural_image
Diagram of a battery charger with an arrow indicating direction and a battery icon (no text or symbols)natural_image
Technical line drawing of a mechanical component with a magnified inset showing a battery (no text or symbols)natural_image
Illustration of two hand-painted tool holders performing a manual operation, no text or symbols presentnatural_image
Illustration of a person using a handheld device to clean another (no text or symbols present)natural_image
Diagram of a hairdryer with arrows indicating direction (no text or symbols)natural_image
Diagram of a hand using a tool to adjust or install a device component, with no visible text or symbols.natural_image
Illustration of a hand holding a mechanical component with arrows indicating assembly or movement (no text or symbols present)
natural_image
Diagram of a medical procedure showing fluid flow from a pipette into a device (no text or labels)natural_image
Illustration of a mechanical device emitting white ribbons into a textured surface (no text or symbols)natural_image
Illustration of a hand holding a mechanical component with arrows indicating assembly or repair (no text or symbols present)natural_image
Diagram of a mechanical component with an arrow indicating direction, showing internal structure without any text or symbols.natural_image
Illustration of a hand holding a tray with three round objects and upward arrows, no text or symbols present.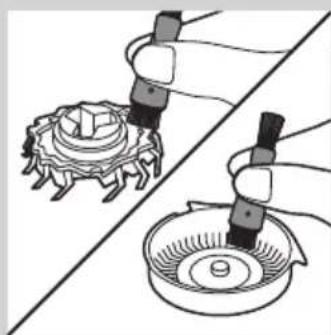
natural_image
Illustration of two hands using a tool to lift a mechanical component, no text or symbols present
natural_image
Illustration showing a molecular structure with a checkmark and a hand holding a container (no text or symbols present)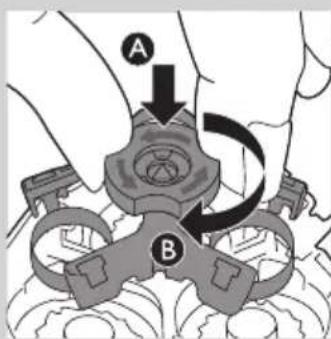

natural_image
Diagram showing two views of a mechanical component with arrows indicating direction (no text or symbols)natural_image
Diagram of a mechanical device with two circular indicators (no text or symbols)natural_image
Illustration of hands using a tool to lift a small bowl with a downward arrow, no text or symbols presentnatural_image
Diagram of a battery charging mechanism with an arrow indicating direction and a battery icon (no text or symbols)

natural_image
Line drawing of a handbag with straps and buttons, no text or symbols present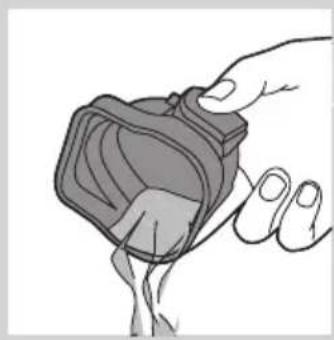
natural_image
Illustration of a hand holding a small object with layered texture (no text or symbols)
natural_image
Illustration showing hands using a tool to lift a small bowl with a downward arrow, no text or symbols present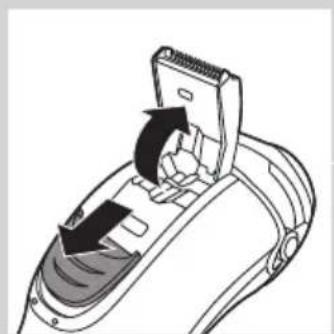
natural_image
Diagram of a hairdryer with a brush and lever mechanism (no text or symbols)natural_image
Illustration of a hand inserting a plug into a connector (no text or symbols)natural_image
Diagram of a hand turning a three-pin electric shaver (no text or symbols)natural_image
Illustration of a hand holding a small electric shaver with a magnified inset showing the internal mechanism (no text or symbols)natural_image
Illustration of a hand holding a mechanical component with arrows indicating movement (no text or symbols)natural_image
Illustration of a food safety concept with a hand holding a bowl and a checkmark over a turtle (no text or symbols)natural_image
Diagram showing two views of a medical device with internal components and arrows indicating movement (no text or labels)natural_image
Symbol of a waste bin with crossed lines indicating no waste, and a solid black rectangle below (no text or labels)natural_image
Prohibition sign of a faucet without any text or symbols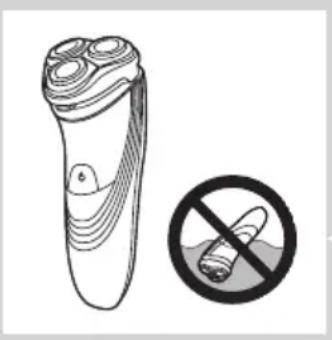
natural_image
Illustration of a pair of electric shakers with a prohibition symbol (no text or labels)
natural_image
No smoking sign with faucet symbol (no text or numbers)natural_image
Simple black-and-white icon of a faucet with raindrops (no text or symbols)Batería baja
Carga rápida
Carga
natural_image
Illustration of a handheld device with a downward arrow pointing to a spherical base (no text or symbols)natural_image
Illustration of a hand inserting a plug into a device component (no text or symbols visible)
natural_image
Diagram of a battery charger with a lightning bolt symbol and a magnified view of its battery (no text or labels present)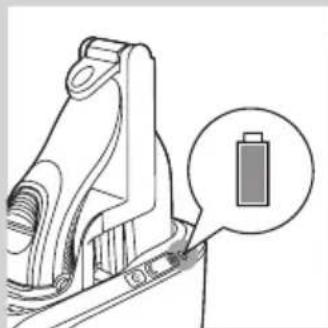
natural_image
Technical line drawing of a mechanical component with a magnified inset showing a battery (no text or symbols)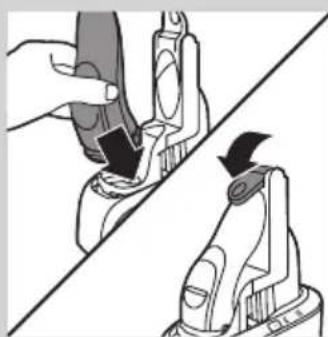
natural_image
Illustration of two hand-painted tool tips on a diagonal line, one being cut with an arrow (no text or symbols)Carga mediante el sistema Jet Clean (solo modelos PT927CC/PT923CC)
natural_image
Illustration of a person using a handheld device to interact with another person (no text or symbols present)natural_image
Diagram of a hairdryer with directional arrows indicating movement or operation (no text or symbols)natural_image
Diagram of a hand using a tool to adjust or install a device component, with arrows indicating the process (no text or symbols present)natural_image
Illustration of a hand holding a mechanical component with arrows indicating direction (no text or symbols)
natural_image
Diagram of a cable being inserted into a connector, showing internal components and fluid flow (no text or labels)
natural_image
Illustration of a mechanical device pouring liquid into a container (no text or symbols)natural_image
Illustration of a hand holding a mechanical component with arrows indicating movement (no text or symbols)natural_image
Diagram of a mechanical component with an arrow indicating direction, showing internal structure without any text or symbols.natural_image
Illustration of a hand holding a tray with three small food items, each with upward arrows indicating growth or increase (no text or symbols present)natural_image
Illustration of two hands using a tool to adjust a mechanical component, no text or symbols present
natural_image
Illustration of a hand holding a tray with food items, separated by a diagonal line (no text or symbols)natural_image
Diagram showing two views of a mechanical component with arrows indicating direction (no text or symbols)natural_image
Diagram of a washing machine handle with water level indicators (no text or symbols)natural_image
Illustration of hands using a tool to lift a cup, with no text or symbols present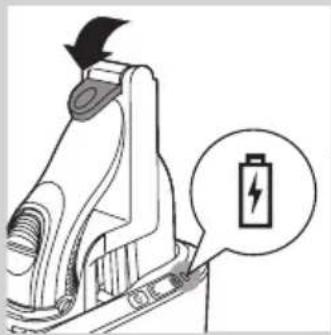
natural_image
Diagram of a battery holder with an arrow indicating direction and a battery symbol inside (no text or labels)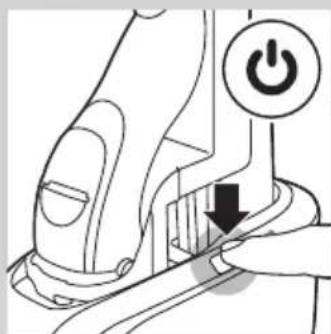
natural_image
Diagram of a hand operating a power switch with an icon (no text or labels)
natural_image
Diagram of a hand pump mechanism with water level indicators (no text or symbols)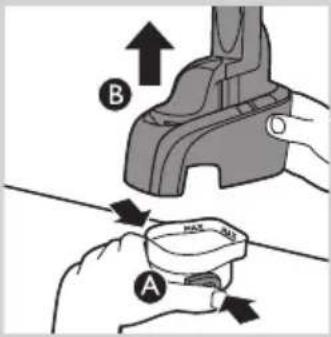

natural_image
Illustration of a hand holding a small object, possibly a device or container, with no visible text or symbols.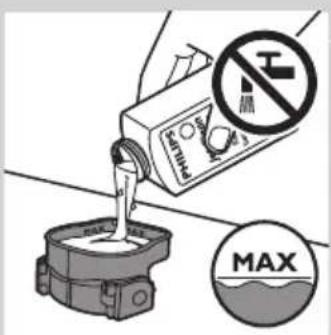
natural_image
Illustration of hands using a tool to lift a cup, with no text or symbols presentnatural_image
Diagram of a hairdryer with a brush and lever mechanism (no text or symbols)natural_image
Illustration of a hand using a tool to adjust or install a mechanical component, with arrows indicating motion (no text or symbols present)natural_image
Diagram of a hand turning a leaf into a three-cylinder shaver (no text or symbols)natural_image
Diagram of a hairbrush with a circular icon highlighting the brush tip (no text or symbols present)natural_image
Illustration of a hand holding a mechanical component with arrows indicating direction (no text or symbols)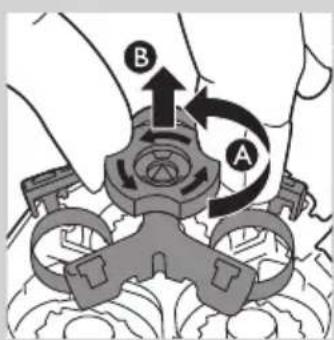
natural_image
Illustration showing a hand holding a tray with food items, alongside a stylized molecular model (no text or symbols)natural_image
Diagram showing two views of a biological structure with arrows indicating movement or transformation (no text or labels)natural_image
Symbol of a trash bin crossed with no text or numbers, representing waste sorting or disposal (no text present)natural_image
Prohibition sign showing a faucet without a shower, enclosed in a circle (no text or symbols)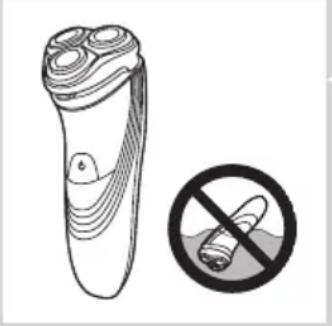
natural_image
Illustration of a pair of electric shakers with a prohibition symbol (no text or labels)
natural_image
Simple black-and-white icon of a faucet with raindrops (no text or symbols)Lataus vähissä
Nopea lataus
Lataaminen
Akku täynnä
natural_image
Illustration of a hand using a tool to adjust or install a mechanical component (no text or symbols visible)natural_image
Diagram of a mechanical device with a battery icon and directional arrow, no text or symbols presentnatural_image
Technical line drawing of a mechanical component with a magnified inset showing a battery symbol (no text or labels)natural_image
Illustration of two hand-painted mechanical components, one being cut with a black arrow and the other holding a tool (no text or symbols)natural_image
Illustration of a person using a handheld device to clean another (no text or symbols present)natural_image
Diagram of a hairbrush with a clip and handle, showing internal components and motion arrows (no text or symbols)1 Kytke parranajokoneeseen virta painamalla virtapainiketta kerran.
natural_image
Diagram of a hand using a tool to adjust or install a device component, with no visible text or symbols.natural_image
Illustration of a mechanical assembly with arrows indicating direction (no text or symbols)natural_image
Diagram of a medical procedure showing fluid flow from a tube into a device with internal components (no text or labels)natural_image
Illustration of a medical procedure showing fluid flow from a bottle onto a patient's foot (no text or symbols)natural_image
Illustration of a hand holding a mechanical component with arrows indicating movement (no text or symbols)natural_image
Diagram of a mechanical component with an arrow indicating direction, showing internal parts and a top view (no text or symbols)
natural_image
Illustration of a hand holding a tray with three small food items and upward arrows, no text or symbols present.
natural_image
Illustration of two hands using a pipette to clean a mechanical component, no text or symbols present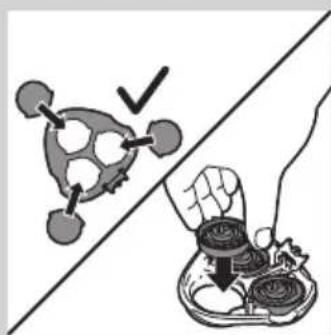
natural_image
Illustration showing a molecular structure with a checkmark and a hand holding a container (no text or symbols present)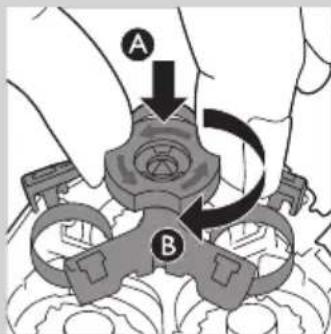
natural_image
Diagram showing two views of a mechanical component with arrows indicating movement or assembly (no text or symbols present)natural_image
Diagram of a handbag with water level indicators (no text or symbols)natural_image
Illustration of hands using a tool to lift a cup, showing motion and shading (no text or symbols)natural_image
Diagram of a battery charger with an icon indicating battery charging (no text or symbols present)


natural_image
Diagram of a handbag with attached straps and two circular symbols (no text or labels)natural_image
Illustration of a hand holding a segmented object with visible internal structure (no text or symbols)natural_image
Illustration of hands using a tool to apply liquid to a cup, with no visible text or symbolsnatural_image
Diagram of a hairdryer with black arrows indicating direction (no text or symbols)natural_image
Illustration of a hand holding a tool with arrows indicating motion or force (no text or symbols)natural_image
Diagram of a hand turning a three-pin electric shaver (no text or symbols)natural_image
Illustration of a hand holding a three-pin electric shaver with a circular diagram highlighting the blade (no text or symbols present)natural_image
Illustration of a hand holding a mechanical component with arrows indicating movement (no text or symbols)natural_image
Medical illustration showing two views of a surgical instrument with arrows indicating movement (no text or labels)
natural_image
Symbol of a trash bin crossed with a diagonal line, representing waste sorting or disposal (no text or numbers present)natural_image
Prohibition sign showing a faucet without a shower, enclosed in a circle (no text or symbols)
natural_image
Illustration of a pair of electric shakers with a prohibition symbol (no text or labels)
natural_image
Simple black-and-white icon of a faucet with raindrops, no text or symbols present.Conforme aux normes
Piles faibles
Charge rapide
Charge\
natural_image
Illustration of a handheld device with a downward arrow pointing to a spherical base (no text or symbols)natural_image
Illustration of a hand inserting a plug into a device component (no text or symbols visible)natural_image
Diagram of a battery holder mechanism with an arrow indicating direction and a battery icon (no text or symbols present)natural_image
Technical line drawing of a mechanical component with a magnified inset showing a battery (no text or symbols present)natural_image
Illustration of two hand-painted pliers on a diagonal line, one holding a black clip and the other adjusting a tool (no text or symbols)natural_image
Illustration of a person using a handheld device to clean another's face (no text or symbols present)natural_image
Diagram of a hairdryer with black arrows indicating direction (no text or symbols)natural_image
Diagram of a hand using a tool to adjust or install electronic components, with arrows indicating the process (no text or symbols present)natural_image
Illustration of a hand holding a mechanical component with arrows indicating movement (no text or symbols)natural_image
Diagram of a mechanical component with an arrow indicating upward motion, no text or symbols presentnatural_image
Illustration of a hand holding a tray with four round food items and three upward-pointing arrows (no text or symbols)natural_image
Illustration of two hands using pipette to process a mechanical component (no text or symbols present)natural_image
Illustration showing a hand holding a tray with food items, separated by a diagonal line (no text or symbols)natural_image
Diagram showing two mechanical components with arrows indicating movement or assembly (no text or symbols present)natural_image
Diagram of a handbag with buttons and icons indicating water level and U-turn (no text or symbols)natural_image
Illustration of hands using a tool to lift a cup, showing a downward arrow and spark effect (no text or symbols)natural_image
Diagram of a battery holder with an arrow indicating direction and a battery icon (no text or symbols)natural_image
Diagram of a hand operating a power switch with an icon (no text or symbols present)natural_image
Diagram of a hand pump mechanism with water level indicators (no text or symbols)

natural_image
Illustration of a hand holding a small object, possibly a device or container, with no visible text or symbols.
natural_image
Illustration of hands using a tool to lift a cup, with no text or symbols presentnatural_image
Diagram of a hairbrush with a clip and handle, showing internal components (no text or symbols)
natural_image
Illustration of a hand holding a tool with arrows indicating movement or force (no text or symbols)natural_image
Diagram of a hand turning a three-pin shaver into a circular socket (no text or symbols)natural_image
Diagram of a hand holding a small electric shaver with a circular arrow indicating rotation (no text or symbols present)natural_image
Illustration of a hand holding a mechanical component with arrows indicating direction (no text or symbols)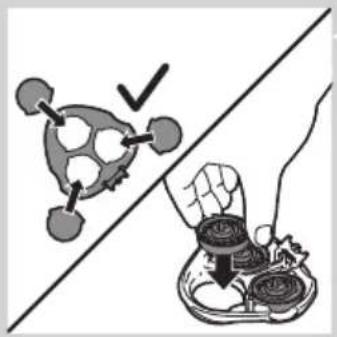
natural_image
Illustration showing a hand holding a tray with food items, separated by a diagonal line (no text or symbols)natural_image
Diagram showing two mechanical components with arrows indicating motion or assembly, no visible text or symbolsnatural_image
Symbol of a waste bin with crossed lines indicating no waste, and a solid black rectangle below (no text or labels)natural_image
No smoking sign with a faucet symbol crossed out by a diagonal line (no text)
natural_image
Illustration of a pair of electric shakers with a prohibition symbol (no text or labels)
natural_image
Simple black-and-white icon of a faucet with radiating lines, no text or symbols present.Batteria scarica
Ricarica rapida

natural_image
Illustration of a medical or laboratory device with a downward arrow pointing to a spherical base (no text or symbols)natural_image
Illustration of a hand inserting a plug into a device component (no text or symbols visible)natural_image
Diagram of a battery holder mechanism with an arrow indicating direction and a battery icon (no text or symbols present)natural_image
Technical line drawing of a mechanical component with a magnified inset showing a battery (no text or symbols)natural_image
Illustration of two hand-painted pliers on a diagonal line, one holding a black clip and the other adjusting its tip (no text or symbols)natural_image
Illustration of a person using a handheld device to clean another's face (no text or symbols present)natural_image
Diagram of a hairdryer with directional arrows indicating movement or force (no text or symbols)natural_image
Diagram of a device being inserted into a component, showing tool and internal structure (no text or symbols)natural_image
Illustration of a hand holding a mechanical component with arrows indicating assembly or movement (no text or symbols present)natural_image
Diagram of a medical procedure showing fluid flow from a tube into a device (no text or labels)
natural_image
Illustration of a medical procedure showing fluid flow from a bottle onto a patient's foot (no text or symbols)natural_image
Illustration of a hand holding a mechanical component with arrows indicating movement (no text or symbols)natural_image
Diagram of a mechanical component with an arrow indicating direction, showing internal structure without any text or symbols.natural_image
Illustration of a hand holding a tray with three small food items, each with upward arrows indicating growth or increase (no text or symbols present)natural_image
Illustration of two hands using a tool to adjust a mechanical component, no text or symbols presentnatural_image
Illustration showing a hand holding a tray with food items, separated by a diagonal line (no text or symbols)natural_image
Diagram showing two mechanical components with arrows indicating movement or assembly (no text or symbols present)natural_image
Diagram of a handbag with buttons and icons indicating water level and weight (no text or symbols)natural_image
Illustration of hands using a tool to lift a cup, with no text or symbols present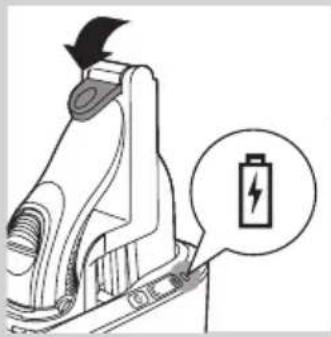
natural_image
Diagram of a battery holder mechanism with an icon indicating battery charging (no text or symbols present)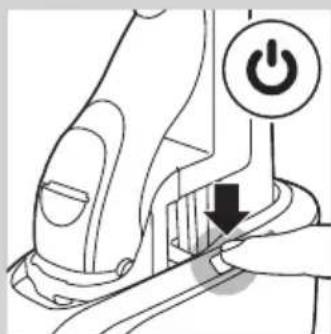
natural_image
Diagram of a handbag with buttons and icons, no readable text or symbols present

natural_image
Illustration of a hand holding a small object, possibly a device or container, with no visible text or symbols.
natural_image
Illustration of hands using a tool to lift a cup, with no text or symbols presentnatural_image
Diagram of a hairbrush with a clip and handle, showing internal components (no text or symbols)
natural_image
Illustration of a hand holding a tool with arrows indicating movement or force (no text or symbols)natural_image
Diagram of a hand turning a circular component into a base, showing internal structure (no text or symbols)natural_image
Diagram of a hairbrush with a circular arrow indicating rotation (no text or symbols)natural_image
Illustration of a hand holding a mechanical component with arrows indicating movement (no text or symbols)
natural_image
Illustration showing a hand holding a tray with food items, separated by a diagonal line (no text or symbols)natural_image
Diagram showing two mechanical components with arrows indicating motion or assembly, no visible text or symbolsnatural_image
Symbol of a waste bin with no text or labels, crossed by two crossed lines and a solid black rectangle below (no text or symbols present)natural_image
Prohibition sign showing a faucet without a shower, enclosed in a circle (no text or symbols)
natural_image
Illustration of a pair of electric shakers with a prohibition symbol (no text or labels)
natural_image
Black and white icon of a faucet with raindrops falling (no text or symbols)Accu bijna leeg
Snel opladen
Opladen
Accu vol
natural_image
Illustration of a medical or laboratory device with a downward arrow pointing to a spherical base (no text or symbols)natural_image
Illustration of a hand holding a plug inserted into a device (no text or symbols visible)natural_image
Diagram of a battery charger with a magnified view showing the battery symbol (no text or labels present)natural_image
Technical line drawing of a mechanical component with a magnified inset showing a battery symbol (no text or labels)natural_image
Illustration of two hand-painted pliers on a diagonal line, showing tool application (no text or symbols)natural_image
Illustration of a person using a handheld device to interact with another person (no text or symbols present)natural_image
Diagram of a hairdryer with directional arrows indicating movement or operation (no text or symbols)natural_image
Diagram of a hand using a tool to adjust or install a device component, with arrows indicating the process (no text or symbols present)natural_image
Illustration of a hand holding a mechanical component with arrows indicating direction (no text or symbols)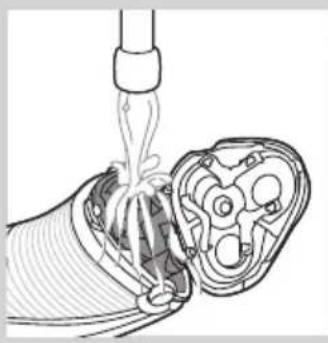
natural_image
Diagram of a cable being inserted into a connector, showing internal components and fluid flow (no text or labels)
natural_image
Illustration of a mechanical device pouring liquid into a container (no text or symbols)natural_image
Illustration of a hand holding a mechanical component with arrows indicating movement (no text or symbols)natural_image
Diagram of a mechanical component with an arrow indicating direction, showing internal structure without any text or symbols.natural_image
Illustration of a hand holding a tray with three small food items, each with upward arrows indicating growth or increase (no text or symbols present)natural_image
Illustration of two hands using a tool to adjust a mechanical component, no text or symbols present
natural_image
Diagram showing two mechanical components with arrows indicating movement or assembly (no text or symbols present)natural_image
Diagram of a handbag with buttons and icons indicating water level and weight (no text or symbols)natural_image
Illustration of hands using a tool to lift a cup, with no text or symbols present
natural_image
Diagram of a battery holder mechanism with an icon indicating battery charging (no text or symbols present)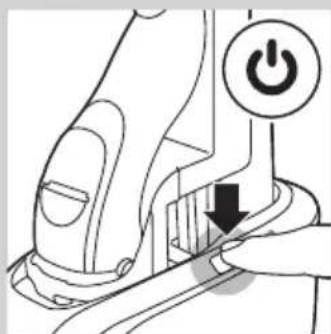
natural_image
Diagram of a hand operating a power switch with an icon (no text or labels)
natural_image
Diagram of a hairless machine with water level indicators (no text or symbols)
natural_image
Illustration of a hand holding a small object, possibly a device or container, with no visible text or symbols.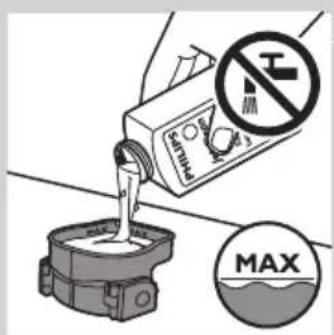
natural_image
Illustration of hands using a tool to lift a cup, with no text or symbols presentnatural_image
Diagram of a hairdryer with a brush and lever mechanism (no text or symbols)natural_image
Hand holding a tool interacting with a mechanical component, showing motion arrows (no text or symbols)natural_image
Diagram of a hand turning a circular device into a base, showing three blades and a top handle (no text or symbols)natural_image
Illustration of a hairbrush with a magnified inset showing internal rotation (no text or symbols)natural_image
Illustration of a mechanical assembly with arrows indicating movement or force (no text or symbols present)natural_image
Illustration showing a hand holding a tray with food items, alongside a stylized molecular model (no text or symbols)natural_image
Diagram showing two views of a biological structure with arrows indicating movement or transformation (no text or labels)natural_image
Symbol of a waste bin with no text or labels, crossed by two crossed lines and a solid black rectangle below (no text or symbols present)natural_image
Symbol of a trash bin crossed with a diagonal line, representing no waste or discharge (no text or labels)natural_image
No sign depicting a faucet crossed out by a diagonal line, indicating no pollution or water release.
natural_image
Illustration of a pair of electric shakers with a prohibition symbol (no text or labels)
natural_image
Simple black-and-white icon of a faucet with raindrops (no text or symbols)Lav batterikapasitet
Hurtiglading
Lading
- Når barbermaskinen lades, blinker batterilampen hvitt.

Fulladet batteri
natural_image
Close-up of a medical or electronic device with a downward arrow and label 'Hepa' (no readable text or symbols beyond labels)1 Koble den lille kontakten til ladestativet.
2 Sett adapteren i stikkontakten.
3 Sett barbermaskinen i ladestativet.
natural_image
Illustration of a hand holding a plug inserted into a device (no text or symbols visible)1 Koble den lille kontakten til Jet Clean-systemet.
2 Sett adapteren i stikkontakten.
3 Plasser barbermaskinen uten beskyttelsesdeksel opp-ned i barbermaskinholderen.
Merk: Barbermaskinen kan ikke plasseres i Jet Clean-systemet hvis beskyttelsesdekselet sitter på skjæreenheten.

natural_image
Diagram of a battery charger with a magnified view showing the battery symbol (no text or labels present)natural_image
Technical line drawing of a mechanical component with a magnified inset showing a battery symbol (no text or labels)Når batteriet er fulladet, lyser batterisymbolet på Jet Clean-systemet kontinuerlig.
natural_image
Illustration of two hand-painted pliers on a diagonal line, one holding a black tool and the other with an arrow (no text or symbols)natural_image
Illustration of a person using a handheld device to clean another (no text or symbols present)natural_image
Diagram of a hairdryer with a brush and lever mechanism (no text or symbols)natural_image
Diagram of a hand using a tool to adjust or install a device component, with arrows indicating the process (no text or symbols present)natural_image
Illustration of a hand holding a mechanical component with arrows indicating direction (no text or symbols)natural_image
Diagram of a medical procedure showing fluid flow from a pipette into a device (no text or labels)
natural_image
Illustration of a mechanical device pouring liquid into a container (no text or symbols)natural_image
Illustration of a hand holding a mechanical component with arrows indicating movement (no text or symbols)natural_image
Diagram of a mechanical component with an arrow indicating direction, showing internal structure (no text or symbols)natural_image
Illustration of a hand holding a tray with three small round objects and upward arrows, no text or symbols present.natural_image
Illustration of two hands using a tool to adjust a mechanical component, no text or symbols presentnatural_image
Illustration showing a hand placing food items into a tray with a checkmark (no text or symbols)natural_image
Medical illustration showing two views of a surgical instrument with arrows indicating movement (no text or labels)natural_image
Diagram of a mechanical device with labeled parts and directional indicators (no text or symbols present)natural_image
Illustration of hands using a tool to remove or apply a small bowl, with no text or symbols present.
natural_image
Diagram of a battery holder with an arrow indicating direction and a battery symbol (no text or labels present)
natural_image
Diagram of a mechanical device with a power button and arrow indicating action (no text or symbols present)
natural_image
Diagram of a mechanical device with labeled parts and directional indicators (no readable text or symbols)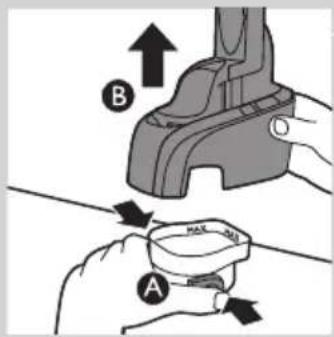

natural_image
Illustration of a hand holding a small object with a curved handle (no text or symbols)
natural_image
Illustration of hands using a tool to lift a cup, showing motion and shading (no text or symbols)natural_image
Diagram of a hairdryer with directional arrows indicating movement (no text or symbols)natural_image
Hand holding a tool with arrows indicating motion or sequence (no text or symbols)natural_image
Diagram of a hand turning a circular component into a base, showing three concentric rings and a top hat (no text or symbols)natural_image
Illustration of a hairbrush with a magnified inset showing internal components (no text or symbols)natural_image
Illustration of a hand holding a mechanical component with arrows indicating direction (no text or symbols)
natural_image
Illustration showing a hand holding a tray with food items, separated by a diagonal line (no text or symbols)natural_image
Diagram showing two mechanical components with arrows indicating motion or assembly, no visible text or symbolsnatural_image
Symbol of a trash bin crossed with two crossed lines and a solid black rectangle below (no text or labels)natural_image
Symbol of a trash bin crossed out by two crossed lines, representing no waste or discharge (no text or labels)- Det integrerte oppladbare barbermaskinbatteriet inneholder stoffer som kan forurense miljøet. Ta alltid ut batteriet før du kaster barbermaskinen eller leverer den på en offentlig gjenvinningsstasjon. Lever batteriet på en offentlig gjenvinningsstasjon for batterier. Hvis du har problemer med å ta ut batteriet, kan du også ta apparatet med til et Philips-servicesenter. Der vil de ta ut batteriet for deg og behandle det på en miljøvennlig måte.
Fjerne det oppladbare barbermaskinbatteriet
Det oppladbare batteriet skal bare tas ut när du avhender barbermaskinen. Kontroller at batteriet er helt utladet när du fjerner det.
natural_image
Prohibition sign showing a faucet without a shower, enclosed in a circle (no text or symbols)
natural_image
Illustration of a pair of electric shakers with a prohibition symbol (no text or labels)
natural_image
Prohibition sign showing a faucet crossed out by a diagonal line, indicating no fire or water discharge (no text present)natural_image
Black and white icon of a faucet with raindrops falling (no text or symbols)Bateria fraca
Carga rápida
Carregamento
natural_image
Illustration of a handheld device with a downward arrow and label 'Hugel' at the base (no readable text or symbols beyond labels)natural_image
Illustration of a hand inserting a plug into a device component (no text or symbols visible)natural_image
Diagram of a battery charger with a lightning bolt symbol and a magnified view of its battery (no text or labels present)natural_image
Technical line drawing of a mechanical component with a magnified inset showing a battery (no text or symbols)natural_image
Illustration of two mechanical tools on a diagonal line, one being adjusted and the other using a tool (no text or symbols present)natural_image
Illustration of a person using a handheld device to clean another's face (no text or symbols present)natural_image
Diagram of a hairdryer with a brush and lever mechanism (no text or symbols)natural_image
Diagram of a device being inserted into a component, showing tool and internal structure (no text or symbols)natural_image
Illustration of a hand holding a mechanical component with arrows indicating assembly or movement (no text or symbols present)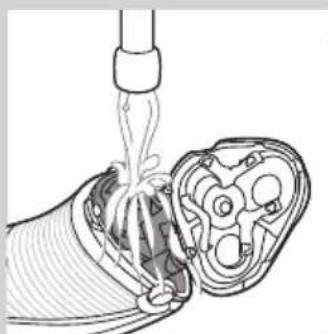
natural_image
Diagram of a medical procedure showing fluid flow through a device into a cross-sectional view (no text or labels)
natural_image
Illustration of a mechanical device pouring liquid into a container (no text or symbols)natural_image
Illustration of a hand holding a mechanical component with arrows indicating movement (no text or symbols)natural_image
Diagram of a mechanical component with an arrow indicating direction, showing internal structure without any text or symbols.natural_image
Illustration of a hand holding a tray with three small food items, each with upward arrows indicating growth or increase (no text or symbols present)natural_image
Illustration of two hands using a tool to adjust a mechanical component, no text or symbols present
natural_image
Diagram showing two mechanical components with arrows indicating movement or assembly (no text or symbols)natural_image
Diagram of a handbag with buttons and icons indicating water level and weight (no text or symbols)natural_image
Illustration of hands using a tool to lift a cup, with no text or symbols present
natural_image
Diagram of a battery holder with an arrow indicating direction and a battery symbol inside (no text or labels)
natural_image
Diagram of a hand operating a power switch with an icon (no text or labels)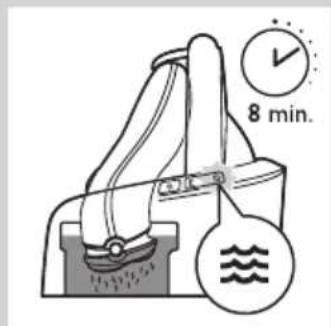
natural_image
Diagram of a hand pump mechanism with water level indicators (no text or symbols)
natural_image
Illustration of a hand holding a small object with layered texture (no text or symbols)
natural_image
Illustration of hands using a tool to lift a cup, with no text or symbols presentnatural_image
Diagram of a hairdryer with a brush and lever mechanism (no text or symbols)natural_image
Illustration of a hand using a tool to adjust or install a mechanical component, with arrows indicating motion (no text or symbols present)natural_image
Diagram of a hand turning a three-pin electric shaver (no text or symbols)natural_image
Diagram of a hand holding a small object with a circular arrow indicating rotation or movement (no text or symbols present)natural_image
Illustration of a hand holding a mechanical component with arrows indicating movement (no text or symbols)1 O símbolo da cabeça de corte permanece continuamente aceso a cor de laranja.
natural_image
Illustration showing a hand holding a tray with food items, separated by a diagonal line (no text or symbols)natural_image
Diagram showing two views of a mechanical component with arrows indicating movement, no text or symbols presentEncomendar acessórios
natural_image
Symbol of a waste bin with no text or labels, crossed by two crossed lines and a solid black rectangle below (no text or symbols present)natural_image
Symbol of a trash bin crossed with a diagonal line, representing no waste or discharge (no text or labels)natural_image
Prohibition sign showing a faucet without a shower, enclosed in a circle (no text or symbols)
natural_image
Illustration of a pair of electric shakers with a prohibition symbol (no text or labels)
natural_image
Simple black-and-white icon of a faucet with radiating lines, no text or symbols present.Låg batterinivå
Snabbladdning
Laddning
- När rakapparaten laddas blinkar batterilampan vitt.

Batteriet fulladdat
natural_image
Close-up of a handheld electronic device with a black arrow pointing to a circular base labeled 'Neu' and 'R', no text or symbols present.natural_image
Illustration of a hand holding a plug inserted into a device component (no text or symbols visible)natural_image
Diagram of a mechanical device with a battery icon and directional arrow, no text or symbols presentnatural_image
Technical line drawing of a mechanical component with a magnified inset showing a battery symbol (no text or labels)natural_image
Illustration of two hand-painted mechanical components, one being cut with a black arrow and the other holding a tool (no text or symbols)natural_image
Illustration of a person using a handheld device to clean another (no text or symbols present)natural_image
Diagram of a hairbrush with directional arrows indicating movement or operation (no text or symbols)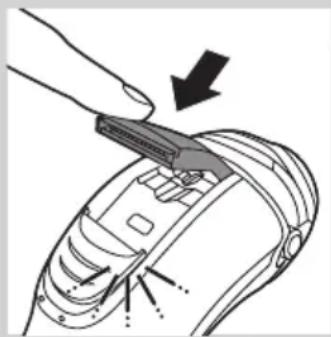
natural_image
Diagram of a hand using a tool to adjust or install a device component, with arrows indicating the process (no text or symbols present)Trimming
natural_image
Diagram of a human head with internal mechanical components and directional arrows indicating movement (no text or labels)natural_image
Diagram of a medical procedure showing fluid flow through a device into a cross-sectional view (no text or labels)natural_image
Illustration of a mechanical device emitting a fluid or material stream from a nozzle (no text or symbols)natural_image
Illustration of a hand holding a mechanical component with arrows indicating movement (no text or symbols)natural_image
Diagram of a mechanical component with an arrow indicating direction, showing internal parts and a top view (no text or symbols)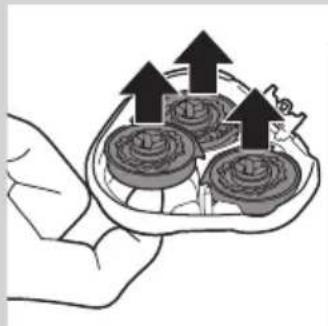
natural_image
Illustration of a hand holding a tray with three small food items and upward arrows, no text or symbols present.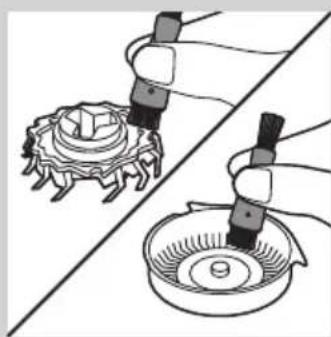
natural_image
Illustration of two hands using a pipette to clean a mechanical component, no text or symbols present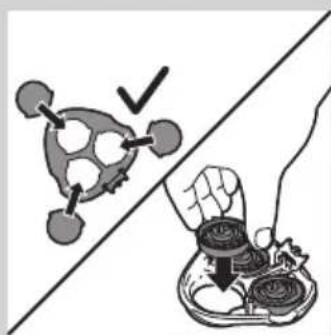
natural_image
Illustration showing a molecular structure with a checkmark and a hand holding a container (no text or symbols)
natural_image
Diagram showing two mechanical components with arrows indicating movement or assembly (no text or symbols present)natural_image
Diagram of a mechanical device with labeled parts and icons (no readable text or symbols)natural_image
Illustration of hands using a tool to lift a cup, showing motion and shading (no text or symbols)natural_image
Diagram of a mechanical device with a battery icon and directional arrow (no text or symbols)
natural_image
Diagram of a mechanical device with a power button and arrow indicating action (no text or symbols present)
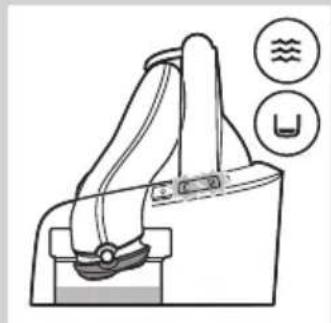
natural_image
Line drawing of a handbag with two circular icons labeled 'U' and 'S', no text or symbols present.
natural_image
Illustration of a hand holding a small object with a curved handle (no text or symbols)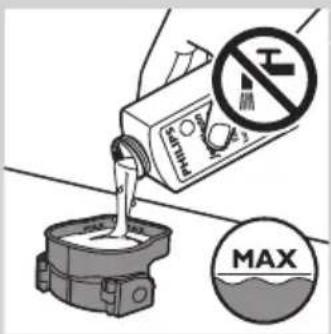

natural_image
Illustration of hands using a tool to lift a bowl with a downward arrow, no text or symbols presentnatural_image
Diagram of a hairdryer with directional arrows indicating movement (no text or symbols)natural_image
Hand holding a tool interacting with a mechanical component, showing motion arrows (no text or symbols)natural_image
Diagram of a hand turning a leaf with three circular blades (no text or symbols)Byten
natural_image
Diagram of a hairbrush with a circular inset showing internal rotation (no text or symbols)natural_image
Illustration of a human hand holding a medical device with internal components (no text or symbols visible)natural_image
Illustration showing a food item being cut off by a hand, with no visible text or symbols.natural_image
Diagram showing two mechanical components with arrows indicating movement or assembly (no text or symbols present)natural_image
Symbol of a waste bin with crossed lines indicating no waste, and a solid black rectangle below (no text or labels)natural_image
Prohibition sign showing a faucet crossed out by a diagonal line, indicating no leakage or disinfection (no text present)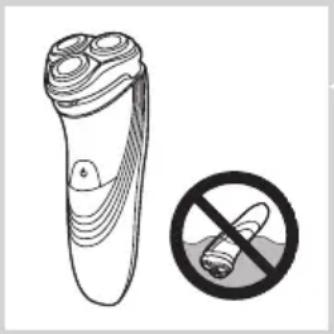
natural_image
Illustration of a pair of electric shakers with a prohibition symbol (no text or labels)
natural_image
Simple black-and-white icon of a faucet with raindrops (no text or symbols)Düşük pil
Şarj etme

natural_image
Close-up of a handheld electronic device with a black arrow pointing to a circular base labeled 'Neu' and 'R', no text or symbols present.natural_image
Illustration of a hand holding a tool interacting with a mechanical component (no text or symbols visible)natural_image
Diagram of a battery holder mechanism with an arrow indicating direction and a battery icon (no text or symbols)natural_image
Technical line drawing of a mechanical component with a magnified inset showing a battery symbol (no text or labels)natural_image
Two mechanical components with arrows indicating assembly or disassembly (no text or symbols)natural_image
Illustration of a person using a handheld device to clean another (no text or symbols present)natural_image
Diagram of a hairbrush with a scroll wheel and directional arrows indicating movement (no text or symbols)natural_image
Diagram of a hand using a tool to adjust or install a device component, with no visible text or symbols.natural_image
Illustration of a hand holding a mechanical component with arrows indicating movement (no text or symbols)natural_image
Diagram of a medical procedure showing fluid flow through a device into a cross-sectional view (no text or labels)natural_image
Illustration of a mechanical device pouring liquid into a textured surface (no text or symbols)natural_image
Illustration of a hand holding a mechanical component with arrows indicating direction (no text or symbols)natural_image
Diagram of a mechanical component with an arrow indicating direction, showing internal structure without any text or symbols.
natural_image
Illustration of a hand holding a tray with three food items and upward arrows indicating growth (no text or symbols)
natural_image
Illustration of two hands using a tool to interact with a mechanical component (no text or symbols present)
natural_image
Illustration showing a food item being cut off by a hand, with no visible text or symbols.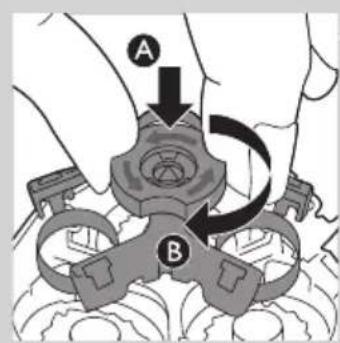
natural_image
Diagram showing two mechanical components with arrows indicating movement or assembly (no text or symbols present)natural_image
Diagram of a mechanical device with labeled parts and icons (no readable text or symbols)natural_image
Illustration of hands using a tool to lift a cup, showing motion and shading (no text or symbols)natural_image
Diagram of a battery charger mechanism with an arrow indicating direction and a battery symbol (no text or labels present)


natural_image
Diagram of a handbag with water level indicators (no text or symbols)natural_image
Illustration of a hand holding a small object with a curved handle, no text or symbols presentnatural_image
Illustration of hands using a tool to lift a cup, showing motion and shading (no text or symbols)natural_image
Diagram of a hairdryer with black arrows indicating direction (no text or symbols)natural_image
Illustration of a hand holding a tool with arrows indicating motion or force (no text or symbols)natural_image
Diagram of a hand turning a three-pin electric shaver (no text or symbols)natural_image
Illustration of a hand holding a three-pin electric shaver with a circular diagram highlighting the blade (no text or symbols present)natural_image
Illustration of a hand holding a mechanical component with arrows indicating movement (no text or symbols)natural_image
Diagram showing two views of a mechanical component with arrows indicating direction (no text or symbols)
natural_image
Symbol of a waste bin with no text or labels, crossed by two crossed lines and a solid rectangle below (no text or symbols present)- Always here to help you
- User manual
- PHILIPS
- Introduction
- General description (Fig. 1)
- Important
- Danger
- Warning
- Caution
- Compliance with standards
- General
- Charging
- Charge indications
- Battery low
- Quick charging
- Battery fully charged
- Charging with the adapter
- Charging in the Jet Clean System (PT927CC/PT923CC only)
- Using the shaver
- Shaving
- Trimming
- Cleaning and maintenance
- Cleaning the shaving unit under the tap
- ENGLISH 12
- Cleaning the shaving unit with the cleaning brush
- Cleaning the shaving unit in the Jet Clean System (PT927CC/PT923CC only)
- Preparing the Jet Clean System for use
- Using the Jet Clean System
- Cleaning the Jet Clean System
- Cleaning the trimmer with the cleaning brush
- Storage
- Replacement
- Replacement reminder
- Ordering accessories
- Shaving heads
- Cleaning
- Environment
- Removing the rechargeable shaver battery
- Guarantee and support
- Guarantee restrictions
- Troubleshooting
- Introduktion
- Lavt batteriniveau
- Opladning
- Normerfüllung
- Akku fast leer
- Schnelles Aufladen
- Laden
- Ersatz
- Κίνδυνος
- Γρήγορη φόρτιση
- Φόρτιση
- Batería baja
- Carga rápida
- Carga
- Carga mediante el sistema Jet Clean (solo modelos PT927CC/PT923CC)
- Lataus vähissä
- Nopea lataus
- Lataaminen
- Akku täynnä
- Conforme aux normes
- Piles faibles
- Charge rapide
- Charge\
- Batteria scarica
- Ricarica rapida
- Accu bijna leeg
- Snel opladen
- Opladen
- Accu vol
- Lav batterikapasitet
- Hurtiglading
- Lading
- Fulladet batteri
- Fjerne det oppladbare barbermaskinbatteriet
- Bateria fraca
- Carregamento
- Encomendar acessórios
- Låg batterinivå
- Snabbladdning
- Laddning
- Batteriet fulladdat
- Byten
- Düşük pil
- Şarj etme
Brand : PHILIPS
Model : PowerTouch PT877
Category : Razor