
Modus Plus - Weather Station TFA - Free user manual and instructions
Find the device manual for free Modus Plus TFA in PDF.


| Product Type | Wireless Weather Station |
| Brand | TFA |
| Model | Modus Plus |
| Dimensions (base station) | 140 x 100 x 80 mm |
| Weight (base station) | 200 g |
| Power supply | 2 AAA 1.5 V batteries |
| Outdoor sensor | Powered by 2 AA 1.5 V batteries |
| Indoor temperature | 0 °C to +50 °C |
| Outdoor temperature | -20 °C to +60 °C |
| Indoor humidity | 20 % to 95 % |
| Outdoor humidity | 20 % to 95 % |
| Atmospheric pressure | 700 to 1100 hPa |
| Display | Backlit LCD screen |
| Radio frequency | 433 MHz |
| Maximum range | 100 m (free field) |
| Time functions | Time, date, alarm |
| Weather function | Weather forecast (symbols) |
| Maintenance and cleaning | Wipe with a soft, dry cloth |
| Safety | Do not immerse in water, avoid impacts |
| Spare parts and repairability | Not user-repairable, contact customer service |
| General information | Indoor and outdoor use with sensor |
Frequently Asked Questions - Modus Plus TFA
User questions about Modus Plus TFA
0 question about this device. Answer the ones you know or ask your own.
Ask a new question about this device
Download the instructions for your Weather Station in PDF format for free! Find your manual Modus Plus - TFA and take your electronic device back in hand. On this page are published all the documents necessary for the use of your device. Modus Plus by TFA.
USER MANUAL Modus Plus TFA
Kat. Nr. 35.1122
CE
Fig. 1 Fig. 2




Fig. 3
D1
D2
D5

D3
MODUS PLUS – Wireless weather station
GB
Thank you for choosing this instrument from TFA.
1. Before you start using it
- Please make sure to read the instruction manual carefully. This information will help you to familiarise yourself with your new device, to learn all of its functions and parts, to find out important details about its first use, how to operate it and how to get advice in the event of a malfunction.
- Following and respecting the instructions in your manual will prevent damage to your instrument and loss of your statutory rights arising from defects due to incorrect use.
- We shall not be liable for any damage occurring as a result of not following these instructions. Likewise, we take no responsibility for any incorrect readings and for any consequences which may result from them.
- Please take particular note of the safety advice!
- Please keep this instruction manual for future reference.
2. Delivery contents
• Wireless weather station (base station)
• Outdoor transmitter
- Instruction manual
3. Field of operation and all the benefits of your new instrument at a glance
- Outdoor temperature and humidity wireless (868 MHz), range approx. 75 m (free field)
- Expandable up to 3 outdoor transmitters (also for the climate control of remote rooms, e.g. children's room, wine-cellar)
- Indoor temperature and humidity
• Maximum and minimum values
• Weather forecast with symbols and tendency of atmospheric pressure - Radio-controlled clock with weekday and date, 2 alarm times and snooze function
- Moon phases
- Backlight
• For wall mounting or table standing
• Very simple installation, no cables required
4. For your safety
- This product is exclusively intended for the field of application described above. It should only be used as described within these instructions.
- Unauthorised repairs, modifications or changes to the product are prohibited.
MODUS PLUS - Wireless weather station
GB

Caution! Risk of injury:
- Keep these devices and the batteries out of reach of children.
- Batteries contain harmful acids and may be hazardous if swallowed. If a battery is swallowed, this can lead to serious internal burns and death within two hours. If you suspect a battery could have been swallowed or otherwise caught in the body, seek medical help immediately.
- Batteries must not be thrown into a fire, short-circuited, taken apart or recharged. Risk of explosion!
- Low batteries should be changed as soon as possible to prevent damage caused by leaking. Never use a combination of old and new batteries together, nor batteries of different types.
- Wear chemical-resistant protective gloves and safety glasses when handling leaking batteries.

Important information on product safety!
- Do not place your product near extreme temperatures, vibrations or shocks.
- Protect it from moisture.
- The instrument is protected against splash water, but is not watertight. Choose a shady and dry position for the transmitter.
5. Elements
Weather station (base station)
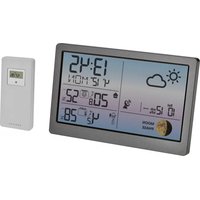
A: LCD display (Fig. 1):
A 1: Weather tendency indicator
A 2: Weather forecast icon
A 3: Moon phase display
A 4: Battery symbol for outdoor transmitter
A 5: Reception symbol for the outdoor transmitter
A 6: Outdoor transmitter channel symbol
A 7: Circle symbol for automatically alternating channel
A 8: Outdoor temperature and humidity
A 9: Symbol for maximum value
A 10: Symbol for the indoor values
A 11: Indoor temperature and humidity
A 12: Symbol for minimum value
A 13: Battery symbol for weather station
A 14: Radio-controlled time symbol
A 15: Time with seconds
A 16: Alarm time symbols
MODUS PLUS – Wireless weather station
GB
B: Buttons on the weather station (Fig. 1):
B 1: MODE/ENTER button
B 2: MAX/MIN button
B 3: ▼/UNIT button
B 4: ▲/CH button
B 5: ALARM button
B 6: SNOOZE button
C: Housing (Fig. 2):
C 1: Wall mount hole
C 2: Battery compartment
C 3: Stand (fold out)
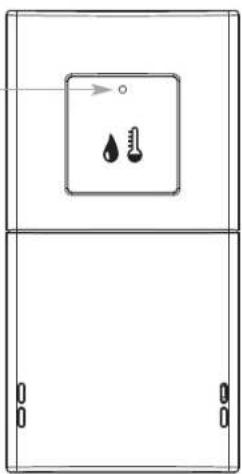
D: Outdoor transmitter (Fig. 3):
Housing front:
D 1: LED
Housing backside:
D 2: Wall mount hole
D 3: Battery compartment
Buttons in the battery compartment:
D 4: RESET button
D 5: CH button
6. Getting started
Insert batteries:
- Place both instruments on a desk with a distance of approximately 1.5 meter. Check that no other electronic devices are close.
- Insert at first three new batteries 1,5 V AA in the battery compartment of the base station and then two new batteries 1,5 V AA in the battery compartment of the outdoor transmitter. Make sure the polarities are correct.
Reception of outdoor temperature and humidity
- The base station automatically starts scanning the signals to register the outdoor transmitter after batteries are inserted. The basic unit will scan for 2 minutes the outdoor values. The reception symbol flashes.
- The LED indicator of the transmitter is flashing. The outdoor transmitter is set to channel 1 by default.
- If the reception of outdoor values fails, “- -” appears on the display. Check the batteries and try it again. Check if there is any source of interference.
- Manual initialization can be helpful. Press and hold ▲/CH button for 3 seconds. The reception symbol flashes. The weather station will only search for an outdoor transmitter on the actual selected channel.
MODUS PLUS – Wireless weather station
GB
Radio-controlled time reception
- The clock will now scan the DCF frequency signal and the DCF symbol flashes on the LCD. When the time code is received successfully after 3-8 minutes, the radio-controlled time is displayed and the DCF symbol remains permanently on the display. During the DCF time reception period, no outdoor values will be transmitted.
• There are 3 different reception symbols:

- reception is active

- reception is very good

- No DCF reception
- To activate the DCF reception, press the ALARM button for 2 seconds. The reception signal - symbol flashes. Press the ALARM button again to stop scanning DCF time signal.
- If the clock cannot detect the DCF-signal (for example due to disturbances, transmitting distance, etc.), the clock can be set manually.
- The clock will then work as a normal quartz clock. (see: Manual setting of the clock, calendar and day-of-week language).
Note for radio-controlled time DCF:
The time base for the radio-controlled time is a caesium atomic clock operated by the Physikalisch Technische Bundesanstalt Braunschweig. It has a time deviation of less than one second in one million years. The time is coded and transmitted from Mainflingen near Frankfurt via frequency signal DCF-77 (77.5 kHz) and has a transmitting range of approximately 1,500 km. Your radio controlled clock receives this signal, converts it to shows the precise time. Changeover from summer time or winter time are automatic. The quality of the reception depends mainly on the geographic location. Normally there should be no reception problems within a 1,500 km radius around Frankfurt.
Please take note of the following:
- The recommended distance to any interfering sources like computer monitors or TV sets is at least 1.5 - 2 metres.
- Inside ferro-concrete rooms (basements, superstructures), the received signal is naturally weakened. In extreme cases, please place the unit close to a window to improve the reception.
- During nighttime, the atmospheric interference is usually less severe and reception is possible in most cases. A single daily reception is adequate to keep the accuracy deviation under 1 second.
7. Operation
- During the reception of the outdoor values or the time is a button operation not possible.
MODUS PLUS – Wireless weather station

- In the setting mode, press ▼/UNIT or ▲/CH button to select the values. Press and hold the buttons for fast running.
- The instrument will automatically quit the setting mode if no button is pressed within 10 seconds.
• Each button operation is acknowledged with a beep.
7.1 Manual setting of the clock, calendar and day-of-week language
- Press the MODE/ENTER button for 2 seconds in normal mode to enter the setting mode.
• 24 Hr starts flashing. - Press the ▲/CH or ▼/UNIT button to choose 12 HR (PM appears on the display after 12h) or 24 HR system.
- Confirm with the MODE/ENTER button.
- The setting sequence is shown as follows: Hours, minutes, year, month/day sequence (American version) or day/month (European version), month, date, the language for the weekday. Press the ▼/UNIT or ▲/CH button to adjust it.
- Day-of-week language: English (E), German (G), French (F), Spanish (S) and Italian (I).
- Press the MODE/ENTER button again to return to normal mode.
- When the DCF reception is activated, the manually set clock will be overwritten by a successfully reception of the DCF time.
7.2 Recall of time, weekday, alarm time and date
- Press the MODE/ENTER button in normal mode to change the display between:
→ Time with seconds
→ Time with weekday
→ 1. Alarm time
- Alarm time
Date
7.3 Setting of the alarm
- Press the MODEI ENTER button in normal mode, until the flashing 1 for the first alarm time appears.
• 0:00 or the last adjusted alarm time appears.
• You can now adjust the first alarm time. - Press and hold MODE/ENTER button.
- The hour digit is flashing. Press the ▲/ICH or ▼/UNIT button to adjust hours.
• The alarm symbol appears on the display. - Press the MODE/ENTER button again and you can adjust the minutes with the ▼/UNIT or ▲/CH button.
- Confirm the settings with the MODE/ENTER button.
• The alarm for the first alarm time is activated. - Press the MODE/ENTER button again.
MODUS PLUS - Wireless weather station

• 2 for the second alarm time is flashing.
• 0:00 or the last adjusted alarm time appears.
- Set the alarm time for the second alarm in the same way.
7.4 Activate/turn off the different alarm times
- To activate or deactivate the alarm function press the ALARM button in the setting mode.
- In normal mode appears or disappears the corresponding symbol (A), B, C, D or no alarm symbol appears.
- When the alarm time is reached, the alarm will ring. The backlight turns on for a short time.
- If the alarm is not stopped, the increasing alarm will automatically turn off after 2 minutes and will be reactivated at the same time.
- When the alarm rings, press the SNOOZE button and the snooze function is activated.
• The backlight turns on for a short time.
• The corresponding alarm symbol flashes.
• The alarm will be interrupted for 5 minutes. - When the snooze function is activated, a button operation is not possible. You can only activate the backlight by pressing the SNOOZE button.
- Press the ALARM button to stop the snooze function.
7.5 Maximum and minimum values
- Press once the MAX/MIN button.
- The maximum values for outdoor and indoor will appear.
- Press the MAX/MIN button again.
- The minimum values for outdoor and indoor will appear.
- Press and hold MAX/MIN button in the respective mode to clear the recorded values.
• The actual values appear on the display.
7.6 Weather forecast symbols
• There are 5 different weather symbols:

Sunny

Partly
cloudy rain

Cloudy

Rainy

Strong
- The weather forecast relates to a range of 12 to 24 hours and indicates only a general weather trend. For example, if the current weather is cloudy and the rain icon is displayed, it does not mean the product is faulty because it is not raining. It simply means that the air pressure has dropped and the weather is expected to get worse but not necessarily rainy. The accuracy is about 70% .
- The sun symbol also appears at night if there is a starry night.
MODUS PLUS – Wireless weather station

7.7 Temperature indication
- Press the ▼/UNIT button to select temperature display in °C (Celsius) or °F (Fahrenheit) as the temperature unit.
7.8 Weather trend pointer
- The trend pointer displayed on the LCD indicates if the atmospheric pressure is increasing, decreasing or steady.
7.9 Indication of actual moon phase
• The moon phase of each day is shown on the LCD:

A

B

C

D

E

F

G

H
A: New Moon B: Waxing Crescent
C: First Quarter D: Waxing Gibbous
E: Full Moon F: Waning Gibbous
G: Last Quarter H: Waning Crescent
7.10 Backlight
- Press the SNOOZE button. The backlight turns on for 5 seconds.
7.11 Outdoor transmitter
- The outdoor transmitter will automatically transmit outdoor values to the base station on channel 1 after batteries are inserted.
• After successful installation close the battery compartment of outdoor transmitter carefully. - Please reset the instrument and follow the battery installation procedure if the outdoor transmitter does not work properly. Change the batteries.
7.12 Additional transmitters
- After inserting the batteries into the outdoor transmitter the transmitter will automatically transmit the outdoor values to the weather station on channel 1.
- For having more than one outdoor transmitter, select a different channel (1 to 3) for every outdoor transmitter by pressing the CH button on the transmitter while the LED is flashing (after starting up of the transmitter). Press once for channel 2 and twice for channel 3. The LED is flashing once for channel 1, twice for channel 2 and three times for channel 3.
MODUS PLUS - Wireless weather station

- Press and hold the ▲/CH button on the base station for two seconds to start initialization manually. The channel number on the display appears. The reception symbol and -.-- flash. The reception of the new outdoor transmitter will be received automatically.
- If you have installed more than one outdoor transmitter, press the ▲/CH button to change between the outdoor transmitters.
- You can also choose an alternating channel display. Press the ▲/CH button three times until the circle symbol appears for alternating channel.
- To deactivate the function press the ▲/CH button again and the symbol disappears.
7.13 Positioning and fixing of base station and outdoor transmitter
- With the foldable leg at the back of the unit, the base station can be placed onto any flat surface or wall mounted at the respective location by the hanging hole at the back of the unit. Avoid the vicinity of any interfering field like computer monitors or TV sets and solid metal objects.
- Choose a shady and dry position for the transmitter. (Direct sunshine falsifies the measurement and continuous humidity strains the electronic components needlessly).
- Check the transmission of the signal from the outdoor transmitter to the base station (transmission range 75 m free field). Within ferro-concrete rooms (basements, superstructures), the received signal is naturally weakened.
- If necessary choose another position for the outdoor transmitter and/or base station.
- If the transmission is successfully, fix the outdoor transmitter by using a nail (not included) on the wall or place it onto a flat surface.
8. Care and maintenance
- Clean the instruments with a soft damp cloth. Do not use solvents or scouring agents.
- Remove the batteries if you do not use the products for a long period of time.
- Keep the instruments in a dry place.
8.1 Battery replacement
- Replace the batteries when the battery symbol of the base station appears next to the time display.
- When the batteries of the transmitter are used up, the low battery icon appears next to the outdoor temperature display.
- Make sure the polarities are correct. Close the covers again.
- Please note: When the batteries are changed, the contact between transmitter and receiver must be restored – so always insert new batteries into both units or start a manual transmitter search.
MODUS PLUS – Wireless weather station
GB
9. Troubleshooting
Problems Solution
No indication → Observe correct polarity when inserting on the weather station the batteries
→ Change the batteries
No transmitter reception → No transmitter installed
Display “---” → Check batteries of external transmitter for channel 1/2/3 (do not use rechargeable batteries!)
→ Restart the transmitter and weather station according to the manual
→ Start manual search for the transmitter
→ Choose another place for the transmitter and/or the weather station
→ Reduce the distance between the transmitter and the weather station
→ Check if there is any source of interference
No DCF reception → See: "No reception of the transmitter"
→ Manual clock setting
→ Wait for attempted reception during the night
Incorrect indication → Change the batteries
10. Waste disposal
This product has been manufactured using high-grade materials and components which can be recycled and reused.

Never dispose of empty batteries and rechargeable batteries in household waste.
As a consumer, you are legally required to take them to your retail store or to appropriate collection sites depending on national or local regulations in order to protect the environment.
The symbols for the heavy metals contained are:
Cd=cadmium, Hg=mercury, Pb=lead

This instrument is labelled in accordance with the EU Waste Electrical and Electronic Equipment Directive (WEEE).
Please do not dispose of this instrument in household waste. The user is obligated to take end-of-life devices to a designated collection point for the disposal of electrical and electronic equipment, in order to ensure environmentally-compatible disposal.
MODUS PLUS - Wireless weather station
GB
11. Specifications
Base station:
| Measuring range indoorTemperature: -10 °C... +60 °C (+14°...+140 °F) | |
| Resolution: 0.1 °C (0.2 °F) | |
| Humidity: | 20 %rH ... 99 %rH |
| Operating environment: | 0 °C...+50 °C (+32 °F...+122 °F) |
| Power consumption: | 3 x 1.5 V AA (Batteries not included)Use alkaline batteries |
| Dimensions: | 100 x 34 (84) x 168 mm |
| Weight: | 237 g (instrument only) |
Outdoor transmitter:
| Measuring range outdoor Temperature: -40°C... +60 °C (-40°...+140 °F) | |
| Resolution: 0.1 °C (0.2 °F) | |
| Humidity: | 20 %rH ... 99 %rH |
| Operating environment: | -20 °C ...+60 °C (-4 °F...+140 °F) |
| Range: | max. 75 m (free field) |
| Transmission frequency: | 868 MHz |
| Maximum radio-frequency power: | < 25 mW |
| Transmission time: 120 seconds | |
| Power consumption: | 2 x 1.5 V AA (Batteries not included) Use alkaline batteries |
| Dimensions: | 53 x 26 x 105 mm |
| Weight: | 50 g (instrument only) |
MODUS PLUS – Wireless weather station
GB
No part of this manual may be reproduced without written consent of TFA Dostmann. The technical data are correct at the time of going to print and may change without prior notice. The latest technical data and information about this product can be found in our homepage by simply entering the product number in the search box.
EU declaration of conformity
Hereby, TFA Dostmann declares that the radio equipment type 35.1122 is in compliance with Directive 2014/53/EU. The full text of the EU declaration of conformity is available at the following Internet address: www.tfa-dostmann.de/service/downloads/ce
www.tfa-dostmann.de
Cd = cadmium, Hg = mercure, Pb = plomb


- MODUS PLUS – WIRELESS WEATHER STATION
- BEFORE YOU START USING IT
- DELIVERY CONTENTS
- FIELD OF OPERATION AND ALL THE BENEFITS OF YOUR NEW INSTRUMENT AT A GLANCE
- FOR YOUR SAFETY
- MODUS PLUS - WIRELESS WEATHER STATION
- CAUTION! RISK OF INJURY
- IMPORTANT INFORMATION ON PRODUCT SAFETY
- ELEMENTS
- WEATHER STATION (BASE STATION)
- A: LCD DISPLAY (FIG. 1)
- GETTING STARTED
- INSERT BATTERIES
- RECEPTION OF OUTDOOR TEMPERATURE AND HUMIDITY
- RADIO-CONTROLLED TIME RECEPTION
- NOTE FOR RADIO-CONTROLLED TIME DCF
- PLEASE TAKE NOTE OF THE FOLLOWING
- OPERATION
- 7.1 MANUAL SETTING OF THE CLOCK, CALENDAR AND DAY-OF-WEEK LANGUAGE
- 7.2 RECALL OF TIME, WEEKDAY, ALARM TIME AND DATE
- 7.3 SETTING OF THE ALARM
- 7.4 ACTIVATE/TURN OFF THE DIFFERENT ALARM TIMES
- 7.5 MAXIMUM AND MINIMUM VALUES
- 7.6 WEATHER FORECAST SYMBOLS
- 7.7 TEMPERATURE INDICATION
- 7.8 WEATHER TREND POINTER
- 7.9 INDICATION OF ACTUAL MOON PHASE
- 7.10 BACKLIGHT
- 7.11 OUTDOOR TRANSMITTER
- 7.12 ADDITIONAL TRANSMITTERS
- 7.13 POSITIONING AND FIXING OF BASE STATION AND OUTDOOR TRANSMITTER
- CARE AND MAINTENANCE
- 8.1 BATTERY REPLACEMENT
- TROUBLESHOOTING
- PROBLEMS SOLUTION
- WASTE DISPOSAL
- SPECIFICATIONS
- BASE STATION
- EU DECLARATION OF CONFORMITY
- WWW.TFA-DOSTMANN.DE
Brand : TFA
Model : Modus Plus
Category : Weather Station