
Grip 500 - Mouse TURTLE BEACH - Free user manual and instructions
Find the device manual for free Grip 500 TURTLE BEACH in PDF.


| Product Type | Wired Gaming Mouse |
| Brand | Turtle Beach |
| Model | Grip 500 |
| Connectivity | USB 2.0 |
| Sensor Type | Optical |
| DPI Range | 200 - 12,000 DPI (adjustable) |
| Button Count | 6 programmable buttons |
| Lighting | RGB customizable lighting |
| Dimensions (L x W x H) | 125 x 70 x 40 mm |
| Weight | 100 g (without cable) |
| Cable Length | 1.8 m braided cable |
| Power Source | USB bus powered |
| Main Functions | Gaming, productivity, DPI switching, onboard memory |
| Ergonomics | Right-handed, contoured grip |
| Material | Matte plastic with rubber side grips |
| Compatibility | Windows 10/11, macOS (basic function) |
| Software | Swarm II software for customization |
| Cleaning | Wipe with a dry cloth; avoid liquids |
| Safety | Do not expose to moisture or extreme temperatures |
| Spare Parts / Repairability | Not user-serviceable; contact support for issues |
| General Information | Official Turtle Beach product; includes user manual |
Frequently Asked Questions - Grip 500 TURTLE BEACH
User questions about Grip 500 TURTLE BEACH
0 question about this device. Answer the ones you know or ask your own.
Ask a new question about this device
Download the instructions for your Mouse in PDF format for free! Find your manual Grip 500 - TURTLE BEACH and take your electronic device back in hand. On this page are published all the documents necessary for the use of your device. Grip 500 by TURTLE BEACH.
USER MANUAL Grip 500 TURTLE BEACH
natural_image
Simple illustration of a palm tree inside a black triangle frame (no text or symbols)TURTLE BEACH®
Table of Contents
Table of Contents......4
Introduction 5
Installation 5
Opening and Closing Grip 500 Configuration Software ....6
Configuring Your Grip 500 Mouse....7
Main Window....7
Profiles....7
Button Assignments....7
Performance Settings 9
Setting DPI levels 9
Setting DPI in each level 9
Setting Report [Polling] Rate 10
Setting Lift-Off Height 10
Setting Double Click Speed....10
Illumination Settings 11
Setting the Illumination Effect....11
Setting the Scroll Wheel Color....11
Macro Editor 12
Creating New Macros....12
Recording Macros with no Delays....13
Recording Macros with a Set Delay....13
Editing Macros....14
Saving, Loading, Deleting Macros 14
Help 14
Introduction
Welcome to the Turtle Beach Grip 500 Gaming Mouse User's Guide. This user's guide is intended to introduce you to the features and operation of your Grip 500 Gaming Mouse and the configuration software that can be used to enable and configure all its powerful features.
For more help, visit www.turtlebeach.com/grip500.
Installation
Visit www.turtlebeach.com/grip500 to download the Grip 500 Configuration Software.
After the download completes, open the installer and follow the on-screen installation instructions.
After installation, the Grip 500 Configuration Software will start and run in the background. You can launch the program by double clicking it in the system tray per the picture below.


Plug your Grip 500 Mouse into an available USB port. Occasionally, Turtle Beach will upgrade the firmware in the mouse. If the program says that it wants to upgrade the firmware in your mouse, please click OK and the mouse firmware will be updated.
By default, the Grip 500 Configuration Software will be located in your Program Files folder on Windows.
Installation Requirements
Grip 500 Configuration Software requires approximately 50 MB of free hard drive space and one of the currently platforms:
Windows XP
Windows Vista
Windows 7
Windows 8
Windows 8.1
Opening and Closing Grip 500 Configuration Software
When you close the application, an icon will remain in the system tray. You can relaunch the application by double clicking on the Turtle Beach icon in the system tray

You can also start the application by launching it from the Windows Start menu [in Windows 7] or from the Apps launcher [in Windows 8].
You can minimize the application by pressing the _ icon. In this cause the application to remain open in the background and can be quickly reopened from the Task Bar. You can close the application by pressing the X icon. This closes the application but it remains available in the System Tray.
Configuring Your Grip 500 Mouse
You can enable features and customize the configuration of you Grip 500 from the main configuration window and the subsequent windows that open depending on what you are adjusting.
Main Window
Basic operations such as assigning actions to buttons and managing Profiles are accomplished from the main window.

flowchart
graph TD
    A["Open Performance Window"] --> B["Performance Settings"]
    C["Open Illumination Window"] --> D["Illumination Options"]
    E["Open Macro Editor"] --> F["Macro Editor"]
    B --> G["Profile 1"]
    D --> H["Profile 2"]
    F --> I["Profile 3"]
    G --> J["Profile 4"]
    H --> K["Profile 5"]
    I --> L["Profile 5"]
    J --> M["? - X"]
    K --> N["Profile 5"]
    L --> O["Profile 5"]
    M --> P["Profile 5"]
    N --> Q["Profile 5"]
    O --> R["Profile 5"]
    P --> S["Profile 5"]
    Q --> T["Profile 5"]
    R --> U["Profile 5"]
    S --> V["Profile 5"]
    T --> W["Profile 5"]
    U --> X["Profile 5"]
    V --> Y["Profile 5"]
    W --> Z["Profile 5"]
    X --> AA["Profile 5"]
    Y --> AB["Profile 5"]
    Z --> AC["Profile 5"]
    AA --> AD["Profile 5"]
    AB --> AE["Profile 5"]
Profiles
Grip 500 can be programmed with up to 5 Profile. A Profile holds all the configuration settings of you mouse including button assignments, macro assignments, illumination settings, and performance settings. It may be convenient to create a custom profile for your favorite games or applications. We also suggest that you select a different scroll wheel illumination color for each profile so that you can quickly see which profile you have selected.
The 5 profiles are stored in memory on the mouse so they will be present even if you plug your mouse into another computer that does not have the software installed. The profile that is active on the mouse is selected either by clicking on the Profile bar at the top of the window or by pressing the Profile button on the bottom of the mouse. Pressing the Profile button will cycle through your 5 Profiles. The currently active Profile will be on the top layer of the stack of Profiles and is Darkened while the other profiles are in the background and are gold colored.
To create a custom profile, select the settings and button assignments that you would like and then click on Apply. Pressing the Apply Button loads the Profile to the mouse and leaves the Configuration Window open for more operations. Pressing the OK button loads the Profile settings to the mouse and then closes the Window. Pressing the Cancel Button cancels all changes.
Button Assignments
All 9 buttons on the Grip 500 can be reprogrammed to do almost anything you want. This includes the scroll up
and down.
You can program any of the following to buttons using the Button Assignment pull-down menus.
- Mouse buttons - Left click, right click, middle click, mouse button 4 and 5, scroll up, scroll down. You can also Deactivate the button.
• Sensitivity [DPI] - Up, Down, or Cycle to next setting. - Keyboard keys _ Up to 3 simultaneous keystrokes along with CTRL SHIFT, ALT, and WIN modifier keys.
- Macros - You can create up to 50 complex Macros with up to approximately 100 commands each and then assign them to any button. First create the macro (See the Macro Creation section) and then assign it to any button.
• Media Buttons _ Volume up, volume down, mute, play / pause, next, previous - Launch a program. By selecting Launch Program, you can program a button to automatically launch another program. Select Launch Program and then locate the application .exe file. They usually are in your Program Files or Program Files [x86] folder.
To program a button simply select that button in the Button Assignment list. A pull-down menu will appear with all the available options. Just select the one you want to assign to that button. After programing a button with a new command hit the Apply or OK button to apply it to your mouse.

Performance Settings
To customize the performance settings of your mouse, press the Performance Settings button. This will open the Performance Settings Window.

flowchart
graph TD
    A["Active Level"] --> B["PERFORMANCE SETTING"]
    B --> C["DPI Levels (up to 4)"]
    C --> D["Level 1"]
    D --> E["Level 2"]
    E --> F["Level 3"]
    F --> G["Level 4"]
    G --> H["4"]
    H --> I["Set # of DPI Levels"]
    C --> J["Set DPI"]
    J --> K["400"]
    K --> L["100"]
    L --> M["1400"]
    M --> N["Customize Different Speed X-DPI 400 Y-DPI 1400"]
    N --> O["Report Rate"]
    O --> P["125"]
    P --> Q["250"]
    Q --> R["500"]
    R --> S["1000"]
    S --> T["Set Report Rate"]
    U["Set Lift-Off Height"] --> V["Lift-Off Height"]
    V --> W["Low"]
    W --> X["High"]
    X --> Y["Double Click Speed"]
    Y --> Z["Fast"]
    Z --> AA["Slow"]
    AA --> AB["Set Double Click Speed"]
    AC["Apply Changes"] --> AD["Apply Changes and Close"]
    AE["OK"] --> AF["Cancel Changes"]
    AG["Cancel Changes"] --> AH["Apply Changes and Close"]
This window allows you to customize the following for your mouse:
• Mouse movement speed [DPI] can be adjusted in up to 4 levels from DPI of 100 to 8200 in increments of 50 DPI.
- DPI for the X direction [horizontal] and Y direction [vertical] can be set differently if you'd like. This may useful in games where you want to be able to move or aim faster left to right than up and down.
- Report (Polling) Rate can be set in the following levels: 125, 250, 500, or 1000 Hertz. Generally if you have a fast computer, 1000 Hz is best. If you have a slower computer a lower setting may be better.
- Lift-Off Height. This adjustment allows you to tailor how high you have to life the mouse off the surface before it stops tracking. This can be useful to get the best performance from you mousepad and your personal preference of how high you like to pick up your mouse.
- Double click speed _ Adjusts how fast you click the buttons to get Windows to register it as a double clike.
Setting DPI levels
On the upper right section of the window, select the number of DPI levels you would like in this profile (from 1 to 4). This will change the number of panels that will be visible. The currently active Level will be on the top layer of the stack of Levels and is Darkened while the other Levels are in the background and are gold colored.
Setting DPI in each level
For each level that you created, set the DPI by sliding the DPI slider to the DPI you want. Or you can click in the DPI box and type the exact DPI into the box (in increments of 50 DPI).
If you'd like to set the X and Y DPI's differently, select the Customize Different Speed checkbox. This will then separate the DPI slider into 2 sliders and you can then set the X and Y DPI's to different numbers.
Press Apply or OK to save those settings. Click Cancel if you want to cancel what you changed.
Setting Report [Polling] Rate
Report rate is the frequency that the mouse reports its status to the Windows operating system. A setting of 1000 hertz means that it reports 1000 times per second or approximately once ever 1 mS. This is very fast. Most modern computers are fine getting information this quickly. You only need to adjust this setting if you have a slower computer or one that is doing a lot of other operations.
If you'd like to change it lower just click the switch corresponding to 125, 250, 500, or 1000 Hz.
Setting Lift-Off Height
You can change how high you have to lift the mouse off the surface for it to stop tracking. The default level is medium which is approximately 1.5 mm on the Turtle Beach Drift Mousepad. Using the slider you can adjust the lift distance from approximately 0.5 to 2.5 mm.
Experiment with levels from low to high to find the level you prefer.
Caution: While experimenting with lift distance, when you go to the lowest level, the mouse may stop tracking on some surfaces. Be sure to have another mouse input device (like a trackpad or a 2^nd mouse) so that you can still move your cursor around and select a higher Lift-Off distance if this happens.
Setting Double Click Speed
Slide the Double Click Speed cursor back and forth to adjust the Windows double click speed from fast to slow to fit your preference.
After changing settings always remember to press Apply or OK to save your settings to your mouse.
Illumination Settings
To customize the Illumination of your mouse press the Illumination Settings button. This will open the Illumination Settings Window.

In this window, you can set the illumination of the 3 zones [scroll wheel, Turtle Beach logo, and front grill].
Setting the Illumination Effect
Notice that when you hover your cursor over the logo, scroll wheel, or front of the mouse that that area glows brightly. Click on one of the 3 zones and then go over to the Effects pull-down menu and select the illumination effect you want. You can select from:
• OFF - Turn the illumination off
• Steady - The illumination stays on all the time
• Breathing - The illumination goes up and down like it is breathing.
- Battle - The illumination starts by being off but then gets brighter based on how fast you click your mouse buttons.
Setting the Scroll Wheel Color
The scroll wheel has a full RGB [red / green / blue] LED so you can set it to 16.8 million possible colors.
Hover your cursor over the scroll wheel and then click on it. This will enable the color picker. To set the color, first select the color using the vertical color bar. Then select the brightness / shade of that color in the Color / Shade picker.
The boxes on the bottom right tells you the value of the R[red], G[green], and B[blue] components of the LED. It also tells you the hex value of that color. These may be useful to set an exact color that you like from some other application.
After selecting the color and effect, remember to press Apply or OK.
As you use colors, the software will remember up to 10 colors and place them in the little boxes at the bottom of the scroll wheel color picker. You can reuse them later by clicking on the one you want.
Macro Editor
With the Grip 500 and its configuration software, you can create and assign complex combinations of keystrokes so that you can do almost anything you want. You can also insert commands and customize the timing / delays between those keystrokes.
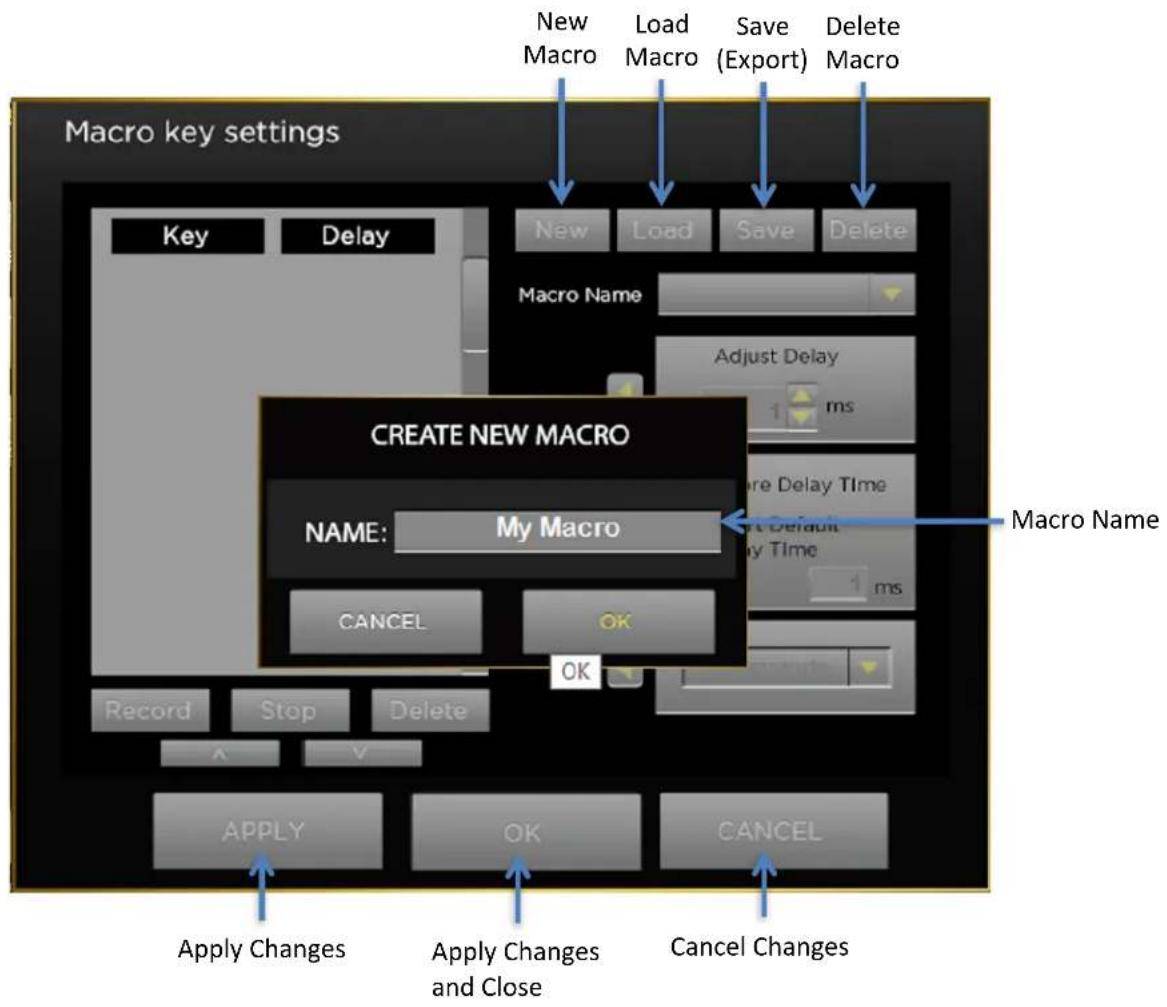
To enable the Macro Editor press the Macro Editor button which will bring up the main macro editor screen.
Creating New Macros
The first step is to create your macro. Press the New button and the above Create New Macro box will popup. Type in a name for your macro and then press OK.
Then press the Record button. Now all keystrokes that you type will be recorded along with the timing [how fast you are pressing the buttons]. When you have completed your macro click on the Stop button. Your macro is now ready to assign the any mouse button. If you want to make more detailed adjustments to your macro you can edit it using the same screen.
Recording Macros with no Delays
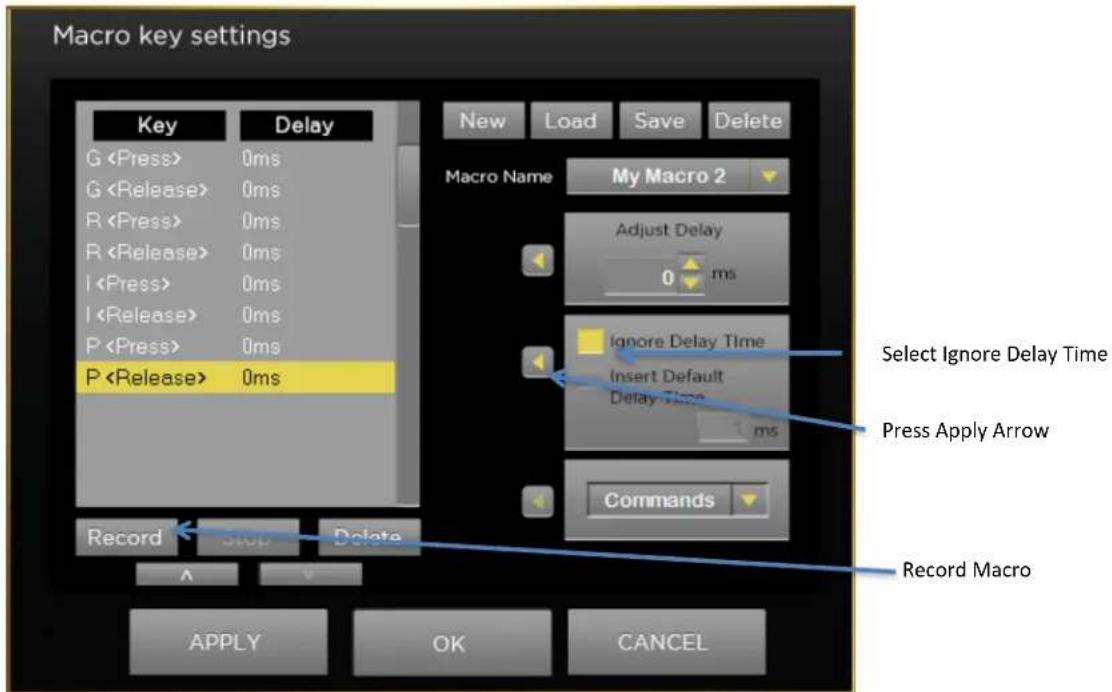
If you want to record macros with no delay between the keystrokes then before you click Record, select the box next to the Ignore Delay Time Box then click the apply Arrow. Then press Record and press all the keystrokes you want in your macro. Once you are complete, click on the Stop button. Now the delay between your keystokes will be 0 ms and they will be output to the computer as fast as possible.
Recording Macros with a Set Delay
If you want to record macros with the same non-zero delay between the keystrokes then before you click Record, select the box next to the Insert Default Time Box then click the apply Arrow. Then press Record and press all the keystrokes you want in your macro. Once you are complete, click on the Stop button. Now the delay between your keystokes will be the same number of ms and they will be output to the computer at that rate.

Editing Macros
You can also edit macros that you previously recorded from the macro editor window.
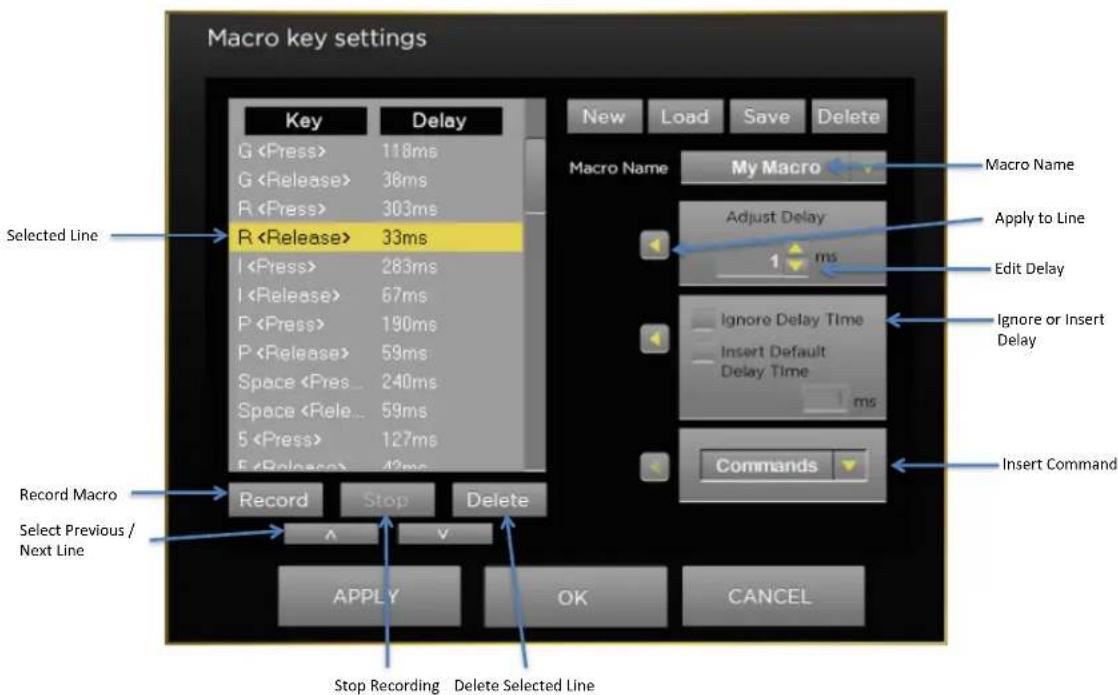
To change the timing of commands in your macro, select the line of the keystroke in the editor window and them change the delay in the Adjust Delay box. When you have the delay you want to apply to that line click on the left arrow to apply it to that line. You can apply the same delay [or a different one] on any step in your macro via the same method.
If you'd like to insert Commands (such as Page Up, Copy, Paste, Close Window, Undo, Print Screen, Zoom In) select the line just after where you would like to insert the command. Then select the desired Command from the Commands pull-down menu and press the Apply Arrow. Your command will be inserted just above the selected line.
Saving, Loading, Deleting Macros
You can save macros to a file for use later on another computer or to send to a friend.
To save a macro select the macro that you want to save and then press Save. Then select the location on your computer where you would like to save your macro. A file with a .mac file extension with the file name of your macro will be saved in that location. You can then copy or email that file to another computer and your macros will be there.
To load a macro that you saved, press the Load button and navigate to the location on your computer where the file is stored. The macro will now be available for use on that new computer. [Note: The other computer needs to have the Grip 500 Configuration software installed.]
Help
To access this manual at any time, press the ? [Help] button on the top right of the window.
- TURTLE BEACH®
- Table of Contents
- Table of Contents......4
- Introduction 5
- Installation 5
- Opening and Closing Grip 500 Configuration Software ....6
- Configuring Your Grip 500 Mouse....7
- Help 14
- Introduction
- Installation
- Installation Requirements
- Opening and Closing Grip 500 Configuration Software
- Configuring Your Grip 500 Mouse
- Main Window
- Profiles
- Button Assignments
- Performance Settings
- Setting DPI levels
- Setting DPI in each level
- Setting Report [Polling] Rate
- Setting Lift-Off Height
- Setting Double Click Speed
- Illumination Settings
- Setting the Illumination Effect
- Setting the Scroll Wheel Color
- Macro Editor
- Creating New Macros
- Recording Macros with no Delays
- Recording Macros with a Set Delay
- Editing Macros
- Saving, Loading, Deleting Macros
- Help
Brand : TURTLE BEACH
Model : Grip 500
Category : Mouse