
HP-A8C - Headphone amplifier FOSTEX - Free user manual and instructions
Find the device manual for free HP-A8C FOSTEX in PDF.

| Product Type | Headphone Amplifier / DAC |
| Model | HP-A8C |
| Brand | Fostex |
| Dimensions (W x H x D) | 215 x 60 x 180 mm |
| Weight | 1.5 kg |
| Power Supply | AC 100-240V, 50/60 Hz |
| Inputs | USB (Type B), Optical (Toslink), Coaxial (RCA), RCA pair (Line) |
| Headphone Outputs | 6.35mm (1/4") TRS, 4-pin XLR balanced |
| Line Outputs | RCA pair (fixed or variable) |
| Output Power | 500 mW + 500 mW (32 Ω) |
| Frequency Response | 20 Hz - 20 kHz ±0.5 dB |
| THD+N | <0.001% (1 kHz, 32 Ω, 1 V) |
| Signal-to-Noise Ratio | >110 dB |
| Supported Audio Formats | PCM up to 192 kHz/24-bit, DSD64/128 (DoP) |
| Volume Control | Analog potentiometer |
| Gain Selection | Low / High (rear switch) |
| Input Selection | Front panel button |
| Chassis Material | Aluminum |
| Accessories Included | AC power cord, USB cable, owner's manual |
| Cleaning Instructions | Wipe with soft dry cloth; avoid solvents |
| Safety Precautions | Use only specified voltage; do not cover ventilation slots; keep away from moisture |
| Repairability / Spare Parts | Contact Fostex authorized service center for repairs and genuine parts |
Frequently Asked Questions - HP-A8C FOSTEX
User questions about HP-A8C FOSTEX
0 question about this device. Answer the ones you know or ask your own.
Ask a new question about this device
Download the instructions for your Headphone amplifier in PDF format for free! Find your manual HP-A8C - FOSTEX and take your electronic device back in hand. On this page are published all the documents necessary for the use of your device. HP-A8C by FOSTEX.
USER MANUAL HP-A8C FOSTEX
32 bit/DAC Headphone amplifier
HP-A8C
Thank you very much for purchasing a Fostex product. This manual provides instructions for basic use of the unit. Read this before using the unit for the first time.
Before connecting this product to a Windows computer with a USB cable, install the USB Audio Class 2.0 driver for HP-A8C.
You can download the driver software from our website.
http://www.fostexinternational.com/docs/products/HP-A8C.shtml
For macintosh computers, you can use the product without downloading the driver software.
WARNINGS and PRECAUTIONS
- CAUTION: TO PREVENT ELECTRIC SHOCK, MATCH WIDE BLADE OF PLUG TO WIDE SLOT, FULLY INSERT.
ATTENTION: POUR PREVENIR LES CHOCS ELECTRIQUES, APAR DE LA FENTE LARGE, FOND.
- WARNING: To reduce the risk of fire or electric shock, do not expose this apparatus to rain or moisture.
- CAUTION: Use of any controls or adjustments or performance of procedures other than those herein specified may result in hazardous radiation exposure.
- WARNING: Changes or modifications to this unit not expressly approved by the party responsible for compliance could void the user's authority to operate the equipment.
- WARNING: Do not place the unit on top of any soft, porous, or sensitive surfaces to avoid damaging the surface. Use a protective barrier between the unit and surface to protect the surface.
- WARNING: Use of this unit near fluorescent lighting may cause interference regarding use of the remote. If the unit is displaying erratic behavior move away from any fluorescent lighting, as it may be the cause.
- CAUTION: Danger of explosion if battery is incorrectly replaced. Replace only with the same or equivalent type.
- WARNING: Do not install this equipment in a confined space such as a book case or similar unit.
- WARNING: Mains plug is used as disconnect device and it should remain readily operable during intended use. In order to disconnect the apparatus from the mains completely, the mains plug should be disconnected from the mains socket outlet completely.
The lightning flash with arrowhead symbol, within an equilateral triangle, is intended to alert the user to the presence of uninsulated “dangerous voltage” within the product’s enclosure that may be of sufficient magnitude to constitute a risk of electric shock to persons.

IMPORTANT SAFETY INSTRUCTIONS
1) Read these instructions. Lisez ces instructions.
2) Keep these instructions. Conservez ces instructions.
3) Heed all warnings. Respectez tous les avertissements.
4) Follow all instructions. Suivez toutes les instructions.
8) Do not install near any heat sources such as radiators, heat registers, stoves, or other apparatus (including amplifiers) that produce heat.
12) Use only with the cart, stand, tripod, bracket, or table specified by the manufacturer, or sold with the apparatus. When a cart is used, use caution when moving the cart/apparatus combination to avoid injury from tipover.

14) Refer all servicing to qualified service personnel. Servicing is required when the apparatus has been damaged in any way, such as power supply cord or plug is damaged, liquid has been spilled or objects have fallen into the apparatus, the apparatus has been exposed to rain or moisture, does not operate normally, or has been dropped.
17) Mains plug is used as disconnect device. It shall remain readily operable and should not be obstructed during intended use. To completely disconnect the apparatus from supply mains, the main plug of the apparatus shall be disconnected from the mains socket outlet completely.
This product, when installed as indicated in the instructions contained in this manual, meets FCC and ICES-003 requirements. Changes or modifications not expressly approved by Fostex Company for compliance could void the user's authority to operate the equipment. DO NOT MODIFY THIS PRODUCT.
2. IMPORTANT
In order to comply with FCC and ICES-003 requirements, use high quality shielded cables for connection to accessories and / or another products. If any cables are supplied with this product, they MUST be used. Follow all installation instructions. Failure to do so could void your FCC / ICES-003 authorization to use this product in the USA / Canada.
3. NOTE
This equipment has been tested and found to comply with the limits for a Class B digital device, pursuant to Part 15 of the FCC Rules. These limits are designed to provide reasonable protection against harmful interference in a residential installation. This equipment generates, uses and can radiate radio frequency energy and, if not installed and used in accordance with instructions, may cause harmful interference to radio communications. However, there is no guarantee that interference will not occur in a particular installation.
If this equipment does cause harmful interference to radio or television reception, which can be determined by turning the equipment off and on, the user is encouraged to correct the interference by one or more of the following measures:
- Reorient or relocate the receiving antenna.
- Increase the separation between the equipment and receiver.
- Connect the equipment into an outlet on a circuit different from that to which the receiver is connected.
-
Consult the dealer or an experienced radio/TV technician for help.
-
Compliance with Part 15 of FCC Rules and Canadian ICES-003.
This device complies with Part 15 of the FCC Rules.
Operation is subject to the following two conditions:
(1) This device may not cause harmful interference, and
(2) this device must accept any interference received, including interference that many cause undesired operation.
This Class B digital apparatus complies with Canadian ICES-003.
WARNINGS and PRECAUTIONS ......2
IMPORTANT SAFETY INSTRUCTIONS .....3
Introductions ....5
Features of the HP-A8C 5
Accessories 5
Functions 6
Front panel 6
Rear panel 7
Remote controller 8
Connecting external audio devices .....9
Connecting output devices ....10
Connecting the power cord .....10
Listening to an external audio device ...11
Listening to the external device .....11
Listening to the files on an SD card .....12
playable files 12
Hierarchy example in the SD card .....12
Ejecting the SD card ....13
Using remote controller ....13
Changing the settings ......14
Setting item list ....14
Troubleshooting ....17
Resetting the product .....17
Updating the version ....18
Specifications ......19
* Microsoft, Windows and Windows Vista are either registered trademarks or trademarks of Microsoft Corporation in the United States and/or other countries.
* Apple, Macintosh, Mac and Mac OS are trademarks of Apple Inc., registered in the U.S. and other countries. Other company names and product names in this document are the trademarks or registered trademarks of their respective owners.
* All other company names, product names and logos are trademarks or registered trademarks of their respective owners.
* "DSD" is a trademark.
* ASIO is a trademark of Steinberg Media Technologies GmbH.
European model only
The HP-A8C conforms to ErP directive and pursues energy efficiency. When the operation continues for about 30 minutes, it will automatically turn OFF the power. This mode can be disabled by the "AUTO POWER OFF" on the Setting item list.

Introductions
HP-A8C is a DAC headphone amplifier with high efficiency, high-quality sound. You can enjoy high-quality digital audio signals from your computer or from a digital audio player.
■ Features of the HP-A8C
• Headphone amplifier equipped with high-quality sound 32bit-DAC (AK4399) and all discrete circuit.
• Supports a sampling frequency of up to 32 bit/192 kHz through in house developed USB driver. In addition, supports DSD 2.8 MHz (DoP/ASIO).
- Eliminates the jitter caused by low accuracy of the source clock of the computer etc. by using the asynchronous mode of a high precision TCXO (temperature compensated crystal oscillator) clock.
• Equipped with high-quality sound, high-accuracy electronic volume for audio level control.
• Equipped with a large capacity toroidal power transformer.
- Computers, and digital and analog audio devices can be used as the input source.
- Plays DSF files, WAV files and AIFF files on an SD (SDHC) card directly using built-in SD (SDHC) card drive. The drive can also be used for future updates.
• Equipped with an analog output terminal (RCA pin jack).
- Both the internal clock and the external clock are available for the master clock (only for SPDIF).
- 2x or 4x upsampling function (can also be turned off).
- Switchable digital filter.
• 24 level gain settings for headphone output.
- Direct analog output that does not pass through the volume.
• Equipped with an infrared remote controller.
• Equipped with an organic EL display.
• Equipped with independent clocks for 44.1K factor and 48K factor.
■ Accessories
Supplied accessories are listed below. Confirm that accessories are present after purchase.
- Remote controller × 1
- Power cord × 1
- Owner's Manual (this book) × 1
• Safety information sheet × 1
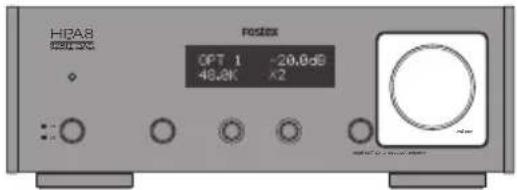
Functions
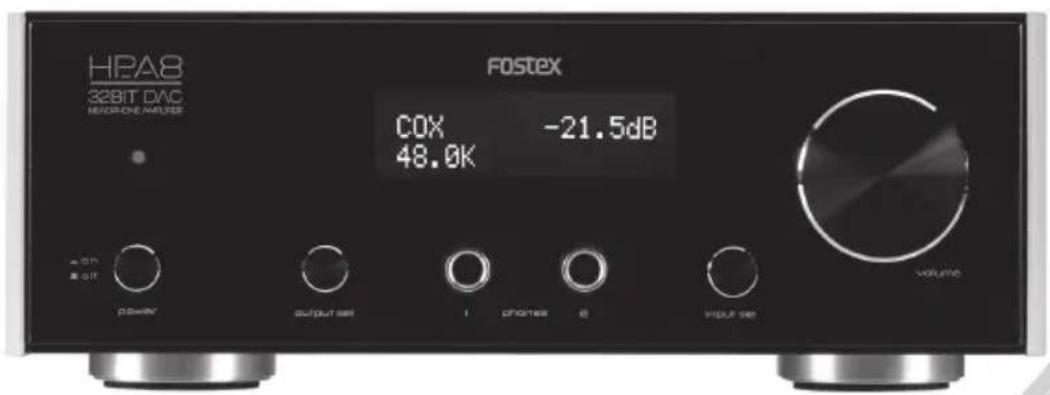
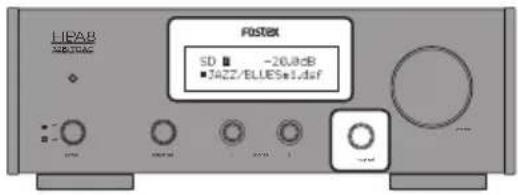
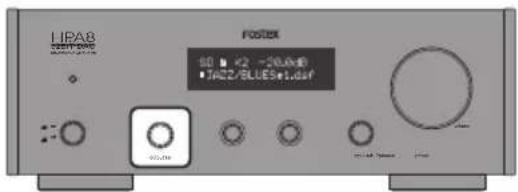
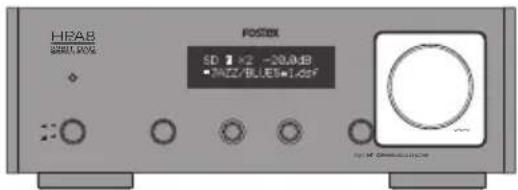
Front panel
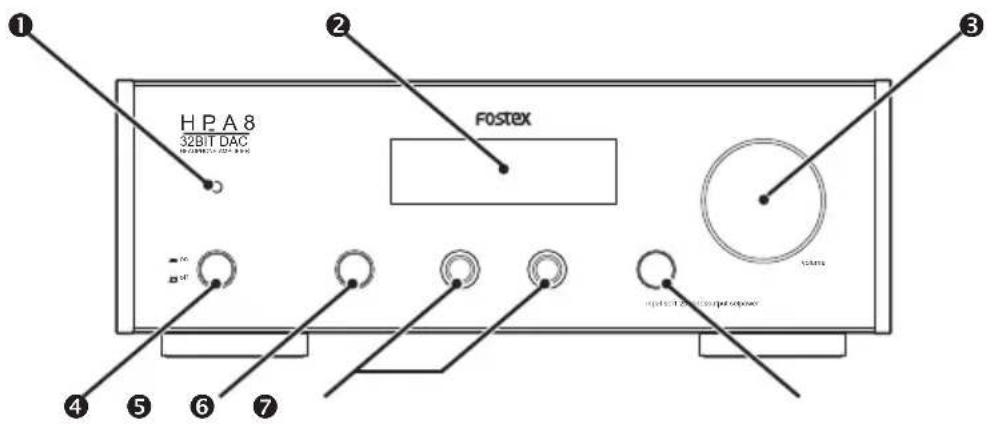
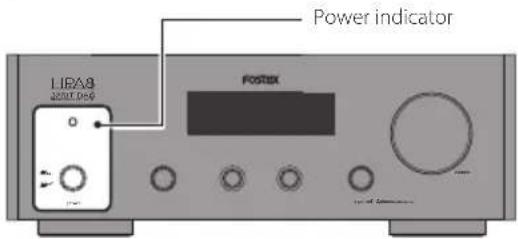
① Power indicator
Lights in red when the power is on.
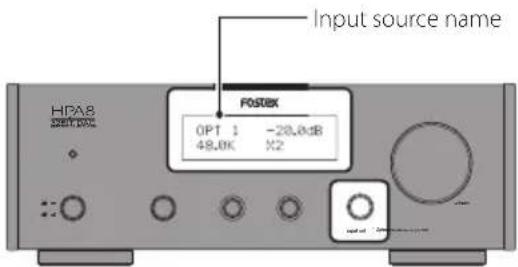
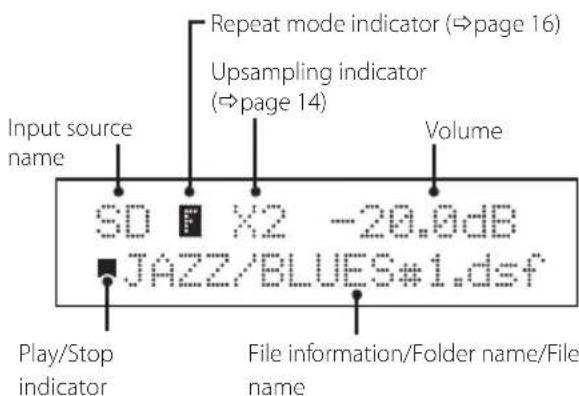
② Display
Variousinformation(⇒page11,13)andmenu screen (⇒page 14) are displayed.
③ volume knob
Adjusts the volume of the headphones or the analog output.
Note
- You can not adjust the analog output volume when the "DIRECT" setting is set to "ON" (⇒page 15)
④ power switch
Switches the power on/off. The recessed position is on.
When set up item "AUTO POWER OFF" is set to "ON", the HP-A8C will automatically turn OFF the power. Press the switch twice to return the power ON. You can disable "AUTO POWER OFF" mode by Setting item.
⑤ output sel switch
Switches the output source. Outputs the signal from analog output terminal at the recessed position.
⑥ [phones] terminals (1/2)
Connect the headphones with a standard stereo jack. Up to 2 pairs of headphones can be connected at the same time.
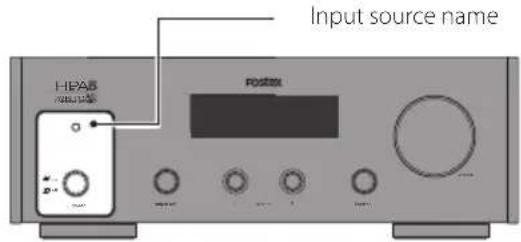
⑦ input sel knob/switch
Turn the knob clockwise or counterclockwise to switch the input source ( page 11).
Also, press and hold the switch to display the menu screen, and press to select a menu item. (⇒page 14).
Rear panel
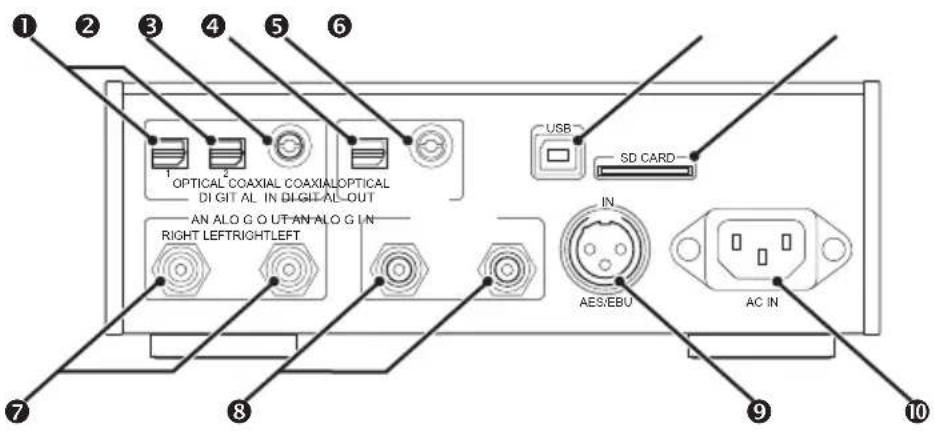
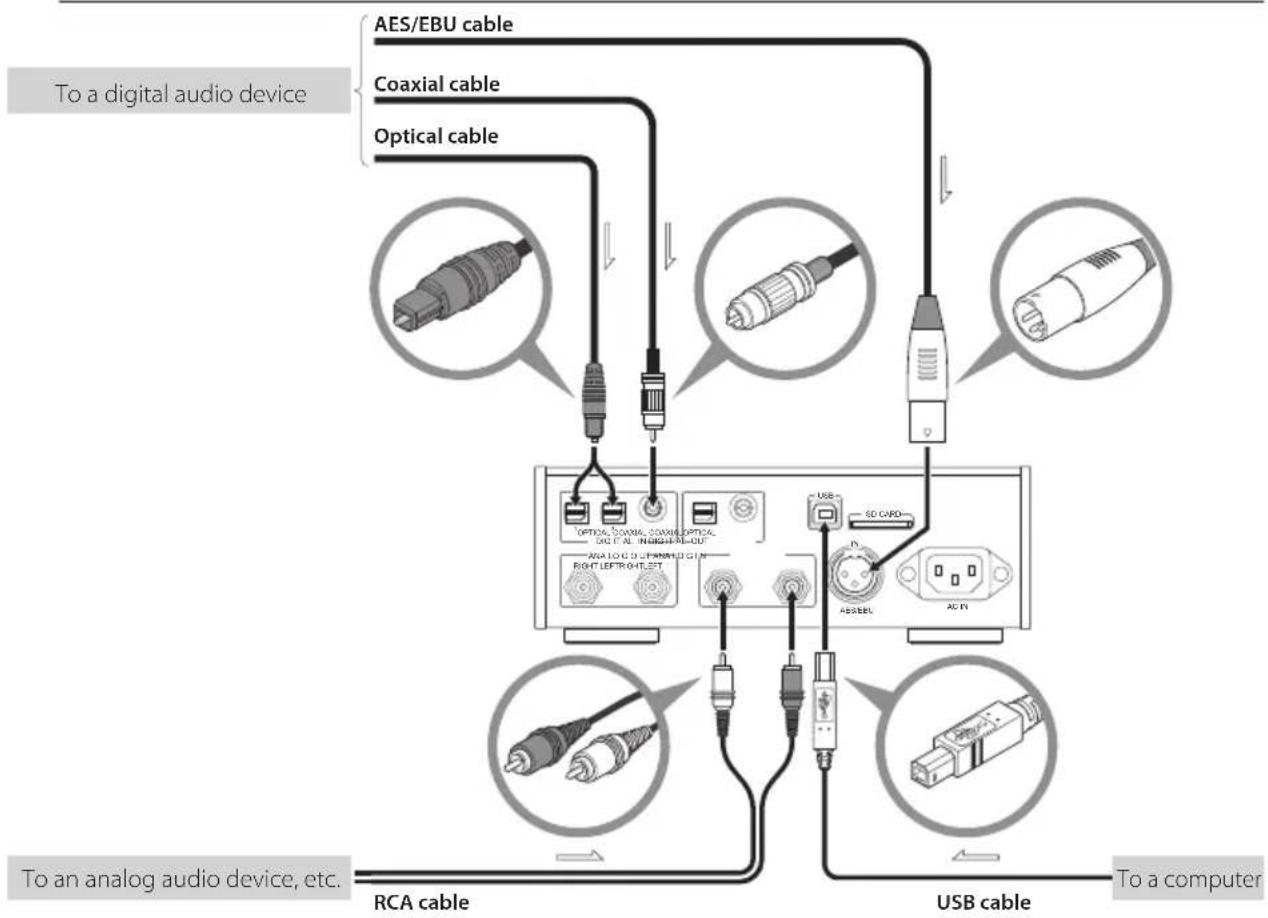
①[DIGITAL IN - OPTICAL] terminals (1/2)
Connect a digital audio device as an input source using a square optical cable. Up to 2 devices can be connected at the same time.
② [DIGITAL IN - COAXIAL] terminal
Connect a digital audio device as an input source using a coaxial cable.
③[DIGITAL OUT - OPTICAL] terminal
Outputs a digital audio signal to the connected digital audio device via a square optical cable.
④ [DIGITAL OUT - COAXIAL] terminal
Outputs a digital audio signal to the connected digital audio device via a coaxial cable.
⑤ [USB] terminal
Connect a computer (Win/Mac) as an input source using a USB cable.
⑥ [SD CARD] slot
Insert an SD (SDHC) card including WAV files, AIFF files or DSF files with the label side facing upward.
⑦ [ANALOG OUT] terminals (RIGHT/LEFT)
Connect a device such as an amplifier using an RCA pin cable.
⑧ [ANALOG IN] terminals (RIGHT/LEFT)
Connect an analog audio device as an input source using an RCA pin cable.
⑨ [AES/EBU] terminal (IN)
Connect a digital audio device as an input source using an AES/EBU cable.
⑩ [AC IN] terminal
Connect the supplied power cable.
Note
- S/PDIF format is used for digital audio input/output.
- The signal is always output from the [DIGITAL OUT] terminal regardless of the "OUTPUT SEL" setting (⇒ page 11, 13). Digital signal does not output when the input source is set to [ANALOG IN] ("RCA") or a DSD signal is input.
■ Remote controller
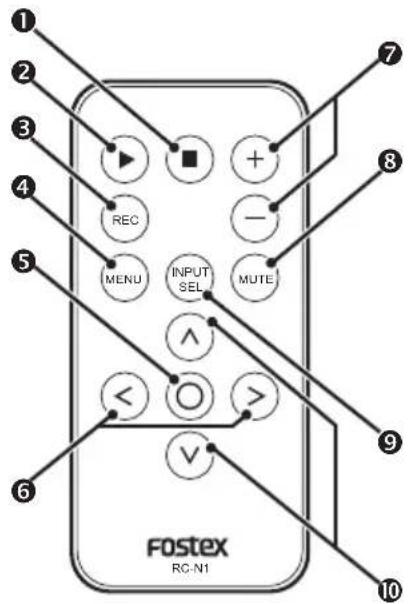
① ■ key
Playback stops when the input source is set to SD (SDHC) card ("SD").
②▶ key
Playback starts when the input source is set to SD (SDHC) card ("SD").
③ REC key
Not used.
④ MENU key
Menu screen is displayed. Press again to exit the menu.
⑤ ○ key
Unmounts the SD card.
In the menu screen, selects the displayed menu item.
⑥ keys
Selects the previous/next file when the input source is set to SD (SDHC) card ("SD"). In the menu screen, switches the menu item or the setting value.
Note
- The included battery is for checking operation. Replace it as soon as possible.
- Read "Safety information for Fostex product using electricity" (attached sheet) and handle the battery correctly.
- Dispose of the battery in the proper manner according to the local regulations.
⑦ +/- keys
Adjusts the volume of the headphones or the analog output. It has the same function as the volume knob of the main unit.
⑧ MUTE key
Mutes the sound of the headphones or the analog output temporarily. Press again to return the sound.
Note
- Mute is cancelled when you change the volume.
- You cannot mute the analog output sound when the "DIRECT" setting is set to "ON" (⇒ page 14).
⑨ INPUT SEL key
Switches the input source ( page 11). It has the same function as the input sel knob of the main unit.
⑩ ∧ / v keys
Selects the previous/next folder when the input source is set to SD (SDHC) card ("SD").

Connecting external audio devices
Connect a digital audio device as an input source to the digital audio input terminal, square optical terminals [OPTICAL 1]/[OPTICAL 2], the coaxial terminal [COAXIAL] or the AES/EBU terminal [AES/EBU].
Connect an analog audio device as an input source to the analog audio input terminal [ANALOG IN].
To listen to music files from a computer, connect the computer to the USB terminal [USB].
To change the input source, turn the input sel knob on the front panel.

Note
- Do not connect the power cord until all connections are finished.
flowchart
graph TD
    A["To a digital audio device"] --> B["AES/EBU cable"]
    A --> C["Coaxial cable"]
    A --> D["Optical cable"]
    B --> E["USB cable"]
    C --> E
    D --> E
    E --> F["To an analog audio device, etc."]
    style A fill:#f9f,stroke:#333
    style B fill:#ccf,stroke:#333
    style C fill:#ccf,stroke:#333
    style D fill:#ccf,stroke:#333
    style E fill:#cfc,stroke:#333
    style F fill:#fcc,stroke:#333
Connecting output devices
Connect headphones to the headphone terminals [phones] (1/2) on the front panel, or connect an amplifier or active speaker to the analog output terminal [ANALOG OUT] to enjoy music.
To change the output, use the output sel switch on the left side of the front panel. You can obtain S/PDIF format signals through the square optical terminal [OPTICAL] or coaxial terminal [COAXIAL] when connecting a digital audio device.
Note
- Do not connect the power cord until all connections are finished.
- The signal is always output from the [DIGITAL OUT] terminal regardless of the "OUTPUT SEL" setting (⇒ page 11, 13). Digital signal does not output when the input source is set to [ANALOG IN] ("RCA") or a DSD signal is input.

flowchart
graph TD
    A["Front panel"] --> B["Headphones"]
    B --> C["Fostex TH900, etc. (sold separately)"]
    C --> D["Coaxial cable"]
    C --> E["Optical cable"]
    D --> F["Rear panel"]
    E --> F
    F --> G["Fostex PM0.5d, etc. (sold separately)"]
    G --> H["RCA cable"]
    H --> I["To an analog amplifier, etc."]
    I --> J["To an AC outlet"]
■ Connecting the power cord
Connect the power cord after all connections are finished.

Listening to an external audio device
You can enjoy music from the external audio device connected to the unit through headphone output or analog output.
Connect the desired device before the operation. ( page 9)
■ Listening to the external device
1 Turn on the product.
Push in the power switch.
The power indicator lights in red when the power is on.

Note
- When an amplifier is connected, turn the volume of the amplifier to the minimum before powering on the product.
2 Select the input source.
Turn the input sel knob on the main unit, or press the INPUT SEL key on the remote control.
- "AES/EBU": Device connected to [AES/EBU]
- "USB": Computer connected to [USB]
• "RCA": Device connected to [ANALOG IN] - "SD": Inserted SD card (→page 12)
- "COX": Device connected to [COAXIAL]
• "OPT1": Device connected to [OPTICAL 1]
• "OPT2": Device connected to [OPTICAL 2]
3 Select the output source.
Select headphones or analog output.
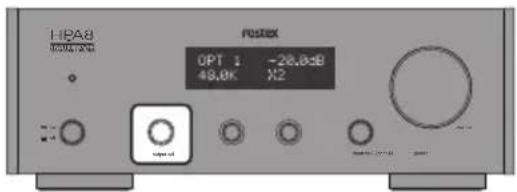
• Listening via headphones:
Do not push in the output sel switch

output sel
- Listening via analog output:
Push in the output sel switch

output sel
4 Adjust the volume.
Turn the volume knob on the main unit, or press the +/- key on the remote control.

Note
- You cannot adjust the analog output volume when the "DIRECT" setting is set to "ON".
- You can change the input source selecting method with the "INPUT SEL MODE" setting (⇒page16).
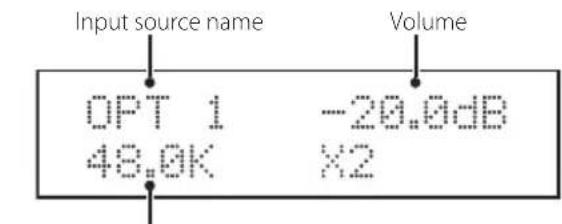
Sampling frequency (Fs)
Listening to the files on an SD card
You can enjoy DSF files, WAV files and AIFF files.
■ Playable files
Note
- Format the card in FAT32.
- The maximum number of folders you can create on an SD card is 15.
- The maximum number of files you can copy in each folder is 30.
- You can use up to 50 alphanumeric characters for folder names, 70 characters for file names. 2 byte characters are displayed as "☐".
DSF files (extension: .dsf)
Format: 2.8 MHz
WAV files (extension: .wav), AIFF files (extension: .aiff)
- Sampling frequency: 44.1 kHz, 48 kHz, 88.2 kHz, 96 kHz
- Bit rate: 16 Bit, 24 Bit, 32 Bit
- Format: Linear PCM
■ Hierarchy example in the SD card
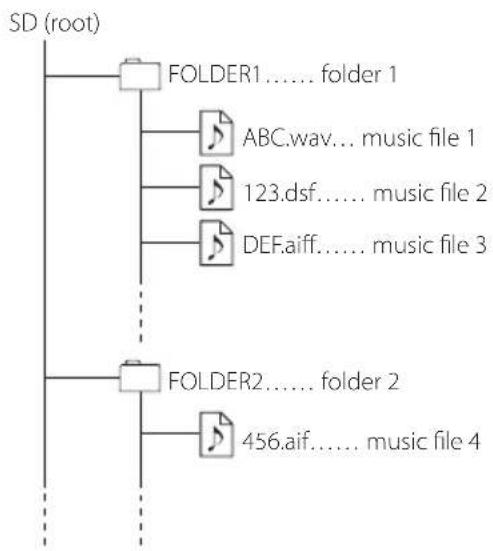
flowchart
graph TD
    A["SD (root)"] --> B["FOLDER1...... folder 1"]
    B --> C["ABC.wav... music file 1"]
    B --> D["123.dsf...... music file 2"]
    B --> E["DEF.aiff...... music file 3"]
    F["FOLDER2...... folder 2"] --> G["456.aif...... music file 4"]
1 Insert an SD card.
Insert an SD (SDHC) card into the slot on the rear panel with the label side facing upward.
![[SD CARD] slot OPTICAL CANADAL CANADAL OPTICAL DINJING NAGPAL-OUT ANALOG OUT ANALYSIS IN RIGHT LEFT/RIGHT LEFT SD CARD N ASSEMBU AC IN](/content/2026/06/1282231/images/7db1cf9cba073c8f3277f8d39a215b8be459ae6ac667d8e9e8975fb3070ddb9b.jpg)
2 Turn on the product.
Push in the power switch. The power indicator lights in red when the power is on.
Note
- When an amplifier is connected, turn the volume of the amplifier to the minimum before turning on the product.
3 Select the input source.
Turn the input sel knob on the main unit, or press the INPUT SEL key on the remote control to select "SD".
4 Select the output source.
Select headphones or analog output.
• Listening via headphones:
Do not push in the output sel switch


• Listening via analog output:
Push in the output sel switch


5 Adjust the volume.
Turn the volume knob on the main unit, or press the +/- key on the remote control.
Note
- You cannot adjust the analog output volume when the "DIRECT" setting is set to "ON".
■ Ejecting the SD card
Unmount the SD card by the following procedure before ejection. Otherwise, the data may be damaged.
1 Stop playback.
Press the ■ key on the remote controller.
2 Press the key on the remote controller.
SD (SDHC) card is unmounted, and "EJECT" is displayed.
3 Push in the card gently until a clicking sound is heard.
The card pops out a little.
4 Grasp the card and pull it out straight.
■ Using the remote controller
You can control the product using the remote controller.
▶ : Playback (current file)
■ : Stop
O : Unmount
^ : Previous folder
v : Next folder
< : Previous file
: Next file
Note
- You can select the repeat playback range with the "SD REPEAT MODE" setting (⇒ page 16).
- If you change the settings on the menu screen during SD card playback, the changes are stored when you stop playback. Also, the volume setting of the "IN/VOL MEM" setting is stored when you stop playback.
Changing the settings
You can change the settings according to your environment.
1 Press and hold the input sel switch on the main unit or press the MENU key on the remote controller.
The menu screen is displayed.
2 Turn the input sel knob on the main unit or press the </> key on the remote controller to select the item to change.

"→" on the first line indicates the selected item.
3 Press the input sel switch on the main unit or press the ○ key on the remote controller to select the current item.

"→" on the second line indicates the selected setting value.
4 Turn the input sel knob on the main unit or press the </> key on the remote controller to select the setting value.
5 Press the input sel switch on the main unit or press the ○ key on the remote controller to apply the current setting value.

6 Press and hold input sel switch on the main unit or press the MENU key on the remote controller.
The display changes from the menu screen to the normal screen.
Setting item list
| Setting item Setting value | |
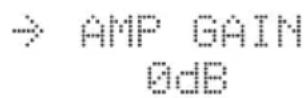
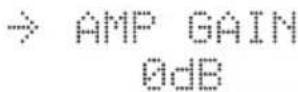
| "AMP GAIN"Selects the gain according to the sensitivity of your headphones. | Default: "0 dB""0 dB" to "20 dB" (0.5 dB step) |
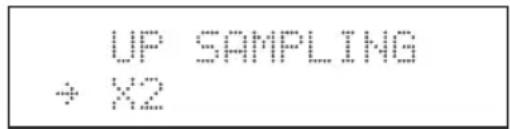
| "UP SAMPLING"Activates the upsampling function.* The product upsamples up to 192 kHz. This function does not affect DSD signals. | Default: "×1""×1", "×2", "×4" |
| "DIGITAL FILTER"Selects the digital filter. | Default: "SHARP ROL-OF""SHARP ROL-OF"Conventional digital filter"MINIMUM DELAY"Close to unprocessed, no pre-echo filter developed by Asahi Kasei Microdevices (AKM) |
| "MSCK SEL"Selects the master clock of the DAC.* The internal clock is always used when the input source is set to "USB" or "SD" regardless of this setting. | Default: "DIR""DIR"Uses the external clock of the digital input source."XTAL"Uses the high precision internal TCXO clock. |
| "DIRECT"Selects whether the signal for the [ANALOG OUT] terminal goes through volume or not.* The signals for headphones always go through volume regardless of this setting. | Default: "OFF""OFF"Goes through volume (You can change the volume with volume)"ON"Does not go through volume (You can not change the volume with volume) |
| "IN/VOL MEM"Activates the memory function of the last source and volume. | Default: "DISABLE""DISABLE"The last source and volume are not memorized."INPUT"Switches to the last source automatically at power on.The volume is set to MUTE."VOLUME"Switches to the last volume automatically at power on.The source is set to "COX"."INPUT+VOLUME"Switches to the last source and volume automatically at power on. |
| "USB MUTE SEL"Activates cross-fade processing (volume down) between files when the input source is set to "USB". | Default: "OFF""OFF"Play the signal from USB directly. A snapping noise may be produced between files."ON"Activates cross-fade processing at the beginning and end of the file. For the continuously recorded sound source, such as a live recording album, sound may be interrupted for a moment. |
| "INPUT SEL MODE"Selects the function of the input sel switch on the main unit or the INPUT SEL key on the remote controller. | Default: "INCREMENT""INCREMENT"The input source will change at every operation of the input sel knob on the main unit or the INPUT SEL key on the remote controller."DIRECT SELECT"To change the input source, select the desired source first with the input sel on the main unit or the INPUT SEL key on the remote controller, and then press the input sel switch on the main unit or the O key on the remote controller.You can change to the desired source quickly by skipping unnecessary sources. |
| "SD REPEAT MODE"Selects the repeat range of the SD card playback. | Default: "FOLDER""FOLDER"Repeats the current folder ("F" indicator is displayed)."ALL"Repeats the whole card ("A" indicator is displayed)."SINGLE"Repeats the current file ("1" indicator is displayed). |
| "LCD ON/OFF"Selects the lighting pattern of the LCD display. | Default: "ON""ON":LCD is always on."OFF":LCD turns off 8 seconds after the operation. |
| "AUTO POWER OFF"Selects the "AUTO POWER OFF" mode ON or OFF. | Default: "ON""ON":The HP-A8C will automatically turn OFF the power, when the operation continues for about 30 minutes."OFF":The HP-A8C does not automatically power OFF. i.e., it keeps powering ON even after 30 minutes of operation. |
| "SYSTEM INFO"Displays the current software version. | Default: "VerX.XXX""VerX.XXX"Current version."VERSION UP"Executes the update. (⇒ page 18)"RESET"Returns to the factory settings (⇒ page 17). |
Common problems and solutions are listed below.
| Problem Solutions | |
| There is no sound. | Confirm that the product is connected properly (⇒page 9).Confirm that the input source is selected properly. (⇒page 11)Confirm that the output source is selected properly. (⇒page 11) |
| Cannot be recognized from a Windows PC. • Download the driver from our site and install. | |
| Cannot playback the SD card. • The files may not be played back if the transfer rate is insufficient. Use a Class 6 or higher SDHC card.We do not guarantee the operation of all cards. Try a different card. In addition, this product does not support SDXC cards. | |
■ Resetting the product
You can reset the product back to the factory settings. Reset the product when it is not working properly.
1 Select "RESET" on the "SYSTEM INFO" setting in menu screen.
All settings are set to the default settings.
■ Updating the version
An update file may be released to solve problems and provide a better listening environment. Update the product by the following procedure.
1 Save the obtained update file on an SD (SDHC) card.
Save the file in the root directory.
Note
- Format the card in FAT32.
- Do not save files other than the update file on the SD card.
2 Insert the card into the slot on the rear panel with the label side facing upward.
3 Turn on the product, and select "COX" as the input source.
4 Press and hold the input sel switch on the main unit or press the MENU key on the remote controller to display the menu screen.
5 Select "SYSTEM INFO" from the menu item.

The current version is displayed.
6 Select "VERSION UP" from the setting value.

7 Select "VERSION UP".
Updating starts.
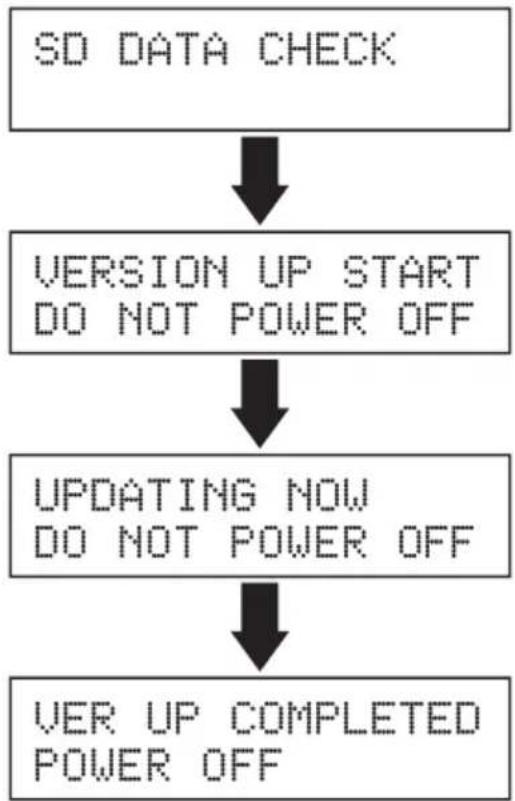
flowchart
graph TD
    A["SD DATA CHECK"] --> B["VERSION UP START\nDO NOT POWER OFF"]
    B --> C["UPDATING NOW\nDO NOT POWER OFF"]
    C --> D["VER UP COMPLETED\nPOWER OFF"]
It takes about 30 seconds to finish updating. Wait until "VER UP COMPLETED/POWER OFF" or "VERSION UP END/POWER OFF" is displayed, and do not turn off the product during updating.
8 Turn off the product.
The update is now completed.
Note
• Refer page 14 for menu screen operations.
- All settings will return to the factory settings after updating.
Specifications
| USB terminal | ||
| Connector B type (Standard) | ||
| Quantization, sampling frequency | 16/24/32 bit, 44.1 kHz/48 kHz/88.2 kHz/96 kHz/176.4 kHz/192 kHz, DSD 2.8 MHz (DoP/ASIO) | |
| Interface USB High Speed | ||
| DIGITAL INPUT-OPTICAL (1, 2) terminal | ||
| Connector Square optical | ||
| Format S/P DIF | ||
| Quantization, sampling frequency | 16/24 bit, 44.1 kHz/48 kHz/88.2 kHz/96 kHz/176.4 kHz/192 kHz | |
| DIGITAL INPUT-COAXIAL terminal | ||
| Connector RCA pin jack | ||
| Format S/P DIF | ||
| Quantization, sampling frequency | 16/24 bit, 44.1 kHz/48 kHz/88.2 kHz/96 kHz/176.4 kHz/192 kHz | |
| DIGITAL INPUT-AES/EBU terminal | ||
| Connector XLR-3-31 type (No.2 hot) | ||
| Format AES/EBU | ||
| Quantization, sampling frequency | 16/24 bit, 44.1 kHz/48 kHz/88.2 kHz/96 kHz/176.4 kHz/192 kHz | |
| ANALOG INPUT (L, R) terminal | ||
| Connector RCA pin jack | ||
| SD card | ||
| Card SDHC | ||
| File system FAT32 | ||
| Format DSF/WAV/AIFF | ||
| Quantization, sampling frequency | 16/24/32 bit, 44.1 kHz/48 kHz/88.2 kHz/96 kHz, DSD 2.8 MHz | |


- bit/DAC Headphone amplifier
- HP-A8C
- WARNINGS and PRECAUTIONS
- IMPORTANT SAFETY INSTRUCTIONS
- IMPORTANT
- NOTE
- WARNINGS and PRECAUTIONS ......2
- IMPORTANT SAFETY INSTRUCTIONS .....3
- Introductions ....5
- Functions 6
- Connecting external audio devices .....9
- Connecting output devices ....10
- Listening to an external audio device ...11
- Listening to the files on an SD card .....12
- Changing the settings ......14
- Troubleshooting ....17
- Specifications ......19
- European model only
- Introductions
- ■ Features of the HP-A8C
- ■ Accessories
- Functions
- Front panel
- ① Power indicator
- ② Display
- ③ volume knob
- Note
- ④ power switch
- ⑤ output sel switch
- ⑥ [phones] terminals (1/2)
- ⑦ input sel knob/switch
- Rear panel
- ①[DIGITAL IN - OPTICAL] terminals (1/2)
- ② [DIGITAL IN - COAXIAL] terminal
- ③[DIGITAL OUT - OPTICAL] terminal
- ④ [DIGITAL OUT - COAXIAL] terminal
- ⑤ [USB] terminal
- ⑥ [SD CARD] slot
- ⑦ [ANALOG OUT] terminals (RIGHT/LEFT)
- ⑧ [ANALOG IN] terminals (RIGHT/LEFT)
- ⑨ [AES/EBU] terminal (IN)
- ⑩ [AC IN] terminal
- ■ Remote controller
- ① ■ key
- ②▶ key
- ③ REC key
- ④ MENU key
- ⑤ ○ key
- ⑥ keys
- ⑦ +/- keys
- ⑧ MUTE key
- ⑨ INPUT SEL key
- ⑩ ∧ / v keys
- Connecting external audio devices
- Connecting output devices
- ■ Connecting the power cord
- Listening to an external audio device
- ■ Listening to the external device
- Turn on the product.
- Select the input source.
- Select the output source.
- Adjust the volume.
- Listening to the files on an SD card
- ■ Playable files
- DSF files (extension: .dsf)
- WAV files (extension: .wav), AIFF files (extension: .aiff)
- ■ Hierarchy example in the SD card
- Insert an SD card.
- Turn on the product.
- Select the input source.
- Select the output source.
- Adjust the volume.
- ■ Ejecting the SD card
- Stop playback.
- Press the key on the remote controller.
- Push in the card gently until a clicking sound is heard.
- Grasp the card and pull it out straight.
- ■ Using the remote controller
- Changing the settings
- Setting item list
- ■ Resetting the product
- Select "RESET" on the "SYSTEM INFO" setting in menu screen.
- ■ Updating the version
- Save the obtained update file on an SD (SDHC) card.
- Insert the card into the slot on the rear panel with the label side facing upward.
- Turn on the product, and select "COX" as the input source.
- Press and hold the input sel switch on the main unit or press the MENU key on the remote controller to display the menu screen.
- Select "SYSTEM INFO" from the menu item.
- Select "VERSION UP" from the setting value.
- Select "VERSION UP".
- Turn off the product.
- Specifications
- Declaration of EC Directive
- The Affect of Immunity on This Equipment
- FOSTEX DISTRIBUTORS LIST IN EUROPE
- Austria
- Belgium
- Czecho
- Denmark
- Finland
- France
- Germany
- Greece
- Hungary
- Italy
- The Netherlands
- Norway
- Poland
- Portugal
- Russia
- Spain & Portugal
- Spain
- Sweden
- Sweden, Norway, Finland & Denmark
- Switzerland
- Turkey
- UK
- Ukraine
Brand : FOSTEX
Model : HP-A8C
Category : Headphone amplifier