
DMS-1900 - Saw Defort - Free user manual and instructions
Find the device manual for free DMS-1900 Defort in PDF.


| Product Type | Radial Miter Saw |
| Brand | Defort |
| Model | DMS-1900 |
| Blade Diameter | 190 mm |
| Dimensions (L x W x H) | 500 x 400 x 300 mm |
| Weight | 12 kg |
| Power | 230 V, 50 Hz |
| Rated Power | 1,500 W |
| No-Load Speed | 5,000 rpm |
| Cutting Capacity at 90° | 60 x 120 mm |
| Cutting Capacity at 45° | 40 x 80 mm |
| Miter Range | 0° - 45° left/right |
| Bevel Range | 0° - 45° left tilt |
| Main Functions | Crosscut, miter, bevel, compound cut |
| Maintenance and Cleaning | Dust regularly, check brushes, lubricate moving parts |
| Safety | Safety switch, transparent blade guard, emergency stop |
| Spare Parts | Blade, motor brushes, rip fence, dust bag |
| Repairability | Repairability index: 7.8/10 (parts available) |
| General Information | User manual available for free download |
Frequently Asked Questions - DMS-1900 Defort
User questions about DMS-1900 Defort
0 question about this device. Answer the ones you know or ask your own.
Ask a new question about this device
Download the instructions for your Saw in PDF format for free! Find your manual DMS-1900 - Defort and take your electronic device back in hand. On this page are published all the documents necessary for the use of your device. DMS-1900 by Defort.
USER MANUAL DMS-1900 Defort
DMS-1900
98291315
DE Bedienungsanleitung ....5
GB User's Manual 10
FR Mode d'emploi ....14
RU Инструкция по эксплуатации .....19
1

220 V
50 Hz

1900 W

5000 min -1

254x25,4 x2.8 mm

90°×90° 70x310 mm
45°×45° 40x210 mm
45°×90° 40x310 mm
90°×45° 70x210 mm

7,5 kg
2

3


DE Deutsch
The numbering of the components shown refers to the representation of the power tool on the graphic pages.
1 Handle
3 Lever for releasing the tool arm
4 Blade guard
5 Retracting blade guard
6 Fence
7 Insert plate
8 Screws for insert plate
9 Handle for turning the saw table
10 Scale for mitre angle (horizontal)
11 Saw table
12 Mounting holes
13 Recessed grips
14 Material clamp
15 Scale for bevel angle (vertical)
17 Saw blade
18 Dust bag
19 On/Off switch
21 Sawdust ejector
22 Allen key
23 Clamping lever for various bevel angles (vertical)
24 Transport safety-lock
25 Clamping lever for any mitre angle
26 Allen screws of the fence
27 Drill holes for material clamp
28 Spindle lock
SAFETY NOTES
General Power Tool Safety Warnings When using electric tools basic safety precautions should always be followed to reduce the risk of fi re, electric shock and personal injury including the following. Read all these instructions before attempting to operate this product and save these instructions. The term "power tool" in the warnings refers to your mains-operated (corded) power tool or battery-operated (cordless) power tool.
1) Work area safety
a) Keep work area clean and well lit. Cluttered or dark areas invite accidents.
b) Do not operate power tools in explosive atmospheres, such as in the presence of flammable liquids, gases or dust. Power tools create sparks which may ignite the dust or fumes.
c) Keep children and bystanders away while operating a power tool. Distractions can cause you to lose control.
2) Electrical safety
a) Power tool plugs must match the outlet. Never modify the plug in any way. Do not use any adapter plugs with earthed (grounded) power tools. Unmodified plugs and matching outlets will reduce risk of electric shock.
b) Avoid body contact with earthed or grounded surfaces, such as pipes, radiators, ranges and refrigerators. There is an increased risk of electric shock if your body is earthed or grounded.
c) Do not expose power tools to rain or wet conditions. Water entering a power tool will increase the risk of electric shock.
d) Do not abuse the cord. Never use the cord for carrying, pulling or unplugging the power tool. Keep cord away from heat, oil, sharp edges and moving parts.
Damaged or entangled cords increase the risk of electric shock.
e) When operating a power tool outdoors, use an extension cord suitable for outdoor use. Use of a cord suitable for outdoor use reduces the risk of electric shock.
f) If operating a power tool in a damp location is unavoidable, use a residual current device (RCD) protected supply. Use of an RCD reduces the risk of electric shock.
3) Personal safety
a) Stay alert, watch what you are doing and use common sense when operating a power tool. Do not use a power tool while you are tired or under the influence of drugs, alcohol or medication. A moment of inattention while operating power tools may result in serious personal injury.
b) Use personal protective equipment. Always wear eye protection. Protective equipment such as dust mask, non-skid safety shoes, hard hat, or hearing protection used for appropriate conditions will reduce personal injuries.
c) Prevent unintentional starting. Ensure the switch is in the off-position before connecting to power source and/or battery pack, picking up or carrying the tool. Carrying power tools with your fi nger on the switch or energising power tools that have the switch on invites accidents.
d) Remove any adjusting key or wrench before turning the power tool on. A wrench or a key left attached to a rotating part of the power tool may result in personal injury.
e) Do not overreach. Keep proper footing and balance at all times. This enables better control of the power tool in unexpected situations.
f) Dress properly. Do not wear loose clothing or jewellery. Keep your hair, clothing and gloves away from moving parts. Loose clothes, jewellery or long hair can be caught in moving parts.
g) If devices are provided for the connection of dust extraction and collection facilities, ensure these are connected and properly used. Use of dust collection can reduce dust-related hazards.
4) Power tool use and care
a) Do not force the power tool. Use the correct power tool for your application. The correct power tool will do the job better and safer at the rate for which it was designed.
b) Do not use the power tool if the switch does not turn it on and off. Any power tool that cannot be controlled with the switch is dangerous and must be repaired.
c) Disconnect the plug from the power source and/or the battery pack from the power tool before making any adjustments, changing accessories, or storing power tools. Such preventive safety measures reduce the risk of starting the power tool accidentally.
d) Store idle power tools out of the reach of children and do not allow persons unfamiliar with the power tool or these instructions to operate the power tool. Power tools are dangerous in the hands of untrained users.
e) Maintain power tools. Check for misalignment or binding of moving parts, breakage of parts and any other condition that may affect the power tool's operation. If damaged, have the power tool repaired before use. Many accidents are caused by poorly maintained power tools.
f) Keep cutting tools sharp and clean. Properly maintained cutting tools with sharp cutting edges are less likely to bind and are easier to control.
g) Use the power tool, accessories and tool bits etc. in accordance with these instructions, taking into account the working conditions and the work to be performed. Use of the power tool for operations different from those intended could result in a hazardous situation.
5) Service
a) Have your power tool serviced by a qualified repair person using only identical replacement parts. This will ensure that the safety of the power tool is maintained.
SAFETY WARNINGS FOR CHOP AND MITRE SAWS
Never make warning signs on the machine unrecognisable.
- Never stand on the power tool. Serious injuries can occur when the power tool tips over or when inadvertently coming into contact with the saw blade.
- Make sure that the guard operates properly and that it can move freely. Never lock the guard in place when opened.
- Never remove cutting remainders, wood chips, etc. from the sawing area while the machine is running. Always guide the tool arm back to the neutral position first and then switch the machine off.
- Guide the saw blade against the workpiece only when the machine is switched on. Otherwise there is damage of kickback, when the saw blade becomes wedged in the workpiece.
- Keep handles dry, clean, and free from oil and grease. Greasy, oily handles are slippery causing loss of control.
Operate the power tool only when the work area to the workpiece is clear of any adjusting tools, wood chips, etc. Small pieces of wood or other objects that come in contact with the rotating saw blade can strike the operator with high speed.
- Keep the floor free of wood chips and material remainders. You could slip or trip.
- Always firmly clamp the piece to be worked. Do not saw workpieces that are too small to clamp. Otherwise, the clearance of your hand to the rotating saw blade is too small.
- Use the machine only for cutting the materials listed under Intended Use. Otherwise, the machine can be subject to overload.
- If the saw blade should become jammed, switch the machine off and hold the workpiece until the saw blade comes to a complete stop. To prevent kickback, the workpiece may not be moved until after the machine has come to a complete stop. Correct the cause for the jamming of the saw blade before restarting the machine.
-
Do not use dull, cracked, bent or damaged saw blades. Unsharpened or improperly set saw blades produce narrow kerf causing excessive friction, blade binding and kickback.
-
Always use saw blades with correct size and shape (diamond versus round) of arbor holes. Saw blades that do not match the mounting hardware of the saw will run eccentrically, causing loss of control.
- Do not use high speed steel (HSS) saw blades. Such saw blades can easily break.
- Do not touch the saw blade after working before it has cooled. The saw blade becomes very hot while working.
- Never operate the machine without the insert plate. Replace a defective insert plate. Without flawless insert plates, injuries are possible from the saw blade.
- Check the cable regularly and have a damaged cable repaired only through an authorised customer service agent for SBM Group. Replace damaged extension cables. This will ensure that the safety of the power tool is maintained.
- Store the machine in a safe manner when not being used. The storage location must be dry and lockable. This prevents the machine from storage damage, and from being operated by untrained persons. Secure the workpiece. A workpiece clamped with clamping devices or in a vice is held more secure than by hand.
- Never leave the machine before it has come to a complete stop. Cutting tools that are still running can cause injuries.
- Never use the machine with a damaged cable. Do not touch the damaged cable and pull the mains plug when the cable is damaged while working. Damaged cables increase the risk of an electric shock. Products sold in GB only: Your product is fitted with an BS 1363/A approved electric plug with internal fuse (ASTA approved to BS 1362).
If the plug is not suitable for your socket outlets, it should be cut off and an appropriate plug fitted in its place by an authorised customer service agent. The replacement plug should have the same fuse rating as the original plug.
The severed plug must be disposed of to avoid a possible shock hazard and should never be inserted into a mains socket elsewhere.
Products sold in AUS and NZ only: Use a residual current device (RCD) with a rated residual current of 30 mA or less.
SYMBOLS
The following symbols can be important for the operation of your power tool. Please memorise the symbols and their meanings. The correct interpretation of the symbols helps you operate the power tool better and more secure.

Wear a dust respirator.

Wear safety goggles.

Wear ear protectors. Exposure to noise can cause hearing loss.

Keep hands away from the cutting area while the machine is running. Danger of injury when coming in contact with the saw blade.

Danger area! Keep hands, fingers or arms away from this area.
FUNCTIONAL DESCRIPTION
Read all safety warnings and all instructions. Failure to follow the warnings and instructions may result in electric shock, fire and/or serious injury.
INTENDED USE
The power tool is intended as a stationary machine for making straight lengthways and crossways cuts in wood. In this, mitre angles from -46° to +46° as well as bevel angles from 0° to 45° are possible.
The capacity of the power tool is designed for sawing hardwood and softwood.
The power tool is not suitable for cutting aluminium or other non-ferrous metals or alloys.
ASSEMBLY
- Avoid unintentional starting of the machine. During assembly and for all work on the machine, the power plug must not be connected to the mains supply.
Note: Check the power tool for possible damage. Before further use of the machine, check that all protective devices are fully functional. Any lightly damaged parts must be carefully checked to ensure flawless operation of the tool. All parts must be properly mounted and all conditions fulfilled that ensure faultless operation. Damaged protective devices and parts must be immediately replaced by an authorised service centre.
MOUNTING TO A WORKING SURFACE
- To ensure safe handling, the machine must be mounted on a level and stable surface (e.g., workbench) prior to using.
- Carefully remove all parts included in the delivery from their packaging.
– Remove all packaging material from the machine and the accessories provided. - Fasten the power tool with suitable screw fasteners to the working surface. The holes 12 serve for this purpose.
Dusts from materials such as lead-containing coatings, some wood types, minerals and metal can be harmful to one's health. Touching or breathing-in the dusts can cause allergic reactions and/or lead to respiratory infections of the user or bystanders.
Certain dusts, such as oak or beech dust, are considered as carcinogenic, especially in connection with wood-treatment additives (chromate, wood preservative). Materials containing asbestos may only be worked by specialists.
– Always use dust extraction.
- Provide for good ventilation of the working place.
- It is recommended to wear a P2 filter-class respirator.
Observe the relevant regulations in your country for the materials to be worked.
The dust/chip extraction can be blocked by dust, chips or workpiece fragments.
- Switch the machine off and pull the mains plug from the socket outlet.
- Wait until the saw blade has come to a complete stop.
– Determine the cause of the blockage and correct it.
INTEGRATED DUST EXTRACTION
- Mount the dust bag 18 onto the sawdust ejector 21.
During sawing, the dust bag must never come into contact with the movable machine parts. Always empty the dust bag in good time.
EXTERNAL DUST EXTRACTION
For dust extraction, a vacuum hose can also be connected to the dust ejector 21.
The vacuum cleaner must be suitable for the material being worked. When vacuuming dry dust that is especially detrimental to health or carcinogenic, use a special vacuum cleaner.
CHANGING THE TOOL
- Before any work on the machine itself, pull the mains plug.
- When mounting the saw blade, wear protective gloves. Danger of injury when touching the saw blade. Use only saw blades whose maximum permitted speed is higher than the no-load speed of the power tool.
Use only saw blades that correspond with the characteristic data given in these operation instructions and that are tested and marked in accordance with EN 847-1.
Use only saw blades recommended by the tool manufacturer, and suitable for sawing the materials to be cut.
MOUNTING THE SAW BLADE
If required, clean all parts to be mounted prior to assembly.
- Press lever 3, swing back the retracting blade guard 5 to the stop and hold it in this position.
- Place the new saw blade onto the interior clamping fl ange.
- When mounting the saw blade, pay attention that the cutting direction of the teeth (arrow direction on the saw blade) corresponds with the direction of the arrow on the blade guard!
- Slowly guide the retracting blade guard downward again.
- Place on the clamping fl ange and the screw.
Press the spindle lock 28 until it engages and tighten the screw turning in anticlockwise direction.
OPERATION
- Before any work on the machine itself, pull the mains plug.
ADJUSTING THE CUTTING ANGLE
- When adjusting the cutting angle, never actuate the On/Off switch 19. Danger of injury if the machine should accidentally start.
ADJUSTING THE CUTTING ANGLE
- When adjusting the cutting angle, never actuate the On/Off switch 19. Danger of injury if the machine should accidentally start.
ADJUSTING HORIZONTAL MITRE ANGLES
The horizontal mitre angle can be set in the range from 46° (left side) to 46° (right side).
- Release clamping lever, if tightened. This allows the saw table to move freely.
– Turn the saw table 11 left or right by handle 9 until the angle indicator indicates the desired mitre angle.
ADJUSTING VERTICAL BEVEL ANGLES
The vertical bevel angle can be set in the range from 0° to 45° .
- Loosen the clamping lever 23.
- Tilt the tool arm by the handle 1 until the angle indicator indicates the desired bevel angle.
- Hold the tool arm in this position and retighten the clamping lever 23.
For quick and precise setting of the standard angles 0° und 45° , end stops are provided on the housing.
- Loosen the clamping lever 23.
- For this, tilt the tool arm by the handle 1 to the stop toward the right (0°) or to the stop toward the left (45°).
– Retighten the clamping lever 23 again.
STARTING OPERATION
- Observe correct mains voltage! The voltage of the power source must agree with the voltage specified on the nameplate of the machine. Power tools marked with 230 V can also be operated with 220 V.
SWITCHING ON
- To start the machine, press the On/Off switch 19 and keep it pressed.
Note: For safety reasons, the On/Off switch 19 cannot be locked; it must remain pressed during the entire operation.
The tool arm can only be guided downward when pressing lever 3.
- For sawing, you must additionally press lever 3 in addition to actuating the On/Off switch.
SWITCHING OFF
- To switch off the machine, release the On/Off switch 19.
WORKING ADVICE
GENERAL SAWING INSTRUCTIONS
- For all cuts, it must first be ensured that the saw blade at no time can come in contact with the fence, screw clamps or other machine parts. Remove possibly mounted auxiliary stops or adjust them accordingly. Protect the saw blade against impact and shock. Do not subject the saw blade to lateral pressure. Do not saw warped/bent workpieces. The workpiece must always have a straight edge to face against the fence. Long workpieces must be underlaid or supported at their free end.
- Do not stand in a line with the saw blade in front of the machine. Always stand aside of the saw blade. This protects your body against possible kickback.
- Keep hands, fingers and arms away from the rotating saw blade.
- Do not cross your arms when operating the tool arm.
CUTTING OFF
- Firmly clamp the workpiece as appropriate for its dimensions.
- Adjust the requested horizontal and/or vertical mitre/bevel angle.
- Switch on the machine.
- Press lever 3 and slowly guide the tool arm downward by handle 1.
– Saw through the workpiece applying uniform feed. - Switch off the machine and wait until the saw blade has come to a complete stop.
– Guide the tool arm slowly upward.
REPLACING THE INSERT PLATE
The red insert plate 7 can become worn after long use of the power tool.
Replace defective insert plates.
- Bring the power tool into the working position. - Unscrew screws 8 using a Phillips screwdriver and remove the old insert plate.
- Insert the new insert plate and and screw all screws 8 in again.
TRANSPORT
Before transporting the power tool, the following steps must be carried out:
- Bring the machine into the transport position.
- Remove all accessories that cannot be mounted firmly to the power tool.
If possible, place unused saw blades in an enclosed container for transport. - For lifting or transporting, hold the power tool by the recessed grips 13 on the side of the saw table 11.
- When transporting the power tool, use only the transport devices and never use the protective devices.
MAINTENANCE AND SERVICE
MAINTENANCE AND CLEANING
- Before any work on the machine itself, pull the mains plug.
If the machine should fail despite the care taken in manufacturing and testing procedures, repair should be carried out by an after-sales service centre for SBM Group.
CLEANING
For safe and proper working, always keep the power tool and its ventilation slots clean.
The retracting blade guard must always be able to move freely and retract automatically. Therefore, always keep the area around the retracting blade guard clean.
Remove dust and chips after each working procedure by blowing out with compressed air or with a brush.
FR Français
Scie à onglets
FR
CARACTÉRISTIQUES TECHNIQUES 1
ELÉMENTS DE L'APPAREIL 2
Exploded view DMS-1900
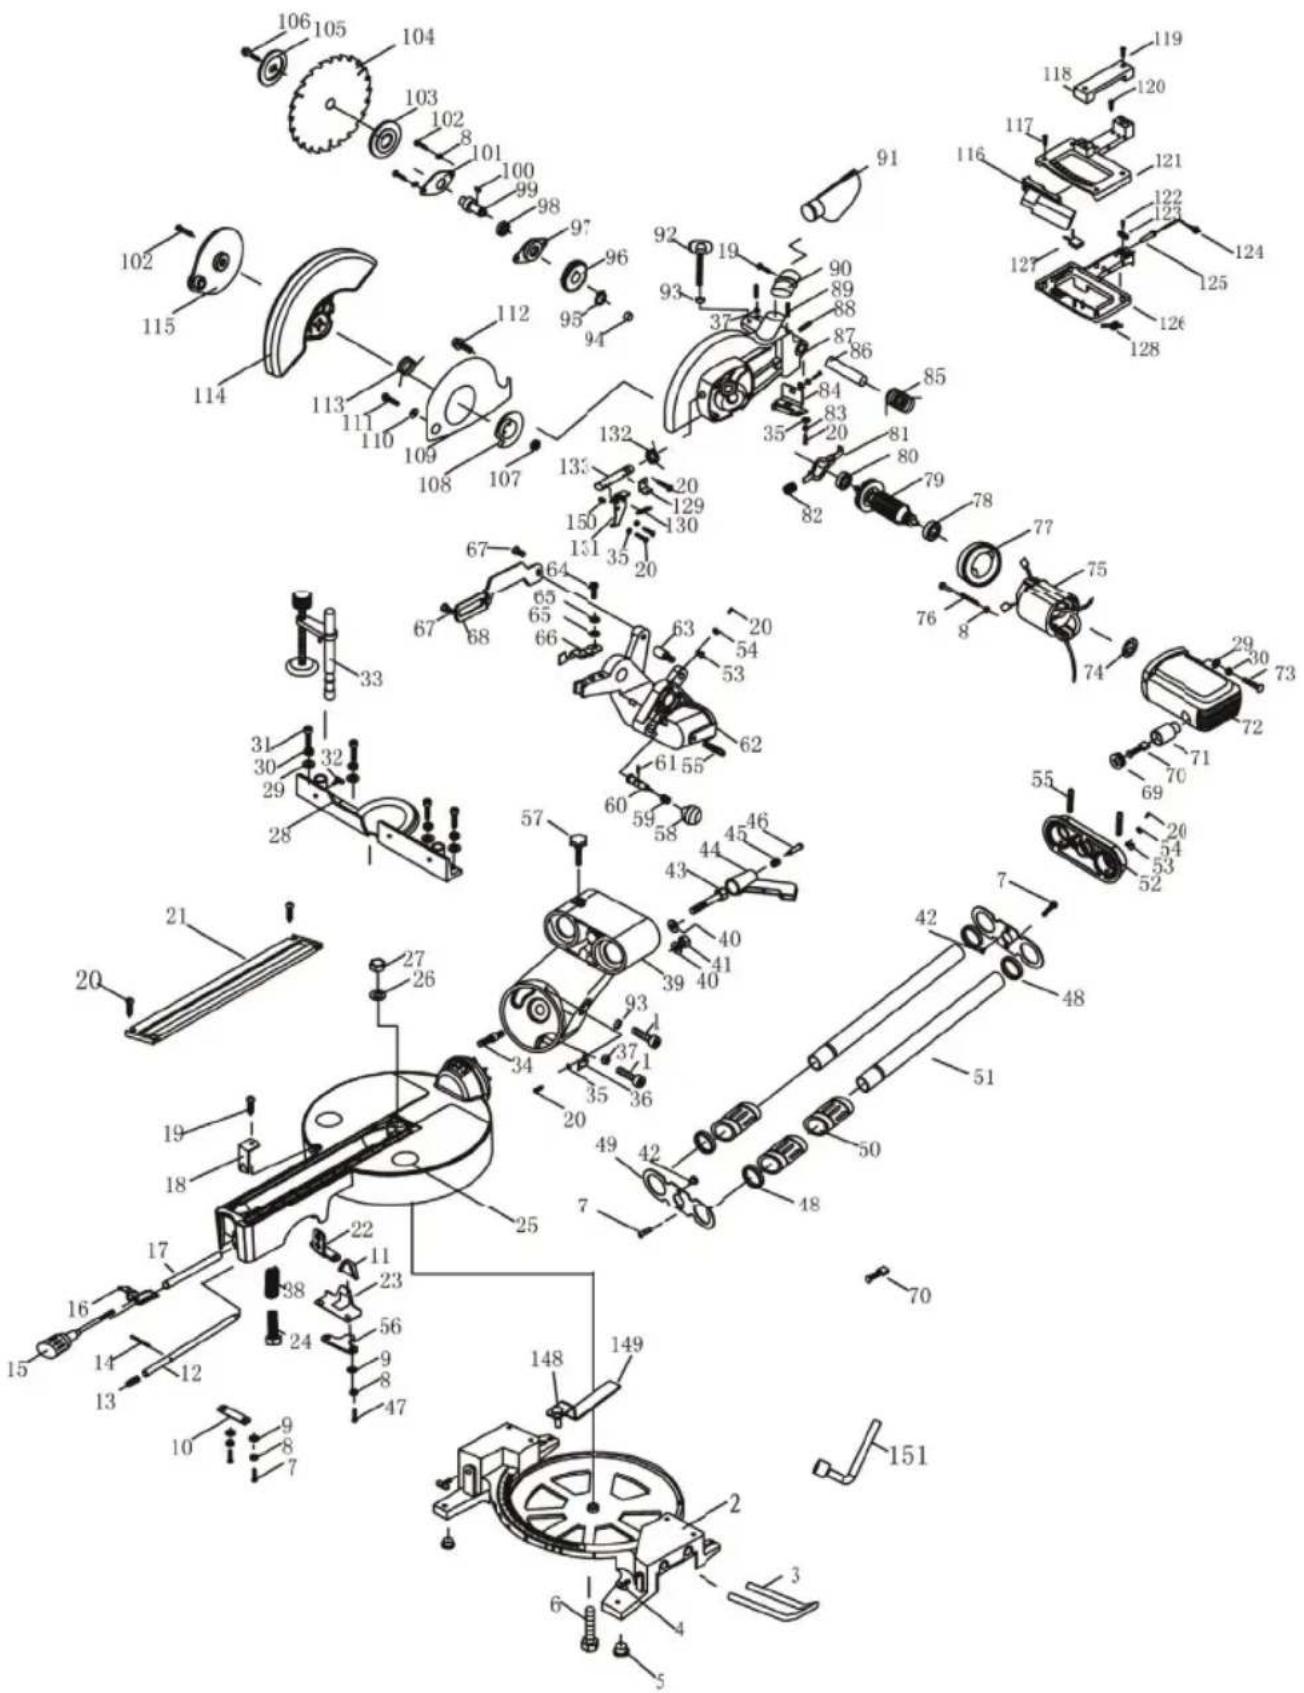
Spare parts list DMS-1900
No. Part Name
70 Set of brushes
71 Brush holder
75 Stator
79 Rotor
87 Intermediate fl ange with impact block
94 Bearing slip
96 Gear
99 Spindle
116 Switch
DECLARATION OF CONFORMITYGBCE
We declare under our sole responsibility that this product is in conformity with the following standards or standardized documents: EN 55014-1:2006; EN 55014-2:1997/+A1:2001/+A2:2008; EN 61000-3-2:2006; EN 61000-3-3:2008 in accordance with the regulations 2006/42/EEC, 2006/95/EEC, 2004/108/EEC.
NOISE/VIBRATION Measured in accordance with EN 60745 the sound pressure level of this tool is <95 dB(A) and the sound power level is <108 dB(A) (standard deviation: 3 dB), and the vibration is <3,82 m/s² (hand-arm method).
DÉCLARATION DE CONFORMITÉFR CE
10719 Berlin, Germany

Discarded electric appliances are recyclable and should not be discarded in the domestic waste! Please actively support us in conserving resources and protecting the environment by returning this appliance to the collection centres (if available).
FR INFORMATIONS SUR LA PROTECTION DE L'ENVIRONNEMENT


- DMS-1900
- DE DEUTSCH
- SAFETY NOTES
- SAFETY WARNINGS FOR CHOP AND MITRE SAWS
- SYMBOLS
- FUNCTIONAL DESCRIPTION
- INTENDED USE
- ASSEMBLY
- MOUNTING TO A WORKING SURFACE
- INTEGRATED DUST EXTRACTION
- EXTERNAL DUST EXTRACTION
- CHANGING THE TOOL
- MOUNTING THE SAW BLADE
- OPERATION
- ADJUSTING THE CUTTING ANGLE
- ADJUSTING HORIZONTAL MITRE ANGLES
- ADJUSTING VERTICAL BEVEL ANGLES
- STARTING OPERATION
- SWITCHING ON
- SWITCHING OFF
- WORKING ADVICE
- GENERAL SAWING INSTRUCTIONS
- CUTTING OFF
- REPLACING THE INSERT PLATE
- TRANSPORT
- MAINTENANCE AND SERVICE
- MAINTENANCE AND CLEANING
- CLEANING
- FR FRANÇAIS
- SCIE À ONGLETS
- FR
- CARACTÉRISTIQUES TECHNIQUES 1
- ELÉMENTS DE L'APPAREIL 2
- SPARE PARTS LIST DMS-1900
- NO. PART NAME
- DECLARATION OF CONFORMITYGBCE
- DÉCLARATION DE CONFORMITÉFR CE
- FR INFORMATIONS SUR LA PROTECTION DE L'ENVIRONNEMENT
Brand : Defort
Model : DMS-1900
Category : Saw