Tivoli WH/F/60 - Basket Turbo air - Free user manual and instructions
Find the device manual for free Tivoli WH/F/60 Turbo air in PDF.

| Product type | Kitchen hood |
| Brand | Turbo air |
| Model | Tivoli WH/F/60 |
| Width | 60 cm |
| Color | White |
| Minimum height | 65 cm |
| Net weight | 12 kg |
| Electrical supply | 220-240 V, 50/60 Hz |
| Motor power | 200 W |
| Lighting | LED, 2 x 1.5 W |
| Maximum noise level | 65 dB(A) |
| Maximum airflow | 620 m³/h |
| Filtration type | Activated carbon filter (optional) / Washable metal filter |
| Number of speeds | 3 + intensive |
| Controls | Touch screen or push buttons |
| Recirculation function | Possible with charcoal filter kit |
| Metal filter maintenance | Dishwasher safe (every 2-3 months) |
| Charcoal filter maintenance | Replacement every 4-6 months |
| Safety | Automatic shut-off in case of overheating |
| Spare parts available | Filters, LED bulbs, optional remote control |
| Repairability | Repairability index: 7.8/10 (estimate) |
| Energy class | A+ |
Frequently Asked Questions - Tivoli WH/F/60 Turbo air
User questions about Tivoli WH/F/60 Turbo air
0 question about this device. Answer the ones you know or ask your own.
Ask a new question about this device
Download the instructions for your Basket in PDF format for free! Find your manual Tivoli WH/F/60 - Turbo air and take your electronic device back in hand. On this page are published all the documents necessary for the use of your device. Tivoli WH/F/60 by Turbo air.
USER MANUAL Tivoli WH/F/60 Turbo air
Filtru de cărbune
Szénfilter
Uholný filter
Aktivni karbonski filter
Ogleni filter
Вугільний фільтр
Anglies filtras
Aktivo oglu filtrs
Aktiivsöefilter

natural_image
Technical diagram of a mechanical fan assembly with labeled components (no readable text or symbols)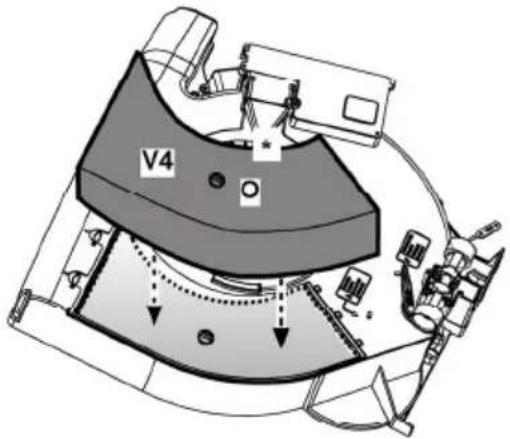
Sostituzione lampada alogena
Ersetzten der Halogenlampe
Replacing the halogen bulbs
Remplacement des lampes halogène
Halogeenlamp vervanging
Substitución làmparas halógenas
Замена галогенной лампы
Substituição das lâmpadas de halogéneos
Halogeenilampun vaihto
Utskifting av halogenpære
Byte av halogenlampor
Zamjena halogene lampe
Výmina halogenového svítidla
Wymiana lamp halogenowych
Schimbarea becului halogen
Halogén izzó cseréje
Výmena halogenového svítidla
Zamenjivanje halogene lampe
Menjava halogene žarnice
Заміна галогенної лампочки
Halogeninës lempos pakeitimas
Halogçna spuldzes maiòa
Halogeenlampide vahetamine

Closely follow the instructions set out in this manual. All responsibility, for any eventual inconveniences, damages or fires caused by not complying with the instructions in this manual, is declined. The extractor hood has been designed exclusively for domestic use.
! It is important to conserve this booklet for consultation at any moment. In the case of sale, cession or move, make sure it is together with the product.
! Read the instructions carefully: there is important information about installation, use and safety.
! Do not carry out electrical or mechanical variations on the product or on the discharge conduits.
Note: the elements marked with the symbol “(*)” are optional accessories supplied only with some models or elements to purchase, not supplied.

Caution
WARNING! Do not connect the appliance to the mains until the installation is fully complete.
Before any cleaning or maintenance operation, disconnect hood from the mains by removing the plug or disconnecting the mains electrical supply.
Always wear work gloves for all installation and maintenance operations.
The appliance is not intended for use by children or persons with impaired physical, sensorial or mental faculties, or if lacking in experience or knowledge, unless they are under supervision or have been trained in the use of the appliance by a person responsible for their safety.
This appliance is designed to be operated by adults, children should be monitored to ensure that they do not play with the appliance.
This appliance is designed to be operated by adults. Children should not be allowed to tamper with the controls or play with the appliance.
Never use the hood without effectively mounted grating!
The hood must NEVER be used as a support surface unless specifically indicated.
The premises where the appliance is installed must be sufficiently ventilated, when the kitchen hood is used together with other gas combustion devices or other fuels.
The ducting system for this appliance must not be connected to any existing ventilation system which is being used for any other purpose such as discharging exhaust fumes from appliances burning gas or other fuels.
The flaming of foods beneath the hood itself is severely prohibited.
The use of exposed flames is detrimental to the filters and may cause a fire risk, and must therefore be avoided in all circumstances.
Any frying must be done with care in order to make sure that the oil does not overheat and ignite.
Accessible parts of the hood may become hot when used with cooking appliance.
With regards to the technical and safety measures to be adopted for fume discharging it is important to closely follow the regulations provided by the local authorities.
The hood must be regularly cleaned on both the inside and outside (AT LEAST ONCE A MONTH).
This must be completed in accordance with the maintenance instructions provided in this manual). Failure to follow the instructions provided in this user guide regarding the cleaning of the hood and filters will lead to the risk of fires.
Do not use or leave the hood without the lamp correctly mounted due to the possible risk of electric shocks.
We will not accept any responsibility for any faults, damage or fires caused to the appliance as a result of the non-observance of the instructions included in this manual.
This appliance is marked according to the European directive 2002/96/EC on Waste Electrical and Electronic Equipment (WEEE). By ensuring this product is disposed of correctly, you will help prevent potential negative consequences for the environment and human health, which could otherwise be caused by inappropriate waste handling of this product.

The symbol ■ on the product, or on the documents accompanying the product, indicates that this appliance may not be treated as household waste. Instead it should be taken to the appropriate collection point for the recycling of electrical and electronic equipment. Disposal must be carried out in accordance with local environmental regulations for waste disposal.
For further detailed information regarding the process, collection and recycling of this product, please contact the appropriate department of your local authorities or the local department for household waste or the shop where you purchased this product.
Use
The hood is designed to be used either for exhausting or filter version.
Ducting version
The cooker hood has an upper air duct B1 and an optional rear air duct B2*, for external fumes exit.
Select the suitable air duct and apply the flange C supplied, ensure to close the unused hole duct with cap D* supplied if provided.
Note: in some models upper hole B1 is supplied closed: Press firmly to detach the detachable part that closes the outlet hole and remove it.
Attention! The detachable part cannot be mounted in position again. Carry out this operation only if you are sure of the type of installation to make.
Caution! In some models the rear hole duct is not easily accessible, even when the tap (if mounted) is removed, in this case remove the plastic piece E1 or E2 that is blocking the hole duct, by unwinding using pliers and cutter. Check that the filter/suction selector (inside the cooker hood) G is in the suction (A) position.
Filter version
In the case where it is not possible to discharge the cooking fumes externally, the cooker hood may be used in the filter version by fixing a carbon filter, the fumes and vapours are recycled via the anterior grill placed above the control panel. Check that the filter/suction selector (inside the cooker hood) G is in the filter (F) position.
The models with no suction motor only operate in ducting mode, and must be connected to an external suction device (not supplied).
The connecting instructions are supplied with the peripheral suction unit.
Installation
The minimum distance between the supporting surface for the cooking equipment on the hob and the lowest part of the range hood must be not less than 60cm from electric cookers and 70cm from gas or mixed cookers.
If the instructions for installation for the gas hob specify a greater distance, this must be adhered to.

Electrical connection
The mains power supply must correspond to the rating indicated on the plate situated inside the hood. If provided with a plug connect the hood to a socket in compliance with current regulations and positioned in an accessible area, after installation. If it not fitted with a plug (direct mains connection) or if the plug is not located in an accessible area, after installation, apply a double pole switch in accordance with standards which assures the complete disconnection of the mains under conditions relating to over-current category III, in accordance with installation instructions.
Warning! Before re-connecting the hood circuit to the mains supply and checking the efficient function, always check that the mains cable is correctly assembled.
Warning! Power cable replacement must be undertaken by the authorised service assistance centre or similar qualified person.
Mounting
The cooker hood may be installed on the wall or on the base of a cabinet; if supplied, use the hole gauge H to drill the correct distance, otherwise lean the cooker hood on the wall or on the base of the cabinet and mark the holes with a pencil.
Wall mounting - Insert the wall screw anchors J in the drilled holes and the two K screws in the upper drill holes, remove the grill and hook the cooker hood to the 2 screws, finally from the inside, insert the third screw L and lock them all in.
Cabinet fixing - Affix the cooker hood with the 4 M screws from inside the cabinet.
Additional Installation Specifications:
Use only the fixing screws supplied with the product for installation.
Use the correct length screws which are identified in the Installation Guide
WARNING! Failure to install the screws or fixing device in accordance with these instructions may result in electrical hazards.
Operation
The hood is fitted with a control panel with aspiration speed selection control and a light switch to control cooking area lights.
Use the high suction speed in cases of concentrated kitchen vapours. It is recommended that the cooker hood suction is switched on for 5 minutes prior to cooking and to leave in operation during cooking and for another 15 minutes approximately after terminating cooking.
Always open the vapour catcher N*.
If your product is provided with an electrically or mechanically activated valve, the keys and/or the buttons and/or the handles available are for controlling the lights and for opening and closing the valve.
Maintenance
ATTENTION! Before performing any maintenance operation, isolate the hood from the electrical supply by switching off at the connector and removing the connector fuse.
Or if the appliance has been connected through a plug and socket, then the plug must be removed from the socket.
Cleaning
The cooker hood should be cleaned regularly (at least with the same frequency with which you carry out maintenance of the fat filters) internally and externally. Clean using the cloth dampened with neutral liquid detergent. Do not use abrasive products. DO NOT USE ALCOHOL!
WARNING: Failure to carry out the basic cleaning recommendations of the cooker hood and replacement of the filters may cause fire risks.
Therefore, we recommend observing these instructions.
The manufacturer declines all responsibility for any damage to the motor or any fire damage linked to inappropriate maintenance or failure to observe the above safety recommendations.
Grease filter
Traps cooking grease particles.
If situated inside the support grill, it may be one of the following types:
Paper filter must be replaced once a month or if colouring appears on upper side, in such cases the colouring is evident through the grill openings.
Metallic filter must be cleaned once a month, with non abrasive detergents, by hand or in dishwasher on low temperature and short cycle.
When washed in a dishwasher, the grease filter may discolour slightly, but this does not affect its filtering capacity.
In order to remove the grease filter open the grill via the P hooks and free the R1 or R2 stoppers.
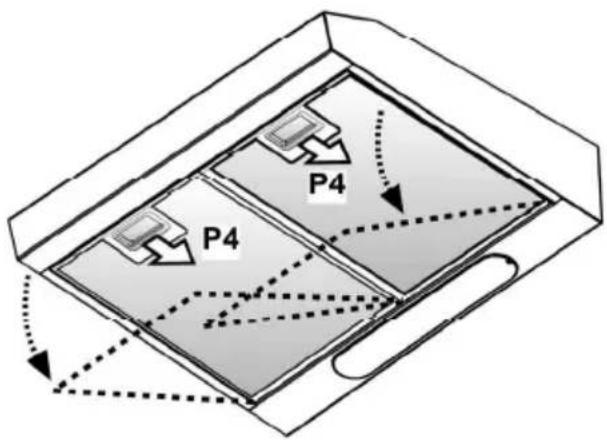
The self-supporting metal filter does not include a support grill, in order to remove the filter – pull the release springs P4 backwards and slide the filter downwards.
Charcoal filter (filter version only)
It absorbs unpleasant odours caused by cooking.
The saturation of the charcoal filter occurs after more or less prolonged use, depending on the type of cooking and the regularity of cleaning of the grease filter.
In any case it is necessary to replace the cartridge at least every four months.
The charcoal filter may NOT be washed or regenerated.
It may be one of the following types:
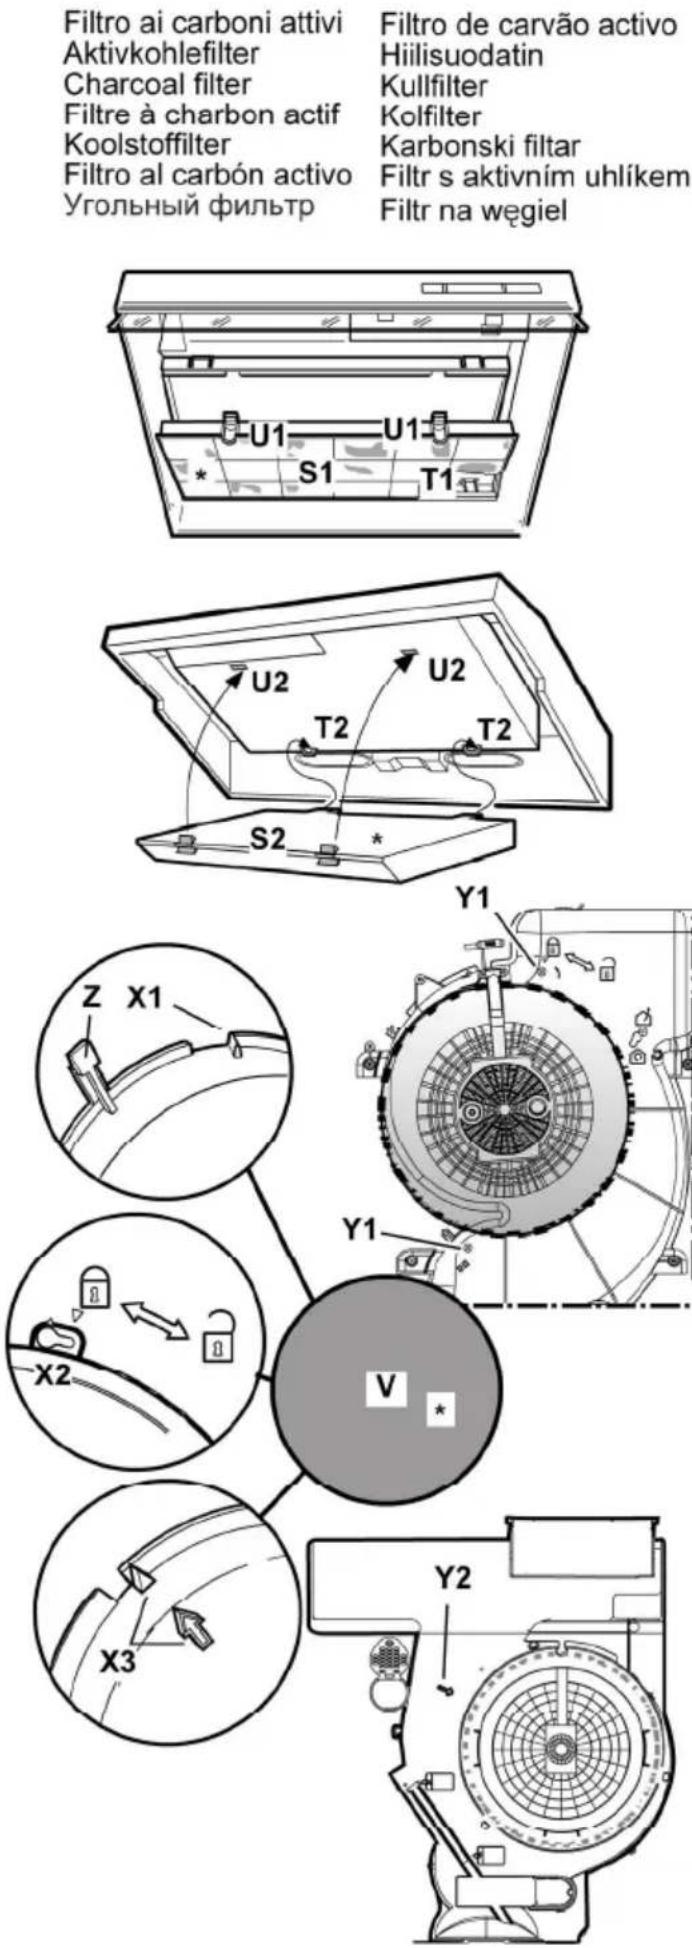
Rectangular S1 or S2 or S3:
Mounting (S1 or S2) : insert the rear side T and hook further to the front (U).
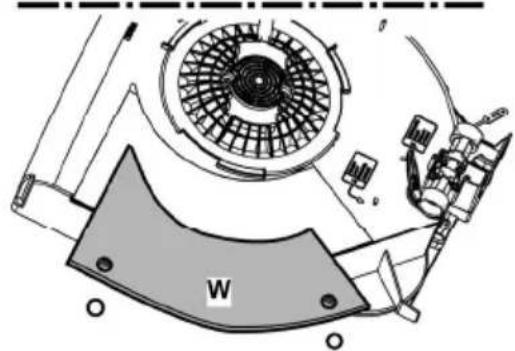
Mounting (S3): Remove the cover W by rotating the O knobs to 90°, fit the filter inside and lock in place with the central knob O, then close the cover.
Proceed in the inverse for dismounting.
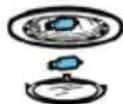
Circular (V1-V2-V3-various models):
Bayonet mount position the filter in the middle of the motor protection grill covering ensuring that the reference to X1 or X2 or X3 on the carbon filter match the Y1 or Y2 references on the conveyor, then turn clockwise; in case of dismounting turn anticlockwise, if provided with a Z tape remember to gently lift first.
Replacing lamps
Disconnect the hood from the electricity.
Warning! Prior to touching the light bulbs ensure they are cooled down.
Replacing lightbulbs 40W - Unscrew the damaged light bulb and replace with an incandescent oval light bulb with a maximum of 40W E14. Remove the grill in order to reach the light bulb area.
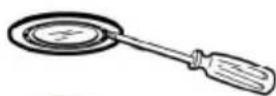
Replacing the halogen bulbs - Access the light compartment - extract the lamp cover by levering it off with a small screwdriver or similar tool.
Replace the damaged light bulb. Only use halogen bulbs of 20W max (G4), making sure you do not touch them with your hands. Close the lamp cover (it will snap shut).
If the lights do not work, make sure that the lamps are fitted properly into their housings before you call for technical assistance.
Brand : Turbo air
Model : Tivoli WH/F/60
Category : Basket