
8003 DC - Heat gun SKIL - Free user manual and instructions
Find the device manual for free 8003 DC SKIL in PDF.


| Product type | Heat gun |
| Brand | Skil |
| Model | 8003 DC |
| Dimensions (L x W x H) | 25 x 20 x 8 cm |
| Weight | 0.6 kg |
| Power supply | 230 V, 50 Hz |
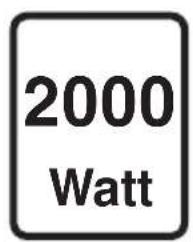
| Power | 2000 W |
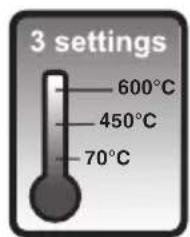
| Maximum temperature | 600 °C |
| Air flow | 300 L/min |
| Main functions | 2 speeds, progressive temperature adjustment, automatic shut-off |
| Maintenance and cleaning | Clean the ventilation grilles with a brush, do not immerse |
| Safety | Overheat protection, automatic shut-off in case of fall |
| Spare parts and repairability | Repairability index rated 8/10, parts available via after-sales service |
| Warranty | 2 years |
| Included accessories | Concentrator nozzle, deflector nozzle |
Frequently Asked Questions - 8003 DC SKIL
User questions about 8003 DC SKIL
0 question about this device. Answer the ones you know or ask your own.
Ask a new question about this device
Download the instructions for your Heat gun in PDF format for free! Find your manual 8003 DC - SKIL and take your electronic device back in hand. On this page are published all the documents necessary for the use of your device. 8003 DC by SKIL.
USER MANUAL 8003 DC SKIL
natural_image
Illustration of a SKIL handheld hair dryer (no text or symbols on body)

GB ORIGINAL INSTRUCTIONS 6
F NOTICE ORIGINALE 10
D ORIGINALBETRIEBSANLEITUNG 14
NL ORIGINELE GEBRUIKSAANWIJZING 19
S BRUKSANVISNING I ORIGINAL 23
DK ORIGINAL BRUGSANVISNING 27
N ORIGINAL BRUKSANVISNING 32
FIN ALKUPERÄISET OHJEET 36
E MANUAL ORIGINAL 40
P MANUAL ORIGINAL 45
I ISTRUZIONI ORIGINALI 50
H EREDETI HASZNÁLATI UTASÍTÁS 54
CZ PÜVODNÍM NÁVODEM K POUŽÍVÁNÍ 59
TR ORİJINAL İŞLETME TALİMATI 63
PL INSTRUKCJA ORYGINALNA 68
RU
ПОДЛИННИК РУКОВОДСТВА
ПО ЭКСПЛУАТАЦИИ
72
UA ОРИГІНАЛЬНА ІНСТРУКЦІЯ
З ЕКСПЛУАТАЦІЇ 78
GR ΠΡΩΤΟΥΠΟ ΟΔΗΓΙΩΝ ΧΡΗΣΗΣ 83
RO INSTRUCTIUNI DE FOLOSIRE
ORIGINALE 88
BG ОРИГИНАЛНО РЪКОВОДСТВО
ЗА ЕКСПЛОАТАЦИЯ 92
SK PÔVODNÝ NÁVOD NA POUŽITIE 98
HR ORIGINALNE UPUTE ZA RAD 102
SRB ORIGINALNO UPUTSTVO ZA RAD 106
SLO IZVIRNA NAVODILA 110
EST ALGUPÄRANE KASUTUSJUHEND 114
LV ORIGINĀLĀ LIETOŠANAS PAMĀCĪBA 119
LT ORIGINALI INSTRUKCIJA 123
МК ИЗВОРНО УПАТСТВО ЗА РАБОТА 128
AL UDHËZIMET ORIGJINALE 133
AR دليل الاستعمال 147
④ RAHENMAI AUSLI 144
www.skil.com

①
8003


②
③

4

natural_image
Simple line drawing of a mechanical component with curved and straight lines (no text or symbols)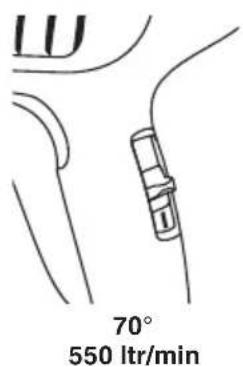

natural_image
Line drawing of a SMC electric shaver with handle and base (no text or symbols)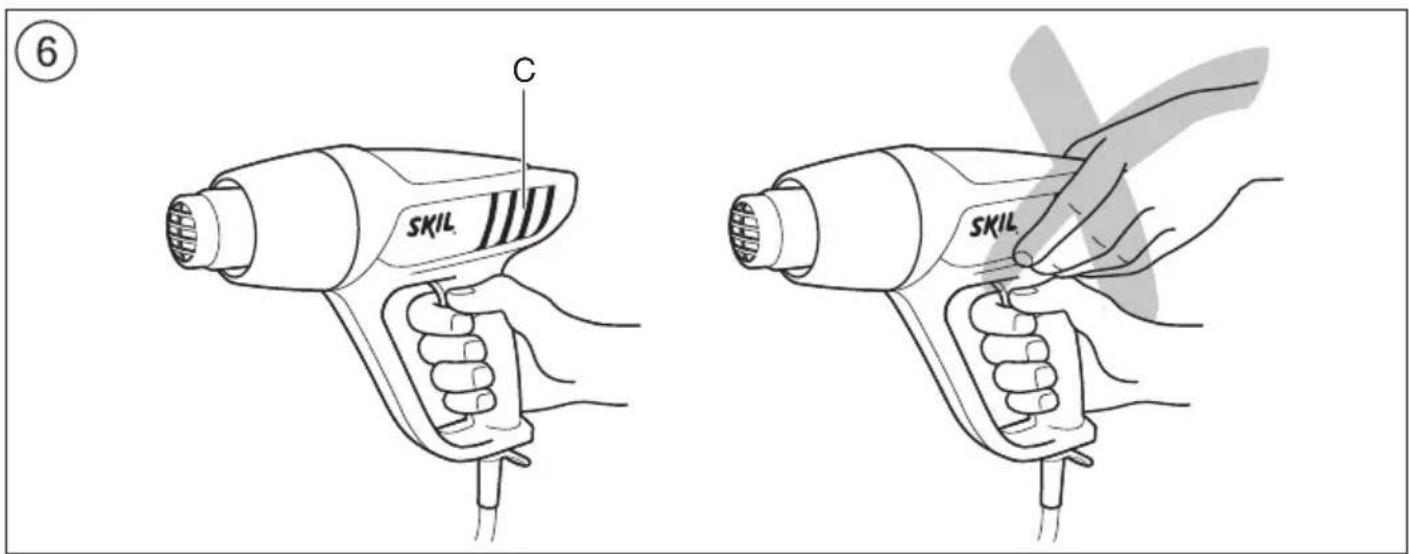




16

GB
Heat gun 8003
INTRODUCTION
- This tool is intended for the removal of paint, the forming and welding of plastic, and the warming of heat-shrinkable tubing; the tool is also suitable for soldering and tinning, loosening adhesive joints and defrosting water pipes
• This tool is not intended for professional use
• Read and save this instruction manual ③
TECHNICAL SPECIFICATIONS ①
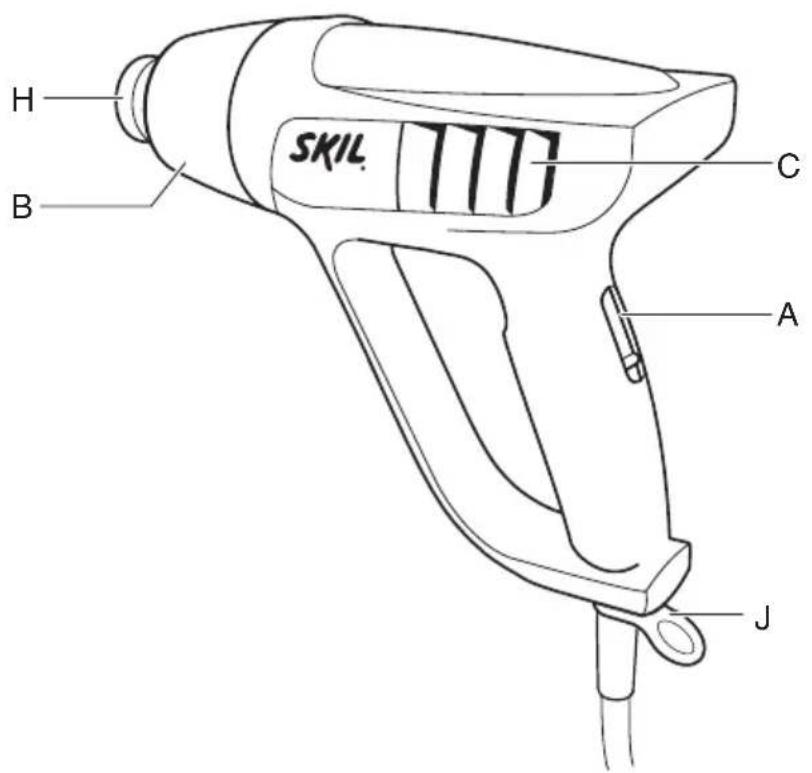
TOOL ELEMENTS ②
A On/off switch
B Protection ring
C Ventilation slots
D Glass protection nozzle
E Flat nozzle
F Reflector nozzle
G Reduction nozzle
H Air outlet/nozzle
J Hanging ring
SAFETY
GENERAL SAFETY INSTRUCTIONS
WARNING! Read all safety warnings and all instructions. Failure to follow the warnings and instructions may result in electric shock, fire and/or serious injury. Save all warnings and instructions for future reference. The term "power tool" in the warnings refers to your mains-operated (corded) power tool or battery-operated (cordless) power tool.
1) WORK AREA SAFETY
a) Keep work area clean and well lit. Cluttered or dark areas invite accidents.
b) Do not operate power tools in explosive atmospheres, such as in the presence of flammable liquids, gases or dust. Power tools create sparks which may ignite the dust or fumes.
c) Keep children and bystanders away while operating a power tool. Distractions can cause you to lose control.
2) ELECTRICAL SAFETY
a) Power tool plugs must match the outlet. Never modify the plug in any way. Do not use any adapter plugs with earthed (grounded) power tools.
Unmodified plugs and matching outlets will reduce risk of electric shock.
b) Avoid body contact with earthed or grounded surfaces such as pipes, radiators, ranges and refrigerators. There is an increased risk of electric shock if your body is earthed or grounded.
c) Do not expose power tools to rain or wet conditions. Water entering a power tool will increase the risk of electric shock.
d) Do not abuse the cord. Never use the cord for carrying, pulling or unplugging the power tool. Keep cord away from heat, oil, sharp edges or moving parts. Damaged or entangled cords increase the risk of electric shock.
e) When operating a power tool outdoors, use an extension cord suitable for outdoor use. Use of a cord suitable for outdoor use reduces the risk of electric shock.
f) If operating a power tool in a damp location is unavoidable, use an earth leakage circuit breaker. Use of an earth leakage circuit breaker reduces the risk of electric shock.
3) PERSONAL SAFETY
a) Stay alert, watch what you are doing and use common sense when operating a power tool. Do not use a power tool while you are tired or under the influence of drugs, alcohol or medication. A moment of inattention while operating power tools may result in serious personal injury.
b) Use personal protective equipment. Always wear eye protection. Protective equipment such as dust mask, non-skid safety shoes, hard hat, or hearing protection used for appropriate conditions will reduce personal injuries.
c) Prevent unintentional starting. Ensure the switch is in the off-position before connecting to power source and/or battery pack, picking up or carrying the tool. Carrying power tools with your finger on the switch or energising power tools that have the switch on invites accidents.
d) Remove any adjusting key or wrench before turning the power tool on. A wrench or a key left attached to a rotating part of the power tool may result in personal injury.
e) Do not overreach. Keep proper footing and balance at all times. This enables better control of the power tool in unexpected situations.
f) Dress properly. Do not wear loose clothing or jewelry. Keep your hair, clothing and gloves away from moving parts. Loose clothes, jewelry or long hair can be caught in moving parts.
g) If devices are provided for the connection of dust extraction and collection facilities, ensure these are connected and properly used. Use of dust collection can reduce dust-related hazards.
4) POWER TOOL USE AND CARE
a) Do not force the power tool. Use the correct power tool for your application. The correct power tool will do the job better and safer at the rate for which it was designed.
b) Do not use the power tool if the switch does not turn it on and off. Any power tool that cannot be controlled with the switch is dangerous and must be repaired.
c) Disconnect the plug from the power source and/or the battery pack from the power tool before making any adjustments, changing accessories, or storing power tools. Such preventive safety measures reduce the risk of starting the power tool accidentally.
d) Store idle power tools out of the reach of children and do not allow persons unfamiliar with the power
tool or these instructions to operate the power tool. Power tools are dangerous in the hands of untrained users.
e) Maintain power tools. Check for misalignment or binding of moving parts, breakage of parts and any other condition that may affect the power tool's operation. If damaged, have the power tool repaired before use. Many accidents are caused by poorly maintained power tools.
f) Keep cutting tools sharp and clean. Properly maintained cutting tools with sharp cutting edges are less likely to bind and are easier to control.
g) Use the power tool, accessories and tool bits etc., in accordance with these instructions, taking into account the working conditions and the work to be performed. Use of the power tool for operations different from those intended could result in a hazardous situation.
5) SERVICE
a) Have your power tool serviced by a qualified repair person using only identical replacement parts. This will ensure that the safety of the power tool is maintained.
SAFETY INSTRUCTIONS FOR HEAT GUNS
BEFORE USE:
- Check the functioning of the tool before each use and, in case of a defect, have it repaired immediately by a qualified person; never open the tool yourself
- Inspect tool cord and plug before each use and, if damaged, have them replaced by a qualified person
- Use completely unrolled and safe extension cords with a capacity of 16 Amps (U.K. 13 Amps)
- Inspect the extension cord periodically and replace it, if damaged
- Use the tool and its accessories in accordance with this instruction manual and in the manner intended for the tool; use of the tool for operations, different from those normally expected to be performed by the tool, could result in a hazardous situation
- This tool should not be used by people under the age of 16 years
- This tool is not intended for use by persons (including children) with reduced physical, sensory or mental capabilities, or lack of experience and knowledge, unless they have been given supervision or instruction concerning use of the tool by a person responsible for their safety
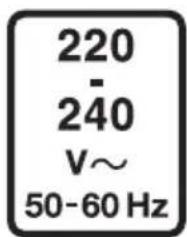
- Always check that the supply voltage is the same as the voltage indicated on the nameplate of the tool
- Be sure tool is switched off when plugging in
DURING USE:
- Handle the tool with care; prevent fire and burns
-do not touch the air outlet/nozzle and the heated object; they become extremely hot
-do not hold the air outlet/nozzle too close to the object to be worked on
-do not direct the hot air flow towards the same surface for too long
-never look down the air outlet/nozzle
-wear protective gloves and use safety glasses
-never direct the hot air flow towards persons or animals
-never use the tool for drying hair
-do not leave the tool unattended
-never use the tool in the proximity of inflammable gases or combustible materials (risk of explosion)
-when working with plastic, paint, varnish and similar materials, inflammable and poisonous gases may be produced; inform yourself beforehand about the materials to be worked on
-take into account, that heat may be transferred to combustible materials out of eyesight
-to be on the safe side, have a bucket of water or a fire extinguisher handy, in case any material catches fire
• Prevent electrical shock
-never poke anything down the air outlet/nozzle
-avoid body contact with earthed surfaces (e.g. pipes, radiators, ranges, refrigerators)
-ensure the tool does not get wet
-do not use the tool in damp locations
-when used outdoors, connect the tool via a fault current (FI) circuit breaker with a triggering current of 30 mA maximum, and only use an extension cord which is intended for outdoor use and equipped with a splashproof coupling-socket
- Handle the cord with care
-always keep away the cord from the hot air flow and the air outlet/nozzle
-keep the cord away from heat, oil and sharp edges -do not carry the tool by the cord, and do not yank the cord to disconnect it from the socket -do not suspend the tool by the cord
• Never use the tool in conjunction with chemical solvents
• Make sure work area is adequately ventilated
- Keep work area clean and well lit
- Keep children away from work area
• Ensure that children do not play with the tool
- Inrush currents cause short-time voltage drops; under unfavourable power supply conditions, other equipment may be affected (if the system impedance of the power supply is lower than 0,127 + j0,079 Ohm, disturbances are unlikely to occur); if you need further clarification, you may contact your local power supply authority
- Stay alert; watch what you are doing, use common sense and do not operate the tool when you are tired
• Take a secure stance; do not overreach, especially on ladders and stages
- Ensure that the tool is switched off, before putting it aside
- In case of electrical or mechanical malfunction, immediately switch off the tool and disconnect the plug
AFTER USE:
- Switch off the tool and disconnect the plug
- Allow the tool to cool down for at least 30 minutes before storage
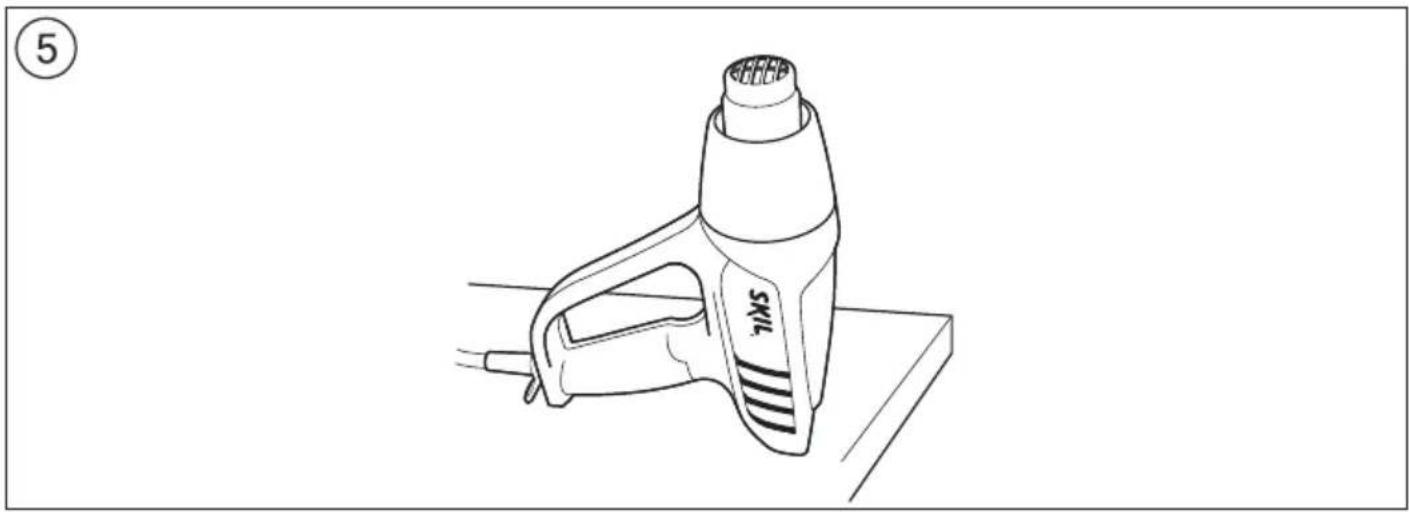
- Suspend the tool on hanging ring J ② or set it down on its rear in an upright position; when doing so, make sure no combustible materials or inflammable gases are in the proximity
• Do not store/leave the tool outdoors - Store the tool in a dry and locked-up place, out of reach of children
USE
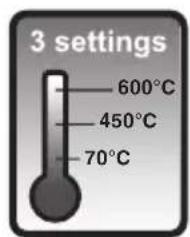
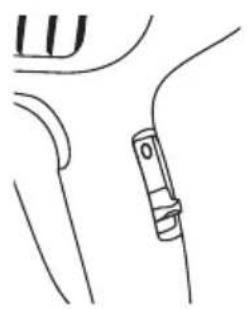
- On/off switch with 3 temperature settings ④ !check if switch A is in position "0" before
plugging in
-switch on the tool by pushing switch A in desired position:
I = 70°C, air flow 550 litres/minute
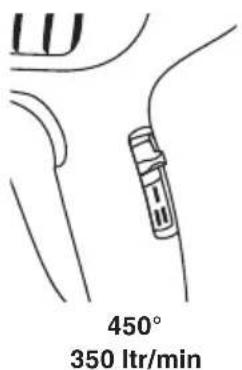
II = 450°C, air flow 350 litres/minute
III = 600°C, air flow 550 litres/minute
-when using it for the first time, some smoke may emit from the tool; this is normal and will soon cease
-switch off the tool by pushing switch A in position "0"
- General use
-determine the right temperature by testing out on an inconspicuous part of the workpiece; start with a low temperature setting
-the temperature drops as the distance between the air outlet/nozzle and the workpiece increases
-the temperature required depends on the material to be worked on
- Stationary use ⑤
-set the tool down on its rear in an upright position
-make sure the surface is clean and dustfree; polluted air damages the motor
-make sure the air flow is directed away from you
-secure the cord to prevent pulling down the tool
-do not touch the air outlet/nozzle
-make sure nothing drops into the air outlet/nozzle
-carefully hold the tool with one hand while switching it off with the other hand, and then allow it to cool down
• Use at hard-to-reach places
- remove ring B ②, thus releasing the metal air outlet over a greater distance
!pay attention to increased risk of fire and burns
• Holding and guiding the tool ⑥
-hold the tool with one hand
-while working, keep the nozzle at a minimum distance of 7 cm from the workpiece; accumulated air damages the tool
-keep ventilation slots C ② uncovered
• SKIL accessories (not standard included) ⑦
-glass protection nozzle D (for deflecting air flow)
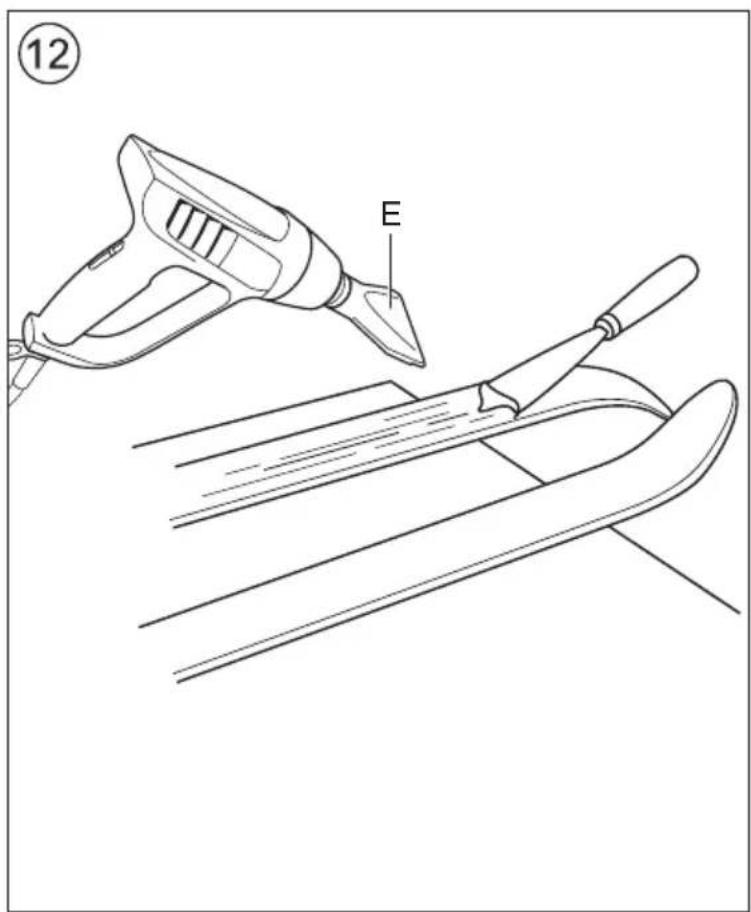
-flat nozzle E (for broadening air flow)
-reflector nozzle F (for reflecting air flow)
-reduction nozzle G (for concentrating air flow)
NOTES:
- all application examples (except removing paint next to glass) can be performed without accessories; however, using the appropriate accessory simplifies the work and significantly improves the quality of the results
-this tool can also be used in combination with BOSCH- and other commonly available accessories for heat guns
- Mounting/removing accessories (not standard included)
- simply fit the accessory onto air outlet H ②
-remove an accessory by pulling it off to the front after it has cooled down
!mount an accessory only when the air outlet is cold, when the switch is in position "0" and when the plug is disconnected
- Hanging ring J ⑧
-for easy storage of the tool
!allow the tool to cool down for at least 30 minutes before storage
• Constant heat control (overload protection)
Protects heating element from damage when tool is overloaded without having to stop it and/or let it cool down for a period of time
-when the temperature gets too high, the heating element switches itself off, while the motor continues to run and produces cold air
-when the temperature has dropped sufficiently (taking only a few seconds), the heating element will be switched on automatically
!when the tool is switched off after working at a high temperature setting, and switched on again after a short break, it may take a while before the heating element reaches the desired temperature
APPLICATION ADVICE
- Removing paint/lacquer ⑨
-use a clean, sharp scraper
-scrape firmly, when the paint softens
-experiment to establish the length of time necessary to apply the heat for optimal results
-scrape the softened paint immediately, or it will harden again
-keep a 30^ to 40^ angle between the tool and the workpiece
-remove paint and debris immediately from the scraper to prevent them from ignition
-scrape with the grain of the wood, wherever possible
-do not direct the hot air flow towards the same surface for too long
-dispose of all paint debris safely
-thoroughly clean the work area after completing the job
!be careful when removing layers of paint in old buildings; in the past the building may have been painted with paint containing lead, which is highly poisonous
!exposure to even low levels of lead can cause serious brain and nervous system damage; young and unborn children are particularly vulnerable !have lead-based paint removed by a professional without using a heatgun
OTHER APPLICATION EXAMPLE:
★removing (synthetic) wall covering
- Removing paint/lacquer next to glass ⑩
- always use glass protection nozzle D when working next to glass
-remove the paint with a hand scraper
!do not use the tool for removing paint on metal-framed windows; metal is heat-conducting which might lead to breaking of the glass
- Removing stickers (use flat nozzle E) ⑪
-many adhesives become softer when heated, allowing adhesive bonds to be separated and superfluous adhesive to be removed
!heat sticker on the upper side
!always take care not to overheat the underlying surface
OTHER APPLICATION EXAMPLES:
★ removing linoleum and vinyl carpeting
★removing carpet tiles made of synthetic fibres
★removing veneers/applying veneer strips
★softening/melting tar, tin, bitumen, wax (use flat nozzle E)
★ waxing (skis, furniture) (use flat nozzle E) ⑫
★removing resin
★loosening rusty/too tightly fastened metal screws, nuts and bolts
★removing candle wax (do not overheat the underlying surface)
★repairing broken candles/restoring bent candles to their original shape
- Shrink fitting ⑬
-use reflector nozzle F or reduction nozzle G
-select a shrink-fit tube with a diameter matching that of the workpiece
-heat the shrink-fit tube evenly
OTHER APPLICATION EXAMPLE:
★ shrink-wrapping
• Soldering water pipes ⑭
This tool is most suitable for working with soft solders (melting point below 400°)
-use reflector nozzle F
-thoroughly clean both joining sections before soldering
- pre-heat both sections and apply soldering wire (do not use lead-based soldering wire)
• Thawing out frozen water pipes ⑮
-use reflector nozzle F
-heat the frozen area evenly
!water pipes are often difficult to distinguish from gas pipes; heating gas pipes is extremely dangerous – risk of explosion
OTHER APPLICATION EXAMPLES:
★ thawing out water pipes made of PVC (position I, max. 70°C)
★thawing out frozen car locks (position I, max. 70°C) (use reduction nozzle G)
★defrosting freezers (do not damage the plastic housing)
★thawing out ice-covered steps and pavements
• Shaping plastic tubes
-use reflector nozzle F
-fill the tube with sand and seal it at both ends, to avoid kinking of the tube
-heat the tube evenly by moving it from side to side OTHER APPLICATION EXAMPLES:
★ shaping all plastics with a low melting-point (polyethylene, PVC etc.)
★shaping all plastics with a high melting-point (acrylic glass, Plexiglas etc.)
★shaping and bending carpet tiles made of synthetic fibres
★shaping and bending of wood (model-building)
- Welding plastics
-the weld seam must be clean and grease-free
-keep welding rod close to weld seam and apply heat, until the welding rod gets tacky
-remove heat, when weld seam is filled up
OTHER APPLICATION EXAMPLES:
* repairing of surfboards, skis and other synthetic sports goods (use flat nozzle E)
★welding PVC-materials
★smoothening blisters after sticking PVC-labels
★connecting garden hoses (use reflector nozzle F)
- Drying
!only dry with a low or medium temperature setting (position I or II) and with an increased distance between the tool and the workpiece
-drying of paint, varnish, gypsum, mortar and plaster
-drying wet timber prior to filling
-drying thickly applied filler or adhesive quickly
-drying building joints before spraying insulation or sealant
-drying joints and cracks in boatbuilding
- Cleaning/disinfecting
- disinfecting rabbit hutches, dove cotes, etc. (remove your pet first)
-combatting ant colonies - combatting woodworms and boring beetles (hold the tool at an adequate distance from the wood)
-eliminating weeds
MAINTENANCE / SERVICE
• This tool is not intended for professional use
- Always keep tool and cord clean (especially ventilation slots C ②)
- Never use easy inflammable liquids for cleaning the heat gun in general and the air outlet/nozzle in particular
- If the tool should fail despite the care taken in manufacturing and testing procedures, repair should be carried out by an after-sales service centre for SKIL power tools
- send the tool undismantled together with proof of purchase to your dealer or the nearest SKIL service station (addresses as well as the service diagram of the tool are listed on www.skil.com)
ENVIRONMENT
- Do not dispose of electric tools, accessories and packaging together with household waste material (only for EU countries)
-in observance of European Directive 2002/96/EC on waste of electric and electronic equipment and its implementation in accordance with national law, electric tools that have reached the end of their life must be collected separately and returned to an environmentally compatible recycling facility
- symbol ⑯ will remind you of this when the need for disposing occurs
CE DECLARATION OF CONFORMITY
• We declare under our sole responsibility that this product is in conformity with the following standards or standardized documents: EN 60335, EN 61000, EN 55014, in accordance with the provisions of the directives 2006/95/EC, 2004/108/EC, 2011/65/EU
• Technical file at: SKIL Europe BV (PT-SEU/ENG1), 4825 BD Breda, NL
Operations & Engineering
Olaf Dijkgraaf
Approvals Manager
SKIL Europe BV, 4825 BD Breda, NL
14.12.2012

Pistolet chauffant 8003
INTRODUCTION
J Bague de suspension
SECURITE
INSTRUCTIONS GENERALES DE SECURITE
• Bague de suspension J ⑧
Operations & Engineering
Olaf Dijkgraaf
Approvals Manager

SKIL Europe BV, 4825 BD Breda, NL
14.12.2012
C€13

Varmluftpistol 8003
INLEDNING
Operations & Engineering
Olaf Dijkgraaf
Approvals Manager

SKIL Europe BV, 4825 BD Breda, NL
14.12.2012
C€13

Varmepistol 8003
INTRODUKSJON
1) SIKKERHET PÅ ARBEIDSPLASSEN
a) Hold arbeidsområdet rent og ryddig. Rotete arbeidsområder eller arbeidsområder uten lys kan føre til ulykker.
VEDLIKEHOLD / SERVICE
Operations & Engineering
Olaf Dijkgraaf
Approvals Manager

SKIL Europe BV, 4825 BD Breda, NL
14.12.2012
C€13
E
Pistola de calor 8003
INTRODUCCIÓN
DALŠÍ PŘÍKLAD POUŽITÍ:
DALŠÍ PŘÍKLAD POUŽITÍ:
DALŠI PŘIKLADY POUŽITÍ:
Operations & Engineering
Olaf Dijkgraaf
Approvals Manager
SKIL Europe BV, 4825 BD Breda, NL
14.12.2012
C€13

Opalarka 8003
WSTEP
Operations & Engineering
Olaf Dijkgraaf
Approvals Manager

SKIL Europe BV, 4825 BD Breda, NL
14.12.2012
C€13
GR
Operations & Engineering
Olaf Dijkgraaf
Approvals Manager

SKIL Europe BV, 4825 BD Breda, NL
14.12.2012
CE13

Puhalo vrućeg zraka 8003
UVOD
- Ovaj je uređaj predviđen za skidanje starih slojeva boje, oblikovanje i zavarivanje plastike i zagrijavanje cijevi na toplo skupljanje; uređaj je pogodan i za lemljenje i kositrenje, otpuštanje zalijepljenih spojeva i odmrzavanje vodovodnih cijevi
- Ovaj uređaj nije namijenjen profesionalnoj upotrebi
- Pažljivo pročitajte i sačuvajte ove upute za rukovanje ③
TEHNIČKI PODACI ①
DIJELOVI ALATA ②
OPŠTA UPUTSTVA O SIGURNOSTI
A PAŽNJA! Čitajte sva upozorenja i uputstva. Propusti kod pridržavanja upozorenja i uputstava mogu imati za posledicu električni udar, požar i/ili teške povrede. Čuvajte sva upozorenja i uputstva za budućnost. Pojam upotrebljen u upozorenjima "električni alat" odnosi se na električne alate sa radom na mreži (sa mrežnim kablom) i na električne alate sa radom na akumulator (bez mrežnog kabla).
1) SIGURNOST NA RADNOM MESTU
a) Držite Vaše područje rada čisto i pospremljeno.
Operations & Engineering
Olaf Dijkgraaf
Approvals Manager
SKIL Europe BV, 4825 BD Breda, NL
14.12.2012

C€13

Grelnik zraka 8003
UVOD
ÜLDISED OHUTUSJUHISED
Operations & Engineering
Olaf Dijkgraaf
Approvals Manager

SKIL Europe BV, 4825 BD Breda, NL
14.12.2012
C€13
LV
APKALPOŠANA / APKOPE
Operations & Engineering
Approvals Manager

SKIL Europe BV, 4825 BD Breda, NL
14.12.2012
CE13
natural_image
Simple line drawing of a pencil (no text or symbols)
natural_image
Simple line drawing of a pencil (no text or symbols)
natural_image
Simple line drawing of a pencil (no text or symbols)محيط زیست
Operations & Engineering
Olaf Dijkgraaf
Approvals Manager

SKIL Europe BV, 4825 BD Breda, NL
14.12.2012
CE13
سایر موارد استفاده:
natural_image
Line drawing of a SWEI electric shaver with handle and base (no text or symbols)


8003




natural_image
Simple line drawing of a mechanical component with curved and straight lines (no text or symbols)
natural_image
Simple line drawing of a medical device with a curved tube and connector (no text or symbols)70° 550 ltr/min

natural_image
Simple line drawing of a medical device attached to a curved anatomical structure (no text or symbols)450° 350 ltr/min

natural_image
Simple line drawing of a medical device with a curved tube and attached tubing (no text or symbols)600° 550 ltr/min

natural_image
Illustration of a SKIL handheld hair dryer (no text or symbols on body)دليل الاستعمال AR
raهنماي اصلی FA



- GB
- Heat gun 8003
- INTRODUCTION
- TECHNICAL SPECIFICATIONS ①
- TOOL ELEMENTS ②
- SAFETY
- GENERAL SAFETY INSTRUCTIONS
- SAFETY INSTRUCTIONS FOR HEAT GUNS
- BEFORE USE:
- DURING USE:
- • Prevent electrical shock
- - Handle the cord with care
- AFTER USE:
- USE
- plugging in
- !pay attention to increased risk of fire and burns
- NOTES:
- APPLICATION ADVICE
- MAINTENANCE / SERVICE
- ENVIRONMENT
- CE DECLARATION OF CONFORMITY
- Pistolet chauffant 8003
- SECURITE
- INSTRUCTIONS GENERALES DE SECURITE
- Varmluftpistol 8003
- INLEDNING
- Varmepistol 8003
- INTRODUKSJON
- 1) SIKKERHET PÅ ARBEIDSPLASSEN
- VEDLIKEHOLD / SERVICE
- Pistola de calor 8003
- INTRODUCCIÓN
- Opalarka 8003
- WSTEP
- GR
- Puhalo vrućeg zraka 8003
- UVOD
- TEHNIČKI PODACI ①
- DIJELOVI ALATA ②
- OPŠTA UPUTSTVA O SIGURNOSTI
- Grelnik zraka 8003
- ÜLDISED OHUTUSJUHISED
- LV
- APKALPOŠANA / APKOPE
- محيط زیست
- 8003
Brand : SKIL
Model : 8003 DC
Category : Heat gun