
Panther de Luxe - Chopper BEEM - Free user manual and instructions
Find the device manual for free Panther de Luxe BEEM in PDF.


| Product type | Electric meat grinder |
| Model | Panther de Luxe |
| Brand | BEEM |
| Dimensions (L x W x H) | Approx. 30 x 20 x 25 cm |
| Weight | Approx. 4 kg |
| Power supply | 220-240 V, 50 Hz, 800 W |
| Housing material | Robust ABS plastic |
| Blade material | Stainless steel |
| Bowl capacity | 1.5 L |
| Main functions | Grinding meat, fish, vegetables; making pâtés, sausages |
| Included grinding discs | Fine and coarse grinding discs, sausage attachment |
| Safety device | Safety switch with automatic shut-off in case of overload |
| Non-slip feet | Yes, for better stability |
| Storage compartment | Integrated accessory storage |
| Easy cleaning | Removable parts dishwasher-safe, stainless steel blade easy to clean by hand |
| Cable length | 1.2 m |
| Manufacturer's warranty | 2 years |
| Country of manufacture | China |
| Repairability | Spare parts available from BEEM after-sales service |
| Color | White and red |
Frequently Asked Questions - Panther de Luxe BEEM
User questions about Panther de Luxe BEEM
0 question about this device. Answer the ones you know or ask your own.
Ask a new question about this device
Download the instructions for your Chopper in PDF format for free! Find your manual Panther de Luxe - BEEM and take your electronic device back in hand. On this page are published all the documents necessary for the use of your device. Panther de Luxe by BEEM.
USER MANUAL Panther de Luxe BEEM
natural_image
Exterior view of a modern stainless steel meat maker (no text or symbols visible)- Introduction.... 15
- About these instructions .... 15
- Description of appliance, components, contents 16
- Important safety instructions.... 17
- Prior to initial use 18
- Use....19
6.1 Assembly of meat grinder.... 19
6.2 To use the meat grinder 19
6.3 Hints for usage 19
6.4 Assembly your meat grinder for sausage stuffing or preparation of Kebbe (stuffed meat rolls) 20
6.5 Filling sausages....20
6.6 Preparation of Kebbe (stuffed meat rolls)....20
6.7 Use of the cookie attachment.... 21
- Faults and troubleshooting 21
- Cleaning 21
- Disposal 22
- Technical data.... 22
- Certifications.... 22
- Guarantee, service, repairs 23
- Replacement parts and accessories 24
- Wiring diagram 47
- European Conformity Declaration 48
FR
Sommaire
natural_image
Mechanical assembly diagram showing motor components and flow direction (no text or labels)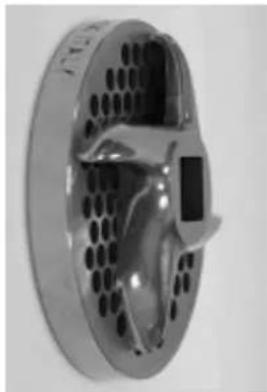
natural_image
Close-up of a metallic circular device with perforated surface and central display (no visible text or symbols)natural_image
Exploded view diagram of a mechanical assembly showing parts like bolts, gears, and a valve (no text or labels)natural_image
3D rendering of a mechanical device with a pipe fitting and a valve mechanism (no text or symbols visible)natural_image
Close-up of a stainless steel kitchen knife with a downward arrow indicating compression (no text or symbols visible)natural_image
Close-up of a stainless steel meat maker with a handle and spout, showing mechanical components (no text or symbols visible)natural_image
Exploded view diagram of a mechanical assembly showing components like gears and a T-junction (no text or labels)
natural_image
Exterior view of a modern office building (no signage)
natural_image
Close-up of a stainless steel kitchen knife with a downward arrow indicating compression (no text or symbols visible)
natural_image
Close-up of a kitchen grater with a downward arrow indicating compression (no text or symbols visible)First of all we would like to sincerely thank you for purchasing this appliance.
Our efforts to produce this appliance in accordance with strict quality guidelines have been rewarded by your purchase.
Let's get away from being a "disposable society" and return to traditional values. That's our motto. If you agree with us then we congratulate you on your choice.
We wish you every success with it.
2. About these instructions
The appliance is equipped with safety devices. Nevertheless, please carefully read the safety instructions and only use the appliance as described in these instructions so as to avoid inadvertent injuries or damage.
Keep these instructions safe for later reference. If the appliance is given to another person, these instructions must also be included with it.
Safety terms in these instructions:
The signal word DANGER warns of potentially serious injuries and a risk to life.
The signal word WARNING warns of injuries and serious material damage.
The signal word CAUTION warns of minor injuries or damage.
3. Description of appliance, components, contents

A) Pusher
B) Tray
C) Grinder Housing
D) Release Button
E) Motor Unit
F) Switch Button
G) Reverse Button(REV)
H) Indicator Light
J) Fine grinding disk 3 mm ∅
K) Medium grinding disk 4,5 mm ∅
L) Worm-shaft
M) Knife
N) Coarse grinding disk 8,0 mm
O) Screw ring
P) Separator
Q) Sausage horn
R) Former
S) Cone
T) Cookie shaper
U) Shaper fixation
V) Gear and spare gear for the worm-shaft
4. Important safety instructions
Intended use
- This appliance is only intended for domestic use. Commercial use prohibited.
- This appliance is intended for the mincing and grinding of meat, preparation of sausages and cookies.
DANGER FOR CHILDREN
- Particular care should be taken if the appliance is used near children.
-
The appliance must not be operated by people with
-
impaired physical abilities,
- impaired sensory abilities,
- impaired mental abilities,
- a lack of experience and knowledge
• or children
if they are not supervised or have not been instructed how to use the appliance by a person who is responsible for their safety.
- The appliance should be placed beyond the reach of children.
- Keep children away from the packaging. Dangers can include suffocation!
HAZARD FROM ELECTRICITY
- To avoid the risk of fire, electric shock and personal injury, do not use the appliance in the open air, and do not immerse it in water or other liquids.
- Before connecting the appliance to your power supply, you should ensure that the voltage indicated on the rating plate matches that of your power supply.
- The appliance should only be connected to a properly earthed mains power supply.
- Never pull on the cable to disconnect the appliance from the power socket. Always pull the plug.
- Do not allow the mains lead to hang over sharp edges or hot surfaces.
- Never attempt to repair the unit yourself, and never use it if the plug or cable is damaged, if it is not working properly, or if there is another type of damage. Send or take the appliance to an authorised dealer. Attempts at repair by unauthorised persons will lead to invalidation of the guarantee entitlement.
- Under no circumstances should you open up the appliance, or remove covers or parts of the housing.
-
Pull the mains plug out of the socket,
-
if you are not using the appliance
-
if a fault occurs during use
• before cleaning the appliance -
Only use the accessories supplied. Using other components may cause electric shock, fire or damage to persons or objects.
DANGER OF INJURY
- Switch off the appliance and disconnect it from power supply, before changing any accessories or approaching parts that move in use. Wait until the machine has stopped completely before removing any parts.
- Never stick your fingers or any objects into the appliance whilst it is in operation. Always use the stuffer.
- The knives are very sharp. Care shall be taken when handling the sharp cutting blades, emtying and during cleaning.
WARNING of injuries from other causes
- Do not allow the mains lead to hang over projections (trip-wire effect).
CAUTION - Material damage
- The appliance is not intended for use with external timers or remote control systems.
- Place the appliance on a flat, watertight, stable surface at least 5 cm from the wall.
- Never operate the appliance unattended.
-
The plug must be easily accessible so that you can pull it out quickly if necessary.
-
Never place the appliance near a gas flame, electric hotplate or other source of heat. External heat can damage the appliance.
- Contemporary furnishings are coated with a wide range of varnishes and plastics, and are treated with all sorts of care agents. It could be, therefore, that some of these materials may contain elements that attack and soften the silicone feet. If necessary, place a support layer beneath the feet of the appliance.
ATTENTION: No liability can be accepted for any damage caused by misuse.
5. Prior to initial use
- Ensure that all the packaging has been removed from the appliance (protective foil, etc.).
- Do not remove the rating plate or any warnings.
CAUTION: Check that the appliance is undamaged and that no parts are missing. If any components are damaged, the appliance should not be used. Contact qualified service personnel.
◆ Place the appliance on a watertight, flat surface.
◆ Rinse and dry the parts A-C and J-R before initial use.
We recommend cleaning the meat grinder thoroughly before initial use. Thorough cleaning of the mincer is basic requirement for a hygienic food preparation.
The motor unit should not be immersed in water or come in contact with water. Clean the parts D-H with a damp-cloth only without abrasive agents.
- Never use a dishwasher for cleaning.
NOTE: When you use the appliance for the first time slight smoke or smells may be created.
6. Use
6.1 Assembly of meat grinder
Before inserting the plug into the power socket, make sure that the appliance is switched off.
- After removing the screw ring (O) insert knife (M) and the desired grinding disk (J, K, N) into the grinder-housing (C).
- Please note that the parts must be fitted into the housing in the following order: worm shaft (L) - knife (M) - disk (J, K, N).
- The sharp blade of the knife (M) must always face towards the grinding disk (see figure below).
- Tighten the screw ring (O) by turning clockwise.
- Insert the grinder-housing into the motor unit at an angle of 45°.
- Then turn the grinder housing counter clockwise until it reaches a vertical position and clicks into place.
- Fit the tray into the inlet of the grinder housing.

natural_image
Mechanical assembly diagram showing a motor, gear, and fan components (no text or labels)6.2 To use the meat grinder
Switch on the appliance. For pushing food in the grinder housing in order to avoid injuries always use the pusher. Excessive filling does not speed up the mincing process!
Please note that excess fat has to be trimmed of the meat and the meat has to be cut into cubes before putting into the grinder housing.
6.3 Hints for usage
The motor is protected against overload by a temperature-controlled cutoff switch and switches off automatically if overloaded. In this case let cool down the appliance for about 60 minutes.
NOTE: If overloading has occurred, turn off the appliance and unplug. Check the cause of disturbance and eliminate it. After 60 minutes plug in again. The appliance is ready for use.
The reverse button (G) is to be used if the worm shaft gets stuck, because of unproperly minced meat. In this case push the reverse button for about 2-3 seconds, just to allow the worm shaft to free itself. Remove the meat that has blocked the mincing process. The appliance is now ready for further use.
Note: the reverse button must only be used for max. 10 seconds otherwise the motor will be damaged. In this case the manufacturer assumes no liability.
6.4 Assembly your meat grinder for sausage stuffing or preparation of Kebbe (stuffed meat rolls)
natural_image
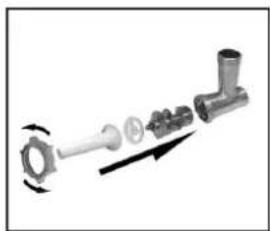
Mechanical assembly diagram showing a pipe fitting with internal components and directional arrow (no text or labels)After removing the screw ring (O) insert the worm shaft (L) first then add the separator (P) and the sausage horn into the grinder housing.

natural_image
Exploded view diagram of a pipe fitting showing internal components and motion arrows (no text or labels)After removing the screw ring (O) insert the worm shaft (L) first then add the former (R) and the cone (S) into the grinder housing.
natural_image
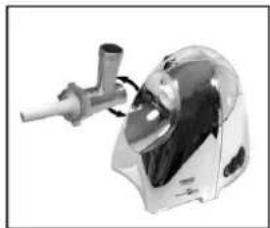
Mechanical assembly diagram showing a valve inserted into a housing (no text or labels visible)Thighten the screw ring by turning clockwise. Attach the grinder-housing to the motor unit.
natural_image
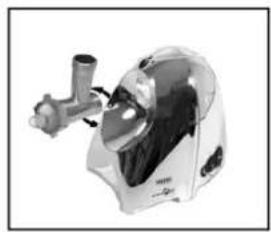
Mechanical device with a metallic handle and transparent casing, no visible text or symbolsThighten the screw ring by turning clockwise. Attach the grinder-housing to the motor unit.

natural_image
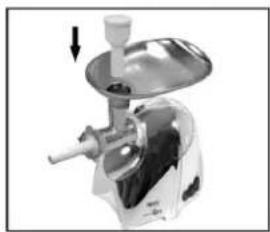
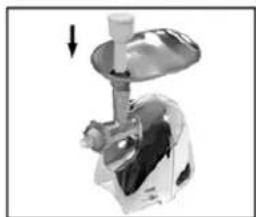
Close-up of a mechanical food processor with a lid and arrow indicating compression (no visible text or symbols)Fit the tray into the inlet of the grinder housing.

natural_image
Close-up of a kitchen feeder with a downward arrow indicating compression (no text or symbols visible)Fit the tray into the inlet of the grinder housing.
natural_image
Close-up of a stainless steel manual shaver with a downward arrow indicating compression (no text or symbols visible)Now the appliance is ready for the preparation of sausages.

natural_image
Close-up of a kitchen grater with a downward arrow indicating compression (no text or symbols visible)Now the appliance is ready for the preparation of Kebbe (stuffed meat rolls).
6.5 Filling sausages
♦ Only use minced meat for filling sausages.
Put the ingredients (minced meat) on the tray. Use the pusher to gently push the meat into the grinder housing.
Put the sausage skin in lukewarm water for 10 minutes. Then slide the wet skin onto the sausage horn.
If the skin gets stuck onto the sausage horn, wet it with some water.
♦ Switch on the appliance and the sausages stuffing can be started.
6.6 Preparation of Kebbe (stuffed meat rolls)
♦ Only use minced meat for filling sausages.
Put the ingredients (minced meat) on the tray. Use the pusher to gently push the meat into the grinder housing.
The minced meat is pushed through the former and cone (R+S) and a hollow cylinder will be produced. Cut it into the desired length. These rolls can now be stuffed with various ingredients.
6.7 Use of the cookie attachment

T+U
Remove the screw ring (O) and fit the cookie attachment without slider to the grinding disk. Note that the insert at the side of the cookie attachment must fit onto the insert of the grinding disk. Attach the screw ring to the grinder housing again and tighten by turning clockwise.
7. Faults and troubleshooting
| Faulty function | Possible reason | Remedy |
| Drive motor not running | Mains plug not plugged in | Connect the appliance to the mains |
| No electricity supply | Check the fuse/plug | |
| Appliance overheated | Pull out the mains plug and wait at least 60 minutes | |
| Appliance switches off abruptly | Appliance overheated Pull out the | mains plug and wait at least 60 minutes |
| Fuse blows | Appliance is faulty | Inform the after-sales service |
| Too many appliances connected | Reduce number of appliances using the circuit |
8. Cleaning

WARNING
Danger of injury
Always pull out the mains plug before cleaning.

DANGER
Danger of death from electric shock
Never immerse the appliance in water or other fluids.

CAUTION
Material damage
Never use aggressive or abrasive cleaning agents.
- Switch the appliance off and unplug.
- When disassembled, the grinder-housing (not the motor unit!) can be rinsed.
- For disassembling push the release button button (D) and remove the grinder housing from the motor unit while turning slightly.
- Rinse all accessories with lukewarm water and rinsing agent.
- Therefore please put all parts of the mincing unit A to C and J to U for at least 10 Minutes in warm water.
- Then clean all parts with a brush and rinsing agent. Clean thoroughly the inside of grinder housing (C) and all parts A, B and J to U especially also around the plastic gear (V) and the inside of screw ring (O).
• Then rinse again with fresh water.
- Wipe the motor housing with a damp cloth only.
• Dry all parts thoroughly.
• Re-assemble the appliance.
- The accessories (P-S) can be stored inside the pusher.
- The power cord can be stored in the base of the motor unit.
- Store the appliance in a dry, well ventilated place.
THE MOTOR UNIT SHOULD NOT BE IMMERSED IN WATER OR COME INTO CONTACT WITH WATER. CLEAN WITH DAMP-CLOTH ONLY.
NOTE: Some foods can cause discoloration of the plastic parts. This does not damage the material and does not affect the taste of other foods. You can wipe off the discoloration with a cloth and a little cooking oil.
9. Disposal
The following regulations may only apply for countries of the European Community.
Dispose of the packaging according to type. If you do not wish to keep the unit, dispose of it in accordance with the environmental regulations and current provisions.
The following standard provision applies for Germany and several EC countries:
This product is not to be treated as normal domestic refuse, but instead handed over to a collecting point for recycling electrical and electronic appliances corresponding to the provisions applicable in your country. Your municipal authority will provide you with information.
Several EC and non-EC countries have country-specific regulations for the disposal of old appliances. The authority responsible for this can provide you with information.
10. Technical data
Model: PANTHER
Model number: LW-6108, M12.001
Power supply: 230V\~50Hz
Power consumption: 600W (850W Max.)
Protection class: II
We reserve the right to change the design and technology at any time. Misprints excepted.
11. Certifications


This appliance has been tested and certified by TUV Sued.
This appliance complies with the EC Directive on Electromagnetic Compatibility (EMC) 2004/108/EC and the Low-Voltage Directive 2006/95/EC.
12. Guarantee, service, repairs
This high quality product from BEEM has been made in accordance with the latest manufacturing methods.
We guarantee that this high-quality product is in perfect condition. We will remedy all material or manufacturing defects free of charge within the warranty period.
The warranty period for this product is 2 years.
With industrial or similar use e.g. in hotels, guesthouses or communal facilities, or when the customer is not a consumer in terms of the German Civil Code, the manufacturer provides a warranty of 6 months. This does not affect the warranty exclusion.
Warranty exclusion: the warranty specifically excludes defects that have been caused by incorrect manipulation, disregard of the operating instructions and safety notes, use of force, alterations, attempts at self-repair or repair attempts undertaken by unqualified third parties. Also excluded are defects caused by normal wear & tear.
Insofar as we are legally obliged to provide a warranty, we will either repair or replace the defective item free of charge – with rights of replacement or reduction in price being excluded. If it is not possible to repair the product after a number of attempts have been made, or if the replacement is also defective for reasons which are our responsibility, then the customer is entitled to a reduction in price or, at his discretion, to withdraw from the contract. The warranty is not extended by availment thereof.
The dealer from whom you purchased the product is responsible in the first instance for swapping (exchange or replacement), return of the product (withdrawal from the sales contract) or reduction in the sale price. This is especially the case in the event of return or claims for reduction in price, since these must be settled with consideration for the sale price. Refund of the sale price in the event of return of goods, or issue of a credit note in the case of price reduction, can only be effected by the dealer from whom you bought the product.
If defects should transpire, contrary to expectations, please try first by telephone to clear up the problem. If the problem still remains please send the carefully-packed article to your dealer or to the customer service address given below. Include your full address, the product's type and model number and the serial number; these are to be found on the rating label. Describe as detailed as possible the defects or deficiencies. A machine-generated and dated sales receipt or invoice is to be enclosed with the product or spare parts order. Warranty services cannot be rendered without a machine-generated and dated sales receipt or invoice, either for repairs, spare parts or other claims.
Outside of Germany and especially in non-EC countries, send the article to your dealer or to your local distributor. You can obtain information from the customer service address below, preferably via email.
You can also arrange for repairs that are not covered by the warranty to be carried out by customer service - outside of Germany, via your dealer or distributor. These will be invoiced on their individual merits.
Consumable parts & materials can be ordered from your dealer or from the stated customer service address. Outside of Germany, please contact your dealer or distributor in the first instance.
Contact your dealer or the stated customer service department if you want product information or wish to order accessories or ask questions relating to service matters.
Outside of Germany and especially in non-EC countries, please contact your dealer or distributor in the first instance.
Please also use the internet. On our website www.beem.de can be found accessories, replacement parts and instruction manuals in various languages. Also further product information.
Customer service address, Germany:
BEEM GmbH, Customer Service Department, Dieselstrasse 19 – 21, D-61191 Rosbach Service telephone number: +49 1805-233600 | Service fax number: +49 1805-233699 (Service number subject to a charge, may vary according to the country) | Service email address: kundenservice@beem.de | Internet: www.beem.de
13. Replacement parts and accessories
| Number* | Article number Name of part | |||
| A | 900 | 041 | 066 | Pusher with cover |
| B | 900 | 041 | 071 | Tray |
| C | 900 | 041 | 031 | Grinder housing |
| J D 10 | 00122 Fine grinding | disk ∅ 3.0 mm | ||
| K D 10 | 00124 Coarse grinding | ing disk ∅ 4.5 m | ||
| L | 900 | 041 | 027 | Worm shaft |
| M | D 1000128 | Knife | ||
| N D 10 | 00126 Coarse grinding | ing disk ∅ 8.0 m | ||
| O | 900 | 041 | 051 | Srew ring |
| P | 900 | 041 | 061 | Separator |
| Q | 900 | 041 | 056 | Sausage horn |
| R | 900 | 041 | 091 | Former |
| S | 900 | 041 | 096 | Cone |
| T + U | 900 | 041 | 086 | Cookie attachment |
| V | 900 | 041 | 022 | Gear |
• as per the diagram in the appliance description (see above; Chapter 3)
Waiver: Translation of the binding original version of the Instructions in German language into English language for information purposes only.
1. Introduction
Chère cliente, cher client!
natural_image
Mechanical assembly diagram showing a motor, gear, and fan components (no text or labels)natural_image
Mechanical assembly diagram showing a bolt, nut, and shaft with directional arrows indicating motion (no text or labels)natural_image
Medical device with tubing and connector, no visible text or symbolsnatural_image
Close-up of a stainless steel meat maker with a downward arrow indicating compression (no text or symbols visible)Posez l'entonnoir.

natural_image
Close-up of a stainless steel kitchen grater with a downward arrow indicating compression (no text or symbols visible)natural_image
Exploded view diagram of a mechanical assembly showing parts like gears and a valve (no text or labels)natural_image
Medical device with metallic tubing and a glass cap (no visible text or symbols)natural_image
Close-up of a stainless steel kitchen knife with a downward arrow indicating compression (no text or symbols visible)Posez l'entonnoir.
natural_image
Close-up of a mechanical device with a downward arrow indicating motion (no visible text or symbols)natural_image
Mechanical assembly diagram showing a motor, gears, and fan components (no text or labels)natural_image
Mechanical assembly diagram showing a bolt, nut, and shaft with directional arrows indicating motion (no text or labels)natural_image
Medical device with tubing and connector, no visible text or symbolsnatural_image
Close-up of a stainless steel meat maker with a downward arrow indicating compression (no text or symbols visible)natural_image
Close-up of a stainless steel meat maker with a downward arrow indicating compression (no text or symbols visible)natural_image
Exploded view diagram of a mechanical assembly showing gears and shafts (no text or labels)natural_image
Medical device with surgical instrument in a clinical setting (no visible text or symbols)natural_image
Mechanical component diagram showing a motor and housing assembly (no text or symbols visible)natural_image
Close-up of a stainless steel cutting machine with a downward arrow indicating compression (no text or symbols visible)We herewith confirm that this appliance complies with the standards of the European Electromagnetic Compatibility Directive (EMC) 2004/108/EC (EN55014-1/A2:2002, EN55014-2/A1:2001, EN61000-3-2:2000, EN61000-3-3/A1:2001), and with the European safety regulations according to the European Low Voltage Directive (LVD) 2006/95/EC (EN60335-1/A13:2008, EN60335-2-14/A1:2008, EN62233:2008).



- FR
- Sommaire
- About these instructions
- Description of appliance, components, contents
- Important safety instructions
- Intended use
- DANGER FOR CHILDREN
- HAZARD FROM ELECTRICITY
- DANGER OF INJURY
- WARNING of injuries from other causes
- CAUTION - Material damage
- Prior to initial use
- CAUTION: Check that the appliance is undamaged and that no parts are missing. If any components are damaged, the appliance should not be used. Contact qualified service personnel.
- Use
- Assembly of meat grinder
- To use the meat grinder
- Hints for usage
- Assembly your meat grinder for sausage stuffing or preparation of Kebbe (stuffed meat rolls)
- Filling sausages
- Preparation of Kebbe (stuffed meat rolls)
- Use of the cookie attachment
- Faults and troubleshooting
- Cleaning
- WARNING
- DANGER
- Danger of death from electric shock
- CAUTION
- Material damage
- THE MOTOR UNIT SHOULD NOT BE IMMERSED IN WATER OR COME INTO CONTACT WITH WATER. CLEAN WITH DAMP-CLOTH ONLY.
- Disposal
- The following standard provision applies for Germany and several EC countries:
- Technical data
- Certifications
- Guarantee, service, repairs
- The warranty period for this product is 2 years.
- Customer service address, Germany:
- Replacement parts and accessories
- Introduction
Brand : BEEM
Model : Panther de Luxe
Category : Chopper