
NQuire 232 - Barcode Reader Newland - Free user manual and instructions
Find the device manual for free NQuire 232 Newland in PDF.

| Product Type | Handheld Barcode Scanner |
| Brand | Newland |
| Model | NQuire 232 |
| Scan Technology | 2D Imager |
| Scan Angle | Horizontal: 40°, Vertical: 30° |
| Resolution | 1280 x 800 pixels |
| Depth of Field | Up to 500 mm (for 10 mil Code 39) |
| Symbologies Supported | 1D, 2D, PDF417, QR, Data Matrix, and more |
| Connectivity | USB, Bluetooth |
| Power Supply | USB powered (5V DC) or rechargeable battery |
| Battery Capacity | 2300 mAh (Li-ion) |
| Dimensions (W x D x H) | 70 mm x 100 mm x 170 mm |
| Weight | 200 g |
| Operating Temperature | 0°C to 50°C |
| Drop Resistance | 1.5 m to concrete |
| Protection Class | IP54 (dust and splash resistant) |
| Display | 2.4 inch color TFT LCD |
| Indicators | Beeper, LED (Red/Green/Blue) |
| Cleaning Instructions | Wipe with a soft, dry cloth. Do not use abrasive cleaners. |
| Safety Certifications | CE, FCC, RoHS |
| Spare Parts Available | Battery, charging cable, USB cable, cradle (optional) |
| Repairability | Battery and cable replaceable by user |
Frequently Asked Questions - NQuire 232 Newland
User questions about NQuire 232 Newland
0 question about this device. Answer the ones you know or ask your own.
Ask a new question about this device
Download the instructions for your Barcode Reader in PDF format for free! Find your manual NQuire 232 - Newland and take your electronic device back in hand. On this page are published all the documents necessary for the use of your device. NQuire 232 by Newland.
USER MANUAL NQuire 232 Newland
NQuire 200/230
Customer Information Terminal User Manual
Revisions
| Version Description Date | ||
| Version 1.0 | Initial release, use only in case of NQuire firmware version 1.0 and 1.1. | 21-10-2009 |
| Version 1.1 | Support as from NQuire firmware version 1.2 / hardware V1.2 and higher | 18-12-2009 |
| Version 1.2 | Support as from NQuire firmware version 1.4 / hardware V1.3 and higher | 30-06-2010 |
NQuire 200 User Manual
© 2009, Fuijan Newland Computer Co., Ltd. All rights reserved.
This manual is copyrighted, with all rights reserved. Under the copyright laws, this manual may not, in whole or in part, be copied, photocopied, reproduced, translated or converted to any electronic medium or machine readable form without prior written consent of Newland. Limited Warranty: Under all circumstances this manual should be read attentively, before installing and/or using the product. In no event shall Newland be liable for any direct, indirect, special, consequential or incidental damages arising out of the use or inability to use this documentation or product, even if advised of the possibility of such damages. In particular, Newland shall not be liable for any hardware, software, or data that is stored or used with the product, including the cost of repairing, replacing or recovering the above. Newland reserves the right to change parts of the device at any time without preceding or direct announcement to the client. Newland reserves the right to revise this manual, and to make changes in the contents without obligation to notify any person or entity of the revision or change. A serial number appears on the product. Make sure that this official registration number has not been removed. It should be used whenever servicing by Newland or an authorised Newland dealer is necessary.
NOTE: This equipment has been tested and found to comply with the limits for a Class B digital device, pursuant to EN55022, and with the limits for a class A digital device, pursuant to part 15 of the FCC rules. These limits are designed to provide reasonable protection against harmful interference when the equipment is operated in a commercial environment. This equipment generates, uses, and can radiate radio frequency energy and, if not installed and used in accordance with the user's manual, may cause harmful interference to radio communications. Operation of the equipment in a residential area is likely to cause harmful interference in which case the user will be required to correct the interference at his own expense. Any unauthorised changes or modifications to this equipment could void the user's authority to operate this equipment. The NQuire is in conformity with the CE standards. Please note that a Newland CE-marked power supply unit should be used to conform to these standards.
Radio and/or television interference: Operation of this equipment in a residential area can cause interference with radio or television reception. This can be determined by turning the equipment off and on. The user is encouraged to try to correct the interference by one or more of the following measures:
- Re-orientate the receiving antenna
- Relocate the devices with respect to the receiver
- Move the device away from the receiver
- Plug the device into a different outlet in order to have the device and receiver on different branch circuits.
If necessary, the user should consult the manufacturer, an authorised Newland dealer or experienced radio/television technician for additional suggestions.
Content
Unpack....1
Declaration of Conformity....2
Tips and Cautions....3
Specifications....4
Product Outline....5
-
General Device Operation....6
-
Installation....7
2.1 Mounting....7
2.2 Power supply.....8
2.3 Connections....9
- Configuration....10
3.1 General....10
3.2 Network settings ....11
3.3 Wireless settings....12
3.4 Idle screen settings ....13
3.4 Scanner settings....15
3.5 Miscellaneous settings ....17
- How to Scan....20
4.1 Introduction....20
4.2 How to scan 1D with NQuire 201 ....20
4.3 How to scan 1D/2D with NQuire 202. 21
4.4 How to scan RFID. 22
- Connecting external devices....23
5.1 HR100 Scanner 23
5.2 HR200 Scanner 23
5.3 GPIO device....24
Content
Appendices....26
A. NQuire programming codes ....26
B. Programming the NQuire with barcodes 29
C. NQuire control....30
D. HR100 programming 35
E. Example barcodes ....36
F. Maintenance ....37
G. Troubleshooting ....38
Unpack
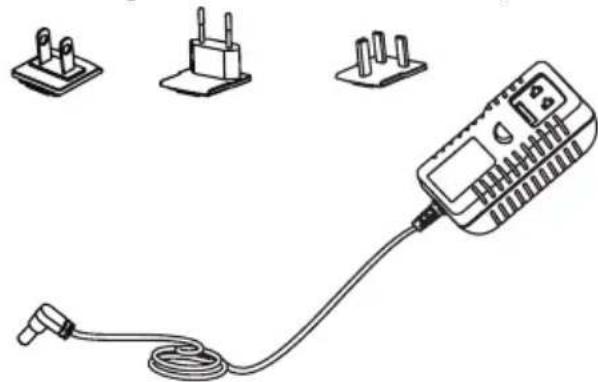
When you unpack the NQuire, the following hardware should be available to you:
- NQuire 200 main unit

natural_image
Front view of a modern digital payment terminal with a barcode symbol on the base (no readable text or labels)- Power Adapter - USB back cover (for external USB devices)
natural_image
Line drawing of a handheld electrical device with three terminal blocks and a cord, no text or symbols present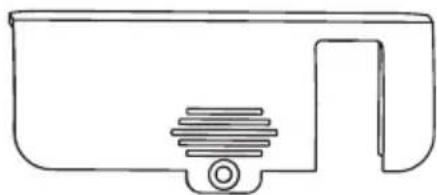
natural_image
Simple line drawing of a mechanical component with a threaded base and handle (no text or symbols)- VESA 75 mount, screws and screwdriver - Rigid Ethernet connector back cover
(optional use)
natural_image
Technical line drawings of mechanical components including a bracket, screwdriver, and screwdriver assembly (no text or symbols)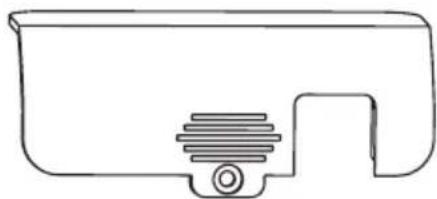
natural_image
Simple line drawing of a mechanical component with a threaded base and mounting bracket (no text or symbols)Declaration of Conformity
Declaration of Conformity
Newland Europe B.V.
Hereby declares under our sole responsibility that the product:
Product : NQuire200/230 series Customer Information Terminal
Model Number : NQuire200/230
Product View
Will comply with the following product specifications:
Laser/LED Safety: EN60825-1(1994) and IEC 60825-1(1993)
Electrical Safety : EN60950
EMC : EN55022 (2006) Radio disturbance characteristic EN55024(1998) Immunity characteristics EN61000-3-2(2006) Limits for harmonic current emissions EN61000-3-3(1995) Limitation of voltage fluctuations and flicker EN61000-4-2(1995) Electrostatic discharge immunity EN61000-4-3(2006) Radiated, radio-frequency, electromagnetic field immunity EN61000-4-4(2004) Electrical fast transient/burst immunity EN61000-4-5(2006) Surge immunity EN61000-4-6(1996) Immunity to conducted disturbances, induced by radio-frequency fields EN61000-4-8(1993) Power frequency magnetic field immunity EN61000-4-11(2004) Voltage dips, short interruptions and voltage variations immunity
Means of Conformity:
Please note that a CE-Marked power supply unit should be used to conform to the product specifications stated above.

Peter H. Sliedrecht CEO Newland Europe B.V. 2009-07-10
Tips and Cautions
The following tips and cautions are used in this manual:
»TOOL, facilitates the use of the manual
»ATTENTION, be aware & read through
»TIPS, E.g., to help understand the product better
»EXAMPLE, to clarify a situation

Introduction of the NQuire 200/230
» The NQuire 200/230 customer information terminal is designed to read/scan, inform and interact with your customer. It is excellent for communicating prices, product information and loyalty points.
» This small and attractive information terminal reads multiple data carriers; from 1D EAN/UPC barcodes to complex 2D barcodes of mobile phone displays. It is even possible to equip the NOuire 200/230 with a RFID reader.
» The NQuire 200/230 complies with standard VESA 75 brackets enabling easy mounting on shelves and walls. Furthermore, it is possible to add USB peripherals to expand this solution with a printer, a hand held scanner for scanning large objects, a magnetic stripe reader and more.
» The NQuire 200/230 supports various networking options: 10/100Mbps Ethernet, WiFi 802.11b/g, GPRS and Power-over-Ethernet so it can be easily integrated into your existing wireless or wired LAN.
» The NQuire 200/230 can be used for various applications such as price checking, product information inquiries, access control, mobile barcode/coupon/ticket validations and more...
Specifications
Specifications
| Specification NQuire 201/231 NQuire | 202/232 | ||
| CPU 32-bit ARM9 CPU | |||
| Memory | SDRAM: 32 MB | ||
| Flash: 8 MB | |||
| Support Micro SD up to 2GB (optionally used for loading different kind of ttf font set) | |||
| Display | Blue-White 240*128 pixels graphical LCD (90mm x 55mm) / NQuire 230 models have a touch screen with 16 free definable “buttons” | ||
| Interface 10/100 Mbps Ethernet + WiFi | OR PoE OR GPRS | ||
| Optional | WiFi IEEE 802.11b/g, 2.4GHz, DSSS,14dBm, WEP 64/128, WPA | ||
| GPRS GSM 850 / 900 / 1800 / 1900 MHz, 85.4Kbps(Max) | |||
| RFID Mifare (ISO 14443A) | |||
| External ports | USB USB Host | ||
| GPIO Free programmable GPIO (2 in - 2 out) | |||
| Reading Modes CCD Imager | |||
| Symbologies | PDF417,QR Code, Data Matrix, Aztec, Vericode, Chinese-Sensible Code | ||
| Code128,EAN-13,EAN-8,Code39,UPC-A,UPC-E, Codabar, Interleaved 2 of 5,China post 25,ISBN/ISSN,Code93, GS1 Databar | |||
| Precision ≥4 mil ≥3 mil | |||
| Power | Power Consumption Up to 12W, depending on configuration | ||
| Adapter 12DC, 2000mA | |||
| P-o-E | Power-over-Ethernet IEEE 802.3af (Optional) | ||
| Environment | Operate Temperature 0 °C ~ + 50 °C | ||
| Storage Temperature -20 °C ~ + 55 °C | |||
| Operate Humidity 5% - 90% (no condensation) | |||
| Storage Humidity 5% - 95% (no condensation) | |||
| Weight | 440g | ||
| Dimensions | 140 mm(H) * 140 mm (W)* 60 mm(D) | ||
| Operation System | Linux Kernel 2.6.25 | ||
| Certifications | CE, FCC | ||
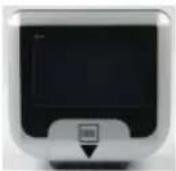
Product Outline
Outline
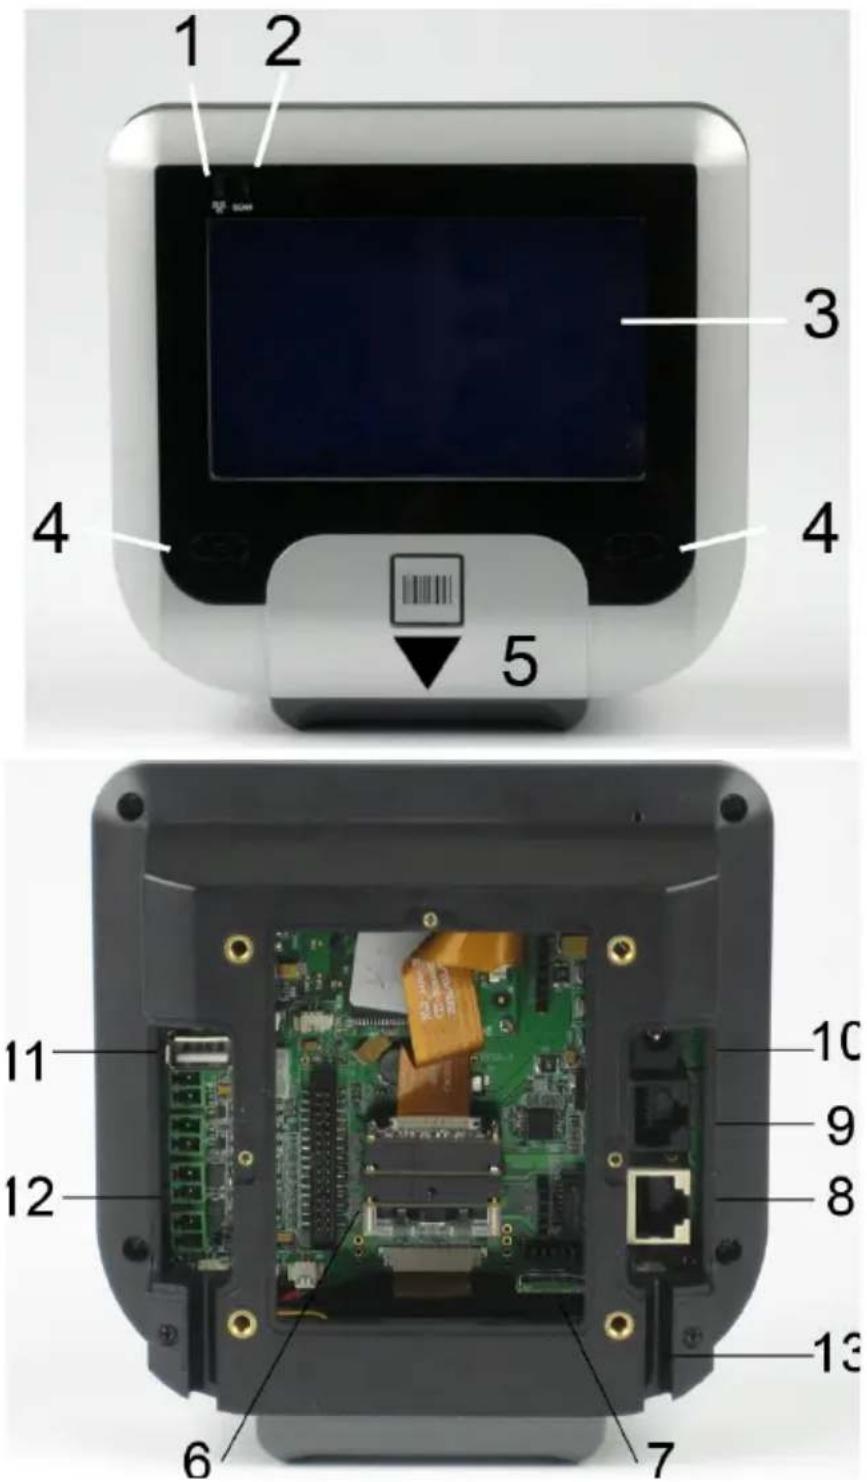
| 1.Network indicator 2.Good | scan indicator 3.LCD (touch) display | |
| 4.Beeper speaker 5."Where to scan" arrow 6.Barcode scanner | ||
| 7.Micro SD card Slot 8.Ethernet port 9.Debug port | ||
| 10.Power jack 11.USB host | 12.GPIO connectors | |
| 13.Cable run | ||
1. General Device Operation
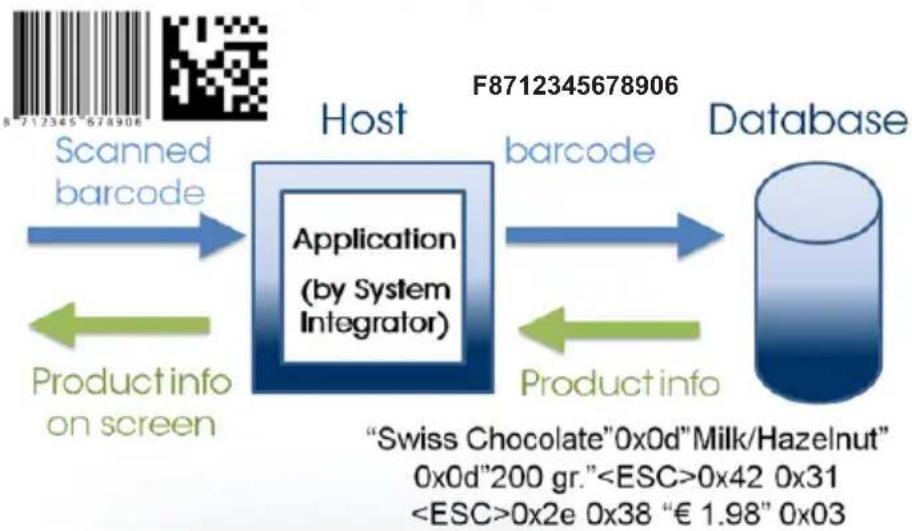
How it works
The NQuire 200/230 is a terminal which receives its input via either:
- a 1D CCD barcode scanner (NQuire 201/231).
- a 2D CMOS barcode scanner (NQuire 202/232).
- optional RFID reader (on NQuire 201/202 or 231/232).
When the input is received, it is sent to the application software which runs on a remote PC/server elsewhere. The application program will send the appropriate display information back to the NQuire 200/230.

By default, the NQuire 200/230 sends its input according to the information in the barcode with code identifier and with [CR]. The code ID's can be disabled in the web configuration tool.
| Barcode Identifier Barcode Identifier | ||||
| EAN-8 FF Codabar % | ||||
| EAN-13 F Code 93 c | ||||
| Code128 # PDF417 r | ||||
| EAN128 P QR Code s | ||||
| IF 2/5 i Aztec | z | |||
| Code39 * DataMatrix | u | |||
| GS1 Databar | R | RFID option | MF | |

NQuire 200

flowchart
graph LR
    A["Scanned barcode"] --> B["Application (by System Integrator)"]
    C["Product info on screen"] --> B
    D["barcode"] --> B
    E["Database"] --> B
    B --> F["F8712345678906"]
    style B fill:#333,stroke:#fff,color:#fff
    note right of B "Swiss Chocolate" 0x0d "Milk/Hazelnut"
        "0x0d" 200 gr. "<ESC>0x42 0x31"
        <ESC>0x2e 0x38 "€ 1.98" 0x03
2. Installation
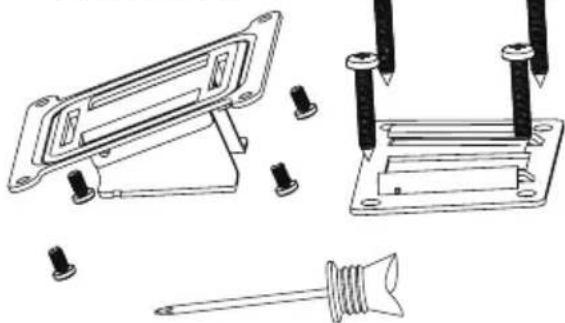
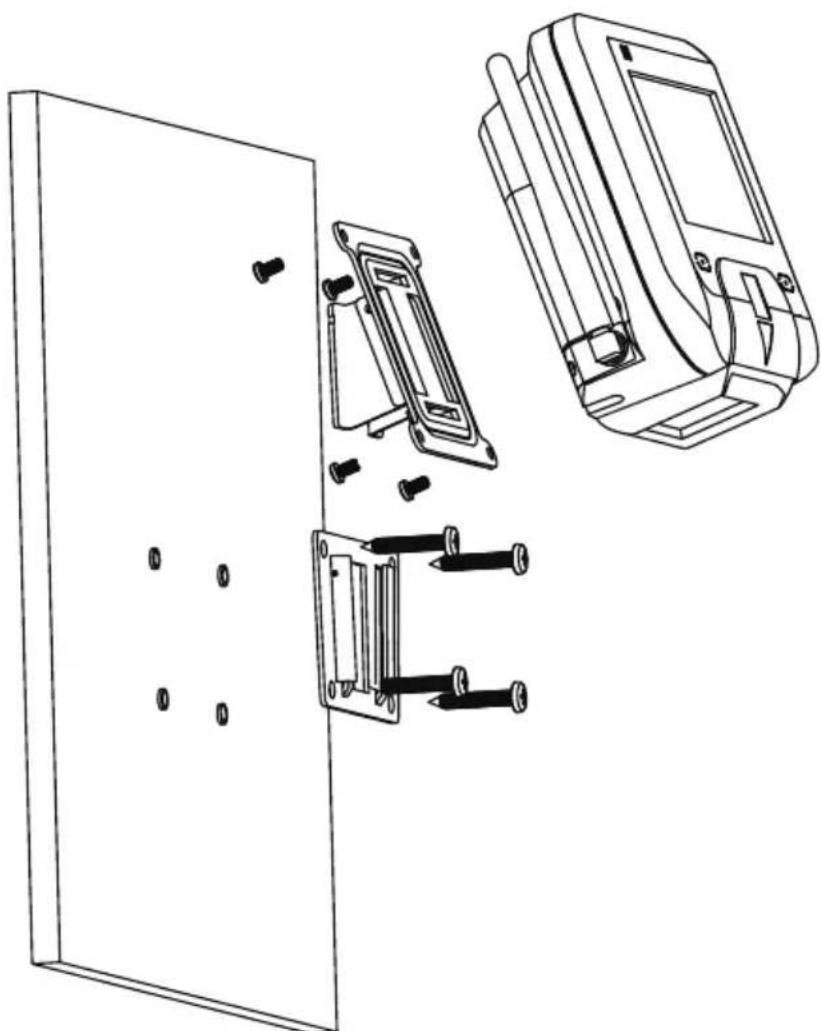
2.1 Mounting
The NQuire 200/230 comes standard with a VESA mount. Please follow the following instructions for mounting:
- Determine the mounting location.
- Choose a convenient scanning hight for your user environment.
- Secure the mounting plate on a wall, countertop or shelve.
- Secure the adjustable VESA plate on the back cover of the NQuire using the 4 screws and screw inserts.
- After having connected the appropriate cabling (See chapter 2.2 and 2.3), you can slide the NQuire into the mounting plate.
Example
natural_image
Technical line drawing of a door panel assembly with exploded view and component details (no text or symbols)2.2 Power Supply
Please select, based on the model you have, between the following power supply options:
- Newland power supply.
- Power-over-Ethernet.
In case of the power supply:
- Remove the right cover on the back of the NQuire 200/230.
- Click the appropriate adapter on the Power Supply and plug it in (see page 5).
- Lead the cable trough the cable run for appropriate routing (see page 5).
-
Wired ethernet: Connect the Ethernet cable to the Ethernet port (see page 5), close the cover and fix it with the screw. NOTE: When using a rigid Ethernet connector (unable to close cover), the "Rigid Ethernet back cover" must be used as described on page 1 to connect to the NQuire.
-
Wireless ethernet: Close the cover and fix it with the screw.
In case of using Power-over-Ethernet:
- Remove the right cover on the back of the NQuire 200/230.
- Connect the Ethernet cable to the Ethernet port (see page 5).
- Lead the cable trough the cable run for appropriate routing (see page 5).
-
Close the cover and fix it with the screw. NOTE: When using a rigid Ethernet connector (unable to close cover), the "Rigid Ethernet back cover" must be used as described on page 1 to connect to the NQuire.
-
Connect the other end of the Ethernet cable into a PoE module or a Powered Switch (NOT supplied by Newland). The NQuire supports both the Mid-span and End-span Power-over-Ethernet protocol.
-
Connect DC power to either the third party PoE module or Powered Switch.

Do not use the power supply in conjunction with an active PoE solution. This can cause damage to the NQuire.
Installation
2.3 Connections
There are 5 physical connectors on the NQuire 200/230:
- Power connector:
- It has a positive center and the outer tab is ground.
- It is compatible with 100\~240V\~50/60Hz, 12V.
-
Debug connector: only for Newland internal use.
-
Ethernet connector:
PIN Description
1 Tx+
2 Tx-
3 Rx+
4 Not Used / PoE
5 Not Used / PoE
6 Rx-
7 Not Used / PoE
8 Not Used / PoE
- USB host connector: In conjunction with the delivered USB back cover (see page 1), this can be used to connect external devices such as a hand held scanner, a keypad or magnetic stripe card reader.
When your user environment asks for scanning large objects, you can connect a Newland HR100 or HR200 hand held scanner to the USB connector. See chapter 5 for details.
-
GPIO connectors (General Purpose Input/Output interface):
-
Two in (2 pin each).
- Two out (2 pin each).
Please read Chapter 5.3 for connector details and connection possibilities.
3. Configuration
3.1 General
The NQuire 200/230 uses a internal webserver for configuration. This eliminates Operating System restrictions. You can access the configuration tool by following this process:
- Open/Start your web browser.
- Enter the NQuire IP address in the address bar (default 192.168.1.200).
- The following screen opens:

Newland Configuration tool
Welcome
| Home |
| Network |
| Messages |
| Scanner |
| Miscellaneous |
| Log |
| Reboot |
Device name Newland NQuire 200
Serial number EIO399206P
Application version 1.4
Root file system version 1.3.9
Application build nr 799
Application build date Apr 29 2010
Scanner module firmware MB2027 / app:3.04.001Alpha / fw:3.06.013
MAC address c4:82:3f:0b:dc:09
Hardware version V1.3
-
In the event of an error screen, please try to "ping" the device:
-
Make sure your PC is in the same IP range as the NQuire, for instance 192.168.1.198. NOTE: If you don't want to change your network settings, please scan the DHCP programming code in Appendix A.
- Type ping 192.168.1.200 in your "command prompt" (MS Windows: cmd.exe).
- If this is not successful, please double check the IP address (in case of DHCP, you can check the IP address with the programming code "on screen configuration" in Appendix A) and physical Ethernet connection.

All configuration settings are saved in the "cit.conf" file which can be accessed through any FTP program (e.g. FileZilla). This allows you to save your configuration locally and duplicate/upload it to other NQuire units. Please be aware that you will have to change the IP settings per individual device!
3.2 Network settings
When you are using an Ethernet/PoE NQuire and you click on "Network" in the Configuration tool, the following screen opens:

Newland Configuration tool
Home
Network
Messages
Scanner
Miscellaneous
Log
Reboot
IP Settings
Use DHCP

IP address
192.168.1.200
Netmask
255.255.255.0
Gateway
192.168.1.254
NQuire protocol settings
UDP port
9000
TCP port
9101
Mode
server
Remote IP address
192.168.1.201
Apply settings
-
IP settings: Use of DHCP (automatic assignment of IP-address to NQuire 200) or not (NQuire has fixed IP-address). In a DHCP-request the NQuire vendor ID is: NQuire200
-
NQuire protocol settings:
- Define UDP/TCP port;
- Define connect mode: server (also UDP active), client (also UDP active), (pure) UDP, TCP server (no UDP), TCP client (no UDP) and TCP client on scan (for non-continuous Ethernet connections such as ISDN).
- Define remote IP address.

For each setting you want to change and save, click the "Apply settings" button after each change and in each box.
3.3 Wireless settings
When you have an Ethernet/WiFi NQuire, two extra boxes appears in the "Network" screen as shown below:
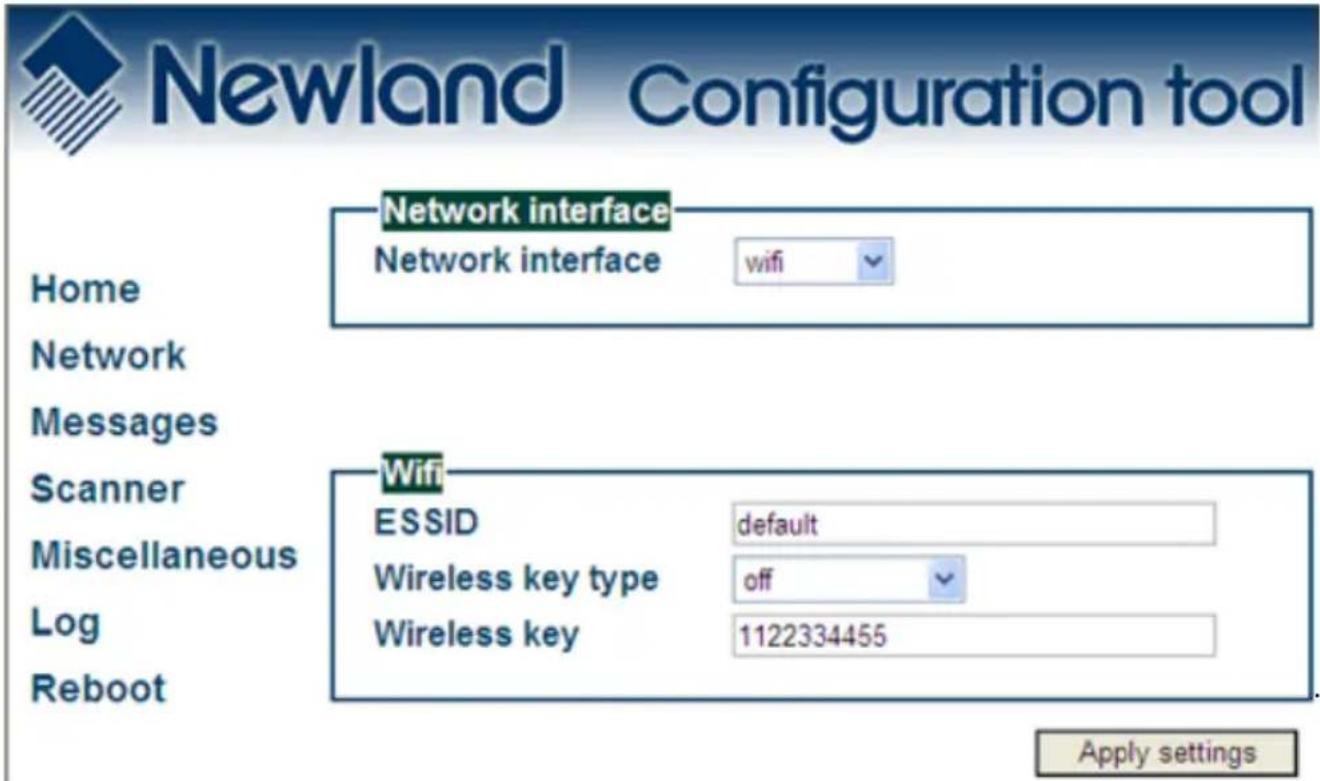
-
Wireless key type: You can choose between three security levels:
-
None: No encryption key is needed, the NQuire is, via your wireless router, available to all WiFi enabled devices.
- WEP: Entry-level encryption with a wireless key to limit network access.
- WPA / WPA2: High-end encryption with a wireless key to limit network access.

It is strongly advised to use a wireless key to avoid third parties to intrude your network. Please ask your administrator what network security level is available in your user environment.
- Wireless key: Type the key which is going to be used to encrypt wireless data communication.

For each setting you want to change and save, click the "Apply settings" button after each change.
3.4 Idle screen settings
When you click on "Messages" in the Configuration tool, the following screen opens:
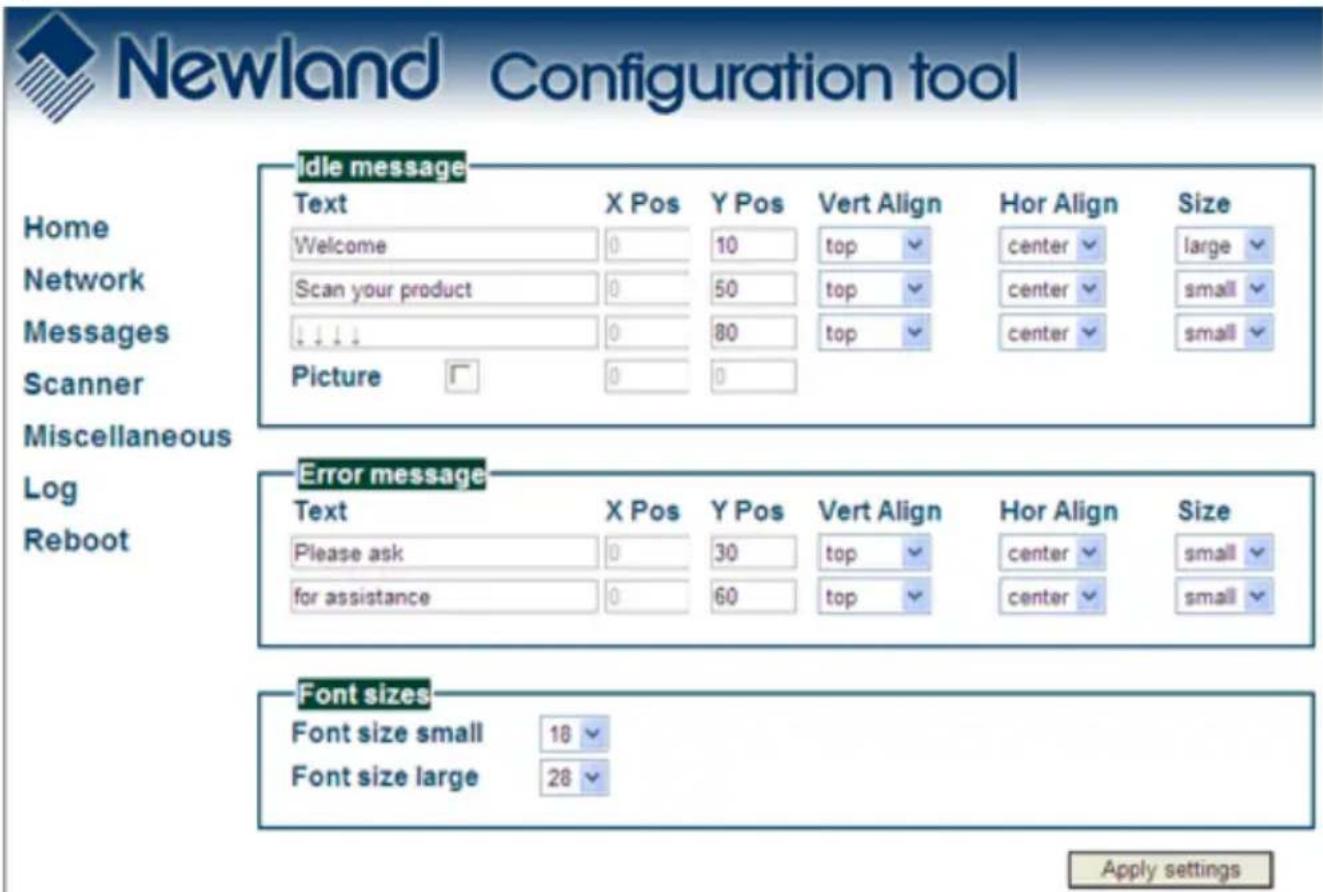
- Idle message: You can type (on three lines) the text which is displayed on the screen at moments nothing is scanned:
- X Pos / Y Pos: define the X-and Y positions per pixel on the screen. - Vert Align / Hor Align: Vertical and horizontal alignment options which have system default X -and Y screen positions. X positions can only defined when horizontal alignment is set to "left".
- Size: Choose between system default large -and small size text. - Picture: Instead of or as a background picture in addition to the idle messages you can upload an (animated max. 32 frames and 2 frames per sec.) .gif picture file (2-colour black&white, inverted (black bkgrd/white drawing), max. 240 x 128 pixels, max. 16K size, non-interlaced) through any FTP program. The file name must be renamed to "welcome.gif" before uploading. Please upload to the NQuire "/img" directory. You can now enable the picture.
- Error message: You can type (on two lines) the text which is displayed on the screen when the NQuire receives a timeout from the network (NQuire not connected / offline). Timeout settings can be changed at "Miscellaneous".
Idle screen settings
- Font sizes: You can select here whether the small used font size should be 18 (default) or 24 pixels high. For instance when you use 18 pixels, you can have up to 25 characters on one line and have 8 lines on a display. For the big font size you can choose between a height of 28 or 32 pixels.
For alternative font sizes and how to implement these, please see Appendix C / NQuire control.
3.5 Scanner settings
When you click on "Scanner" in the Configuration tool, the following screen opens:

Newland Configuration tool
Barcodes
Home
Network
Messages
Scanner
Miscellaneous
Log
Reboot
Barcodes
Constrain multi reading
Duplicate scan timeout
Enable barcode ID
1D only
Semi
NOP
C
No
©
Yes
UCC/EAN 128
EAN-8
EAN-13
UPC-E
UPC-A
Interleaved 2 of 5
ITF14
Code 39
Codabar
Code 93
GS1 Databar
Code 11
C
No
©
Yes
C
No
©
Yes
C
No
©
Yes
C
No
©
Yes
C
No
©
Yes
C
No
©
Yes
C
No
©
Yes
C
No
©
Yes
C
No
©
Yes
C
No
©
Yes
C
No
©
Yes
C
No
©
Yes
Scanning modes Imagen
Red Illumination LEDs
Blinking activation sensitivity
Green aiming LED
Blinking
Low
V
Blinking
V
Apply settings
Scanner settings
Barcodes:
- The NQuire reads, by default, only 1D codes. You can select it to read 2D codes as well (only available for NQuire 202 models).
- Constrain multi reading:
• ON: Same barcode cannot be read twice.
- Semi (default): Same barcode can only be read after barcode is removed from scanning field first.
- OFF: Same barcode can be read twice when in scanning field.
- Duplicate scan timeout can be set to avoid that e.g. a ticket is scanned twice.
- The barcode identifiers (as described on page 6) can be enabled or disabled.
- Depending on the selection made (1D or 1D and 2D), you can select which barcodes you want to enable or disable.
2. Scanning modes Imager (202 model):
Scanning modes CCD (201 model):
- Red Illumination LEDs
- Blinking (default)
- Always ON
• Always ON
- Blinking
- Sensor Mode (default)
• Always OFF (the 2 middle LEDs will stay on; this can result in decreased scanning performance in case of insufficient ambient light)
- Blinking Sensitivity (how reactive the blinking sensor is when there is a object in its field of view)
- Low (default)
- Medium
• High
- Green Aiming LEDs
- Blinking (default, LEDs will only be activated when product is in view)
- Always ON
- Sensor mode (LEDs will be "Always on" only when product is in view)
RFID Scanner settings: When you have a NQuire unit with a RFID scanner integrated, you will be able to configure also the following options:
-
Access key: Please type the access key A (no Key B can be inserted) which has been defined for your Mifare tags/cards.
-
Sectors to read: Please define which of the 16 sectors of the Mifare tag/card should be read. Each sector number should be divided by a comma.
-
Duplicate scan timeout: Define how many seconds the RFID reader waits before you can successfully scan the same tag/card with the same information on it (no time restriction when you scan a different tag/card).
3.6 Miscellaneous settings
When you click on "Miscellaneous", the following screen opens:

Newland Configuration tool
Home
Network
Messages
Scanner
Miscellaneous
Log
Reboot
Authentication
Enable authentication
Username
Password
No Yes
admin
●●●●
■ ■ ■ ■
Programming barcode security
Programming mode timeout
Enable security code
Barcode programming security code
15
No Yes
The Ground Truth image displays a single, solid horizontal line. According to Rule 2 (UNDERSCORE & LINE RULES), this is a stylistic or background line, not a placeholder underscore. Therefore, the OCR result must ignore it and output nothing or only meaningful text. The provided OCR content is "____", which consists of four underscores. This is an incorrect interpretation of the line as a placeholder, violating the rule that stylistic lines must be ignored. The OCR has hallucinated placeholder underscores where none should exist. Hence, the result is inconsistent with the Ground Truth.
Text and messages
Idle message timeout
Error message timeout
Font codepage
Scan message separator
3
1
ibm852
LF
Interaction
Display contrast
Beeper volume
Beeper type
Disable beep after scan
2
4
1
No Yes
GPIO
Server message prefix
Method
Poll speed (seconds)
1
On read GPIO
5
Miscellaneous settings
-
Device name: Type a random name used for your own administration.
-
Authentication: You can choose whether or not you want a password protection to access the NQuire configuration tool via a username and password.
-
Programming barcode security:
- Programming mode timeout: The time before returning to idle state when no programming barcode is scanned in seconds.
- Security code: You can also program the NQuire with a so-called 2D batch code (only for 202 models, see Appendix). As you don't not want to allow just anyone to be able to program the unit with barcodes, you can set a security code out of which you can create a barcode to enable programming.
- Text and messages:
- Idle message timeout: the period of time before the idle message is displayed again after a scan in seconds.
- Error message timeout: the period of time the NQuire device waits for a response from the host pc/server in seconds. When this timeout is exceeded, the error message will be displayed for 5 seconds.
- Font codepage: Choose either UTF-8 (universal fontset which supports most used language fonts) or one of the following codepages:
| Codepage Description | |
| 851 DOS Greek | |
| 852 “Multilingual” West European Latin-1 | |
| 866 Cyrillic DOS codepage | |
| 874 Thai | |
| 1250 Central and East European Latin | |
| 1251 Cyrillic | |
| 1252 West European Latin-2 | |
| 1253 Greek | |
| 1254 Turkish | |
| 1257 Baltic |
- The scan message separator (sent after scan) can be set to LF, CR or both.
- Interaction:
- Decide on the level of contrast of the display dependant on the user environment and display reading angle.
- Choose between different types of beeper tones and volumes.
- GPIO:
You can set the parameters for the GPI ports to "On read GPIO" (only when information passes through, "On change"(state change GPI port) or by
"polling" the GPI port including the eventual poll speed (continuous process).
Miscellaneous settings
- When you have an NQuire with touch screen (Model NQuire 23x), one extra box appears in the "Miscellaneous" screen as shown below:
Touch screen
Server message prefix
Touch keyboard timeout [seconds]
Touch key click
Minimum time between click
Only send active key events to server
K
60
beep1
1
No Yes
Apply settings
- Server message prefix: You can define a prefix so the database identifies the touch "key" similar to identifying a barcode.
- Touch keyboard timeout: The time the keyboard/button is shown on the screen before returning to idle state.
- Touch key click: You can choose between 3 sounds in the event a key is touched.
- Minimum time between click: Define how many seconds the touch screen waits before you can touch the same key again. Useful to prevent “double clicks”.
- Only send active key events to server: When selected "No" every touch is registered on the network, even when no "button" is shown.
4. How to scan
4.1 Introduction
The NQuire 200/230 is a terminal which receives its input via either:
- a 1D CCD barcode scanner (NQuire 201/231).
- a 2D CMOS barcode scanner (NQuire 202/232).
- optional RFID reader (on NQuire 201/202 or 202/232).
Each input device requires a different approach in scanning movement and orientation.
Please check Appendix E for example codes of the different 1D and 2D barcodes.
4.2 How to scan 1D with NQuire 201/231
The NQuire 201 is only able to read 1D barcodes. A single line CCD scan engine reads 1D codes via a horizontal red line.
Example

natural_image
Line drawing of a blood glucose meter device with screen and stand (no text or symbols)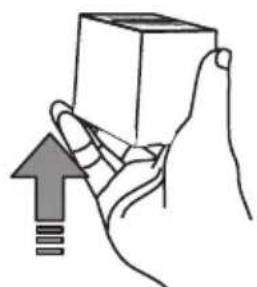
natural_image
Illustration of a hand holding a cube with an upward arrow and a small symbol below (no text or labels)Optimal reading orientation Optimal reading approach to scanner

The optimal reading distance from the scanner screen lies between 5 and 15 centimeters.
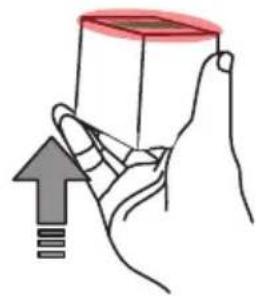
4.3 How to scan 1D/2D with NQure 202/232
The NQuire 202/232 is able to read 1D and 2D barcodes. An omnidirectional imager reads 1D and 2D codes via red leds (for illumination) and a green line (for targeting).
Example
natural_image
Line drawing of a blood glucose meter device with screen and stand (no text or symbols)
natural_image
Illustration of a hand holding a transparent cube with an upward arrow, no text or symbols presentReading orientation can be 360^ Optimal reading approach to scanner

The optimal reading distance from the scanner screen lies between 5 and 15 centimeters.
4.4 How to scan RFID
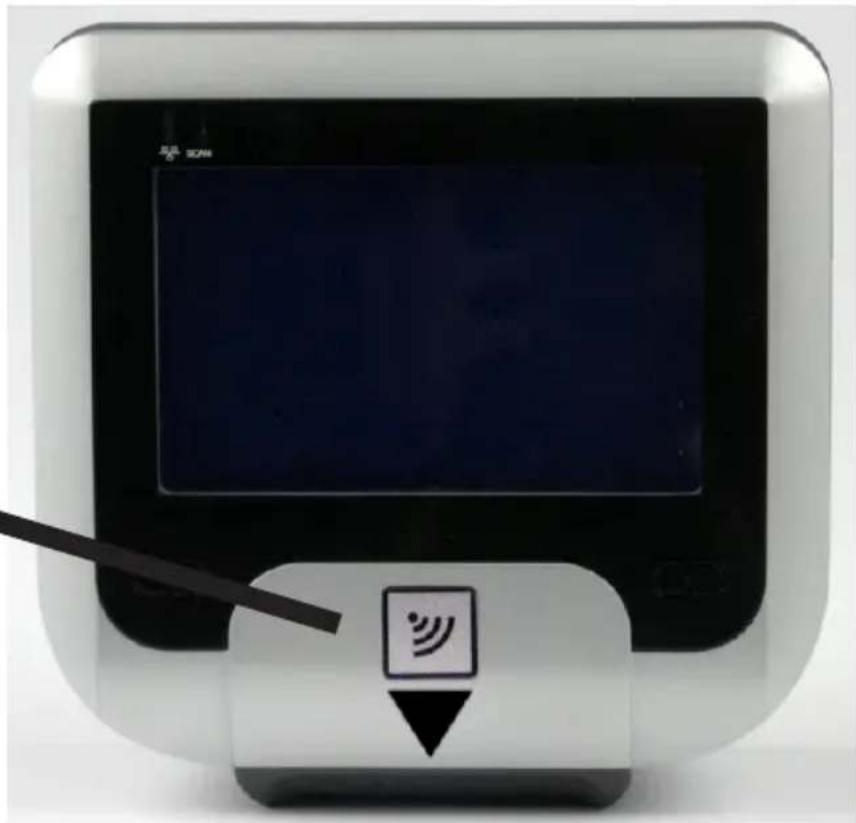
The NQuire 201/202 and 231/232 can be equipped with a RFID reader (Mifare ISO14443A) as well. The most common use is for access control applications. A small sticker with a "RFID label" just below the LCD screen indicates the place to scan your RFID tags/cards.
When a RFID tag/card is scanned, the information sent to the back office server is by default preceded by the prefix "MF" to identify this information came from the RFID reader. This is similar in using barcode prefixes.
Example

natural_image
Simple icon of a Wi-Fi signal inside a square frame (no text or symbols)RFID label
natural_image
Digital payment terminal with a stylus and signal icon, no visible text or symbols on the device itself.
The optimal reading distance from the RFID scanner label is between 0 and 5 centimeters.
5. Connecting external devices
5.1 HR100 Scanner
A Newland HR100 can be attached to the USB port (see page 5) in case of scanning large objects.
When attaching a HR100 which is in factory default settings, please scan the programming codes in Appendix D with the HR100 in order for proper communication with the NQuire.
5.2 HR200 scanner
A Newland HR200 can be attached to the USB port (see page 5) in case of scanning large objects.
When attaching a HR200 which is in factory default settings, please scan the following programming codes with the HR200 in order for proper communication with the NQuire. The sequence is: Code Programming ON → Allow read batch Code → Read DataMatrix batch Code → Code Programming OFF

Code Programming ON

Allow Batch Code

Batch Code HR200

Code Programming OFF

nlscan.com
The optimal reading distance of the HR100 and HR200 scanners is around 10 cm.
GPIO Device
5.3 GPIO Device
The NQuire 200/230 supports interfacing with a GPIO device such as an entry/exit gate, door lock or LED lamp by connecting the signal wires to the GPIO ports.
The pin definitions of the GPIO ports are as follows:
| J3 Pin2 | OUT1- |
| J3 Pin1 | OUT1+ |
| J2 Pin2 | OUT2- |
| J2 Pin1 | OUT2+ |
| J13 Pin1 | IN1+ |
| J13 Pin2 | IN1- |
| J9 Pin1 | IN2+ |
| J9 Pin2 | IN2- |
GPIO device
Please find below an example of how a GPO integration could look like:
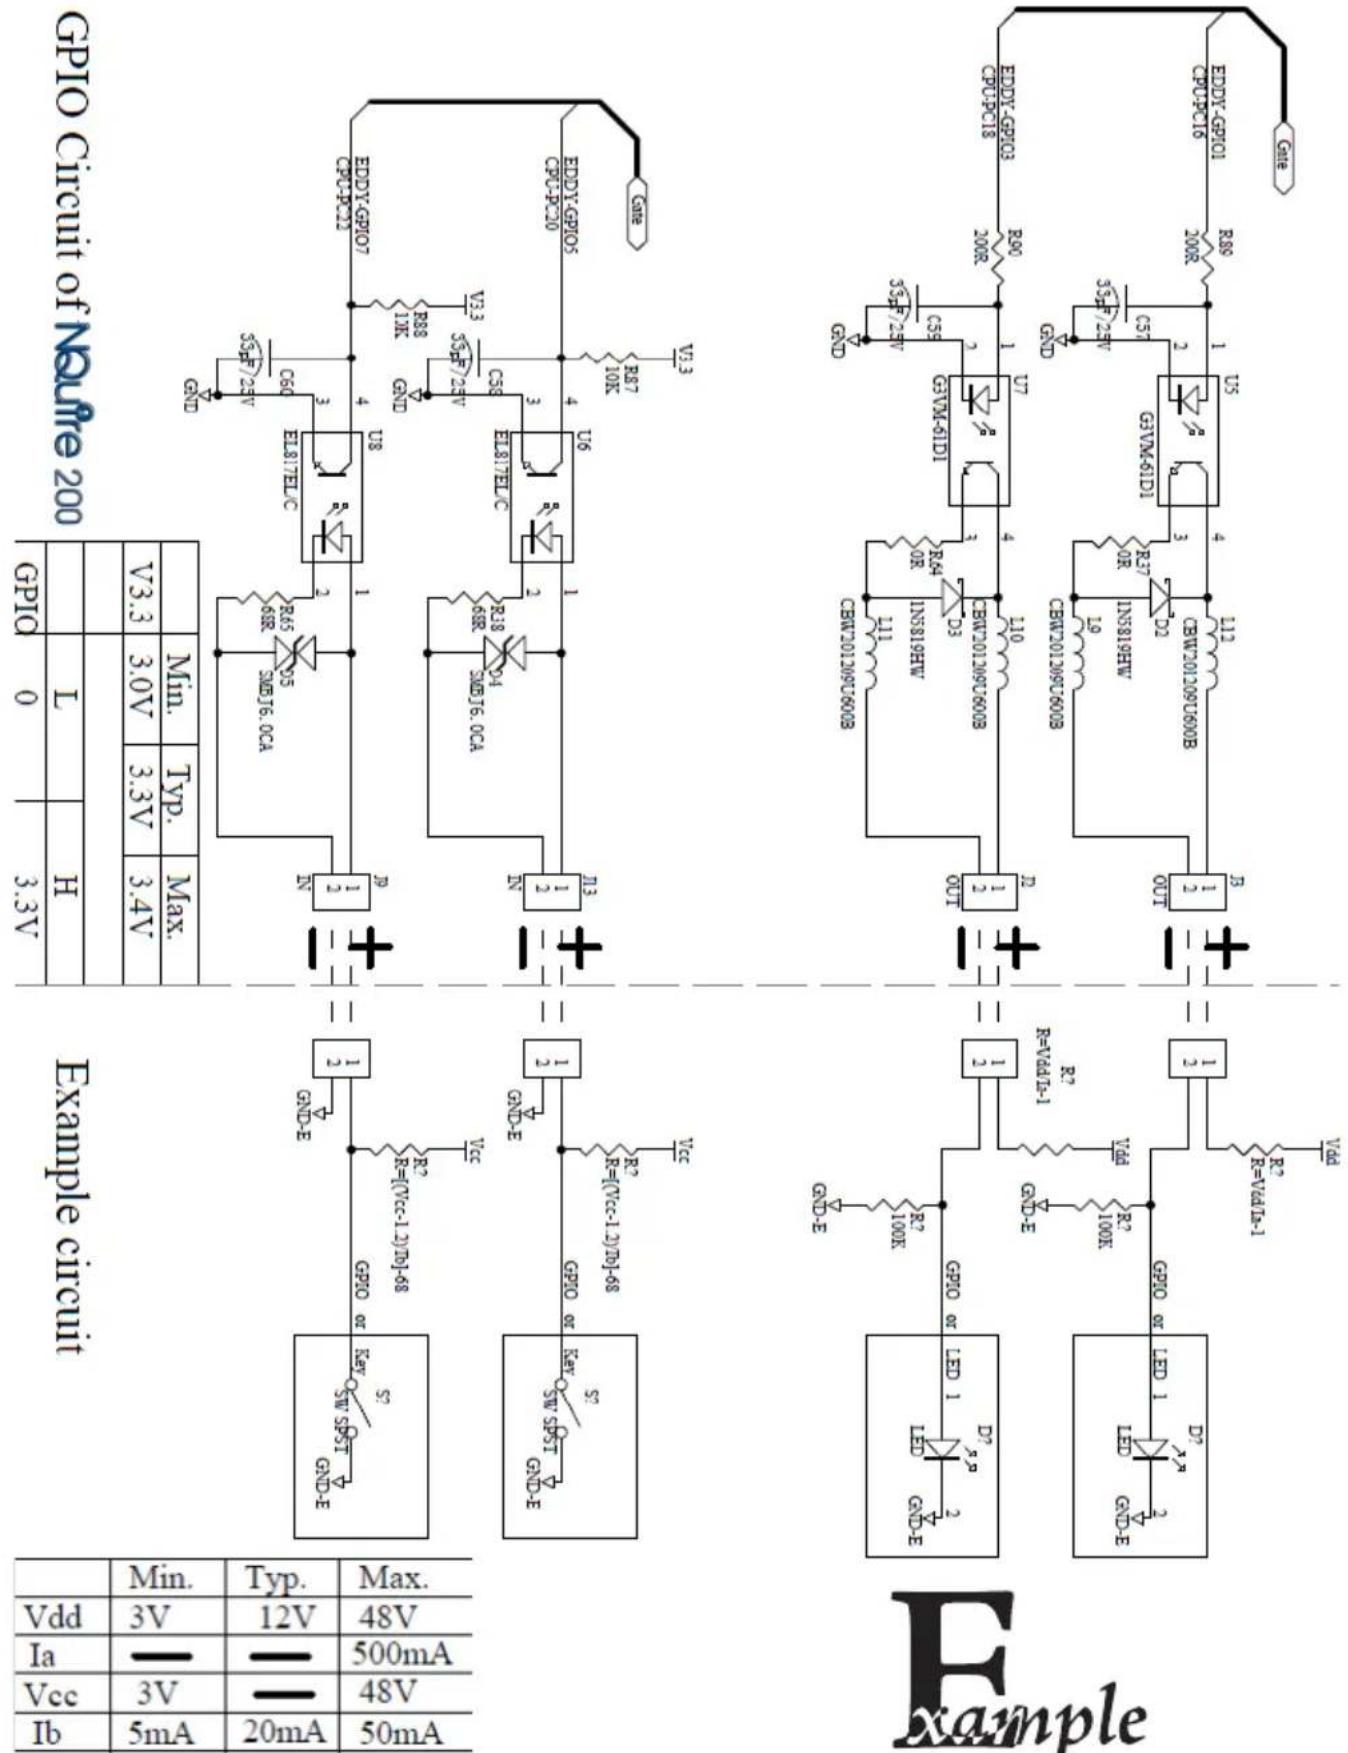
| Min. | Typ. | Max. | |
| Vdd | 3V | 12V | 48V |
| Ia | — | — | 500mA |
| Vcc | 3V | — | 48V |
| Ib | 5mA | 20mA | 50mA |
Appendices
A. NQuire programming codes (simplified hardcopy / part of the configuration tool)

Programming ON

Tools

Programming OFF

Program network settings
Network settings
When the below barcode is scanned, the NQuire will have a fixed IP-address, it will use the last configured IP address. The default IP address is 192.168.1.200

/network/dhcp = false
When the below barcode is scanned, the NQuire will function in DHCP mode and it is not necessary to put your own network environment in the default range 192.168.1.xxx

/network/dhcp = true

The programming sequence is successful, when the NQuire displays: "Programming" > "Scan settings" > "Programming"
NQuire programming codes

Programming ON

Tools

Programming OFF
Beeper settings

No Beeper

Beeper Volume 1

Beeper Volume 2

Beeper Volume 3

Beeper Volume 4

Beeper Volume 5

Beeper Tone 1

Beeper Tone 2

Beeper Tone 3

Always scan the "Programming OFF" barcode in order to return to idle state.
NQuire programming codes

Programming ON

Tools

Programming OFF
LCD display settings

Contrast level 1

Contrast level 2

Contrast level 3

Contrast level 4
Reboot

Reboot

Back to Factory
Default & Reboot
Configuration

On screen configuration overview
B. Programming the NQuire with barcodes (only for 202 and 232 models)
Introduction
When you do not have a PC/laptop available at the moment of physically installing the NQuire, you can alternatively create 2D Datamatrix codes from each "configuration section" in the cit.conf file which you can upload through any FTP program. You can create 2D Datamatrix codes for instance on our website www.newland-id.com.
Scanning sequence

Programming ON

Tools

Programming OFF

Program configuration settings
After you have scanned the above barcode, you can now scan he 2D Datamatrix code you have created, for EXAMPLE:

/network/interface = ethernet
/network/dhcp = false

/network/ip/address = 192.168.1.202
/network/ip/netmask = 255.255.255.0
/network/ip/gateway = 192.168.1.254

The programming sequence is successful, when the NQuire displays: "Programming" > "Scan settings" > "Programming"
C. NQuire control
Introduction
The NQuire is controlled by means of ESC commands in order to configure:
- Cursor control.
- Clear display.
- Text alignment.
- Remotely putting the NQuire LCD screen and scanner in "Sleep mode" and "Wake up" again.
- Controlling the touch screen (only on NQuire 23x models)
Text
The NQuire uses proportional font widths. This means a "m" is physically wider than a "i". Consequently, you can not exactly measure how many characters fit on one line. When a line is "too long", some characters will not fit on the screen and will not be shown. Twenty characters per line can be shown on average.

ASCII values from 20 - 255 which are not part of a command are normally displayed on the screen.
The following commands control the position and control of text:
- Carriage return (go to next line): ESC 0x0d
- Linefeed (go to start position next line): ESC 0x0a
- Set cursor (for predefined cursor postions): ESC 0x27
- Set pixel position (placing the cursor on any position): ESC 0x2C
- Align text (easy alignment, such as center of screen, right of screen): ESC 0x2e
The complete command set table is on page 31.
NQuire command set table
| ESC HEX DEC CHAR Action Parameters | ||||||
| ESC 24 or 25 36 or 37 $ or % Clear Display and move the cursor to the top left position | ||||||
| ESC 27 39 ' Set cursor position '0x30- | 0x3F | <LINE>0x30-0x34 | ||||
| ESC 2C 44 , Set current pixel posi- | tion on display2 | <POS>0x30-0xAF | <LINE>0x30-0X6F | |||
| ESC 2E 46 . Align a string of text3ALIGN> | 0x30-0x3E | <DATA>"..."[0x03] | ||||
| ESC 42 66 B Select font set4 | Normal: 0x30Large: 0x31 | <FONTSET>0x30-0x31 | ||||
| ESC 5A 90 Z Reboot | ||||||
| ESC 5B 91 [ Enable/Disable scan- | ning | <MODE>Disable:0x30Enable:0x31 | ||||
| ESC 5C 92 \ Enable/Disable | Backlight | <MODE>Disable:0x30Enable:0x31 | ||||
| ESC 5D 93 ] Sleep/Wakeup barcode scanner | <MODE>Disable:0x30Enable:0x31 | |||||
| ESC 5E 94 ^ Generate default beep | ||||||
| ESC | 7E | 126 | ~ | GP-Out on/off | <PORT>Out1:0x30Out2:0x31 | <STATE>Off:0x30On:0x31 |
| ESC | 7F | 127 | State request GP-In | <PORT>In1:0x30In2:0x31 | ||
The actual pixel position is dependant on the selected font set:
- Every x-position is a multiple of 8 pixels.
- Every y-position is dependant on selected font set; height of 18, 24, 28 or 32 pixels.
- POS: 0-15 (0x30 - 0x3F).
- LINE: 0-4 (0x30 - 0x34).
^2 This allows a text to be displayed anywhere on the screen. Please be aware that a character can be displayed on in part when it does not fully fits on the screen.
- POS: 0-127 (0x30) - 0xAF).
- LINE: 0-63 (0x30 - 0x6F).
NQuire control
^3 Display a text, using current used font set, on a calculated position on the screen:
| Action | |
| 0x30 Left top | |
| 0x31 Center top | |
| 0x32 Right top | |
| 0x33 Left center | |
| 0x34 Center | |
| 0x35 Right center | |
| 0x36 Left bottom | |
| 0x37 Center bottom | |
| 0x38 Right bottom |
| Action | |
| 0x39 | Left, using current y-coordinate |
| 0x3A | Center, using current y-coordinate |
| 0x3B | Right, using current y-coordinate |
| 0x3C | Top, using current x-coordinate |
| 0x3D | Center, using current x-coordinate |
| 0x3E | Bottom, using current x-coordinate |
field has a maximum length of 25 characters. If less characters are used, please use 0x03 (ETX) as last character.
^4 Please find below a list of font sizes which can be used directly in your application code as an alternative to the set which can be configured in the web configuration tool at the “Messages” tab.
| Code Font size | |
| \x1b\x42\x32 | 6 pixels |
| \x1b\x42\x33 | 2 pixels |
| \x1b\x42\x34 | 8 pixels |
| \x1b\x42\x35 | 24 pixels |
| \x1b\x42\x36 | 30 pixels |
| \x1b\x42\x37 | 36 pixels |
| \x1b\x42\x38 | 42 pixels |
| \x1b\x42\x39 | 48 pixels |
| \x1b\x42\x3A | 54 pixels |
| \x1b\x42\x3B | 60 pixels |
| \x1b\x42\x3C | 66 pixels |
| \x1b\x42\x3D | 72 pixels |
Controlling the touch screen (only for 23x models)
The NQuire 230 series has a touch layer on the screen containing 16 free-definable "buttons". The picture shown on the screen is related to 1 or more touchscreen buttons.
The names of the images/buttons should not be too long and not contain spaces. Together they can have 64-16-3=45 characters. Pre-defined buttons can be downloaded from the NQuire via the FTP directory "img". You can upload your own .gif files into this directory as well.
\xf2
Touch screen position layout:
| 0 1 2 3 | |||
| 4 5 6 7 | |||
| 8 9 a b | |||
| c d e f |
| Command Action | |
| x1b\x42\x30 Normal font | set |
| \x1b\x24 Clear screen, | cursor top left |
| \x1b\xf21.gif\x0d\x0d44\x03\x1b\xf22.gif\x0d\x0d55\x03\x1b\xf23.gif\x0d\x0d66\x03\x1b\xf2ok.gif\x0d\x0d77\x03\x1b\xf24.gif\x0d\x0d88\x03\x1b\xf25.gif\x0d\x0d99\x03\x1b\xf26.gif\x0d\x0daa\x03\x1b\xf2cancel.gif\x0d\x0dbb\x03\x1b\xf27.gif\x0d\x0dcc\x03\x1b\xf28.gif\x0d\x0ddd\x03\x1b\xf29.gif\x0d\x0dee\x03\x1b\xf20.gif\x0d\x0dff\x03 | Align image buttons on screen |
| \x1b\x42\x30\x1b\x2c\x30\x35Welcome ${user} Code: \x03 | Normal font set, clear screen, cursor top and align text right center |
| Welcome Guest Code: | |||
| 1 | 2 | 3 | OK |
| 4 | 5 | 6 | cancel |
| 7 | 8 | 9 | 0 |
Example
Example screens
Here are some example on how to generate different screens on the NQuire 200:
Example
| Command Action | |
| x1b\x42\x30 Normal font size | |
| \x1b\x25 Clear screen, cursor topleft | |
| Cheese Text on screen | |
| \x0d Carriage return | |
| 500 gr. Text on screen | |
| \x1b\x42\x31 Large font size | |
| \x1b\x2e\x38\x805.69\x03 | Align right bottom andtext on screen |
Cheese 500 gr.
€ 5.69
Example
| Command Action | |
| x1b\x42\x31 Large font size | |
| \x1b\x24 Clear screen, cursor top left | |
| \x1b\x2e\x31Special offer!\x03 | Align center top and text on screen |
| \x1b\x42\x30 Normal font size | |
| \x1b\x2e\x346-pack water 0.5L\x03 | Align center and text on screen |
| \x1b\x42\x31 Large font size | |
| \x1b\x2e\x37\x80 0.99\x03 | Align center bottom and text on screen |
Special offer!
6-pack water 0.5L
€ 0.99

The notation of x1b is the value of
D. HR100 programming
Scan the below barcodes starting with the top left "Code Programming ON" and working from left to right, ending with "Code programming OFF".
Code Programming ON


*Load All Factory Default
Code Programming ON


Program Stop Suffix

0

D

Save
Code Programming ON


Enable Stop Suffix

Allow Code ID Prefix
Code Programming OFF

E. Testing Codes


Interleaved 2 of 5 Code 39


Aztec
F. Maintenance
Keeping the NQuire dust-free
To keep the inside of the NQuire dust-free and at its peak performance, please always screw the back covers back onto the backhousing.
Wired Ethernet: When you are using a rigid Ethernet connector (unable to close back cover), the "Rigid Ethernet back cover", as described on page 1, must be used to connect to the NQuire.
USB devices: The USB back cover, as described on page 1, must be used to connect your usb device to the connector on the NQuire.
Cleaning
Occasional clean the scanner window to remove dust, dirt and fingerprints. Cleaning can be performed during operation with a non-abrasive glass spray cleaner and a soft lint-free cloth.
Clean the housing and display screen every now and then. Take care:
• Use a mild glass spray cleaner;
- Spray the cleaner on a soft, lint-free cloth;
- Wipe the NQuire clean.

The display screen and bottom scanner screen are scratch-sensitive, please clean carefully!
The NQuire should NOT be cleaned with cleaners containing:
• Aromatic hydrocarbons.
- Chloride.
• Acids, oxydizing agents.
- Abrasives.
• Other aggressive cleaners.
G. Troubleshooting
| Problem Possible Cause Possible Solution(s) | ||
| NQuire does not turn on No power to the NQuire AC outlet power | - Connect the approved power supply to an AC power source and to the NQuire power connector. See page 5.Power-over-Ethernet- Connect Ethernet cable to NQuire Ethernet port.- Connect other end of Ethernet cable to Power-Over-Ethernet (POE) device.- Connect POE device power supply to an AC outlet.- Perform continuity check on the Ethernet cable. | |
| NQuire does not respond to polls/pings from the host computer | No communication between NQuire and the host. | Check cables to the NQuire.Ensure the NQuire IP-address is the address the host is polling/pinging.Check communication parameters. |
| NQuire does not send data to host computer | NQuire is not connected to the host. | 1. Check all cabling to host computer.2. Incorrect configuration of host ip address or port. |
| No Wireless communication with NQuire 20xRW | Incorrect WiFi settings Please | scan the "back to factory default" barcode on page 28, connect a physical Ethernet cable and try configuring again. |
| Parameter changes made using Web Configuration Tool were not retained after the NQuire was re-booted | Parameter changes were not saved. | For each setting you want to change and save, click the "Apply settings" button after each change and in each box |
| The NQuire 202 does not read 2D barcodes | Default settings are not changed in Web Configuration tool | See chapter 3.5 how to set the internal scanner to read 2D barcodes as well. |

natural_image
Abstract geometric design with blue and white diagonal stripes (no text or symbols)Headquarters
Fujian Newland Auto-ID Tech. Co., Ltd.
Newland Science & Technology Park
No.1 Rujiang West Rd., Mawei,
Fuzhou, Fujian 350001, China
TEL: +86 591 8397 9219
WEB: www.nlscan.com
AsiaPac Office
Newland Taiwan Co., Ltd.
7F.-6, No.268, Liancheng Rd., Zhonghe
City, Taipei County, Taiwan
TEL: +886-2-77315388
WEB: www.newland-id.com
EMEA office
Newland Europe BV
Newland North America Inc.
46559 Fremont Blvd., Fremont, CA 94538,
USA
TEL: +510 490 3888
WEB: www.newlandna.com
- NQuire 200/230
- NQuire 200 User Manual
- © 2009, Fuijan Newland Computer Co., Ltd. All rights reserved.
- Content
- Appendices....26
- Unpack
- Declaration of Conformity
- Hereby declares under our sole responsibility that the product:
- Will comply with the following product specifications:
- Means of Conformity:
- Tips and Cautions
- Introduction of the NQuire 200/230
- Specifications
- Product Outline
- General Device Operation
- How it works
- Installation
- Mounting
- Power Supply
- In case of the power supply:
- In case of using Power-over-Ethernet:
- Installation
- Connections
- PIN Description
- Configuration
- General
- Newland Configuration tool
- Network settings
- IP Settings
- NQuire protocol settings
- Wireless settings
- Idle screen settings
- Idle screen settings
- Scanner settings
- Barcodes
- Scanning modes Imagen
- Scanner settings
- Barcodes:
- Scanning modes Imager (202 model):
- Scanning modes CCD (201 model):
- RFID Scanner settings: When you have a NQuire unit with a RFID scanner integrated, you will be able to configure also the following options:
- Miscellaneous settings
- Authentication
- Programming barcode security
- Text and messages
- Interaction
- GPIO
- Miscellaneous settings
- Touch screen
- Apply settings
- How to scan
- Introduction
- How to scan 1D with NQuire 201/231
- How to scan 1D/2D with NQure 202/232
- Example
- How to scan RFID
- Connecting external devices
- HR100 Scanner
- HR200 scanner
- GPIO Device
- GPIO Device
- Appendices
- Network settings
- NQuire programming codes
- LCD display settings
- Reboot
- Configuration
- Programming the NQuire with barcodes (only for 202 and 232 models)
- Introduction
- Scanning sequence
- NQuire control
- Text
- NQuire control
- Controlling the touch screen (only for 23x models)
- Example screens
- HR100 programming
- Maintenance
- Keeping the NQuire dust-free
- Cleaning
- Troubleshooting
- Headquarters
- AsiaPac Office
- EMEA office
Brand : Newland
Model : NQuire 232
Category : Barcode Reader