
6000 Series HQ6675 - Razor PHILIPS - Free user manual and instructions
Find the device manual for free 6000 Series HQ6675 PHILIPS in PDF.


| Product Type | Electric Shaver |
| Model | 6000 Series HQ6675 |
| Brand | Philips |
| Shaving System | Rotary |
| Number of Heads | 3 |
| Pop-up Trimmer | Yes |
| Wet/Dry Use | Wet & Dry |
| Power Source | Rechargeable Battery (NiMH) |
| Operating Time | Approx. 40 minutes |
| Charging Time | 8 hours |
| Battery Indicator | LED |
| Dimensions (W x H x D) | 2.4 x 6.3 x 1.8 inches |
| Weight | 0.5 lbs (approx.) |
| Cleaning | Rinse under running water |
| Replacement Heads | HQ8+ (recommended every 2 years) |
| Travel Lock | Yes |
| Voltage | 100-240 V (Automatic) |
| Cordless/Corded | Cordless |
Frequently Asked Questions - 6000 Series HQ6675 PHILIPS
User questions about 6000 Series HQ6675 PHILIPS
0 question about this device. Answer the ones you know or ask your own.
Ask a new question about this device
Download the instructions for your Razor in PDF format for free! Find your manual 6000 Series HQ6675 - PHILIPS and take your electronic device back in hand. On this page are published all the documents necessary for the use of your device. 6000 Series HQ6675 by PHILIPS.
USER MANUAL 6000 Series HQ6675 PHILIPS
Read this user manual carefully before you use the appliance and save it for future reference.
- This appliance is not intended for use by persons (including children) with reduced physical, sensory or mental capabilities, or lack of experience and knowledge, unless they have been given supervision or instruction concerning use of the appliance by a person responsible for their safety.
- Children should be supervised to ensure that they do not play with the appliance.
- Only use the mains cord supplied.
- Do not use a damaged mains cord.
- If the mains cord is damaged, always have it replaced with one of the original type in order to avoid a hazard.
- The appliance is equipped with an automatic voltage selector and is suitable for mains voltages ranging from 100 to 240 volts.
- Charge, store and use the appliance at a temperature between 5°C and 35°C.
- Do not recharge the shaver in a closed pouch.
- Keep the appliance and the mains cord dry.
Electromagnetic fields (EMF)
This Philips appliance complies with all standards regarding electromagnetic fields (EMF). If handled properly and according to the instructions in this user manual, the appliance is safe to use based on scientific evidence available today.
Charging
Make sure the appliance is switched off before you start to charge it.

natural_image
Illustration of a pair of electric shaver and cord with no visible text or symbolsCharge the appliance for at least 8 hours, but not more than 24 hours. Do not leave the appliance connected to the mains continuously.
To prevent the battery from going flat during shaving, you can also charge the shaver in between shaves, even if the battery is not completely empty yet. This will not damage the battery.
Charge indications


natural_image
Diagram of a mechanical component with an arrow indicating upward motion (no text or symbols)Charging
When you start charging the empty shaver, the charging light goes on.
Charging the appliance
Charge the appliance when:
- the appliance is new or has not been used for a long time
- motor stops or starts running slower
1 Put the appliance plug in the shaver.
2 Put the mains plug in the wall socket.
3 Remove the mains plug from the wall socket and pull the appliance plug out of the shaver when the battery has been fully charged.
Cordless shaving time
A fully charged shaver has a cordless shaving time of up to 10 days.
Using the appliance
The shaver cannot be used directly from the mains.
Shaving

natural_image
Illustration of a person applying a cotton or cotton product to their face, with arrows indicating direction (no text or symbols)1 Switch on the shaver by pushing the on/off slide to position I.
2 Move the shaving heads quickly over your skin, making both straight and circular movements.
Shaving on a dry face gives the best results.
Your skin may need 2 or 3 weeks to get accustomed to the Philips shaving system.
3 Switch off the shaver by pushing the on/off slide to position 0.
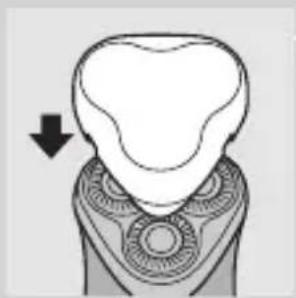
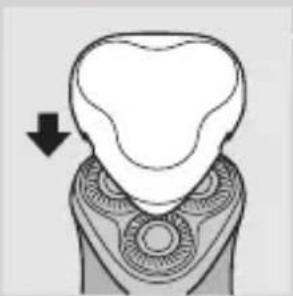
4 Put the protection cap on the shaver every time you have used it, to prevent damage.

natural_image
Diagram of a tooth with decorative patterns and a downward arrow, no text or symbols presentTrimming

natural_image
Hand holding a device with an arrow indicating rotation (no text or symbols visible)For grooming sideburns and moustache.
1 Open the trimmer by pushing the slide upwards.
The trimmer can be activated while the motor is running.
2 Close the trimmer ('click').
Cleaning and maintenance

natural_image
Simple 3D illustration of a cylindrical object with concentric rings (no text or symbols)Regular cleaning guarantees better shaving performance.
For easy and optimal cleaning, the Philips Shaving Head Cleaner (type HQ100) is available. Ask your Philips dealer for information.
Note: The Philips Shaving Head Cleaner may not be available in all countries. Contact the Customer Care Centre in your country about the availability of this accessory.
You can also clean the shaver in the following way:
Every week: shaving unit and hair chamber

1 Switch off the shaver, remove the mains plug from the wall socket and pull the appliance plug out of the shaver.
2 Clean the top of the appliance first, using the brush supplied.
3 Press the release button (1) and remove the shaving unit (2).
4 Clean the inside of the shaving unit and the hair chamber with the brush.
5 Put the shaving unit back onto the shaver.
Every two months: shaving heads
1 Switch off the shaver, remove the mains plug from the wall socket and pull the appliance plug out of the shaver.
ENGLISH8

2 Press the release button (1) and remove the shaving unit (2).

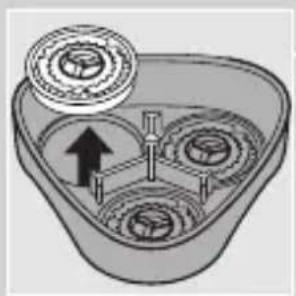
3 Turn the wheel anticlockwise (1) and remove the retaining frame (2).
natural_image
Diagram of a mechanical assembly with gears and a central shaft, no text or symbols present4 Remove the cutters and guards and clean them with the brush supplied.

natural_image
Close-up of hands using a tool to adjust teeth with a clip (no text or symbols visible)Do not clean more than one cutter and guard at a time, since they are all matching sets. If you accidentally mix up the cutters and guards, it may take several weeks before optimal shaving performance is restored.
5 Clean the cutter with the short-bristled side of the brush.
Brush carefully in the direction of the arrow.

natural_image
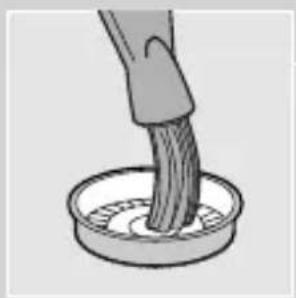
Illustration of a hand brushing a tooth in a circular basin (no text or symbols)6 Brush the guard.
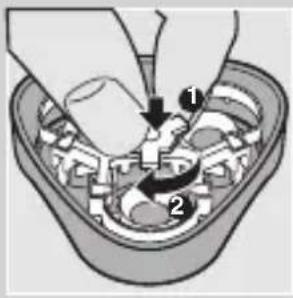
7 Put the shaving heads back into the shaving unit. Put the retaining frame back into the shaving unit (1) and turn the wheel clockwise (2).
8 Put the shaving unit back onto the shaver. For extra thorough cleaning, clean the shaving heads by putting them in a degreasing liquid (e.g. alcohol) every six months. To remove the shaving heads, follow steps 1 to 4 described above. After cleaning, lubricate the central point on the inside of the guards with a drop of sewing machine oil to prevent wear of the shaving heads.
Trimmer

natural_image
Illustration of a hand inserting a plug into a device (no text or symbols visible)Clean the trimmer every time you have used it.
1 Switch off the shaver, remove the mains plug from the wall socket and pull the appliance plug out of the shaver.
2 Clean the trimmer with the brush supplied.
3 Lubricate the trimmer teeth with a drop of sewing machine oil every six months.
Storage
natural_image
Diagram of a dental implant or tooth structure with an arrow indicating direction (no text or symbols present)Put the protection cap on the shaver to prevent damage to the shaving heads.
The appliance can be stored in the pouch supplied.
Replacement

Replace the shaving heads every two years for optimal shaving results.
Replace damaged or worn shaving heads with HQ55 Philips Shaving Heads only.
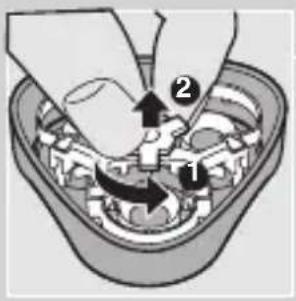
1 Switch off the shaver, remove the mains plug from the wall socket and pull the appliance plug out of the shaver.
2 Press the release button (1) and remove the shaving unit (2).
3 Turn the wheel anticlockwise (1) and remove the retaining frame (2).

natural_image
Diagram of a mechanical component with gears and a central shaft, no text or symbols present4 Remove the shaving heads and place new ones in the shaving unit.

5 Put the retaining frame back into the shaving unit (1) and turn the wheel clockwise (2).
6 Put the shaving unit back onto the shaver.
Accessories
The following accessories are available:
- HQ55 Philips Shaving Heads.
-
HQ100 Philips Shaving Head Cleaner (not available in China).
-
HQ101 Philips Shaving Head Cleaning Fluid (not available in China).
- HQ110 Philips Shaving Head Cleaning Spray (not available in China).
Environment

- Do not throw the appliance away with the normal household waste at the end of its life, but hand it in at an official collection point for recycling. By doing this you will help to preserve the environment.
- The built-in rechargeable shaver battery contains substances that may pollute the environment. Always remove the battery before you discard and hand in the shaver at an official collection point. Dispose of the battery at an official collection point for batteries. If you have trouble removing the battery, you can also take the shaver to a Philips service centre. The staff of this centre will remove the battery for you and will dispose of it in an environmentally safe way.
Disposal of the battery
Only remove the battery if it is completely empty.
1 Switch off the shaver, remove the mains plug from the wall socket and pull the appliance plug out of the shaver.
2 Let the shaver run until it stops, undo the screws and open the shaver.
3 Remove the battery.
Do not connect the shaver to the mains again after the battery has been removed.

natural_image
Illustration of a hand pressing down on a shoe with an upward arrow indicating motion (no text or symbols)Guarantee & service
If you need information or if you have a problem, please visit the Philips website at www.philips.com or contact the Philips Customer Care Centre in your country (you find its phone number in the worldwide guarantee leaflet). If there is no Customer Care Centre in your country, go to your local Philips dealer or contact the Service Department of Philips Domestic Appliances and Personal Care BV.
Troubleshooting
1 Reduced shaving performance
Cause 1: the shaving heads are dirty.
The shaver has not been cleaned well enough or has not been cleaned for a long time.
Clean the shaver thoroughly before you continue shaving. See chapter ‘Cleaning and maintenance’.
Cause 2: long hairs are obstructing the shaving heads.
Clean the cutters and guards with the brush supplied. See chapter ‘Cleaning and maintenance’, section ‘Every two months: shaving heads’.
Cause 3: the shaving heads are damaged or worn.
Replace the shaving heads. See chapter 'Replacement'.
2 The shaver does not work when the on/off slide is pushed to position I.
Cause 1: the battery is empty.
Recharge the battery. See chapter 'Charging'.
Penting
natural_image
Illustration of a hand holding a cable with a prohibition symbol (no text or labels)Medan elektromagnet (EMF)
natural_image
Diagram of a mechanical component with an arrow indicating upward motion (no text or symbols)natural_image
Illustration of a person applying a circular massage or pressure technique to their face (no text or symbols present)natural_image
Diagram of a tooth with decorative patterns and a downward arrow, no text or symbols presentnatural_image
Hand holding a device with an arrow indicating rotation (no text or symbols visible)natural_image
Simple 3D illustration of a cylindrical object with concentric rings (no text or symbols)natural_image
Diagram of a brush applying material to a circular mechanical component with three teeth (no text or symbols)natural_image
Illustration of a hand inserting wires into a battery pack (no text or symbols)natural_image
Diagram of a multi-pin electric shaver with a black arrow indicating the blade (no text or symbols present)natural_image
Diagram of a mechanical assembly with gears and a housing, showing directional arrows (no text or labels)natural_image
Diagram of a hand using a tool to adjust or install a mechanical component (no text or symbols visible)INDONESIA18

natural_image
Illustration of a hand brushing a tooth in a circular container (no text or symbols)
natural_image
Illustration of a hand using a handheld device to press or install a component (no text or symbols visible)
natural_image
Simple line drawing of a human head with decorative patterns and a black arrow pointing to the lower side (no text or symbols)
natural_image
Diagram of a mechanical component with three gears and a central shaft, showing internal structure (no text or symbols)natural_image
Illustration of a hand pressing down on a shoe with an upward arrow indicating motion (no text or symbols)natural_image
Illustration of a pair of electric shakers and a coiled cord with a prohibition symbol (no text or labels)충전
natural_image
Diagram of a mechanical component with an arrow indicating upward motion (no text or symbols)natural_image
Illustration of a person applying a medical or cosmetic tool to their face (no text or symbols visible)natural_image
Illustration of a dental implant with an arrow indicating direction (no text or symbols)natural_image
Illustration of a hand holding a device with an arrow indicating rotation (no text or symbols)natural_image
Simple 3D illustration of a conical object with layered spherical structure (no text or symbols)natural_image
Diagram of a mechanical device with three circular components and a tool inserted, showing internal structure (no text or symbols)natural_image
Illustration of a hand inserting a plug into a battery pack (no text or symbols)natural_image
Diagram of a multi-pin electric shaver with a downward arrow indicating compression (no text or symbols)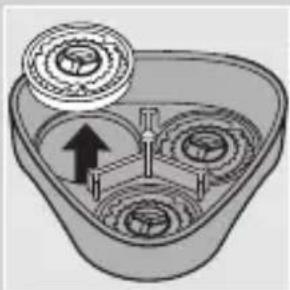
natural_image
Diagram of a mechanical assembly with gears and a housing, showing directional arrows (no text or labels)natural_image
Illustration of a hand using a tool to adjust teeth with an arrow indicating the process (no text or symbols present)natural_image
Illustration of a hand brushing a tooth in a circular basin (no text or symbols)
6 바깥날을 청소하십시오.
natural_image
Illustration of a hand using a power tool to adjust or install a component (no text or symbols visible)
natural_image
Illustration of a hairbrush with a droplet above it, no text or symbols presentnatural_image
Illustration of a stylized human head with decorative patterns and a black arrow pointing to the lower side (no text or symbols)natural_image
Diagram of a mechanical component with gears and a central shaft, showing directional movement (no text or symbols)natural_image
Symbol of a trash bin crossed with no text or numbers, representing waste sorting or disposal (no text present)natural_image
Illustration of a hand pressing down on a mechanical component with an arrow indicating upward motion (no text or symbols)natural_image
Illustration of a hand holding a remote control device and a coiled cable with a prohibition symbol (no text or labels)Mengecas
natural_image
Diagram of a mechanical component with an arrow indicating direction (no text or symbols)natural_image
Illustration of a person applying a medical or therapeutic tool to their face, showing arrows indicating direction (no text or symbols)natural_image
Illustration of a dental implant with an arrow indicating direction (no text or symbols)natural_image
Hand holding a device with an arrow indicating rotation (no text or symbols visible)natural_image
Simple 3D illustration of a conical object with layered spherical structure (no text or symbols)natural_image
Diagram of a mechanical component with three circular grooves and a tool inserted, showing internal rotation (no text or symbols)natural_image
Illustration of a hand inserting wires into a battery pack (no text or symbols)natural_image
Diagram of a three-pin electric shaver with a downward arrow indicating rotation (no text or symbols)natural_image
Diagram of a mechanical component with gears and a rotating shaft, no text or symbols presentnatural_image
Close-up of hands using a tool to adjust or install a mechanical component (no text or symbols visible)natural_image
Illustration of a hand brushing a tooth in a circular container (no text or symbols)6 Berus adangan.
BAHASA MELAYU38

natural_image
Illustration of a hand inserting a plug into a device component (no text or symbols visible)natural_image
Diagram of a cleaning or cleaning device with a bottle and drop symbol (no text or labels)natural_image
Illustration of a stylized human head with decorative patterns and a black arrow pointing to the lower side (no text or symbols)natural_image
Diagram of a mechanical component with three gears and a central shaft, showing directional arrows (no text or symbols)natural_image
Symbol of a trash bin crossed with no text or numbers, representing waste sorting or disposal (no text present)natural_image
Illustration of a hand using a screwdriver to press down a shoe (no text or symbols present)natural_image
Illustration of a hand holding a cord with a plastic clip and a prohibition symbol (no text or labels)Electromagnetic fields (EMF)
natural_image
Diagram of a container with an arrow indicating upward movement (no text or symbols)natural_image
Illustration of a person applying a medical or therapeutic tool to their ear (no text or symbols present)
natural_image
Diagram of a dental implant or tooth structure with an arrow indicating direction (no text or symbols present)natural_image
Hand holding a handheld device with an arrow indicating rotation (no text or symbols visible)natural_image
Simple 3D illustration of a conical object with concentric layers (no text or symbols)natural_image
Diagram of a mechanical device with three circular components and a tool inserted, showing rotational motion (no text or symbols)
natural_image
Illustration of a hand inserting a plug into a battery pack (no text or symbols)natural_image
Diagram of a three-pin electric shaver with a downward arrow indicating compression (no text or symbols)natural_image
Diagram of a mechanical assembly with gears and a housing, showing directional arrows (no text or labels)natural_image
Illustration of a hand using a tool to adjust or install a gear component (no text or symbols visible)natural_image
Illustration of a hand brushing a tooth in a circular basin (no text or symbols)natural_image
Illustration of a hand using a power tool to adjust or install a component (no text or symbols visible)natural_image
Illustration of a handwashing device with a bottle and droplet above it (no text or symbols)การจัดเก็บ

natural_image
Simple line drawing of a human head with decorative patterns and an arrow indicating direction (no text or symbols)natural_image
Diagram of a mechanical component with gears and a central arrow indicating direction (no text or symbols)อุปกรณ์เสริม
natural_image
Symbol of a trash bin with crossed lines indicating no waste or restriction (no text or numbers present)natural_image
Illustration of a hand pressing down on a shoe with an upward arrow indicating motion (no text or symbols)natural_image
Illustration of a handheld device with three leads and a coiled cord, accompanied by a no-smoking symbol (no text or labels present)natural_image
Diagram of a mechanical component with an arrow indicating upward motion (no text or symbols)natural_image
Illustration of a person applying a medical or cosmetic procedure to their ear (no text or symbols present)natural_image
Illustration of a human tooth with decorative banding and a downward arrow (no text or symbols)natural_image
Illustration of a hand holding a device with an arrow indicating upward motion (no text or symbols)natural_image
Simple 3D illustration of a cylindrical object with concentric rings (no text or symbols)natural_image
Diagram of a mechanical component with three circular cavities and a tool inserted, showing internal structure (no text or symbols)natural_image
Illustration of a hand inserting wires into a socket (no text or symbols)natural_image
Diagram of a multi-pin electric shaver with a downward arrow indicating the blade (no text or symbols present)natural_image
Diagram of a mechanical component with gears and a central shaft, no text or symbols presentnatural_image
Illustration of a hand holding a tool interacting with a mechanical component (no text or symbols visible)natural_image
Illustration of a hand brushing a tooth in a circular basin (no text or symbols)natural_image
Illustration of a hand inserting a plug into a device (no text or symbols visible)natural_image
Illustration of a hand holding a bottle with liquid droplets, next to a device outline (no text or symbols)Cât giữ

natural_image
Diagram of a dental implant or tooth structure with an arrow indicating direction (no text or symbols present)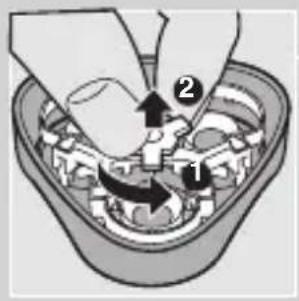

natural_image
Diagram of a mechanical component with gears and shafts, no text or symbols present
natural_image
Symbol of a trash bin crossed with no text or labels, indicating no waste or disposal (no text present)natural_image
Illustration of a hand pressing down on a shoe component with an upward arrow (no text or symbols)Bảo hành & dịch vụ
natural_image
Illustration of a pair of electric shaver and a coiled hose with a prohibition symbol (no text or labels)充電指示
充電
natural_image
Diagram of a bottle being inserted into a container with an arrow indicating direction (no text or symbols)natural_image
Illustration of a person applying a medical or cosmetic tool to their face, showing arrows indicating direction (no text or symbols)natural_image
Diagram of a dental implant or tooth structure with an arrow indicating direction (no text or symbols present)natural_image
Illustration of a hand holding a mobile phone with a circular button, showing mechanical components and an upward arrow (no text or symbols)適合刮除鬢角及髭髴。
natural_image
Simple 3D illustration of a conical object with concentric layers (no text or symbols)定期清潔以維持較佳的刮鬍效果。
natural_image
Diagram of a mechanical device with three circular components and a tool inserted, showing internal structure (no text or symbols)natural_image
Diagram of a mechanical component with gears and a central shaft, showing no text or symbols.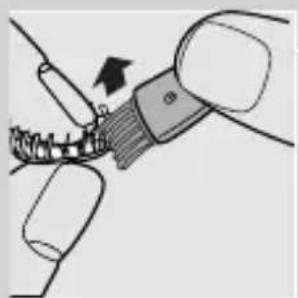
natural_image
Illustration of a hand holding a tool interacting with teeth, showing a finger insertion (no text or symbols present)
natural_image
Illustration of a hand brushing a tooth in a circular basin (no text or symbols)
natural_image
Illustration of a hand using a handheld device to adjust a component (no text or symbols visible)natural_image
Simple line drawing of a human head with decorative banding and a downward arrow (no text or symbols)natural_image
Diagram of a mechanical component with gears and shafts, no text or symbols presentnatural_image
Illustration of a pair of electric shaver and coiled cord with no visible text or symbols充电指示

充电
natural_image
Diagram of a funnel-shaped object with an arrow pointing to a vertical bar (no text or symbols)natural_image
Illustration of a person applying a circular massage or pressure tool to their face (no text or symbols present)natural_image
Illustration of a human head with decorative patterns and a downward arrow (no text or symbols)natural_image
Illustration of a hand holding a device with an arrow indicating rotation (no text or symbols present)用于修剪鬓角和小胡子。
natural_image
3D illustration of a conical object with concentric layers (no text or symbols)natural_image
Diagram of a mechanical device with three circular components and a tool inserted, showing internal rotation (no text or symbols)natural_image
Illustration of a hand inserting wires into a plug into a socket (no text or symbols)natural_image
Diagram of a hand holding a three-pin electric shaver with a black arrow indicating the direction (no text or symbols present)5 将剃须刀头部件重新安装到剃须刀上。
每两个月:剃须刀头

natural_image
Diagram of a mechanical component with gears and a central shaft, no text or symbols presentnatural_image
Illustration of a hand using a tool to adjust teeth with an arrow indicating the process (no text or symbols present)5 用毛刷的短毛一侧清洁刀片。
按箭头方向仔细刷净。
natural_image
Illustration of a hand brushing a tooth in a circular container (no text or symbols)6 刷净网罩。

natural_image
Illustration of a hand inserting a plug into a device (no text or symbols visible)每次使用后都要清洁修发器。
存放
natural_image
Illustration of a tooth with decorative patterns and a downward arrow (no text or symbols)
natural_image
Diagram of a mechanical component with gears and shafts, no text or symbols presentnatural_image
Symbol of a trash bin crossed with no text or numbers, representing waste sorting or disposal (no text present)natural_image
Illustration of a hand pressing down on a shoe with an upward arrow indicating motion (no text or symbols)仅在电池电量完全耗尽后方可取出电池。
- Electromagnetic fields (EMF)
- Charging
- Charge indications
- Charging the appliance
- Cordless shaving time
- Using the appliance
- Shaving
- Trimming
- Cleaning and maintenance
- Every week: shaving unit and hair chamber
- Every two months: shaving heads
- ENGLISH8
- Trimmer
- Storage
- Replacement
- Accessories
- Environment
- Disposal of the battery
- Guarantee & service
- Troubleshooting
- Reduced shaving performance
- The shaver does not work when the on/off slide is pushed to position I.
- Penting
- Medan elektromagnet (EMF)
- INDONESIA18
- 충전
- Mengecas
- BAHASA MELAYU38
- การจัดเก็บ
- อุปกรณ์เสริม
- Cât giữ
- Bảo hành & dịch vụ
- 充電指示
- 充電
- 充电指示
- 充电
- 每两个月:剃须刀头
- 存放
Brand : PHILIPS
Model : 6000 Series HQ6675
Category : Razor