
Fidelio CSS9216 - Home Theater System PHILIPS - Free user manual and instructions
Find the device manual for free Fidelio CSS9216 PHILIPS in PDF.


| Product Type | Home Theater System |
| Model | Fidelio CSS9216 |
| Brand | Philips |
| Dimensions (Main Unit) | 435 x 58 x 320 mm |
| Weight (Main Unit) | 3.5 kg |
| Total Power Output | 600 W RMS |
| Audio Decoding | Dolby Digital, DTS |
| Speaker Configuration | 5.1 Channel |
| Subwoofer Type | Wireless Active Subwoofer |
| Connectivity | HDMI (ARC), Optical, Coaxial, USB, Bluetooth, Wi-Fi |
| Supported Media | DVD, CD, USB playback, Streaming services |
| Power Supply | AC 220-240 V, 50/60 Hz |
| Power Consumption (Standby) | < 0.5 W |
| Remote Control | Included (IR) |
| Cleaning Instructions | Wipe with a soft dry cloth; avoid solvents |
| Safety Features | Overload protection, auto standby |
| Spare Parts Availability | Contact Philips service center |
| Repairability Index | 8.2 / 10 (estimated) |
Frequently Asked Questions - Fidelio CSS9216 PHILIPS
User questions about Fidelio CSS9216 PHILIPS
0 question about this device. Answer the ones you know or ask your own.
Ask a new question about this device
Download the instructions for your Home Theater System in PDF format for free! Find your manual Fidelio CSS9216 - PHILIPS and take your electronic device back in hand. On this page are published all the documents necessary for the use of your device. Fidelio CSS9216 by PHILIPS.
USER MANUAL Fidelio CSS9216 PHILIPS


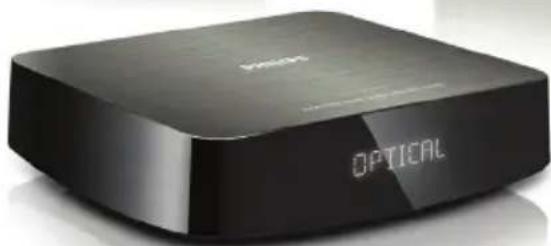
User manual
User manual
User manual
User manual
User manual
User manual
User manual
User manual
User manual
User manual
User manual
User manual
User manual
Contents
1 Help and support 2
FAQs 2
Contact Philips 2
2 Notice 2
Compliance 2
Mains fuse 3
Trademarks 3
3 Important 3
Safety 3
Care for your product 4
Care of the environment 4
4 Your SoundHub 5
Main unit 5
Subwoofer 5
Remote control 5
5 Connect your SoundHub 6
Connect speakers 6
Connectors 7
Connect audio from TV and other devices 8
Listen to a connected device 8
Connect to a Wi-Fi network 8
6 Use your SoundHub 13
Choose your sound 13
MP3 player 14
Play audio from an AirPlay device 14
7 Change settings 15
Setup menu options and settings 15
Apply factory settings 16
8 Update software 17
Check software version 17
Update software through computer 17
9 Product specifications 17
10 Troubleshooting 18
11 Index 19
1 Help and support
FAQs
If you have a problem, refer to the frequently asked questions (FAQs) for this SoundBar at www.philips.com/support.
If you still need help, contact Philips Consumer Care in your country.

Warning
- Do not attempt to repair your SoundBar yourself. This may cause severe injury, irreparable damage to your SoundBar, or void your warranty.
Contact Philips
If you contact Philips, you will be asked for the model and serial number of your product. The model number and serial number are on the back or bottom of your product. Note the numbers before you call Philips:
Model No. ____ Serial No. ____
2 Notice
This section contains the legal and trademark notices.
Compliance
CE
This product is in compliance with the essential requirements and other relevant provisions of Directives 2006/95/EC (Low Voltage), 2004/108/EC (EMC).

* Wireless and Ethernet LAN functions are authorized for indoor use only.
Hereby, Philips Consumer Lifestyle, declares that this product (CSS9216) is in compliance with the essential requirements and other relevant provisions of Directive 1999/5/EC.
A copy of the EC declaration of Conformity is available in the Portable Document Format (PDF) version of the user manual at www.philips.com/support.
Mains fuse
This information applies only to products with a UK mains plug.
This product is fitted with an approved molded plug. If you replace the fuse, use one with:
• the ratings shown on the plug, • a BS 1362 approval, and • the ASTA approval mark.
Contact your dealer if you are not sure about what type of fuse to use.
Caution: To conform with the EMC directive (2004/108/EC), do not detach the plug from the power cord.
Trademarks

dts
Digital Surround
Manufactured under license under U.S. Patent Nos: 5,956,674; 5,974,380; 6,487,535 & other U.S. and worldwide patents issued & pending. DTS, the Symbol, & DTS and the Symbol together are registered trademarks & DTS Digital Surround and the DTS logos are trademarks of DTS, Inc. Product includes software. ©DTS, Inc. All Rights Reserved.

DIGITAL
Manufactured under license from Dolby Laboratories. Dolby and the double-D symbol are trademarks of Dolby Laboratories.

CERTIFIED®
The Wi-Fi CERTIFIED Logo is a certification mark of the Wi-Fi Alliance.
3 Important
Read and understand all instructions before you use your SoundHub. If damage is caused by failure to follow instructions, the warranty does not apply.
Safety
Risk of electric shock or fire!
- Never expose the product and accessories to rain or water. Never place liquid containers, such as vases, near the product. If liquids are spilt on or into the product, disconnect it from the power outlet immediately. Contact Philips Consumer Care to have the product checked before use.
- Never place the product and accessories near naked flames or other heat sources, including direct sunlight.
- Never insert objects into the ventilation slots or other openings on the product.
- Where the mains plug or an appliance coupler is used as the disconnect device, the disconnect device shall remain readily operable.
- Disconnect the product from the power outlet before lightning storms.
- When you disconnect the power cord, always pull the plug, never the cable.
Risk of short circuit or fire!
- Before you connect the product to the power outlet, ensure that the power voltage matches the value printed on the back or bottom of the product. Never connect the product to the power outlet if the voltage is different.
Risk of injury or damage to the SoundHub!
- For wall-mountable products, use only the supplied wall mount bracket. Secure the wall mount to a wall that can support the combined weight of the product and the wall mount. Koninklijke Philips Electronics N.V. bears no responsibility for improper wall mounting that results in accident, injury or damage.
- Never place the product or any objects on power cords or on other electrical equipment.
- If the product is transported in temperatures below 5°C, unpack the product and wait until its temperature matches room temperature before connecting it to the power outlet.
- Parts of this product can be made of glass. Handle with care to avoid injury and damage.
Risk of overheating!
- Never install this product in a confined space. Always leave a space of at least four inches around the product for ventilation. Ensure curtains or other objects never cover the ventilation slots on the product.
Risk of contamination!
- Do not mix batteries (old and new or carbon and alkaine, etc.).
- Danger of explosion if batteries are incorrectly replaced. Replace only with the same or equivalent type.
- Remove batteries if they are exhausted or if the remote control is not to be used for a long time.
- Batteries contain chemical substances, they should be disposed of properly.
Risk of swallowing batteries!
- The product/remote control may or may not contain a coin/button type battery, which can be swallowed. Keep the battery out of reach of children at all times! If swallowed, the battery can cause serious injury or death. Severe internal burns can occur within two hours of ingestion.
- If the battery has been swallowed, seek immediate medical attention.
- When you change the batteries, always keep all new and used batteries out of reach of children. Ensure that the battery compartment is completely secure after you replace the battery.
- If the battery compartment cannot be completely secured, discontinue use of the product. Keep out of reach of children and contact the manufacturer.
Care for your product
Use only microfiber cloth to clean the product.
Care of the environment

Your product is designed and manufactured with high quality materials and components, which can be recycled and reused.

When this crossed-out wheeled bin symbol is attached to a product it means that the product is covered by the European Directive 2002/96/EC.
Please inform yourself about the local separate collection system for electrical and electronic products.
Please act according to your local rules and do not dispose of your old products with your normal household waste.
Correct disposal of your old product helps to prevent potential negative consequences for the environment and human health.

Your product contains batteries covered by the European Directive 2006/66/EC, which cannot be disposed with normal household waste.
Please inform yourself about the local rules on separate collection of batteries because correct disposal helps to prevent negative consequences for the environment and human health.
4 Your SoundHub
Congratulations on your purchase, and welcome to Philips! To fully benefit from the support that Philips offers, register your SoundHub at www.philips.com/welcome.
Main unit
① Standby indicator ② Display panel
Subwoofer
① LED indicator
- When the SoundHub is on standby, the LED indicator is red.
- When the SoundHub is on, the LED indicator is white.
- When the SoundHub is connecting to the network, the LED indicator blinks.
Remote control
① ⏻(Standby-On)
Switch the SoundHub on or to standby.
② AUX
Switch your audio source to the AUX connection.
③ MUSIC iLINK
Switch your audio source to the MUSIC iLINK connection.
④ Navigation buttons (◄/►/ ▲)▼ Navigate menus. ⑤ OK Confirm an entry or selection. ⑥ AUDIO SYNC Change the audio delay. ⑦ NIGHT MODE Turn night mode on or off. ⑧ ✦(Mute) Mute or restore volume. ⑨ +/- (Volume) Increase or decrease volume. ⑩ TREBLE +/- Increase or decrease treble. ⑪ BASS +/- Increase or decrease bass. ⑫ SURR. SOUND Switch to auto, stereo, or 360 surround sound. ⑬ AUTO VOLUME Turn auto volume on or off. ⑭ SOUND MODE Select a sound mode. ⑮ EXIT Exit a menu. ⑯ SETUP • Access the setup menu. • Press and hold to switch to Wi-Fi protected setup (WPS) mode. ⑰ COAXIAL/OPTICAL Switch your audio source to the coaxial or optical connection.
5 Connect your SoundHub
This section helps you connect your SoundHub to a TV and other devices.
For information about the basic connections of your SoundHub and accessories, see the quick start guide. For a comprehensive interactive guide, see www.connectivityguide.philips.com.

Note
- For identification and supply ratings, see the type plate at the back or bottom of the product.
- Before you make or change any connections, make sure that all devices are disconnected from the power outlet.
Connect speakers
The speaker cables are color-coded for easy connection. To connect a speaker to your SoundHub, match the color on the speaker cable to the color on the connector.
Speaker position plays a critical role in setting up a surround sound effect. For best results, place your speakers and the subwoofer as shown below.


Note
- Surround sound depends on various factors such as room shape and size, type of wall and ceiling, windows and reflective surfaces, and speaker acoustics.
Follow these general guidelines, and then set up your subwoofer.
1 Seating position: This is the center of your listening area. 2 SPEAKER LEFT (speaker left) and SPEAKER RIGHT (speaker right) speakers: Place the left and right speakers in the front, and equidistant from the main unit in an arc, so that the two speakers are at same distance from your seating position. For best effect, point the speakers towards the seating position and place the speakers close to the ear level (when seated).
3 SUBWOOFER (subwoofer):
Place the subwoofer at least one meter to the left or right of the TV. Leave about ten centimeter clearance from the wall.
Setup
Set up your subwoofer through the setup menu.
1. Press SETUP repeatedly to select SUBW VOL on the display panel. 2. Press OK. 3. Press the Navigation buttons (▲ / ▼) to change the volume. 4. Press OK to confirm. 5. Press EXIT to exit the menu.
Connectors
Connect other devices to your SoundHub.
Side right

① MUSIC iLINK
Audio input from an MP3 player.
Rear connectors - main unit

① SUBWOOFER
Connect to the supplied subwoofer.
② AUDIO IN-AUX 1/AUX 2
Connect to an analog audio output on the TV or an analog device.
③ DIGITAL IN-COAXIAL
Connect to a coaxial audio output on the TV or a digital device.
④ DIGITAL IN-OPTICAL
Connect to an optical audio output on the TV or a digital device.
Rear connectors - subwoofer

Connect to the supplied speakers.
② TO MAIN UNIT
Connect to the main unit.
③ AC MAINS~
Connect to the power supply.
Connect audio from TV and other devices
Play audio from TV or other devices through your
SoundHub.
Use the best quality connection available on other devices.

Note
- The audio connections in this user manual are only recommendations. You can use other connections too.
Option 1: Connect audio through a digital optical cable
Best quality audio
Using an optical cable, connect the OPTICAL connector on your SoundHub to the OPTICAL OUT connector on the device.
The digital optical connector might be labeled SPDIF, SPDIF OUT, or OPTICAL.

Option 2: Connect audio through a digital coaxial cable
Good quality audio
Using a coaxial cable, connect the COAXIAL connector on your SoundHub to the COAXIAL/DIGITAL OUT connector on the device.
The digital coaxial connector might be labeled DIGITAL AUDIO OUT.

Option 3: Connect audio through analog audio cables
Basic quality audio
Using an analog cable, connect the AUX connectors on your SoundHub to the audio connectors on the device.

Listen to a connected device
Before you can listen to a connected device, select the source for the device.
1 Press AUX, COAXIAL/OPTICAL, or MUSIC iLINK on the remote control to cycle through and select an audio source, as shown in the following table.
| Source button Display | text | Audio source |
| AUX AUX1 or AUX2 | AUX input | |
| COAXIAL/OPTICAL COAX | IN or OPTI IN | Coaxial or Optical input |
| MUSIC iLINK I-LINK MP3 input | ||
Connect to a Wi-Fi network
Connect your SoundHub, AirPlay device and computer to the same Wi-Fi network to enjoy:
• Wireless music streaming from your AirPlay enabled device to your SoundHub.
- Update your SoundHub software through the computer.

Caution
- Before you try to connect the SoundHub to a computer network, familiarize yourself with the network router, media server software, and network principles. If necessary, read documentation that accompanies the network components. Philips is not responsible for lost, damaged, or corrupt data.
What you need
• A wireless network router. • An AirPlay enabled device:
- iOS 4.3 and above on iPhone, iPod touch, or iPad.
- iTunes 10.2 or later on Wi-Fi enabled computer.
Before you start
• Make sure that the wireless router is switched on and works properly. - Check the type of wireless router you use. Some operations may vary when different types of wireless routers are used.
Connect SoundHub to a Wi-Fi network
Depending on the type of the router, connect your SoundHub to the Wi-Fi network in one of the following ways.
The SoundHub automatically connects to the last used Wi-Fi setup every time it is switched on.
Option 1: Connect SoundHub to a WPS router
Wi-Fi protected setup (WPS) enables you to connect devices to your router without a password. Simply enable the WPS function on both the router and your SoundHub and they are connected. Most of the WPS router carry the WPS logo:
1 Press and hold SETUP for five seconds to switch to the WPS mode. → PRESS WPS BUTTON ON ROUTER AND WAIT is displayed on the display panel. → The subwoofer LED indicator blinks continuously.
2 Within ninety seconds, press the WPS button once on the router. 3 When the connection with the router is established, WPS SUCCESS is displayed on the display panel.
4 When the SoundHub joins the Wi-Fi network successfully, READY FOR AIRPLAY is displayed on the display panel. → The subwoofer LED indicator stops blinking and stays white. 5 If the connection fails or you are unable to press the WPS button on the router within ninety seconds, WPS FAILED is displayed on the display panel. Repeat steps 1 to 4 again.

Note
- To enable AirPlay, make sure that your AirPlay device is connected to the same network as the SoundHub.
Option 2: Connect SoundHub to a non-WPS router
Connect your SoundHub to a non-WPS router through an AirPlay enabled device.
1 Press SETUP repeatedly to select WIFI on the display panel. 2 Press OK. 3 Press the Navigation buttons (▲/▼) to select BROWSER SETUP, and then press OK. → First, PLEASE WAIT is displayed on the display panel and the subwoofer LED indicator blinks continuously. → Then, the SoundHub creates a virtual network and SELECT PHILIPS AIRPLAY NETWORK AND BROWSE 192.168.1.12 is displayed on the display panel. When you connect your AirPlay enabled device to this network, you can access the SoundHub setup web page.
4 On your iPod Touch, iPhone or iPad, select Settings > Wi-Fi.
- On your Wi-Fi enabled computer, select the list of available wireless networks.

5 Select Philips SoundHub AirPlay (Philips SoundHub AirPlay) from the list of available wireless networks.

6 On your iPod Touch, iPhone or iPad, open Safari (Safari) to access the configuration page. Enter the IP address 192.168.1.12 at the address bar.
- On your computer, open the web browser and enter 192.168.1.12 at the address bar.
→ The SoundHub web page is displayed. This page allows you to configure the SoundHub by connecting it to your home network.

7 From the Philips SoundHub web page, select the Network Configuration (network configuration) tab.

8 Select your router SSID from the pull-down list of Service Set ID (SSID).
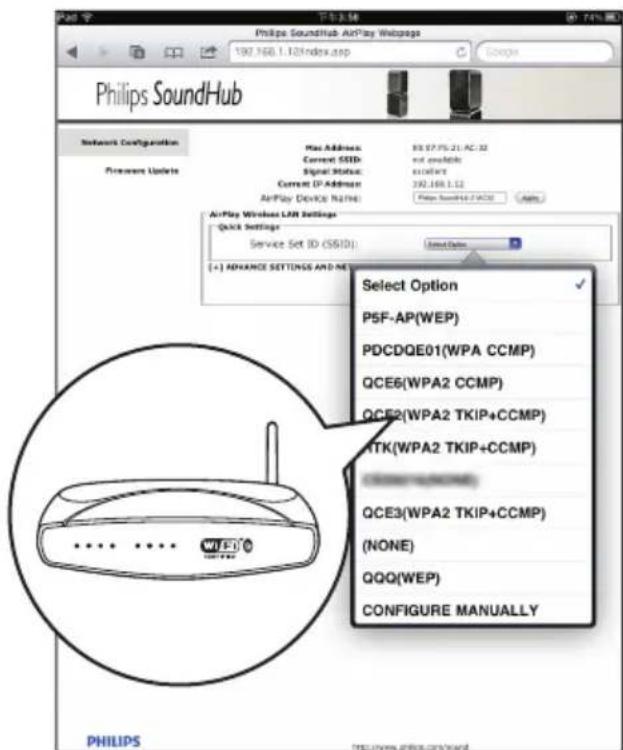
9 Enter your network key if required.
- For some routers, you may also need to tick DHCP under Advanced Settings.

10 Click Apply at the bottom of the page to apply your settings. → A menu for confirmation of your settings pops up.

11 Click OK on the popup menu to confirm your settings.

→ CONNECTING is displayed on the display panel. The connection to the Philips SoundHub AirPlay network is lost because your SoundHub is connecting to the selected network. → After the SoundHub joins the Wi-Fi network successfully, READY FOR AIRPLAY is displayed on the display panel. The subwoofer LED indicator stops blinking and stays white. → If the connection fails, NO CONNECTION is displayed on the display panel. Repeat steps 1 to 11 again.

Note
- To enable AirPlay, make sure that your AirPlay device is connected to the same network as the SoundHub.
Connect an AirPlay device to the same Wi-Fi network
Connect your AirPlay device to the same network as the SoundHub.
1 On your iPod Touch, iPhone, or iPad, select Settings > Wi-Fi.
- On your computer, select the list of available wireless networks.

2 Select your router SSID from the list of available wireless networks.

6 Use your SoundHub
This section helps you use the SoundHub to play audio from connected devices.
Before you start
• Make the necessary connections described in the quick start guide and the user manual. - Switch the SoundHub to the correct source for other devices.
Choose your sound
This section helps you choose the ideal sound for your video or music.
Sound mode
Select predefined sound modes to suit your video or music.
1 Press SOUND MODE repeatedly to select a sound setting within three seconds on the display panel: • AUTO: Automatically select MOVIE or MUSIC based on the sound stream. • MOVIE: Enjoy a cinematic audio experience, specially enhanced for movies. • MUSIC: Recreate the original recording environment of your music, in the studio or at a concert. • NEWS: Hear every word with optimized speech and clear vocals. • GAMING: Enjoy thrilling arcade sounds, ideal for action-packed video games or loud parties. • ORIGINAL: Experience the original sound of your movies and music, without added sound effects.
Auto volume
Turn the auto volume on to keep the volume constant when you switch to a different source.
1 Press AUTO VOLUME repeatedly to select a setting within three seconds on the display panel:
• ON: Turn on auto volume.
• OFF: Turn off auto volume.
• ON: Turn on auto volume. • OFF: Turn off auto volume.
Night mode
For quiet listening, decrease the volume of loud sounds when you play discs. Night mode is only available for Dolby encoded DVD and Blu-ray discs.
1 Press NIGHT MODE repeatedly to select a setting within three seconds on the display panel:
• ON: Turn on night mode.
• OFF: Turn off night mode.
- ON: Turn on night mode. - OFF: Turn off night mode.

Note
- If auto volume is set to ON, you cannot enable the night mode.
Synchronize picture and sound
If the audio and video are not synchronized, delay the audio to match the video.
1 Press AUDIO SYNC. 2 Within two seconds, press the Navigation buttons (▲) to change the delay shown on the display panel.
3 Press AUDIO SYNC again to exit.
Surround sound mode
Experience an immersive audio experience with surround sound modes.
1 Press SURR. SOUND repeatedly to select a setting within three seconds on the display panel:
- AUTO: Surround sound based on the audio stream. • STEREO: Two-channel stereo sound. Ideal for listening to music. • 360SOUND: Surround sound for best cinematic experience.

Note
- If you play a source with DTS, DTS is displayed on the display panel for two seconds.
- If you play a source with Dolby, DOLBY D is displayed on the display panel for two seconds.
- If you play a source with DTS, DTS is displayed on the display panel for two seconds. - If you play a source with Dolby, DOLBY D is displayed on the display panel for two seconds.
Equalizer
Change the high frequency (treble) and low frequency (bass) settings of your SoundHub.
1 Press TREBLE +/- or BASS +/- within three seconds to change the frequency shown on the display panel.
MP3 player
Connect your MP3 player to play your audio files or music.
What you need
- An MP3 player. • A 3.5mm stereo audio cable.
Play music
1 Connect the MP3 player to the SoundHub as described in the Quick start guide. 2 Press MUSIC iLINK. → I-LINK is displayed on the display panel. 3 Press the buttons on the MP3 player to select and play audio files or music.
Play audio from an AirPlay device
Your SoundHub has an integrated AirPlay receiver that lets you stream music wirelessly from the Airplay enabled device.
Before you start
- Connect the AirPlay device to the same Wi-Fi network as the SoundHub (see 'Connect to a Wi-Fi network' on page 8).
1 On your iPod Touch, iPhone, or iPad, open iPod (iPod). - On a computer, open iTunes 10.2 and above. 2 Tap or click the AirPlay icon.

3 Select PHILIPS SoundHub (Philips SoundHub) from the list.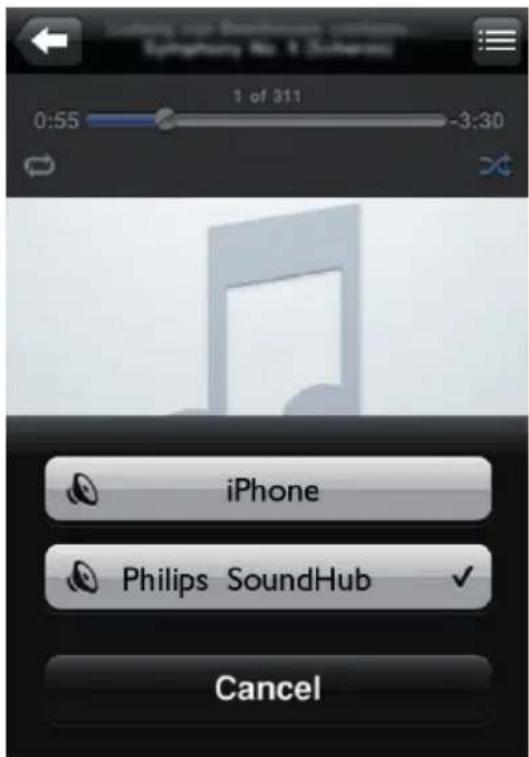
4 Select and play audio file from your AirPlay device.

5 To control play from your AirPlay device, use the play buttons on your AirPlay device.
7 Change settings
This section helps you to change the settings of your SoundHub.

Caution
- The settings are already configured for optimal performance. Unless you have a reason to change a setting, we recommend that you keep the default setting.
Setup menu options and settings
| Setup menu option | Setting for the option |
| SUBWVOL +5, +4, +3, ..., 0, ..., -3, -4, -5 | |
| DISPLAY BRIGHT | |
| DIM 1 | |
| DIM 2 | |
| SLEEP OFF, 15 MIN, 30 MIN, 45MIN, 60 MIN | |
| WIFI WPS | |
| BROWSER SETUP | |
| IP ADDR | |
| VERSION | |
| RESET DEFAULT SETTINGS | |
1 Press SETUP repeatedly to cycle through the options on the display panel. 2 Select an option, and then press OK. 3 Press the Navigation buttons (▲/▼) to select a setting for the option, and then press OK.

Note
- If you do not press a button within ten seconds, the setup menu exits.
- To exit the menu, press EXIT.
- WIFI, IP ADDR, and RESET DEFAULT SETTINGS are available about forty seconds after the SoundHub is switched on.
Display panel
Change the brightness of the SoundHub display panel.
1 Press SETUP repeatedly to select DISPLAY on the display panel. 2 Press OK. 3 Press the Navigation buttons (▲/▼) to select BRIGHT, DIM 1, or DIM 2, and then press OK.
Sleep timer
Set timers to switch the SoundHub to standby after a specified time.
1 Press SETUP repeatedly to select SLEEP on the display panel. 2 Press OK. 3 Press Navigation buttons (▲/▼) to set a sleep time on the display panel.
→ The sleep timer can be set up to 60 minutes. If the sleep timer is set to OFF, it switches off.

Note
- If you switch the SoundHub to standby, the sleep time that you have set is canceled.
IP address
Check the IP address if the SoundHub is successfully connected to the network.
1 Press SETUP repeatedly to select IP ADDR on the display panel.
2 Press OK. → The current IP address is displayed.

Note
- If the network connection fails or not yet connected, NO CONNECTION is displayed when IP ADDR is selected.
Apply factory settings
You can reset your SoundHub to the default settings programmed at the factory.
1 Press SETUP repeatedly to select RESET DEFAULT SETTINGS on the display panel.
2 Press OK.
→ TO RESET PRESS OK is displayed on the display panel.
3 Press OK again.
When the default settings are restored, RESET OK is displayed on the display panel, and the SoundHub automatically switches off and restarts.
8 Update software
To continue to get the best features and support for your SoundHub, update the software regularly. Compare the version of your current software with the latest version on www.philips.com/support.
Check software version
1 Press SETUP repeatedly to select VERSION on the display panel. 2 Press OK. → The software version is displayed.
Update software through computer
Log in to your SoundHub web page to perform the software update.
1 Make sure that the SoundHub and computer are connected to the same Wi-Fi network (see 'Connect to a Wi-Fi network' on page 8). 2 Open a web browser on your computer. 3 Check and enter the IP address to access the configuration page (see 'IP address' on page 16). 4 Select the firmware update tab. → The current firmware version is displayed. 5 If a newer version is available, download it from www.philips.com/support, and then click OK. A new page is displayed. Your SoundHub prepares for the firmware update. 6 Click Select file (Select file) and locate the firmware that you downloaded from www.philips.com/support. 7 Click OK to start the software update. Wait until the upgrade is complete. A new page is displayed when the upgrade is complete. Your SoundHub loads the new firmware, reconnects to your home network, and enables AirPlay.
9 Product specifications

Note
- Specifications and design are subject to change without notice.
Amplifier
• Total output power: • Europe and Asia: 400W RMS (30% THD) • Latin America: 320W RMS (10% THD) • Frequency response: 20 Hz-20 kHz / ±3 dB • Signal-to-noise ratio: > 65 dB (CCIR) / (A-weighted) - Input sensitivity: - AUX1, AUX2: 450 mV • Music iLink: 170 mV
Audio
• S/PDIF Digital audio input: • Coaxial: IEC 60958-3 - Optical: TOSLINK
Main unit
• Dimensions (WxHxD): 150 × 41 × 126 mm - Weight: 0.4 kg
Subwoofer
• Output power: 100W RMS (30% THD) • Power supply: 220-240 V~, 50 Hz • Power consumption: 55 W • Standby power consumption: ≤ 0.5 W - Impedance: 4 ohm • Speaker drivers: 165 mm (6.5") woofer • Frequency response: 20 Hz-150 Hz • Dimensions (WxHxD): 196 x 397 x 357 mm - Weight: 7.6 kg - Cable length: 3 m
Speakers
• Output power: 2 x 150W RMS (30% THD) - Speaker impedance: 6 ohm - Drivers per speaker: 2 × 64 mm (2.5") full range woofer + 1 × 64 mm (2.5") woofer + 1 × 25.4 mm (1") soft-dome tweeter • Frequency response: 150 Hz-20 kHz • Dimensions (WxHxD): 99 × 247 × 117 mm • Weight: 1.4 kg/each - Cable length: 5 m
Remote control batteries
- 2 × AAA-R03-1.5 V
10 Troubleshooting

Warning
- Risk of electric shock. Never remove the casing of the product.
To keep the warranty valid, never try to repair the product yourself.
If you have problems using this product, check the following sections before you request service. If you still have a problem, register your product and get support at www.philips.com/welcome.
Sound
No sound from SoundHub.
- Make sure that the SoundHub is not muted. Press to select MUTE OFF on the display panel.
- Connect the audio cable from your SoundHub to your TV or other devices.
- Reset your SoundHub to its factory settings, and then switch it off and switch on again.
- On your remote control, press AUX, COAXIAL/OPTICAL, or MUSIC iLINK repeatedly to select the correct audio input on the display panel (see 'Listen to a connected device' on page 8).
Distorted sound or echo.
- If you play audio from the TV through the SoundHub, make sure that the TV is muted.
Audio and video are not synchronized.
- 1) Press AUDIO SYNC. 2) Within two seconds, press the Navigation buttons (▲▼) to change the delay shown on the display panel. 3) Press AUDIO SYNC again to exit.
Play
AirPlay icon does not appear in iTunes.
• Make sure that the AirPlay device is connected to the same network as the SoundHub. • Make sure that the network connection is successful. - Restart the iPod (iPod) application on your AirPlay device.
AirPlay music streaming breaks frequently.
• Make sure that the Auto channel scan option is enabled (if available on the Wi-Fi router).
- Make sure that the Wireless Intelligent Stream Handling (WISH) option is enabled (if available on the Wi-Fi router).
- Make sure that the Quality of Service (QoS) option is enabled (if available on the Wi-Fi router).
- Turn off other home routers.
Network
Wireless network distorted or not found.
- Make sure that your Wi-Fi router is Wi-Fi certified. The SoundHub is only compatible with Wi-Fi certified routers.
- Your SoundHub does not support WPS-Pin routers.
- Your SoundHub does not support all WPS-PBC routers. If your home routers are WPS-PBC routers, reset all settings in your router.
- Make sure that your router SSID name consists of normal characters or digits, with no space or special characters, such as %/#/*, inserted.
- Make sure that SSID broadcast on the Wi-Fi router is enabled.
- Make sure that the wireless network is not disturbed by microwave ovens, DECT phones, or other neighboring Wi-Fi devices. • Make sure that there is no overlap between your wireless network and other nearby networks.
Wi-Fi setup page not found.
- Make sure that you enter the correct IP address (see 'IP address' on page 16).
RESTARTING appears on the display panel.
- SoundHub restarts automatically due to critical firmware problem.
GETTING IP ADDRESS appears on the display panel.
- The SoundHub is obtained IP address from the DHCP server.
11 Index
A
AirPlay audio 14 Wi-Fi network 8 amplifier 17 auto volume 13 night mode 13 sound mode 13 specifications 17 surround sound mode 13
audio
audio source
remote control 8
B
brightness 16
C
environment 4 product 4 check current version 17 compliance 2
care
connect
audio (analog cable) 8 audio (coaxial cable - digital) 8 audio (optical cable - digital) 8 audio from TV and other devices 8 non WPS router 9 Wi-Fi network 9 WPS router 9
connectors
back connectors - main unit 7 back connectors - subwoofer 7 side connector 7
D
disable
auto volume 13
night mode 13
display panel 5
E
enable
auto volume 13
night mode 13
F
factory settings 16
FAQs 2
L
legal notices 2
M
main unit
overview 5
specifications 17
mains fuse (UK only) 3
MP3
play 14
N
night mode 13
O
overview
connectors 7
main unit 5
remote control 5
P
play
from AirPlay device 14
MP3 14
troubleshooting 18
position
connectors 7
R
recycling 4
remote control
batteries 18
overview 5
S
safety
disposal 4
use of the product 3
setup menu
check current version 17
sleep timer 16
subwoofer volume 7
software
check current version 17
update 17
sound
predefined sound mode 13
surround sound mode 13
synchronize picture and sound 13
troubleshooting 18
SSID 12
subwoofer
setup 7
subwoofer volume 7
synchronize picture and sound 13
T
trademarks 3
troubleshooting
play 18
sound 18
U
update software
check current version 17
from PC or Mac 17
V
video
synchronize picture and sound 13
Language Code
| Abkhazian 6566 | Inupiaq | 7375 | Pushto | 8083 | |
| Afar 6565 | Irish | 7165 | Russian | 8285 | |
| Afrikaans 6570 | İslenska | 7383 | Quechua | 8185 | |
| Amharic 6577 | Italiano | 7384 | Raeto-Romance | 8277 | |
| Arabic 6582 | Ivrit | 7269 | Romanian | 8279 | |
| Armenian 7289 | Japanese | 7465 | Rundi | 8278 | |
| Assamese 6583 | Javanese | 7486 | Samoan | 8377 | |
| Avestan 6569 | Kalaallisut | 7576 | Sango | 8371 | |
| Aymara 6589 | Kannada | 7578 | Sanskrit | 8365 | |
| Azerhaijani 6590 | Kashmiri | 7583 | Sardinian | 8367 | |
| Bahasa Melayu 7783 | Kazakh | 7575 | Serbian | 8382 | |
| Bashkir 6665 | Kernewek | 7587 | Shona | 8378 | |
| Belarusian 6669 | Khmer | 7577 | Shqip | 8381 | |
| Bengali 6678 | Kinyarwanda | 8287 | Sindhi | 8368 | |
| Bihari 6672 | Kirghiz | 7589 | Sinhalese | 8373 | |
| Bislama 6673 | Komi | 7586 | Slovensky | 8373 | |
| Bokmål, Norwegian 7866 | Korean | 7579 | Slovenian | 8376 | |
| Bosanski 6683 | Kuanyama; Kwanyama | 7574 | Somali | 8379 | |
| Brezhoneg 6682 | Kurdish | 7585 | Sotho; Southern | 8384 | |
| Bulgarian 6671 | Lao | 7679 | South Ndebele | 7882 | |
| Burmese 7789 | Latina | 7665 | Sundanese | 8385 | |
| Castellano, Español 6983 | Latvian | 7686 | Suomi | 7073 | |
| Catalán 6765 | Letzeburgesch; | 7666 | Swahili | 8387 | |
| Chamorro 6772 | Limburgan; Limburger | 7673 | Swati | 8383 | |
| Chechen 6769 | Lingala | 7678 | Svenska | 8386 | |
| Chewa; Chichewa; Nyanja 7889 | Lithuanian 7684 | Tagalog | 8476 | ||
| 中文 9072 | Luxembourgish; | 7666 | Tahitian | 8489 | |
| Chuang; Zhuang 9065 | Macedonian 7775 | Tajik | 8471 | ||
| Church Slavic; Slavonic 6785 | Malagasy | 7771 | Tamil | 8465 | |
| Chuvash 6786 | Magyar | 7285 | Tatar | 8484 | |
| Corsican 6779 | Malayalam | 7776 | Telugu | 8469 | |
| esky 6783 | Maltese | 7784 | Thai | 8472 | |
| Dansk 6865 | Manx | 7186 | Tibetan | 6679 | |
| Deutsch 6869 | Maori | 7773 | Tigrinya | 8473 | |
| Dzongkha 6890 | Marathi | 7782 | Tonga (Tonga Islands) | 8479 | |
| English 6978 | Marshallese | 7772 | Tsonga | 8483 | |
| Esperanto 6979 | Moldavian | 7779 | Tswana | 8478 | |
| Estonian 6984 | Mongolian 7778 | Türkçe | 8482 | ||
| Euskara 6985 | Nauru | 7865 | Turkmen | 8475 | |
| 6976 | Navaho; Navajo | 7886 | Twi | 8487 | |
| Faroese 7079 | Ndebele, North | 7868 | Uighur | 8571 | |
| Français 7082 | Ndebele, South | 7882 | Ukrainian | 8575 | |
| Frysk 7089 | Ndonga | 7871 | Urdu | 8582 | |
| Fijian 7074 | Nederlands | 7876 | Uzbek | 8590 | |
| Gaelic; Scottish Gaelic 7168 | Nepali | 7869 | Vietnamese | 8673 | |
| Gallegan 7176 | Norsk | 7879 | Volapuk | 8679 | |
| Georgian 7565 | Northern Sami | 8369 | Walloon | 8765 | |
| Gikuyu; Kikuyu 7573 | North Ndebele | 7868 | Welsh | 6789 | |
| Guarani 7178 | Norwegian Nynorsk; | 7878 | Wolof | 8779 | |
| Gujarati 7185 | Occitan; Provencal | 7967 | Xhosa | 8872 | |
| Hausa 7265 | Old Bulgarian; Old Slavonic | 6785 | Yiddish | 8973 | |
| Herero 7290 | Oriya | 7982 | Yoruba | 8979 | |
| Hindi 7273 | Oromo | 7977 | Zulu | 9085 | |
| Hiri Motu 7279 | Ossetian; Ossetic | 7983 | |||
| Hrwatski 6779 | Pali | 8073 | |||
| Ido 7379 | Panjabi | 8065 | |||
| Interlingua (International) 7365 | Persian | 7065 | |||
| Interlingue 7365 | Polski | 8076 | |||
| Inuktitut 7385 | Português | 8084 |



- USER MANUAL
- CONTENTS
- HELP AND SUPPORT
- NOTICE
- IMPORTANT
- YOUR SOUNDHUB
- CONNECT YOUR SOUNDHUB
- USE YOUR SOUNDHUB
- CHANGE SETTINGS
- UPDATE SOFTWARE
- PRODUCT SPECIFICATIONS
- TROUBLESHOOTING
- INDEX
- FAQS
- WARNING
- CONTACT PHILIPS
- COMPLIANCE
- CE
- MAINS FUSE
- TRADEMARKS
- DIGITAL SURROUND
- SAFETY
- RISK OF ELECTRIC SHOCK OR FIRE
- RISK OF SHORT CIRCUIT OR FIRE
- RISK OF INJURY OR DAMAGE TO THE SOUNDHUB
- RISK OF OVERHEATING
- RISK OF CONTAMINATION
- RISK OF SWALLOWING BATTERIES
- CARE FOR YOUR PRODUCT
- CARE OF THE ENVIRONMENT
- NOTE
- CONNECT SPEAKERS
- SETUP
- CONNECTORS
- SIDE RIGHT
- REAR CONNECTORS - MAIN UNIT
- REAR CONNECTORS - SUBWOOFER
- CONNECT AUDIO FROM TV AND OTHER DEVICES
- OPTION 1: CONNECT AUDIO THROUGH A DIGITAL OPTICAL CABLE
- BEST QUALITY AUDIO
- OPTION 2: CONNECT AUDIO THROUGH A DIGITAL COAXIAL CABLE
- GOOD QUALITY AUDIO
- OPTION 3: CONNECT AUDIO THROUGH ANALOG AUDIO CABLES
- BASIC QUALITY AUDIO
- LISTEN TO A CONNECTED DEVICE
- CONNECT TO A WI-FI NETWORK
- CAUTION
- WHAT YOU NEED
- BEFORE YOU START
- CONNECT SOUNDHUB TO A WI-FI NETWORK
- OPTION 1: CONNECT SOUNDHUB TO A WPS ROUTER
- OPTION 2: CONNECT SOUNDHUB TO A NON-WPS ROUTER
- CONNECT AN AIRPLAY DEVICE TO THE SAME WI-FI NETWORK
- ON YOUR IPOD TOUCH, IPHONE, OR IPAD, SELECT SETTINGS > WI-FI
- SELECT YOUR ROUTER SSID FROM THE LIST OF AVAILABLE WIRELESS NETWORKS
- CHOOSE YOUR SOUND
- SOUND MODE
- AUTO VOLUME
- NIGHT MODE
- SYNCHRONIZE PICTURE AND SOUND
- SURROUND SOUND MODE
- EQUALIZER
- MP3 PLAYER
- PLAY MUSIC
- PLAY AUDIO FROM AN AIRPLAY DEVICE
- SETUP MENU OPTIONS AND SETTINGS
- DISPLAY PANEL
- SLEEP TIMER
- IP ADDRESS
- APPLY FACTORY SETTINGS
- CHECK SOFTWARE VERSION
- UPDATE SOFTWARE THROUGH COMPUTER
- AMPLIFIER
- AUDIO
- MAIN UNIT
- SUBWOOFER
- SPEAKERS
- REMOTE CONTROL BATTERIES
- SOUND
- NO SOUND FROM SOUNDHUB
- DISTORTED SOUND OR ECHO
- AUDIO AND VIDEO ARE NOT SYNCHRONIZED
- PLAY
- AIRPLAY ICON DOES NOT APPEAR IN ITUNES
- AIRPLAY MUSIC STREAMING BREAKS FREQUENTLY
- NETWORK
- WIRELESS NETWORK DISTORTED OR NOT FOUND
- WI-FI SETUP PAGE NOT FOUND
- RESTARTING APPEARS ON THE DISPLAY PANEL
- GETTING IP ADDRESS APPEARS ON THE DISPLAY PANEL
- A
- AUDIO SOURCE
- B
- C
- CARE
- CONNECT
- D
- DISABLE
- E
- F
- L
- M
- N
- O
- P
- R
- S
- T
- U
- V
Brand : PHILIPS
Model : Fidelio CSS9216
Category : Home Theater System