
CAM100 - Camcorder PHILIPS - Free user manual and instructions
Find the device manual for free CAM100 PHILIPS in PDF.


| Product Type | Camcorder |
| Brand | Philips |
| Model | CAM100 |
| Dimensions | 119 × 59 × 67 mm |
| Weight | 310 g (with battery) |
| Power Source | Rechargeable Li-ion battery (3.7V, 1100 mAh) |
| Image Sensor | 5 MP CMOS |
| Video Resolution | Full HD 1080p (1920×1080) @ 30 fps |
| Photo Resolution | 12 MP (interpolated) |
| Optical Zoom | 5x digital zoom |
| Display | 2.7-inch LCD (270° rotation) |
| Storage Media | SD/SDHC card (up to 32 GB) |
| Connectivity | USB 2.0, HDMI mini, AV out |
| Microphone | Built-in stereo |
| Image Stabilization | Electronic |
| Battery Life | Approx. 60 minutes continuous recording |
| Cleaning | Clean lens with soft, dry cloth. Do not use liquids. |
| Safety Warnings | Do not expose to water, extreme temperatures, or drop. Use only approved charger. |
| Spare Parts | Battery, charger, HDMI cable available from Philips authorized suppliers. |
Frequently Asked Questions - CAM100 PHILIPS
User questions about CAM100 PHILIPS
0 question about this device. Answer the ones you know or ask your own.
Ask a new question about this device
Download the instructions for your Camcorder in PDF format for free! Find your manual CAM100 - PHILIPS and take your electronic device back in hand. On this page are published all the documents necessary for the use of your device. CAM100 by PHILIPS.
USER MANUAL CAM100 PHILIPS
Thank you for choosing Philips.
Need help fast?
Read your Quick Start Guide and/or User Manual first for quick tips that make using your Philips product more enjoyable. If you have read your instructions and still need assistance, you may access our online help at
www.philips.com/welcome or call
I-888-PHILIPS (744-5477)
while with your product.
(and Model / Serial number)

I-888-PHILIPS (744-5477) (English speaking)
natural_image
Exterior view of a Philips HD digital camera (no visible text or symbols beyond brand name)EN User manual 6
This digital apparatus does not exceed the Class B limits for radio noise emissions from digital apparatus as set out in the Radio Interference Regulations of the Canadian Department of Communications. This Class B digital apparatus complies with Canadian ICES-003.
Français:
The set complies with the FCC-Rules, Part 15 and with 21 CFR 1040.10. Operation is subject to the following two conditions:
- This device may not cause harmful interference, and
- This device must accept any interference received, including interference that may cause undesired operation.
Load the Micro SD card 10
Turn on 10
Set the date and time
(for first-time users only) 11
Select a menu display language 11
Charge the built-in battery 11
4 Use your camcorder 12
Record video 12
Take pictures 12
Play 12
Options during video play 12
Adjust settings 13
5 Use more of your camcorder 13
View video or pictures on TV 13
Install and use the camcorder software 14
6 Technical specifications 15
7 Frequently asked questions (FAQ) 16
Register online at www.philips.com/welcome today to get the very most from your purchase.
Registering your model with PHILIPS makes you eligible for all of the valuable benefits listed below, so don't miss out. Register online at www.philips.com/welcome to ensure:
\*Product Safety Notification \*Additional Benefits
By registering your product, you'll receive notification - directly from the manufacturer.
Registering your product guarantees that you'll receive all of the privileges to which you're entitled, including special money-saving offers.
PHILIPS
Congratulations on your purchase, and welcome to the "family!"
Dear PHILIPS product owner:
Thank you for your confidence in PHILIPS.You've selected one of the best-built, best-backed products available today.We'll do everything in our power to keep you happy with your purchase for many years to come.
As a member of the PHILIPS “family,” you're entitled to protection by one of the most comprehensive warranties in the industry. What's more, your purchase guarantees you'll receive all the information and special offers for which you qualify, plus easy access to accessories from our convenient home shopping network.
Most importantly, you can count on our uncompromising commitment to your total satisfaction.
All of this is our way of saying welcome - and thanks for investing in a PHILIPS product.
P.S. To get the most from your PHILIPS purchase, be sure to register online at:
www.philips.com/welcome
Know these
safety symbols

CAUTION
RISK OF ELECTRIC SHOCK DO NOT OPEN

CAUTION: TO REDUCE THE RISK OF ELECTRIC SHOCK, DO NOT REMOVE COVER (OR BACK). NO USER-SERVICEABLE PARTS INSIDE. REFER SERVICING TO QUALIFIED SERVICE PERSONNEL.

This "bolt of lightning" indicates uninsulated material within your unit may an electrical shock. For the safety of one in your household, please do not give product covering.

The “exclamation point” calls attention to features for which you should be enclosed literature closely to pre-operating and maintenance problems.
WARNING: To reduce the risk of fire or electric shock, this apparatus should not be exposed to rain or moisture and objects filled with liquids, such as vases, should not be placed on this apparatus.
CAUTION: To prevent electric shock, match wide blade of plug to wide slot, fully insert.
Enter below the Serial No. which is located on the rear of the cabinet. Retain this information for future reference.
Model No.
Serial No.
PHILIPS
Visit our World Wide Web Site at http://www.philips.com/welcome
PHILIPS LIMITED WARRANTY ONE (1) YEAR
WARRANTY COVERAGE:
PHILIPS warranty obligation is limited to the terms set forth below.
WHO IS COVERED:
Philips warrants the product to the original purchaser or the person receiving the product as a gift against defects in materials and workmanship as based on the date of original purchase ("Warranty Period") from an Authorized Dealer. The original sales receipt showing the product name and the purchase date from an authorized retailer is considered such proof.
WHAT IS COVERED:
The Philips warranty covers new products if a defect in material or workmanship occurs and a valid claim is received by Philips within the Warranty Period. At its option, Philips will either (1) repair the product at no charge, using new or refurbished replacement parts, or (2) exchange the product with a product that is new or which has been manufactured from new, or serviceable used parts and is at least functionally equivalent or most comparable to the original product in Philips current inventory, or (3) refund the original purchase price of the product. Philips warrants replacement products or parts provided under this warranty against defects in materials and workmanship from the date of the replacement or repair for ninety (90) days or for the remaining portion of the original product's warranty, whichever provides longer coverage for you. When a product or part is exchanged, any replacement item becomes your property and the replaced item becomes Philips' property. When a refund is given, your product becomes Philips' property.
Note: Any product sold and identified as refurbished or renewed carries a ninety (90) day limited warranty.
Replacement product can only be sent if all warranty requirements are met. Failure to follow all requirements can result in delay.
WHAT IS NOT COVERED - EXCLUSIONS AND LIMITATIONS:
This Limited Warranty applies only to the new products manufactured by or for Philips that can be identified by the trademark, trade name, or logo affixed to it. This Limited Warranty does not apply to any non-Philips hardware product or any software, even if packaged or sold with the product. Non-Philips manufacturers, suppliers, or publishers may provide a separate warranty for their own products packaged with the bundled product.
Philips is not liable for any damage to or loss of any programs, data, or other information stored on any media contained within the product, or any non-Philips product or part not covered by this warranty. Recovery or reinstallation of programs, data or other information is not covered under this Limited Warranty.
This warranty does not apply (a) to damage caused by accident, abuse, misuse, neglect, misapplication, or non-Philips product, (b) to damage caused by service performed by anyone other than Philips or Philips Authorized Service Location, (c) to a product or a part that has been modified without the written permission of
Philips, or (d) if any Philips serial number has been removed or defaced, or (e) product, accessories or consumables sold "AS IS" without warranty of any kind by including refurbished Philips product sold "AS IS" by some retailers.
This Limited Warranty does not cover:
- Shipping charges to return defective product to Philips.
- Labor charges for installation or setup of the product, adjustment of customer controls on the product, and installation or repair of antenna/signal source systems outside of the product.
- Product repair and/or part replacement because of improper installation or maintenance, connections to improper voltage supply, power line surge, lightning damage, retained images or screen markings resulting from viewing fixed stationary content for extended periods, product cosmetic appearance items due to normal wear and tear, unauthorized repair or other cause not within the control of Philips.
- Damage or claims for products not being available for use, or for lost data or lost software.
- Damage from mishandled shipments or transit accidents when returning product to Philips.
- A product that requires modification or adaptation to enable it to operate in any country other than the country for which it was designed, manufactured, approved and/or authorized, or repair of products damaged by these modifications.
- A product used for commercial or institutional purposes (including but not limited to rental purposes).
- Product lost in shipment and no signature verification receipt can be provided.
- Failure to operate per Owner's Manual.
TO OBTAIN ASSISTANCE IN THE U.S.A., PUERTO RICO, OR U.S. VIRGIN ISLANDS...
Contact Philips Customer Care Center at: 1-888-PHILIPS (1-888-744-5477)
TO OBTAIN ASSISTANCE IN CANADA...
1-800-661-6162 (French Speaking) 1-888-PHILIPS (1-888-744-5477) - (English or Spanish Speaking)
REPAIR OR REPLACEMENT AS PROVIDED UNDER THIS WARRANTY IS THE EXCLUSIVE REMEDY FOR THE CONSUMER. PHILIPS SHALL NOT BE LIABLE FOR ANY INCIDENTAL OR CONSEQUENTIAL DAMAGES FOR BREACH OF ANY EXPRESS OR IMPLIED WARRANTY ON THIS PRODUCT. EXCEPT TO THE EXTENT PROHIBITED BY APPLICABLE LAW, ANY IMPLIED WARRANTY OF MERCHANTABILITY OR FITNESS FOR A PARTICULAR PURPOSE ON THIS PRODUCT IS LIMITED IN DURATION TO THE DURATION OF THIS WARRANTY.
Some states do not allow the exclusions or limitation of incidental or consequential damages, or allow limitations on how long an implied warranty lasts, so the above limitations or exclusions may not apply to you.
This warranty gives you specific legal rights. You may have other rights which vary from state/province to state/province.
1 Important
Safety
① Read these instructions.
② Keep these instructions.
③ Heed all warnings.
④ Follow all instructions.
⑤ Do not use this apparatus near water.
⑥ Clean only with dry cloth.
⑦ Do not block any ventilation openings. Install in accordance with the manufacturer's instructions.
⑧ Do not install near any heat sources such as radiators, heat registers, stoves, or other apparatus (including amplifiers) that produce heat.
⑨ Only use attachments/accessories specified by the manufacturer.
⑩ Refer all servicing to qualified service personnel. Servicing is required when the apparatus has been damaged in any way, such as power-supply cord or plug is damaged, liquid has been spilled or objects have fallen into the apparatus, the apparatus has been exposed to rain or moisture, does not operate normally, or has been dropped.
⑪ Apparatus shall not be exposed to dripping or splashing.
⑫ Do not place any sources of danger on the apparatus (e.g. liquid filled objects, lighted candles).
Hearing safety
Listen at a moderate volume.
Using headphones at a high volume can • impair your hearing. This product can produce sounds in decibel ranges that may cause hearing loss for a normal person, even for exposure less than a minute. The higher decibel ranges are offered for those that may have already experienced some hearing loss. Sound can be deceiving. Over time your • hearing ‘comfort level’ adapts to higher volumes of sound. So after prolonged listening, what sounds ‘normal’ can actually be loud and harmful to your hearing. To guard against this, set your volume to a safe level before your hearing adapts and leave it there.
To establish a safe volume level:
Set your volume control at a low setting. • Slowly increase the sound until you can • hear it comfortably and clearly, without distortion.
Listen for reasonable periods of time:
Prolonged exposure to sound, even • at normally ‘safe’ levels, can also cause hearing loss. Be sure to use your equipment • reasonably and take appropriate breaks.
Be sure to observe the following guidelines when using your headphones.
Listen at reasonable volumes for • reasonable periods of time. Be careful not to adjust the volume as • your hearing adapts. Do not turn up the volume so high that • you can't hear what's around you. You should use caution or temporarily • discontinue use in potentially hazardous situations. Do not use headphones while operating a motorized vehicle, cycling, skateboarding, etc.; it may create a traffic hazard and is illegal in many areas.
Any changes or modifications made to this device that are not expressly approved by
Philips Consumer Lifestyle may void the user's authority to operate the equipment.
Notice
This digital apparatus does not exceed the Class B limits for radio noise emissions from digital apparatus as set out in the Radio Interference Regulations of the Canadian Department of Communications. This Class B digital apparatus complies with Canadian ICES-003.
The set complies with the FCC-Rules, Part 15 and with 21 CFR 1040.10. Operation is subject to the following two conditions:
- This device may not cause harmful interference, and
- This device must accept any interference received, including interference that may cause undesired operation.
Disposal of your old product and batteries
Your product is designed and manufactured with high quality materials and components, which can be recycled and reused. Never dispose of your product with other household waste. Please inform yourself about the local rules on the separate collection of electrical and electronic products and batteries. The correct disposal of these products helps prevent potentially negative consequences on the environment and human health.
Your product contains batteries, which cannot be disposed of with normal household waste. Please inform yourself about the local rules on separate collection of batteries. The correct disposal of batteries helps prevent potentially negative consequences on the environment and human health.
Please visit www.recycle.philips.com for additional information on a recycling center in your area.

Caution
Removal of the built-in battery invalidates the warranty and may destroy the product.
Always bring your product to a professional to remove the built-in battery.
Perchlorate Material - special handling may apply. See www.dtsc.ca.gov/hazardouswaste/perchlorate.
2 Your camcorder
Introduction
With this portable camcorder, you can:
take HD (720P) or VGA movies •
take pictures•
play recorded movies or pictures either •
directly or on the large screen of a
connected TV
upload the recorded movies or pictures •
to the Internet directly
What's in the box
Make sure that the following items are packed in the box:
Camcorder•
AV cable•
Quick start guide•
Pouch•
Hand strap•
- Micro SD card (1G)
Functional overview
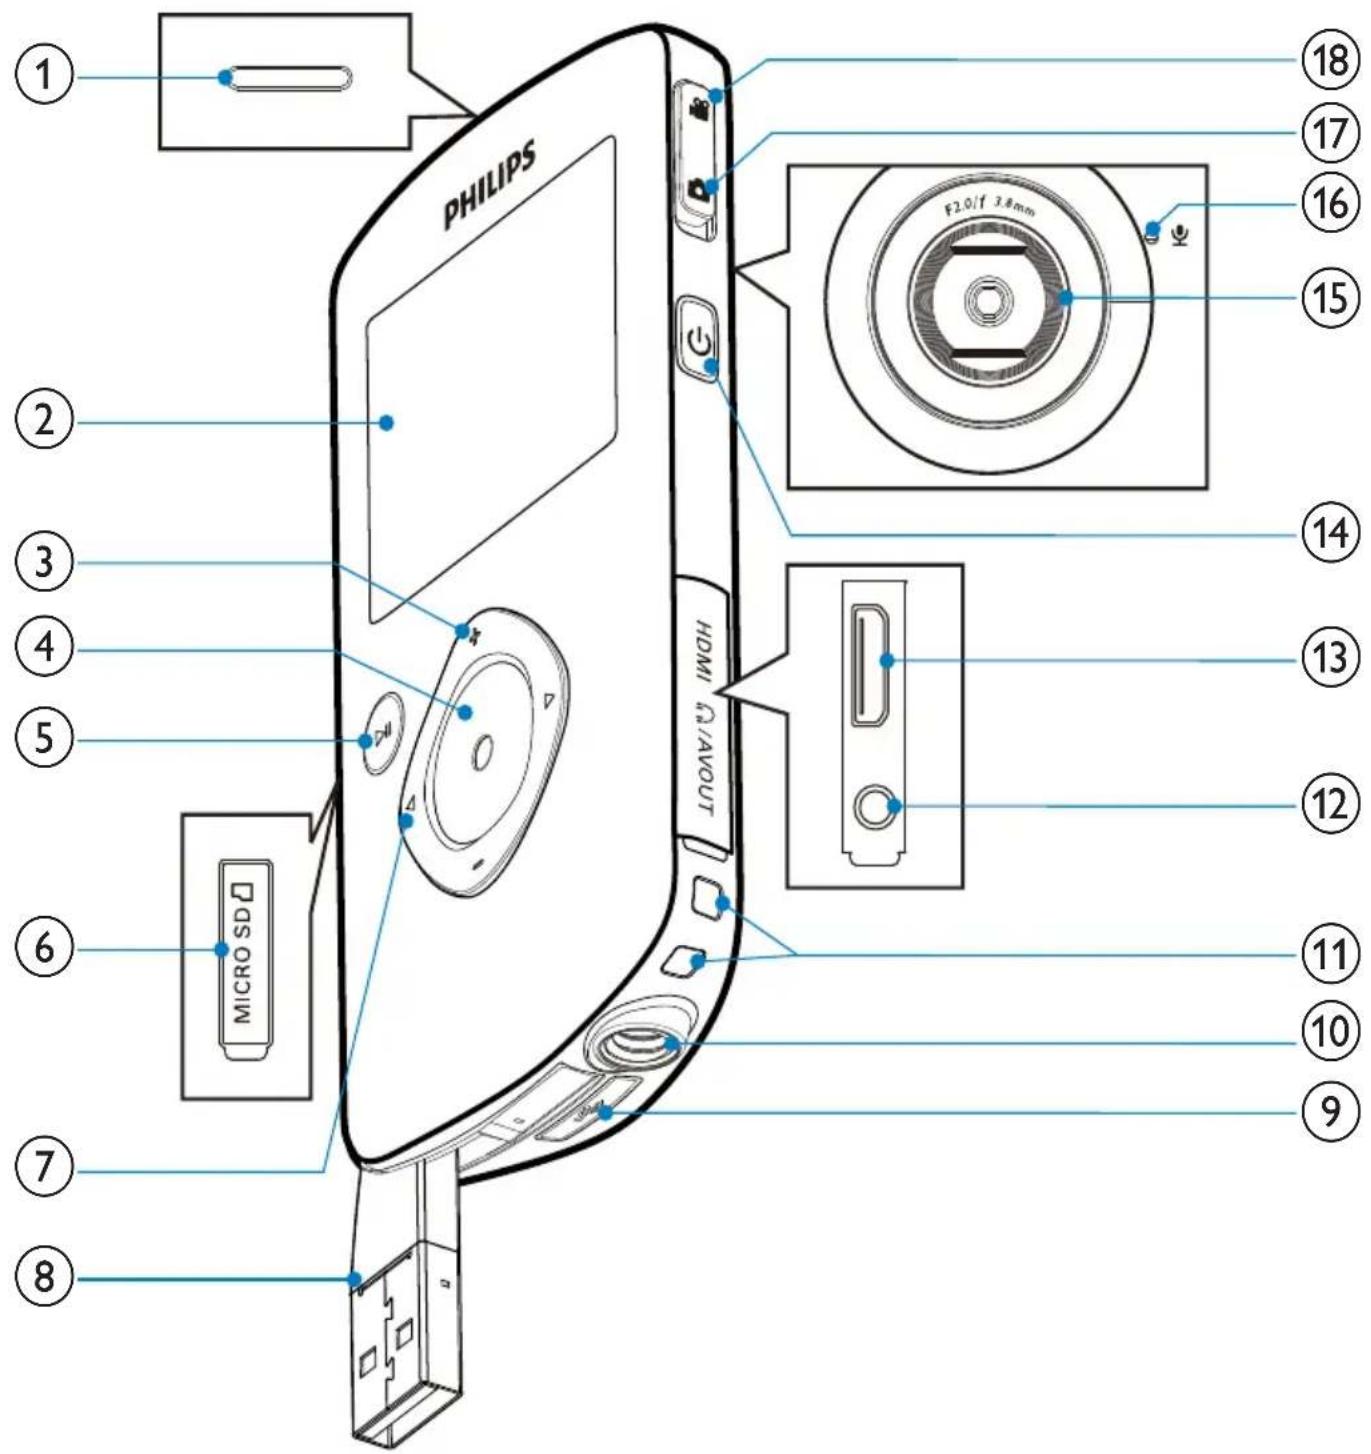
① Built-in speaker
② Display panel
③ +/ -
In viewfinder mode, zoom in/out.
Navigate up/down in a menu.
Change a value in the settings menu.
During video play, change the • volume.
Perform the specific function as shown on the display panel.
④ Shutter button
In viewfinder mode, take a picture or • start/stop video recording.
• In play mode, switch to viewfinder mode.
⑤ ▶ II
• In viewfinder mode, switch to play mode.
• In play mode, play a selected video clip.
- Confirm settings.
⑥ MICRO SD
- Connect a Micro SD card.
⑦
- Navigate left/right in a menu.
- Select a menu option.
In play mode, turn to the previous/• next picture/video clip.
• In viewfinder mode, switch to the settings menu.
⑧ USB connector
⑨
• Eject the USB connector.
⑩ Tripod socket
⑪ Hand strap hole
⑫ AV OUT
- Connect a headphone.
- Connect to a TV through an AV cable.
⑬ HDMI
- Connect to a TV through an HDMI cable with a mini HDMI connector.
⑭
• Turn on/off the camcorder.
⑮ Lens
⑯ Built-in microphone
⑰ Mode switch button
Switch between picture and video recording modes.
3 Get started
Load the Micro SD card
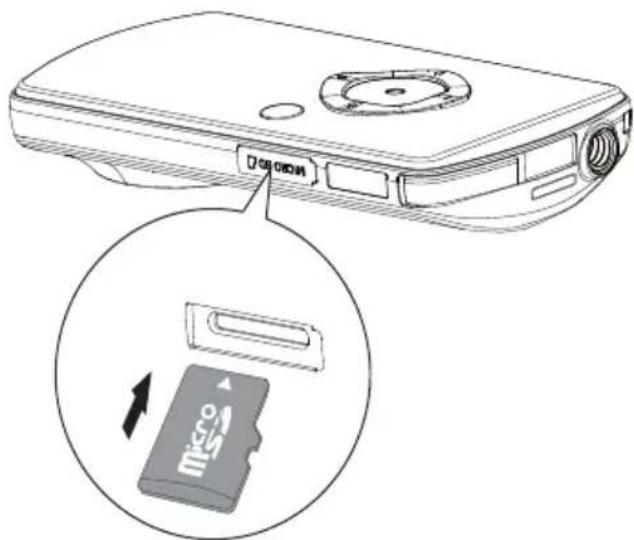
1 Flap open the protective cover on the Micro SD card socket.
2 Insert the Micro SD card into the socket.
Ensure that the the Micro SD card is • not write-protected.
Ensure that the metal contact of the • card faces down.
3 Close the protective cover securely.
Turn on
Press
For first-time users, a menu for date → and time setting appears (See "Get started - Set the date and time).
The camcorder switches to viewfinder → mode.
To turn off the camcorder:
Press and hold 🔊.
The backlight on the display panel turns off.

Tip
To save energy, the camcorder turns off • automatically after being idle for 3 minutes.
Set the date and time (for first-time users only)
When you turn on the camcorder for the first time, a menu for date and time setting appears.
1 Press ▲ to highlight [Yes]. A date setting menu appears.
2 Press ◀/▶ to select the day, month and year fields successively.
3 Press ▲/▼ to change the value of each field.
4 Press ▶II to confirm the date setting.
A time setting menu appears.
5 Press ◀/▶ to select the hour and minute fields successively.
6 Press ◀/▶ to change the value of each field.
7 Press ▶II to confirm the time setting.
The date and time setting is complete.
The camcorder enters viewfinder mode.
Select a menu display language
1 In viewfinder mode, press .▶
◀ settings menu appears.
2 Press ▲/▼ to highlight [Language].
3 Press ◀/▶ to select a language.
4 Press ▲/▼ to highlight [Resolution].
5 Press ◀/▶ to select the HD or standard resolution.
6 Press ▶II to confirm the setting and return to viewfinder mode.
Charge the built-in battery
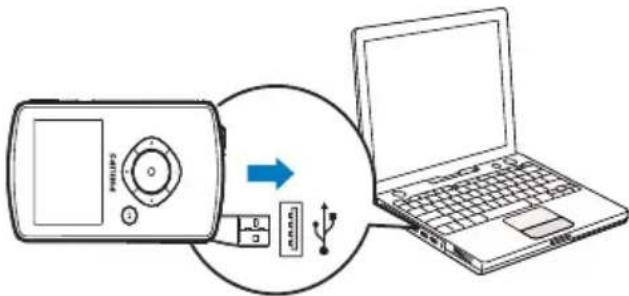
1 Press ✦ at the bottom of the camcorder to eject the USB connector.
2 Connect the USB connector to a USB socket on a PC.
The status indicator on the shutter button starts flashing in orange.
3 Wait until the status indicator stops flashing and turns to green steadily. The built-in battery is fully charged.

Tip
The camcorder is fully charged for first-time use.
- It takes about 3 hours to fully charge the built-in battery via the PC.
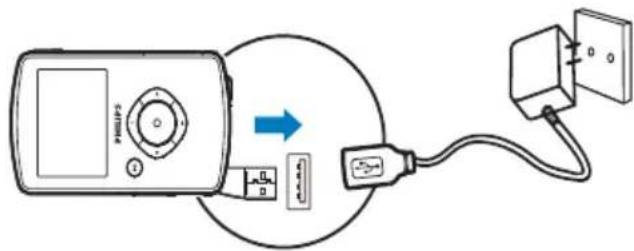
You can also charge the camcorder via a USB adaptor (not supplied) connected to mains power. The charge time is about 2 hours.
4 Use your camcorder
Record video
1 Switch the mode switch button to .The selected resolution and remaining recording time appear on the display panel.
2 Hold the camcorder steadily and aim the lens as needed.
3 Press the shutter button to start recording.
A red time indicator appears on the display panel.
The status indicator on the shutter button starts flashing in red.
4 Press the shutter button again to end recording.
→[Recording saved!] appears briefly.
Take pictures
1 Switch the mode switch button to 📄
The file size and remaining number of pictures that can be taken appear on the display panel.
2 Hold the camcorder steadily and aim the lens as needed.
3 Press the shutter button to take a picture.
→[Picture saved!] appears briefly.
Play
1 In viewfinder mode, press to enter play mode. The last recorded video clip is played automatically.
2 Press ◀/▶ to select a picture or video clip for play.
3 If the selected file is a video clip, press to start play.
Delete a file
1 In play mode, press /◆to select a file.
2 Press ▲ to enter deletion mode.
3 Press ◀ to highlight [Yes] and confirm the deletion operation.
→[Deleted!] appears briefly.
Preview
In play mode, press ▼. The thumbnails of 6 files are displayed → on each page. To select a file, press ▲/▼/◄►
Options during video play
Fast forward/reverse
• During video play, press and hold ◀/▶.
• To return to the normal speed, release ◀/▶.
Adjust volume level
• During video play, press ▲/▼.
Listen through headphone
- Plug a headphone into the Ⓞ/AV OUT socket on the camcorder.
Adjust settings
1 In viewfinder mode, press . ▶ A settings menu appears.
2 Press ▲/▼ to highlight an option.
3 Press ◀/▶ to select a setting.
4 Press ▶II to confirm the setting and return to viewfinder mode.
| Description | |
| [Scene] | Select an automatic exposure mode that matches your shot for easy shooting. |
| [Effects] | Add a special effect to your shooting. |
| [Resolution] | Select a video resolution. |
| [Volume] | Change the keypad tone and operation sound. |
| [Date] | Set the date. |
| [Time] | Set the time. |
| [Auto power] | Enable/disable automatic power-off mode. |
| [Capture sound] | Turn on/off the capture sound. |
| [Language] | Select your desired menu language. |
| [Pre-record] | Enable/disable 3-second pre-record mode. |
| [TV system] | Change this setting if the output video does not appear correctly on your TV. |
| [Format] | Clear contents from the micro SD card or internal memory (when no micro SD card is inserted). |
5 Use more of your camcorder
View video or pictures on TV
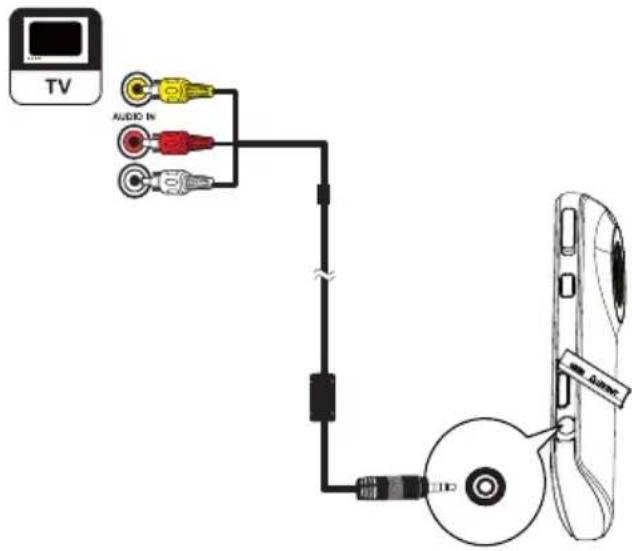
1 Connect the supplied AV cable to: the AV OUT socket on the camcorder
the component video and audio • input sockets on the TV
2 Select a file and start play.
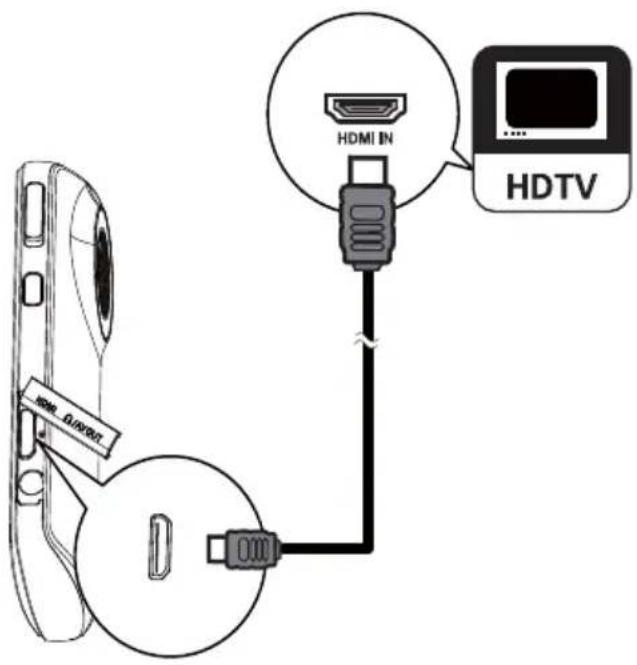
To enjoy high-quality video/picture:
1 Connect an HDMI cable (not supplied) to: the • HDMI socket on the camcorder (requiring a mini HDMI connector) the HDMI input socket on an HDTV•
Install and use the camcorder software
With the software (ArcSoft MedialImpression HD Edition) available in the internal memory of the camcorder, you can import, edit, archive or upload your pictures/videos to the Internet easily.

Note
The software supplied only works on PCs that operate Microsoft® Windows® XP, Vista and Windows 7.
- When you connect the camcorder to a Mac, use the iMovie software to import and edit your pictures/videos directly.
Install the camcorder software
1 Connect the camcorder to a PC (see 'Get started' > 'Charge the built-in battery').
2 If the software does not install automatically, find and click the Setup icon at My Computer\Removable Disk.
3 Follow the on-screen instructions to finish installation of the software.
Install and use the camcorder software
1 On your PC, click Start\All Programs\ArcSoft MedialImpression HD Edition. The main screen of the software → appears.
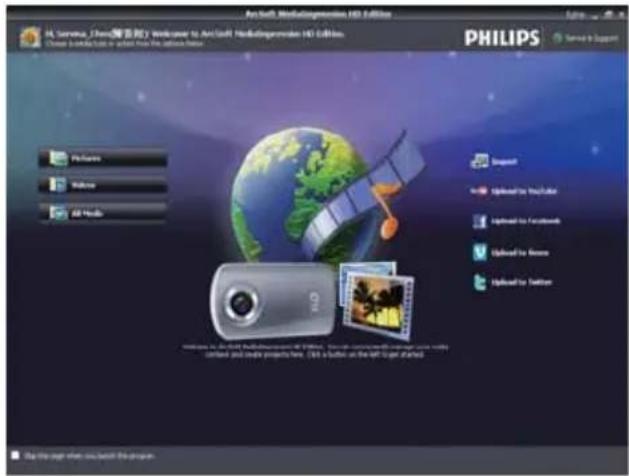
2 Click an option to select the corresponding operation.
3 Follow the on-screen instructions to complete the operation.
Transfer video/pictures to a PC/Mac
1 Connect the camcorder to a PC/Mac (see 'Get started' > 'Charge the built-in battery'). It may take some time for the PC/Mac to recognize the camcorder.
2 Find your video/pictures at My Computer\Removable Disc\DCIM\100MEDIA.
3 Copy any video/pictures you want to your designated folder in the PC/Mac.

Tip
You can also import the video/picture files with the camcorder software (for PC) or iMovie (for Mac).
6 Technical specifications
Product information is subject to change without prior notice.
| Image sensor 1/4” 1.1M CMOS sensor | |
| Operation modes Movie record, picture record | |
| Lens (focusing) Fixed | |
| Focus mode Fixed | |
| Focus range 0.6m to Infinity | |
| Aperture F2.0 | |
| Digital zoom 2X | |
| Exposure control Auto | |
| Exposure compensation | -2.0~2.0EV |
| White balance | Auto |
| Auto power off | 3 minutes |
| Memory | 64MB (512Mbit) DDR2 + 128MB SLC (96MB for AP) + Micro-SD card Slot |
| Shutter type | Electronic |
| Shutter speed | 1/2~1/4000 second |
| Picture file format | JPEG |
| Video compression format | *.MP4 (H.264 ) |
| Video resolution | HD (720p 30) 1280×720 (30fps)VGA (4:3) 640×480 (30fps) |
| Audio file format | AAC |
| Battery 700mAh Li-ion (built-in) | |
| PC interface | Mini USB 2.0 port |
| System support Windows XP/Vista/Windows 7, Mac (mass storage only) | |
| TV out NTSC/PAL selectable,Mini HDMI (type C) | |
| Weight 0.06kg | |
| Dimensions(W x H x D) | 32 x 95.7 x 22.5 mm |
7 Frequently asked questions (FAQ)
Why is there no response when I use the camcorder?
The camcorder is in power-off mode. • Turn on the camcorder (see 'Get started' > 'Turn on').
The built-in battery may be drained. •
Charge the battery (see 'Get started' > 'Charge the built-in battery').
Why is [Memory full!] displayed when I try to record?
Ensure that the Micro SD card has been • inserted correctly (see 'Get started' > 'Load the Micro SD card').
The memory is used up. Save your video/ • pictures to a computer (see 'Use more of your camcorder' > 'Transfer video/pictures to a PC/Mac'). Then delete files from your camcorder or clear the memory.
Why do I have no access to folders on the camcorder from my computer?
- Ensure that the USB connection is correct.
- The camcorder turns off automatically 15 minutes after it is connected to a computer. You can press ▶III to turn it on again.
Why do my video/pictures look blurry?
- Hold the camcorder steady in your hands during shooting.
- During video capture, do not move the camcorder too fast.
• Use a tripod (not supplied) if necessary.
Why do my video/pictures look distorted on a TV screen?
• Select the correct TV system.
How do I charge the camcorder?
You can charge the camcorder via the • USB pop-out connector. When you connect it to your PC/laptop it will automatically charge. You can also plug the camcorder via the pop-out USB into a USB charger.
How long do I have to charge the camcorder?
The camcorder is fully charged for first • usage. The camcorder charge time when connected to your PC/laptop is 3 hours. When you charge it via USB adaptor, the charge time is 2 hours.
How do I fast-forward or rewind on the camcorder?
You can fast-forward during play of a • movie by pressing the right-button for 2 seconds. You can rewind during play of a movie by pressing the left-button for 2 seconds.
Can I connect the camcorder directly to TV, DVD/Blu-ray player or Home Cinema set via their USB-port?
The USB plug is designed to share your • videos/pictures to your PC or Laptop. You can plug the CAM100 directly into your TV, DVD/Blu-ray player or Home cinema set (called the host from this point on), and it will play the pictures that are stored on the CAM100. To play the videos from the CAM100, it depends if your host supports the file format H.264 of the CAM100. Most Blu-ray enabled players are able to play this format.
Camcorder stopped responding?
In the unlikely event that your camcorder stops responding, you can manually reset it. The reset button is located under the HDMI headphone/AV out cover. There you see a small opening above the HDMI connection. Please use a small prying object (like a pen) to insert and press gently for resetting. After you have reset the camcorder, please turn on the
camcorder again, and set-up will start again.
Why does the camcorder sometimes not record the right color?
To record both indoors and outdoors, • and not having to change any settings, the camcorder has an automatic white-balance correction. This enables you to record both indoors and outdoors where the amount of light in the environment changes. If you move fast from outdoors to indoors, the camcorder might need some time to correct that, and in extreme cases the colors might seem a bit unnatural. However, after a few seconds this will be corrected automatically by the camcorder.
How do I connect it to a Windows PC/laptop?
Connect the camcorder to your PC/ • laptop via USB. The USB pop-out connector is strong enough to support the camcorder when it is plugged into the PC's USB port. For easy sharing and editing, install the software program (Media Impression HD) that comes with the camcorder.
How do I connect it to a Mac?
The camcorder works with the Mac via USB. The USB pop-out connector is strong enough to support the camcorder when it is plugged into the USB port. The camcorder works great with the iMovie software, which is part of the iLife package that comes with your Mac. To transfer videos using iMovie, simply connect the camcorder to your Mac via USB, launch iMovie and start importing by clicking the camcorder icon. Select 'Use original quality' to ensure the best quality, and to maintain file sizes at an optimum.
What is HD?
HD stands for High Definition. The camcorder captures videos in high definition (720p), which is also the
resolution that HD TV programs are broadcast in. “720” refers to the display resolution, in terms of the number of horizontal lines onscreen. “p” stands for progressive scan, or the sequential appearance of the lines in each frame. HD 720p gives video quality that is superior to that found in typical mobile phones and digital cameras.
How do I play my videos on TV?
To play back on TV, please use an HDMI • connector (mini HDMI to standard HDMI) if your TV accepts HDMI input, or use the video-out cable provided.
Why is there no lens cover?
The camcorder comes without a lens • cover, keeping it simple to use and fuss-free. It is made of robust material that doesn't scratch under normal usage. A travel pouch and a lens cloth are provided, allowing you to keep the camcorder clean.
What format does the camcorder record in?
The camcorder uses the same video • format as Blu-ray players and discs – H.264. This highly sophisticated format delivers superb HD picture quality.
What does pre-record mean that is in the setting?
The pre-record button is designed to let you never miss a moment. When you enable the pre-record function, the camcorder will record video 3 seconds before you have pressed the record button. So when you play-back the recorded film, you will automatically see the first 3 seconds before you have pressed the record button. This can be useful when filming unexpected moments. The pre-record function will not drain battery life, it will operate as normal.
Tips on video making
You can easily look back on fun moments • and relive them with the camcorder. To
enjoy these memories to the fullest, here are some simple video tips:
When capturing videos, hold your camcorder steady in your hand Don't move too fast when panning (i.e. moving the camera horizontally) as it will be hard to follow what is captured when you review the video Try shooting from different angles – for example, from the side, from the front, or even from below. You can easily join the different video segments together with the PC software included
Philips Consumer Lifestyle
A division of Philips Electronics North America
Corporation
P.O. Box 10313
Stamford, CT 06904
Phone: 1-888-PHILIPS (744-5477)
Meet Philips at the Internet
http://www.philips.com/welcome

- Need help fast?
- Français:
- Use your camcorder 12
- Use more of your camcorder 13
- Technical specifications 15
- Frequently asked questions (FAQ) 16
- Register online at www.philips.com/welcome today to get the very most from your purchase.
- \*Product Safety Notification \*Additional Benefits
- PHILIPS
- Dear PHILIPS product owner:
- safety symbols
- CAUTION
- PHILIPS LIMITED WARRANTY ONE (1) YEAR
- WARRANTY COVERAGE:
- WHO IS COVERED:
- WHAT IS COVERED:
- WHAT IS NOT COVERED - EXCLUSIONS AND LIMITATIONS:
- This Limited Warranty does not cover:
- TO OBTAIN ASSISTANCE IN THE U.S.A., PUERTO RICO, OR U.S. VIRGIN ISLANDS...
- TO OBTAIN ASSISTANCE IN CANADA...
- Important
- Safety
- Hearing safety
- Listen at a moderate volume.
- To establish a safe volume level:
- Listen for reasonable periods of time:
- Be sure to observe the following guidelines when using your headphones.
- Notice
- Disposal of your old product and batteries
- Your camcorder
- Introduction
- What's in the box
- Get started
- Load the Micro SD card
- Turn on
- To turn off the camcorder:
- Tip
- Set the date and time (for first-time users only)
- Select a menu display language
- Charge the built-in battery
- Use your camcorder
- Record video
- Take pictures
- Play
- Delete a file
- Preview
- Options during video play
- Fast forward/reverse
- Adjust volume level
- Listen through headphone
- Adjust settings
- Use more of your camcorder
- View video or pictures on TV
- Install and use the camcorder software
- Note
- Install the camcorder software
- Transfer video/pictures to a PC/Mac
- Technical specifications
- Frequently asked questions (FAQ)
- Why does the camcorder sometimes not record the right color?
- How do I connect it to a Windows PC/laptop?
- How do I connect it to a Mac?
- What is HD?
- How do I play my videos on TV?
- Why is there no lens cover?
- What format does the camcorder record in?
- What does pre-record mean that is in the setting?
- Tips on video making
Brand : PHILIPS
Model : CAM100
Category : Camcorder