
PBAA 13 - Refrigerator INDESIT - Free user manual and instructions
Find the device manual for free PBAA 13 INDESIT in PDF.


| Product Type | Built-in Refrigerator |
| Brand | Indesit |
| Model | PBAA 13 |
| Height (cm) | 82 |
| Width (cm) | 60 |
| Depth (cm) | 55 |
| Net Weight (kg) | 30 |
| Power Supply | 220-240 V, 50 Hz |
| Energy Class | A+ |
| Net Capacity (L) | 95 |
| Number of Shelves | 3 |
| Interior Lighting | LED |
| Adjustable Thermostat | Yes, mechanical |
| Reversible Door | Yes |
| Bottle Shelf | Yes |
| Egg Tray | Yes |
| Defrosting | Manual |
| Noise Level (dB) | 40 |
| Maintenance and Cleaning | Clean with a damp cloth and mild detergent. Do not use abrasive products. |
| Spare Parts and Repairability | Spare parts available via Indesit after-sales service. Repairable by a professional. |
| General Information | User manual included. Manufacturer warranty 2 years. |
Frequently Asked Questions - PBAA 13 INDESIT
User questions about PBAA 13 INDESIT
0 question about this device. Answer the ones you know or ask your own.
Ask a new question about this device
Download the instructions for your Refrigerator in PDF format for free! Find your manual PBAA 13 - INDESIT and take your electronic device back in hand. On this page are published all the documents necessary for the use of your device. PBAA 13 by INDESIT.
USER MANUAL PBAA 13 INDESIT
Vista d'insieme
natural_image
Technical illustration of two mechanical assembly components, one showing a curved arrow and the other a cylindrical component (no text or symbols)natural_image
Diagram of a kitchen sink with a downward arrow indicating a drop or change (no text or symbols present)natural_image
Simple line drawing of a door with a lid and a circular base (no text or symbols)Operating Instructions
Positioning and connection
Reversible doors
Description of the appliance, 13
Overall view
Start-up and use, 14-15
Starting the appliance
Setting the temperature
Using the refrigerator to its full potential
Using the freezer to its full potential
Maintenance and care, 16
Switching the appliance off
Cleaning the appliance
Avoiding mould and unpleasant odours
Defrosting the appliance
Replacing the light bulb
Precautions and tips, 17
General safety
Disposal
Respecting and conserving the environment
Troubleshooting, 18
Assistance, 19
GB
! Before placing your new appliance into operation please read these operating instructions carefully. They contain important information for safe use, for installation and for care of the appliance.
! Please keep these operating instructions for future reference. Pass them on to possible new owners of the appliance.
Positioning and connection
Positioning
- Place the appliance in a well-ventilated humidity-free room.
- Do not obstruct the rear fan grills. The compressor and condenser give off heat and require good ventilation to operate correctly and save energy.
- Leave a space of at least 10 cm between the top part of the appliance and any furniture above it, and at least 5 cm between the sides and any furniture/side walls.
- Ensure the appliance is away from any sources of heat (direct sunlight, electric stove, etc.).
- In order to maintain the correct distance between the appliance and the wall behind it, fit the spacers supplied in the installation kit, following the instructions provided.
Levelling
- Install the appliance on a level and rigid floor.
- If the floor is not perfectly horizontal, adjust the refrigerator by tightening or loosening the rear feet.
Electrical connections
After the appliance has been transported, carefully place it vertically and wait at least 3 hours before connecting it to the electricity mains. Before inserting the plug into the electrical socket ensure the following:
- The appliance is earthed and the plug is compliant with the law.
- The socket can withstand the maximum power of the appliance, which is indicated on the data plate located on the bottom left side of the fridge (e.g. 150 W).
- The voltage must be in the range between the values indicated on the data plate located on the bottom left side (e.g. 220-240V).
- The socket is compatible with the plug of the appliance. If the socket is incompatible with the plug, ask an authorised technician to replace it (see Assistance). Do not use extension cords or multiple sockets.
! Once the appliance has been installed, the power supply cable and the electrical socket must be easily accessible.
! The cable must not be bent or compressed.
! The cable must be checked regularly and replaced by authorised technicians only (see Assistance).
! The manufacturer declines any liability should these safety measures not be observed.
Reversible doors

Description of the appliance
Overall view
The instructions contained in this manual are applicable to different model refrigerators. The diagrams may not directly represent the appliance purchased. For more complex features, consult the following pages.
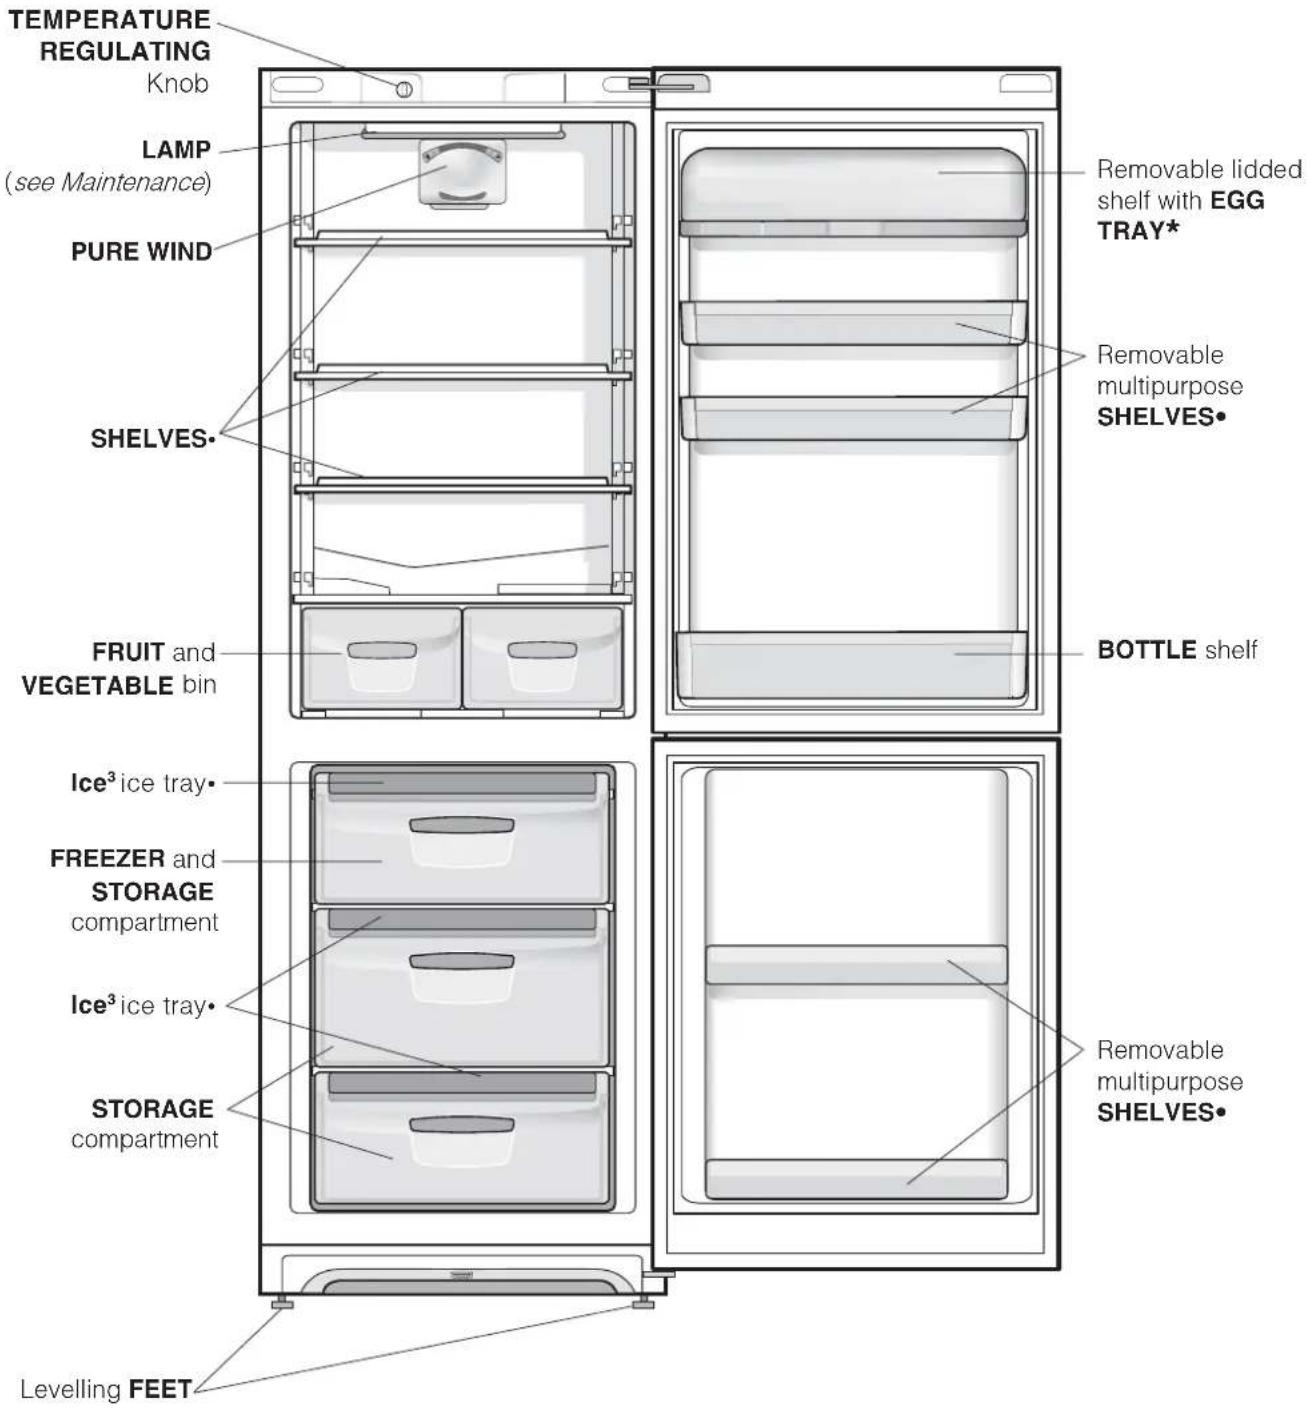
• Varies by number and/or position.
* Available only on certain models.
GB
Starting the appliance
! Before starting the appliance, follow the installation instructions (see Installation).
! Before connecting the appliance, clean the compartments and accessories well with lukewarm water and bicarbonate.
1. Insert the plug into the socket and ensure that the internal light illuminates.
2. Turn the TEMPERATURE ADJUSTMENT knob to an average value. After a few hours you will be able to put food in the refrigerator.
Setting the temperature
The temperature inside the refrigerator compartment automatically adjusts itself according to the position of the thermostat knob.
= warmest
↓ = coldest
We recommend, however, a medium position.
The cooling section of the refrigerator is located inside the back wall of the refrigerator compartment for increased space and improved aesthetics. During operation, the back wall will be covered in frost or water droplets depending on whether the compressor is operating or paused. Do not worry, the refrigerator is functioning normally.
PURE WIND
It is recognizable due to the presence of the mechanism on the top part of the refrigerator compartment (see diagram).

Pure Wind maximises air circulation, improving the efficiency of the evaporator and helping to achieve the optimal temperature inside the refrigerator as quickly as possible each time it has been opened. The blown air (A) is cooled when it comes into contact with the cold wall, whereas the hotter air (B) is sucked up (see diagram). If the TEMPERATURE ADJUSTMENT knob has been set on high values with large quantities of food and with a high ambient temperature, the appliance can operate
continuously, resulting in excessive frost formation and excessive energy consumption: compensate for this by shifting the knob towards lower values (defrosting will occur automatically).
Using the refrigerator to its full potential
- Use the TEMPERATURE ADJUSTMENT knob to adjust the temperature (see Description).
- Place only cold or lukewarm foods in the compartment, not hot foods (see Precautions and tips).
- Remember that cooked foods do not last longer than raw foods.
- Do not store liquids in open containers. They will increase humidity in the refrigerator and cause condensation to form.
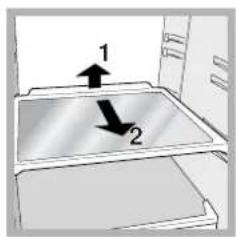
SHELVES: with or without grill. Due to the special guides the shelves are removable and the height is adjustable (see diagram), allowing easy storage of large containers and food. Height can be adjusted without complete removal of the shelf.
FLEXY SHELVES*
natural_image
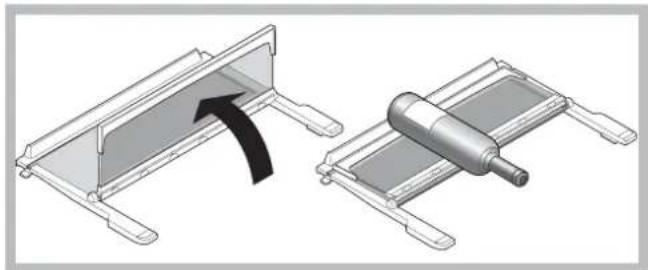
Mechanical assembly diagram showing two views of a mechanical component with an arrow indicating direction (no text or symbols present)The central shelf of the fridge compartment folds on itself to create space for the bulky containers located on the shelf beneath it.
For maximum flexibility in the use of internal space, the shelf can be positioned in place of other shelves according to the required need.
* Available only on certain models.
Using the freezer to its full potential
- Do not re-freeze food that is defrosting or that has already been defrosted. These foods must be cooked and eaten (within 24 hours).
- Fresh food that needs to be frozen must not come into contact with food that has already been defrosted. Fresh food must be stored in the top FREEZER and STORAGE compartment where the temperature drops below -18°C and guarantees rapid freezing.
- Do not place glass bottles which contain liquids, and which are corked or hermetically sealed in the freezer because they could break.
- The maximum quantity of food that may be frozen daily is indicated on the plate containing the technical properties located on the bottom left side of the refrigerator compartment (for example: Kg/24h: 4).
- In order to obtain a greater amount of space in the freezer compartment, you may remove the bins (except the lowest bin and the special COOL CARE ZONE bin, which has an adjustable temperature) and place the food directly onto the evaporator plates.
! Do not open the door during freezing.
! If there is a power cut or malfunction, do not open the freezer door. This will help maintain the temperature inside the freezer, ensuring that foods are conserved for at least 9 -14 hours.
! If the room temperature drops below 10^ C for an extended period of time, the ideal temperature will not be reached in the freezer compartment and food preservation will be reduced.
Ice ^3 ice tray
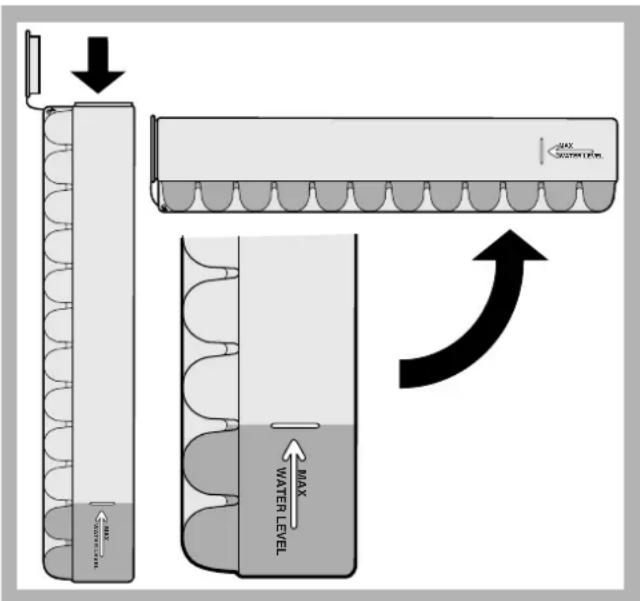
The fact that they are situated on the top part of the freezer drawers ensures greater cleanliness: the ice no longer comes into contact with the food placed inside the freezer compartment; furthermore, the dripping of the water during filling is avoided (a lid to cover up the hole after filling with water is also provided).
- Pull out the tray by pushing it up. Check that the tray is completely empty and fill it with water through the opening provided.
- Take care not to exceed the level indicated (MAX WATER LEVEL). Excess water prevents the ice cubes from dispensing (if this happens, wait for the ice to melt and empty the tray).
- Turn the tray 90°: due to the connected compartments each mould fills with water (see diagram).
- Close the opening with the lid provided and put the tray back.
- When the ice has formed (minimum time approximately 8 hours) knock the tray against a hard surface and wet the outside so that the ice cubes come loose and take them out through the opening.
Switching the appliance off
During cleaning and maintenance it is necessary to disconnect the appliance from the electricity supply. It is not sufficient to set the temperature adjustment knobs on ● (appliance off) to eliminate all electrical contact.
Cleaning the appliance
- The external and internal parts, as well as the rubber seals may be cleaned using a sponge that has been soaked in lukewarm water and bicarbonate of soda or neutral soap. Do not use solvents, abrasive products, bleach or ammonia.
- The removable accessories may be soaked in warm water and soap or dishwashing liquid. Rinse and dry them carefully.
- The back of the appliance may collect dust which can be removed by delicately using the hose of a vacuum cleaner set on medium power. The appliance must be switched off and the plug must be pulled out before cleaning the appliance.
Avoiding mould and unpleasant odours
- The appliance is manufactured with hygienic materials which are odour free. In order to maintain an odour free refrigerator and to prevent the formation of stains, food must always be covered or sealed properly.
- If you want to switch the appliance off for an extended period of time, clean the inside and leave the doors open.
Defrosting the appliance
! Follow the instructions below.
Do not speed up the defrosting process by using any devices or tools other than the scraper provided, you may damage the refrigeration circuit.
Defrosting the refrigerator compartment
The refrigerator has an automatic defrosting function:
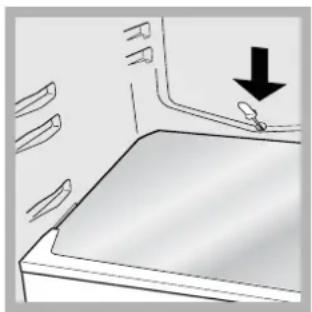
natural_image
Diagram of a kitchen sink with a downward arrow indicating a drop or change (no text or symbols present)water is ducted to the back of the appliance by a special discharge outlet (see diagram) where the heat produced by the compressor causes it to evaporate. It is necessary to clean the discharge hole regularly so that the water can flow out easily.
Defrosting the freezer compartment
Remove frost regularly using the special scraper provided. If the frost layer is greater than 5 mm, it is necessary to defrost manually:
- Set the TEMPERATURE ADJUSTMENT knob to the position ●.
- Wrap frozen foods in newspaper and place them in another freezer or in a cool place.
- Leave the door open until the frost has melted completely. This can be made easier by placing containers with lukewarm water in the freezer compartment.
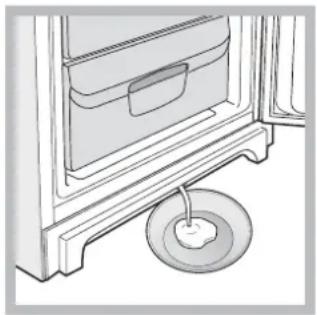
natural_image
Line drawing of a door with a circular drain and a bag, no text or symbols present-
Certain appliances are fitted with the DRAIN SYSTEM to lead the water outside: let the water flow into a container (see diagram).
-
Clean and dry the freezer compartment carefully before switching the appliance on again.
- Wait for approximately 2 hours, i.e. until the ideal storage conditions have been restored, before placing food in the freezer compartment.
Replacing the light bulb
To replace the light bulb in the refrigerator compartment, pull out the plug from the electrical socket. Follow the instructions below.
Access the light bulb by removing the cover as indicated in the diagram.
Replace it with a similar light bulb within the power range indicated on the cover (15W or 25W).

! The appliance was designed and manufactured in compliance with international safety standards. The following warnings are provided for safety reasons and must be read carefully.

This appliance complies with the following Community Directives:
- 73/23/EEC of 19/02/73 (Low Voltage) and subsequent amendments;
-89/336/EEC of 03.05.89 (Electromagnetic Compatibility) and subsequent amendments; -2002/96/CE.

General safety
- The appliance was designed for domestic use inside the home and is not intended for commercial or industrial use.
- The appliance must be used to store and freeze food products by adults only and according to the instructions in this manual.
- The appliance must not be installed outdoors, even in covered areas. It is extremely dangerous to leave the appliance exposed to rain and storms.
- Do not touch the appliance with bare feet or with wet or moist hands and feet.
- Do not touch the internal cooling elements: this could cause skin abrasions or frost/freezer burns.
- When unplugging the appliance always pull the plug from the mains socket, do not pull on the cable.
- Before cleaning and maintenance, always switch off the appliance and disconnect it from the electrical supply. It is not sufficient to set the temperature adjustment knobs on ● (appliance off) to eliminate all electrical contact.
- In the case of a malfunction, under no circumstances should you attempt to repair the appliance yourself. Repairs carried out by inexperienced persons may cause injury or further malfunctioning of the appliance.
- Do not use devices or tools other than the special scraper provided inside the compartments.
- Do not put ice cubes taken directly from the freezer into your mouth.
- This appliance is not intended for use by persons (including children) with reduced physical, sensory or lack of experience and knowledge unless they have been given supervision or instruction concerning use of the appliance by a person responsible for their safety. Children should be supervised to ensure that they do not play with the appliance.
- Keep packaging material out of the reach of children! It can become a choking or suffocation hazard.
Disposal
- Observe local environmental standards when disposing packaging material for recycling purposes.
- The European Directive 2002/96/EC on Waste Electrical and Electronic Equipment (WEEE), requires that old household electrical appliances must not be disposed of in the normal unsorted municipal waste stream. Old appliances must be collected separately in order to optimise the recovery and recycling of the materials they contain and reduce the impact on human health and the environment. The crossed out “wheeled bin” symbol on the product reminds you of your obligation, that when you dispose of the appliance it must be separately collected. Consumers should contact their local authority or retailer for information concerning the correct disposal of their old appliance.
Respecting and conserving the environment
- Install the appliance in a fresh and well-ventilated room. Ensure that it is protected from direct sunlight and do not place it near heat sources.
- Try to avoid keeping the door open for long periods or opening the door too frequently in order to conserve energy.
- Do not fill the appliance with too much food: cold air must circulate freely for food to be preserved properly. If circulation is impeded, the compressor will work continuously.
- Do not place hot food directly into the refrigerator. The internal temperature will increase and force the compressor to work harder and will consume more energy.
- Defrost the appliance if ice forms (see Maintenance). A thick layer of ice makes cold transference to food products more difficult and results in increased energy consumption.
- Regularly check the door seals and wipe clean to ensure they are free of debris and to prevent cold air from escaping (see Maintenance).
If the appliance does not work, before calling for Assistance (see Assistance), check for a solution from the following list.
| Malfunctions: | Possible causes / Solutions: |
| The internal light does not illuminate. | · The plug has not been inserted into the electrical socket, or not far enough to make contact, or there is no power in the house. |
| The refrigerator and the freezer do not cool well. | · The doors do not close properly or the seals are damaged.· The doors are opened too frequently.· The TEMPERATURE ADJUSTMENT knob is not in the correct position· The refrigerator or the freezer have been over-filled.· The atmospheric temperature of the area surrounding the appliance is lower than 10°C. |
| The food inside the refrigerator is beginning to freeze. | · The TEMPERATURE ADJUSTMENT knob is not in the correct position.· The food is in contact with the back inside wall of the refrigerator. |
| The PURE WIND fan does not rotate | · The PURE WIND system is only activated automatically when it becomes necessary to restore perfect operational conditions inside the refrigerator compartment. |
| The motor runs continuously. | · The door is not closed properly or is continuously opened.· The outside ambient temperature is very high.· The thickness of the frost exceeds 2-3 mm (see Maintenance). |
| The appliance makes a lot of noise. | · The appliance has not been installed on a level surface (see Installation).· The appliance has been installed between cabinets that vibrate and make noise.· The internal refrigerant makes a slight noise even when the compressor is off. This is not a defect, it is normal. |
| Some of the external parts of the refrigerator become hot | · These raised temperatures are necessary in order to avoid the formation of condensation on certain parts of the product. |
| The back wall of the refrigerator unit is covered in frost or droplets of water | · This shows the appliance is operating normally. |
| There is water at the bottom of the refrigerator. | · The water discharge hole is blocked (see Maintenance). |
Before calling for Assistance:
- Check if the malfunction can be solved on your own (see Troubleshooting).
- If after all the checks, the appliance still does not operate or the problem persists, call the nearest Service Centre
Communicating:
- type of malfunction
- appliance model (Mod.)
- serial number (S/N)
This information can be found on the data plate located on the bottom left side of the refrigerator compartment.

Never call on unauthorized technicians and always refuse spare parts which are not originals.
GB

Italiano, 1

English,11

Français, 21

Espanol, 31

Polski, 41

Slovenščina 51

Česky. 61
PBAA 13 V X
Sommaire
Installation, 22

flowchart
graph TD
    A["Top Left"] --> B["Central Box"]
    C["Top Right"] --> B
    D["Bottom Left"] --> B
    E["Bottom Right"] --> B
    F["Bottom Left"] --> B
    G["Bottom Right"] --> B
    H["Top Right"] --> B
    I["Top Left"] --> B
    J["Top Right"] --> B
    K["Bottom Left"] --> B
    L["Bottom Right"] --> B
    M["Bottom Left"] --> B
    N["Bottom Right"] --> B
    O["Bottom Left"] --> B
    P["Bottom Right"] --> B
    Q["Bottom Left"] --> B
    R["Bottom Right"] --> B
    S["Bottom Left"] --> B
    T["Bottom Right"] --> B
    U["Bottom Left"] --> B
    V["Bottom Right"] --> B
    W["Bottom Left"] --> B
    X["Bottom Right"] --> B
    Y["Bottom Left"] --> B
    Z["Bottom Right"] --> B

Vue d'ensemble
natural_image
Mechanical assembly diagram showing two views of a mechanical component, one with an arrow indicating direction (no text or symbols)F
Mise hors tension
natural_image
Diagram of a kitchen sink with a downward arrow indicating a drop or change (no text or symbols present)natural_image
Line drawing of a door with a circular base and handle, no text or symbols presentVista de conjunto
natural_image
Two mechanical assembly diagrams showing a bracket and a cylindrical component, with no visible text or symbols.E
natural_image
Diagram of a kitchen sink with a downward arrow indicating a drop or direction (no text or symbols present)natural_image
Line drawing of a cabinet with a circular base and handle, no text or symbols presentWidok ogólny
natural_image
Two mechanical assembly diagrams showing a bracket with a black arrow indicating rotation or force direction (no text or symbols)PL
natural_image
Diagram of a kitchen sink with a downward arrow indicating a drop or change (no text or symbols present)natural_image
Line drawing of a cabinet with a circular base and a screw, no text or symbols presentSkupni pogled
natural_image
Technical illustration of two mechanical assembly steps: one showing a bracket with an arrow indicating direction, the other showing a cylindrical component inserted into a housing (no text or symbols present)SL
natural_image
Diagram of a kitchen sink with a downward arrow indicating a drop or change (no text or symbols present)natural_image
Line drawing of a kitchen appliance with a bowl and lid (no text or symbols)
flowchart
graph TD
    A["Top Left Panel"] --> B["Central Box"]
    C["Top Right Panel"] --> B
    D["Bottom Left Panel"] --> B
    E["Bottom Right Panel"] --> B
    F["Bottom Right Panel"] --> B
    B --> G["Arrow Up"]
    B --> H["Arrow Down"]
    B --> I["Arrow Up"]
    B --> J["Arrow Down"]
Celkový pohled
natural_image
Technical illustration showing two mechanical assembly states: one with a curved arrow indicating direction, the other with a cylindrical component (no text or symbols)natural_image
Diagram of a kitchen sink with a downward arrow indicating a drop or direction (no text or symbols present)natural_image
Line drawing of a cabinet with a circular base and handle, no text or symbols present- Vista d'insieme
- Operating Instructions
- Description of the appliance, 13
- Start-up and use, 14-15
- Maintenance and care, 16
- Precautions and tips, 17
- Troubleshooting, 18
- GB
- Positioning and connection
- Positioning
- Levelling
- Electrical connections
- Description of the appliance
- Overall view
- Starting the appliance
- ! Before starting the appliance, follow the installation instructions (see Installation).
- Setting the temperature
- PURE WIND
- Using the refrigerator to its full potential
- Using the freezer to its full potential
- Ice 3 ice tray
- Switching the appliance off
- Cleaning the appliance
- Avoiding mould and unpleasant odours
- Defrosting the appliance
- Defrosting the refrigerator compartment
- Defrosting the freezer compartment
- Replacing the light bulb
- General safety
- Disposal
- Respecting and conserving the environment
- Before calling for Assistance:
- Communicating:
- Sommaire
- Installation, 22
- Vue d'ensemble
- F
- Mise hors tension
- Vista de conjunto
- E
- Widok ogólny
- PL
- Skupni pogled
- SL
- Celkový pohled
Brand : INDESIT
Model : PBAA 13
Category : Refrigerator