
ThinkPad T400s - Laptop LENOVO - Free user manual and instructions
Find the device manual for free ThinkPad T400s LENOVO in PDF.


| Product Type | Laptop |
| Brand | Lenovo |
| Model | ThinkPad T400s (also covers T410s, T410si) |
| Dimensions (approx.) | 337 mm x 239 mm x 21 mm |
| Weight (approx.) | Starting at 1.8 kg (varies by configuration) |
| AC Adapter | 20 V DC, 3.25 A (65 W) or similar; output voltage 20 V |
| Battery Type | Rechargeable lithium-ion battery pack (6-cell or 9-cell) |
| Display | 14.1-inch TFT LCD (WXGA+ 1440x900 or other) |
| Processor | Intel Core 2 Duo (various models up to 2.8 GHz) |
| Memory | 2 DDR3 SO-DIMM slots, up to 8 GB total |
| Storage | 2.5-inch SATA hard disk drive or solid state drive; capacities vary (e.g., up to 500 GB) |
| Optical Drive | Optional Serial Ultrabay Slim DVD or CD drive |
| Wireless Connectivity | Intel WiFi (802.11 a/b/g/n), Bluetooth, optional Wireless WAN and WiMAX |
| Security Features | Fingerprint reader, TPM security chip, supervisor/HDD password, power-on password |
| Operating System | Pre-installed Windows 7, Vista, or XP (recovery DVDs available) |
| Power Management | Screen blank, sleep (standby), and hibernation modes |
| Diagnostic Tools | PC-Doctor for DOS, Lenovo ThinkVantage Toolbox, and built-in HDD diagnostic |
| Maintenance | FRU replacement supported; detailed disassembly/reassembly procedures in manual |
| Safety Precautions | ESD grounding, electrical safety, laser compliance; proper handling of batteries and LCD |
| Spare Parts | Comprehensive FRU list including system board, LCD, keyboard, battery, HDD/SSD, etc. |
| Manual Language | English (primary); multilingual safety notices included |
Frequently Asked Questions - ThinkPad T400s LENOVO
User questions about ThinkPad T400s LENOVO
0 question about this device. Answer the ones you know or ask your own.
Ask a new question about this device
Download the instructions for your Laptop in PDF format for free! Find your manual ThinkPad T400s - LENOVO and take your electronic device back in hand. On this page are published all the documents necessary for the use of your device. ThinkPad T400s by LENOVO.
USER MANUAL ThinkPad T400s LENOVO
ThinkPadT400s,T410s,andT410si HardwareMaintenanceManual
ThinkPadT400s,T410s,andT410si HardwareMaintenanceManual
Note
Before using this information and the product it supports, be sure to read the general information under "Notices" on page 219
Fourth Edition (March 2010)
©CopyrightLenovo2009,2010.
LENOVO products, data, computer software, and services have been developed exclusively at private expense and are sold to governmental entities as commercial items as defined by 48 C.F.R. 2.101 with limited and restricted rights to use, reproduction and disclosure.
LIMITED AND RESTRICTED RIGHTS NOTICE: If products, data, computer software, or services are delivered pursuant a General Services Administration "GSA" contract, use, reproduction, or disclosure is subject to restrictions set forth in Contract No. GS-35F-05925.
© Lenovo 2009, 2010
Contents
Aboutthismanual. . . . . . . . . . v
Safetyinformation. 1
General safety. 2
Electrical safety. 3
Safety inspection guide. 5
Handling devices that are sensitive to electrostatic discharge. 6
Grounding requirements. 6
Safety notices (multilingual translations) . . . . . 7
Laser compliance statement (multilingual translations). 2 8
Importantserviceinformation. . . . . 3 9
Strategy for replacing FRUs. 3 9
Strategy for replacing a hard disk drive. . . . 4 0
Important notice for replacing a system board . . 40
How to use error message. . . . . . . . 4 0
Strategy for replacing FRUs for CTO, CMV, and
G AV . . . . . . . . . . . . . . . . .
Product definition. 4 1
FRU identification for CTO, CMV, and GAV products. 4 1
Generalcheckout 4 3
What to do first. 4 4
Checkout guide . . . . . . . . . . . . . 4 5
Diagnostics using PC-Doctor for DOS ..... 4 5
Lenovo ThinkVantage Toolbox (Lenovo System Toolbox) 4 8
PC-Doctor for Rescue and Recovery . . . . . 4 8
FRU tests. 4 9
Power system checkout. 5 1
Checking the AC adapter. 5 1
Checking operational charging. . . . . . . 5 2
Checking the battery pack 5 2
Checking the backup battery 53
Relatedserviceinformation. . . . . . 5 5
Restoring the factory contents by using Product
Recovery discs 5 5
Restoring the factory contents by using Recovery
Disc Set 5 6
Passwords. 57
Power-on password 57
Hard-disk password. . . . . . . . . . 5 7
Supervisor password . . . . . . . . . . 5 8
How to remove the power-on password. . . . 58
How to remove the hard-disk password. . . . 5 9
Power management 60
Screen blank mode. 6 0
Sleep (standby) mode . . . . . . . . . . 6 0
Hibernation mode . . . . . . . . . . . 6 1
Symptom-to-FRU index 6 2
Numeric error codes. 6 2
Error messages 6 6
Beep symptoms . . . . . . . . . . . . 6 7
No-beep symptoms. 6 7
LCD-related symptoms. 6 8
Intermittent problems. 6 9
Undetermined problems. 6 9
Statusindicators. 7 1
Fnkeycombinations ..... 7 5
FRUreplacementnotices. . . . . . 7 9
Screw notices. 7 9
Retaining serial numbers. 80
Restoring the serial number of the system unit 80
Retaining the UUID 80
Reading or writing the ECA information . . . 81
RemovingandreplacingaFRU ..... 8 3
Before servicing ThinkPad T400s, T410s, and T410si 84
1010 Battery pack. 8 5
1020 Serial Ultrabay Slim device or travel bezel .. 86
1030 Solid state drive (SSD) or hard disk drive
(HDD) 8 7
1040 DIMM 8 9
1050 PCI Express Mini Card for wireless LAN. . . 92
1060 PCI Express Mini Card for wireless WAN . . 95
1070 Keyboard 9 8
1080 Backup battery . . . . . . . . . . 1 0 3
1090 Wireless USB adapter or Intel Turbo Memory 104
1100 Palm rest or palm rest with fingerprint reader 106
1110 Bluetooth daughter card (BDC-2) . . . . . 108
1120 Keyboard bezel and speaker assembly . . . 109
1130 5-in-1 Media Card Reader adapter. . . . . 113
1140 Bluetooth-wireless radio switch FPC. . . . 114
1150 LCD unit . . . . . . . . . . . . . 116
1160 System board, fan assembly, and 34-mm
ExpressCard slot frame . . . . . . . . . 1 2 0
1170 I/O sub card and base cover assembly . . . 128
2010 LCD bezel assembly 1 3 0
2020 LCD latch L and R. 1 3 2
2030 Integrated camera or microphone sub card 133
2040 LED sub card 1 3 5
2050 LCD panel 1 37
2060 LCD cable. 1 4 0
2070 Hinge kit . . . . . . . . . . . . 1 4 1
2080 LED cable. 1 43
2090 Antenna kit and LCD rear cover assembly 145
Locations 147
Front view 1 4 7
Rear view 1 48
Bottom view. 1 49
| Partslist. | 1 | 5 | 1 | Windows Vista Business (64 bit) DVDs . | . | . | 2 | 0 | 4 | |
| Overall. | . | . | . | . | Windows Vista Ultimate (32 bit) DVDs . | . | . | 2 | 0 | 5 |
| LCD FRUs. | . | . | . | . | Windows 7 Home Basic (32 bit) DVDs . | . | . | 2 | 0 | 6 |
| Keyboard. | . | . | . | . | Windows 7 Home Premium (32 bit) DVDs | . | . | 207 | ||
| Miscellaneous parts. | . | . | . | . | Windows 7 Home Premium (64 bit) DVDs | . | . | 209 | ||
| AC adapters. | . | . | . | . | Windows 7 Professional (32 bit) DVDs . | . | . | 2 | 11 | |
| Power cords. | . | . | . | . | Windows 7 Professional (64 bit) DVDs . | . | . | 2 | 1 | 5 |
| Recovery discs. | . | . | . | . | Common service tools. | . | . | 2 | 1 | 7 |
| Windows XP Professional (32 bit) DVDs . . . 197 | ||||||||||
| Windows Vista Starter Edition (32 bit) DVDs 199 | Notices. | . | . | 2 | 1 | 9 | ||||
| Windows Vista Home Basic (32 bit) DVDs. . . 200 | Trademarks. | . | . | 2 | 2 | 0 | ||||
| Windows Vista Home Premium (32 bit) DVDs | 201 | |||||||||
| Windows Vista Business (32 bit) DVDs . . . | 2 | 0 | 2 | |||||||
Aboutthismanual
This manual contains service and reference information for the following ThinkPad ® products.
ThinkPadT400s
MT 2801, 2808, 2809, 2815, 2823, 2824, and 2825
ThinkPadT410sandT410si
MT 2901, 2904, 2907, 2912, 2924, 2926, and 2928
Use this manual along with the advanced diagnostic tests to troubleshoot problems.
Important:
This manual is intended only for trained service technicians who are familiar with ThinkPad products. Use this manual along with the advanced diagnostic tests to troubleshoot problems effectively.
Before servicing a ThinkPad product, be sure to read all the information under
"Safety information" on page 1 and "Important service information" on page 39.
Safetyinformation
This chapter presents following safety information that you need to be familiar with before you service a ThinkPad Notebook.
• "General safety" on page 2
•“Electrical safety” on page 3
• "Safety inspection guide" on page 5
- "Handling devices that are sensitive to electrostatic discharge" on page 6
• "Grounding requirements" on page 6
• "Safety notices (multilingual translations)" on page 7
• "Laser compliance statement (multilingual translations)" on page 28
Generalsafety
Follow these rules to ensure general safety:
- Observe good housekeeping in the area of the machines during and after maintenance.
- When lifting any heavy object:
- Make sure that you can stand safely without slipping.
- Distribute the weight of the object equally between your feet.
- Use a slow lifting force. Never move suddenly or twist when you attempt to lift.
- Lift by standing or by pushing up with your leg muscles; this action removes the strain from the muscles in your back. Donotattempttoliftanyobjectthat weighsmorethan16kg(35lb)orthatyouthinkistooheavyforyou.
- Do not perform any action that causes hazards to the customer, or that makes the equipment unsafe.
- Before you start the machine, make sure that other service technicians and the customer's personnel are not in a hazardous position.
- Place removed covers and other parts in a safe place, away from all personnel, while you are servicing the machine.
- Keep your toolcase away from walk areas so that other people will not trip over it.
- Do not wear loose clothing that can be trapped in the moving parts of a machine. Make sure that your sleeves are fastened or rolled up above your elbows. If your hair is long, fasten it.
- Insert the ends of your necktie or scarf inside clothing or fasten it with a nonconductive clip, about 8 centimeters (3 inches) from the end.
- Do not wear jewelry, chains, metal-frame eyeglasses, or metal fasteners for your clothing.
Attention: Metal objects are good electrical conductors.
- Wear safety glasses when you are hammering, drilling, soldering, cutting wire, attaching springs, using solvents, or working in any other conditions that might be hazardous to your eyes.
- After service, reinstall all safety shields, guards, labels, and ground wires. Replace any safety device that is worn or defective.
- Reinstall all covers correctly before returning the machine to the customer.
- Fan louvers on the machine help to prevent overheating of internal components. Do not obstruct fan louvers or cover them with labels or stickers.
Electricalsafety
Observe the following rules when working on electrical equipment.
Important:
Use only approved tools and test equipment. Some hand tools have handles covered with a soft material that does not insulate you when working with live electrical currents.
Many customers have, near their equipment, rubber floor mats that contain small conductive fibers to decrease electrostatic discharges. Do not use this type of mat to protect yourself from electrical shock.
• Find the room emergency power-off (EPO) switch, disconnecting switch, or electrical outlet. If an electrical accident occurs, you can then operate the switch or unplug the power cord quickly.
- Do not work alone under hazardous conditions or near equipment that has hazardous voltages.
- Disconnect all power before: - Performing a mechanical inspection - Working near power supplies - Removing or installing main units
- Before you start to work on the machine, unplug the power cord. If you cannot unplug it, ask the customer to power-off the wall box that supplies power to the machine, and to lock the wall box in the off position.
- If you need to work on a machine that has exposed electrical circuits, observe the following precautions:
- Ensure that another person, familiar with the power-off controls, is near you.
Attention: Another person must be there to switch off the power, if necessary.
- Use only one hand when working with powered-on electrical equipment; keep the other hand in your pocket or behind your back.
Attention: An electrical shock can occur only when there is a complete circuit. By observing the above rule, you may prevent a current from passing through your body.
- When using testers, set the controls correctly and use the approved probe leads and accessories for that tester.
- Stand on suitable rubber mats (obtained locally, if necessary) to insulate you from grounds such as metal floor strips and machine frames.
Observe the special safety precautions when you work with very high voltages; Instructions for these precautions are in the safety sections of maintenance information. Use extreme care when measuring high voltages.
- Regularly inspect and maintain your electrical hand tools for safe operational condition.
- Do not use worn or broken tools and testers.
- Never assume that power has been disconnected from a circuit. First, check that it has been powered off.
•Always look carefully for possible hazards in your work area. Examples of these hazards are moist floors, nongrounded power extension cables, power surges, and missing safety grounds.
- Do not touch live electrical circuits with the reflective surface of a plastic dental mirror. The surface is conductive; such touching can cause personal injury and machine damage.
- Do not service the following parts with the power on when they are removed from their normal operating places in a machine:
- Power supply units
- Pumps
- Blowers and fans
- Motor generators
– Similar units to listed above
This practice ensures correct grounding of the units.
- If an electrical accident occurs:
- Use caution; do not become a victim yourself.
- Switch off power.
– Send another person to get medical aid.
Safetyinspectionguide
The purpose of this inspection guide is to assist you in identifying potentially unsafe conditions. As each machine was designed and built, required safety items were installed to protect users and service technicians from injury. This guide addresses only those items. You should use good judgment to identify potential safety hazards due to attachment of non-ThinkPad features or options not covered by this inspection guide.
If any unsafe conditions are present, you must determine how serious the apparent hazard could be and whether you can continue without first correcting the problem.
Consider these conditions and the safety hazards they present:
- Electrical hazards, especially primary power (primary voltage on the frame can cause serious or fatal electrical shock)
•Explosive hazards, such as a damaged CRT face or a bulging capacitor
•Mechanical hazards, such as loose or missing hardware
To determine whether there are any potentially unsafe conditions, use the following checklist at the beginning of every service task. Begin the checks with the power off, and the power cord disconnected.
Checklist:
-
Check exterior covers for damage (loose, broken, or sharp edges).
-
Power off the computer. Disconnect the power cord.
-
Check the power cord for:
a. A third-wire ground connector in good condition. Use a meter to measure third-wire ground continuity for 0.1 ohm or less between the external ground pin and the frame ground.
b. The power cord should be the type specified in the parts list.
c. Insulation must not be frayed or worn.
-
Check for cracked or bulging batteries.
-
Remove the cover.
-
Check for any obvious non-ThinkPad alterations. Use good judgment as to the safety of any non-ThinkPad alterations.
-
Check inside the unit for any obvious unsafe conditions, such as metal filings, contamination, water or other liquids, or signs of fire or smoke damage.
-
Check for worn, frayed, or pinched cables.
-
Check that the power-supply cover fasteners (screws or rivets) have not been removed or tampered with.
Handling device sthataresensitivetoelectrostaticdischarge
Any computer part containing transistors or integrated circuits (ICs) should be considered sensitive to electrostatic discharge (ESD.) ESD damage can occur when there is a difference in charge between objects. Protect against ESD damage by equalizing the charge so that the machine, the part, the work mat, and the person handling the part are all at the same charge.
Notes:
-
Use product-specific ESD procedures when they exceed the requirements noted here.
-
Make sure that the ESD protective devices you use have been certified (ISO 9000) as fully effective.
When handling ESD-sensitive parts:
- Keep the parts in protective packages until they are inserted into the product.
- Avoid contact with other people.
- Wear a grounded wrist strap against your skin to eliminate static on your body.
- Prevent the part from touching your clothing. Most clothing is insulative and retains a charge even when you are wearing a wrist strap.
- Use a grounded work mat to provide a static-free work surface. The mat is especially useful when handling ESD-sensitive devices.
- Select a grounding system, such as those listed below, to provide protection that meets the specific service requirement.
Note:
The use of a grounding system to guard against ESD damage is desirable but not necessary.
- Attach the ESD ground clip to any frame ground, ground braid, or green-wire ground.
- When working on a double-insulated or battery-operated system, use an ESD common ground or reference point. You can use coax or connector-outside shells on these systems.
- Use the round ground prong of the ac plug on ac-operated computers.
Groundingrequirements
Electrical grounding of the computer is required for operator safety and correct system function. Proper grounding of the electrical outlet can be verified by a certified electrician.
Safetynotices(multilingualtranslations)
The safety notices in this section are provided in the following languages:
•English
•Arabic
•Brazilian Portuguese
•French
•German
•Hebrew
•Japanese
•Korean
- Spanish
•Traditional Chinese

DANGER
BeforethecomputerispoweredonafterFRUreplacement,makesureallscrews, springs,andothersmallpartsareinplaceandarenotleftlooseinsidethecomputer. Verifythisbyshakingthecomputerandlisteningforrattlingsounds.Metallicpartsor metalflakescancauseelectricalshorts.

DANGER
Somestandbybatteriescontainasmallamountofnickelandcadmium.Donot disassembleastandbybattery,rechargeit,throwitintofireorwater,orshort-circuitit. Disposeofthebatteryasrequiredbylocalordinancesorregulations.Useonlythe batteryintheappropriatepartslisting.Useofanincorrectbatterycanresultinignition orexplosionofthebattery.

DANGER
The batterypackcontainssmallamountsofnickel.Donotdisassembleit,throwitinto fireorwater,orshort-circuitit.Disposeofthebatterypackasrequiredbylocal ordinancesorregulations.Useonlythebatteryintheappropriatepartslistingwhen replacingthebatterypack.Useofanincorrectbatterycanresultinignitionorexplosion ofthebattery.

DANGER
Thelithium battery can cause a fire, an explosion, or a severe burn. Donotre chargeit, remove its polarized connector, disassemble it, heat above 100irc C ( 212irc F), incinerate it, orepose its cell content stowater. Dispose of the battery as required by local ordinances or regulations. Use only the battery in the appropriate parts listing. Use of an incorrect battery can result in ignition on explosion of the battery.

DANGER
If the LCD breaks and the fluid from inside the LCD gets into your eyes or any hands, immediately wash the affected areas with water for at least 15 minutes. Seek medical care if an symptoms from the fluid are present after washing.

DANGER
Toavoidshock, donotremovetheplasticcoverthatprotectsthelowerpartofthe invertercard.

DANGER
Thoughthemainbatterieshavelowvoltage,ashortedorgroundedbatterycanproduce enoughcurrenttoburnpersonnelorcombustiblematerials.

DANGER
UnlesshotswapisallowedfortheFRUbeingreplaced,doasfollowsbeforeeremoving it:poweroffthecomputer,unplugallpowercordsfromelectricaloutlets,removethe batterypack,anddisconnectanyinterconnectingcables.
The laser compliance statements in this section are provided in the following languages:

Some models of ThinkPad Notebook are equipped from the factory with an optical storage device such as a CD-ROM drive or a DVD-ROM drive. Such devices are also sold separately as options. If one of these drives is installed, it is certified in the U.S. to conform to the requirements of the Department of Health and Human Services 21 Code of Federal Regulations (DHHS 21 CFR) Subchapter J for Class 1 laser products. Elsewhere, the drive is certified to conform to the requirements of the International Electrotechnical Commission (IEC) 60825-1 and CENELEC EN 60825-1 for Class 1 laser products.
If a CD-ROM drive, a DVD-ROM drive, or another laser device is installed, note the following:

CAUTION:
Useofcontrolsoradjustmentsorperformanceofproceduresotherthanthose specifiedhereinmightresultinhazardousradiationexposure.
Opening the CD-ROM drive, the DVD-ROM drive, or any other optical storage device could result in exposure to hazardous laser radiation. There are no serviceable parts inside those drives. Donotopen.
A CD-ROM drive, a DVD-ROM drive, or any other storage device installed may contain an embedded Class 3A or Class 3B laser diode. Note the following:

DANGER
Emitsvisibleandinvisiblelaserradiationwhenopen.Donotstareintothe beam, donotviewdirectlywithopticalinstruments, and avoid direct exposure to the beam.
This chapter presents following important service information that applies to all machine types supported by this manual:
•“Strategy for replacing FRUs”
- "Strategy for replacing a hard disk drive" on page 40
- "Important notice for replacing a system board" on page 40
- "How to use error message" on page 40
•“Strategy for replacing FRUs for CTO, CMV, and GAV” on page 41
- "Product definition" on page 41
- "FRU identification for CTO, CMV, and GAV products" on page 41
Important:
BIOS and device driver fixes are customer-installable. The BIOS and device drivers are posted on the customer support site http://www.lenovo.com/support
System Disassembly/Reassembly videos that show the FRU removals or replacements for the Lenovo ® authorized service technicians are available in the following support site: http://www.lenovoservicetraining.com/ion/
Advise customers to contact the Customer Support Center at 800-426-7378 if they need assistance in obtaining or installing any software fixes, drivers, and BIOS downloads.
Customers in Canada should call the Customer Support Center at 800-565-3344 for assistance or download information.
StrategyforreplacingFRUs
Beforereplacingparts:
Make sure that all software fixes, drivers, and BIOS downloads are installed before replacing any FRUs listed in this manual.
After a system board is replaced, ensure that the latest BIOS is loaded to the system board before completing the service action.
To download software fixes, drivers, and BIOS, do as follows:
-
Go to http://www.lenovo.com/support
-
Enter the product number of the computer or press Auto-detect button on the screen.
-
Select Downloadsanddrivers.
-
Follow the directions on the screen and install the necessary software.
Use the following strategy to prevent unnecessary expense for replacing and servicing FRUs:
- If you are instructed to replace a FRU but there replacement does not correct the problem, reinstall the original FRU before you continue.
- Some computers have both a processor board and a system board. If you are instructed to replace either the processor board or the system board, and replacing one of them does not correct the problem, reinstall that board, and then replace the other one.
- If an adapter or a device consists of more than one FRU, any of the FRUs may be the cause of the error. Before replacing the adapter or device, remove the FRUs, one by one, to see if the symptoms change. Replace only the FRU that changed the symptoms.
Attention: The setup configuration on the computer you are servicing may have been customized. Running Automatic Configuration may alter the settings. Note the current configuration settings (using the View Configuration option); then, when service has been completed, verify that those settings remain in effect.
Strategyforreplacingaharddiskdrive
Always try to run a low-level format before replacing a hard disk drive. This will cause all customer data on the hard disk to be lost. Be sure that the customer has a current backup of the data before doing this task.
Attention: The drive startup sequence in the computer you are servicing may have been changed. Be extremely careful during write operations such as copying, saving, or formatting. If you select an incorrect drive, data or programs can be overwritten.
Importantnoticeforreplacingasystemboard
Some components mounted on a system board are very sensitive. Improper handling of a system board can cause damage to those components, and may cause a system malfunction.
Attention: When handling a system board:
- Do not drop a system board or apply any excessive force to it.
- Avoid rough handling of any kind.
- Avoid bending a system board and hard pushing to prevent cracking at each BGA (Ball Grid Array) chipset.
Howtouseerrormessage
Use the error codes displayed on the screen to diagnose failures. If more than one error code is displayed, begin the diagnosis with the first error code. Whatever causes the first error code may also cause false error codes. If no error code is displayed, see whether the error symptom is listed in the Symptom-to-FRU Index for the computer you are servicing.
StrategyforreplacingFRUsforCTO,CMV,andGAV
Productdefinition
DynamicConfigureToOrder(CTO)
This provides the ability for a customer to configure an IBM or a Lenovo solution from an eSite, and have this configuration sent to fulfillment, where it is built and shipped directly to the customer. The machine label, Product Entitlement Warehouse (PEW), eSupport, and the HMM will load these products as the 4-digit MT and 3-digit model, where model = "CTO" (Example: 1829-CTO).
CustomModelVariant(CMV)
This is a unique configuration that has been negotiated between IBM or Lenovo and the customer. A unique 4-digit MT and 3-digit model is provided to the customer to place orders (Example: 1829-W15). A CMV is a special bid offering. Therefore, it is NOT generally announced.
- The MTM portion of the machine label is the 4-digit MT and 3-digit model, where model = "CTO" (Example: 1829-CTO). The PRODUCT ID portion of the machine label is the 4-digit MT and 3-digit CMV model (Example: 1829-W15).
- The PEW record is the 4-digit MT and 3-digit model, where model = "CTO" (Example: 1829-CTO).
- eSupport will show both the CTO and CMV machine type models (Example: 1829-CTO and 1829-W15 will be found on the eSupport site.)
•The HMM will have the 4-digit MT and 3-digit CTO model only (Example: 1829-CTO). Again, CMVs are custom models and are not found in the HMM.
GeneralAnnounceVariant(GAV)
This is a standard model (fixed configuration). GAVs are announced and offered to all customers. The MTM portion of the machine label is a 4-digit MT and 3-digit model, where model = a "fixed part number", not "CTO" (Example: 1829-F1U). Also, PEW, eSupport, and the HMM will list these products under the same fixed model number.
FRUidentificationforCTO,CMV,andGAVproducts
There are three information resources to identify which FRUs are used to support CTO, CMV, and GAV products. These sources are PEW, eSupport, and the HMM.
UsingPEW
- PEWis the primary source for identifying FRU part numbers and FRU descriptions for the key commodities for CTO, CMV and GAV products at a MT - serial number level. An example of key commodities are hard disk drives, system boards, microprocessors, Liquid Crystal Displays (LCDs), and memory.
- Remember, all CTO and CMV products are loaded in PEW under the 4-digit MT and 3-digit model, where model = "CTO" (Example: 1829-CTO). GAVs are loaded in PEW under the 4-digit MT and 3-digit model, where model = a "fixed part number", not "CTO" (Example: 1829-F1U).
-
PEW can be accessed at the following Web site: http://www.lenovo.com/support/site.wss/document.do?Indocid=LOOK-WARNTY Select Warranty lookup. Input the MT and the Serial number and the list of key commodities will be returned in the PEW record under COMPONENT INFORMATION.
-
Business Partners using Eclaim will access PEW when performing Entitlement Lookup. Business Partners will enter Loc ID, MT and Serial, and the key commodities will be returned in the Eclaim record under SYSTEM DETAILS.
- Authorized IBM Business Partners can access Eclaim at the following Web site: https://wca.eclaim.com
UsingeSupport
ForKeyCommodities(Examples-harddiskdrive,systemboard, microprocessor,LCD,andmemory)
- eSupport can be used to view the list of key commodities built in a particular machine serial (this is the same record found in PEW).
- eSupport can be accessed at the following Web site: http://www.lenovo.com/support
•To view the key commodities, click on PARTS INFORMATION, then PARTS LOOKUP. Type in the model type and serial number. The key commodities will be returned in the eSupport record under PARTS SHIPPED WITH YOUR SYSTEM.
FortheRemainingFRUs(thecompletelistofFRUsattheMTModellevel)
- eSupport can be used to view the complete list of FRUs for a machine type and model.
•To view the complete list of FRUs, type in the machine type and model (Example: 1829-CTO) under QUICK PATH. Under “View by Document Type” select PARTS INFORMATION. Under “Filter by Category” select SERVICE PARTS. Under “Parts Information by Date” select SYSTEM SERVICE PARTS. The list of service parts by description, with applicable machine type model and FRU will be displayed.
UsingtheHMM
ForKeyCommodities(Examples-harddiskdrive,systemboard, microprocessor,LCD,andmemory)
Use the HMM as a back-up to PEW and eSupport to view the complete list of FRUs at the MT Model level.
Generalcheckout
This chapter presents following information:
•“What to do first” on page 44
- "Checkout guide" on page 45
- "Diagnostics using PC-Doctor for DOS" on page 45
- "Lenovo ThinkVantage Toolbox (Lenovo System Toolbox)" on page 48
- "PC-Doctor for Rescue and Recovery" on page 48
- "FRU tests" on page 49
• "Power system checkout" on page 51
The descriptions in this chapter apply to any ThinkPad model that supports the PC-Doctor ® for DOS diagnostics program. Some descriptions might not apply to your particular computer.
Before you go to the checkout guide, be sure to read the following important notes.
Importantnotes:
- Onlycertifiedtrainedpersonnelshouldservicethecomputer.
- BeforereplacinganyFRU,readtheentirepageonremovingandreplacing FRUs.
- WhenyoureplaceFRUs,usenewnylon-coatedscrews.
- Beextremelycarefulduringsuchwriteoperationsascopying,saving,or formatting.Drives in the computer that you are servicing sequence might have been altered. If you select an incorrect drive, data or programs might be overwritten.
-ReplaceaFRUonlywithanotherFRUofthecorrectmodel.When you replace a FRU, make sure that the model of the machine and the FRU part number are correct by referring to the FRU parts list.
- AFRU should not bereplaced because of a single, unreproducible failure. Single failures can occur for a variety of reasons that have nothing to do with a hardware defect, such as cosmic radiation, electrostatic discharge, or software errors. Consider replacing a FRU only when a problem recurs. If you suspect that a FRU is defective, clear the error log and run the test again. If the error does not recur, do not replace the FRU.
•BecarefulnottoreplaceanondefectiveFRU.
Whattodofirst
When you do return a FRU, you must include the following information in the parts exchange form or parts return form that you attach to it:
- Name and phone number of service technician
- Date of service
- Date on which the machine failed
- Date of purchase
_5.Failure symptoms, error codes appearing on the display, and beep symptoms
__6.Procedure index and page number in which the failing FRU was detected
__7.Failing FRU name and part number - Machine type, model number, and serial number
9.Customer's name and address
Noteforwarranty: During the warranty period, the customer may be responsible for repair costs if the computer damage was caused by misuse, accident, modification, unsuitable physical or operating environment, or improper maintenance by the customer.
Following is a list of some common items that are not covered under warranty and some symptoms that might indicate that the system was subjected to stress beyond normal use.
Before checking problems with the computer, determine whether the damage is covered under the warranty by referring to the following list:
The following are not covered under warranty:
•LCD panel cracked from the application of excessive force or from being dropped
•Scratched (cosmetic) parts
•Distortion, deformation, or discoloration of the cosmetic parts
- Plastic parts, latches, pins, or connectors that have been cracked or broken by excessive force
•Damage caused by liquid spilled into the system
- Damage caused by the improper insertion of a PC Card or the installation of an incompatible card
- Improper disc insertion or use of an optical drive
- Diskette drive damage caused by pressure on the diskette drive cover, foreign material in the drive, or the insertion of a diskette with multiple labels
• Damaged or bent diskette eject button
•Fuses blown by attachment of a nonsupported device
•Forgotten computer password (making the computer unusable)
- Sticky keys caused by spilling a liquid onto the keyboard
- Use of an incorrect ac adapter on laptop products
The following symptoms might indicate damage caused by nonwarranted activities:
- Missing parts might be a symptom of unauthorized service or modification.
- If the spindle of a hard disk drive becomes noisy, it may have been subjected to excessive force, or dropped.
Checkoutguide
Use the following procedures as a guide in identifying and correcting problems with the ThinkPad Notebook.
Note: The diagnostic tests are intended to test only ThinkPad products. The use of non-ThinkPad products, prototype cards, or modified options can lead to false indications of errors and invalid system responses.
- Identify the failing symptoms in as much detail as possible.
- Verify the symptoms. Try to re-create the failure by running the diagnostic test or by repeating the operation.
DiagnosticsusingPC-DoctorforDOS
The ThinkPad Notebook has a test program called PC-Doctor for DOS (hereafter called PC-Doctor.) You can detect errors by running the diagnostics test included in PC-Doctor.
Note:
PC-Doctor for DOS is available at the following Web site: http://
www.lenovo.com/support
To create the PC-Doctor diagnostic CD, follow the instructions on the Web site.
For some possible configurations of the computer, PC-Doctor might not run correctly. To avoid this problem, you need to initialize the computer setup by use of the BIOS Setup Utility before you run PC-Doctor.
To enter BIOS Setup Utility, do as follows:
- Turn on the computer.
- When the ThinkPad logo comes up, immediately press F1 to enter the BIOS Setup Utility.
Note: If a supervisor password has been set by the customer, BIOS Setup Utility menu appears after the password is entered. You can start the utility by pressing Enter instead of entering the supervisor password; however, you cannot change the parameters that are protected by the supervisor password.
On the BIOS Setup Utility screen, press F9, Enter, F10, and then Enter.
Note: When you initialize the computer configuration, some devices are disabled, such as the serial port. If you test one of these devices, you will need to enable it by using Configuration utility for DOS. The utility is available on the following Web site: http://www.lenovo.com/support
PC-Doctor cannot be used to test a device that is in the docking station, even if the computer supports the docking station. To test a USB device, connect it to the USB connector of the computer.
Testingthecomputer
Note: The PC-Doctor diagnostic CD does not support any optical drives connected through USB devices or any others. It supports only the internal optical drive of the ThinkPad Notebook.
To run the test, do as follows:
- Turn off the computer.
-
Make sure that the internal optical drive that is supported as a startup device is attached to the computer.
-
Turn on the computer.
If the computer cannot be powered on, go to "Power system checkout" on page 51, and check the power sources.
If an error code appears, go to "Symptom-to-FRU index" on page 62.
-
When the ThinkPad logo comes up, immediately press F12 to enter the Boot Menu.
-
Insert the PC-Doctor CD into the internal optical drive.
-
Press cursor keys to select ATAPI CDx (x: 0, 1, ...) and then press Enter.
-
Follow the instructions on the screen.
-
The main panel of PC-Doctor appears.
-
Select Diagnostics with the arrow keys, and press Enter.
Note: You can select an item not only with the arrow keys, but also with the TrackPoint ® pointer. Instead of pressing Enter, click the left button.
A pull-down menu appears. (Its exact form depends on the model.)
Note: PC-Doctor menu does not mean the formal support device list. Some unsupported device names may appear in the PC-Doctor menu.

The options on the test menu are as follows:
| DiagnosticsInteractiveTests | |
| •Run Normal Test•Run Quick Test•CPU/Coprocessor•System board•Video Adapter•Fixed Disks•Diskette Drives•Other Devices•ThinkPad Devices•Communication•Wireless LAN•Advanced Memory Tests | •Keyboard•Video•Internal Speaker•Mouse•Diskette•System Load•Optical Drive Test•Intel WLAN Radio Test |
| Note:In the Keyboard test in Interactive Tests, the Fn key should be held down for at least 2 seconds; otherwise, it cannot be sensed.Video Adapter test supports only the LCD display on the ThinkPad Notebook. If you have an external monitor attached to your computer, detach it before running PC-Doctor for DOS.To test Digital Signature Chip, the security chip must be set to Active. | |
-
Run the applicable function test.
-
Follow the instructions on the screen. If there is a problem, PC-Doctor shows messages describing it.
-
To exit the test, select Quit—ExitDiag.
To cancel the test, press Esc.
Note: After running PC-Doctor, check the time and date on the system and reset them if they are incorrect.
DetectingsysteminformationwithPC-Doctor
PC-Doctor can detect the following system information:
HardwareInfo
•System Configuration
•Memory Contents
•Physical Disk Drives
•Logical Disk Drives
•VGA Information
•IDE Drive Info
•PCI Information
•PNPISA Info
•SMBIOS Info
• VESA LCD Info
•Hardware Events Log
Utility
•Run External Tests
•Surface Scan Hard Disk
•Benchmark System
• DOS Shell
•Tech Support Form
•Battery Rundown
•View Test Log
- Print Log
•Save Log
•Full Erase Hard Drive
•Quick Erase Hard Drive
LenovoThinkVantageToolbox(LenovoSystemToolbox)
Lenovo ThinkVantage ® Toolbox (Lenovo System Toolbox in Windows Vista ® and Windows ® XP) is a diagnostic program that works through the Windows operating system. It enables you to view symptoms of computer problems and solutions for them, and includes automatic notification when action is required, computing assistance, advanced diagnostics, and diagnostic history.
Note:
The latest Lenovo ThinkVantage Toolbox (Lenovo System Toolbox) is available at the following Web site: http://www.lenovo.com/support
To install the latest Lenovo ThinkVantage Toolbox (Lenovo System Toolbox) on the computer, follow the instructions on the Web site.
To run this program, do as follows:
Windows7:
While the Windows operating system is running, press the ThinkVantage button.
You can also run this program as either of the following:
- Click Start --> All Programs --> Lenovo ThinkVantage Tools --> System Health and Diagnostics.
- Click Start --> Control Panel --> System and Security --> Lenovo's System HealthandDiagnostics.
WindowsVistaandWindowsXP:
Click Start --> All Programs --> Lenovo Services --> Lenovo System Toolbox.
Follow the instructions on the screen. Lenovo ThinkVantage Toolbox (Lenovo System Toolbox) also has problem determination aids that determine software and usage problems.
For additional information about this program, see the Help for the program.
PC-DoctorforRescueandRecovery
In some models of ThinkPad Notebook, the Rescue and Recovery ® workspace enables you to run the PC-Doctor program to test the hardware features of the computer.
To run the test, click "Run Diagnostics" on the Rescue and Recovery main screen.
FRUtests
The following table shows the test for each FRU.
Table1.FRUtests
| FRUApplicabletest | |
| System board | 1. Diagnostics --> CPU/Coprocessor2.Diagnostics--> Systemboard3.If the docking station or the port replicator is attached to the ThinkPad Notebook, detach it.4.Place the computer on a horizontal surface, and run Diagnostics--> ThinkPadDevices--> HDDActiveProtection Test.Note:Do not apply any physical shock to the computer while the test is running. |
| Power | Diagnostics --> ThinkPad Devices --> AC Adapter, Battery 1 (Battery2) |
| LCD unit 1.Diagnostics--> VideoAdapter2.InteractiveTests--> Video | |
| Audio Enter the BIOS Setup Utility and change Serial ATA (SATA) setting to Compatibility, and run Diagnostics --> Other Device --> ConexantAudio | |
| Speaker InteractiveTests--> InternalSpeakerNote:Once Audio test is done, the no sound is heard this test. In this case, turn off and turn on the computer. Then, run this test again. | |
| Keyboard | 1. Diagnostics --> Systemboard --> Keyboard2.InteractiveTests--> Keyboard |
| Hard disk drive or solid state drive | Enter the BIOS Setup Utility and change Serial ATA (SATA) setting to Compatibility, and run Diagnostics --> Fixed Disks |
| You can also diagnose the drive without starting up the operating system. To diagnose the drive from the BIOS Setup Utility, do as follows:1.Remove any diskette from the diskette drive, and then turn off the computer.2.Turn on the computer.3.While the message, “To interrupt normal startup, press the blue ThinkVangate button,” is displayed at the lower left of the screen, press F1 to enter the BIOS Setup Utility.4.Using cursor keys, select HDDdiagnosticprogram. Press enter.5. Using cursor keys, select Main hard disk drive or Ultrabay harddiskdrive.6. Press Enter to start the diagnostic program. | |
| Diskette drive | 1. Diagnostics --> Diskette Drives2.InteractiveTests--> Diskette |
| Optical drive | 1. Diagnostics --> Other Devices--> Optical Drive2.InteractiveTests--> OpticalDriveTest |
| Memory | 1.If two DIMMs are installed, remove one of them and run Diagnostics--> AdvancedMemoryTests.2.If the problem does not recur, return the DIMM to its place, remove the other one, and run the test again. |
| TrackPoint or pointing device | If the TrackPoint does not work, check the configuration as specified in the BIOS Setup Utility. If the TrackPoint is disabled, select Automaticto enable it.After you use the TrackPoint, the pointer may drift on the screen for a short time. This drift can occur when a slight, steady pressure is applied to the TrackPoint pointer. This symptom is not a hardware problem. If the pointer stops after a short time, no service action is necessary.If enabling the TrackPoint does not correct the problem, continue with the following:•InteractiveTests-->Mouse |
| Touch Pad If the Touch Pad does not work, check the configuration as specified in the BIOS Setup Utility. If the Touch Pad is disabled, select Automaticto enable it. If enabling the Touch Pad does not correct the problem, continue with the following:•InteractiveTests-->Mouse | |
Powersystemcheckout
To verify a symptom, do the following:
- Turn off the computer.
- Remove the battery pack.
- Connect the ac adapter.
- Check that power is supplied when you turn on the computer.
- Turn off the computer.
- Disconnect the ac adapter and install the charged battery pack.
- Check that the battery pack supplies power when you turn on the computer.
If you suspect a power problem, see the appropriate one of the following power supply checkouts:
- "Checking the AC adapter"
- "Checking operational charging" on page 52
- "Checking the battery pack" on page 52
- "Checking the backup battery" on page 53
CheckingtheACadapter
You are here because the computer fails only when the AC adapter is used.
- If the power problem occurs only when the docking station or the port replicator is used, replace the docking station or the port replicator.
- If the power-on indicator does not turn on, check the power cord of the AC adapter for correct continuity and installation.
- If the computer does not charge during operation, go to "Checking operational charging" on page 52.
To check the AC adapter, do the following:
- Unplug the AC adapter cable from the computer.
- Measure the output voltage at the plug of the AC adapter cable. See the following figure:

(20V)
| PinVoltage(Vdc) | |
| 1 +20 | |
| 2 | 0 |
| 3 Ground | |
Note: Output voltage of pin no.2 of the AC adapter may different from the one you are servicing.
-
If the voltage is not correct, replace the AC adapter.
-
If the voltage is acceptable, do the following:
-Replace the system board.
- If the problem persists, go to "FRU tests" on page 49.
Note: Noise from the AC adapter does not always indicate a defect.
Checkingoperationalcharging
To check whether the battery charges properly during operation, use a discharged battery pack or a battery pack that has less than 50% of the total power remaining when installed in the computer.
Perform operational charging. If the battery status indicator or icon does not turn on, remove the battery pack and let it return to room temperature. Reinstall the battery pack. If the charge indicator or icon still does not turn on, replace the battery pack.
If the charge indicator still does not turn on, replace the system board. Then reinstall the battery pack. If it is still not charged, go to the next section.
Checkingthebatterypack
Battery charging does not start until the Power Manager Battery Gauge shows that less than 96% of the total power remains; under this condition the battery pack can charge to 100% of its capacity. This protects the battery pack from being overcharged or from having a shortened life.
To check your battery, move your cursor to the Power Manager Battery Gauge icon in the icon tray of the Windows taskbar and wait for a moment (but do not click), and the percentage of battery power remaining is displayed. To get detailed information about the battery, double-click the Power Manager Battery Gauge icon.
Note: If the battery pack becomes hot, it may not be able to charge. Remove it from the computer and leave it at room temperature for a while. After it cools down, reinstall and recharge it.
To check the battery pack, do the following:
- Power off the computer.
- Remove the battery pack and measure the voltage between battery terminals 1 (+) and 7 (-). See the following figure:
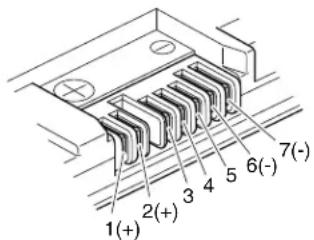
| TerminalVoltage(Vdc) | |
| 1 + 0 to + 12.6 | |
| 7 Ground (-) | |
- If the voltage is less than +11.0 V dc, the battery pack has been discharged.
Note: Recharging will take at least 3 hours, even if the indicator does not turn on.
If the voltage is still less than +11.0 V dc after recharging, replace the battery.
- If the voltage is more than +11.0 V dc, measure the resistance between battery terminals 5 and 7. The resistance must be 4 to 30 KΩ.
If the resistance is not correct, replace the battery pack. If the resistance is correct, replace the system board.
Checkingthebackupbattery
Do the following:
- Power off the computer, and unplug the ac adapter from it.
- Turn the computer upside down.
- Remove the battery pack (see "1010 Battery pack" on page 85).
- Remove the backup battery (see "1080 Backup battery" on page 103).
- Measure the voltage of the backup battery. See the following figure.
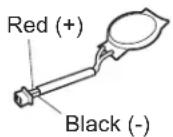
| WireVoltage(Vdc) |
| Red +2.5 to +3.2 |
| Black Ground |
- If the voltage is correct, replace the system board.
- If the voltage is not correct, replace the backup battery.
- If the backup battery discharges quickly after replacement, replace the system board.
Relatedserviceinformation
This chapter presents following information:
• "Restoring the factory contents by using Product Recovery discs"
• "Restoring the factory contents by using Recovery Disc Set" on page 56
• "Passwords" on page 57
• "Power management" on page 60
• "Symptom-to-FRU index" on page 62
ServiceWebsite:
When the latest maintenance diskette and the system program service diskette become available, they will be posted on http://www.lenovo.com/spm
RestoringthefactorycontentsbyusingProductRecoverydiscs
When the hard disk drive (HDD) or solid state drive (SSD) is replaced because of a failure, no Product Recovery program is on the new drive. In this case, you must use the recovery discs for the computer. Order the recovery discs and the drive at the same time so that you can recover the new drive with the pre-installed software when they arrive. For information on which discs to order, see “Recovery discs” on page 197.
To install the factory contents by using Product Recovery discs, do the following:
Note: Recovery takes several hours. The length of time depends on the method you use. If you use recovery discs, recovery takes at least five hours.
- Insert the bootable StartRecoveryDiscinto the DVD drive.
- Select your language and click Next.
- Read the license. If you agree with the terms, select I accept these terms and conditions and then click Next.
- Insert the Operating System Recovery Disc when prompted and click Yes to begin the operating system recovery process.
- Insert the Product Recovery Disc when prompted and click OK.
- If you have a Supplemental Recovery Disc, insert it when prompted and click Yes. If you do not have a Supplemental Recovery Disc, click No.
Note: Not all recovery disc sets come with a Supplemental Recovery Disc. If there is a Supplemental RecoveryDisc, it will be clearly marked as such.
- When all of the data has been copied from the last disc in the set, a message is displayed prompting you to restart the computer. Remove the disc and then click Yes.
Note: The remainder of the recovery process is fully automated and no action is required by you. The computer will restart into the Windows desktop several times and you might experience periods when no activity is apparent on the screen for several minutes at a time. This is normal.
- When the recovery process is complete, the Welcome to Microsoft Windows screen is displayed. Follow the instructions on the screen to complete the Windows setup.
RestoringthefactorycontentsbyusingRecoveryDiscSet
When the hard disk drive (HDD) or solid state drive (SSD) is replaced because of a failure, no product recovery program is on the new drive. In this case, you must use the Recovery Disc Set for the computer. Order the Recovery Disc Set and the drive at the same time so that you can recover the new drive with the pre-installed software when they arrive. For information on which discs to order, see “Recovery discs” on page 197.
The recovery disc set consists of the user instructions and the following set of DVDs to restore the computer to the original factory configuration.
OperatingSystemRecoveryDisc(onedisc)
This disc restores the Microsoft ® Windows operating system. Use this disc to start the recovery process.
ApplicationsandDriversRecoveryDisc(oneormorediscs)
This disc restores the preinstalled applications and drivers on the computer.
SupplementalRecoveryDisc
This disc contains additional content, such as updates to the software that was preinstalled on the computer. Not all recovery disc sets come with a SupplementalRecoveryDisc.
Notes:
- You must have a DVD drive to use the recovery discs. If you do not have an internal DVD drive, you can use an external USB DVD drive.
- During the recovery process, all data on the drive will be deleted. If possible, copy any important data or personal files that you want to keep onto removable media or a network drive before you start the recovery process.
To restore the computer to the original factory configuration using the recovery disc set, do the following:
Note: Recovery takes several hours. The length of time depends on the method you use. If you use recovery discs, recovery takes at least five hours.
- Make the CD/DVD drive the first startup device in the startup sequence using the following procedure:
a. Press and hold down the F1 key, and then turn on the computer. When the logo screen is displayed or if you hear repeating beeps, release the F1 key. The Setup Utility program opens.
b. Use the arrow keys to select Startup → Boot.
c. Select the CD/DVD drive as the 1stBootDevice.
-
Insert the OperatingSystemRecoveryDiscinto the DVD drive.
-
Press F10 to save the Setup Utility configuration changes. Follow the instructions on the screen to begin the recovery process.
-
Select your language and click Next.
-
Read the license. If you agree with the terms and conditions, select I accept these terms and conditions and then click Next. If you do not agree with the terms and conditions, follow the instructions on the screen.
- Click Yes in the displayed window to begin the operating system recovery process.
- Insert the Applications and Drivers Recovery Disc when prompted and then click OK to begin the applications and drivers recovery process.
- If you have a Supplemental Recovery Disc, insert it when prompted and click Yes. If you do not have a Supplemental Recovery Disc, click No.
- When all of the data has been copied from the last disc in the set and has been processed, remove the disc and restart the computer.
Note: The rest of the recovery process is fully automated and no action is required by you. The computer will restart into the Microsoft Windows desktop several times and you might experience periods when no activity is apparent on the screen for several minutes at a time. This is normal.
-
When the recovery process is complete, the Set Up Windows screen is displayed. Follow the instructions on the screen to complete the Windows setup.
-
After you have completed the Windows setup, you might want to restore the original startup sequence. Start the Setup Utility program and then press F9 to restore the default settings. Press F10 to save and exit the Setup Utility.
Note: After restoring a drive to the factory default settings, you might need to reinstall some device drivers.
Passwords
As many as three passwords may be needed for any ThinkPad Notebook: the power-on password (POP), the hard-disk password (HDP), and the supervisor password (SVP).
If any of these passwords has been set, a prompt for it appears on the screen whenever the computer is turned on. The computer does not start until the password is entered.
Exception: If only an SVP is installed, the password prompt does not appear when the operating system is booted.
Power-onpassword
A power-on password (POP) protects the system from being powered on by an unauthorized person. The password must be entered before an operating system can be booted. For how to remove the POP, see "How to remove the power-on password" on page 58.
Hard-diskpassword
There are two hard-disk passwords (HDPs):
-User HDP—for the user
- Master HDP—for the system administrator, who can use it to get access to the hard disk even if the user has changed the user HDP
Note: There are two modes for the HDP: User only and Master + User. The Master+Usermode requires two HDPs; the system administrator enters both in the same operation. The system administrator then provides the user HDP to the system user.
Attention: If the user HDP has been forgotten, check whether a master HDP has been set. If it has, it can be used for access to the hard disk drive. If no master HDP is available, neither Lenovo nor Lenovo authorized service technicians provide any services to reset either the user or the master HDP, or to recover data from the hard disk drive. The hard disk drive can be replaced for a scheduled fee.
For how to remove the POP, see "How to remove the hard-disk password" on page 59.
Supervisorpassword
A supervisor password (SVP) protects the system information stored in the BIOS Setup Utility. The user must enter the SVP in order to get access to the BIOS Setup Utility and change the system configuration.
Attention: If the SVP has been forgotten and cannot be made available to the service technician, there is no service procedure to reset the password. The system board must be replaced for a scheduled fee.
Howtoremovethepower-onpassword
To remove a POP that you have forgotten, do the following:
(A) If no SV Phasbeenset:
- Turn off the computer.
- Remove the battery pack.
For how to remove the battery pack, see "1010 Battery pack" on page 85.
- Remove the backup battery.
For how to remove the backup battery, see "1080 Backup battery" on page 103. - Turn on the computer and wait until the POST ends.
After the POST ends, the password prompt does not appear. The POP has been removed.
- Reinstall the backup battery and the battery pack.
(B)IfanSVPhasbeensetandisknownbytheservicetechnician:
- Turn on the computer.
- When the ThinkPad logo comes up, immediately press F1 to enter BIOS Setup Utility.
For models supporting the Passphrase function, press F1 while the POP icon is appearing on the screen; then enter the POP. For the other models, enter the POP.
Note: To check whether the ThinkPad Notebook you are servicing supports the Passphrase function, enter the BIOS Setup Utility and go to Security-->
Password. If the Using Passphrase item is displayed in the menu, this function is available on the ThinkPad Notebook.
- Select Security, using the cursor directional keys to move down the menu.
-
Select Password.
-
Select Power-OnPassword.
- Type the current SVP in the Enter Current Password field. then leave the Enter NewPasswordfield blank, and press Enter twice.
- In the Changes have been saved window, press Enter.
- Press F10; then, in the Setup confirmation window, select Yes.
Howtoremovethehard-diskpassword
Attention: If User only mode is selected and the user HDP has been forgotten and cannot be made available to the service technician, neither Lenovo nor Lenovo authorized service technicians provide any services to reset the user HDPs or to recover data from the hard disk drive. The hard disk drive can be replaced for a scheduled fee.
To remove a user HDP that has been forgotten, when the SVP and the master HDP are known, do the following:
- Turn on the computer.
- When the ThinkPad logo comes up, immediately press F1 to enter BIOS Setup Utility.
For models supporting the Passphrase function, press F1 while HDP icon is appearing on the screen; then enter the master HDP. For the other models, enter the master HDP.
Note: To check whether the ThinkPad Notebook you are servicing supports the Passphrase function, enter the BIOS Setup Utility and go to Security--> Password. If Using Passphrase item is displayed in the menu, this function is available on the ThinkPad Notebook.
- Select Security, using the cursor directional keys to move down the menu.
- Select Password.
- Select Hard-disk x password, where x is the letter of the hard disk drive. A pop-up window opens.
- Select MasterHDP.
- Type the current master HDP in the Enter Current Password field. then leave the EnterNewPasswordfield blank, and press Enter twice.
- Press F10.
- Select Yes in the Setup Configuration window. Both user HDP and master HDP will have been removed.
Powermanagement
To reduce power consumption, the computer has three power management modes: screen blank, sleep (standby in Windows XP), and hibernation.
Screenblankmode
If the time set on the "Turn off monitor" timer in the operating system expires, the LCD backlight turns off.
To put the computer into screen blank mode, do as follows:
-
Press Fn+F3. A panel for selecting a power plan (in Windows XP, power scheme) appears.
-
Select Power off display (keep current power plan) (in Windows XP, keep currentpowerscheme).
You can also put the computer into screen blank mode, press ThinkVantage button and use the ThinkVantage Productivity Center.
Note: If the computer is a Windows 7 model, it does not support ThinkVantage Productivity Center.
To end screen blank mode and resume normal operation, press any key.
Sleep(standby)mode
When the computer enters sleep (standby) mode, the following events occur in addition to what occurs in screen blank mode:
•The LCD is powered off.
•The hard disk drive is powered off.
•The CPU stops.
To enter sleep (standby) mode, press Fn+F4.
Note: You can change the action of the Fn+F4 key combination by changing the settings in Power Manager.
In certain circumstances, the computer goes into sleep (standby) mode automatically:
- If a “suspend time” has been set on the timer, and the user does not do any operation with the keyboard, the TrackPoint, the hard disk, the parallel connector, or the diskette drive within that time.
- If the battery indicator blinks orange, indicating that the battery power is low.
Note: Even if you do not set the low-battery alarm, the charge indicator notifies you when the battery is low, and then the computer enters the power-saving mode automatically.
To cause the computer to return from sleep (standby) mode and resume operation, do one of the following:
- Press the Fn key.
- Open the LCD cover.
- Turn on the power switch.
Also, in either of the following events, the computer automatically returns from sleep (standby) mode and resumes operation:
•The ring indicator (RI) is signaled by a serial device or a PC Card device.
•The time set on the resume timer elapses.
Note: The computer does not accept any input immediately after it enters sleep (standby) mode. Wait a few seconds before taking any action to reenter operation mode.
Hibernationmode
In hibernation mode, the following occurs:
•The system status, RAM, VRAM, and setup data are stored on the hard disk.
•The system is powered off.
Note: If the computer enters the hibernation mode while it is docked to the docking station, do not undock it before resuming normal operation. If you do undock it and then try to resume normal operation, you will get an error message, and you will have to restart the system.
To cause the computer to enter hibernation mode, do any of the following:
- Press the Fn+F12 keys.
- If you have defined one of the following actions as the event that causes the system to go into hibernation mode, perform that action.
- Closing the lid.
- Pressing the power button.
- Pressing Fn+F4 keys.
Also, the computer goes into hibernation mode automatically in either of the following conditions:
- If a “hibernation time” has been set on the timer, and if the user does not do any operation with the keyboard, the TrackPoint, the hard disk drive, the parallel connector, or the diskette drive within that time.
- If the timer conditions are satisfied in suspend mode.
When the power is turned on, the computer returns from hibernation mode and resumes operation. The hibernation file in the boot record on the hard disk drive is read, and system status is restored from the hard disk drive.
Symptom-to-FRUindex
This section contains following information:
• "Numeric error codes"
- "Error messages" on page 66
•“Beep symptoms” on page 67
• "No-beep symptoms" on page 67
• "LCD-related symptoms" on page 68
• "Intermittent problems" on page 69
• "Undetermined problems" on page 69
The symptom-to-FRU index in this section lists symptoms and errors and their possible causes. The most likely cause is listed first, in boldface type.
Note: Do the FRU replacement or other actions in the sequence shown in the column headed "FRU or action, in sequence." If replacing a FRU does not solve the problem, put the original part back in the computer. Do not replace a nondefective FRU.
This index can also help you determine, during regular servicing, what FRUs are likely to need to be replaced next.
A numeric error is displayed for each error detected in POST or system operation. In the displays, n can be any number.
If no numeric code is displayed, check the narrative descriptions of symptoms. If the symptom is not described there, go to “intermittent problems” on page 69.
Note:
For a device not supported by diagnostic codes in the ThinkPad Notebooks, see the manual for that device.
Numericerrorcodes
Table2.Numericerrorcodes
| SymptomorerrorFRUoration,insequence | |
| 0175Bad CRC1, stop POST task—The EEPROM checksum is not correct. | Systemboard. |
| 0176System Security—The system has been tampered with. | 1.RunBIOSSetupUtility,andsavethe currentsettingbypassingF10.2.System board. |
| 0177Bad SVP data, stop POST task—The checksum of the supervisor password in the EEPROM is not correct. | Systemboard. |
| 0182Bad CRC2. Enter BIOS Setup and load Setup defaults.—The checksum of the CRS2 setting in the EEPROM is not correct. | 1.RunBIOSSetupUtility.PressF9,and Entertoloadthedefaultsetting.Then savethecurrentsettingbypassingF10.2.System board. |
| 0185Bad startup sequence settings. Enter BIOS Setup and load Setup defaults. | 1.RunBIOSSetupUtility.PressF9,and Entertoloadthedefaultsetting.Then savethecurrentsettingbypassingF10. |
| 0187EAIA data access error—The access to EEPROM is failed. | Systemboard. |
| 0188Invalid RFID Serialization Information Area. | Systemboard. |
| 0189Invalid RFID configuration information area—The EEPROM checksum is not correct. | Systemboard. |
| 0190Critical low-battery error | 1.Chargethebatterypack.2.Battery pack. |
| 0191System Security—Invalid Remote Change requested. | 1.RunBIOSSetupUtility,andthensave currentsettingbypassingF10.2.System board. |
| 0192System Security—Embedded Security hardware tamper detected. | Systemboard. |
| 0199System Security—Security password retry count exceeded. | 1.RunBIOSSetupUtility,andthensave thecurrentsettingbypassingF10.2.System board. |
| 01C9More than one Ethernet devices are found. Remove one of them. Pressto continue. | 1.RemovetheEthernetdevicethatyou installed;orpressEsctoignorethe warningmessage.2.System board. |
| 01CAMore than one Wireless LAN devices are found. Remove one of them. | 1.RemovethewirelessLANdevicethat youinstalled.2.System board. |
| 0200Hard disk error—The hard disk is not working. | 1.Reseattheharddiskdrive.2.Load Setup Defaults in BIOS Setup Utility.3.Hard disk drive.4.System board. |
| 021xKeyboard error. | Runinteractivetestsofthekeyboardand theauxiliaryinputdevice. |
| 0220Monitor type error—Monitor type does not match the one specified in CMOS. | LoadSetupDefaultsinBIOSSetupUtility. |
| 0230Shadow RAM error—Shadow RAM fails at offset nnnn. | Systemboard. |
| 0231System RAM error—System RAM fails at offset nnnn. | 1.DIMM.2.System board. |
| 0232Extended RAM error—Extended RAM fails at offset nnnn. | 1.DIMM.2.System board. |
| 0250System battery error—System battery is dead. | 1.Chargethebackupbatteryformore than8hoursbyconnectingtheac adapter.2.Replace the backup battery and run BIOS Setup Utility to reset the time and date. |
| 0251System CMOS checksum bad—Default configuration used. | 1.Chargethebackupbatteryformore than8hoursbyconnectingtheac adapter.2.Replace the backup battery and run BIOS Setup Utility to reset the time and date. |
| 0252Password checksum bad—The password is cleared. | ResetthepasswordbyrunningBIOSSetup Utility. |
| 0260System timer error. | 1.Chargethebackupbatteryformore than8hoursbyconnectingtheac adapter.2.Replace the backup battery and run BIOS Setup Utility to reset the time and date.3.System board. |
| 0270Real-time clock error. | 1.Chargethebackupbatteryformore than8hoursbyconnectingtheac adapter.2.Replace the backup battery and run BIOS Setup Utility to reset the time and date.3.System board. |
| 0271Date and time error—Neither the date nor the time is set in the computer. | RunBIOSSetupUtilitytoresetthetime anddate. |
| 0280Previous boot incomplete—Default configuration used. | 1.Load“SetupDefault”inBIOSSetup Utility.2.DIMM.3.System board. |
| 02F0CPU ID:xx Failed. | 1.CPU.2.System board. |
| 02F4EISA CMOS not writable. | 1.LoadSetupDefaultsinBIOSSetup Utility.2.Replace the backup battery.3.System board. |
| 02F5DMA test failed. | 1.DIMM.2.System board. |
| 02F6Software NMI failed | 1.DIMM.2.System board. |
| 02F7Fail-safe timer NMI failed | 1.DIMM.2.System board. |
| 1802Unauthorized network card is plugged in—Turn off and remove the miniPCI network card. | 1.RemoveMiniPCInetworkcard.2.System board. |
| 1803Unauthorized daughter card is plugged in—Turn off and remove the daughter card. | 1.Removethedaughtercardthatyou installed.2.System board. |
| 1804Unauthorized WAN card is plugged in—Power off and remove the WAN card. | 1.RemovetheWANcardthatyou installed.2.System board. |
| 1805Unauthorized Wireless USB card is plugged in—Power off and remove the Wireless USB card. | 1.RemovetheWirelessUSBcardthatyou installed.2.System board. |
| 1820More than one external fingerprint reader is attached. Power off and remove all but the reader that you set up within your main operating system. | Removeallbutthereaderthatyousetup fortheauthentication. |
| 1830Invalid memory configuration—Power off and install a memory module to Slot-0 or the lower slot. | InstallDIMMinSlot-0,butnotinSlot-1.Note:For the construction of the DIMM slot, see '1040 DIMM" on page 89. |
| 2000Hard Drive Active Protection sensor diagnostics failed.Pressto continue.Pressto enter SETUP | 1.Undock docking station or port replicator if it is attached to the ThinkPad Notebook.2.Place the ThinkPad Notebook on a horizontal surface. Do not apply any physical shock to the computer.3.Run Diagnostics-->ThinkPadDevices-->HDDActiveProtectionTest. |
| 2010Warning: Your internal hard disk drive (HDD) may not function correctly on this system. Ensure that your HDD is supported on this system and that the latest HDD firmware is installed. | Inform the following information to the customer: If in the primary bay the customer is using a non-IBM or non-Lenovo hard disk drive (HDD), or an old generation IBM HDD which is not supported by this system, with the risk in mind, the customer can still use it by pressing ESC. If in the primary drive bay the customer is using a supported IBM/Lenovo HDD with an old firmware, the customer needs to update its firmware to the latest. The latest version is available at http://www.lenovo.com/support |
| 2100Initialization error on HDD0 (Main hard disk drive) | 1.Reseattheharddiskdrive.2.Main hard disk drive.3.System board. |
| 2102Initialization error on HDD1 (Ultrabay hard disk drive) | 1.Reseattheharddiskdrive.2.UltrabayTMhard disk drive.3.System board. |
| 2110Read error on HDD0 (Main hard disk drive) | 1.Reseattheharddiskdrive.2.Main hard disk drive.3.System board. |
| 2112Read error on HDD1 (Ultrabay hard disk drive) | 1.Reseattheharddiskdrive.2.Ultrabay hard disk drive.3.System board. |
Errormessages
Table3. Errormessages
| SymptomorerrorFRUoration,insequence | |
| Device address conflict. 1.Load“SetupDefaults” | intheBIOS SetupUtility.2.Backup battery.3.System board. |
| Allocation error for device. 1.Load“SetupDefaults” | intheBIOS SetupUtility.2.Backup battery.3.System board. |
| Failing bits: nnnn. 1.DIMM. | 2.System board. |
| Invalid system configuration data. 1.DIMM. | 2.System board. |
| I/O device IRQ conflict. 1.Load“SetupDefaults” | intheBIOS SetupUtility.2.Backup battery.3.System board. |
| Hibernation error. 1.Restorethesystemconfigurationto whatitwasbeforethecomputer enteredhibernationmode.2.If memory size has been changed, re-create the hibernation file. | |
| Fan error. 1.Fan. | Thermal grease.3.System board. |
| Thermal sensing error. Systemboard. | |
| Cannot boot from any device. Checkthestatusof devicewhichyouwant tobootfrom.Device not found.1.The device you want to boot from.2.System board.Device Error.1.The device you want to boot from.2.System board.No valid operating system.1.Check that the operating system has no failure and is installed correctly.2.Reinstall the operation system.Excluded from boot order.Enter the BIOS Setup Utility and add the device in boot order. | |
Beepsymptoms
Table4.Beepsymptoms
| SymptomorerrorFRUoration,insequence | |
| One beep and a blank, unreadable, or flashing LCD. | 1.ReseattheLCDconnector.2.LCD assembly.3.External CRT.4.System board. |
| One long and two short beeps, and a blank or unreadable LCD. | 1.Systemboard.2.LCD assembly.3.DIMM. |
| Two short beeps with error codes. POSTerror.See“Numericerrorcodes”onpage62. | |
| Two short beeps and a blank screen. 1.Systemboard.2.DIMM. | |
| Three short beeps, pause, three more short beeps, and one short beep. | 1.DIMM.2.System board |
| One short beep, pause, three short beeps, pause, three more short beeps, and one short beep. | |
| Only the cursor appears. Reinstalltheoperatingsystem. | |
| Four cycles of four short beeps and a blank screen. | Systemboard(security chip) |
| Five short beeps and a blank screen. Systemboard | |
No-beepsymptoms
Table5.No-beepsymptoms
| SymptomorerrorFRUoration,insequence | |
| No beep, power-on indicator on, LCD blank, and no POST. | 1.Makesurethateveryconnectoris connectedtightlyandcorrectly.2.DIMM.3.System board. |
| No beep, power-on indicator on, and LCD blank during POST. | 1.ReseatDIMM.2.System board. |
| The power-on password prompt appears. A power-on password or a supervisor password is set. Type the password and press Enter. | |
| The hard-disk password prompt appears. A hard-disk password is set. Type the password and press Enter. | |
LCD-relatedsymptoms
Important: The TFT LCD for the notebook computer contains many thin-film transistors (TFTs). The presence of a small number of dots that are missing, discolored, or always lighted is characteristic of TFT LCD technology, but excessive pixel problems can cause viewing concerns.
If the LCD you are servicing has two or less visible defective pixels, it should not be considered faulty. However, if the LCD has three or more visible defective pixels, it will be deemed as defective by Lenovo and it should be replaced.
Notes:
•This policy applies to all ThinkPad Notebooks purchased on 1 January, 2008 or later.
- Lenovo will not provide replacement if the LCD is within specification as we cannot guarantee that any replacement LCD will have zero pixel defects.
•One pixel consists of R, G, B sub-pixels.
Table6.LCD-relatedsymptoms
| SymptomorerrorFRUoration,insequence | |
| No beep, power-on indicator on, and a blank LCD during POST. | Systemboard. |
| LCD backlight not working.LCD too dark.LCD brightness cannot be adjusted.LCD contrast cannot be adjusted. | ReseattheLCDconnectors.LCD assembly.System board. |
| LCD screen unreadable.Characters missing pixels.Screen abnormal.Wrong color displayed. | Seeimportantnotefor“LCD-related symptoms.”Reseat all LCD connectors.LCD assembly.System board. |
| Horizontal or vertical lines displayed on LCD. | LCDassembly. |
Intermittentproblems
Intermittent system hang problems can be due to a variety of causes that have nothing to do with a hardware defect, such as cosmic radiation, electrostatic discharge, or software errors. FRU replacement should be considered only when a problem recurs.
When analyzing an intermittent problem, do the following:
- Run the diagnostic test for the system board in loop mode at least 10 times.
- If no error is detected, do not replace any FRUs.
- If any error is detected, replace the FRU shown by the FRU code. Rerun the test to verify that no more errors exist.
Undeterminedproblems
If the diagnostic tests did not identify the adapter or device that has failed, if wrong devices are installed, or if the system simply is not operating, follow these procedures to isolate the failing FRU (do not isolate FRUs that have no defects).
Verify that all attached devices are supported by the computer.
Verify that the power supply being used at the time of the failure is operating correctly. (See "Power system checkout" on page 51.)
- Turn off the computer.
- Visually check each FRU for damage. Replace any damaged FRU.
- Remove or disconnect all of the following devices:
a.Non-ThinkPad devices
b.Devices attached to the docking station or the port replicator
c.Printer, mouse, and other external devices
d.Battery pack
e. Hard disk drive
f.External diskette drive or optical drive
g.DIMM
h. Optical disk or diskette in the internal drive
i.PC Cards
-
Turn on the computer.
-
Determine whether the problem has been solved.
-
If the problem does not recur, reconnect the removed devices one at a time until you find the failing FRU.
-
If the problem remains, replace the following FRUs one at a time (do not replace a nondefective FRU):
a.System board
b.LCD assembly
Statusindicators
This chapter presents the system status indicators that show the status of the computer.

Table7.Statusindicators
| IndicatorMeaning | |
1 Speaker mute | Orange:The speaker is on mute. To set the speakers on mute or unmute, press the speaker mute button. |
2 Microphone mute | Orange:The microphone is on mute. None of the recording devices is available while the microphone mute is on by default. |
3 Wireless LAN, Wireless WAN, or WiMAX status | Green:The wireless LAN feature (the IEEE 802.11 b/g standard, 802.11 a/b/g, or 802.11n), wireless WAN feature, or WiMax feature is on, and the radio link is ready for use, or the data is being transmitted.Blinkinggreen:Data is being transmitted (for some models).Turnoff:Wireless network devices are disabled or the radio is turned off. |
4 Bluetooth wireless or Wireless USB status | Green:The Bluetoothwireless feature or wireless USB feature is on, and the radio link is ready for use, or the data is being transmitted.Blinkinggreen:Data is being transmitted (for some models).Turnoff:The Bluetoothfeature is disabled. |
5 Device access , , | Green:Data is being read from or written to the hard disk drive, the diskette drive, or the drive in the Serial Serial Ultrabay Slim device. When this indicator is on, do not put the computer into sleep (standby) mode or turn off the computer.Note:Do not move the system while the green device access light is on. Sudden physical shock could cause drive errors. |
6 Power on | Green:The computer is on and ready to use. This indicator stays lit around the power-on button whenever the computer is on.Blinkinggreen:The computer is in sleep (standby) mode.Turnoff:The computer is off. |
| 7 Serial Ultrabay Slim device status | Green:A Serial Ultrabay Slim device is installed and in use.Blinkinggreen:A Serial Ultrabay Slim device is in the process of being detached.Turnoff:A Serial Ultrabay Slim device is ready to be attached or detached. |
8 Fingerprint reader status | Green:The fingerprint reader is ready to swipe.Blinkinggreen:The fingerprint is being authenticated or has been authenticated.Blinkingorange:The fingerprint could not be authenticated. |
| 9 Caps lock[24XXO] | Green:Caps Lock mode is enabled. To enable or disable Caps Lock mode, press the Caps Lock key. |
| 10 Sleep (standby for Windows XP) status | Green:The computer is in sleep (standby) mode.Blinkinggreen:The computer is entering sleep (standby) mode or hibernation mode, or is resuming normal operation. |
| 11 Battery status | Green:The battery has more than 20% charge.Orange:The battery has between 5% and 20% charge.Fastblinkingorange:The battery has less than 5% charge.Note:The battery may be charging.Slowblinkingorange:The battery is being charged. When it reaches 20%, the blinking color changes to green.Slowblinkinggreen:The battery has between 20% and 80% charge, and charging is continuing. When the battery reaches 80% charge, blinking stops, but the charging may continue until the battery is 100% charged.Note:If the computer is operating on battery power, the battery status indicator does not work while the computer is turned off or is in sleep (standby) mode or hibernation mode.Quickblinkingorange:An error has been occurred in the battery.Thebatterystatusindicatorisoff:The battery pack of the computer is detached. |
Fnkeycombinations
The following table shows the function of each combination of Fn with a function key.
Table8.Fnkeycombinations
| KeycombinationDescription | ||
| Fn+F1 Reserved. | ||
| Fn+F2 Lock the computer. | ||
| Fn+F3 Select a power plan (in Windows XP, power scheme) that has been created by Power Manager, or adjust the power level by using the slider control. When you press this combination, a panel for selecting a power plan (power scheme) appears.Notes:1.To use the Fn+F3 key combination, you must have the ThinkPad PM device driver installed on the computer.2.If you have logged on with an administrator user ID, and you press Fn+F3, the panel for selecting a power plan (power scheme) appears. If you have logged on with another user ID, and you press Fn+F3, the panel does not appear.3.You cannot turn off the computer display by pressing Fn+F3. | ||
| Fn+F4 Put the computer in sleep (standby) mode. To return to normal operation, press the Fn key only, without pressing a function key.Notes:1.To use the Fn+F4 key combination, you must have the ThinkPad PM device driver installed on the computer.2.If you want to use the combination to put the computer into hibernation mode or do-nothing mode (in Windows XP, shut the computer down or show the panel for turning off the computer), change the settings in the Power Manager. | ||
| Fn+F5 Enable or disable the built-in wireless networking features and theBluetoothfeatures. If you press Fn+F5, a list of wireless features is displayed. You can quickly change the power state of each feature in the list.Note:If you want to use Fn+F5 to enable the feature specified in IEEE standard 802.11, the following device drivers must be installed on the computer beforehand:ThinkPad Power Management driverOnScreen Display UtilityWireless device drivers | ||
| Fn+F6 Change the camera settings and the setting of the microphone mute button. When you press Fn+F6, the camera setting window is opened.Note:For Window XP models, the setting of the microphone mute button cannot be changed. | ||
| Fn+F7 Apply a presentation scheme directly, with no need to start Presentation Director.To disable this function and use the Fn+F7 key combination for switching a display output location, start Presentation Director, and change the settings.Note:If the computer is an Windows 7 model, it does not support presentation schemes, but the Fn+F7 combination is available for switching a display output location. | ||
| Fn+F8 Change the settings of the UltraNav ® pointing device. | ||
| Fn+F9 Reserved. | ||
| Fn+F10 Reserved. | ||
| Fn+F11 Reserved. | ||
| Fn+F12 Put the computer into hibernation mode. To return to normal operation, press the power button for less than four seconds.Note:To use Fn+F12 for hibernation, you must have the ThinkPad PM device driver installed on the computer. | ||
| Fn+PgUp Turn the ThinkLight ® on or off.Note:This function is supported only on the ThinkPad Notebooks that have the ThinkLight. The on or off status of the ThinkLight is shown on the screen for a few seconds when you press Fn+PgUp. | ||
| Fn+Home The computer display becomes brighter. | ||
| Fn+End The computer display becomes dimmer. | ||
| Fn+Spacebar Enable the FullScreen Magnifier function. | ||
| Fn+PrtSc Has the same function as the SysRq key. | ||
| Fn+ScrLk Enable or | disable the numeric keypad. The indicator of numeric lock will be displayed on the screen. | |
| Fn+Pause Has the same function as the Break key. | ||
| Fn+cursor keys These key combinations work with Windows Media Player. Fn+down arrow key works for the Play or Pause button, Fn+up arrow key for the Stop button, Fn+right arrow key for the Next Track button, and Fn+left arrow key for the Previous Track button. | ||
FRUreplacementnotices
This chapter presents notices related to removing and replacing parts. Read this chapter carefully before replacing any FRU.
Screwnotices
Loose screws can cause a reliability problem. In the ThinkPad Notebook, this problem is addressed with special nylon-coated screws that have the following characteristics:
•They maintain tight connections.
•They do not easily come loose, even with shock or vibration.
•They are harder to tighten.
• Each one should be used only once.
Do the following when you service this machine:
- Keep the screw kit (for the P/N, see "Miscellaneous parts" on page 192) in your tool bag.
•Always use new screws. - Use a torque screwdriver if you have one.
Tighten screws as follows:
- Plastictoplastic
Turn an additional 90degrees after the screw head touches the surface of the plastic part:
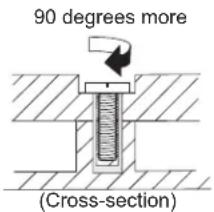
•Logiccardtoplastic
Turn an additional 180degrees after the screw head touches the surface of the logic card:
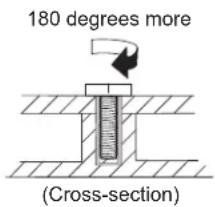
•Torquedriver
If you have a torque driver, refer to the "Torque" column for each step.
- Make sure that you use the correct screw. If you have a torque screwdriver, tighten all screws firmly to the torque shown in the table. Neveruseascrew thatyouremoved.Useanewone.Makesurethatallofthescrewsare tightenedfirmly.
- Ensure torque screw drivers are calibrated correctly following country specifications.
Retainingserialnumbers
This section includes the following descriptions:
• "Restoring the serial number of the system unit"
•“Retaining the UUID”
• "Reading or writing the ECA information" on page 81
Restoring the serial number of the system unit
When the computer was manufactured, the EEPROM on the system board was loaded with the serial numbers of the system and all major components. These numbers need to remain the same throughout the life of the computer.
If you replace the system board, you must restore the serial number of the system unit to its original value.
Before replacing the system board, save the original serial number by doing the following:
- Install the LENOVO ThinkPad Hardware Maintenance Diskette Version 1.76 or later, and restart the computer.
- From the main menu, select 1. SetSystemIdentification.
- Select 2. ReadS/NdatafromEEPROM.
The serial number of each device in your computer is displayed; the serial number of the system unit is listed as follows:
•20: Serial number
Write down that number.
Note: The serial number of the system unit is also written on the label attached to the bottom of the computer.
After you have replaced the system board, restore the serial number by doing the following:
- Install the LENOVO ThinkPad Hardware Maintenance Diskette Version 1.76 or later and restart the computer.
- From the main menu, select 1. SetSystemIdentification.
- Select 1. AddS/NdatafromEEPROM.
Follow the instructions on the screen.
If the MTM and Product ID numbers differ from each other on the rear label, use what is shown for the Product ID field. See example below:
MTMonrearlabel:
TTTT-CTO S/N SSSSSSS
ProductIDonrearlabel:
TTTT-MMM (Use this number when setting Serial Number)
In the example, the Serial Number to be input is '1STTTTMMMSSSSSSS'.
RetainingtheUUID
The Universally Unique Identifier (UUID) is a 128-bit number uniquely assigned to your computer at production and stored in the EEPROM of your system board.
The algorithm that generates the number is designed to provide unique IDs until the year A.D. 3400. No two computers in the world have the same number.
When you replace the system board, you must set the UUID on the new system board as follows:
-
Install the LENOVO ThinkPad Hardware Maintenance Diskette Version 1.76 or later, and restart the computer.
-
From the main menu, select 4.AssignUUID.
A new UUID is created and written. If a valid UUID already exists, it is not overwritten.
ReadingorwritingtheECAinformation
Information on Engineering Change Announcements (ECA) are stored in the EEPROM of the system board. The electronic storage of this information simplifies the procedure to check if the ECA has been previously applied to a machine. The machine does not need to be disassembled to check for the ECA application.
To check what ECAs have been previously applied to the machine, use the ECA Information Read/Write function on the LENOVO ThinkPad Hardware Maintenance Diskette Version 1.76 or later.
-
Insert the LENOVO ThinkPad Hardware Maintenance Diskette Version 1.76 or later, and restart the computer.
-
From the main menu, select 6. Set ECA Information.
-
To read ECA information, select 2. Read ECA/rework number from EEPROM and follow the instruction.
-
To read box build date, select 5. Read box build date from EEPROM, and follow the instruction on the screen.
After an ECA has been applied to the machine, the EEPROM must be updated to reflect the ECA's application. Use the LENOVO ThinkPad Hardware Maintenance Diskette Version 1.76 or later to update the EEPROM.
Note: Only the ECA number is stored in the EEPROM. The machine type of the ECA is assumed be the same as the machine type of the machine that had the ECA applied to it.
-
Insert the LENOVO ThinkPad Hardware Maintenance Diskette Version 1.76 or later, and restart the computer.
-
From the main menu, select 6. SetECAInformation.
-
To write ECA information, select 1. Write ECA/rework number from EEPROM, and follow the instruction.
-
To write box build date, select 4. Write box build date from EEPROM, and follow the instruction on the screen.
If the system board is being replaced, try to read the ECA information from the old system board and transfer the information to the new system. If the system board is inoperable, this will not be possible.
RemovingandreplacingaFRU
This chapter presents directions and drawings for use in removing and replacing a FRU. Be sure to observe the following general rules:
- Do not try to service any computer unless you have been trained and certified. An untrained person runs the risk of damaging parts.
- Before replacing any FRU, review "FRU replacement notices" on page 79.
- Begin by removing any FRUs that have to be removed before the failing FRU. Any such FRUs are listed at the top of the page. Remove them in the order in which they are listed.
- Follow the correct sequence in the steps for removing the FRU, as given in the drawings by the numbers in square callouts.
- When turning a screw to replace a FRU, turn it in the direction as given by the arrow in the drawing.
- When removing the FRU, move it in the direction as given by the arrow in the drawing.
- To put the new FRU in place, reverse the removal procedure and follow any notes that pertain to replacement. For information about connecting and arranging internal cables, see "Locations" on page 147.
- When replacing a FRU, use the correct screw as shown in the procedures.

DANGER
BeforeeremovinganyFRU,turnoffthecomputer,unplugallpowercords fromelectricaloutlets,removethebatterypack,andthendisconnectany interconnectingcables.
Attention: After replacing a FRU, do not turn on the computer until you have made sure that all screws, springs, and other small parts are in place and none are loose inside the computer. Verify this by shaking the computer gently and listening for rattling sounds. Metallic parts or metal flakes can cause electrical short circuits.
Attention: The system board is sensitive to, and can be damaged by, electrostatic discharge. Before touching it, establish personal grounding by touching a ground point with one hand or by using an electrostatic discharge (ESD) strap (P/N 6405959).
BeforeservicingThinkPadT400s,T410s,andT410si
RemovingtheSIMcard:
Some models of the ThinkPad T400s, T410s, and T410si you are servicing might have the SIM card that the customer has installed.
If the computer you are servicing has the SIM card, remove it before you start the servicing.
To remove the SIM card, you need to remove the battery pack first. (See "1010 Battery pack" on page 85.
After you finish the servicing, make sure that you insert the card back into the slot firmly.

natural_image
Diagram of a device showing internal components and a magnified view of the internal structure (no text or symbols)Notice on disconnecting the cable from flip-lock ZIF connector:
Some cables used in the ThinkPad T400s, T410s, and T410si are connected to the flip-lock ZIF connectors.
When disconnecting the cable from those connectors, do as shown in this figure.

1010Batterypack
Importantnoticeforreplacingabatterypack:
Lenovo ThinkVantage Toolbox (in Windows 7) and Lenovo System Toolbox (in Windows Vista and Windows XP) have an automatic battery diagnostic that determines if the battery pack is defective. A battery pack FRU should not be replaced unless this diagnostic shows that the battery is defective.
The only exception to this is if the battery pack is physically damaged or a customer is reporting a possible safety issue.
If Lenovo ThinkVantage Toolbox or Lenovo System Toolbox is not installed in the computer, the customer should download this program before a non-physically damaged battery pack is replaced. Note that a physically damaged battery pack is non-warranty replacement.
Table9. Removalstepsofbatterypack

DANGER
Useonlythebatteryspecifiedinthepartslistforyourcomputer.Anyother batterycouldigniteorexplode.
Unlock the battery latch 1. Holding the battery latch in the unlocked position 2, remove the battery pack in the direction shown by arrow 3 and 4.

Wheninstalling:Install the battery pack in the slot, and then make sure that the battery latch is in the locked position.
1020SerialUltrabaySlimdeviceortravelbezel
For access, remove this FRU:
• "1010 Battery pack" on page 85
Table10. RemovalstepsofSerialUltrabaySlimdeviceortravelbezel
Holding the bay lock latch in the unlocked position 1, slide the bay eject latch 2, and then pull out the Ultrabay Slim Media Bay device or the travel bezel in the direction shown by arrow 3.

1030Solidstatedrive(SSD)orharddiskdrive(HDD)
For access, remove these FRUs in order:
• "1010 Battery pack" on page 85
Attention:
- Do not drop the drive or apply any physical shock to it. The drive is sensitive to physical shock. Improper handling can cause damage and permanent loss of data.
- Before removing the drive, have the user make a backup copy of all the information on it if possible.
- Never remove the drive while the system is operating or is in suspend mode.
Table11. RemovalstepsofSSDorHDD

| StepScrew(quantity)ColorTorque | |||
| 1 M2 | ×6 mm, bind-head, nylon-coated (1) Black 0.181 Nm | (1.85 kgfcm) | |
Table11. RemovalstepsofSSDorHDD(continued)

natural_image
Technical line drawing of a mechanical component with labeled part '3' (no text or symbols beyond label)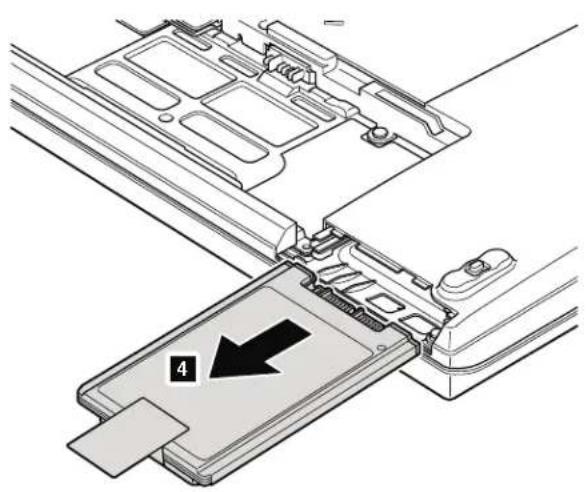
natural_image
Technical diagram of a device showing internal components and a labeled component '4' (no text or symbols beyond the label)Wheninstalling: Make sure that the SSD connector or HDD connector is attached firmly.
1040DIMM
For access, remove these FRUs in order:
• "1010 Battery pack" on page 85
Table12. RemovalstepsofDIMM
Note: Loosen the screws 1, but do not remove them.

Table12. RemovalstepsofDIMM(continued)
Note: For ThinkPad T400s, if only one DIMM is used on the computer you are servicing, the card must be installed in SLOT-0 (a), but not in SLOT-1 (b).
ForThinkPadT400s:

Table12. RemovalstepsofDIMM(continued)
ForThinkPadT410sandT410si:
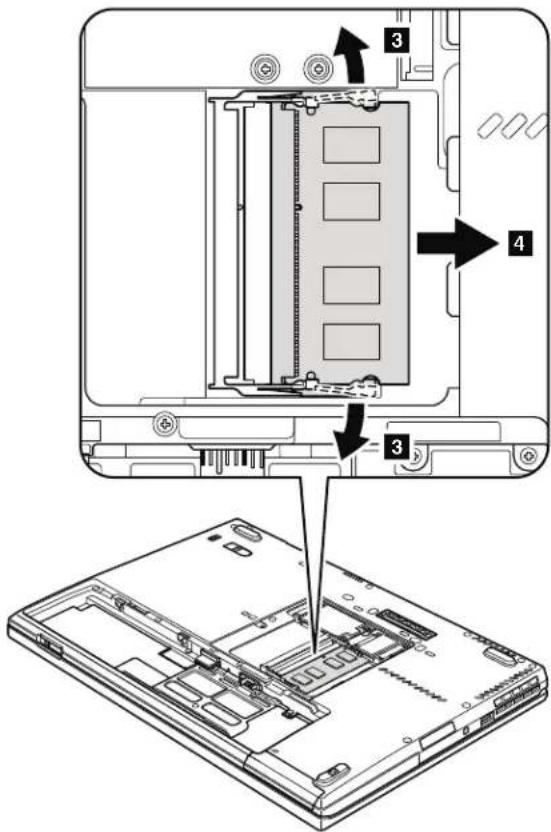
Wheninstalling:Insert the notched end of the DIMM into the socket. Press the DIMM firmly, and pivot it until it snaps into the place. Make sure that it is firmly fixed in the slot and does not move easily.
1050PCIExpressMiniCardforwirelessLAN
For access, remove these FRUs in order:
• "1010 Battery pack" on page 85
Table13. RemovalstepsofPCIExpressMiniCardforwirelessLAN
Note: Loosen the screws 1, but do not remove them.

Table13. RemovalstepsofPCIExpressMiniCardforwirelessLAN(continued)
In step 3, unplug the jacks by using the removal tool antenna RF connector (P/N: 08K7159) or pick the connectors with your fingers and gently unplug them in direction of the arrow.
Note: Some models might have only two antenna cables in step 3.

| StepScrew(quantity)ColorTorque | |||
| For ThinkPad T400s | |||
| 4 M2 | ×3 mm, small-head, nylon-coated (2) Silver 0.181 Nm | (1.85 kgfcm) | |
| For ThinkPad T410s and T410si | |||
| 4 M2 | ×3 mm, small-head, nylon-coated (2) Black 0.181 Nm | (1.85 kgfcm) | |
Table13. RemovalstepsofPCIExpressMiniCardforwirelessLAN(continued)

Wheninstalling:
•In models with wireless LAN card that has two antenna connectors, plug the gray cable into the jack labeled MAIN or M, and the black cable into the jack labeled AUX or A on the card. If the computer you are servicing has three cables, put the white cable in the cable protection tube.
•In models with wireless LAN card that has three antenna connectors, plug the gray cable (MAIN) into the jack labeled TR1, the white cable (3rd) into jack labeled RO or TR3, and the black cable (AUX) into jack labeled TR2 on the card.
1060PCIExpressMiniCardforwirelessWAN
For access, remove these FRUs in order:
• "1010 Battery pack" on page 85
Table14. RemovalstepsofPCIExpressMiniCardforwirelessWAN
Note: Loosen the screws 1, but do not remove them.

Table14. RemovalstepsofPCIExpressMiniCardforwirelessWAN(continued)
In step 3, unplug the jacks by using the removal tool antenna RF connector (P/N: 08K7159) or pick the connectors with your fingers and gently unplug them in direction of the arrow.

| StepScrew(quantity)ColorTorque | |||
| For ThinkPad T400s | |||
| 4 M2 | ×3 mm, small-head, nylon-coated (2) Silver 0.1 | 81 Nm | (1.85 kgfcm) |
| For ThinkPad T410s and T410si | |||
| 4 M2 | ×3 mm, small-head, nylon-coated (2) Black 0.1 | 81 Nm | (1.85 kgfcm) |
Table14. RemovalstepsofPCIExpressMiniCardforwirelessWAN(continued)

natural_image
Technical diagram of a mechanical assembly with labeled component '5' (no text or symbols beyond label)Note: Plug the orange cable into the jack labeled MAIN, and the blue cable into the jack labeled AUXon the card.
1070Keyboard
For access, remove these FRUs in order:
• "1010 Battery pack" on page 85
Table15. Removalstepsofkeyboard
Note: Loosen the screws 1, but do not remove them.
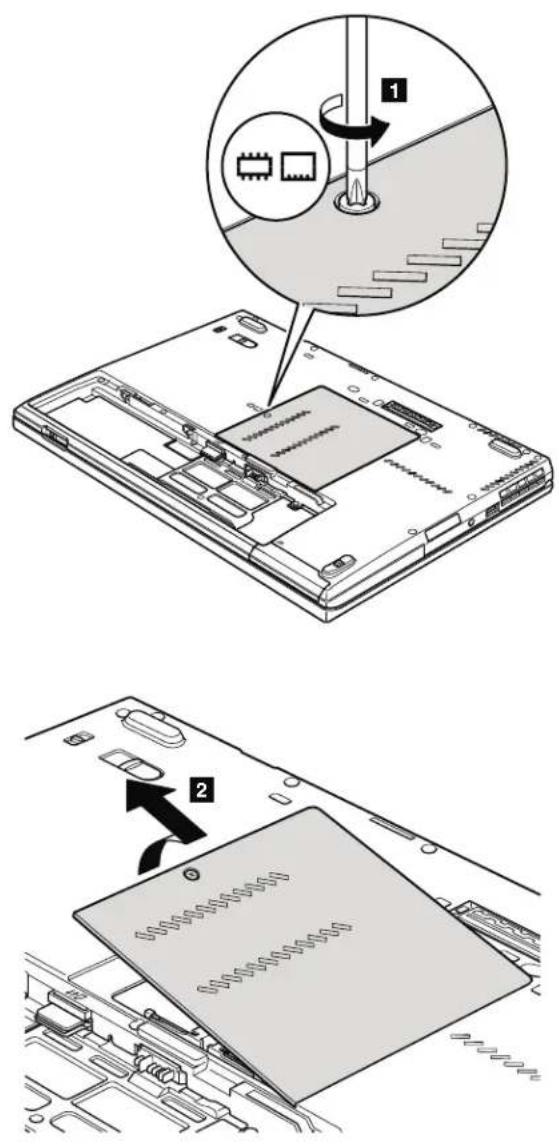
Table15. Removalstepsofkeyboard(continued)

| StepScrew(quantity)ColorTorque | |||
| 3 M2 | ×6 mm, bind-head, nylon-coated (2) Black 0.18 | 1 Nm | (1.85 kgfcm) |
Push down the keyboard a little toward the arrow 4, and then lift up the keyboard in the direction of 5.

Table15. Removalstepsofkeyboard(continued)
Lift the keyboard a little in the direction shown by arrow 6, and then detach the connector 7.
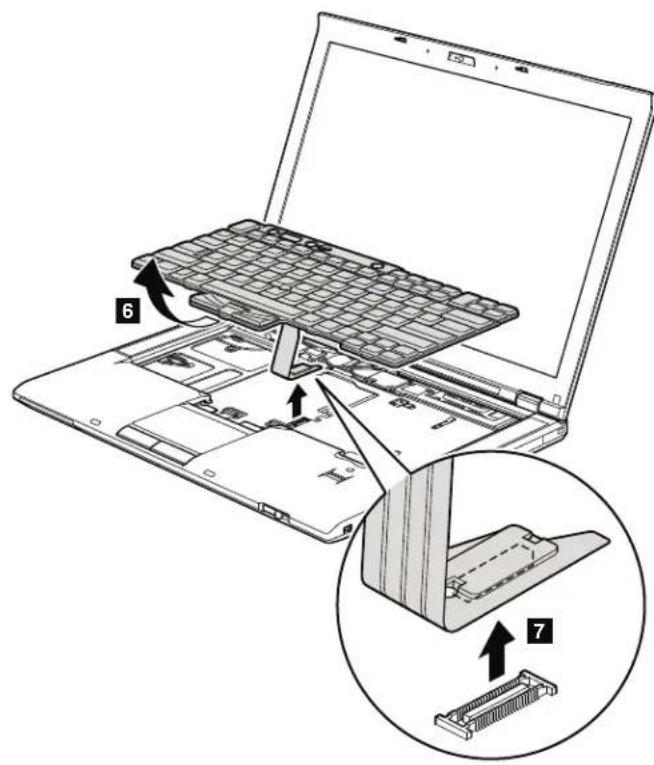
When installing the keyboard, do as follows:
Table16.Installationstepsofkeyboard
- Attach the keyboard connector.

natural_image
Diagram of a laptop with internal components and an inset showing a disassembled component (no text or symbols present)Table16. Installationstepsofkeyboard(continued)
- Attach the keyboard so that the keyboard edges a are under the frame as shown in this figure.

- To make sure that the front side of the keyboard is housed firmly, gently press the keys with your thumbs and try to slide the keyboard toward you.
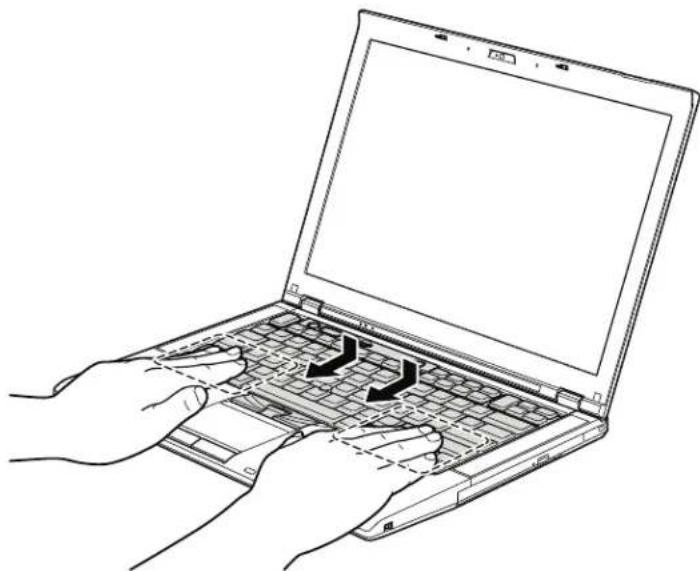
natural_image
Line drawing of hands typing on a laptop keyboard with directional arrows indicating movement (no text or symbols)- Secure the keyboard by tightening the screws from the bottom side of the computer.
1080Backupbattery
For access, remove these FRUs in order:
• "1010 Battery pack" on page 85
• "1070 Keyboard" on page 98

DANGER
Useonlythebatteryspecifiedinthepartslistforyourcomputer.Anyother batterycouldigniteorexplode.
Table17. Removalstepsofbackupbattery

When installing: Attach the backup battery on the hole a in the insulation sheet as shown in the figure below and make sure that the battery connector is attached firmly.

1090WirelessUSBadapterorIntelTurboMemory
For access, remove these FRUs in order:
• "1010 Battery pack" on page 85
• "1070 Keyboard" on page 98
Table18. RemovalstepsofwirelessUSBadapterorIntelTurboMemory
Note: Step 1 is only for models with the wireless USB adapter. For models with the Intel ® Turbo Memory Minicard, skip step 1.
In step 1, unplug the jack by using the removal tool antenna RF connector (P/N: 08K7159) or pick the connector with your fingers and gently unplug them in direction of the arrow.

Wheninstalling: In models with the wireless USB adapter, route the antenna cable as shown in this figure and plug the cable firmly into the jack on the adapter.
| StepScrew(quantity)ColorTorque | |||
| 2 M2 | ×6 mm, flat-head, nylon-coated (2) Silver 0.181 | Nm | (1.85 kgfcm) |
Table18. RemovalstepsofwirelessUSBadapterorIntelTurboMemory(continued)
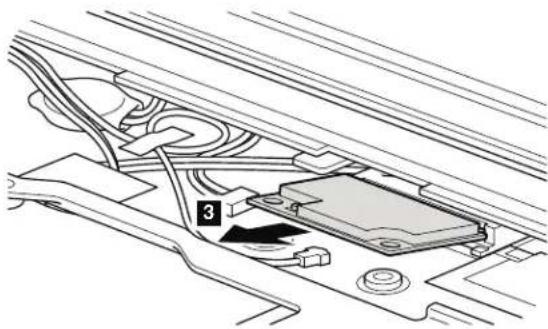
natural_image
Technical diagram of a mechanical assembly with labeled component (no text or symbols present)1100Palmrestorpalmrestwithfingerprintreader
For access, remove these FRUs in order:
• "1010 Battery pack" on page 85
• "1030 Solid state drive (SSD) or hard disk drive (HDD)" on page 87
•"1070 Keyboard" on page 98
Note:
In models with the fingerprint reader, the sensor is attached to the palm rest FRU. If the fingerprint reader has any defects, you can replace it by the procedures given in this section, which are the same for a palm rest with or without a fingerprint reader.
Table19. Removalstepsof palmrestorpalmrestwithfingerprintreader

| StepScrew(quantity)ColorTorque | |||
| 1 M2 | ×4 mm, bind-head, nylon-coated (8) Black 0.181 Nm | (1.85 kgfcm) | |
| 2 M2 | ×6 mm, bind-head, nylon-coated (2) Black 0.181 Nm | (1.85 kgfcm) | |
Table19. Removal stepsof palmrestorpalmrestwithfingerprintreader(continued)

1110Bluetoothdaughtercard(BDC-2)
•"1010 Battery pack" on page 85
•"1030 Solid state drive (SSD) or hard disk drive (HDD)" on page 87
• "1070 Keyboard" on page 98
• "1100 Palm rest or palm rest with fingerprint reader" on page 106
Table20. RemovalstepsofBDC-2

| StepScrew(quantity)ColorTorque | |||
| 1 M2 | ×4 mm, bind-head, nylon-coated (1) Black 0.18 | 1 Nm | (1.85 kgfcm) |
Wheninstalling: Make sure that the connector is attached firmly.
1120Keyboardbezelandspeakerassembly
For access, remove these FRUs in order:
• "1010 Battery pack" on page 85
• "1020 Serial Ultrabay Slim device or travel bezel" on page 86
• "1030 Solid state drive (SSD) or hard disk drive (HDD)" on page 87
• "1070 Keyboard" on page 98
• "100 Palm rest or palm rest with fingerprint reader" on page 106
Table21. Removalstepsofkeyboardbezelandspeakerassembly
Note: The speaker assembly is attached to the keyboard bezel.

| StepScrew(quantity)ColorTorque | |||
| 1 M2 | ×6 mm, bind-head, nylon-coated (6) Black 0.181 Nm | (1.85 kgfcm) | |
Table21. Removalstepsofkeyboardbezelandspeakerassembly(continued)

| StepScrew(quantity)ColorTorque | |||
| 2 M2 | ×6 mm, bind-head, nylon-coated (3) Black 0.181 Nm | (1.85 kgfcm) | |
| 3 M2 | ×4 mm, bind-head, nylon-coated (2) Black 0.181 Nm | (1.85 kgfcm) | |
| For ThinkPad T400s | |||
| 4 M2 | ×3 mm, small-head, nylon-coated (1) Silver 0.181 Nm | (1.85 kgfcm) | |
| For ThinkPad T410s and T410si | |||
| 4 M2 | ×3 mm, small-head, nylon-coated (1) Black 0.181 Nm | (1.85 kgfcm) | |
Table21. Removalstepsofkeyboardbezelandspeakerassembly(continued)

Note: Before step 8, pull the cables out from the cable guide hole of the keyboard bezel as shown in the figure a.

Table21. Removal stepsof keyboard bezelandspeaker assembly (continued) Turn the keyboard bezel over, and remove the speaker assembly.
ForThinkPadT400s:

| StepScrew(quantity)ColorTorque | |||
| 10 | M2 ×3 mm, small-head, nylon-coated (5) Silver 0.181 Nm | (1.85 kgfcm) | |
ForThinkPadT410sandT410si:
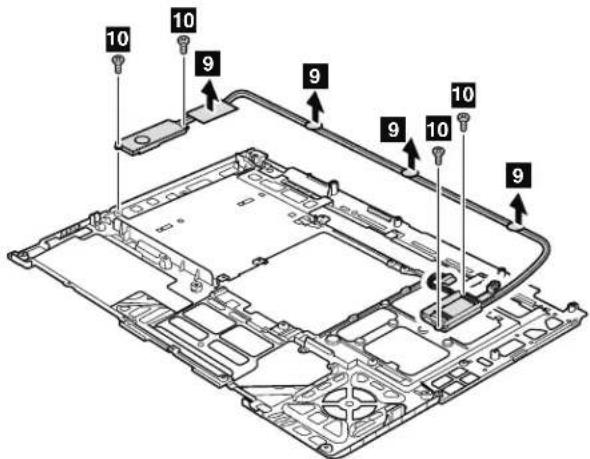
| StepScrew(quantity)ColorTorque | |||
| 10 | M2 ×3 mm, small-head, nylon-coated (4) Black 0.181 Nm | (1.85 kgfcm) | |
11305-in-1MediaCardReaderadapter
For access, remove these FRUs in order:
• "1010 Battery pack" on page 85
• "1020 Serial Ultrabay Slim device or travel bezel" on page 86
•"1030 Solid state drive (SSD) or hard disk drive (HDD)" on page 87
•"1070 Keyboard" on page 98
• "100 Palm rest or palm rest with fingerprint reader" on page 106
• "120 Keyboard bezel and speaker assembly" on page 109
Table22. Removalstepsof5-in-1MediaCardReaderadapter
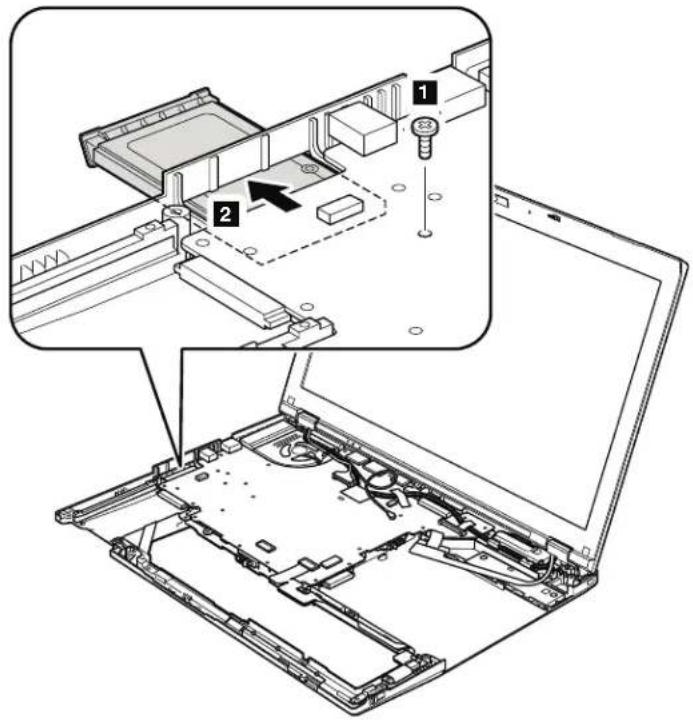
| StepScrew(quantity)ColorTorque | |||
| 1 M2 | ×1.8 mm, shoulder-socket head, nylon-coated (1) | Black 0.181 | Nm(1.85 kgfcm) |
1140Bluetooth-wirelessradioswitchFPC
For access, remove these FRUs in order:
• "1010 Battery pack" on page 85
• "1020 Serial Ultrabay Slim device or travel bezel" on page 86
•"1030 Solid state drive (SSD) or hard disk drive (HDD)" on page 87
•"1070 Keyboard" on page 98
• "100 Palm rest or palm rest with fingerprint reader" on page 106
• "1110 Bluetooth daughter card (BDC-2)" on page 108
• "120 Keyboard bezel and speaker assembly" on page 109
Table23. RemovalstepsofBluetooth-wirelessradioswitchFPC
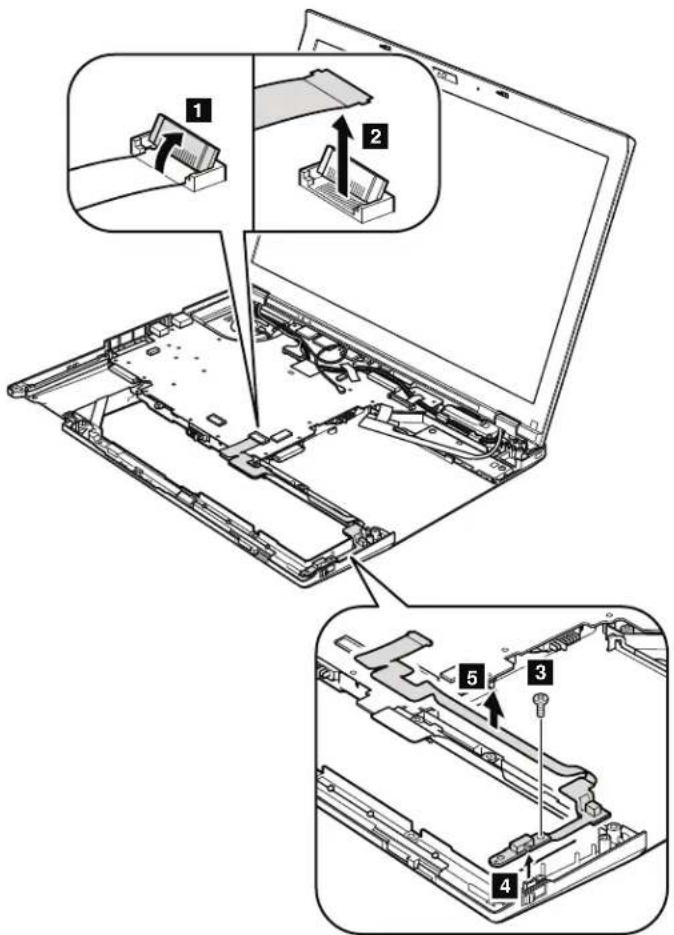
| StepScrew(quantity)ColorTorque | |||
| 3 M2 | ×4 mm, bind-head, nylon-coated (1) Black 0.18 | 1 Nm | (1.85 kgfcm) |
Table23. RemovalstepsofBluetooth-wirelessradioswitchFPC(continued)
When installing: Attach the wireless radio switch as shown in the figure a.

1150LCDunit
For access, remove these FRUs in order:
• "1010 Battery pack" on page 85
• "1020 Serial Ultrabay Slim device or travel bezel" on page 86
•"1030 Solid state drive (SSD) or hard disk drive (HDD)" on page 87
•"1050 PCI Express Mini Card for wireless LAN" on page 92
•"1060 PCI Express Mini Card for wireless WAN" on page 95
• "1070 Keyboard" on page 98
• "1090 Wireless USB adapter or Intel Turbo Memory" on page 104
• "1100 Palm rest or palm rest with fingerprint reader" on page 106
• "120 Keyboard bezel and speaker assembly" on page 109
Table24. RemovalstepsofLCDunit

| StepScrew(quantity)ColorTorque | |||
| 1 M2 | 5 ×6.5 mm, flat-head, nylon-coated (2) Black 0.392 Nm | (4.0 kgfcm) | |
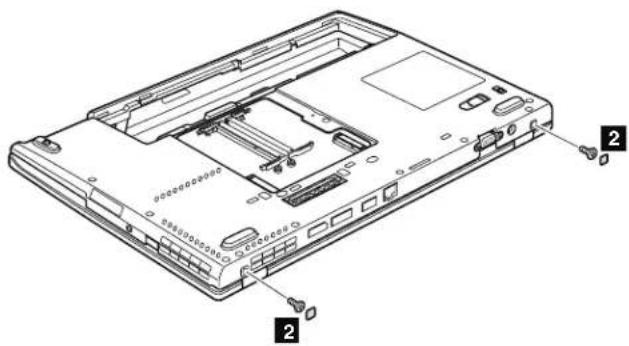
natural_image
Technical line drawing of a computer chassis showing internal components and labeled parts (no text or symbols present)| StepScrewcapScrew | (quantity)ColorTorque | |||
| 2 | □ | M2.5 ×6.5 mm, flat-head, nylon-coated (2) | Black 0.392 | Nm(4.0 kgfcm) |
Table24. RemovalstepsofLCDunit(continued)

Wheninstalling:
•Make sure that you route the cables firmly and tape up in the proper positions as shown in this figure.
- When you route the cables, make sure that they are not subjected to any tension. Tension could cause the cables to be damaged by the cable guides, or a wire to be broken.
Table24. RemovalstepsofLCDunit(continued)

Wheninstalling: Make sure that the connector is attached firmly.
Table24. RemovalstepsofLCDunit(continued)

1160Systemboard, fanassembly, and 34-mm Express Cardslotframe
Importantnoticesforhandlingthesystemboard:
When handling the system board, bear the following in mind.
- The system board has an accelerometer, which can be broken by applying several thousands of G-forces.
Note: Dropping a system board from a height of as little as 6 inches so that it falls flat on a hard bench can subject the accelerometer to as much as 6,000 G's of shock.
- Be careful not to drop the system board on a bench top that has a hard surface, such as metal, wood, or composite.
- If a system board is dropped, you must test it, using PC-Doctor for DOS, to make sure that the HDD Active Protection still functions (see below).
Note: If the test shows that HDD Active Protection is not functioning, be sure to document the drop in any reject report, and replace the system board.
- Avoid rough handling of any kind.
- At every point in the process, be sure not to drop or stack the system board.
- If you put a system board down, be sure to put it only on a padded surface such as an ESD mat or conductive corrugated material.
After replacing the system board, run PC-Doctor for DOS to make sure that HDD Active Protection still functions. The procedure is as follows:
-
Place the computer on a horizontal surface.
-
Run Diagnostics --> ThinkPad Devices --> HDD Active Protection Test.
Attention: Do not apply physical shock to the computer while the test is running.
For access, remove these FRUs, in order:
• "1010 Battery pack" on page 85
•"1020 Serial Ultrabay Slim device or travel bezel" on page 86
•"1030 Solid state drive (SSD) or hard disk drive (HDD)" on page 87
• "1050 PCI Express Mini Card for wireless LAN" on page 92
• "1060 PCI Express Mini Card for wireless WAN" on page 95
•"1070 Keyboard" on page 98
• "1090 Wireless USB adapter or Intel Turbo Memory" on page 104
• "1100 Palm rest or palm rest with fingerprint reader" on page 106
- "1110 Bluetooth daughter card (BDC-2)" on page 108
• "1120 Keyboard bezel and speaker assembly" on page 109
• "1130 5-in-1 Media Card Reader adapter" on page 113
•"140 Bluetooth-wireless radio switch FPC" on page 114
• "1150 LCD unit" on page 116
Table25. Removalstepsofsystemboard, fanassembly, and 34-mmExpressCardslotframe
Following components soldered on the top side of the system board are extremely sensitive. When you service the system board, avoid any kind of rough handling.
ForThinkPadT400s:
a ICH (I/O Controller Hub)
b CPU
c GMCH (Graphics Memory Controller Hub)
d Accelerometer chip for the HDD Active Protection System ™


Table25. Removalstepsofsystemboard, fanassembly, and 34-mmExpressCardslot frame(continued)
ForThinkPadT410sandT410si:
a PCH (Platform Controller Hub)
b CPU
c Accelerometer chip for the HDD Active Protection System
d Graphic controller (only for switchable graphics models)

Table25. Removalstepsofsystemboard, fanassembly, and 34-mmExpressCardslot frame (continued)
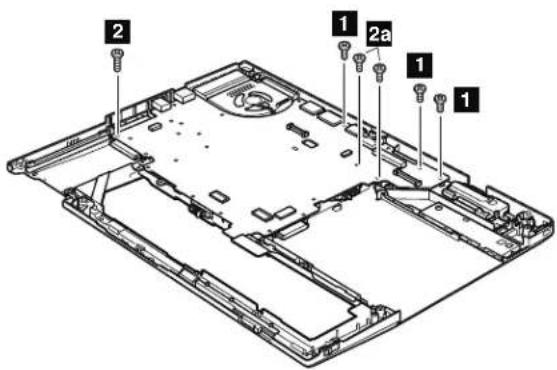
Note:Step 2a is only for ThinkPad T410s and T410si.
| StepScrew(quantity)ColorTorque | |||
| 1 M2 | × 3.5 mm , big-head, nylon-coated (3) Black 0.1 | 81 Nm | (1.85 kgfcm) |
| 2 M2 | × 6 mm , bind-head, nylon-coated (1) Black 0.1 | 81 Nm | (1.85 kgfcm) |
| 2a M2 | × 6 mm , bind-head, nylon-coated (2) Black 0.1 | 181 Nm | (1.85 kgfcm) |
In step 4, remove the system board and fan assembly together from the base cover assembly.

Table25. Removalstepsofsystemboard, fanassembly, and 34-mmExpressCardslot frame (continued)
Note: The steps from 5 to 7 indicate the removal steps of fan assembly, and those from 8 to 11 indicate the ones of 34-mm ExpressCard slot frame.

Note:Step 5a is only for ThinkPad T410s and T410si.
| StepScrew(quantity)ColorTorque | |||
| 5 M2 | ×3.5 mm, big-head, nylon-coated (3) Black 0.181 Nm | (1.85 kgfcm) | |
| 5a M2 | ×3.5 mm, big-head, nylon-coated (1) Black 0.181 Nm | (1.85 kgfcm) | |
Turn the system board over, and then disconnect the fan assembly from the system board.

Table25. Removalstepsofsystemboard, fanassembly, and 34-mmExpressCardslot frame (continued)
Wheninstalling:
- Before you attach the fan assembly to the computer, apply thermal grease, at an amount of 0.2 grams, on the part marked a as in the following figure. Either too much or too less application of grease can cause a thermal problem due to imperfect contact with a component. You need to peel the thin film off from the rubber b.
ForThinkPadT400s:

natural_image
Technical diagram of a mechanical device with labeled parts (a and b), showing internal components without any text or symbols.ForThinkPadT410sandT410si:

natural_image
Technical line drawing of a mechanical component with fan and housing, showing internal structure and mounting points (no text or symbols)•Make sure that the fan connector is attached firmly.
Table25. Removalstepsofsystemboard, fanassembly, and 34-mmExpressCardslot frame (continued)
ForThinkPadT400s:

| StepScrew(quantity)ColorTorque | |||
| 8 M2 | ×3 mm, small-head, nylon-coated (1) Silver 0.181 Nm | (1.85 kgfcm) | |
| 9 M2 | ×5 mm, flat-head, nylon-coated (2) Black 0.181 Nm | (1.85 kgfcm) | |
ForThinkPadT410sandT410si:
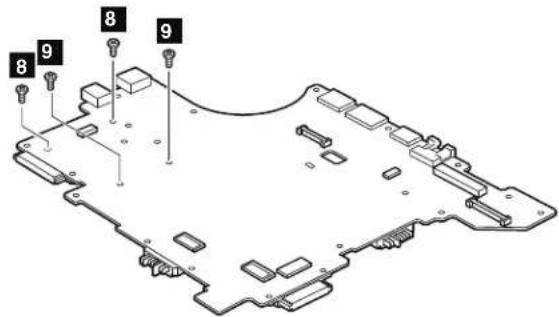
| StepScrew(quantity)ColorTorque | |||
| 8 M2 | ×3 mm, small-head, nylon-coated (2) Black 0.181 Nm | (1.85 kgfcm) | |
| 9 M2 | ×5 mm, flat-head, nylon-coated (2) Black 0.181 Nm | (1.85 kgfcm) | |
Table25. Removalstepsofsystemboard, fanassembly, and 34-mmExpressCardslot frame (continued)
Turn the system board over, and then remove the 34-mm ExpressCard slot frame from the system board.

1170I/Osubcardandbasecoverassembly
For access, remove these FRUs in order:
• "1010 Battery pack" on page 85
• "1020 Serial Ultrabay Slim device or travel bezel" on page 86
•"1030 Solid state drive (SSD) or hard disk drive (HDD)" on page 87
•"1050 PCI Express Mini Card for wireless LAN" on page 92
•"1060 PCI Express Mini Card for wireless WAN" on page 95
• "1070 Keyboard" on page 98
• "1090 Wireless USB adapter or Intel Turbo Memory" on page 104
• "1100 Palm rest or palm rest with fingerprint reader" on page 106
• "1110 Bluetooth daughter card (BDC-2)" on page 108
•"1120 Keyboard bezel and speaker assembly" on page 109
- "1130 5-in-1 Media Card Reader adapter" on page 113
• "140 Bluetooth-wireless radio switch FPC" on page 114
• "1150 LCD unit" on page 116
- "160 System board, fan assembly, and 34-mm ExpressCard slot frame" on page
120
Table26. Removalstepsofl/Osubcardandbasecoverassembly
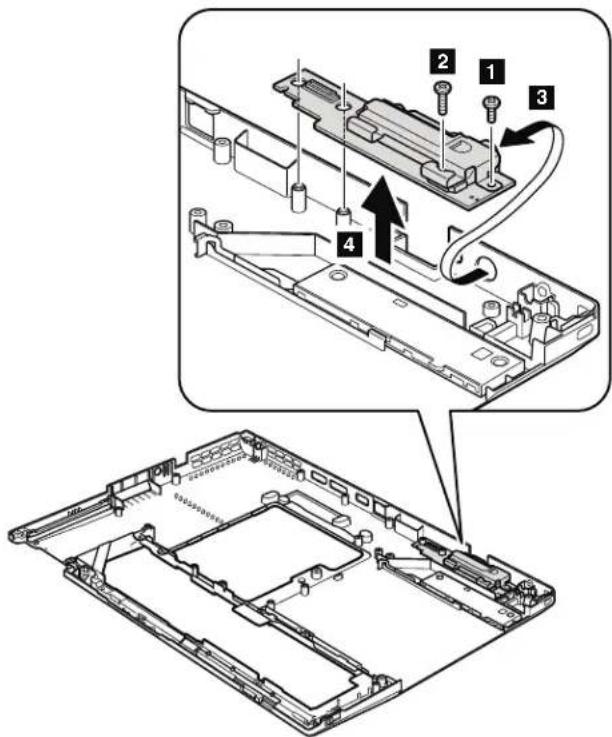
| StepScrew(quantity)ColorTorque | |||
| 1 M2 | ×4 mm, bind-head, nylon-coated (1) Black 0.181 Nm | (1.85 kgfcm) | |
| 2 M2 | ×6 mm, bind-head, nylon-coated (1) Black 0.181 Nm | (1.85 kgfcm) | |
Note: Applyinglabelstothebasecover
The new base cover FRU is shipped with a kit containing labels of several kinds. When you replace the base cover, you need to apply the following labels:
8 Blind sheet L
14 Homologation label
Following labels need to be peeled off from the old base cover, and need to be put on the new base cover.
1 Serial number label
2 SIM ICCID label
3 Brazil ANATEL Bluetoothlabel
4 Brazil ANATEL wireless LAN label
5 Asset tag label
6 Mac address label
7 Windows license label (COA)
9 Ericsson wireless WAN label
10 Qualcomm Wireless WAN label
11 Israel label
12 SIRM label
13 LMA label
For some models, you also need to apply one or two FCC labels. Check the old base cover; if it has one or two FCC labels, find duplicates of them in the label kit and apply them to the new base cover.
For the location of each label, refer the following figure:

2010LCDbezelassembly
For access, remove the following FRU:
• "1010 Battery pack" on page 85
Table27. RemovalstepsofLCDbezelassembly

| StepScrewcapScrew | (quantity)ColorTorque | |||
| 1 | □ | M2 ×3 mm, shoulder-socket head, nylon-coated (2) | Black 0.181 | Nm(1.85 kgfcm) |
Table27. RemovalstepsofLCDbezelassembly(continued)
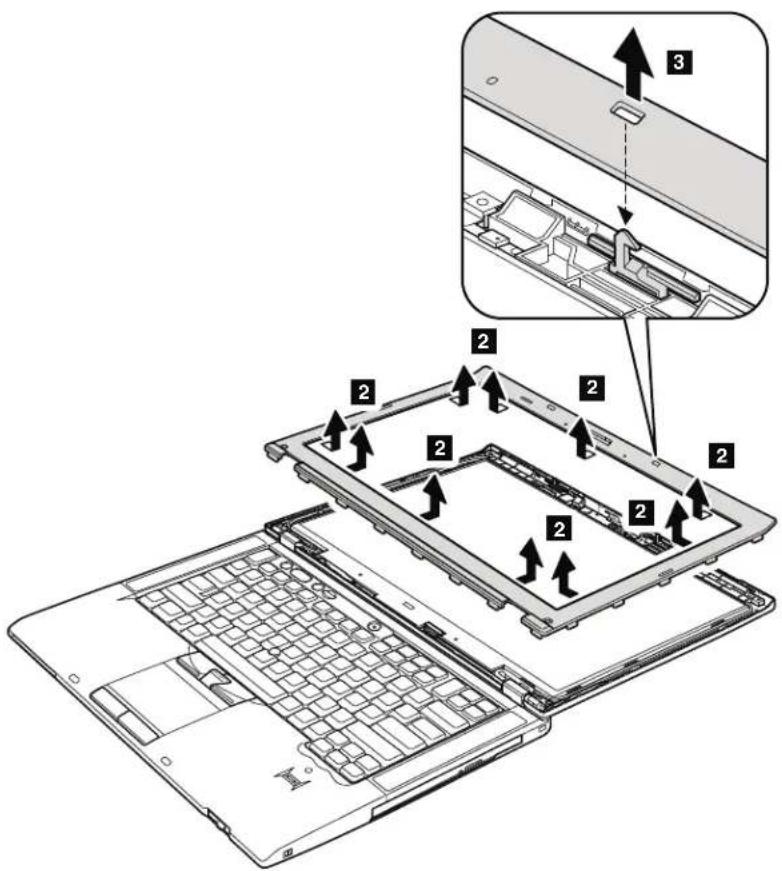
2020LCDlatchLandR
For access, remove the following FRU:
• "1010 Battery pack" on page 85
• "2010 LCD bezel assembly" on page 130
Table28. RemovalstepsofLCDlatchLandR

When installing: Attach the LCD latch marked L to the left-hand side and the LCD latch marked R to the right-hand side.


2030Integratedcameraormicrophonesubcard
For access, remove these FRUs, in order:
• "1010 Battery pack" on page 85
• "2010 LCD bezel assembly" on page 130
Table29. Removalstepsofintegratedcameraormicrophonesubcard

| StepScrew(quantity)ColorTorque | |||
| For ThinkPad T400s | |||
| 1 M2 | × 3 mm, small-head, nylon-coated (1) Silver 0.1 | 81 Nm | (1.85 kgfcm) |
| For ThinkPad T410s and T410si | |||
| 1 M2 | × 3 mm, small-head, nylon-coated (1) Black 0.1 | 81 Nm | (1.85 kgfcm) |
Wheninstalling: Make sure that the connector of the integrated camera or the microphone sub card is attached firmly.
Table29. Removal stepsof integrated cameraaormicrophonesubcard(continued)

2040LEDsubcard
For access, remove these FRUs in order:
•"1010 Battery pack" on page 85
• "2010 LCD bezel assembly" on page 130
Table30. RemovalstepsofLEDsubcard
ForThinkPadT400s:
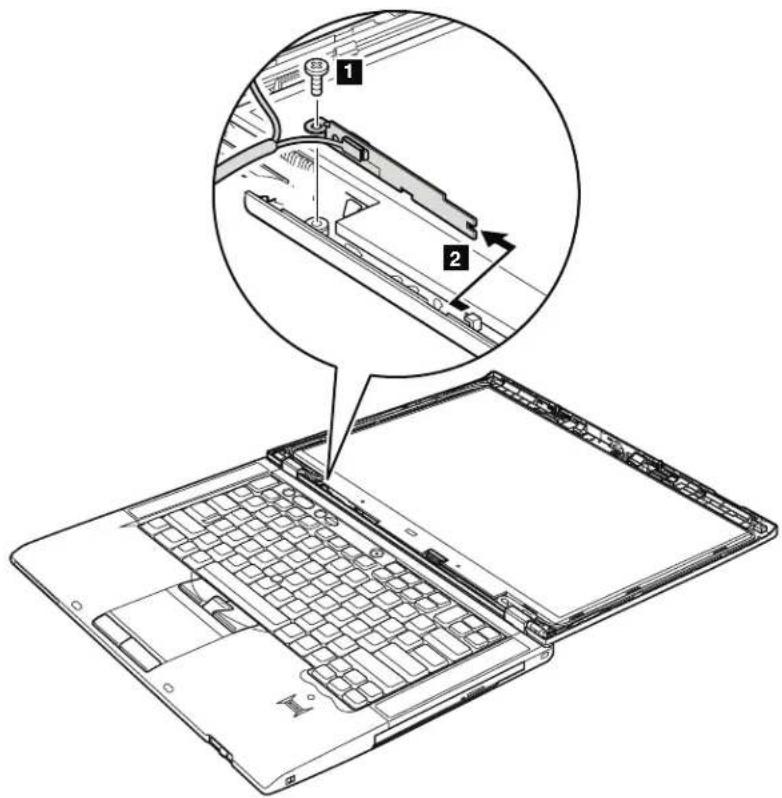
| StepScrew(quantity)ColorTorque | |||
| 1 M2 | ×3 mm, small-head, nylon-coated (1) Silver 0.1 | 81 Nm | (1.85 kgfcm) |

natural_image
Diagram of a cable connector with a labeled component (no text or symbols present)Wheninstalling: Make sure that the connector is attached firmly.
Table30. RemovalstepsofLEDsubcard(continued)
ForThinkPadT410sandT410si:

| StepScrew(quantity)ColorTorque | |||
| 1 M2 | ×3 mm, small-head, nylon-coated (1) Black 0.181 Nm | (1.85 kgfcm) | |
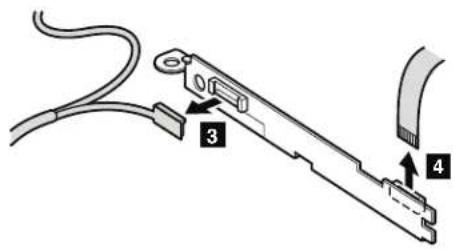
Wheninstalling: Make sure that the connector is attached firmly.
2050LCDpanel
For access, remove these FRUs, in order:
• "1010 Battery pack" on page 85
• "2010 LCD bezel assembly" on page 130
ImportantnoticeonhandlingtheLCDpanel:
The LCD panel and the peripheral parts used in this product are very sensitive. Improper handling of the LCD panel can cause damage to the parts, and may cause a system malfunction such as a missing dot, missing line, or pixel problems.
•DO NOT apply any kind of pressure to the LCD panel.
- When you lift the LCD panel, always hold the left and right edges of the panel with both of your hands. DO NOT hold the panel with one hand or hold the top and bottom edges of the panel.
- DO NOT touch or apply any kind of pressure to the print circuit board or sensitive parts as shown in the figure a.

natural_image
Line drawing of a flat-screen monitor with a dashed outline and an arrow indicator labeled 'a' pointing to the bottom panel (no text or symbols on the screen itself)Table31. RemovalstepsofLCDpanel

natural_image
Line drawing of a laptop with a close-up inset showing internal components (no text or symbols)Attention: Unplug the LCD cable with holding the left and right edges of the connector with your fingers, and gently pull the connector toward you. DO NOT unplug it with pulling the cable. Applying tension could cause the cable to be damaged or a wire to be broken.
Wheninstalling:
- Place the LCD panel on a soft and clean sheet spread on a flat table, and plug the cable by pushing the left and right edges of the connector little by little with your fingers.
•DO NOT work by lifting the LCD panel.
•DO NOT plug the cable with one hand.

natural_image
Diagram of an open laptop with visible internal grid and keyway, showing the front panel and top panel (no text or symbols)Table31. RemovalstepsofLCDpanel(continued)
Wheninstalling: When attaching the LCD panel to the cover, press the left and right edges covered with metal gently with your fingers. DO NOT press the surface of the panel or apply any excessive force to the panel.
2060LCDcable
For access, remove these FRUs, in order:
• "1010 Battery pack" on page 85
• "1020 Serial Ultrabay Slim device or travel bezel" on page 86
•"1030 Solid state drive (SSD) or hard disk drive (HDD)" on page 87
•"1050 PCI Express Mini Card for wireless LAN" on page 92
•"1060 PCI Express Mini Card for wireless WAN" on page 95
• "1070 Keyboard" on page 98
• "1090 Wireless USB adapter or Intel Turbo Memory" on page 104
• "1100 Palm rest or palm rest with fingerprint reader" on page 106
•"1120 Keyboard bezel and speaker assembly" on page 109
•"1150 LCD unit" on page 116
• "2010 LCD bezel assembly" on page 130
• "2050 LCD panel" on page 137
Table32. RemovalstepsofLCDcable
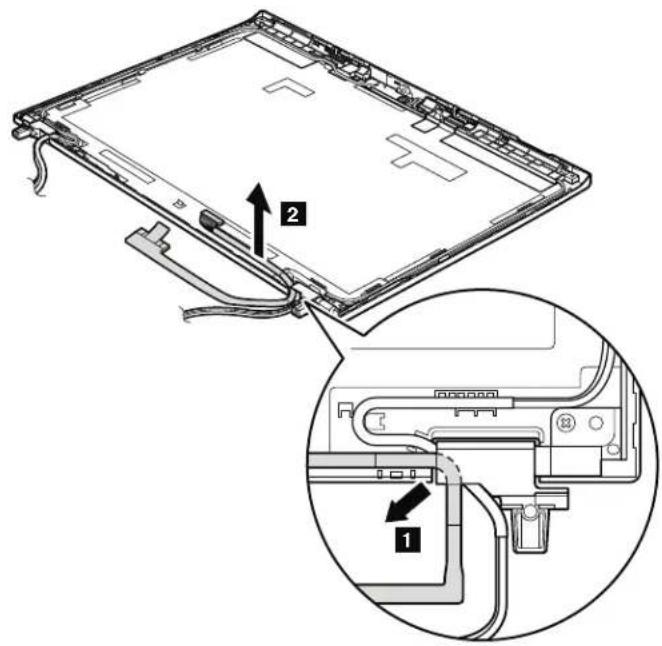
Cablerouting: When you install the LCD cable, route the cable as shown in this figure.
2070Hingekit
For access, remove these FRUs in order:
• "1010 Battery pack" on page 85
• "1020 Serial Ultrabay Slim device or travel bezel" on page 86
• "1030 Solid state drive (SSD) or hard disk drive (HDD)" on page 87
• "1050 PCI Express Mini Card for wireless LAN" on page 92
• "1060 PCI Express Mini Card for wireless WAN" on page 95
• "1070 Keyboard" on page 98
• "1090 Wireless USB adapter or Intel Turbo Memory" on page 104
• "100 Palm rest or palm rest with fingerprint reader" on page 106
• "120 Keyboard bezel and speaker assembly" on page 109
•"1150 LCD unit" on page 116
• "2010 LCD bezel assembly" on page 130
•“2050 LCD panel” on page 137
• "2060 LCD cable" on page 140
Table33. Removalstepsofhingekit

| StepScrew(quantity)ColorTorque | |||
| For ThinkPad T400s | |||
| 1 ForMultitouchpanelmodels: M2 ×4 mm, bind-head, nylon-coated (2) | Silver 0.181 Nm (1.85 kgfcm) | ||
| ForotherthanMultitouchpanel models: M2 ×3 mm, small-head, nylon-coated (2) | Silver 0.181 Nm (1.85 kgfcm) | ||
| For ThinkPad T410s and T410si | |||
| 1 ForMultitouchpanelmodels: M2 ×4 mm, bind-head, nylon-coated (2) | Black 0.181 Nm (1.85 kgfcm) | ||
Table33. Removalstepsofhingekit(continued)

Cablerouting: When you install the hinge kit, route the cables as shown in the figure below.

natural_image
Technical line drawing of a mechanical assembly with no visible text or symbols2080LEDcable
For access, remove these FRUs in order:
• "1010 Battery pack" on page 85
• "1020 Serial Ultrabay Slim device or travel bezel" on page 86
•"1030 Solid state drive (SSD) or hard disk drive (HDD)" on page 87
• "1050 PCI Express Mini Card for wireless LAN" on page 92
•"1060 PCI Express Mini Card for wireless WAN" on page 95
• "1070 Keyboard" on page 98
• "1090 Wireless USB adapter or Intel Turbo Memory" on page 104
• "1100 Palm rest or palm rest with fingerprint reader" on page 106
• "1120 Keyboard bezel and speaker assembly" on page 109
•"1150 LCD unit" on page 116
• "2010 LCD bezel assembly" on page 130
•“2050 LCD panel” on page 137
•“2060 LCD cable” on page 140
•“2070 Hinge kit” on page 141
Table34. RemovalstepsofLEDcable

Table34. RemovalstepsofLEDcable(continued)
Cablerouting: When you install the LED cable, route the cable as shown in the figure below.

natural_image
Technical line drawing of a laptop chassis frame with visible connectors and ventilation ducts (no text or symbols)2090AntennakitandLCDrearcoverassembly
For access, remove these FRUs in order:
•"1010 Battery pack" on page 85
• "1020 Serial Ultrabay Slim device or travel bezel" on page 86
• "1030 Solid state drive (SSD) or hard disk drive (HDD)" on page 87
• "1050 PCI Express Mini Card for wireless LAN" on page 92
• "1060 PCI Express Mini Card for wireless WAN" on page 95
• "1070 Keyboard" on page 98
• "1090 Wireless USB adapter or Intel Turbo Memory" on page 104
• "1100 Palm rest or palm rest with fingerprint reader" on page 106
• "120 Keyboard bezel and speaker assembly" on page 109
•"1150 LCD unit" on page 116
• "2010 LCD bezel assembly" on page 130
•“2050 LCD panel” on page 137
• "2060 LCD cable" on page 140
• "2070 Hinge kit" on page 141
•"2080 LED cable" on page 143
Table35. RemovalstepsofantennakitandLCDrearcoverassembly

natural_image
Diagram of a laptop chassis showing front panel and rear panel with labeled connectors (no text or symbols present)| StepScrew(quantity)ColorTorque | |||
| 1 M2 | ×4 mm, bind-head, nylon-coated (2) Black 0.18 | 1 Nm | (1.85 kgfcm) |
Table35. RemovalstepsofantennakitandLCDrearcoverassembly(continued)

Cablerouting: When you install the antenna kit, route the cables as shown in the figures below. As you route the cables, make sure that they are not subjected to any tension. Tension could cause the cables to be damaged by the cable guides, or a wire to be broken.

natural_image
Technical line drawing of a laptop front panel with visible door, scroll, and cable connections (no text or labels)Locations
This chapter presents the location of ThinkPad T400s, T410s, and T410si features and hardware.
Frontview
1 Integrated camera (for some models)
2 ThinkLight
3 Built-in microphone
4 Status indicators
Note: For the description of each indicator, see "\$status indicators" on page 71.
5 ThinkVantage button
6 Power switch
7 Security keyhole
8 Ultrabay Slim Media Bay drive or travel bezel
9 Built-in stereo speakers
10 Wireless radio switch
11 Fingerprint reader (for some models)
12 TrackPoint pointing stick
13 TrackPoint buttons
14 Touch pad buttons
15 Touch pad
16 UltraNav
17 Volume control buttons

Rearview
1 Status indicators
Note: For the description of each indicator, see "Status indicators" on page 71
2 34-mm ExpressCard slot or 5-in-1 Media Card Reader slot
3 Combo audio jack
4 Universal serial bus (USB) connectors
5 DisplayPort
6 USB/eSATA combo connector
7 RJ-45 (Ethernet) connector
8 External monitor connector
9 AC power connector
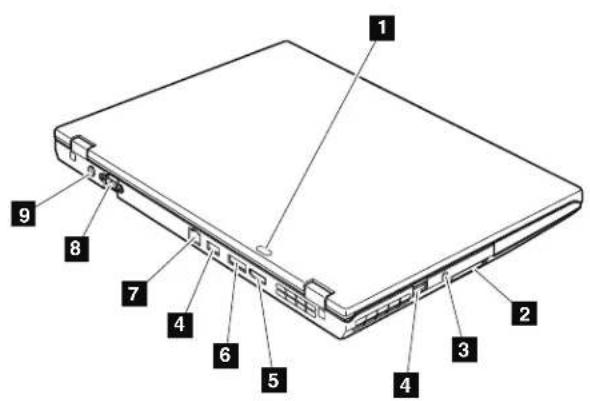
Bottomview
1 Expansion slot (DIMM, PCI Express Mini Card for wireless LAN and wireless WAN)
2 Docking connector
3 Solid state drive (SSD) or hard disk drive (HDD)
4 Battery pack
5 Battery pack latch
6 LCD cover latch
7 Ultrabay Slim Media Bay lock latch
8 Ultrabay Slim Media Bay eject latch

Partslist
This chapter contains following lists of the service parts.
• "Overall" on page 152
•“LCD FRUs” on page 177
•“Keyboard” on page 191
• "Miscellaneous parts" on page 192
•“AC adapters” on page 195
• "Power cords" on page 196
•“Recovery discs” on page 197
• "Common service tools" on page 217
Notes:
• Each FRU is available for all types or models, unless specific types or models are specified.
- FRU with specific models listed and described as xxU (where U is an example of a country designator) should be used for all models ending in U.
- FRU with specific models listed and described as 3Dx (where 3D is an example of a unique configuration) should be used for all of these models, unless specific country or region designator is specified.
- A CRU (customer replaceable unit) is identified by a single asterisk (*) or two asterisks (**) in the CRU ID column. An N in the CRU ID column means that the part is not a CRU. A single asterisk (*) means that the part is a Self-service CRU; two asterisks (**) means that the part is an Optional-service CRU.
ThinkPad Notebooks contain the following types of CRUs:
Self-serviceCRUs
These CRUs unplug or are held by no more than two screws.
Examples of these types of CRUs include an AC adapter, a power cord, a battery, and a hard disk drive. Other Self-service CRUs depending on product design may include a memory, a wireless card, a keyboard, and a palm rest with finger print reader and touchpad.
Optional-serviceCRUs
These CRUs are isolated parts within the computer that are concealed by an access panel that is typically secured by more than two screws.
Once the access panel is removed, the specific CRU is visible.
•FRUs marked with OP are available as options.
Overall

Table36.Partslist—Overall
| No.FRU(Overall)FRUno.CRU | ID | ||
| a,bSee “Miscellaneous parts” on page 192. | |||
| 1 LCD unit (see “LCD FRUs” on page 177.) | |||
| 2 Keyboard bezel assembly 45M2656 N | |||
| 3 Speaker assembly 93P4881 N | |||
| 3 Speaker assembly 93P4882 N | |||
| 4 Intel WiFi Link 5100•2801-CTO, A3x, A4x, A7x, A8x, A9x, AEx, AHx, AJx, AKx, ANx, APx, AQx•2808-CTO, C2x, C3x, C4x, C5x, CQx, CUx, CZx, DHx, DJx, DKx, DLx, DXx, DYx, DZx, E2x, EHx, EJx, EKx, ELx, EMx, EQx, ERx, EXx, EYx, EZx, F2x, F3x, F4x•2809-CTO, 73x, 74x, 75x, 76x, 77x, 78x, 79x•2815-CTO, 22x, 23x, 25x, 2Ax, 2Bx, 2Cx, 2Dx, 2Ex, 2Fx, 2Hx, 2Yx, 2Zx, 32x, 33x, 34x, 35x, 36x, 37x, 38x, 3Sx, 3Vx, 3Yx, 46x, 47x, 48x, 49x, 4Hx, 4Tx, 4Ux, 4Vx, 52x, 53x, 5Fx, 5Gx, 5Hx, 5Jx, 5Lx, 5Nx, 5Px, 5Xx, 5Yx, 62x, 63x, 64x•2823-CTO, 22x, 23x, 25x, 93x, 9Dx, 9Lx•2824-CTO•2825-CTO | 43Y6517 ** | ||
| 4 Intel WiFi Link 5300•2801-CTO, A2x•2808-CTO, C6x, C7x, C8x, C9x, CAx, CBx, CCx, CDx, CEx, CFx, CGx, CHx, CJx, CKx, CLx, CMx, CNx, CPx, CRx, CSx, CVx, CWx, CXx, CYx, D2x, D3x, D4x, D5x, D9x, DAx, DBx, DCx, DDx, DEx, DFx, DGx, DMx, DNx, DPx, DQx, DRx, DSx, DTx, DUx, E3x, E4x, E5x, E6x, E7x, E8x, E9x, EAx, EBx, ECx, EDx, EEx, EFx, EGx, ENx, EPx, F5x, F6x, F7x, F8x, F9x, FAx, FBx, FCx, FDx, FEx, FFx, FGx, FHx, FJx, FKx, FLx, FNz•2809-CTO, 72x, 7Ax, 7Bx, 7Cx•2815-CTO, 24x, 2Gx, 2Jx, 2Kx, 2Lx, 2Mx, 2Nx, 2Px, 2Qx, 2Rx, 2Sx, 2Tx, 2Ux, 2Vx, 2Wx, 2Xx, 39x, 3Ax, 3Bx, 3Cx, 3Dx, 3Fx, 3Gx, 3Hx, 3Jx, 3Kx, 3Lx, 3Mx, 3Nx, 3Px, 3Rx, 3Tx, 3Ux, 3Wx, 3Xx, 3Zx, 42x, 43x, 44x, 45x, 4Ax, 4Bx, 4Cx, 4Dx, 4Ex, 4Fx, 4Gx, 4Jx, 4Kx, 4Lx, 4Mx, 4Nx, 4Px, 4Qx, 4Rx, 4Sx, 4Wx, 4x,x, 4Zx, 5Ax, 5Bx, 5Cx, 5Dx, 5Ex, 5Kx, 5Mx, 5Qx, 5Vx, 5Wx•2823-CTO, 24x, 92x, 94x, 95x, 96x, 97x, 98x, 99x, 9Ax, 9Bx, 9Cx, 9Ex, 9Fx, 9Gx, 9Hx, 9Jx, 9Kx, 9Nx, 9Px, 9Qx•2824-CTO•2825-CTO | 43Y6519 ** | ||
| 4 Intel WiMAX/WiFi Link 5150•2801-CTO, A5x, A6x, AAx, ABx, ACx, ADx, AFx, AGx•2808-CTO, D6x, D7x, D8x, DVx, DWx, ESx, ETx, EUx, EVx, EWx•2809-CTO, 7Dx, 7Ex•2815-CTO, 3Ex, 5Rx, 5Sx, 5Tx, 5Ux•2823-CTO•2824-CTO•2825-CTO | 43Y6515 ** | ||
| 4 ThinkPad 11b/g Wireless LAN Mini PCI Express Adapter III•2801-CTO•2808-CTO•2809-CTO•2815-CTO•2823-CTO•2824-CTO•2825-CTO | 43Y6511 ** | ||
| 4 ThinkPad 11b/g/n Wireless LAN Mini-PCI Express Adapter II•2801-CTO, ALx, AMx•2808-CTO•2809-CTO•2815-CTO•2823-CTO•2824-CTO•2825-CTO•2901-CTO, A3x, A5x, A6x, A7x, A8x, A9x, AAx•2904-CTO, CFx, CGx, CPx, CQx, CRx, CSx, D2x, F7x, FMx, G5x, G9x•2907-CTO, 73x, 74x, 75x, 76x, 77x, 78x•2912-CTO, 23x, 2Ax, 2Bx, 2Xx, 2Yx, 2Zx, 32x, 33x, 34x, A0x•2924-CTO, 23x•2926-CTO•2928-CTO | 43Y6553 ** | ||
| 4 ThinkPad 11b/g/n Wireless LAN Mini-PCI Express Adapter II•2801-CTO, ALx, AMx•2808-CTO•2809-CTO•2815-CTO•2823-CTO•2824-CTO•2825-CTO•2901-CTO, A3x, A5x, 6x, A7x, A8x, A9x, AAx•2904-CTO, CFx, CGx, CPx, CQx, CRx, CSx, D2x, F7x, FMx, G5x, G9x•2907-CTO, 73x, 74x, 75x, 76x, 77x, 77x, 78x•2912-CTO, 23x, 2Ax, 2Bx, 2Xx, 2Yx, 2Zx, 32x, 33x, 34x, A0x•2924-CTO, 23x•2926-CTO•2928-CTO | 60Y3177 ** | ||
| 4 ThinkPad 11b/g/n Wireless LAN Mini-PCI Express Adapter II (n-disabled)•2801-CTO•2808-CTO•2809-CTO•2815-CTO•2823-CTO•2824-CTO•2825-CTO | 60Y3185 ** | ||
| 4 ThinkPad 11b/g/n Wireless LAN Mini-PCI Express Adapter II (n-disabled)•2801-CTO•2808-CTO•2809-CTO•2815-CTO•2823-CTO•2824-CTO•2825-CTO | 60Y3187 ** | ||
| 4 Intel ® Centrino ® Wireless-N 1000•2901-CTO, ABx, ACx, ADx, AEx, AFx, AGx, AHx, AJx, AKx•2904-CTO, CUx, CVx, CWx, CZx, D3x, D6x, D7x, D8x, D9x, DAx, DBx, DCx, DDx, DEx, DFx, DMx, DNx, EWx, EXx, EYx, EZx, F2x, F3x, F4x, F5x, F6x, F8x, F9x, FAx, FBx, FCx, FDx, FEx, FFx, FGx, FHx, FJx, FKx, FLx, FNx, G3x, G4x, G6x, G7x, GBx, GCx•2907-CTO•2912-CTO, 3Dx, 3Fx, 3Gx, 3Hx•2924-CTO, 96x, 98x, 9Ax, 9Bx, 9Cx, 9Dx•2926-CTO•2928-CTO | 60Y3203 ** | ||
| 4 Intel Centrino Advanced-N 6200•2901-CTO, A2x, A4x•2904-CTO, C2x, C3x, C4x, C5x, C6x, C7x, C8x, CHx, CJx, CKx, CLx, CXx, CYx, D5x, DPx, DQx, DRx, DTx, DUx, E4x, E5x, E6x, E7x, E8x, E9x, EEx, EFx, EGx, EHx, ENx, EPx, EQx, ERx, FPx, FXx, FZx, G2x, G8x, GDx•2907-CTO, 72x•2912-CTO, 20x, 22x, 24x, 25x, 2Cx, 2Dx, 2Fx, 2Lx, 2Mx, 2Rx, 2Sx, 2Tx, 2Ux, 39x, 3Cx, 3Ex, 3Jx, 3Px, 3Rx, 52x, 53x•2924-CTO, 22x, 24x, 25x, 92x, 97x, 99x•2926-CTO•2928-CTO | 60Y3231 ** | ||
| 4 Intel Centrino Ultimate-N 6300•2901-CTO•2904-CTO, CBx, CCx, CDx, CEx, DGx, DHx, DJx, DKx, DLx, DSx, DVx, DWx, DXx, DYx, DZx, E2x, E3x, FQx, FSx, FTx, FUx, FVx, FWx, FYx•2907-CTO•2912-CTO, 2Ex, 2Gx, 2Hx, 2Jx, 2Kx, 2Nx, 2Px, 2Qx, 30x, 36x, 37x, 38x, 3Ax, 3Kx, 3Lx, 3Mx, 3Nx, 62x•2924-CTO, 93x, 94x, 95x, 9Ex•2926-CTO•2928-CTO | 60Y3233 ** | ||
| 4 Intel Centrino Advanced-N + WiMAX 6250 (other than Russia)•2901-CTO•2904-CTO, CMx, CNx, EAx, EBx, ECx, EDx, EJx, EKx, ELx, EMx, ESx, ETx, EUx, EVx•2907-CTO•2912-CTO, 21x, 2Vx, 2Wx, 40x•2924-CTO•2926-CTO•2928-CTO | 60Y3195 ** | ||
| 4 Intel Centrino Advanced-N + WiMAX 6250 (Russia)•2901-CTO•2904-CTO, D4x•2907-CTO•2912-CTO•2924-CTO•2926-CTO•2928-CTO | 60Y3209 ** | ||
| 5 Qualcomm® UNDP1 - Wireless WAN card•2801-CTO•2808-CTO, DLx•2809-CTO•2815-CTO, 2Yx•2823-CTO•2824-CTO•2825-CTO | 42T0961 ** | ||
| 5 Integrated Mobile Broadband (Gobi 2000 3G with GPS)•2901-CTO•2904-CTO, C3x, C4x, C5x, C6x, C7x, C9x, CCx, CVx, CYx, D4x, DLx, DRx, DSx, DUx, DVx, DXx, DZx, E3x, FCx, FDx, FEx, FFx, FPx, FSx, FUx, FWx, FXx, FYx, G7x, G8x, GCx, GDx•2907-CTO•2912-CTO, 20x, 21x, 30x, 2Cx, 2Dx, 2Fx, 2Hx, 2Jx, 2Kx, 2Mx, 2Px, 2Qx, 38x, 3Ax•2924-CTO, 92x, 93x, 94x, 95x•2926-CTO•2928-CTO | 60Y3183 ** | ||
| 5 Ericsson F3507g USA - Wireless WAN card•2801-CTO•2808-CTO, C5x•2809-CTO•2815-CTO, 2Zx•2823-CTO•2824-CTO•2825-CTO | 43Y6537 ** | ||
| 5 Ericsson F3507g Other - Wireless WAN card•2801-CTO•2808-CTO, CCx, CDx, CEx, CFx, CGx, CHx, CJx, CKx, CLx, CMx, CNx, CPx, DMx, DNx, DPx, DQx, DRx, DSx, DTx, DUx, E5x, E6x, E7x, E8x, E9x, EAx, EBx, ECx, EDx, EEx, EFx, EGx, ELx, EMx, ENx, EPx, CUx, CWx, CYx, D4x, D5x, D9x, DBx, Dx, DFx, FNx•2809-CTO•2815-CTO, 3Fx, 3Gx, 3Hx, 3Jx, 4Zx, 5Ax, 5Bx, 5Cx, 5Dx, 5Ex, 5Lx, 5Mx, 5Qx, 2Lx, 2Mx, 2Qx, 2Sx, 2Tx, 2Vx, 20x, 3Sx, 3Tx, 3Ux, 4Kx, 4Lx, 4Rx, 4Sx•2823-CTO, 9Bx, 9Cx, 94x, 9Jx•2824-CTO•2825-CTO | 43Y6513 ** | ||
| 6 Bluetoothdaughter card (BDC-2.1)2801-CTO, A3x, A4x, A5x, A6x, A7x, A8x, A9x, AAx, ABx, ACx, ADx, AEx, AFx, AGx, AHx, AJx, AKx, ALx, AMx, ANx, APx, AQx2808-CTO, C2x, C3x, C5x, C6x, C7x, C8x, C9x, CAx, CBx, CCx, CDx, Cex, CFx, CGx, CHx, CJx, CKx, CLx, CMx, CNx, CPx, CQx, CRx, CSx, Cux, CVx, CWx, CXx, Cyx, CZx, D2x, D3x, D4x, D5x, D6x, D7x, D8x, D9x, DAx, DBx, DCx, DDx, DEx, DFx, DGx, DKx, DLx, DMx, DNx, DPx, DQx, DRx, DSx, DTx, DUx, DVx, DWx, DXx, DYx, DZx, E2x, E3x, E4x, E5x, E6x, E7x, E8x, E9x, EAx, EBx, ECx, EDx, EEx, EFx, EGx, EHx, EJx, EKx, ELx, EMx, ENx, EPx, EQx, ERx, ESx, ETx, EUx, EVx, EWx, EXx, EYx, EZx, F2x, F3x, F4x, F5x, F6x, F7x, F8x, F9x, FAx, FBx, FCx, FDx, FEx, FFx, FGx, FHx, FJx, FKx, FLx, FNx2809-CTO, 72x, 73x, 74x, 75x, 76x, 77x, 78x, 79x, 7Ax, 7Bx, 7Cx, 7Dx, 7Ex2815-CTO, 20x, 22x, 23x, 24x, 25x, 2Ax, 2Bx, 2Cx, 2Dx, 2Ex, 2Fx, 2Gx, 2Hx, 2Jx, 2Kx, 2Lx, 2Mx, 2Nx, 2Px, 2Qx, 2Rx, 2Sx, 2Tx, 2Ux, 2Vx, 2Xx, 2Yx, 2Zx, 30x, 32x, 33x, 34x, 35x, 36x, 37x, 38x, 39x, 3Ax, 3Bx, 3Cx, 3Dx, 3Ex, 3Fx, 3Gx, 3Hx, 3Jx, 3Kx, 3Lx, 3Mx, 3Nx, 3Px, 3Qx, 3Rx, 3Sx, 3Tx, 3Ux, 3Vx, 3Wx, 3Xx, 3Yx, 3Zx, 42x, 43x, 44x, 45x, 46x, 47x, 48x, 49x, 4Ax, 4Bx, 4Cx, 4Dx, 4Ex, 4Fx, 4Gx, 4Hx, 4Jx, 4Kx, 4Lx, 4Mx, 4Nx, 4Px, 4Qx, 4Rx, 4Sx, 4Tx, 4Ux, 4Vx, 4Wx, 4Xx, 4Zx, 52x, 53x, 5Ax, 5Bx, 5Cx, 5Dx, 5Ex, 5Fx, 5Gx, 5Hx, 5Jx, 5Kx, 5Lx, 5Mx, 5Nx, 5Px, 5Qx, 5Rx, 5Sx, 5Tx, 5Ux, 5Vx, 5Wx, 5Xx, 5Yx2823-CTO, 22x, 23x, 24x, 25x, 92x, 93x, 94x, 95x, 96x, 97x, 98x, 99x, 9Ax, 9Bx, 9Cx, 9Dx, 9Ex, 9Fx, 9Gx, 9Hx, 9Jx, 9Kx, 9Lx2824-CTO2825-CTO | 43Y6481 N | ||
| 6 Bluetoothdaughter card (BDC-2.1)2901-CTO, A2x, A3x, A4x, A5x, A6x, A7x, A8x, A9x, AAx, ABx, ACx, ADx, AEx, AFx, AGx, AHx, AJx, AKx2904-CTO, C2x, C3x, C4x, C5x, C6x, C7x, C8x, C9x, CBx, CCx, CDx, CEx, CGx, CHx, CJx, CKx, CLx, CMx, CNx, CPx, CQx, CRx, CSx, CUx, CVx, CWx, CXx, CYx, CZx, D2x, D3x, D4x, D5x, D6x, D7x, D8x, D9x, DAx, DBx, DCx, DDx, DEx, DFx, DGx, DHx, DJx, DKx, DLx, DMx, DNx, DPx, DQx, DRx, DSx, DTx, DUx, DVx, DWx, DXx, DYx, DZx, E2x, E3x, E4x, E5x, E6x, E7x, E8x, E9x, EAx, EBx, ECx, EDx, EEx, EFx, EEx, EGx, EHx, EJx, EKx, ELx, EMx, ENx, EPx, EQx, ERx, ESx, ETx, EUx, EVx, EWx, EXx, FYx, EZx, F2x, F3x, F4x, F5x, F6x, F7x, F8x, F9x, FAx, FBx, FCx, FDx, FEx, FEx, FGx, FHx, FJx, FKx, FLx, FMx, FNx, FPx, FQx, FSx, FTx, FUx, FWx, FXx, FYx, FZx, G2x, G3x, G4x, G5x, G6x, G7x, G8x, G9x, GBx, GCx, GDx2907-CTO, 72x, 73x, 74x, 75x, 76x, 77x, 78x2912-CTO, 20x, 21x, 22x, 23x, 24x, 25x, 2Bx, 2Cx, 2Dx, 2Ex, 2Fx, 2Gx, 2Hx, 2Jx, 2Kx, 2Lx, 2Mx, 2Nx, 2Px, 2Qx, 2Rx, 2Sx, 2Tx, 2Ux, 2Vx, 2Wx, 2Xx, 2Zx, 30x, 32x, 33x, 34x, 36x, 37x, 38x, 39x, 3Ax, 3Cx, 3Dx, 3Ex, 3Fx, 3Gx, 3Hx, 3Jx, 3Kx, 3Lx, 3Mx, 3Nx, 3Px, 3Rx, 40x2924-CTO, 22x, 23x, 24x, 25x, 92x, 93x, 94x, 95x, 96x, 97x, 98x, 99x, 9Ax, 9Bx, 9Cx, 9Dx, 9Ex2926-CTO2928-CTO | 60Y3199 N | ||
| 7 Bluetooth-wireless radio switch FPC 44C9984 N | |||
| 8 I/O sub card 42W8292 N | |||
| 8 I/O sub card 42W8293 N | |||
| 9 DVD-ROM drive•2901-CTO•2904-CTO•2907-CTO•2912-CTO•2924-CTO•2926-CTO•2928-CTO | 45N7485 * | ||
| 9 DVD/CD-RW combo disc drive•2801-CTO•2808-CTO•2809-CTO, 73x, 74x, 75x, 76x•2815-CTO, 32x, 33x, 34x, 35x, 5Fx•2823-CTO•2824-CTO•2825-CTO | 42T2611 * | ||
| 9 DVD-RAM/RW drive•2801-CTO, A2x, A3x, A4x, A5x, A6x, A7x, A8x, AAx, ABx, ACx, ADx, AEx, AFx, AGx, AHx, AJx, AKx, ALx, AMx, ANx, APx, AQx•2808-CTO, C2x, C3x, C4x, C5x, C6x, C7x, C8x, C9x, CAx, CBx, CCx, CDx, CEx, CFx, CGx, CHx, CJx, CKx, CLx, CMx, CNx, CPx, CQx, CRx, CSx, CUx, CVx, CWx, CXx, CYx, CZx, D2x, D3x, D4x, D5x, D6x, D7x, D8x, D9x, DAx, DBx, DCx, DDx, DEx, DFx, DGx, DHx, DJx, DKx, DLx, DMx, DNx, DPx, DQx, DRx, DSx, DTx, DUx, DVx, DWx, DXx, DYx, DZx, E2x, E3x, E4x, E5x, E6x, E7x, E8x, E9x, EAx, EBx, ECx, EDx, EEx, EFx, EGx, EHx, EJx, EKx, ELx, EMx, ENx, EPx, EQx, ERx, ESx, ETx, EUx, EVx, EWx, EXx, EYx, EZx, F2x, F4x, F5x, F6x, F7x, F8x, F9x, FAx, FBx, FCx, FDx, FEx, FFx, FGx, FHx, FJx, FKx, FLx, FNx•2809-CTO, 72x, 77x, 78x, 79x, 7Ax, 7Bx, 7Cx, 7Dx, 7Ex•2815-CTO, 20x, 22x, 23x, 24x, 25x, 2Ax, 2Bx, 2Cx, 2Dx, 2Ex, 2Fx, 2Gx, 2Hx, 2Jx, 2Kx, 2Lx, 2Mx, 2Nx, 2Qx, 2Rx, 2Sx, 2Tx, 2Ux, 2Vx, 2Wx, 2Xx, 2Yx, 34x, 35x, 36x, 37x, 38x, 39x, 3Ax, 3Bx, 3Cx, 3Dx, 3Ex, 3Fx, 3Hx, 3Jx, 3Kx, 3Lx, 3Mx, 3Nx, 3Px, 3Rx, 3Sx, 3Tx, 3Vx, 3Wx, 3Xx, 3Yx, 52x, 53x, 5Xx, 5Yx, 62x, 63x, 64x•2823-CTO, 22x, 23x, 24x, 25x, 92x, 93x, 94x, 95x, 96x, 97x, 98x, 99x, 9Ax, 9Bx, 9Cx, 9Dx, 9Ex, 9Fx, 9Gx, 9Hx, 9Jx, 9Kx, 9Lx•2824-CTO•2825-CTO | 42T2599 * | ||
| 9 DVD-RAM/RW drive2801-CTO, A2x, A3x, A4x, A5x, A6x, A7x, A8x, AAx, ABx, ACx, ADx, AEx, AFx, AGx, AHx, AJx, AKx, ALx, AMx, ANx, APx, AQx2808-CTO, C2x, C3x, C4x, C5x, C6x, C7x, C8x, C9x, CAx, CBx, CCx, CDx, CEx, CFx, CGx, CHx, CJx, CKx, CLx, CMx, CNx, CPx, CQx, CRx, CSx, CUx, CVx, CWx, CXx, CYx, CZx, D2x, D3x, D4x, D5x, D6x, D7x, D8x, D9x, DAx, DBx, DCx, DDx, DEx, DFx, DGx, DHx, DJx, DKx, DLx, DMx, DNx, DPx, DQx, DRx, DSx, DTx, DUx, DVx, DWx, DXx, DYx, DZx, E2x, E3x, E4x, E5x, E6x, E7x, E8x, E9x, EAx, EBx, ECx, EDx, EEx, EFx, EGx, EHx, EJx, EKx, ELx, EMx, ENx, EPx, EQx, ERx, ESx, ETx, EUx, EVx, EWx, EXx, EYx, EZx, F2x, F4x, F5x, F6x, F7x, F8x, F9x, FAx, FBx, FCx, FDx, FEx, FFx, FGx, FHx, FJx, FKx, FLx, FNx2809-CTO, 72x, 77x, 78x, 79x, 7Ax, 7Bx, 7Cx, 7Dx, 7Ex2815-CTO, 20x, 22x, 23x, 24x, 25x, 2Ax, 2Bx, 2Cx, 2Dx, 2Ex, 2Fx, 2Gx, 2Hx, 2Jx, 2Kx, 2Lx, 2Mx, 2Nx, 2Qx, 2Rx, 2Sx, 2Tx, 2Ux, 2Vx, 2Wx, 2Xy, 34x, 35x, 36x, 37x, 38x, 39x, 3Ax, 3Bx, 3Cx, 3Dx, 3Ex, 3Fx, 3Hx, 3Jx, 3Kx, 3Lx, 3Mx, 3Nx, 3Px, 3Rx, 3Sx, 3Tx, 3Vx, 3Wx, 3Xx, 3Yx, 52x, 53x, 5Xx, 62x, 63x, 64x2823-CTO, 22x, 23x, 24x, 25x, 92x, 93x, 94x, 95x, 96x, 97x, 98x, 99x, 9Ax, 9Bx, 9Cx, 9Dx, 9Ex, 9Fx, 9Gx, 9Hx, 9Jx, 9Kx, 9Lx2824-CTO2825-CTO9 DVD-RAM/RW drive2801-CTO, A2x, A3x, A4x, A5x, A6x, A7x, A8x, AAx, ABx, ACx, ADx, AEx, AFx, AGx, AHx, AJx, AKx, ALx, AMx, ANx, APx, AQx2808-CTO, C2x, C3x, C4x, C5x, C6x, C7x, C8x, C9x, CAx, CBx, CCx, CDx, CEx, CFx, CGx, CHx, CJx, CKx, CLx, CMx, CNx, CPx, CQx, CRx, CSx, CUx, CVx, CWx, CXx, CYx, CZx, D2x, D3x, D4x, D5x, D6x, D7x, D8x, D9x, DAx, DBx, DCx, DDx, DEx, DFx, DGx, DHx, DJx, DKx, DLx, DMx, DNx, DPx, DQx, DRx, DSx, DTx, DUx, DVx, DWx, DXx, DYx, DZx, E2x, E3x, E4x, E5x, E6x, E7x, E8x, E9x, EAx, EBx, ECx, EDx, EEx, EFx, EGx, EHx, EJx, EKx, ELx, EMx, ENx, EPx, EQx, ERx, ESx, ETx, EUx, EVx, EWx, EXx, EYx, EZx, F2x, F4x, F5x, F6x, F7x, F8x, F9x, FAx, FBx, FCx, FDx, FEx, FFx, FGx, FHx, FJx, FKx, FLx, FNx2809-CTO, 72x, 77x, 78x, 79x, 7Ax, 7Bx, 7Cx, 7Dx, 7Ex2815-CTO, 20x, 22x, 23x, 24x, 25x, 2Ax, 2Bx, 2Cx, 2Dx, 2Ex, 2Fx, 2Gx, 2Hx, 2Jx, 2Kx, 2Lx, 2Mx, 2Nx, 2Qx, 2Rx, 2Sx, 2Tx, 2Ux, 2Vx, 2Wx, 2Yx, 34x, 35x, 36x, 37x, 38x, 39x, 3Ax, 3Bx, 3Cx, 3Dx, 3Ex, 3Fx, 3Hx, 3Jx, 3Kx, 3Lx, 3Mx, 3Px, 3Rx, 3Sx, 3Tx, 3Vx, 3Wx, 3Xx, 3Yx, 52x, 53x, 5Xx, 5Yx, 62x, 63x, 64x2823-CTO, 22x, 23x, 24x, 25x, 92x, 93x, 94x, 95x, 96x, 97x, 98x, 99x, 9Ax, 9Bx, 9Cx, 9Dx, 9Ex, 9Fx, 9Gx, 9Hx, 9Jx, 9Kx, 9Lx2824-CTO2825-CTO2901-CTO, A2x, A3x, A4x, A5x, A6x, A7x, A8x, A9x, AAx, ABx, ACx, ADx, AEx, AFx, AGx, AHx, AJx, AKx2904-CTO, C2x, C3x, C4x, C5x, C6x, C7x, C8x, C9x, CBx, CCx, CDx, CEx, CFx, CGx, CHx, CJx, CKx, CLx, CMx, CNx, CPx, CQx, CRx, CSx, CUx, CVx, CWx, CXx, CYx, CZx, D2x, D3x, D4x, D5x, D6x, D7x, D8x, D9X, DAx, DBx, DCx, DDx, DEx, DFx, DGx, DHx, DJx, DKx, DLx, DMx, DNx, DPx, DQx, DRx, DSx, DTx, DUx, DVx, DWx, DXx, DYx, DZx, E2x, E3x, E4x, E5x, E6x, E7x, BEX, EBx, ECx, EDx, EEx, EFx, EGx, EHx, EJx, EKx, ELx, EMx, ENx, EPx, EQx, ERx, ESx, ETx, EUx, EVx, EWx, EXx, EYx, EZx, F2x, F3x, F4x, F5x, F6x, F7x, F8x, F9x, FAx, FBx, FCx, FDx, FEx, FFx, FGx, FHx, FJx, FKx, FLx, FMx, FMx, FMx, FMx, FMx, FMx, FMx, FMx, FMx, FMx, FMx, FMx, FMx, FMx, FMx, FMx, FMx, FMx, FMx, FMx, FMx, FMx, FMx, FMx, FMx, FMx, FMx, FMx, FMx, FMx, FMx, FMx, FMx, FMz2907-CTO, 72x, 73x, 74x, 75x, 76x, 77x, 78x2912-CTO, 20x, 21x, 22x, 23x, 24x, 25x, 2Ax, 2Bx, 2Cx, 2Dx, 2Ex, 2Fx, 2Gx, 2Hx, 2Jx, 2Kx, 2Lx, 2Mx, 2Nx, 2Px, 2Qx, 2Rx, 2Sx, 2Tx, 2Ux, 2Vx, 2Wx, 2Yx, 2Zx, 30x, 32x, 33x, 34x, 36x, 37x, 38x, 39x, 3Ax, 3Cx, 3Dx, 3Ex, 3Fx, 3Gx, 3Hx, 3Jx, 3Kx, 3Lx, 3Mx, 3Nx, 3Px, 3Rx, 40x, 52x, 53x, 62x, A0x2924-CTO, 22x, 23x, 24x, 25x, 92x, 93x, 94x, 95x, 96x, 97x, 98x, 99x, 9Ax, 9Bx, 9Cx, 9Dx, 9Ex2926-CTO2928-CTO | 42T2603 *45N7451 * | ||
| 9 DVD-RAM/RW drive2901-CTO, A2x, A3x, A4x, A5x, A6x, A7x, A8x, A9x, AAx, ABx, ACx, ADx, AEx, AFx, AGx, AHx, AJx, AKx2904-CTO, C2x, C3x, C4x, C5x, C6x, C7x, C8x, C9x, CBx, CCx, CDx, CEx, CFx, CGx, CHx, CJx, CKx, CLx, CMx, CNx, CPx, CQx, CRx, CSx, CUx, CVx, CWx, CXx, CYx, CZx, D2x, D3x, D4x, D5x, D6x, D7x, D8x, D9x, DAx, DBx, DCx, DDx, DEx, DFx, DGx, DHx, DJx, DKx, DLx, DMx, DNx, DPx, DQx, DRx, DSx, DTx, DUx, DVx, DWx, DXx, DYx, DZx, E2x, E3x, E4x, E5x, E6x, E7x, E8x, E9x, EAx, EBx, ECx, EDx, EEx, EFx, EGx, EHx, EJx, EKx, ELx, EMx, ENx, EPx, EQx, ERx, ESx, ETx, EUx, EVx, EWx, EXx, EYx, EZx, F2x, F3x, F4x, F5x, F6x, F7x, F8x, F9x, FAx, FBx, FCx, FDx, FEx, FFx, FGx, FHx, FJx, FKx, FLx, FMx, FNx, FPx, FQx, FSx, FTx, FUx, FVx, FWx, FXx, FYx, FZx, G2x, G3x, G4x, G5x, G6x, G7x, G8x, G9x, GBx, GCx, GDx2907-CTO, 72x, 73x, 74x, 75x, 76x, 77x, 78x2912-CTO, 20x, 21x, 22x, 23x, 24x, 25x, 2Ax, 2Bx, 2Cx, 2Dx, 2Ex, 2Fx, 2Gx, 2Hx, 2Jx, 2Kx, 2Lx, 2Mx, 2Nx, 2Px, 2Qx, 2Rx, 2Sx, 2Tx, 2Ux, 2Vx, 2Wx, 2Xx, 2Yx, 2Zx, 30x, 32x, 33x, 34x, 36x, 37x, 38x, 39x, 3Ax, 3Cx, 3Dx, 3Ex, 3Fx, 3Gx, 3Hx, 3Jx, 3Kx, 3Lx, 3Mx, 3Nx, 3Px, 3Rx, 40x, 52x, 53x, 62x, A0x2924-CTO, 22x, 23x, 24x, 25x, 92x, 93x, 94x, 95x, 96x, 97x, 98x, 99x, 9Ax, 9Bx, 9Cx, 9Dx, 9Ex2926-CTO2928-CTO | 45N7457 * | ||
| 9 DVD-RAM/RW drive2901-CTO, A2x, A3x, A4x, A5x, A6x, A7x, A8x, A9x, AAx, ABx, ACx, ADx, AEx, AFx, AGx, AHx, AJx, AKx2904-CTO, C2x, C3x, C4x, G5x, C6x, C7x, C8x, C9x, CBx, CCx, CDx, CEx, CFx, CGx, CHx, CJx, CKx, CLx, CMx, CNx, CPx, CQx, CRx, CSx, CUx, CVx, CWx, CXx, CYx, CZx, D2x, D3x, D4x, D4x, D5x, D6x, D7x, D8x, D9x, DAx, DBx, DCx, DDx, DEx, DFx, DGx, DHx, DJx, DKx, DLx, DMx, DNx, DPx, DQx, DRx, DSx, DTx, DUx, DVx, DWx, DXx, DYx, DZx. E2x, E3x, E4x, E5x, E6x, E7x, E8x, E9x, EAx, EBx, ECx, EDx, EEx, EFx, EGx, EHx, EJx, EKx, ELx, EMx, ENx, EPx, EQx, ERx, ESx, ETx, EUx, EVx, EWx, EXx. EYx, EZx, F2x, F3x, F4x, F5x, F6x, F7x, F8x, F9x, FAx, FBx, FCx, FDx, FEx, FFx, FGx, FHx, FJx, FKx, FLx, FMx, FNx, FPx, FQx, FSx, FTx, FUx, FVx, FAX, FAX, FZx, G2x, G3x, G4x, G5x, G6x, G7x, G8x, G9x, GBx, GCx, GDx2907-CTO, 72x, 73x, 74x, 75x, 76x, 77x, 78x2912-CTO, 20x. 21x. 22x. 23x. 24x. 25x. 2Ax. 2Bx. 2Cx. 2Dx. 2Ex. 2Fx. 2Gx. 2Hx. 2Jx. 2Kx. 2Lx. 2Mx. 2Nx. 2Px. 2Qx. 2Rx. 2Sx. 2Tx. 2Ux. 2Vx. 2Wx. 2Xx. 2Zx. 30x. 32x. 33x. 34x. 36x. 37x. 38x. 39x. 3Ax. 3Cx. 3Dx. 3Ex. 3Fx. 3Gx. 3Hx. 3Jx. 3Kx. 3Lx. 3Mx. 3Nx. 3Px. 3Rx. 40x. 52x. 53x. 62x. A0x2924-CTO, 22x. 23x. 24x. 25x. 92x. 93x. 94x. 95x. 96x. 97x. 98x. 99x. 9Ax. 9Bx. 9Cx. 9Dx. 9Ex2926-CTO2928-CTO | 45N7453 * | ||
| 9 Blu-ray Disc drive2801-CTO, A9x2808-CTO, F3x2809-CTO2815-CTO, 2Qx, 3Jx, 4Cx, 4Ex, 4Gx, 5Ex2823-CTO2824-CTO2825-CTO | 42T2605 * | ||
| 9 Blu-ray Disc drive•2901-CTO•2904-CTO•2907-CTO•2912-CTO•2924-CTO•2926-CTO•2928-CTO | 45N7459 * | ||
| 9 Travel cover 45M2657 * | |||
| 9 Bay battery•2901-CTO•2904-CTO•2907-CTO•2912-CTO•2924-CTO•2926-CTO•2928-CTO | 51J0508 * | ||
| 10 Battery pack, Li-ion (6 cell) 59+ 42T4688 * | |||
| 10 Battery pack, Li-ion (6 cell) 59+ 42T4690 * | |||
| 11 MicroSATA solid state drive, 64 GB•2801-CTO•2808-CTO•2809-CTO•2815-CTO•2823-CTO•2824-CTO•2825-CTO | 45N7951 ** | ||
| 11 MicroSATA solid state drive, 64 GB•2801-CTO•2808-CTO•2809-CTO•2815-CTO•2823-CTO•2824-CTO•2825-CTO | 45N8201 ** | ||
| 11 MicroSATA solid state drive, 80 GB•2801-CTO, CZx, DFx, DGx, DKx•2808-CTO, CZx, DFx, DGx•2809-CTO•2815-CTO, 25x, 2Lx, 2Wx, 3Mx, 3Ux, 3Xx, 45x, 4Kx, 4Lx•2823-CTO, 25x, 94x•2824-CTO•2825-CTO | 41W0524 | ** | |
| No.FR | U(Overall)FRUno.CRU | ID | |
| 11 MicroSATA solid state drive, 80 GB•2801-CTO, CZx, DFx, DGx, DKx•2808-CTO, CZx, DFx, DGx•2809-CTO•2815-CTO, 25x, 2Lx, 2Wx, 3Mx, 3Ux, 3Xx, 45x, 4Kx, 4Lx•2823-CTO, 25x, 94x•2824-CTO•2825-CTO•2901-CTO, A4x•2904-CTO, CDx, CEx,CWx•2907-CTO•2912-CTO, 2Cx, 36x•2924-CTO, 94x, 95x•2926-CTO•2928-CTO | 41W0516 ** | ||
| 11 MicroSATA solid state drive, 128 GB•2801-CTO, ACx, ADx•2808-CTO, C5x, C9x, CBx, CEx, CJx, CKx, CLx, CMx, CPx, CSx, CWx, CXx, CYx, D3x, D4x, D7x, D9x, DAx, DBx, DCx, DLx, DMx, DTx, DUx, E3x, E7x, EBx, ECx, EDx, EEx, EGx, EHx, ENx, EPx, EUx, F3x, F4x, F5x, FAx, FFx, FGx, FHx, FJx, FLx, FNx, FNx•2809-CTO, 7Cx, 7Dx•2815-CTO, 20x, 24x, 2Gx, 2Hx, 2Kx, 2Nx, 2Px, 2Qx, 2Rx, 2Tx, 2Ux, 2Vx, 2Zx, 30x, 3Cx, 3Dx, 3Ex, 3Hx, 3Qx, 3Rx, 3Tx, 3Wx, 3Zx, 42x, 4Dx, 4Ex, 4Mx, 4Nx, 4Px, 4Qx, 4Rx, 4Sx, 4Wx, 53x, 5Ax, 5Dx, 5Kx, 5Mx, 5Qx, 5Yx, 63x, 64x•2823-CTO, 24x, 95x, 98x, 9Ax, 9Cx, 9Fx, 9Gx, 9Kx, 9Px, 9Qx•2824-CTO•2825-CTO•2901-CTO, ADx, AGx, AJx•2904-CTO, C6x, C7x, CBx, CCx, CGx, D5x, DAx, DCx, DEx, DFx, DLx, DSx, DVx, DYx, DZx, E2x, E3x, EWx, EXx, F2x, F8x, FAx, FBx, FDx, FFx, FKx, FPx, FTx, FUx, FVx, FWx, FXx, FYx, FZx, G2x, G8x, GDx•2907-CTO•2912-CTO, 21x, 22x, 25x, 2Dx, 2Jx, 2Nx, 2Px, 2Qx, 30x, 39x, 3Ax, 3Fx, 3Hx, 3Kx, 53x•2924-CTO, 22x, 25x, 93x, 9Cx, 9Dx, 9Ex•2926-CTO•2928-CTO | 45N7953 ** | ||
Table36. Partslist—Overall(continued)
| No.FRU(Overall)FRUno.CRU | ID | |
| 11 MicroSATA solid state drive, 128 GB•2801-CTO, ACx, ADx•2808-CTO, C5x, C9x, CBx, CEx, CJx, CKx, CLx, CMx, CPx, CSx, CWx, CXx, CYx, D3x, D4x, D7x, D9x, DAx, DBx, DCx, DLx, DMx, DTx, DUx, E3x, E7x, EBx, ECx, EDx, EEx, EGx, EHx, ENx, EPx, EUx, F3x, F4x, F5x, FAX, FFx, FGx, FHx, FJx, FLx, FNx•2809-CTO, 7Cx, 7Dx•2815-CTO, 20x, 24x, 2Gx, 2Hx, 2Kx, 2Nx, 2Px, 2Qx, 2Rx, 2Tx, 2Ux, 2Vx, 2Zx, 30x, 3Cx, 3Dx, 3Ex, 3Hx, 3Qx, 3Rx, 3Tx, 3Wx, 3Zx, 42x, 4Dx, 4Ex, 4Mx, 4Nx, 4Px, 4Qx, 4Rx, 4Sx, 4Wx, 53x, 5Ax, 5Dx, 5Kx, 5Mx, 5Qx, 5Yx, 63x, 64x•2823-CTO, 24x, 95x, 98x, 9Ax, 9Cx, 9Fx, 9Gx, 9Kx, 9Px, 9Qx•2824-CTO•2825-CTO•2901-CTO, ADx, AGx, AJx•2904-CTO, C6x, C7x, CBx, CCx, CGx, D5x, DAx, DCx, DEx, DFx, DLx, DSx, DVx, DYx, DZx, E2x, E3x, EWx, EXx, F2x, F8x, FAX, FBx, FDx, FFx, FKx, FPx, FTx, FUx, FVx, FWx, FXx, FYx, FZX, G2x, G8x, GDx•2907-CTO•2912-CTO, 21x, 22x, 25x, 2Dx, 2Jx, 2Nx, 2Px, 2Qx, 30x, 39x, 3Ax, 3Fx, 3Hx, 3Kx, 53x•2924-CTO, 22x, 25x, 93x, 9Cx, 9Dx, 9Ex•2926-CTO•2928-CTO | 45N8203 ** | |
| 11 MicroSATA solid state drive, 128 GB, FDE (Full Disk Encryption)•2801-CTO•2808-CTO, DVx•2809-CTO•2815-CTO•2823-CTO•2824-CTO•2825-CTO•2901-CTO•2904-CTO•2907-CTO•2912-CTO•2924-CTO•2926-CTO•2928-CTO | 45N7955 ** | |
| 11 MicroSATA solid state drive, 128 GB, FDE•2801-CTO•2808-CTO, DVx•2809-CTO•2815-CTO•2823-CTO•2824-CTO•2825-CTO•2901-CTO•2904-CTO•2907-CTO•2912-CTO•2924-CTO | 45N8205 ** | |
| 11 MicroSATA solid state drive, 160 GB•2801-CTO, ALx•2808-CTO, EJx•2809-CTO•2815-CTO, 3Jx, 3Lx, 4Fx, 4Gx, 4Jx, 5Ex•2823-CTO•2824-CTO•2825-CTO•2901-CTO•2904-CTO, F3x•2907-CTO•2912-CTO•2924-CTO•2926-CTO•2928-CTO | 41W0522 ** | |
| 11 MicroSATA solid state drive, 256 GB, FDE•2801-CTO•2808-CTO•2809-CTO•2815-CTO, 3Kx•2823-CTO•2901-CTO•2904-CTO•2907-CTO•2912-CTO•2924-CTO•2926-CTO•2928-CTO | 45N7959 ** | |
| 11 MicroSATA solid state drive, 256 GB, FDE•2801-CTO•2808-CTO•2809-CTO•2815-CTO, 3Kx•2823-CTO•2824-CTO•2825-CTO•2901-CTO•2904-CTO•2907-CTO•2912-CTO•2924-CTO•2926-CTO•2928-CTO | 45N8207 ** | |
| 11 MicroSATA hard disk drive (Generation 2), 120 GB, 5,400 rpm•2801-CTO, A3x, A4x, A5x, A6x, AEx, AQx•2808-CTO, C2x, C3x, C4x, CQx, CUx, DHx, EXx, EZx, F2x•2809-CTO, 73x, 74x, 75x, 76x, 77x, 78x, 79x•2815-CTO, 22x, 2Ax, 2Bx, 2Yx, 32x, 33x, 34x, 35x, 36x, 37x, 38x, 3Fx, 3Yx, 4Hx, 52x, 5Bx, 5Fx, 5Gx, 5Hx, 5Nx, 5Vx, 5Xx, 62x•2823-CTO, 22x, 9Bx, 9Dx•2824-CTO•2825-CTO•2901-CTO•2904-CTO, E4x, E5x, E6x, E7x, E8x, E9x, EAX, EBx, EEx, EFx, EJx, EKx, ENx, EPx, ESx, ETx•2907-CTO•2912-CTO, A0x, 23x, 2Ax, 62x•2924-CTO, 23x•2926-CTO•2928-CTO | 42T1325 ** | |
| 11 MicroSATA hard disk drive (Generation 2), 250 GB, 5,400 rpm•2801-CTO, A2x, A7x, A8x, A9x, AAx, ABx, AFx, AGx, AHx, AJx, AKx, AMx, ANx, APx•2808-CTO, C6x, C7x, C8x, CAx, CCx, CDx, CFx, CGx, CHx, CNx, CRx, CVx, D2x, D5x, D6x, D8x, DDx, DEx, DJx, DNx, DPx, DQx, DRx, DSx, DWx, DXx, DYx, DZx, E2x, E4x, E5x, E6x, E8x, E9x, EAx, EFx, EKx, ELx, EMx, EQx, ERx, ESx, ETx, EVx, EWx, F6x, F7x, F8x, F9x, FBx, FCx, FDx, FEx, FKx•2809-CTO, 72x, 7Ax, 7Bx, 7Ex•2815-CTO, 23x, 2Cx, 2Dx, 2Ex, 2Fx, 2Jx, 2Mx, 2Sx, 2Xx, 39x, 3Ax, 3Bx, 3Gx, 3Nx, 3Px, 3Sx, 3Vx, 43x, 44x, 46x, 47x, 48x, 49x, 4Ax, 4Bx, 4Cx, 4Tx, 4Ux, 4Vx, 4Xx, 4Zx, 5Cx, 5Jx, 5Lx, 5Px, 5Rx, 5Sx, 5Tx, 5Ux, 5Wx•2823-CTO, 23x, 92x, 93x, 96x, 97x, 99x, 9Ex, 9Hx, 9Jx, 9Lx, 9Nx•2824-CTO•2825-CTO•2901-CTO, A2x, A3x, A5x, A6x, A7x, A8x, A9x, AAx, ABx, ACx, AEx, AFx, AHx, AKx•2904-CTO, C2x, C3x, C4x, C5x, C8x, C9x, CFx, CHx, CJx, CKx, CLx, CMx, CNx, CPx, CQx, CRx, CSx, CUx, CVx, CXx, CYx, CZx, D2x, D3x, D4x, D6x, D7x, D8x, D9x, DBx, DDx, DGx, DHx, DJx, DKx, DMx, DNx, DPx, DQx, DRx, DTx, DUx, DWx, DXx, ECx, EDx, EGx, EHx, ELx, EMx, EQx, ERx, EUx, EVx, EZx, F4x, F5x, F6x, F7x, F9x, FCx, FEx, FGx, FHx, FJx, FLx, FMx, FNx, FQx, FSx, G3x, G4x, G5x, G6x, G7x, G9x, GBx, GCx•2907-CTO, 72x, 73x, 74x, 75x, 76x, 77x, 78x•2912-CTO, 20x, 24x, 2Bx, 2Ex, 2Fx, 2Gx, 2Hx, 2Kx, 2Lx, 2Mx, 2Rx, 2Sx, 2Tx, 2Ux, 2Vx, 2Wx, 2Xx, 2Yx, 2Zx, 32x, 33x, 34x, 37x, 38x, 3Cx, 3Dx, 3Ex, 3Gx, 3Jx, 3Lx, 3Mx, 3Nx, 3Px, 3Rx, 40x, 52x•2924-CTO, 24x, 92x, 96x, 97x, 98x, 99x, 9Ax, 9Bx•2926-CTO•2928-CTO | 42T1327 ** | |
| 12 Base cover assembly for 2801 60Y4868 N | ||
| 12 Base cover assembly for 2808 60Y4869 N | ||
| 12 Base cover assembly for 2809 60Y4870 N | ||
| 12 Base cover assembly for 2815 60Y4871 N | ||
| 12 Base cover assembly for 2823 60Y4872 N | ||
| 12 Base cover assembly for 2824 60Y4873 N | ||
| 12 Base cover assembly for 2825 60Y4874 N | ||
| 12 Base cover assembly for T410s and T410si 75Y4469 N |
Table36. Partslist—Overall(continued)
| No.FRU(Overall)FRUno.CRU | ID | ||
| 13 5- in-1 Media Card Reader adapter•2801-CTO, AHx, AJx, AKx, ANx, APx, AQx•2808-CTO, C2x, C3x, CAx, CBx, CCx, CDx, CEx, CFx, CGx, CHx, CJx, CKx, CLx, CMx, CNx, CPx, CQx, CUx, CXx, CYx, D3x, D4x, D9x, DBx, DDx, DFx, DMx, DNx, DPx, DQx, DRx, DSx, DTx, DUx, DZx, E2x, E5x, E6x, E7x, E8x, E9x, EAx, EBx, ECx, EDx, EEx, EFx, EGx, ELx, EMx, ENx, EPx, F3x, F4x, F5x, F6x, F7x, F8x, F9x, FAx, FBx, FCx, FDx, FEx, FFx, FGx, FHx, FJx, FKx, FLx, FNx•2809-CTO•2815-CTO, 20x, 2Ax, 2Bx, 2Cx, 2Dx, 2Ex, 2Fx, 2Gx, 2Hx, 2Kx, 2Lx, 2Mx, 2Px, 2Qx, 2Sx, 2Tx, 2Vx, 3Ax, 3Dx, 3Fx, 3Gx, 3Hx, 3Jx, 3Qx, 3Rx, 3Sx, 3Tx, 3Ux, 46x, 47x, 48x, 49x, 4Ax, 4Bx, 4Cx, 4Dx, 4Ex, 4Fx, 4Gx, 4Kx, 4Lx, 4Rx, 4Sx, 4Yx, 4Zx, 5Ax, 5Bx, 5Cx, 5Dx, 5Ex, 5Lx, 5Mx, 5Qx, 5Vx, 5Wx•2823-CTO, 92x, 93x, 94x, 99x, 9Ax, 9Bx, 9Cx, 9Fx, 9Gx, 9Jx, 9Lx, 9Px, 9Qx•2824-CTO•2825-CTO•2901-CTO, A5x, A8x, ACx, AEx, AFx, AGx, AHx, AJx•2904-CTO, C3x, CPx, CRx, CYx, D3x, DGx, DMx, DNx, DPx, DWx, DXx, EZx, F2x, F3x, F6x, F8x, F9x, FAx, FBx, FCx, FDx, FEx, FFx, FGx, FHx, FJx, FKx, FQx, FSx, FXx, G3x, G4x, G5x, G6x, G9x, GBx•2907-CTO, 73x, 76x•2912-CTO, 20x, 21x, 2Fx, 2Xx, 32x, 36x, 37x, 3Ax, 3Lx•2924-CTO•2926-CTO•2928-CTO | 45M2658 ** | ||
| 14 Fan assembly for T400s 45N5610 N | |||
| 14 Fan assembly for T400s 45N5611 N | |||
| 14 Fan assembly for T410s and T410si, integrated•2901-CTO, A3x, A4x, A5x, A8x, ABx, ACx, AEx, AFx, AGx, AHx, AJx, AKx•2904-CTO, C2x, C3x, CFx, CGx, CHx, CJx, CPx, CRx, CUx, CWx, CXx, CYx, CZx, D2x, D3x, D6x, D7x, D8x, DGx, DMx, DNx, DPx, DWx, DXx, E4x, E5x, E6x, E7x, E8x, E9x, EAx, EBx, ECx, EDx, EEx, EFx, EGx, EHx, EJx, EKx, ELx, EMx, EYx, EZx, F2x, F3x, F4x, F5x, F6x, F7x, F8x, F9x, FAx, FBx, FCx, FDx, FEx, FFx, FGx, FHx, FJx, FKx, FLx, FMx, FNx, FPx, FQx, FSx, FXx, FZx, G3x, G4x, G5x, G6x, G9x, GBx•2907-CTO, 73x, 76x•2912-CTO, 20x, 21x, 22x, 23x, 25x, 2Ax, 2Bx, 2Dx, 2Ex, 2Fx, 2Rx, 2Sx, 32x, 36x, 37x, 38x, 39x, 3Ax, 3Dx, 3Fx, 3Gx, 3Lx, 3Px, 3Rx, 52x, 53x, 62x, A0x•2924-CTO, 22x, 23x, 25x, 9Ax•2926-CTO•2928-CTO | 45M2680 N | ||
| 14 Fan assembly for T410s and T410si, integrated•2901-CTO, A3x, A4x, A5x, A8x, ABx, ACx, AEx, AFx, AGx, AHx, AJx, AKx•2904-CTO, C2x, C3x, CFx, CGx, CHx, CJx, CRx, CRx, CUx, CWx, CXx, CYx, CZx, D2x, D3x, D6x, D7x, D8x, DGx, DMx, DNx, DPx, DWx, DXx, E4x, E5x, E6x, E7x, E8x, E9x, EAx, EBx, ECx, EDx, EEx, EFx. EJx, EKx, ELx, EMx, EYx, EZx, F2x, F3x, F4x, F5x, F6x, F7x, F8x, F9x, FAx, FBx, FCx, FDx, FEx, FFx, FGx, FHx, FJx, FKx, FLx, FMx, FNx, FPx, FQx. F5x, FXx, FZx, G3x, G4x, G5x, G6x, G9x, GBx•2907-CTO, 73x, 76x•2912-CTO, 20x, 21x, 22x, 23x, 25x, 2Ax, 2Bx, 2Dx, 2Ea, 2Fx, 2Rx, 2Sx, 32x, 36x, 37x, 38x, 39x, 3Ax, 3Dx, 3Fx, 3Gx, 3Lx, 3Px, 3Rx, 52x, 53x, 62x, A0x•2924-CTO, 20x, 21x, 22x, 23x, 25x, 2Ax, 2Bx, 2Dx, 2Ex, 2Fx, 2Rx, 2Sx, 32x, 36x, 37x, 38x, 39x, 3Ax, 3Dx, 3Fx, 2Cx, 3Lx, 3Px, 3Rx, 52x, 53x, 62x, A0x•2926-CTO•2928-CTO | 45M2678 N |
Table36. Partslist—Overall(continued)
| No.FRU(Overall)FRUno.CRU | ID | |
| 14 Fan assembly for T410s and T410si, switchable graphics•2901-CTO, A2x, A6x, A7x, A9x, AAx, ADx•2904-CTO, C4x, C5x, C6x, C7x, C8x, C9x, CBx, CCx, CDx, CEx, CKx, CLx, CMx, CNx, CQx, CSx, D4x, D5x, D9x, DAx, DBx, DCx, DEx, DFx, DHx, DJx, DKx, DLx, DQx, DRx, DSx, DTx, DUx, DVx, DYx, DZx, E2x, E3x, ENx, EPx, EQx, ERx, ESx, ETx, EUx, EVx, EWx, EXx, FTx, FUx, FVx, FWx, FYx, G2x, G7x, G8x, GCx, GDx•2907-CTO, 72x, 74x, 75x, 77x, 78x•2912-CTO, 24x, 2Cx, 2Gx, 2Hx, 2Jx, 2Kx, 2Lx, 2Mx, 2Nx, 2Px, 2Qx, 2Tx, 2Ux, 2Vx, 2Wx, 2Yx, 2Zx, 30x, 33x, 34x, 3Cx, 3Ex, 3Hx, 3Jx, 3Kx, 3Mx, 3Nx, 40x•2924-CTO, 24x, 92x, 93x, 94x, 95x, 96x, 97x, 98x, 99x, 9Bx, 9Cx, 9Dx, 9Ex•2926-CTO•2928-CTO | 60Y5145 N | |
| 14 Fan assembly for T410s and T410si, switchable graphics•2901-CTO, A2x, A6x, A7x, A9x, AAx, ADx•2904-CTO, C4x, C5x, C6x, C7x, C8x, C9x, CBx, CCx, CDx, CEx, CKX, CLx, CMx, CNx, CQx, CSx, D4x, D5x, D9x, DAx, DBx, DCx, DDx, DEx, DFx, DHx, DJx, DKx, DLx, DQx, DRx, DSx, DTx, DUx, DVx, DYx, DZx, E2x, E3x, ENx, EPx, EQx, ERx, ESx, ETx, EUx, EVx, EWx, EXx, FTx, FUx, FVx, FWx, FYx. G2x, G7x, G8x, GCx, GDx•2907-CTO, 72x, 74x, 75x, 77x, 78x•2912-CTO, 24x, 2Cx, 2Gx, 2Hx, 2Jx, 2Kx, 2Lx, 2Mx, 3Nx, 2Px, 2Qx, 2Tx, 2Ux, 2Vx, 2Wx, 2Yx, 2Zx, 30x, 33x, 34x, 3Cx, 3Ex, 3Hx, 3Jx, 3Kx, 3Mx, 3Nx, 40x•2924-CTO,24x, 92x, 93x, 94x, 95x, 96x, 97x, 98x, 99x, 9Bx, 9Cx, 9Dx, 9Ex•2926-CTO•2928-CTO | 60Y5146 N | |
| 15 34-mm ExpressCard slot frame•2801-CTO, A2x, A3x, A4x, A5x, A6x, A7x, A8x, A9x, AAx, ABx, ACx, ADx, AEx, AFx, AGx, ALx, AMx•2808-CTO, C4x, C5x, C6x, C7x, C8x, C9x, CRx, CSx, CVx, CWx, CZx, D2x, D5x, D6x, D7x, D8x, DAx, DCx, DEx, DGx, DHx, DJx, DKx, DLx, DVx, DWx, DXx, DYx, E3x, E4x, EHx, EJx, EKx, EQx, ERx, ESx, ETx, EUx, EVx, EWx, EXx, EYx, EZx, F2x•2809-CTO, 72x, 73x, 74x, 75x, 76x, 77x, 78x, 79x, 7Ax, 7Bx, 7Cx, 7Dx, 7Ex•2815-CTO, 22x, 23x, 24x, 25x, 2Jx, 2Nx, 2Rx, 2Ux, 2Wx, 2Xx, 2Yx, 2Zx, 32x, 33x, 34x, 35x, 36x, 37x, 38x, 39x, 3Bx, 3Cx, 3Ex, 3Kx, 3Lx, 3Mx, 3Nx, 3Px, 30x, 3Vx, 3Wx, 3Xx, 3Yx, 3Zx, 42x, 43x, 44x, 45x, 4Hx, 4Jx, 4Mx, 4Nx, 4Px, 4Qx, 4Tx, 4Ux, 4Vx, 4Wx, 4Xx, 5Fx, 5Gx, 5Hx, 5Jx, 5Kx, 5Nx, 5Px, 5Rx, 5Sx, 5Tx, 5Ux, 5Xx, 5Yx, 52x, 53x, 62x, 63x, 64x•2823-CTO, 22x, 23x, 24x, 25x, 95x, 96x, 97x, 98x, 9Dx, 9Ex, 9Hx, 9Kx•2824-CTO•2825-CTO•2901-CTO, A3x, A4x, ABx, AKx•2904-CTO, C2x, CFx, CGx, CHx, CJx, CUx, CVx, CWx, CZx, D2x, D6x, D7x, D8x, E4x, E5x, E6x, E7x, E8x, E9x, EBx, ECx, EDx, EEx, EFx, EGx, EHx, EJx, EKx, ELx, EMx, EYx, F4x, F5x, F7x, FLx, FMx, FNx, FPx, FZx, G2x•2907-CTO•2912-CTO, 22x, 23x, 25x, 2Ax, 2Bx, 2Dx, 2Ex, 2Rx, 2Sx, 38x, 39x, 3Dx, 3Fx, 3Gx, 3Px, 3Rx, 52x, 53x, 62x, A0x•2924-CTO, 22x, 23x, 25x, 9Ax•2926-CTO•2928-CTO | 45M2659 N | |
| 15 34-mm ExpressCard slot frame2801-CTO, A2x, A3x, A4x, A5x, A6x, A7x, A8x, A9x, AAx, ABx, ACx, ADx, AEx, AFx, AGx, ALx, AMx2808-CTO, C4x, C5x, C6x, C7x, C8x, C9x, CRx, CSx, CVx, CWx, CZx, D2x, D5x, D6x, D7x, D8x, DAx, DCx, DEx, DGx, DHx, DJx, DKx, DLx, DVx, DWx, DXx, DYx, E3x, E4x, EHx, EJx, EKx, EQx, ERx, ESx, ETx, EUx, EVx, EWx, EXx, FYx, EZx, F2x2809-CTO, 72x, 73x, 74x, 75x, 76x, 77x, 78x, 79x, 7Ax, 7Bx, 7Cx, 7Dx, 7Ex2815-CTO, 22x, 23x, 24x, 25x, 2Jx, 2Nx, 2Rx, 2Ux, 2Wx, 2Xx, 2Yx, 2Zx, 32x, 33x, 34x, 35x, 36x, 37x, 38x, 39x, 3Bx, 3Cx, 3Ex, 3Kx, 3Lx, 3Mx, 3Nx, 3Px, 30x, 3Vx, 3Wx, 3Xx, 3Yx, 3Zx, 42x, 43x, 44x, 45x, 4Hx, 4Jx, 4Mx, 4Nx, 4Px, 4Qx, 4Tx, 4Ux, 4Vx, 4Wx, 4Xx, 5Fx, 5Gx, 5Hx, 5Jx, 5Kx, 5Nx, 5Px, 5Rx, 5Sx, 5Tx, 5Ux, 5Xx, 5Yx, 52x, 53x, 62x, 63x, 64x2823-CTO, 22x, 23x, 24x, 25x, 95x, 96x, 97x, 98x, 9Dx, 9Ex, 9Hx, 9Kx2824-CTO2825-CTO2901-CTO, A3x, A4x, ABx, AKx2904-CTO, C2x, CFx, CGx, CHx, CJx, CUx, CVx, CWx, CZx, D2x, D6x, D7x, D8x, E4x, E5x, E6x, E7x, E8x, E9x, EAx, EBx, ECx, EDx, EEx, EFx, EGx, EHx, EJx, EKx, ELx, EMx, EYx, F4x, F5x, F7x, FLx, FMx, FNx, FPx, FZx, G2x2907-CTO2912-CTO, 22x, 23x, 25x, 2Ax, 2Bx, 2Dx, 2Ex, 2Rx, 2Sx, 38x, 39x, 3Dx, 3Fx, 3Gx, 3Px, 3Rx, 52x, 53x, 62x, A0x2924-CTO, 22x, 23x, 25x, 9Ax2926-CTO2928-CTO | 45M2660 N | |
| 16 System board assembly, with SP9400 processor, AMT, TPM2801-CTO, A2x, A3x, A4x, A5x, A6x, A7x, A8x, AAx, ABx, AEx, AQx2808-CTO, C2x, C4x, C6x, C7x, C8x, CAx, CCx, CDx, CFx, CGx, CHx, CNx, CQx, CRx, CUx, CVx, CXx, CYx, CZx, D2x, D3x, D4x, D5x, D6x, D9x, DAx, DBx, DCx, DDx, DEx, DFx, DGx, DHx, DJx, DKx, DNx, DPx, DQx, DWx, DXx, DYx, DZx, E2x, E4x, E5x, E6x, E8x, E9x, EAx, EFx, EKx, ELx, EMx, EQx, ERx, F6x, F7x, FBx, FCx, FDx, FEx, FKx2809-CTO, 72x, 73x, 74x, 75x, 76x, 77x, 78x, 79x2815-CTO, 20x, 22x, 2Ax, 2Cx, 2Jx, 2Kx, 2Lx, 2Mx, 2Nx, 2Px, 2Qx, 2Rx, 2Sx, 2Tx, 2Ux, 2Vx, 2Wx, 2Xx, 2Yx, 2Zx, 32x, 33x, 34x, 35x, 36x, 37x, 38x, 3Fx, 3Gx, 3Mx, 3Yx, 44x, 45x, 46x, 47x, 48x, 49x, 4Hx, 4Kx, 4Lx, 4Mx, 4Nx, 4Px, 4Qx, 4Rx, 4Sx, 52x, 53x, 5Bx, 5Cx, 5Fx, 5Gx, 5Hx, 5Lx, 5Nx, 5Vx, 5Wx, 5Xx, 5Yx, 62x, 63x2823-CTO, 22x, 92x, 94x, 95x, 96x, 97x, 99x, 9Bx, 9Dx2824-CTO2825-CTO | 60Y5693 N | |
| 16 System board assembly, with SP9400 processor, AMT, non-TPM2801-CTO2808-CTO, F4x2809-CTO2815-CTO, 2Bx, 2Dx2823-CTO, 93x, 9Lx2824-CTO2825-CTO | 60Y5695 N |
Table36. Partslist—Overall(continued)
| No.FR | RU(Overall)FRUno.CRU | ID | |
| 16 S | System board assembly, with SP9600 processor, AMT, TPM2801-CTO, A9x, ACx, ADx, AFx, AGx2808-CTO, C5x, C9x, CBx, CEx, CJx, CKx, CLx, CMx, CPx, CSx, CWx, D7x, D8x, DLx, DMx, DRx, DSx, DTx, DUx, DVx, E3x, E7x, EBx, ECx, EDx, EEx, EGx, ENx, EPx, ESx, ETx, EUx, EVx, EWx, F5x, F8x, F9x, FAx, FFx, FGx, FHx, FJx, FLx, FNx2809-CTO, 7Ax, 7Bx, 7Cx, 7Dx, 7Ex2815-CTO, 23x, 24x, 25x, 2Ex, 2Gx, 39x, 3Ax, 3Bx, 3Cx, 3Dx, 3Ex, 3Hx, 3Jx, 3Kx, 3Lx, 3Nx, 3Px, 3Qx, 3Rx, 30x, 3Sx, 3Tx, 3Ux, 3Vx, 3Wx, 3Xx, 3Zx, 42x, 43x, 4Ax, 4Bx, 4Cx, 4Dx, 4Ex, 4Fx, 4Gx, 4Jx, 4Wx, 4Zx, 5Ax, 5Dx, 5Ex, 5Jx, 5Kx, 5Mx, 5Px, 5Qx, 5Rx, 5Sx, 5Tx, 5Ux, 64x2823-CTO, 23x, 24x, 25x, 98x, 9Ax, 9Cx, 9Ex, 9Fx, 9Gx, 9Hx, 9Jx, 9Kx, 9Nx, 9Px, 9Qx2824-CTO2825-CTO | 60Y5694 N | |
| 16 S | System board assembly, with SP9600 processor, AMT, non-TPM2801-CTO2808-CTO, EJx, F3x2809-CTO2815-CTO, 2Fx, 2Hx2823-CTO2824-CTO2825-CTO | 60Y5696 N | |
| 16 S | System board assembly, with SU3500 processor, AMT, TPM2801-CTO2808-CTO, EXx, EYx2809-CTO2815-CTO, 4Tx, 4Ux, 4Vx, 4Yx2823-CTO2824-CTO2825-CTO | 45M2831 N | |
| 16 S | System board assembly, with SU3500 processor, AMT, non-TPM2801-CTO, ANx, APx2808-CTO, EZx, F2x2809-CTO2815-CTO2823-CTO2824-CTO2825-CTO | 45M2833 N | |
| 16 S | System board assembly, with Intel ® Celeron ® 723 processor, AMT, TPM2801-CTO2808-CTO2809-CTO2815-CTO2823-CTO2824-CTO2825-CTO | 45M2832 N | |
| 16 S | System board assembly, with Intel Celeron 723 processor, AMT, non-TPM2801-CTO2808-CTO2809-CTO2815-CTO2823-CTO2824-CTO2825-CTO | 45M2834 N |
Table36. Partslist—Overall(continued)
| No.FRU(Overall)FRUno.CRU | ID | |
| 16 System board assembly, with Intel ® CoreTM i3-330M processor, integrated, TPM•2901-CTO, ABx, AEx, AFx, AGx, AHx, AJx, AKx•2904-CTO, CUx, CVx, CWx, CZx, D2x, D6x, DMx, DNx, E4x, E5x, E6x, E7x, EYx, EZx, F2x, F3x, F4x, F5x, F6x, F7x, F8x, F9x, FAX, FBx, FCx, FDx, FEx, FFx, FHx, FJx, FKx, FLx, FMx, FNx, G3x, G4x, G5x, G9x•2907-CTO•2912-CTO•2924-CTO•2926-CTO•2928-CTO | 63Y2115 N | |
| 16 System board assembly, with Intel Core i3-330M processor, integrated, non-TPM•2901-CTO•2904-CTO, FGx•2907-CTO•2912-CTO•2924-CTO•2926-CTO•2928-CTO | 63Y2116 N | |
| 16 System board assembly, with Intel Core i5-520M processor, integrated, TPM•2901-CTO, A3x, A4x, A5x, ACx, ADx•2904-CTO, C2x, C3x, C4x, C5x, CFx, CGx, CHx, CJx, CPx, CXx, CYx, D7x, D8x, D9x, DAx, DGx, DHx, DPx, DQx, DRx, DSx, DWx, DXx, DYx, DZx, E8x, E9x, EAx, EBx, ECx, EDx, EEx, EFx, EGx, EHx, EJx, EKx, ELx, EMx, FPx, FQx, FSx, FTx, FUx, FXx, FYx, FZx, G2x, G6x, G7x, GBx, GCx•2907-CTO, 73x•2912-CTO, 20x, 21x, 22x, 23x, 24x, 25x, 2Ax, 2Bx, 2Dx, 2Ex, 2Fx, 2Gx, 2Hx, 2Rx, 2Sx, 2Xx, 36x, 37x, 38x, 39x, 3Ax, 3Dx, 3Fx, 3Gx, 3Hx, 3Jx, 3Lx, 3Mx, 3Px, 3Rx, 52x, 53x, 62x, A0x•2924-CTO, 22x, 23x, 24x, 25x, 96x, 97x, 98x, 99x, 9Ax, 9Bx, 9Cx, 9Dx•2926-CTO•2928-CTO | 63Y2044 N | |
| 16 System board assembly, with Intel Core i5-520M processor, integrated, non-TPM•2901-CTO, A8x•2904-CTO, CRx, D3x, D4x, EWx, EXx•2907-CTO, 76x•2912-CTO, 32x, 3Cx•2924-CTO•2926-CTO•2928-CTO | 63Y2050 N | |
| 16 System board assembly, with Intel Core i5-520M processor, switchable graphics 512MB, TPM•2901-CTO, ADx•2904-CTO, C4x, C5x, D9x, DAx, DHx, DQx, DRx, DSx, DYx, DZx, FTx, FUx, FYx, G2x•2907-CTO•2912-CTO, 24x, 2Gx, 2Hx, 3Hx, 3Jx, 3Mx•2924-CTO, 24x, 96x, 97x, 98x, 99x, 9Bx, 9Cx, 9Dx•2926-CTO•2928-CTO | 63Y2047 N | |
| 16 System board assembly, with Intel Core i5-520M processor, switchable graphics 512MB, non-TPM•2901-CTO•2904-CTO, D4x, EWx, EXx•2907-CTO•2912-CTO, 3Cx•2924-CTO•2926-CTO•2928-CTO | 63Y2053 N | |
| 16 System board assembly, with Intel Core i5-540M processor, switchable graphics 512MB, TPM•2901-CTO, A2x, A6x, A7x•2904-CTO, C6x, C7x, C8x, C9x, CBx, CCx, CDx, CEx, CKx, CLx, CMx, CNx, CQx, DBx, DCx, DDx, DEx, DFx, DJx, DKx, DLx, DTx, DUx, DVx, E2x, E3x, ENx, EPx, EQx, ERx, ESx, ETx, EUx, EVx, FVx, FWx, G8x, GDx•2907-CTO, 72x, 74x, 75x•2912-CTO, 2Cx, 2Jx, 2Kx, 2Lx, 2Mx, 2Nx, 2Px, 2Qx, 2Tx, 2Ux, 2Vx, 2Wx, 2Yx, 2Zx, 30x, 3Ex, 3Kx, 3Nx, 40x•2924-CTO, 92x, 93x, 94x, 95x, 9Ex•2926-CTO•2928-CTO | 63Y2048 N | |
| 16 System board assembly, with Intel Core i5-540M processor, switchable graphics 512MB, non-TPM•2901-CTO, A9x, AAx•2904-CTO, CSx, D5x•2907-CTO, 77x, 78x•2912-CTO, 33x, 34x•2924-CTO•2926-CTO•2928-CTO | 63Y2054 N | |
| 17 1-GB DDR3-1066 SDRAM SO-DIMM (PC3-8500) card•2801-CTO, A3x, A4x, AEx•2808-CTO, CCx, CKx, CNx, CPx, DSx, DZx, E2x, E5x, ECx, EFx, EGx, ELx, EMx, F9x, FBx, FGx, FKx, FLx•2809-CTO, 73x, 74x, 75x, 76x, 77x, 78x, 79x•2815-CTO, 23x, 2Yx, 2Zx, 30x, 32x, 33x, 34x, 35x, 36x, 37x, 38x, 3Yx, 47x, 49x, 4Cx, 4Dx, 4Fx, 5Fx, 5Gx, 63x, 64x•2823-CTO, 23x, 9Dx, 9Lx•2824-CTO•2825-CTO•2901-CTO, ADx, AGx, AHx, AJx•2904-CTO, C3x, CWx, CYx, D4x, DAx, DBx, DCx, DDx, DFx, EWx, EXx, F2x, F3x, FJx, FKx•2907-CTO•2912-CTO, 24x, 25x, 2Ax, 2Bx, 2Cx, 30x, 3Cx, 53x•2924-CTO, 24x, 25x•2926-CTO•2928-CTO | 55Y3712 * |
Table36. Partslist—Overall(continued)
| No.FR | U(Overall)FRUno.CRU | ID | |
| 17 2 | GB DDR3-1066 SDRAM SO-DIMM (PC3-8500) card• 2801-CTO, A2x, A5x, A6x, A7x, A8x, A9x, AAx, ABx, ACx, ADx, AFx, AGx, AHx, AJx, AKx, ALx, AMx, ANx, APx, AQx•2808-CTO, C2x, C3x, C4x, C5x, C6x, C7x, C8x, C9x, CAx, CBx, CCx, CDx, CEx, CFx, CGx, CHx, CJx, CKx, CLx, CMx, CNx, CPx, CQx, CRx, CSx, CUx, CVx, CWx, CXx, CYx, CZx, D2x, D3x, D4x, D5x, D6x, D7x, D8x, D9x, DAx, DBx, DCx, DDx, DEx, DFx, DGx, DHx, DJx, DKx, DLx, DMx, DNx, DPx, DQx, DRx, DSx, DTx, DUx, DVx, DWx, DXx, DYx, DZx, E2x, E3x, E4x, E5x, E6x, E7x, E8x, E9x, EAx, EBx, ECx, EDx, EEx, EFx, EGx, EHx, EJx, EKx, ELx, EMx, ENx, EPx, EQx, ERx, ESx, ETx, EUx, EVx, EWx, EXx, EYx, EZx, F2x, F3x, F4x, F5x, F6x, F7x, F8x, F9x, FAx, FBx,FCx, FDx, FEx, FFx, FGx, FHx, FJx, FKx, FLx, FNx•2809-CTO, 72x, 7Ax, 7Bx, 7Cx, 7Dx, 7Ex•2815-CTO, 20x, 22x, 23x, 25x, 2Ax, 2Bx, 2Cx, 2Dx, 2Ex, 2Fx, 2Gx, 2Hx, 2Jx, 2Kx, 2Lx, 2Mx, 2Nx, 2Px, 2Qx, 2Rx, 2Sx, 2Tx, 2Ux, 2Vx, 2Wx, 2Xx, 2Yx, 2Zx, 30x, 39x, 3Ax, 3Bx, 3Cx, 3Dx, 3Ex, 3Fx, 3Gx, 3Hx, 3Jx, 3Kx, 3Lx, 3Mx, 3Nx, 3Px, 3Qx, 3Rx, 3Sx, 3Tx, 3Vx, 3Wx, 3Yx, 3Zx, 42x, 43x, 44x, 45x, 46x, 47x, 48x, 49x, 4Ax, 4Bx, 4Cx, 4Dx, 4Fx, 4Hx, 4Jx, 4Kx, 4Lx, 4Mx, 4Nx, 4Px, 4Qx, 4Rx, 4Sx, 4Tx, 4Ux, 4Vx, 4Wx, 4Xx, 4Yx, 4Zx, 52x, 53x, 5Ax, 5Bx, 5Cx, 5Dx, 5Ex, 5Hx, 5Jx, 5Kx, 5Lx, 5Mx, 5Nx, 5Px, 5Qx, 5Rx, 5Sx, 5Tx, 5Ux, 5Vx, 5Wx, 5Xx, 62x, 63x, 64x•2823-CTO, 22x, 23x, 25x, 92x, 93x, 94x, 95x, 96x, 97x, 98x, 99x, 9Ax, 9Bx, 9Cx, 9Ex, 9Fx, 9Gx, 9Hx, 9Jx, 9Kx, 9Lx, 9Nx, 9Px, 9Qx•2824-CTO•2825-CTO•2901-CTO, A2x, A3x, A4x, A5x, A6x, A7x, A8x, A9x, AAx, ABx, ACx, ADx, AEx, AFx, AGx, AHx, AJx, AKx•2904-CTO, C2x, C3x, C4x, C5x, C6x, C7x, C8x, C9x, CBx, CCx, CDx, CEx, CFx, CGx, CHx, CJx, CKx, CLx, CMx, CNx, CPx, CQx, CRx, CSx, CUx, CVx, CWx, CXx, CYx, CZx, D2x, D3x, D4x, D5x, D6x, D7x, D8x, D9X, DAx, DBx, DCx, DDx, DEx, DFx, DGx, DHx, DJx, DKx, DLx, DMx, DNx, DPx, DQx, DRx, DSx, DTx, DUx, DVx, DWx, DXx, DYx, DZx, E2x, E3x, E4x, E5x, E6x, E7x, B8x, E9x, EAa, EBx, ECx, EDx, EEx, EFx, EGx, EHx, EJx, EKx, ELx, EMx, ENx, EPx, EQx, ERx, ESx, ETx, EUx, EVx, EWx, EXx, EYx, EZx, F2x, F3x, F4x, F5x, F6x, F7x, F8X, F9X, FAx, FBx, FCx, FDx, FEx, FFx, FGx, FHx, FJx, FKx, FLx, FMx, FNx, FPx, FQx, FSx, FTx, FUx, FVx, FWx, FXx, FZx, G2x, G3x, G4x, G5x, G6x, G7x, G8x, G9x, GBx, GCx, GDx•2907-CTO, 72x, 73x, 74x, 75x, 76x, 77x, 78x•2912-CTO, 20x, 21x, 22x, 23x, 24x, 25x, 2Ax, 2Bx, 2Cx, 2Dx, 2Ex, 2Fx, 2Gx, 2Hx, 2Jx, 2Kx, 2Lx, 2Mx, 2Nx, 2Px, 2Qx, 2Rx, 2Sx, 2Tx, 2Ux, 2Vx, Z2x, 30x, 32x, 33x, 34x, 36x, 37x, 38x, 39x, 3Ax, 3Cx, 3Dx, 3Ex, 3Fx, 3Gx, 3Hx, 3Jx, 3Kx, 3Lx, 3Mx, 3Nx, 3Px, 52x, 53x, 62x, A0x•2924-CTO, 22x, 23x, 24x, 25x, 92x, 93x, 94x, 95x, 96x, 97x, 98x, 99x, 9Ax, 9Bx, 9Cx, 9Dx, 9Ex•2926-CTO•2928-CTO | 55Y3713 * | |
| No.FRU(Overall)FRUno.CRU | ID | ||
| 17 4-GB DDR3-1066 SDRAM SO-DIMM (PC3-8500) card•2801-CTO•2808-CTO•2809-CTO•2815-CTO, 24x, 3Ux, 3Xx, 4Ex, 4Gx, 5Yx•2823-CTO, 24x•2824-CTO•2825-CTO•2901-CTO•2904-CTO•2907-CTO•2912-CTO•2924-CTO•2926-CTO•2928-CTO | 55Y3714 * | ||
| 17 4-GB DDR3-1333 SDRAM SO-DIMM (PC3-10600) card•2901-CTO•2904-CTO, FYx•2907-CTO•2912-CTO, 3Rx, 40x•2924-CTO•2926-CTO•2928-CTO | 55Y3717 * | ||
| 18 Wireless USB PCI Express Half-Mini Card•2801-CTO•2808-CTO•2809-CTO•2815-CTO•2823-CTO•2824-CTO•2825-CTO | |||
| US 43Y6547 ** | |||
| Japan 43Y6549 ** | |||
| EU 43Y6551 ** | |||
| 18 Intel Turbo Memory Minicard, 2 GB (half size)•2801-CTO, A2x, A4x, A6x, A8x, A9x, ABx, ALx, AMx•2808-CTO, C2x, C3x, C6x, E4x•2809-CTO, 78x, 7Bx•2815-CTO, 2Ax, 2Bx, 2Cx, 2Dx, 2Ex, 2Fx, 2Gx, 2Hx, 2Jx, 2Sx, 2Xx, 37x, 3Bx, 3Fx, 3Nx, 3Px, 3Sx, 3Vx, 46x, 47x, 48x, 49x, 4Ax, 4Bx, 4Cx, 4Ux, 4Vx, 4Xx, 5Bx, 5Vx•2823-CTO, 92x, 93x, 96x, 9Bx•2824-CTO•2825-CTO | 43Y6523 ** | ||
| 18 Intel Turbo Memory Minicard, 4 GB (half size)•2801-CTO•2808-CTO•2809-CTO•2815-CTO•2823-CTO•2824-CTO•2825-CTO | 43Y6525 ** | ||
| 19 Backup battery 45N5864 ** | |||
Table36. Partslist—Overall(continued)
| No.FRU(Overall)FRUno.CRU | ID | |
| 20 Palm rest assembly with fingerprint reader• 2801-CTO, A2x, A3x, A4x, A5x, A6x, A7x, A8x, A9x, AAx, ABx, ACx, ADx, AEx, AFx, AGx, ALx, AMx, AQx•2808-CTO, C2x, C3x, C4x, C5x, C6x, C7x, C8x, C9x, CAx, CBx, CCx, CDx, CEx, CFx, CGx, CHx, CJx, CKx, CLx, CMx, CNx, CPx, CQx, CRx, CSx, CUx, CVx, CWx, CXx, CYx, CZx, D2x, D3x, D4x, D5x, D6x, D7x, D8x, D9x, DAx, DBx, DCx, DDx, DEx, DFx, DGx, DHx, DJx, DKx, DLx, DMx, DNx, DPx, DQx, DRx, DSx, DTx, DUx, DVx, DWx, DXx, DYx, DZx, E2x, E3x, E4x, E5x, E6x, E7x, E8x, E9x, EAx, EBx, ECx, EDx, EEx, EFx, EGx, EJx, EKx, ELx, EMx, ENx, EPx, EQx, ERx, ESx, ETx, EUx, EVx, EWx, EXx, EYx, EZx, F2x, F3x, F4x, F5x, F6x, F7x, F8x, F9x, FAx, FBx, FCx, FDx, FEx, FFx, FGx, FHx, FJx, FKx, FLx, FNx•2809-CTO, 72x, 73x, 74x, 75x, 76x, 77x, 78x, 79x, 7Ax, 7Bx, 7Cx, 7Dx, 7Ex•2815-CTO, 20x, 22x, 23x, 24x, 25x, 2Ax, 2Bx, 2Cx, 2Dx, 2Ex, 2Fx, 2Gx, 2Hx, 2Jx, 2Kx, 2Lx, 2Mx, 2Nx, 2Px, 2Qx, 2Rx, 2Sx, 2Tx, 2Wx, 2Xx, 2Yx, 2Zx, 30x, 32x, 33x, 34x, 35x, 36x, 37x, 38x, 39x, 3Ax, 3Bx, 3Cx, 3Dx, 3Ex, 3Fx, 3Gx, 3Hx, 3Jx, 3Kx, 3Lx, 3Mx, 3Nx, 3Px, 3Qx, 3Rx, 3Sx, 3Tx, 3Ux, 3Vx, 3Wx, 3Xx, 3Yx, 3Zx, 42x, 43x, 44x, 45x, 46x, 47x, 48x, 49x, 4Ax, 4Bx, 4Cx, 4Dx, 4Ex, 4Fx, 4Gx, 4Hx, 4Jx, 4Kx, 4Lx, 4Mx, 4Nx, 4Px, 4Qx, 4Tx, 4Ux, 4Vx, 4Wx, 4Xx, 4Yx, 4Zx, 52x, 53x, 5Ax, 5Bx, 5Cx, 5Dx, 5Ex, 5Fx, 5Gx, 5Hx, 5Jx, 5Kx, 5Lx, 5Mx, 5Nx, 5Px, 5Qx, 5Rx, 5Sx, 5Tx, 5Ux, 5Vx, 5Wx, 5Xx, 5Yx•2823-CTO, 22x, 23x, 24x, 25x, 92x, 93x, 94x, 95x, 96x, 97x, 98x, 99x, 9Ax, 9Bx, 9Cx, 9Dx, 9Ex, 9Fx, 9Gx, 9Hx, 9Jx, 9Kx, 9Lx•2824-CTO•2825-CTO•2901-CTO, A2x, A3x, A4x, A5x, A6x, A7x, A8x, A9x, AAx, ABx, ACx, ADx, AEx, AFx, AGx, AHx, AJx•2904-CTO, C2x, C3x, C4x, C5x, C6x, C7x, C8x, C9x, CBx, CCx, CDx, CEx, CFx, CGx, CHx, CJx, CKx, CLx, CMx, CNx, CPx, CQx, CRx, CSx, CUx, CVx, CWx, CXx, CYx, CZx, D2x, D3x, D4x, D5x, D6x, D7x, D8x, D9X, DAx, DBx, DCx, DDx, DEx, DFx, DGx, DHx, DJx, DKx, DLx, DMx, DNx, DPx, DQx, DRx, DSx, DTx, DUx, DVx, DWx, DXx, DYx, DZx, E2x, E3x, E4x, E5x, E6x, E7X, E8X, E9X, EAx, EBx, ECx, EDx, EEx, EFx, EGx, EHx, EJx, EKx, ELx, EMx, ENx, EPx, EQx, ERx, ESx, ETx, EUx, EVx, EWx, EXx, EYx, EZx, F2x, F3x, F4x, F5x, F6x, F7X, F8X, F9X, FAX, FBx, FCx, FDx, FEx, FFx, FGx, FHx, FJx, FKx, FLx, FMx, FNx, FPx, FQx, FSx, FTx, FUx, FVx, FWx, FXx, FYx, FZx, G2x, G2x, G3x, G4x, G5x, G6x, G7x, G8x, G9x, GBx, GCx, GDx•2907-CTO, 73x, 74x, 75x, 76x, 77x, 78x•2912-CTO, 20x, 21x, 22x, 23x, 25x, 2Ax, 2Bx, 2Cx, 2Dx, 2Ex, 2Fx, 2Gx, 2Hx, 2Jx, 2Kx, 2Lx, 2Mx, 2Nx, 2Px, 2Qx, 2Rx, 2Sx, 2Tx, 2Ux, 2Vx, 2Wx, 2Xx, 2Zx, 30x, 32x, 33x, 34x, 36x, 37x, 38x, 39x, 3Ax, 3Cx, 3Dx, 3Ex, 3Gx, 3Hx, 3Jx, 3Kx, 3Lx, 3Mx, 3Nx, 3Px, 3Rx, 40x, 52x, 53x•2924-CTO, 22x, 23x, 25x, 92x, 93x, 94x, 95x, 96x, 97x, 98x, 99x, 9Ax, 9Bx, 9Cx, 9Dx, 9Ex•2926-CTO•2928-CTO | 45M2371 N |
Table36. Partslist—Overall(continued)
| No.FR | U(Overall)FRUno.CRU | ID | |
| 20 Palm rest assembly without fingerprint reader•2801-CTO, AHx, AJx, AKx, ANx, APx•2808-CTO, EHx•2809-CTO•2815-CTO, 2Ux, 2Vx, 4Rx, 4Sx, 62x, 63x, 64x•2823-CTO•2824-CTO•2825-CTO•2901-CTO, AKx•2904-CTO•2907-CTO, 72x•2912-CTO, 24x, 3Fx, 62x, A0x•2924-CTO, 24x•2926-CTO•2928-CTO | 45M2370 N | ||
| 21 Keyboard (see “Keyboard” on page 191.) | |||
| 22 TrackPoint caps 91P9642 * | |||
| — Thermal grease 91P8835 N | |||
| — AC adapter (see “AC adapters” on page 195.) | |||
LCDFRUs
In ThinkPad T400s, T410s, and T410si, there are following types of LCDs.
•14.1-inch WXGA+ TFT LED-backlight LCD (Table 37 on page 178)
• 14.1-inch WXGA+ TFT LED-backlight Multi touch panel (Table 38 on page 187)

Table37. Partslist—14.1-inchWXGA+LED-backlightLCD
| No.FR | U(14.1-inchWXGA+LED-backlightLCD)FRUno.CRU | ID | |
| 1 LCD bezel assembly 45M2653 N | |||
| 2 LCD module, 14.1-inch WXGA+ 27R2479 N | |||
| 2 LCD module, 14.1-inch WXGA+ 27R2485 N | |||
| 3 Antenna kit 45M2907 N | |||
| 3 Antenna kit 45M2911 N | |||
| 4 Microphone sub card• 2801-CTO, A2x, A3x, A4x, A5x, A6x, A7x, A8x, A9x, AAx, ABx, AEx, AFx, AGx, AKx, ALx, AMx, ANx•2808-CTO, C2x, C3x, C4x, D6x, D8x, DFx, DGx, DHx, DJx, DVx, DWx, DXx, DYx, DZx, EQx, ERx, ESx, ETx•2809-CTO, 72x, 73x, 74x, 75x, 76x, 77x, 78x, 79x, 7Ax, 7Bx, 7Cx, 7Dx, 7Ex•2815-CTO, 22x, 2Ax, 2Bx, 2Lx, 2Mx, 2Nx, 2Px, 2Rx, 2Ux, 2Vx, 2Wx, 2Xx, 32x, 33x, 34x, 35x, 36x, 38x, 39x, 3Ax, 4Hx, 5Fx, 5Gx, 5Rx, 5Sx, 62x, 63x, 64x•2823-CTO, 22x, 94x, 95x, 9Dx, 9Ex•2824-CTO•2825-CTO•2901-CTO•2904-CTO, CHx, CJx, CKx, CLx, CMx, CNx, E4x, E5x, E6x, E7x, E8x, E9x, EAx, EBx, ECx, EDx, EEx, EFx, EGx, EHx, EJx, EKx, ELx, EMx, ENx, EPx, EQx, ERx, ESx, ETx, EUx, EVx, EYx, EZx, F2x, F3x•2907-CTO, 72x• 2912-CTO, 23x, 25x, 2Ax, 2Lx, 2Mx, 2Rx, 2Sx, 2Tx, 2Ux, 2Vx, 62x, A0x•2924-CTO, 23x, 25x, 92x•2926-CTO•2928-CTO | 43Y9998 N | ||
| No.FRU(14.1-inchWXGA+LED-backlightLCD)FRUno.CRU | ID | ||
| 4 Integrated camera•2801-CTO, ACx, ADx, AHx, AJx, APx, AQx•2808-CTO, C5x, C6x, C7x, C8x, C9x, CAx, CBx, CCx, CDx, CEx, CFx, CGx, CHx, CJx, CKx, CLx, CMx, CNx, CPx, CQx, CRx, CSx, CUx, CVx, CWx, CXx, CYx, CZx, D2x, D3x, D4x, D5x, D7x, D9x, DAx, DDx, DEx, DKx, DLx, DMx, DNx, DPx, DQx, DRx, DSx, DTx, DUx, E5x, E6x, E7x, E8x, E9x, EAx, EBx, ECx, EDx, EEx, EFx, EGx, EKx, EMx, EPx, EUx, EXx, EYx, EZx, F2x, F3x, F4x, F5x, F6x, F7x, F8x, F9x, FAx, FBx, FCx, FDx, FEx, FFx, FGx, FHx, FJx, FKx, FLx•2809-CTO•2815-CTO, 20x, 23x, 24x, 25x, 2Cx, 2Dx, 2Ex, 2Fx, 2Gx, 2Hx, 2Jx, 2Kx, 2Qx, 2Sx, 2Tx, 2Yx, 2Zx, 30x, 37x, 3Bx, 3Cx, 3Dx, 3Ex, 3Fx, 3Gx, 3Hx, 3Jx, 3Kx, 3Lx, 3Mx, 3Nx, 3Px, 3Qx, 3Rx, 3Sx, 3Tx, 3Ux, 3Vx, 3Wx, 3Xx, 3Yx, 3Zx, 42x, 43x, 44x, 45x, 46x, 47x, 4Ax, 4Jx, 4Tx, 4Ux, 4Vx, 4Yx, 52x, 53x, 5Bx, 5Cx, 5Dx, 5Ex, 5Hx, 5Jx, 5Kx, 5Lx, 5Mx, 5Vx, 5Wx•2823-CTO, 23x, 24x, 25x, 92x, 93x, 96x, 97x, 98x, 99x, 9Ax, 9Bx, 9Cx, 9Fx, 9Gx, 9Hx, 9Jx, 9Kx, 9Lx•2824-CTO•2825-CTO•2901-CTO, A2x, A3x, A4x, A5x, A6x, A7x, A8x, A9x, AAx, ABx, ACx, ADx, AEx, AFx, AGx, AHx, AJx, AKx•2904-CTO, C2x, C3x, C4x, C6x, C8x, C9x, CBx, CCx, CDx, CFx, CGx, CVx, CWx, CXx, CYx, D3x, D6x, D7x, D8x, D9x, DAx, DBx, DCx, DGx, DHx, DJx, DWx, DXx, DYx, DZx, EWx, F4x, F5x, F6x, F7x, F8x, F9x, FAx, FBx, FCx, FDx, FEx, FFx, FGx, FHx, FJx, FKx, FPx, FQx, FSx, FTx, FUx, FXx, FYx, FZx, G2x, G3x, G4x, G5x, G6x, G7x, G9x, GBx, GCx•2907-CTO, 73x, 74x, 75x, 76x, 77x, 78x•2912-CTO, 21x, 30x, 24x, 2Bx, 2Cx, 2Dx, 2Ex, 2Fx, 2Gx, 2Hx, 2Jx, 2Kx, 2Nx, 2Px, 37x, 38x, 39x, 3Dx, 3Fx, 3Gx, 3Hx, 3Jx, 3Kx, 3Lx, 3Mx, 3Px, 3Rx, 52x•2924-CTO, 24x, 93x, 94x, 96x, 97x, 98x, 99x, 9Ax, 9Bx, 9Cx, 9Dx, 9Ex•2926-CTO•2928-CTO5 Hinge kit2801-CTO, A2x, A3x, A4x, A5x, A6x, A7x, A8x, A9x, AAx, ABx, ACx, ADx, AEx, AFx, AGx, AHx, AJx, AKx, ALx, AMx, ANx, APx, AQx2808-CTO, C2x, C3x, C4x, C5x, C6x, C7x, C8x, C9x, CAx, CBx, CCx, CDx, CEx, CFx, CGx, CHx, CJx, CKx, CLx, CMx, CNx, CPx, CQx, CRx, CSx, CUx, CVx, CWx, CXx, CYx, CZx, D2x, D3x, D4x, D5x, D6x, D7x, D8x, D9x, DAx, DDx, DEx, DFx, DGx, DHx, DJx, DKx, DLx, DMx, DNx, DPx, DQx, DRx, DSx, DTx, DUx, DVx, DWx, DXx, DYx, DZx, E5x, E6x, E7x, E8x, E9x, EAx, EBx, ECx, EDx, EEx, EFx, EGx, EKx, EMx, EPx, EQx, ERx, ESx, ETx, EUx, EXx, EYx, EZx, F2x, F3x, F4x, F5x, F6x, F7x, F8x, F9x, FAx, FBx, FCx, FDx, FEx, FFx, FGx, FHx, FJx, FKx, FLx2809-CTO, 72x, 73x, 74x, 75x, 76x, 77x, 78x, 79x, 7Ax, 7Bx, 7Cx, 7Dx, 7Ex2815-CTO, 20x, 22x, 23x, 24x, 25x, 2Ax, 2Bx, 2Cx, 2Dx, 2Ex, 2Fx, 2Gx, 2Hx, 2Jx, 2Kx, 2Lx, 2Mx, 2Nx, 2Px, 2Qx, 2Rx, 2Sx, 2Tx, 2Ux, 2Vx, 2Wx, 2Xx, 2Yx, 2Zx, 30x, 32x, 33x, 34x, 35x, 36x, 37x, 38x, 39x, 3Ax, 3Bx, 3Cx, 3Dx, 3Ex, 3Fx, 3Gx, 3Hx, 3Jx, 3Kx, 3Lx, 3Mx, 3Nx, 3Px, 3Qx, 3Rx, 3Sx, 3Tx, 3Ux, 3Vx, 3Wx, 3Xx, 3Yx, 3Zx, 42x, 43x, 44x, 45x, 46x, 47x, 4Ax, 4Hx, 4Jx, 4Tx, 4Ux, 4Vx, 4Yx, 52x, 53x, 5Bx, 5Cx, 5Dx, 5Ex, 5Fx, 5Gx, 5Hx, 5Jx, 5Kx, 5Lx, 5Mx, 5Rx, 5Sx, 5Vx, 5Wx, 62x, 63x, 64x2823-CTO, 22x, 23x, 24x, 25x, 92x, 93x, 94x, 95x, 96x, 97x, 98x, 99x, 9Ax, 9Bx, 9Cx, 9Dx, 9Ex, 9Fx, 9Gx, 9Hx, 9Jx, 9Kx, 9Lx2824-CTO2825-CTO2901-CTO, A2x, A3x, A4x, A5x, A6x, A7x, A8x, A9x, AAx, ABx, ACx, ADx, AEx, AFx, AGx, AHx, AJx, AKx2904-CTO, C2x, C3x, C4x, C6x, C8x, C9x, CBx, CCx, CDx, CFx, CGx, CHx, CJx, CKx, CLx, CMx, CNx, CVx, CWx, CXx, CYx, D3x, D6x, D7x, D8x, D9x, DAx, DBx, DCx, DGx, DHx, DJx, DWx, DXx, DYx, DZx, E4x, E5x, E6x, E7x, E8x, E9x, EAx, EBx, ECx, EDx, EEx, EFx, EGx, EHx, EJx, EKx, ELx, EMx, ENx, EPx, EQx, ERx, ESx, ETx, EUx, EVx, EWx, EYx, EZx, F2x, F3x, F4x, F5x, F6x, F7x, F8x, F9x, FAx, FBx, FCx, FDx, FEx, FFx, FGx, FHx, FJx, FKx, FPx, FQx, FSx, FTx, FUx, FXx, FYx, FZx, G2x, G3x, G4x, G5x, G6x, G7x, G9x, GBx, GCx2907-CTO, 72x, 73x, 74x, 75x, 76x, 77x, 78x2912-CTO, 21x, 23x, 24x, 25x, 2Ax, 2Bx, 2Cx, 2Dx, 2Ex, 2Fx, 2Gx, 2Hx, 2Jx, 2Kx, 2Lx, 2Mx, 2Nx, 2Px, 2Rx, 2Sx, 2Tx, 2Ux, 2Vx, 2Wx, 30x, 37x, 38x, 39x, 3Dx, 3Fx, 3Gx, 3Hx, 3Jx, 3Kx, 3Lx, 3Mx, 3Px, 3Rx, 52x, 62x, A0x2924-CTO, 23x, 24x, 25x, 92x, 93x, 94x, 96x, 97x, 98x, 99x, 9Ax, 9Bx, 9Cx, 9Dx, 9Ex2926-CTO2928-CTO | 60Y9706 N45M2654 N | ||
Table37. Partslist—14.1-inchWXGA+LED-backlightLCD(continued)
| No.FRU(14.1-inchWXGA+LED-backlightLCD)FRUno.CRU | ID | ||
| 5 Hinge kit2801-CTO, A2x, A3x, A4x, A5x, A6x, A7x, A8x, A9x, AAx, ABx, ACx, ADx, AEx, AFx, AGx, AHx, AJx, AKx, ALx, AMx, ANx, APx, AQx2808-CTO, C2x, C3x, C4x, C5x, C6x, C7x, C8x, C9x, CAx, CBx, CCx, CDx, CEx, CFx, CGx, CHx, CJx, CKx, CLx, CMx, CNx, CPx, CQx, CRx, CSx, CUx, CVx, CWx, CXx, CYx, CZx, D2x, D3x, D4x, D5x, D6x, D7x, D8x, D9x, DAx, DDx, DEx, DFx, DGx, DHx, DJx, DKx, DLx, DMx, DNx, DPx, DQx, DRx, DSx, DTx, DUx, DVx, DWx, DXx, DYx, DZx, E5x, E6x, E7x, E8x, E9x, EAx, EBx, ECx, EDx, EEx, EFx, EGx, EMx, EPx, EQx, ERx, ESx, ETx, EUx, EXx, EYx, EZx, F2x, F3x, F4x, F5x, F6x, F7x, F8x, F9x, FAx, FBx, FCx, FDx, FEx, FFx, FGx, FHx, FJx, FKx, FLx2809-CTO, 72x, 73x, 74x, 75x, 76x, 77x, 78x, 79x, 7Ax, 7Bx, 7Cx, 7Dx, 7Ex2815-CTO, 20x, 22x, 23x, 24x, 25x, 2Ax, 2Bx, 2Cx, 2Dx, 2Ex, 2Fx, 2Gx, 2Hx, 2Jx, 2Kx, 2Lx, 2Mx, 2Nx, 2Px, 2Qx, 2Rx, 2Sx, 2Tx, 2Ux, 2Vx, 2Wx, 2Xy, 2Zx, 30x, 32x, 33x, 34x, 35x, 36x, 37x, 38x, 39x, 3Ax, 3Bx, 3Cx, 3Dx, 3Ex, 3Fx, 3Gx, 3Hx, 3Jx, 3Kx, 3Lx, 3Mx, 3Nx, 3Px, 3Qx, 3Rx, 3Sx, 3Tx, 3Ux, 3Vx, 3Wx, 3Xx, 3Yx, 3Zx, 42x, 43x, 44x, 45x, 46x, 47x, 4Ax, 4Hx, 4Jx, 4Tx, 4Ux, 4Vx, 4Yx, 52x, 53x, 5Bx, 5Cx, 5Dx, 5Ex, 5Fx, 5Gx, 5Hx, 5Jx, 5Kx, 5Lx, 5Mx, 5Rx, 5Sx, 5Vx, 5Wx, 62x, 63x, 64x2823-CTO, 22x, 23x, 24x, 25x, 92x, 93x, 94x, 95x, 96x, 97x, 98x, 99x, 9Ax, 9Bx, 9Cx, 9Dx, 9Ex, 9Fx, 9Gx, 9Hx, 9Jx, 9Kx, 9Lx2824-CTO2825-CTO2901-CTO, A2x, A3x, A4x, A5x, A6x, A7x, A8x, A9x, AAx, ABx, ACx, ADx, AEx, AFx, AGx, AHx, AJx, AKx2904-CTO, C2x, C3x, C4x, C6x, C8x, C9x, CBx, CCx, CDx, CFx, CGx, CHx, CJx, CKx, CLx, CMx, CNx, CVx, CWx, CXx, CYx, D3x, D6x, D7x, D8x, D9x, DAx, DBx, DCx, DGx, DHx, DJx, DWx, DXx, DYx, DZx, E4x, E5x, E6x, E7x, E8x, E9x, EAx, EBx, ECx, EDx, EEx, EFx, EGx, EHx, EJx, EKx, ELx, EMx, ENx, EPx, EQx, ERx, ESx, ETx, EUx, EVx, EWx, EYx, EZx, F2x, F3x, F4x, F5x, F6x, F7x, F8x, F9x, FAx, FBx, FCx, FDx, FEx, FFx, FGx, FHx, FJx, FKx, FPx, FQx, FSx, FTx, FUx, FXx, FYx, FZx, G2x, G3x, G4x, G5x, G6x, G7x, G9x, GBx, GCx2907-CTO, 72x, 73x, 74x, 75x, 76x, 77x, 78x2912-CTO, 21x, 23x, 24x, 25x, 2Ax, 2Bx, 2Cx, 2Dx, 2Ex, 2Fx, 2Gx, 2Hx, 2Jx, 2Kx, 2Lx, 2Mx, 2Nx, 2Px, 2Rx, 2Sx, 2Tx, 2Ux, 2Vx, 2Wx, 30x, 37x, 38x, 39x, 3Dx, 3Fx, 3Gx, 3Hx, 3Jx, 3Kx, 3Lx, 3Mx, 3Px, 3Rx, 52x, 62x, A0x2924-CTO, 23x, 24x, 25x, 92x, 93x, 94x, 96x, 97x, 98x, 99x, 9Ax, 9Bx, 9Cx, 9Dx, 9Ex2926-CTO2928-CTO | 45M2655 N | ||
| 6 LCD latch L and R 60Y4865 N |
Table37. Partslist—14.1-inchWXGA+LED-backlightLCD(continued)
| No.FRU(14.1-inchWXGA+LED-backlightLCD)FRUno.CRU | ID | |
| 7 LCD rear cover assembly2801-CTO, A2x, A3x, A4x, A5x, A6x, A7x, A8x, A9x, AAx, ABx, ACx, ADx, AEx, AFx, AGx, AHx, AJx, AKx, ALx, AMx, ANx, APx, AQx2808-CTO, C2x, C3x, C4x, C5x, C6x, C7x, C8x, C9x, CAx, CBx, CCx, CDx, CEx, CFx, CGx, CHx, CJx, CKx, CLx, CMx, CNx, CPx, CQx, CRx, CSx, CUx, CVx, CWx, CXx, CYx, CZx, D2x, D3x, D4x, D5x, D6x, D7x, D8x, D9x, DAx, DDx, DEx, DFx, DGx, DHx, DJx, DKx, DLx, DMx, DNx, DPx, DQx, DRx, DSx, DTx, DUx, DVx, DWx, DXx, DYx, DZx, E5x, E6x, E7x, E8x, E9x, EAx, EBx, ECx, EDx, EEx, EFx, EGx, EKx, EMx, EPx, EQx, ERx, ESx, ETx, EUx, EXx, EYx, EZx, F2x, F3x, F4x, F5x, F6x, F7x, F8x, F9x, FAx, FBx, FCx, FDx, FEx, FFx, FGx, FHx, FJx, FKx, FLx2809-CTO, 72x, 73x, 74x, 75x, 76x, 77x, 78x, 79x, 7Ax, 7Bx, 7Cx, 7Dx, 7Ex2815-CTO, 20x, 22x, 23x, 24x, 25x, 2Ax, 2Bx, 2Cx, 2Dx, 2Ex, 2Fx, 2Gx, 2Hx, 2Jx, 2Kx, 2Lx, 2Mx, 2Nx, 2Px, 2Qx, 2Rx, 2Sx, 2Tx, 2Ux, 2Vx, 2Xx, 2Yx, 2Zx, 30x, 32x, 33x, 34x, 35x, 36x, 37x, 38x, 39x, 3Ax, 3Bx, 3Cx, 3Dx, 3Ex, 3Fx, 3Gx, 3Hx, 3Jx, 3Kx, 3Lx, 3Mx, 3Nx, 3Px, 3Qx, 3Rx, 3Sx, 3Tx, 3Ux, 3Vx, 3Wx, 3Xx, 3Yx, 3Zx, 42x, 43x, 44x, 45x, 46x, 47x, 4Ax, 4Hx, 4Jx, 4Tx, 4Ux, 4Vx, 4Yx, 52x, 53x, 5Bx, 5Cx, 5Dx, 5Ex, 5Fx, 5Gx, 5Hx, 5Jx, 5Kx, 5Lx, 5Mx, 5Rx, 5Sx, 5Vx, 5Wx, 62x, 63x, 64x2823-CTO, 22x, 23x, 24x, 25x, 92x, 93x, 94x, 95x, 96x, 97x, 98x, 99x, 9Ax, 9Bx, 9Cx, 9Dx, 9Ex, 9Fx, 9Gx, 9Hx, 9Jx, 9Kx, 9Lx2824-CTO2825-CTO2901-CTO, A2x, A3x, A4x, A5x, A6x, A7x, A8x, A9x, AAx, ABx, ACx, ADx, AEx, AFx, AGx, AHx, AJx, AKx2904-CTO, C2x, C3x, C4x, C6x, C8x, C9x, CBx, CCx, CDx, CFx, CGx, CHx, CJx, CKx, CLx, CMx, CNx, CVx, CWx, CXx, CYx, D3x, D6x, D7x, D8x, D9x, DAx, DBx, DCx, DGx, DHx, DJx, DWx, DXx, DYx, DZx, E4x, E5x, E6x, E7x, E8x, E9x, EAx, EBx, ECx, EDx, EEx, EFx, EGx, EHx, EJx, EKx, ELx, EMx, ENx, EPx, EQx, ERx, ESx, ETx, EUx, EVx, EWx, EYx, EZx, F2x, F3x, F4x, F5x, F6x, F7x, F8x, F9x, FAx, FBx, FCx, FDx, FEx, FFx, FGx, FHx, FJx, FKx, FPx, FQx, FSx, FTx, FUx, FXx, FYx, FZx, G2x, G3x, G4x, G5x, G6x, G7x, G9x, GBx, GCx2907-CTO, 72x, 73x, 74x, 75x, 76x, 77x, 78x2912-CTO, 21x, 23x, 24x, 25x, 2Ax, 2Bx, 2Cx, 2Dx, 2Ex, 2Fx, 2Gx, 2Hx, 2Jx, 2Kx, 2Lx, 2Mx, 2Nx, 2Px, 2Rx, 2Sx, 2Tx, 2Ux, 2Vx, 30x, 37x, 38x, 39x, 3Dx, 3Fx, 3Gx, 3Hx, 3Jx, 3Kx, 3Lx, 3Mx, 3Px, 3Rx, 52x, 62x, A0x2924-CTO, 23x, 24x, 25x, 92x, 93x, 94x, 96x, 97x, 98x, 99x, 9Ax, 9Bx, 9Cx, 9Dx, 9Ex2926-CTO2928-CTO | 60Y5610 N | |
| 8 LED sub card2801-CTO, A2x, A3x, A4x, A5x, A6x, A7x, A8x, A9x, AAx, ABx, ACx, ADx, AEx, AFx, AGx, AHx, AJx, AKx, ALx, AMx, ANx, APx, AQx2808-CTO, C2x, C3x, C4x, C5x, C6x, C7x, C8x, C9x, CAx, CBx, CCx, CDx, CEx, CFx, CGx, CHx, CJx, CKx, CLx, CMx, CNx, CPx, CQx, CRx, CSx, CUx, CVx, CWx, CXx, CYx, CZx, D2x, D3x, D4x, D5x, D6x, D7x, D8x, D9x, DAx, DDx, DEx, DFx, DGx, DHx, DJx, DKx, DLx, DMx, DNx, DPx, DQx, DRx, DSx, DTx, DUx, DVx, DWx, DXx, DYx, DZx, E5x, E6x, E7x, E8x, E9x, EAx, EBx, ECx, EDx, EEx, EFx, EGx, EKx, EMx, EPx, EQx, ERx, ESx, ETx, EUx, EXx, EYx, EZx, F2x, F3x, F4x, F5x, F6x, F7x, F8x, F9x, FAx, FBx, FCx, FDx, FEx, FFx, FGx, FHx, FJx, FKx, FLx2809-CTO, 72x, 73x, 74x, 75x, 76x, 77x, 78x, 79x, 7Ax, 7Bx, 7Cx, 7Dx, 7Ex2815-CTO, 20x, 22x, 23x, 24x, 25x, 2Ax, 2Bx, 2Cx, 2Dx, 2Ex, 2Fx, 2Gx, 2Hx, 2Jx, 2Kx, 2Lx, 2Mx, 2Nx, 2Px, 2Qx, 2Rx, 2Sx, 2Tx, 2Ux, 2Vx, 2Wx, 2Xy, 2Zx, 30x, 32x, 33x, 34x, 35x, 36x, 37x, 38x, 39x, 3Ax, 3Bx, 3Cx, 3Dx, 3Ex, 3Fx, 3Gx, 3Hx, 3Jx, 3Kx, 3Lx, 3Mx, 3Nx, 3Px, 3Qx, 3Rx, 3Sx, 3Tx, 3Ux, 3Vx, 3Wx, 3Xx, 3Yx, 3Zx, 42x, 43x, 44x, 45x, 46x, 47x, 4Ax, 4Hx, 4Jx, 4Tx, 4Ux, 4Vx, 4Yx, 52x, 53x, 5Bx, 5Cx, 5Dx, 5Ex, 5Fx, 5Gx, 5Hx, 5Jx, 5Kx, 5Lx, 5Mx, 5Rx, 5Sx, 5Vx, 62x, 63x, 64x2823-CTO, 22x, 23x, 24x, 25x, 92x, 93x, 94x, 95x, 96x, 97x, 98x, 99x, 9Ax, 9Bx, 9Cx, 9Dx, 9Ex, 9Fx, 9Gx, 9Hx, 9Jx, 9Kx, 9Lx2824-CTO2825-CTO2901-CTO, A2x, A3x, A4x, A5x, A6x, A7x, A8x, A9x, AAx, ABx, ACx, ADx, AEx, AFx, AGx, AHx, AJx, AKx2904-CTO, C2x, C3x, C4x, C6x, C8x, C9x, CBx, CCx, CDx, CFx, CGx, CHx, CJx, CKx, CLx, CMx, CNx, CVx, CWx, CXx, CYx, D3x, D6x, D7x, D8x, D9x, DAx, DBx, DCx, DGx, DHx, DJx, DWx, DXx, DYx, DZx, E4x, E5x, E6x, E7x, E8x, E9x, EAx, EBx, ECx, EDx, EEx, EFx, EGx, EHx, EJx, EKx, ELx, EMx, ENx, EPx, EQx, ERx, ESx, ETx, EUx, EVx, EWx, EYx, EZx, F2x, F3x, F4x, F5x, F6x, F7x, F8x, F9x, FAx, FBx, FCx, FDx, FEx, FFx, FGx, FHx, FJx, FKx, FPx, FQx, FSx, FTx, FUx, FXx, FYx, FZx, G2x, G3x, G4x, G5x, G6x, G7x, G9x, GBx, GCx2907-CTO, 72x, 73x, 74x, 75x, 76x, 77x, 78x2912-CTO, 21x, 23x, 24x, 25x, 2Ax, 2Bx, 2Cx, 2Dx, 2Ex, 2Fx, 2Gx, 2Hx, 2Jx, 2Kx, 2Lx, 2Mx, 2Nx, 2Px, 2Rx, 2Sx, 2Tx, 2Ux, 2Vx, 2Wx, 30x, 37x, 38x, 39x, 3Dx, 3Fx, 3Gx, 3Hx, 3Jx, 3Kx, 3Lx, 3Mx, 3Px, 3Rx, 52x, 62x, A0x2924-CTO, 23x, 24x, 25x, 92x, 93x, 94x, 96x, 97x, 98x, 99x, 9Ax, 9Bx, 9Cx, 9Dx, 9Ex2926-CTO2928-CTO | 45M2773 N | |
| 8 LED sub card2801-CTO, A2x, A3x, A4x, A5x, A6x, A7x, A8x, A9x, AAx, ABx, ACx, ADx, AEx, AFx, AGx, AHx, AJx, AKx, ALx, AMx, ANx, APx, AQx2808-CTO, C2x, C3x, C4x, C5x, C6x, C7x, C8x, C9x, CAx, CBx, CCx, CDx, CEx, CFx, CGx, CHx, CJx, CKx, CLx, CMx, CNx, CPx, CQx, CRx, CSx, CUx, CVx, CWx, CXx, CYx, CZx, D2x, D3x, D4x, D5x, D6x, D7x, D8x, D9x, DAx, DDx, DEx, DFx, DGx, DHx, DJx, DKx, DLx, DMx, DNx, DPx, DQx, DRx, DSx, DTx, DUx, DVx, DWx, DXx, DYx, DZx, E5x, E6x, E7x, E8x, E9x, EAx, EBx, ECx, EDx, EEx, EFx, EGx, EKx, EMx, EPx, EQx, ERx, ESx, ETx, EUx, EXx, EYx, EZx, F2x, F3x, F4x, F5x, F6x, F7x, F8x, F9x, FAx, FBx, FCx, FDx, FEx, FFx, FGx, FHx, FJx, FKx, FLx2809-CTO, 72x, 73x, 74x, 75x, 76x, 77x, 78x, 79x, 7Ax, 7Bx, 7Cx, 7Dx, 7Ex2815-CTO, 20x, 22x, 23x, 24x, 25x, 2Ax, 2Bx, 2Cx, 2Dx, 2Ex, 2Fx, 2Gx, 2Hx, 2Jx, 2Kx, 2Lx, 2Mx, 2Nx, 2Px, 2Qx, 2Rx, 2Sx, 2Tx, 2Ux, 2Vx, 2Wx, 2Xx, 2Yx, 2Zx, 30x, 32x, 33x, 34x, 35x, 36x, 37x, 38x, 39x, 3Ax, 3Bx, 3Cx, 3Dx, 3Ex, 3Fx, 3Gx, 3Hx, 3Jx, 3Kx, 3Lx, 3Mx, 3Nx, 3Px, 3Qx, 3Rx, 3Sx, 3Tx, 3Ux, 3Vx, 3Wx, 3Xx, 3Yx, 3Zx, 42x, 43x, 44x, 45x, 46x, 47x, 4Ax, 4Hx, 4Jx, 4Tx, 4Ux, 4Vx, 4Yx, 52x, 53x, 5Bx, 5Cx, 5Dx, 5Ex, 5Fx, 5Gx, 5Hx, 5Jx, 5Kx, 5Lx, 5Mx, 5Rx, 5Sx, 5Vx, 5Wx, 62x, 63x, 64x2823-CTO, 22x, 23x, 24x, 25x, 92x, 93x, 94x, 95x, 96x, 97x, 98x, 99x, 9Ax, 9Bx, 9Cx, 9Dx, 9Ex, 9Fx, 9Gx, 9Hx, 9Jx, 9Kx, 9Lx2824-CTO2825-CTO2901-CTO, A2x, A3x, A4x, A5x, A6x, A7x, A8x, A9x, AAx, ABx, ACx, ADx, AEx, AFx, AGx, AHx, AJx, AKx2904-CTO, C2x, C3x, C4x, C6x, C8x, C9x, CBx, CCx, CDx, CFx, CGx, CHx, CJx, CKx, CLx, CMx, CNx, CVx, CWx, CXx, CYx, D3x, D6x, D7x, D8x, D9x, DAx, DBx, DCx, DGx, DHx, DJx, DWx, DXx, DYx, DZx, E4x, E5x, E6x, E7x, E8x, E9x, EAx, EBx, ECx, EDx, EEx, EFx, EGx, EHx, EJx, EKx, ELx, EMx, ENx, EPx, EQx, ERx, ESx, ETx, EUx, EVx, EWx, EYx, EZx, F2x, F3x, F4x, F5x, F6x, F7x, F8x, F9x, FAx, FBx, FCx, FDx, FEx, FFx, FGx, FHx, FJx, FKx, FPx, FQx, FSx, FTx, FUx, FXx, FYx, FZx, G2x, G3x, G4x, G5x, G6x, G7x, G9x, GBx, GCx2907-CTO, 72x, 73x, 74x, 75x, 76x, 77x, 78x2912-CTO, 21x, 23x, 24x, 25x, 2Ax, 2Bx, 2Cx, 2Dx, 2Ex, 2Fx, 2Gx, 2Hx, 2Jx, 2Kx, 2Lx, 2Mx, 2Nx, 2Px, 2Rx, 2Sx, 2Tx, 2Ux, 2Vx, 2Wx, 30x, 37x, 38x, 39x, 3Dx, 3Fx, 3Gx, 3Hx, 3Jx, 3Kx, 3Lx, 3Mx, 3Px, 3Rx, 52x, 62x, A0x2924-CTO, 23x, 24x, 25x, 92x, 93x, 94x, 96x, 97x, 98x, 99x, 9Ax, 9Bx, 9Cx, 9Dx, 9Ex2926-CTO2928-CTO | 45M2774 N | |
| 9 LED cable assembly2801-CTO, A2x, A3x, A4x, A5x, A6x, A7x, A8x, A9x, AAx, ABx, ACx, ADx, AEx, AFx, AGx, AHx, AJx, AKx, ALx, AMx, ANx, APx, AQx2808-CTO, C2x, C3x, C4x, C5x, C6x, C7x, C8x, C9x, CAx, CBx, CCx, CDx, CEx, CFx, CGx, CHx, CJx, CKx, CLx, CMx, CNx, CPx, CQx, CRx, CSx, CUx, CVx, CWx, CXx, CYx, CZx, D2x, D3x, D4x, D5x, D6x, D7x, D8x, D9x, DAx, DDx, DEx, DFx, DGx, DHx, DJx, DKx, DLx, DMx, DNx, DPx, DQx, DRx, DSx, DTx, DUx, DVx, DWx, DXx, DYx, DZx, E5x, E6x, E7x, E8x, E9x, EAa, EBx, ECx, EDx, EEa, EFx, EGx, EKx, EMx, EPx, EQx, ERx, ESx, ETx, EUx, EXx, EYx, EZx, F2x, F3x, F4x, F5x, F6x, F7x, F8x, F9x, FAx, FBx, FCx, FDx, FEx, FFx, FGx, FHx, FJx, FKx, FLx2809-CTO, 72x, 73x, 74x, 75x, 76x, 77x, 78x, 79x, 7Ax, 7Bx, 7Cx, 7Dx, 7Ex2815-CTO, 20x, 22x, 23x, 24x, 25x, 2Ax, 2Bx, 2Cx, 2Dx, 2Ex, 2Fx, 2Gx, 2Hx, 2Jx, 2Kx, 2Lx, 2Mx, 2Nx, 2Px, 2Qx, 2Rx, 2Sx, 2Tx, 2Ux, 2Vx, 2Wx, 2Xx, 2Zx, 30x, 32x, 33x, 34x, 35x, 36x, 37x, 38x, 39x, 3Ax, 3Bx, 3Cx, 3Dx, 3Ex, 3Fx, 3Gx, 3Hx, 3Jx, 3Kx, 3Lx, 3Mx, 3Nx, 3Px, 3Qx, 3Rx, 3Sx, 3Tx, 3Ux, 3Vx, 3Wx, 3Xx, 3Yx, 3Zx, 42x, 43x, 44x, 45x, 46x, 47x, 4Ax, 4Hx, 4Jx, 4Tx, 4Ux, 4Vx, 4Yx, 52x, 53x, 5Bx, 5Cx, 5Dx, 5Ex, 5Fx, 5Gx, 5Hx, 5Jx, 5Kx, 5Lx, 5Mx, 5Rx, 5Sx, 5Vx, 5Wx, 62x, 63x, 64x2823-CTO, 22x, 23x, 24x, 25x, 92x, 93x, 94x, 95x, 96x, 97x, 98x, 99x, 9Ax, 9Bx, 9Cx, 9Dx, 9Ex, 9Fx, 9Gx, 9Hx, 9Jx, 9Kx, 9Lx2824-CTO2825-CTO2901-CTO, A2x, A3x, A4x, A5x, A6x, A7x, A8x, A9x, AAx, ABx, ACx, ADx, AEx, AFx, AGx, AHx, AJx, AKx2904-CTO, C2x, C3x, C4x, C6x, C8x, C9x, CBx, CCx, CDx, CFx, CGx, CHx, CJx, CKx, CLx, CMx, CNx, CVx, CWx, CXx, CYx, D3x, D6x, D7x, D8x, D9x, DAx, DBx, DCx, DGx, DHx, DJx, DWx, DXx, DYx, DZx, E4x, E5x, E6x, E7x, E8x, E9x, EAa, EBx, ECx, EDx, EEa, EFx, EGx, EHx, EJx, EKx, ELx, EMx, ENx, EPx, EQx, ERx, ESx, ETx, EUx, EVx, EWx, EYx, EZx, F2x, F3x, F4x, F5x, F6x, F7x, F8x, F9x, FAa, FBx, FCx, FDx, FEx, FFx, FGx, FHx, FJx, FKx, FPx, FQx, FSx, FTx, FUx, FXx, FYx, FZx, G2x, G3x, G4x, G5x, G6x, G7x, G9x, GBx, GCx2907-CTO, 72x, 73x, 74x, 75x, 76x, 77x, 78x2912-CTO, 21x, 23x, 24x, 25x, 2Ax, 2Bx, 2Cx, 2Dx, 2Ex, 2Fx, 2Gx, 2Hx, 2Jx, 2Kx, 2Lx, 2Mx, 2Nx, 2Px, 2Rx, 2Sx, 2Tx, 2Ux, 2Vx, 2Wx, 30x, 37x, 38x, 39x, 3Dx, 3Fx, 3Gx, 3Hx, 3Jx, 3Kx, 3Lx, 3Mx, 3Px, 3Rx, 52x, 62x, A0x2924-CTO, 23x, 24x, 25x, 92x, 93x, 94x, 96x, 97x, 98x, 99x, 9Ax, 9Bx, 9Cx, 9Dx, 9Ex2926-CTO2928-CTO | ||
| 10 LCD cable for T400s 44C9983 N | ||
| 10 LCD cable for T410s and T410si 45M2917 N11 Clear plate for LCD bezel for T400s2801-CTO, A2x, A3x, A4x, A5x, A6x, A7x, A8x, A9x, AAx, ABx, ACx, ADx, AEx, AFx, AGx, AHx, AJx, AKx, ALx, AMx, ANx, APx, AQx2808-CTO, C2x, C3x, C4x, C5x, C6x, C7x, C8x, C9x, CAx, CBx, CCx, CDx, CEx, CFx, CGx, CHx, CJx, CKx, CLx, CMx, CNx, CPx, CQx, CRx, CSx, CUx, CVx, CWx, CXx, CYx, CZx, D2x, D3x, D4x, D5x, D6x, D7x, D8x, D9x, DAx, DDx, DEx, DFx, DGx, DHx, DJx, DKx, DLx, DMx, DNx, DPx, DQx, DRx, DSx, DTx, DUx, DVx, DWx, DXx, DYx, DZx, E5x, E6x, E7x, E8x, E9x, EAx, EBx, ECx, EDx, EEx, EFx, EGx, EKx, EMx, EPx, EQx, ERx, ESx, ETx, EUx, EXx, EYx, EZx, F2x, F3x, F4x, F5x, F6x, F7x, F8x, F9x, FAx, FBx, FCx, FDx, FEx, FFx, FGx, FHx, FJx, FKx, FLx2809-CTO, 72x, 73x, 74x, 75x, 76x, 77x, 78x, 79x, 7Ax, 7Bx, 7Cx, 7Dx, 7Ex2815-CTO, 20x, 22x, 23x, 24x, 25x, 2Ax, 2Bx, 2Cx, 2Dx, 2Ex, 2Fx, 2Gx, 2Hx, 2Jx, 2Kx, 2Lx, 2Mx, 2Nx, 2Px, 2Qx, 2Rx, 2Sx, 2Tx, 2Ux, 2Vx, 2Wx, 2Xx, 2Yx, 2Zx, 30x, 32x, 33x, 34x, 35x, 36x, 37x, 38x, 39x, 3Ax, 3Bx, 3Cx, 3Dx, 3Ex, 3Fx, 3Gx, 3Hx, 3Jx, 3Kx, 3Lx, 3Mx, 3Nx, 3Px, 3Qx, 3Rx, 3Sx, 3Tx, 3Ux, 3Vx, 3Wx, 3Xx, 3Yx, 3Zx, 42x, 43x, 44x, 45x, 46x, 47x, 4Ax, 4Hx, 4Jx, 4Tx, 4Ux, 4Vx, 4Yx, 52x, 53x, 5Bx, 5Cx, 5Dx, 5Ex, 5Fx, 5Gx, 5Hx, 5Jx, 5Kx, 5Lx, 5Mx, 5Rx, 5Sx, 5Vx, 5Wx, 62x, 63x, 64x2823-CTO, 22x, 23x, 24x, 25x, 92x, 93x, 94x, 95x, 96x, 97x, 98x, 99x, 9Ax, 9Bx, 9Cx, 9Dx, 9Ex, 9Fx, 9Gx, 9Hx, 9Jx, 9Kx, 9Lx2824-CTO2825-CTO | 60Y4109 N | |
| 11 Clear plate for LCD bezel for T410s and T410si2901-CTO, A2x, A3x, A4x, A5x, A6x, A7x, A8x, A9x, AAx, ABx, ACx, ADx, AEx, AFx, AGx, AHx, AJx, AKx2904-CTO, C2x, C3x, C4x, C6x, C8x, C9x, CBx, CCx, CDx, CFx, CGx, CHx, CJx, CKx, CLx, CMx, CNx, CVx, CWx, CXx, CYx, D3x, D6x, D7x, D8x, D9x, DAx, DBx, DCx, DGx, DHx, DJx, DWx, DXx, DYx, DZx, E4x, E5x, E6x, E7x, E8x, E9x, EAx, EBx, ECx, EDx, EEx, EFx, EGx, EHx, EJx, EKx, ELx, EMx, ENx, EPx, EQx, ERx, ESx, ETx, EUx, EVx, EWx, EYx, EZx, F2x, F3x, F4x, F5x, F6x, F7x, F8x, F9x, FAx, FBx, FCx, FDx, FEx, FFx, FGx, FHx, FJx, FKx, FPx, FQx, FSx, FTx, FUx, FXx, FYx, FZx, G2x, G3x, G4x, G5x, G6x, G7x, G9x, GBx, GCx2907-CTO, 72x, 73x, 74x, 75x, 76x, 77x, 78x2912-CTO, 21x, 23x, 24x, 25x, 2Ax, 2Bx, 2Cx, 2Dx, 2Ex, 2Fx, 2Gx, 2Hx, 2Jx, 2Kx, 2Lx, 2Mx, 2Nx, 2Px, 2Rx, 2Sx, 2Tx, 2Ux, 2Vx, 2Wx, 30x, 37x, 38x, 39x, 3Dx, 3Fx, 3Gx, 3Hx, 3Jx, 3Kx, 3Lx, 3Mx, 3Px, 3Rx, 52x, 62x, A0x2924-CTO, 23x, 24x, 25x, 92x, 93x, 94x, 96x, 97x, 98x, 99x, 9Ax, 9Bx, 9Cx, 9Dx, 9Ex2926-CTO2928-CTO | 75Y4470 N |
Table38. Partslist—14.1-inchWXGA+LED-backlightMultitouchpanel
| No.FR | U(14.1-inchWXGA+LED-backlightMultitouchpanel)FRUno.CRU | ID | |
| 1 LCD bezel assembly (touch panel) 60Y4330 N | |||
| 2 Multi touch panel•2801-CTO•2808-CTO, DBx, DCx, E2x, E3x, E4x, EHx, EJx, ELx, ENx, EVx, EWx, FNx•2809-CTO•2815-CTO, 48x, 49x, 4Bx, 4Cx, 4Dx, 4Ex, 4Fx, 4Gx, 4Kx, 4Lx, 4Mx, 4Nx, 4Px, 4Qx, 4Rx, 4Sx, 4Wx, 4Xx, 4Zx, 5Ax, 5Nx, 5Px, 5Qx, 5Tx, 5Ux, 5Xx, 5Yx•2823-CTO•2824-CTO•2825-CTO•2901-CTO•2904-CTO, C5x, C7x, CEx, CPx, CQx, CRx, CSx, CUx, CZx, D2x, D4x, D5x, DDx, DEx, DFx, DKx, DLx, DMx, DNx, DPx, DQx, DRx, DSx, DTx, DUx, DVx, E2x, E3x, EXx, FLx, FMx, FNx, FVx, FWx, G8x, GDx•2907-CTO•2912-CTO, 20x, 40x, 22x, 2Qx, 2Xx, 2Yx, 2Zx, 32x, 33x, 34x, 36x, 3Ax, 3Cx, 3Ex, 3Nx, 53x•2924-CTO, 22x, 95x•2926-CTO•2928-CTO | 75Y4761 N | ||
| 3 Antenna kit 45M2907 N | |||
| 3 Antenna kit 45M2911 N | |||
| 4 Microphone sub card•2801-CTO•2808-CTO, E2x, EVx, EWx•2809-CTO•2815-CTO, 4Px, 4Qx, 4Rx, 4Sx, 5Tx, 5Ux•2823-CTO•2824-CTO•2825-CTO•2901-CTO•2904-CTO•2907-CTO•2912-CTO•2924-CTO•2926-CTO•2928-CTO | 43Y9998 N | ||
Table38. Partslist—14.1-inchWXGA+LED-backlightMultitouchpanel(continued)
| No.FRU(14.1-inchWXGA+LED-backlightMultitouchpanel)FRUno.CRU | ID | |
| 4 Integrated camera•2801-CTO•2808-CTO, DBx, DCx, E3x, E4x, EHx, EJx, ENx, FNx•2809-CTO•2815-CTO, 48x, 49x, 4Bx, 4Cx, 4Dx, 4Ex, 4Fx, 4Gx, 4Kx, 4Lx, 4Mx, 4Nx, 4Wx, 4x,x, 4Zx, 5Ax, 5Nx, 5Px, 5Qx, 5Xx, 5Yx•2823-CTO•2824-CTO•2825-CTO•2901-CTO•2904-CTO, C5x, C7x, CEx, CPx, CQx, CRx, CSx, CUx, CZx, D2x, D4x, D5x, DDx, DEx, DFx, DKx, DLx, DMx, DNx, DPx, DQx, DRx, DSx, DTx, DUx, DVx, E2x, E3x, EXx, FLx, FMx, FNx, FVx, FWx, G8x, GDx•2907-CTO•2912-CTO, 20x, 40x, 22x, 2Qx, 2Xx, 2Yx, 2Zx, 32x, 33x, 34x, 36x, 3Ax, 3Cx, 3Ex, 3Nx, 53x•2924-CTO, 22x, 95x•2926-CTO•2928-CTO | 60Y9706 N | |
| 5 Hinge kit (touch panel)•2801-CTO•2808-CTO, DBx, DCx, E2x, E3x, E4x, EHx, EJx, ELx, ENx, EVx, EWx, FNx•2809-CTO•2815-CTO, 48x, 49x, 4Bx, 4Cx, 4Dx, 4Ex, 4Fx, 4Gx, 4Kx, 4Lx, 4Mx, 4Nx, 4Px, 4Qx, 4Rx, 4Sx, 4Wx, 4Xx, 4Zx, 5Ax, 5Nx, 5Px, 5Qx, 5Tx, 5Ux, 5Xx, 5Yx•2823-CTO•2824-CTO•2825-CTO•2901-CTO•2904-CTO, C5x, C7x, CEx, CPx, CQx, CRx, CSx, CUx, CZx, D2x, D4x, D5x, DDx, DEx. DFx, DKx, DLx, DMx, DNx, DPx, DQx, DRx, DSx, DTx, DUx, DVx, E2x, E3x, EXx, FLx, FMx, FNx, FVx, FWx, G8x, GDx•2907-CTO•2912-CTO, 20x, 40x, 21x, 2Qx, 2Xx, 2Yx, 2Zx, 32x, 33x, 34x, 36x, 3Ax, 3Cx, 3Ex, 3Nx, 53x•2924-CTO, 22x, 95x•2926-CTO•2928-CTO | 60 Y4331 N | |
| 6 LCD latch L and R 60Y4865 N | ||
| 7 LCD rear cover assembly (touch panel)•2801-CTO•2808-CTO, DBx, DCx, E2x, E3x, E4x, EHx, EJx, ELx, ENx, EVx, EWx, FNx•2809-CTO•2815-CTO, 48x, 49x, 4Bx, 4Cx, 4Dx, 4Ex, 4Fx, 4Gx, 4Kx, 4Lx, 4Mx, 4Nx, 4Px, 4Qx, 4Rx, 4Sx, 4Wx, 4Xx, 4Zx, 5Ax, 5Nx, 5Px, 5Qx, 5Tx, 5Ux, 5Xx, 5Yx•2823-CTO•2824-CTO•2825-CTO•2901-CTO•2904-CTO, C5x, C7x, CEx, CPx, CQx, CRx, CSx, CUx, CZx, D2x, D4x, D5x, DDx, DEx, DFx, DKx, DLx, DMx, DNx, DPx, DQx, DRx, DSx, DTx, DUx, DVx, E2x, E3x, EXx, FLx, FMx, FNx, FVx, FWx, G8x, GDx•2907-CTO•2912-CTO, 20x, 40x, 22x, 2Qx, 2Xx, 2Yx, 2Zx, 32x, 33x, 34x, 36x, 3Ax, 3Cx, 3Ex, 3Nx, 53x•2924-CTO, 22x, 95x•2926-CTO•2928-CTO | 60Y4867 N | |
| 8 LED sub card (touch panel)•2801-CTO•2808-CTO, DBx, DCx, E2x, E3x, E4x, EHx, EJx, ELx, ENx, EVx, EWx, FNx•2809-CTO•2815-CTO, 48x, 49x, 4Bx, 4Cx, 4Dy, 4Ex, 4Fx, 4Gx, 4Kx, 4Lx, 4Mx, 4Nx, 4Px, 4Qx, 4Rx, 4Sx, 4Wx, 4Xx, 4Zx, 5Ax, 5Nx, 5Px, 5Qx, 5Tx, 5Ux, 5Xx, 5Ya•2823-CTO•2824-CTO•2825-CTO•2901-CTO•2904-CTO, C5x, C7x, CEx, CPx, CQx, CRx, CSx, CUx, CZx, D2x, D4x, D5x, DDx, DEx, DFx, DKx, DLx, DMn, DNx, DPx, DQx, DRx, DSx, DTx, DUx, DVx, E2x, E3x, EXx, FLx, FMx, FNx, FVx, FWx, G8x, GDx•2907-CTO•2912-CTO, 20x, 40x, 22x, 2Qx, 2Xy, 2Yx, 2Zx, 32x, 33x, 34x, 36x, 3Ax, 3Cx, 3Ex, 3Nx, 53x•2924-CTO, 22x, 95x•2926-CTO•2928-CTO | 60Y5643 N | |
| 9 LED cable assembly (touch panel)•2801-CTO•2808-CTO, DBx, DCx, E2x, E3x, E4x, EHx, EJx, ELx, ENx, EVx, EWx, FNx•2809-CTO•2815-CTO, 48x, 49x, 4Bx, 4Cx, 4Dx, 4Ex, 4Fx, 4Kx, 4Lx, 4Mx, 4Nx, 4Px, 4Qx, 4Rx, 4Sx, 4Wx, 4Xx, 4Zx, 5Ax, 5Nx, 5Px, 5Qx, 5Tx, 5Ux, 5Xx, 5Yx•2823-CTO•2824-CTO•2825-CTO•2901-CTO•2904-CTO, C5x, C7x, CEx, CPx, CQx, CRx, CSx, CUx, CZx, D2x, D4x, D5x, DDx, DEx, DFx, DKx, DLx, DMx, DNx, DPx, DQx, DRx, DSx, DTx, DUx, DVx, E2x, E3x, EXx, FLx, FMx, FNx, FVx, FWx, G8x, GDx•2907-CTO•2912-CTO, 20x, 40x, 22x, 2Qx, 2Xx, 2Yx, 2Zx, 32x, 33x, 34x, 36x, 3Ax, 3Cx, 3Ex, 3Nx, 53x•2924-CTO, 22x, 95x•2926-CTO•2928-CTO | 45M2850 N | |
| 10 LCD cable for T400s 44C9983 N | ||
| 10 LCD cable for T410s and T410si 45M2917 N | ||
| 11 Clear plate for LCD bezel (touch panel) for T400s•2801-CTO•2808-CTO, DBx, DCx, E2x, E3x, E4x, EHx, EJx, ELx, ENx, EVx, EWx, FNx•2809-CTO•2815-CTO, 48x, 49x, 4Bx, 4Cx, 4Dx, 4Ea, 4Fx, 4Gx, 4Kx, 4Lx, 4Mx, 4Nx, 4Px, 4Qx, 4Rx, 4Sx, 4Wx, 4Xx, 4Zx, 5Ax, 5Nx, 5Px, 5Qx, 5Tx, 5Ux, 5Xx, 5Yx•2823-CTO•2834-CTO•2825-CTO | 60Y4322 N | |
| 11 Clear plate for LCD bezel (touch panel) for T410s and T410si•2901-CTO•2904-CTO, C5x, C7x, CEx, CPx, CQx, CRx, CSx, CUx, CZx, D2x, D4x, D5x, DDx, DEx, DFx, DKx, DLx, DMx, DNx, DPx, DQx, DRx, DSx, DTx, DUx, DWx, E2x, E3x, EXx, FLx, FMx, FNx, FVx, FWx, G8x, GDx•2907-CTO•2912-CTO, 20x, 40x, 22x, 2Qx, 2Xx, 2Yx, 2Zx, 32x, 33x, 36x, 3Ax, 3Cx, 3Ex, 3Nx, 53x•2924-CTO, 22x, 95x•2926-CTO•2928-CTO | 75Y4471 N |
Keyboard
Table39.Partslist—Keyboard
| LanguageFRUno.CRU | ID | |||
| Arabic 45N2076 45N2146 45N2216 ** | ||||
| Belgian 45N2077 45N2147 45N2217 | ||||
| Brazilian Portuguese 45N2075 45N2145 45N2215 | ||||
| Bulgarian 45N2078 45N2148 45N2218 | ||||
| Canadian French (058) 45N2073 45N2143 45N2213 | ||||
| Canadian French (Acnor) 45N2072 45N2142 45N2212 | ||||
| Czech 45N2079 45N2149 45N2219 | ||||
| Danish 45N2080 45N2150 45N2220 | ||||
| Dutch 45N2090 45N2160 45N2230 | ||||
| Finnish, Swedish 45N2097 45N2167 45N2237 | ||||
| French 45N2082 45N2152 45N2222 | ||||
| German | 45N2083 45N2153 45N2223 | |||
| Greek (U.S. English and Greek layout) | 45N2084 45N2154 45N2224 | |||
| Hebrew | 45N2085 45N2155 45N2225 | |||
| Hungarian | 45N2086 45N2156 45N2226 | |||
| Icelandic | 45N2087 45N2157 45N2227 | |||
| Italian | 45N2088 45N2158 45N2228 | |||
| Japanese | 45N2102 45N2172 45N2242 | |||
| Kazakhstan | 45N2089 45N2159 45N2229 | |||
| Korean | 45N2103 45N2173 45N2243 | |||
| Latin American Spanish | 45N2074 45N2144 45N2214 | |||
| Norwegian | 45N2091 45N2161 45N2231 | |||
| Polish 45N2092 45N2162 45N2232 | ||||
| Portuguese | 45N2093 45N2163 45N2233 | |||
| Russian | 45N2094 45N2164 45N2234 | |||
| Slovak 45N2095 45N2165 45N2235 | ||||
| Slovenian | 45N2096 45N2166 45N2236 | |||
| Spanish | 45N2081 45N2151 45N2221 | |||
| Swiss | 45N2098 45N2168 45N2238 | |||
| Thai | 45N2105 45N2175 45N2245 | |||
| Traditional Chinese | 45N2104 45N2174 45N2244 | |||
| Turkish | 60Y9552 | 60Y9554 | 60Y9550 | |
| U.K. English | 45N2100 45N2170 45N2240 | |||
| U.S. English | 45N2071 45N2141 45N2211 | |||
| U.S. English (International, with a Euro symbol) | 45N2101 45N2171 45N2241 | |||
Miscellaneousparts
Table40. Partslist—Miscellaneousparts
| FRUFRUno.CRU | ID | |
| Screw kit for T400s:•M2 ×3 mm (silver), small head (20)•M2 ×4 mm (black), bind head (20)•M2 ×5 mm (black), flat head (6)•M2 ×6 mm (black), bind head (20)•M2 ×6 mm (silver), flat head (10)•M2 ×3.5 mm (black), big head (20)•M2.5 ×6.5 mm (black), flat head (10)•Shoulder screw M2 ×3 mm (black) (front bezel) (6)•Shoulder screw M2 × 1.8 mm (black) (5-in-1 media card reader adapter) (3) | 45M2672 N | |
| Screw kit for T410s and T410si:•M2 ×3 mm (black), small head (20)•M2 ×4 mm (black), bind head (20)•M2 ×6 mm (black), bind head (25)•M2 ×3.5 mm (black), big head (20)•M2.5 ×6.5 mm (black), flat head (12)•Shoulder screw M2 ×3 mm (black) (front bezel) (6)•Shoulder screw M2 × 1.8 mm (silver) (5-in-1 media card reader adapter) (3)•Screw cap, thin (12) | 75Y4472 N | |
| Seal kit:•Tape (10 mm ×20 mm)•Tape (10 mm ×38 mm)•Tape (25 mm ×25 mm)•Tape (25 mm ×80 mm)•Screw cap, thin•Blind sheet (right)•Blind sheet (left)•Blind sheet (speaker cable) | 45M2673 N | |
| Base miscellaneous parts:•Rubber foot (front)•Rubber foot (rear)•LCD latch knob (right hand)•LCD latch (left hand)•Latch link wire•LCD latch spring•Link battery•Battery latch spring•Wireless radio switch knob•Wireless radio switch latch•Security keyhole bracket•EMI spring (optical drive)•EMI spring (HDD front)•EMI spring (HDD rear)•EMI spring (HDD rear right)•EMI spring (Docking connector)•Eject mechanical assembly for bay•HDD guide (left)•HDD guide (right)•HDD rubber rail (front)•HDD guide (rear)•HDD rubber rail (rear)•Dust filter 1•Dust filter 2•Dust filter 3•Circular sticker, low halogen•Adhesive tape•Gasket (2 mm ×25 mm)•Gasket (2 mm ×63 mm)•Tape (Docking connector EMI spring)•Tape (base cover)•Urethane form (73 mm ×7.5 mm) | 60Y4866 N | |
| Keyboard bezel miscellaneous parts:•Support mesh sheet•EMI spring (rear left)•Gasket (keyboard)•EMI finger bay (top)•EMI spring (rear right)•Gasket (short)•Gasket (fingerprint reader)•EMI spring (optical drive) | 45M2670 N | |
| System miscellaneous parts:(a)DIMM slot cover assembly(b)Hard disk drive cover assembly•Express dummy card•Connector capNote: Italicized letters in parentheses are references to the exploded view in "Overall" on page [152] | 45M2671 N | |
| System board miscellaneous parts for T400s:Insulation (top)Insulation (bottom, Mini PCI)Insulation (bottom, 34-mm ExpressCard slot)Insulation (bottom, DIMM socket left)Insulation (bottom, DIMM socket right)Insulation (NB)Insulation (CPU)Insulation (SIM socket)Dummy card SIMBracket SIM card | 45M2668 N | |
| System board miscellaneous parts for T410s and T410si:Insulation (top)Insulation (bottom)Insulation (34-mm ExpressCard slot)Insulation (DIMM socket left)Insulation (DIMM socket right)Insulation (CPU)Insulation (top) for switchable graphicsInsulation (SD slot) for switchable graphicsInsulation (DIMM socket right) for switchable graphicsInsulation (Graphic chip) for switchable graphicsBracket SIM cardThermal rubber | 75Y4468 N | |
| LCD miscellaneous parts:Label (camera)Label (no camera)Screw cap, thinRubber 0.5Rubber 0.8Rubber 1.5 shortRubber 1.5Gasket for LCDLenovo logoThinkPad logoRubber (rear cover A)Rubber (rear cover B)Tape 0.5 (rear cover)Bumper (front bezel) | 45M2674 N |
ACadapters
Table41.Partslist—2-pinACadapters
| FRUFRUno.CRU | ID | |
| 2-pin (65 W, 20 V) adapter (models CTO, xxE, xxF, xxJ, xxL, xxP, xxS, xxU, xxY) 42T5282 * | ||
| 2-pin (65 W, 20 V) adapter (models CTO, xxE, xxF, xxJ, xxL, xxP, xxS, xxU, xxY) 92P1214 | ||
| 2-pin (65 W, 20 V) adapter (models CTO, xxE, xxF, xxJ, xxL, xxP, xxS, xxU, xxY) 92P1159 | ||
| 2-pin (65 W, 20 V) adapter (models CTO, xxE, xxF, xxJ, xxL, xxP, xxS, xxU, xxY) 42T4419 | ||
| 2-pin (65 W, 20 V) adapter (models CTO, xxE, xxF, xxJ, xxL, xxP, xxS, xxU, xxY) 42T4423 | ||
| 2-pin (90 W, 20 V) adapter (models CTO, xxE, xxF, xxJ, xxL, xxP, xxS, xxU, xxY) 42T4427 | ||
| 2-pin (90 W, 20 V) adapter (models CTO, xxE, xxF, xxJ, xxL, xxP, xxS, xxU, xxY) 42T4431 | ||
| 2-pin (90 W, 20 V) adapter (models CTO, xxE, xxF, xxJ, xxL, xxP, xxS, xxU, xxY) 42T4435 | ||
| 2-pin (90 W, 20 V) adapter (models CTO, xxE, xxF, xxJ, xxL, xxP, xxS, xxU, xxY) 42T4439 |
Table42.Partslist—3-pinACadapters
| FRUFRUno.CRU | ID | |
| 3-pin (65 W, 20 V) adapter (models CTO, xxA, xxB, xxC, xxG, xxH, xxK, xxM, xxQ, xxT, xxV) 42T5283 * | ||
| 3-pin (65 W, 20 V) adapter (models CTO, xxA, xxB, xxC, xxG, xxH, xxK, xxM, xxQ, xxT, xxV) 92P1212 | ||
| 3-pin (65 W, 20 V) adapter (models CTO, xxA, xxB, xxC, xxG, xxH, xxK, xxM, xxQ, xxT, xxV) 92P1157 | ||
| 3-pin (65 W, 20 V) adapter (models CTO, xxA, xxB, xxC, xxG, xxH, xxK, xxM, xxQ, xxT, xxV) 42T4417 | ||
| 3-pin (65 W, 20 V) adapter (models CTO, xxA, xxB, xxC, xxG, xxH, xxK, xxM, xxQ, xxT, xxV) 42T4421 | ||
| 3-pin (90 W, 20 V) adapter (models CTO, xxA, xxB, xxC, xxG, xxH, xxK, xxM, xxQ, xxT, xxV) 42T4425 | ||
| 3-pin (90 W, 20 V) adapter (models CTO, xxA, xxB, xxC, xxG, xxH, xxK, xxM, xxQ, xxT, xxV) 42T4429 | ||
| 3-pin (90 W, 20 V) adapter (models CTO, xxA, xxB, xxC, xxG, xxH, xxK, xxM, xxQ, xxT, xxV) 42T4433 | ||
| 3-pin (90 W, 20 V) adapter (models CTO, xxA, xxB, xxC, xxG, xxH, xxK, xxM, xxQ, xxT, xxV) 45N0068 |
Table43.Partslist—2pinACand3pinDCAdapters
| FRUFRUno.CRU | ID | |
| 2-pin AC (90 W, 100 - 240 V) and 3-pin DC (90 W, 10.5 - 18V) combo adapter (models CTO, xxE, xxF, xxJ, xxG, xxP, xxS, xxU, xxY) | 41R0140 * |
Powercords
A ThinkPad power cord for a specific country or region is usually available only in that country or region:
Table44.Partslist—2-pinpowercords
| CountryorregionFRUno.CRU | ID | ||
| Argentina•models -CTO, xxY | 42T5020 | 42T5105 * | |
| Brazil•models -CTO, xxP | 42T5180 | 42T5183 | |
| Canada, U.S.•models -CTO, xxF, xxL, xxS, xxU | 42T5008 | 42T5093 | |
| Japan•models -CTO, xxE, xxJ | 42T5014 | 42T5099 | |
Table45.Partslist—3-pinpowercords
| CountryorregionFRUno.CRU | ID | ||
| Australia, New Zealand•models -CTO, xxM | 42T5050 | 42T5135 * | |
| Bangladesh, Sri Lanka, South Africa•models -CTO, xxG | 42T5056 | 42T5141 | |
| Canada, U.S.•models -CTO, xxG, xxT | 42T5004 | 42T5089 | |
| China (P.R.C.) (other than Hong Kong S.A.R.)•models -CTO, xxC | 42T5065 | 42T5150 | |
| Denmark•models -CTO, xxG | 42T5041 | 42T5126 | |
| European countries•models -CTO, xxG | 42T5029 | 42T5114 | |
| India•models -CTO, xxQ | 42T5083 | 42T5168 | |
| Israel•models -CTO, xxG | 42T5062 | 42T5147 | |
| Italy•models -CTO, xxG | 42T5047 | 42T5132 | |
| Korea•models -CTO, xxK | 42T5077 | 42T5162 | |
| Switzerland•models -CTO, xxG | 42T5044 | 42T5129 | |
| Taiwan•models -CTO, xxV | 42T5071 | 42T5156 | |
| U.K., China (Hong Kong S.A.R.)•models -CTO, xxB, xxG, xxH | 42T5035 | 42T5120 | |
Recoverydiscs
WindowsXPProfessional(32bit)DVDs
Windows XP Professional (32 bit) is preinstalled as the operating system in the following models:
•2801-CTO, A3x, A5x, A7x, AAx, ACx, AEx, AFx, AGx
•2808-CTO, C4x, C8x, CHx, CJx, CNx, CPx, CZx, D2x, D3x, D4x, D5x, D6x, D7x, D8x, DHx, DJx, DKx, DVx, DWx, DYx, DZx, E2x, EAx, EBx, EFx, EGx, EKx, EMx, EPx, EQx, ERx, ESx, ETx, EUx, EXx, EZx, FEx, FFx, FKx, FLx
•2809-CTO, 76x, 79x, 7Ex
•2815-CTO, 22x, 35x, 38x, 4Hx, 5Fx, 5Gx, 5Hx, 5Jx, 5Kx, 5Lx, 5Mx, 5Rx, 5Sx
•2823-CTO, 22x, 9Lx
•2824-CTO
•2825-CTO
Table46.Partslist—WindowsXPProfessional(32bit)recoveryDVDs
| LanguageP/NCRU | ID | |
| Arabic 58Y1832 * | ||
| Brazilian Portuguese 58Y1833 | ||
| Czech 58Y1836 | ||
| Danish 58Y1837 | ||
| Dutch 58Y1848 | ||
| English | 58Y1858 | |
| English (modem-disabled) | 58Y1857 | |
| Finnish | 58Y1838 | |
| French | 58Y1839 | |
| German | 58Y1841 | |
| Greek | 58Y1840 | |
| Hebrew | 58Y1842 | |
| Hungarian | 58Y1844 | |
| Italian | 58Y1845 | |
| Japanese | 58Y2622 | |
| Korean | 58Y1847 | |
| Norwegian | 58Y1849 | |
| Polish 58Y1850 | ||
| Russian | 58Y1852 | |
| Russian (English-enabled) | 58Y1851 | |
| Simplified Chinese | 58Y1834 | |
| Slovenian | 58Y1853 | |
| Spanish | 58Y1854 | |
| Swedish | 58Y1855 | |
| Traditional Chinese | 58Y1835 | |
| Traditional Chinese (Hong Kong S.A.R.) | 58Y1843 | |
| Turkish | 58Y1856 |
•2901-CTO, A3x, A4x
•2904-CTO, CFx, CGx, CXx, CYx, CZx, D2x, E6x, E7x, EEx, EFx, EGx, EHx, EJx, EKx, ELx, EMx, FLx, FMx, FPx
•2907-CTO
•2912-CTO, 2Ax, 2Bx, 3Dx
•2924-CTO
•2926-CTO
•2928-CTO
Table47. Partslist—WindowsXPProfessional(32bit)recoveryDVDs
| LanguageP/NCRU | ID | |
| Arabic 58Y4281 * | ||
| Brazilian Portuguese 58Y4282 | ||
| Danish 58Y4284 | ||
| Dutch 58Y4292 | ||
| English 58Y4300 | ||
| English (modem-disabled) 58Y4299 | ||
| Finnish 58Y4285 | ||
| French | 58Y4286 | |
| German | 58Y4287 | |
| Hebrew | 58Y4288 | |
| Italian | 58Y4290 | |
| Japanese | 58Y4291 | |
| Norwegian | 58Y4293 | |
| Polish 58Y4294 | ||
| Russian | 58Y4295 | |
| Russian (English-enabled) | 58Y4296 | |
| Simplified Chinese | 58Y4283 | |
| Spanish | 58Y4297 | |
| Swedish | 58Y4298 | |
| Traditional Chinese (Hong Kong S.A.R.) | 58Y4289 |
WindowsVistaStarterEdition(32bit)DVDs
Windows Vista Starter Edition (32 bit) is preinstalled as the operating system in the following models:
•2801-CTO
•2808-CTO
•2809-CTO
•2815-CTO
•2823-CTO
•2824-CTO
•2825-CTO
Table48. Partslist—Windows Vista Starter Edition(32bit) recovery DVDs
| LanguageP/NCRU | ID | |
| English (for India) 58Y2097 * |
WindowsVistaHomeBasic(32bit)DVDs
Windows Vista Home Basic (32 bit) is preinstalled as the operating system in the following models:
•2801-CTO
•2808-CTO
•2809-CTO, 73x
•2815-CTO, 32x
•2823-CTO
•2824-CTO
•2825-CTO
Table49.Partslist—WindowsVistaHomeBasic(32bit)recoveryDVDs
| LanguageP/NCRU | ID | |
| Czech 58Y2022 * | ||
| Danish 58Y2023 | ||
| English 58Y2042 | ||
| English (modem-disabled) 58Y2041 | ||
| English (for India) | 58Y2095 | |
| English, Finnish, and Swedish (in Sweden) | 58Y2044 | |
| English, French, German, and Dutch (in Belgium and Luxemburg) | 58Y2043 | |
| English, French, German, and Italian (in Switzerland) | 58Y2045 | |
| French | 58Y2024 | |
| German | 58Y2026 | |
| Greek | 58Y2025 | |
| Hebrew | 58Y2027 | |
| Hungarian | 58Y2029 | |
| Italian | 58Y2030 | |
| Japanese | 58Y2627 | |
| Korean | 58Y2032 | |
| Norwegian | 58Y2033 | |
| Polish 58Y2034 | ||
| Romanian | 58Y2035 | |
| Serbian-Latin | 58Y2039 | |
| Simplified Chinese | 58Y2020 | |
| Slovak | 58Y2036 | |
| Slovenian | 58Y2037 | |
| Spanish | 58Y2038 | |
| Traditional Chinese | 58Y2021 | |
| Traditional Chinese (Hong Kong S.A.R.) | 58Y2028 | |
| Turkish | 58Y2040 |
WindowsVistaHomePremium(32bit)DVDs
Windows Vista Home Premium (32 bit) is preinstalled as the operating system in the following models:
•2801-CTO, A9x, AHx, AJx, AKx, ANx, APx
•2808-CTO
•2809-CTO
•2815-CTO
•2823-CTO
•2824-CTO
•2825-CTO
Table50. Partslist—Windows Vista Home Premium (32bit) recovery DVDs
| LanguageP/NCRU | ID | |
| Danish 58Y2005 * | ||
| English 58Y2016 | ||
| English (modem-disabled) 58Y2015 | ||
| English (for India) | 58Y2094 | |
| English, Finnish, and Swedish (in Sweden) | 58Y2018 | |
| English, French, German, and Dutch (in Belgium and Luxemburg) | 58Y2017 | |
| English, French, German, and Italian (in Switzerland) | 58Y2019 | |
| French | 58Y2006 | |
| German | 58Y2007 | |
| Hebrew | 58Y2008 | |
| Italian | 58Y2010 | |
| Japanese | 58Y2626 | |
| Korean | 58Y2012 | |
| Norwegian | 58Y2013 | |
| Polish | 58Y2085 | |
| Simplified Chinese | 58Y2003 | |
| Spanish | 58Y2014 | |
| Traditional Chinese | 58Y2004 | |
| Traditional Chinese (Hong Kong S.A.R.) | 58Y2009 | |
| Turkish | 58Y2086 |
WindowsVistaBusiness(32bit)DVDs
Windows Vista Business (32 bit) is preinstalled as the operating system in the following models:
•2801-CTO, A2x, A4x, A6x, A8x, ABx, ADx
•2808-CTO, C2x, C3x, C5x, C6x, C7x, C9x, CAx, CBx, CCx, CDx, CEx, CFx, CKx, CLx, CQx, CRx, CSx, CUx, CVx, CWx, CXx, CYx, E5x, E6x, E7x, E8x, ECx, EDx, EHx, EJx, FBx, FCx, FGx, FHx
•2809-CTO, 72x, 75x, 77x, 78x, 7Ax, 7Bx, 7Cx, 7Dx
•2815-CTO, 20x, 23x, 24x, 25x, 2Ax, 2Bx, 2Cx, 2Dx, 2Ex, 2Fx, 2Gx, 2Hx, 2Jx, 2Kx, 2Lx, 2Mx, 2Nx, 2Px, 2Rx, 2Sx, 2Ux, 2Vx, 2Wx, 2Xx, 2Yx, 2Zx, 30x, 34x, 36x, 37x, 39x, 3Ax, 3Bx, 3Cx, 3Dx, 3Ex, 3Fx, 3Gx, 3Hx, 3Jx, 3Kx, 3Lx, 3Mx, 3Sx, 3Tx, 3Ux, 3Vx, 3Wx, 3Xx, 3Yx, 4Kx, 4Mx, 4Px, 4Rx, 4Yx, 4Zx, 5Ax, 5Bx, 5Cx, 5Dx, 5Ex, 5Vx, 5Wx, 52x, 53x, 62x, 63x, 64x
•2823-CTO, 23x, 24x, 25x, 92x, 93x, 94x, 95x, 96x, 97x, 98x, 99x, 9Ax, 9Bx, 9Cx, 9Dx, 9Ex, 9Hx, 9Jx, 9Kx, 9Mx, 9Nx
•2824-CTO
•2825-CTO
Table51. Partslist—Windows Vista Business(32bit)recoveryDVDs
| LanguageP/NCRU | ID | |
| Brazilian Portuguese 58Y1913 * | ||
| Czech 58Y1916 | ||
| Danish 58Y1917 | ||
| English 58Y1939 | ||
| English (modem-disabled) 58Y1938 | ||
| English (for India) 58Y2093 | ||
| English, Finnish, and Swedish (in Sweden) 58Y1941 | ||
| English, French, German, and Dutch (in Belgium and Luxemburg) 58Y1940 | ||
| English, French, German, and Italian (in Switzerland) 58Y1942 | ||
| French | 58Y1918 | |
| German | 58Y1920 | |
| Greek | 58Y1919 | |
| Hebrew | 58Y1921 | |
| Hungarian | 58Y1923 | |
| Italian | 58Y1924 | |
| Japanese | 58Y2625 | |
| Korean | 58Y1926 | |
| Norwegian | 58Y1927 | |
| Polish 58Y1928 | ||
| Portuguese | 58Y1929 | |
| Romanian | 58Y1931 | |
| Russian | 58Y1932 | |
| Russian (English-enabled) | 58Y1930 | |
| Serbian-Latin | 58Y1936 | |
| Simplified Chinese | 58Y1914 | |
| Slovak | 58Y1933 | |
| Slovenian | 58Y1934 | |
| Spanish | 58Y1935 | |
| Traditional Chinese | 58Y1915 | |
| Traditional Chinese (Hong Kong S.A.R.) | 58Y1922 | |
| Turkish | 58Y1937 |
•2901-CTO
•2904-CTO
•2907-CTO
•2912-CTO
•2924-CTO
•2926-CTO
•2928-CTO
Table52. Partslist—Windows Vista Business(32bit) recovery DVDs
| LanguageP/NCRU | ID | |
| English 58Y4301 * | ||
| English (for India) 58Y4853 |
WindowsVistaBusiness(64bit)DVDs
Windows Vista Business (64 bit) is preinstalled as the operating system in the following models:
•2801-CTO
•2808-CTO, CGx, CMx, E9x, EEx, FDx, FJx
•2809-CTO
•2815-CTO, 3Px, 3Rx
•2823-CTO, 9Gx, 9Qx
•2824-CTO
•2825-CTO
Table53. Partslist—Windows Vista Business(64bit) recovery DVDs
| LanguageP/NCRU | ID | |
| English 58Y2073 * | ||
| English (modem-disabled) 58Y2072 | ||
| English (for India) 58Y2096 | ||
| German 58Y2070 | ||
| Japanese | 58Y2629 | |
| Simplified Chinese | 58Y2069 |
WindowsVistaUltimate(32bit)DVDs
Windows Vista Ultimate (32 bit) is preinstalled as the operating system in the following models:
•2801-CTO
•2808-CTO
•2809-CTO
•2815-CTO, 2Qx, 2Tx, 3Nx, 3Qx
•2823-CTO, 9Fx, 9Px
•2824-CTO
•2825-CTO
Table54. Partslist—Windows Vista Ultimate(32bit) recovery DVDs
| LanguageP/NCRU | ID | |
| Czech 58Y2048 * | ||
| Danish 58Y2049 | ||
| English 58Y2065 | ||
| English (modem-disabled) 58Y2090 | ||
| English, Finnish, and Swedish (in Sweden) | 58Y2067 | |
| English, French, German, and Dutch (in Belgium and Luxemburg) | 58Y2066 | |
| English, French, German, and Italian (in Switzerland) | 58Y2068 | |
| French | 58Y2050 | |
| German | 58Y2052 | |
| Greek | 58Y2051 | |
| Hebrew | 58Y2053 | |
| Hungarian | 58Y2055 | |
| Italian | 58Y2056 | |
| Japanese | 58Y2628 | |
| Korean | 58Y2088 | |
| Norwegian | 58Y2057 | |
| Polish 58Y2058 | ||
| Romanian | 58Y2059 | |
| Russian | 58T2089 | |
| Serbian-Latin | 58Y2063 | |
| Simplified Chinese | 58Y2046 | |
| Slovak | 58Y2060 | |
| Slovenian | 58Y2061 | |
| Spanish | 58Y2062 | |
| Traditional Chinese | 58Y2047 | |
| Traditional Chinese (Hong Kong S.A.R.) | 58Y2054 | |
| Turkish | 58Y2064 |
Windows7HomeBasic(32bit)DVDs
Windows 7 Home Basic (32 bit) is preinstalled as the operating system in the following models:
•2801-CTO
•2808-CTO
•2809-CTO
•2815-CTO, 4Ux
•2823-CTO
•2824-CTO
•2825-CTO
Table55. Partslist—Windows7HomeBasic(32bit)recoveryDVDs
| LanguageP/NCRU | ID | |
| Brazilian Portuguese 58Y3208 * | ||
| English 58Y3215 | ||
| English (for India) 58Y4027 | ||
| Russian 58Y3211 | ||
| Russian (English-enabled) 58Y3210 | ||
| Serbian-Latin | 58Y3213 | |
| Simplified Chinese | 58Y3209 | |
| Spanish 58Y3212 | ||
| Turkish | 58Y3214 |
•2901-CTO, A5x, A6x, A8x, A9x, ABx, ACx, AEx, AGx
•2904-CTO, D6x, D7x, FHx, FJx
•2907-CTO, 73x, 74x, 76x, 77x
•2912-CTO, 3Gx
•2924-CTO, 9Ax, 9Bx
•2926-CTO
•2928-CTO
Table56.Partslist—Windows7HomeBasic(32bit)recoveryDVDs
| LanguageP/NCRU | ID | |
| Brazilian Portuguese 76Y2288 * | ||
| English 76Y2297 | ||
| English (for India) 76Y2290 | ||
| Russian 76Y2293 | ||
| Russian (English-enabled) 76Y2292 | ||
| Serbian-Latin | 76Y2295 | |
| Simplified Chinese | 76Y2289 | |
| Spanish 76Y2294 | ||
| Turkish | 76Y2296 |
Windows7HomePremium(32bit)DVDs
Windows 7 Home Premium (32 bit) is preinstalled as the operating system in the following models:
•2801-CTO, AMx
•2808-CTO
•2809-CTO
•2815-CTO
•2823-CTO
•2824-CTO
•2825-CTO
Table57. Partslist—Windows7HomePremium(32bit)recoveryDVDs
| LanguageP/NCRU | ID | |
| Brazilian Portuguese 58Y3216 * | ||
| Danish 58Y3219 | ||
| English 58Y3232 | ||
| English (for India) 58Y4028 | ||
| English (modem-disabled) 58Y3231 | ||
| English, Finnish, and Swedish (in Sweden) | 58Y3234 | |
| English, French, German, and Dutch (in Belgium and Luxemburg) | 58Y3233 | |
| English, French, German, and Italian (in Switzerland) | 58Y3235 | |
| French | 58Y3220 | |
| German | 58Y3221 | |
| Hebrew | 58Y3222 | |
| Japanese | 58Y3224 | |
| Korean | 58Y3225 | |
| Polish | 58Y3226 | |
| Russian | 58Y3228 | |
| Russian (English-enabled) | 58Y3227 | |
| Simplified Chinese | 58Y3217 | |
| Spanish | 58Y3229 | |
| Traditional Chinese | 58Y3218 | |
| Traditional Chinese (Hong Kong S.A.R.) | 58Y3223 | |
| Turkish | 58Y3230 |
•2901-CTO, A7x, AAx
•2904-CTO, CPx, CQx, CRx, CSx, F5x, G3x
•2907-CTO, 75x, 78x
•2912-CTO, 2Xx, 2Yx, 2Zx, 32x, 33x, 34x
•2924-CTO
•2926-CTO
•2928-CTO
Table58. Partslist—Windows7HomePremium(32bit)recoveryDVDs
| LanguageP/NCRU | ID | |
| Brazilian Portuguese 76Y2298 * | ||
| Danish 76Y2301 | ||
| English 76Y2316 | ||
| English (for India) 76Y2302 | ||
| English (modem-disabled) 76Y2315 | ||
| English, Finnish, and Swedish (in Sweden) 76Y2318 | ||
| English, French, German, and Dutch (in Belgium and Luxemburg) 76Y2317 | ||
| English, French, German, and Italian (in Switzerland) | 76Y2319 | |
| French | 76Y2303 | |
| German | 76Y2304 | |
| Hebrew | 76Y2305 | |
| Japanese | 76Y2307 | |
| Korean | 76Y2308 | |
| Norwegian | 76Y2309 | |
| Polish | 76Y2310 | |
| Russian | 76Y2312 | |
| Russian (English-enabled) | 76Y2311 | |
| Simplified Chinese | 76Y2299 | |
| Spanish | 76Y2313 | |
| Traditional Chinese | 76Y2300 | |
| Traditional Chinese (Hong Kong S.A.R.) | 76Y2306 | |
| Turkish | 76Y2314 |
Windows7HomePremium(64bit)DVDs
Windows 7 Home Premium (64 bit) is preinstalled as the operating system in the following models:
•2801-CTO, AQx
•2808-CTO
•2809-CTO
•2815-CTO
•2823-CTO
•2824-CTO
•2825-CTO
Table59. Partslist—Windows7HomePremium(64bit)recoveryDVDs
| LanguageP/NCRU | ID | |
| English 58Y3241 * | ||
| English (for India) 58Y4029 | ||
| French 58Y3237 | ||
| German 58Y3238 | ||
| Japan 58Y3239 | ||
| Simplified Chinese | 58Y3236 | |
| Spanish | 58Y3240 |
•2901-CTO
•2904-CTO, DMx
•2907-CTO
•2912-CTO
•2924-CTO
•2926-CTO
•2928-CTO
Table60. Partslist—Windows7HomePremium(64bit)recoveryDVDs
| LanguageP/NCRU | ID | |
| Czech 76Y2238 * | ||
| English 76Y2253 | ||
| English (for India) 76Y2209 | ||
| French 76Y2239 | ||
| German 76Y2241 | ||
| Greek 76Y2240 | ||
| Hungarian 76Y2243 | ||
| Japanese 76Y2244 | ||
| Polish 76Y2245 | ||
| Portugese | 76Y2246 | |
| Romanian | 76Y2247 | |
| Serbian-Latin | 76Y2251 | |
| Simplified Chinese | 76Y2237 | |
| Slovak | 76Y2248 | |
| Slovenian | 76Y2249 | |
| Spanish | 76Y2250 | |
| Traditional Chinese (Hong Kong S.A.R.) | 76Y2242 | |
| Turkish | 76Y2252 |
Windows7Professional(32bit)DVDs
Windows 7 Professional (32 bit) is preinstalled as the operating system in the following models:
•2801-CTO, ALx
•2808-CTO, D9x, DAx, DBx, DCx, DDx, DEx, DFx, DGx, DMx, DNx, DPx, DQx, DRx, DSx, DTx, DUx, DXx, E4x, ELx, ENx, EVx, EWx, F3x, F4x, F5x, F6x, F7x, F8x, F9x, FAx, FNx
•2809-CTO
•2815-CTO, 3Zx, 42x, 43x, 44x, 45x, 46x, 47x, 48x, 49x, 4Ax, 4Bx, 4Cx, 4Dx, 4Fx, 4Jx, 4Lx, 4Nx, 4Qx, 4Sx, 4Vx, 4Xx, 5Nx, 5Px, 5Qx, 5Tx, 5Ux, 5Xx
•2823-CTO
•2824-CTO
•2825-CTO
Table61. Partslist—Windows7Professional(32bit)recoveryDVDs
| LanguageP/NCRU | ID | |
| Brazilian Portuguese 58Y3242 * | ||
| Czech 58Y3245 | ||
| Danish 58Y3246 | ||
| English 58Y3268 | ||
| English (for India) 58Y4030 | ||
| English (modem-disabled) 58Y3267 | ||
| English, Finnish, and Swedish (in Sweden) 58Y3270 | ||
| English, French, German, and Dutch (in Belgium and Luxemburg) 58Y3269 | ||
| English, French, German, and Italian (in Switzerland) 58Y3271 | ||
| French | 58Y3247 | |
| German | 58Y3249 | |
| Greek | 58Y3248 | |
| Hebrew | 58Y3250 | |
| Hungarian | 58Y3252 | |
| Italian | 58Y3253 | |
| Japanese | 58Y3254 | |
| Korean | 58Y3255 | |
| Norwegian | 58Y3256 | |
| Polish 58Y3257 | ||
| Portuguese | 58Y3258 | |
| Romanian | 58Y3260 | |
| Russian | 58Y3261 | |
| Russian (English-enabled) | 58Y3259 | |
| Serbian-Latin | 58Y3265 | |
| Simplified Chinese | 58Y3243 | |
| Slovak | 58Y3262 | |
| Slovenian | 58Y3263 | |
| Spanish | 58Y3264 | |
| Traditional Chinese | 58Y3244 | |
| Traditional Chinese (Hong Kong S.A.R.) | 58Y3251 | |
| Turkish | 58Y3266 |
•2901-CTO, A2x, ADx, AFx, AHx, AJx, AKx
- 2904-CTO, C2x, C3x, C4x, C5x, C6x, C7x, C8x, C9x, CBx, CCx, CDx, CEx, CHx, CJx, CKx, CLx, CMx, CNx, CUx, CVx, CWx, D3x, D4x, D5x, D8x, D9x, DAx, DBx, DCx, DDx, DFx, DWx, DXx, DYx, DZx, E2x, E3x, E4x, E5x, E8x, E9x, EAx, EBx, ECx, EDx, ENx, EPx, EQx, ERx, ESx, ETx, EUx, EVx, EWx, EXx, EYx, EZx, F2x, F3x, F6x, F7x, F8x, FBx, FEx, FFx, FGx, FKx, FNx, G4x, G5x, G6x, G7x, G8x
- 2907-CTO, 72x
•2912-CTO, 20x, 21x, 22x, 23x, 24x, 25x, 2Cx, 2Dx, 2Ex, 2Fx, 2Gx, 2Hx, 2Jx, 2Kx, 2Lx, 2Mx, 2Nx, 2Px, 2Qx, 2Rx, 2Sx, 2Tx, 2Ux, 2Vx, 2Wx, 30x, 37x, 38x, 39x, 3Cx, 3Ex, 3Fx, 3Hx, 3Jx, 3Kx, 3Px, 40x, 52x, 53x, 62x, A0x
•2924-CTO, 22x, 23x, 24x, 25x, 92x, 93x, 94x, 95x, 96x, 97x, 9Cx, 9Dx, 9Ex
•2926-CTO
•2928-CTO
Table62. Partslist—Windows7Professional(32bit)recoveryDVDs
| LanguageP/NCRU | ID | |
| Brazilian Portuguese 76Y2256 * | ||
| Czech 76Y2259 | ||
| Danish 76Y2260 | ||
| English 76Y2283 | ||
| English (for India) 76Y2261 | ||
| English (modem-disabled) 76Y2282 | ||
| English, Finnish, and Swedish (in Sweden) 76Y2286 | ||
| English, French, German, and Dutch (in Belgium and Luxemburg) 76Y2284 | ||
| English, French, German, and Italian (in Switzerland) 76Y2287 | ||
| French | 76Y2262 | |
| German | 76Y2264 | |
| Greek | 76Y2263 | |
| Hebrew | 76Y2265 | |
| Hungarian | 76Y2267 | |
| Italian | 76Y2268 | |
| Japanese | 76Y2269 | |
| Korean | 76Y2270 | |
| Norwegian | 76Y2271 | |
| Polish 76Y2272 | ||
| Portuguese | 76Y2273 | |
| Romanian | 76Y2275 | |
| Russian | 76Y2276 | |
| Russian (English-enabled) | 76Y2274 | |
| Serbian-Latin | 76Y2280 | |
| Simplified Chinese | 76Y2257 | |
| Slovak | 76Y2277 | |
| Slovenian | 76Y2278 | |
| Spanish | 76Y2279 | |
| Traditional Chinese | 76Y2258 | |
| Traditional Chinese (Hong Kong S.A.R.) | 76Y2266 | |
| Turkish | 76Y2281 |
Windows7Professional(64bit)DVDs
Windows 7 Professional (64 bit) is preinstalled as the operating system in the following models:
•2801-CTO
•2808-CTO, DLx, E3x
•2809-CTO
•2815-CTO, 4Ex, 4Gx, 4Wx, 5Yx
•2823-CTO
•2824-CTO
•2825-CTO
Table63. Partslist—Windows7Professional(64bit)recoveryDVDs
| LanguageP/NCRU | ID | |
| Danish 58Y3274 * | ||
| English 58Y3285 | ||
| English (for India) 58Y4031 | ||
| English, French, German, and Italian (in Switzerland) 58Y3286 | ||
| French 58Y3275 | ||
| German | 58Y3276 | |
| Hebrew | 58Y3277 | |
| Italian | 58Y3279 | |
| Japanese | 58Y3280 | |
| Korean | 58Y3281 | |
| Polish | 58Y3282 | |
| Simplified Chinese | 58Y3272 | |
| Spanish | 58Y3283 | |
| Traditional Chinese | 58Y3273 | |
| Traditional Chinese (Hong Kong S.A.R.) | 58Y3278 | |
| Turkish | 58Y3284 |
•2901-CTO
•2904-CTO, DEx, DGx, DHx, DJx, DKx, DLx, DNx, DPx, DQx, DRx, DSx, DTx, DUx, DVx, F4x, F9x, FAX, FCx, FDx, FQx, FSx, FTx, FUx, FVx, FWx, FXx, FYx, FZx, G2x
•2907-CTO
•2912-CTO, 36x, 3Ax, 3Lx, 3Mx, 3Nx, 3Rx
•2924-CTO
•2926-CTO
•2928-CTO
Table64. Partslist—Windows7Professional(64bit)recoveryDVDs
| LanguageP/NCRU | ID | |
| Czech 76Y2212 * | ||
| Danish 76Y2213 | ||
| English 76Y2206 | ||
| English (for India) 76Y2205 | ||
| English, Finnish, and Swedish (in Sweden) 76Y2235 | ||
| English, French, German, and Dutch (in Belgium and Luxemburg) 76Y2234 | ||
| English, French, German, and Italian (in Switzerland) 76Y2236 | ||
| French | 76Y2214 | |
| German | 76Y2216 | |
| Greek | 76Y2215 | |
| Hebrew | 76Y2217 | |
| Hungarian | 76Y2219 | |
| Italian | 76Y2220 | |
| Japanese | 76Y2221 | |
| Korean | 76Y2222 | |
| Norwegian | 76Y2223 | |
| Polish 76Y2224 | ||
| Portugese | 76Y2225 | |
| Romanian | 76Y2227 | |
| Russian | 76Y2228 | |
| Russian (English-enabled) | 76Y2226 | |
| Serbian-Latin | 76Y2232 | |
| Simplified Chinese | 76Y2210 | |
| Slovak | 76Y2229 | |
| Slovenian | 76Y2230 | |
| Spanish | 76Y2231 | |
| Traditional Chinese | 76Y2211 | |
| Traditional Chinese (Hong Kong S.A.R.) | 76Y2218 | |
| Turkish | 76Y2233 |
Commonservicetools
Table65. Partslist—Commonservicetools
| ToolP/N | |
| Screwdriver kit 95F3598 | |
| 1/4"drive spinner handle 1650840 | |
| 1/4"Sq. to 1/4"hex torx adapter 93F2838 | |
| TR7-TR-10 tamper resistant torx bits 00P6967 | |
| Removal tool antenna RF connector 08K7159 | |
| USB 2.0 CD-RW/DVD-ROM combo drive II 40Y8687 | |
| USB cable 40Y8704 | |
| USB floppy diskette drive for maintenance diskette 05K9283 | |
| USB floppy diskette drive tool kit 27L3452 | |
| Test card for integrated Smart Card 42W7820 | |
| LENOVO ThinkPad Hardware Maintenance Diskette Version 1.76 or laterNote: Download the file from the following Web site: http://www.lenovo.com/spn | — |
Notices
Lenovo may not offer the products, services, or features discussed in this document in all countries. Consult your local Lenovo representative for information on the products and services currently available in your area. Any reference to a Lenovo product, program, or service is not intended to state or imply that only that Lenovo product, program, or service may be used. Any functionally equivalent product, program, or service that does not infringe any Lenovo intellectual property right may be used instead. However, it is the user's responsibility to evaluate and verify the operation of any other product, program, or service.
Lenovo may have patents or pending patent applications covering subject matter described in this document. The furnishing of this document does not give you any license to these patents. You can send license inquiries, in writing, to:
Lenovo(UnitedStates), Inc.
1009ThinkPlace-BuildingOne
Morrisville, NC27560
U.S.A.
Attention: Lenovo Director of Licensing
LENOVO GROUP LTD. PROVIDES THIS PUBLICATION "AS IS" WITHOUT WARRANTY OF ANY KIND, EITHER EXPRESS OR IMPLIED, INCLUDING, BUT NOT LIMITED TO, THE IMPLIED WARRANTIES OF NON-INFRINGEMENT, MERCHANTABILITY OR FITNESS FOR A PARTICULAR PURPOSE. Some jurisdictions do not allow disclaimer of express or implied warranties in certain transactions, therefore, this statement may not apply to you.
This information could include technical inaccuracies or typographical errors. Changes are periodically made to the information herein; these changes will be incorporated in new editions of the publication. Lenovo may make improvements and/or changes in the product(s) and/or the program(s) described in this publication at any time without notice.
The products described in this document are not intended for use in implantation or other life support applications where malfunction may result in injury or death to persons. The information contained in this document does not affect or change Lenovo product specifications or warranties. Nothing in this document shall operate as an express or implied license or indemnity under the intellectual property rights of Lenovo or third parties. All information contained in this document was obtained in specific environments and is presented as an illustration. The result obtained in other operating environments may vary.
Lenovo may use or distribute any of the information you supply in any way it believes appropriate without incurring any obligation to you.
Any references in this publication to non-Lenovo Web sites are provided for convenience only and do not in any manner serve as an endorsement of those Web sites. The materials at those Web sites are not part of the materials for this Lenovo product, and use of those Web sites is at your own risk.
Any performance data contained herein was determined in a controlled environment. Therefore, the result obtained in other operating environments may
vary significantly. Some measurements may have been made on development-level systems and there is no guarantee that these measurements will be the same on generally available systems. Furthermore, some measurements may have been estimated through extrapolation. Actual results may vary. Users of this document should verify the applicable data for their specific environment.
Trademarks
The following terms are trademarks of Lenovo in the United States, other countries or both:
Active Protection System Lenovo ® Rescue and Recovery ® ThinkLight ® ThinkPad ® ThinkVantage ® TrackPoint ® Ultrabay UltraNav ®
IBM ® (used under license) is trademark of the International Business Machines Corporation in the United States, other countries, or both:
The following terms are trademarks of Microsoft Corporation in the United States, other countries, or both:
Windows ® Windows Vista ®
The following terms are trademarks of Intel Corporation or its subsidiaries in the United States, other countries, or both:
Intel ® Intel ® Celeron ® Intel ® Centrino ® Intel ® Core
Other company, product, or service names may be the trademarks or service marks of others.
ThinkPad
PartNumber:45M2271_03
(1P) P/N: 45M2271_03
- ThinkPadT400s,T410s,andT410si HardwareMaintenanceManual
- Fourth Edition (March 2010)
- Contents
- Aboutthismanual. . . . . . . . . . v
- Safetyinformation. 1
- Importantserviceinformation. . . . . 3 9
- Generalcheckout 4 3
- Relatedserviceinformation. . . . . . 5 5
- Statusindicators. 7 1
- Fnkeycombinations ..... 7 5
- FRUreplacementnotices. . . . . . 7 9
- RemovingandreplacingaFRU ..... 8 3
- Locations 147
- Aboutthismanual
- Important:
- Safetyinformation
- Generalsafety
- Electricalsafety
- Safetyinspectionguide
- Checklist:
- Handling device sthataresensitivetoelectrostaticdischarge
- Notes:
- Note:
- Groundingrequirements
- Safetynotices(multilingualtranslations)
- DANGER
- CAUTION:
- StrategyforreplacingFRUs
- Beforereplacingparts:
- Strategyforreplacingaharddiskdrive
- Importantnoticeforreplacingasystemboard
- Howtouseerrormessage
- StrategyforreplacingFRUsforCTO,CMV,andGAV
- Productdefinition
- DynamicConfigureToOrder(CTO)
- CustomModelVariant(CMV)
- GeneralAnnounceVariant(GAV)
- FRUidentificationforCTO,CMV,andGAVproducts
- UsingPEW
- UsingeSupport
- UsingtheHMM
- Generalcheckout
- Importantnotes:
- Whattodofirst
- The following are not covered under warranty:
- The following symptoms might indicate damage caused by nonwarranted activities:
- Checkoutguide
- DiagnosticsusingPC-DoctorforDOS
- Testingthecomputer
- DetectingsysteminformationwithPC-Doctor
- HardwareInfo
- Utility
- LenovoThinkVantageToolbox(LenovoSystemToolbox)
- Windows7:
- WindowsVistaandWindowsXP:
- PC-DoctorforRescueandRecovery
- FRUtests
- Powersystemcheckout
- CheckingtheACadapter
- Checkingoperationalcharging
- Checkingthebatterypack
- Checkingthebackupbattery
- Relatedserviceinformation
- RestoringthefactorycontentsbyusingProductRecoverydiscs
- RestoringthefactorycontentsbyusingRecoveryDiscSet
- Passwords
- Power-onpassword
- Hard-diskpassword
- Supervisorpassword
- Howtoremovethepower-onpassword
- Howtoremovethehard-diskpassword
- Powermanagement
- Screenblankmode
- Sleep(standby)mode
- Hibernationmode
- Symptom-to-FRUindex
- Numericerrorcodes
- Errormessages
- Beepsymptoms
- No-beepsymptoms
- LCD-relatedsymptoms
- Intermittentproblems
- Undeterminedproblems
- Statusindicators
- Fnkeycombinations
- FRUreplacementnotices
- Screwnotices
- Retainingserialnumbers
- Restoring the serial number of the system unit
- RetainingtheUUID
- ReadingorwritingtheECAinformation
- RemovingandreplacingaFRU
- BeforeservicingThinkPadT400s,T410s,andT410si
- 1010Batterypack
- Importantnoticeforreplacingabatterypack:
- 1020SerialUltrabaySlimdeviceortravelbezel
- 1030Solidstatedrive(SSD)orharddiskdrive(HDD)
- Attention:
- 1040DIMM
- Table12. RemovalstepsofDIMM(continued)
- ForThinkPadT400s:
- 1050PCIExpressMiniCardforwirelessLAN
- Table13. RemovalstepsofPCIExpressMiniCardforwirelessLAN(continued)
- Wheninstalling:
- 1060PCIExpressMiniCardforwirelessWAN
- Table14. RemovalstepsofPCIExpressMiniCardforwirelessWAN(continued)
- 1070Keyboard
- Table15. Removalstepsofkeyboard(continued)
- Table16. Installationstepsofkeyboard(continued)
- 1080Backupbattery
- 1090WirelessUSBadapterorIntelTurboMemory
- 1100Palmrestorpalmrestwithfingerprintreader
- 1110Bluetoothdaughtercard(BDC-2)
- 1120Keyboardbezelandspeakerassembly
- 11305-in-1MediaCardReaderadapter
- 1140Bluetooth-wirelessradioswitchFPC
- 1150LCDunit
- 1160Systemboard, fanassembly, and 34-mm Express Cardslotframe
- Importantnoticesforhandlingthesystemboard:
- ForThinkPadT410sandT410si:
- 1170I/Osubcardandbasecoverassembly
- Note: Applyinglabelstothebasecover
- 2010LCDbezelassembly
- 2020LCDlatchLandR
- 2030Integratedcameraormicrophonesubcard
- 2040LEDsubcard
- 2050LCDpanel
- ImportantnoticeonhandlingtheLCDpanel:
- Table31. RemovalstepsofLCDpanel(continued)
- 2060LCDcable
- 2070Hingekit
- 2080LEDcable
- Table34. RemovalstepsofLEDcable(continued)
- 2090AntennakitandLCDrearcoverassembly
- Locations
- Frontview
- Rearview
- Bottomview
- Partslist
- Self-serviceCRUs
- Optional-serviceCRUs
- Overall
- LCDFRUs
- Keyboard
- Miscellaneousparts
- ACadapters
- Powercords
- Recoverydiscs
- WindowsXPProfessional(32bit)DVDs
- WindowsVistaStarterEdition(32bit)DVDs
- WindowsVistaHomeBasic(32bit)DVDs
- WindowsVistaHomePremium(32bit)DVDs
- WindowsVistaBusiness(32bit)DVDs
- WindowsVistaBusiness(64bit)DVDs
- WindowsVistaUltimate(32bit)DVDs
- Windows7HomeBasic(32bit)DVDs
- Windows7HomePremium(32bit)DVDs
- Windows7HomePremium(64bit)DVDs
- Windows7Professional(32bit)DVDs
- Windows7Professional(64bit)DVDs
- Commonservicetools
- Notices
- Trademarks
- ThinkPad
Brand : LENOVO
Model : ThinkPad T400s
Category : Laptop