
EEWA7500 - Kettle ELECTROLUX - Free user manual and instructions
Find the device manual for free EEWA7500 ELECTROLUX in PDF.


| Type de produit | Electric kettle |
| Marque | Electrolux |
| Modèle | EEWA7500 |
| Capacité | 1.7 L |
| Puissance | 2200 W |
| Tension | 220-240 V, 50/60 Hz |
| Dimensions (L x l x H) | 23 x 15 x 26 cm |
| Poids | 1.2 kg |
| Matériau de la carafe | Stainless steel |
| Base pivotante à 360° | Yes |
| Filtre anti-calcaire | Removable mesh filter |
| Indicateur de niveau d'eau | Yes, transparent window |
| Arrêt automatique | Yes, after boiling |
| Protection contre l'ébullition à sec | Yes |
| Ouverture du couvercle | One-touch button |
| Type de cordon | Detachable, cordless serving |
| Entretien | Descale regularly with vinegar or citric acid |
| Nettoyage | Wipe with damp cloth, do not immerse |
| Sécurité | Boil-dry protection, auto shut-off |
| Pièces détachées | Lid, filter, base available |
| Réparabilité | User-serviceable: filter, base |
| Garantie | 2 years |
| Information générale | Free user manual available in PDF on notice-facile.com |
Frequently Asked Questions - EEWA7500 ELECTROLUX
User questions about EEWA7500 ELECTROLUX
0 question about this device. Answer the ones you know or ask your own.
Ask a new question about this device
Download the instructions for your Kettle in PDF format for free! Find your manual EEWA7500 - ELECTROLUX and take your electronic device back in hand. On this page are published all the documents necessary for the use of your device. EEWA7500 by ELECTROLUX.
USER MANUAL EEWA7500 ELECTROLUX
GB Instruction book....3–11 Before using the appliance for the first time, please read the safety advice on page 4.
GB
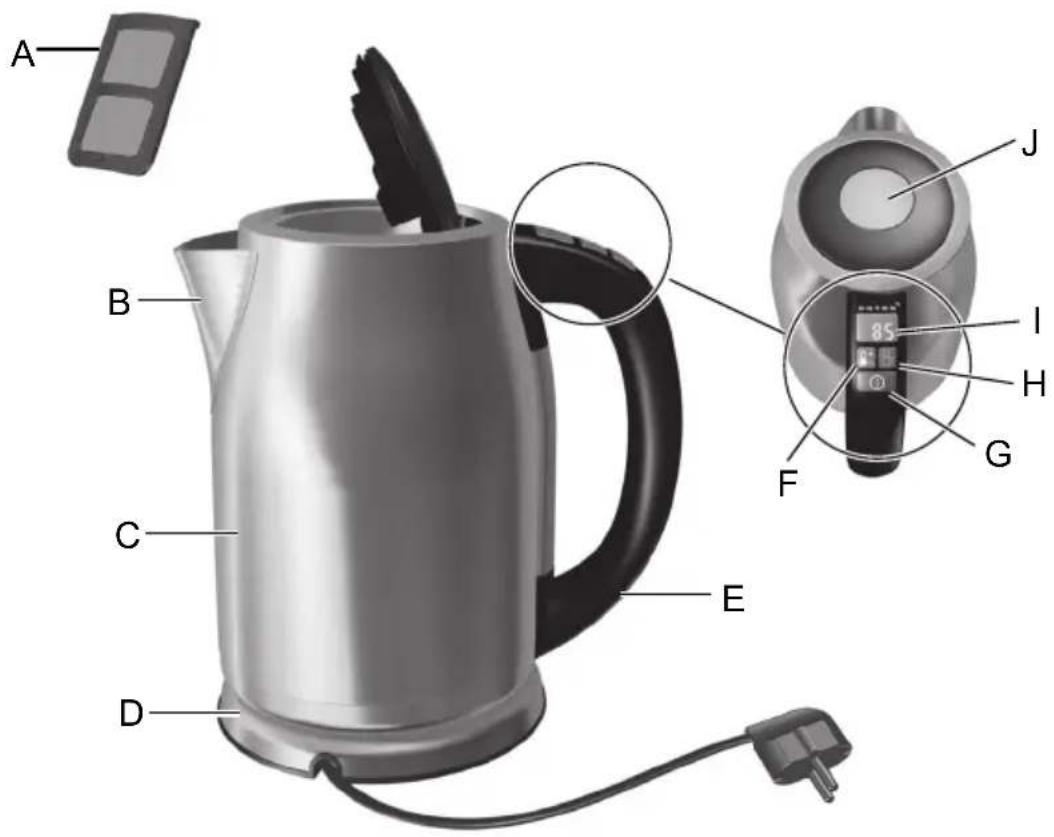
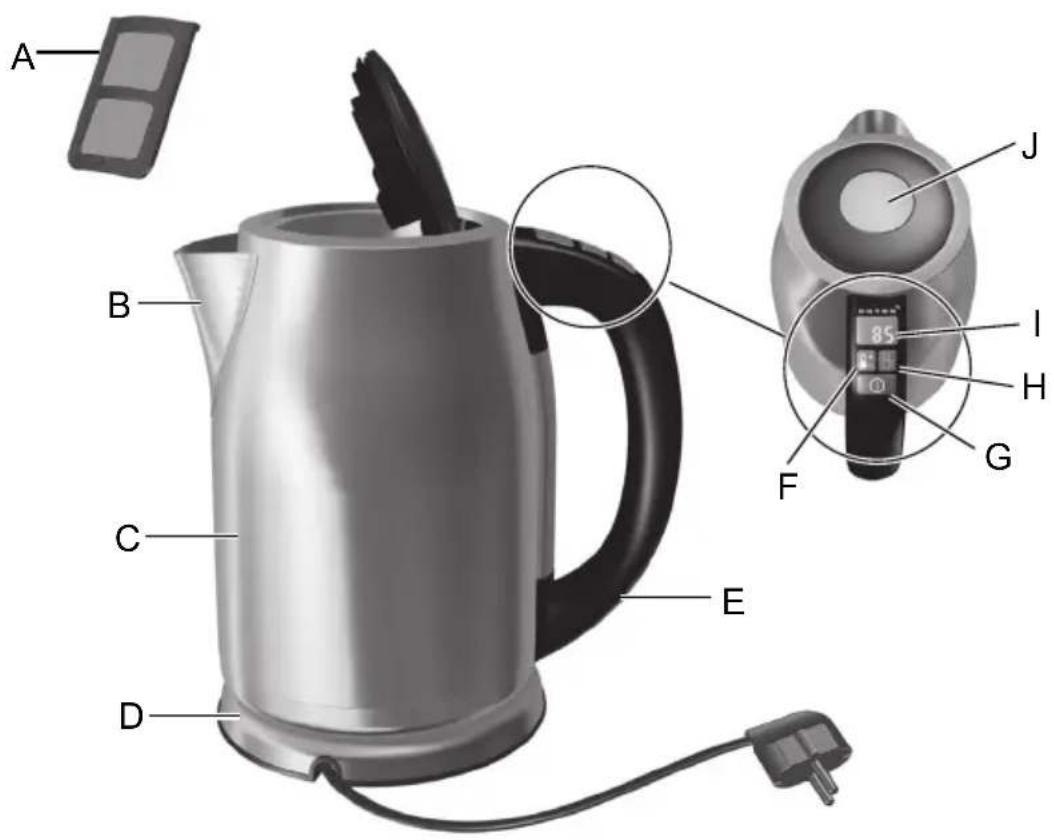
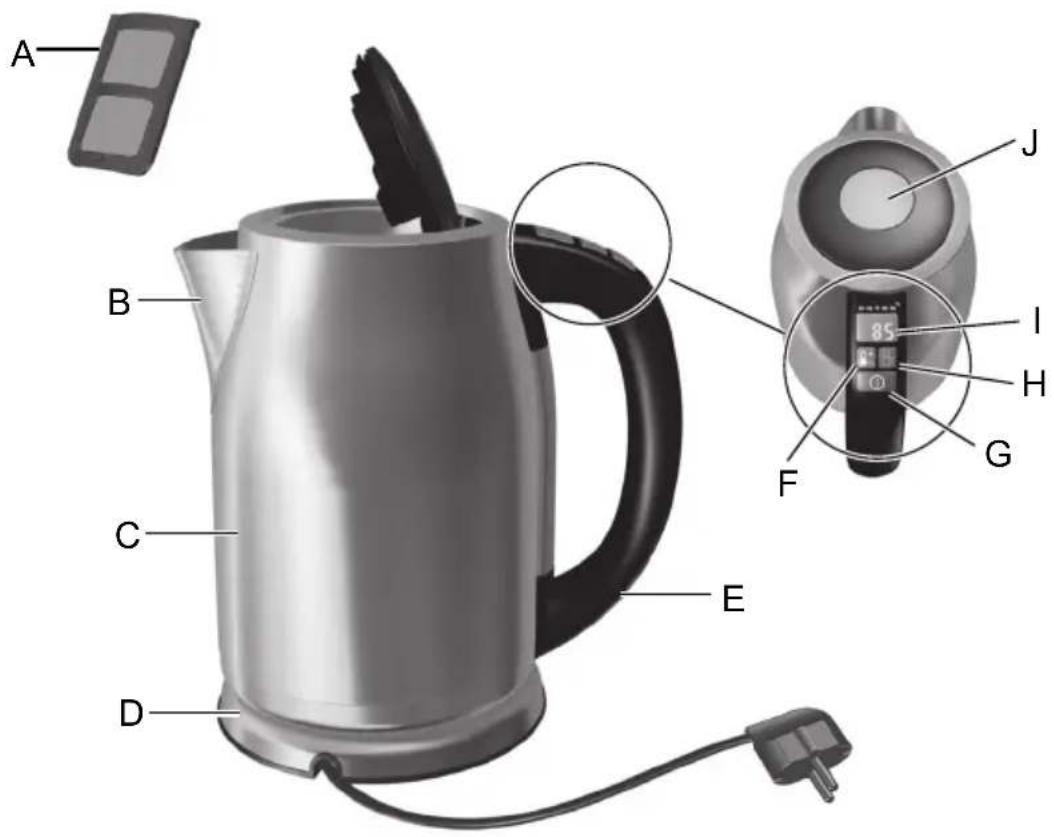
Components
A. Removable mesh filter
B. Spout
C. Jug
D. Separate base unit and mains cable
E. Handle
F. Temperature selection button
G. Power button
H. Keep warm button
I. LED display
J. Open lid button
DN
Teile
Read the following instruction carefully before using the appliance for the first time.
- This appliance is not intended for use by persons (including children) with reduced physical, sensory or mental capabilities, or lack of experience and knowledge, unless they have been given supervision or instruction concerning use of the appliance by a person responsible for their safety.
• Children should be supervised to ensure that they do not play with the appliance. - The appliance may only be connected to a power supply whose voltage and frequency comply with the specifications on the rating plate!
- Never use or pick up the appliance if – the supply cord is damaged, – the housing is damaged."
- The appliance must only be connected to an earthed socket. If necessary an extension cable suitable for 10 A can be used.
- If the appliance or the supply cord is damaged, it must be replaced by the manufacturer, its service agent or
similarly qualified person, in order to avoid hazard.
• Always place the appliance on a flat, level surface.
- The appliance must be switched off and the mains plug withdrawn before cleaning and maintenance.
- The appliance and accessories become hot during operation. Use only designated handles and knobs. Allow to cool down before cleaning or storage.
- The mains cable must not come into contact with any hot parts of the appliance.
- Do not immerse the appliance in water or any other liquid.
' Attention: If the kettle is overfilled there is a risk that the boiling water may spray out, which could scald or burn! Therefore never fill the kettle above the maximum marking.
- Never operate appliance with open lid.
- Do not use or place the appliance on a hot surface or near source of heat.
- Only use the kettle for heating water!
- The kettle can only be used with the stand provided.
- Appliance is for indoor use only.
- This appliance is intended for domestic use only. The manufacturer cannot accept any liability for possible damage caused by improper or incorrect use.
D
GB
- Before first use, rinse the inside and wipe the outside of the kettle with a damp cloth.
D
-
Press the button to open the lid, pour water into the kettle. It is also possible to fill the kettle through the spout, without opening the lid. Make sure water level is visible in the water level indicator, but not exceeding the Max. mark.
-
Die Taste zum Öff nen der Abdeckung drücken, Wasser in den Kocher füllen. Die Wasserbefüllung ist auch direkt über die Ausgusstülle möglich, so muss der Deckel nicht geöff net werden. Der Wasserstand soll an der Wasserstandanzeige sichtbar sein, die oberste Markierung jedoch nicht übersteigen.
-
Pour ouvrir le couvercle, appuyez sur le bouton, puis versez de l'eau dans la bouilloire. Vous pouvez également remplir la bouilloire directement par son large bec verseur. Assurez-vous que l'indicateur de niveau d'eau soit visible, afin de ne pas dépasser le repère Max.
-
Druk op de knop om het deksel te openen en giet water in de waterkoker. Het is ook mogelijk om de waterkoker door de schenkmond te vullen, zonder dat u het deksel hoeft te openen. Zorg ervoor dat het waterpeil binnen de waterniveau aanduidingen blijft, en niet boven de aanduiding Max. uitkomt.
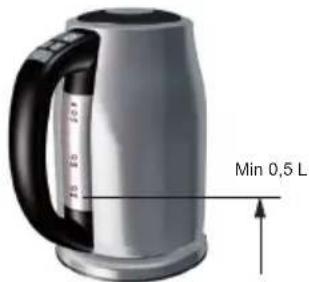
- Fill at least 0,5 L to ensure that the temperature shown on the display is reliable.
Recommended temperatures:
50-60 °C for baby mixtures
80 °C for delicate teas (green/white)
90 °C for instant coffee or soup
100 °C for perfect black tea
- Close the lid and make sure that it snaps in correctly. Otherwise, the auto switch off function will not work reliably.
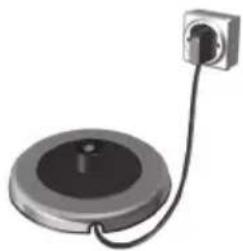
Place the kettle on the base.
The buzzer will buzz and the screen will indicate "0".
The screen will indicate "0" until the temperature reaches 40 °C and then will indicate current temperature. The kettle will switch off automatically when the water is boiling.
7. To heat water to selected temperature (not boiling):
- Press the Temperature selection button to select temperature. 2. Then press the Power button.
When the selected temperature is reached, the kettle will automatically switch off.
D
8. To boil water then keep it warm at selected temperature:
- Press the Keep warm button to select the keep warm temperature. 2. Then press the Power button.
This function will switch off after 30 minutes. Then the buzzer will buzz.
9. To heat water to selected temperature (not boiling) and keep it warm.
- Press the Temperature selection button to select temperature. 2. Then press the Keep warm button. 3. Then press the Power button.
This function will switch off after 30 minutes. Then the buzzer will buzz.
- Before cleaning, always unplug the appliance. Never rinse or immerse the kettle or base unit in water. Just wipe with a damp cloth, using no abrasive detergents. Occasionally rinse out the kettle with clean water.
- Vor der Reinigung immer den Netzstecker des Geräts ziehen. Den Wasserkocher oder die Basis nie abspülen oder in Wasser eintauchen. Nur mit einem feuchten Tuch ohne scheuernde Reinigungsmittel abwischen. Den Wasserkocher gelegentlich mit sauberem Wasser ausspülen.
- Avant toute opération de nettoyage, débranchez toujours l'appareil. Ne rincez ni n'immergez jamais la bouilloire ou son socle dans l'eau. Essuyez-les simplement à l'aide d'un chiffon humide, sans utiliser de produit nettoyant caustique ou abrasif. De temps à autre, rincez l'intérieur de la bouilloire à l'eau claire.
- Trek altijd de stekker uit het stopcontact voordat u het apparaat reinigt. U mag de waterkoker of voet nooit afspoelen onder de kraan of onderdompelen in water. Gebruik alleen een vochtige doek, zonder bijtende schoonmaakproducten, om de waterkoker af te vegen. Spoel de waterkoker af en toe om met schoon water.
-
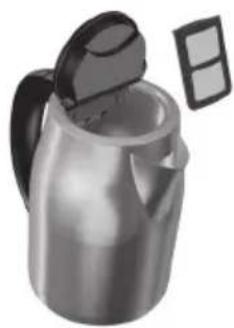
To clean the mesh filter, grab the strainer insert and lift out. Cleaning the heating plate – superficial spots of rust may appear on the base unit. Remove with a stainless steel cleaning agent.
-
Zum Reinigen des Kalkfilters den Siebeinsatz nach oben herausziehen. Reinigen der Heizplatte – Auf der Heizplatte können sich oberflächliche Rostflecken bilden. Mit einem Edelstahlputzmittel entfernen.
-
Pour nettoyer le filtre, retirez-le en le tirant vers le haut. Nettoyage de la plaque chauffante : de la rouille superficielle peut se former sur la plaque chauffante. Éliminez-la à l'aide d'un nettoyant pour acier inoxydable.
-
Voor het reinigen van het netfilter, pakt u de zeefinzet vast en tilt deze eruit.
- Decalcifying is recommended regularly, depending on water hardness. Fill the kettle with water and decalcifier according to decalcifier product instructions. Do not boil the solution as it may foam over. Afterwards, rinse kettle thoroughly with fresh water.
3 Je nach Wasserhärte sollte das Gerät regelmäßig entkalkt werden. Den Wasserkocher der Produktanleitung entsprechend mit Wasser und Entkalker füllen. Die Lösung nicht kochen lassen, da sie überschäumen könnte. Danach den Wasserkocher gründlich mit frischem Wasser ausspülen. - Il est recommandé de procéder à un détartrage régulier en fonction de la dureté de l'eau. Remplissez la bouilloire d'eau et de détartrant en respectant les consignes d'utilisation du produit détartrant. Ne laissez pas bouillir la solution, car la mousse formée pourrait déborder. Puis, rincez soigneusement l'intérieur de la bouilloire à l'eau claire.
- Ontkalken doet u bij voorkeur regelmatig, afhankelijk van de hardheid van het water. Vul de waterkoker met water en ontkalker, volgens de gebruiksaanwijzing van het ontkalkingsproduct. Laat de oplossing niet koken, aangezien deze kan gaan schuimen. Naderhandspoelt u de waterkoker grondig na met schoon water.
GB
| Problem Possible cause Solution | ||
| The appliance switches off before boiling. Too much lime scale at the heating element of the kettle. | Run the decalcifying procedure. | |
| The appliance does not switch off. Close lid until it locks. | Insert the mesh filter correctly. | |
| The appliance cannot be switched on. After operating with little or no water, the appliance has not cooled down sufficiently. | Allow to cool a short time and try again. | |
D
The packaging materials are environmentally friendly and can be recycled. The plastic components are identified by markings, e.g. >PE<, >PS<, etc. Please dispose the packaging materials in the appropriate container at the community waste disposal facilities.
Old appliance

on the product or on cates that this product d as household waste. handed over to the ion point for the ical and electronic suring this product rectly, you will help negative consequences ent and human health,
which could otherwise be caused by inappropriate waste handling of this product. For more detailed information about recycling of this product, please contact your local city office, your household waste disposal service or the shop where you purchased the product.
D
Entsorgung
This page is left blank intentionally
I
Componenti
1
-
Posizionare la base su una superficie piana e stabile. Collegare il cavo di alimentazione ad una presa di rete. Il cavo in eccesso può essere avvolto sotto la base.
-
Coloque la unidad base en una superficie lisa y estable. Conecte el enchufe a la toma de la pared. El cable sobrante se puede enrollar en la parte posterior de la unidad base.
-
Coloque a base numa superfície firme e plana. Ligue a ficha a uma tomada de parede. O cabo excedente pode ser enrolado na parte inferior da base.
-
Altlığı düz ve sağlam bir zemin üzerine yerleştirin. Güç kablosu fişini prize takın. Kablonun fazla kısmı, tabanın altında bulunan bölüme sarılabilir.
Temperature consigliate:
- Scollegare sempre l'apparecchio prima procedere alla pulizia. Non sciacquare o immergere il bollitore o la base in acqua. Pulirli con un panno umido, senza usare detergenti abrasivi. Ogni tanto sciacquare il bollitore sotto l'acqua.
- Desenchufe siempre el electrodoméstico antes de limpiarlo. No enjuague ni sumerja el hervidor o la unidad base en agua. Límpielo con un trapo húmedo. No utilice detergentes abrasivos. Enjuague el hervidor con agua limpia cada cierto tiempo.
- Antes de limpar, desligue sempre o aparelho. Nunca enxague nem mergulhe a chaleira ou a base em água. Basta limpar com um pano húmido, sem detergentes abrasivos. Ocasionalmente, lave a chaleira com água tépida corrente.
- Temizlemeden önce daima cihazın fışini prizden çekin. Su ısıtıcı veya altlığı kesinlik su içinde yıkamayın veya suya daldırmayın. Aşındırıcı deterjanlar kullanmaksızın sadece nemli bir bezle silin. Isıtıcıyı ara sıra temiz suyla durulayın.
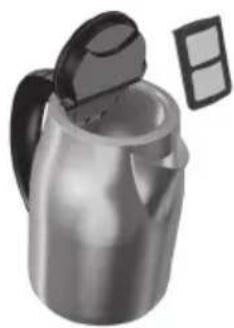
- Per pulire il filtro a maglie, afferrarlo ed estrarlo. Pulizia della piastra di riscaldamento – sulla piastra di riscaldamento potrebbero apparire delle piccole macchie di ruggine. Rimuoverle utilizzando un prodotto di pulizia per acciaio inossidabile.
- Para limpiar el filtro de malla, sujete el filtro y extráigalo. Limpieza de la placa calefactora: pueden aparecer manchas de óxido en la placa calefactora. Elimínelas con un agente limpiador de acero inoxidable.
- Para limpar o filtro anti impurezas, segure o filtro e levante. Limpeza da placa de aquecimento – podem aparecer manchas superficiais de ferrugem na placa de aquecimento. Remova com um agente de limpeza para aço inoxidável.
- Ağ filtreyi temizlemek için,, süzgeç takacağını tutun ve kaldırarak dışarı çıkartın. Rezistansın temizlenmesi – rezistansın yüzeyinde pas lekeleri görülebilir. Paslanmaz çelik temizleme maddesi ile bunları çıkarın.

- È consigliabile eseguire regolarmente la decalcificazione, indipendentemente dalla durezza dell'acqua. Riempire il bolllitore di acqua e decalcificante nella quantità indicata nelle istruzioni del prodotto. Non portare la soluzione a ebollizione perché potrebbe formarsi della schiuma e il liquido potrebbe traboccare. Quindi, sciacquare a fondo il bolllitore in acqua corrente.
- La descalcificación debe realizarse con regularidad, en función de la dureza del agua. Llene el hervidor de agua y descalcificador de acuerdo con las instrucciones del producto descalcificador. No hierva la solución, ya que podría derramar espuma. Después, enjuague el hervidor a conciencia con agua limpia.
- Descalcificação recomenda-se regularmente, dependendo da dureza da água. Encha a chaleira com água e descalcificador de acordo com as instruções do produto descalcificador. Não ferva a solução, já que pode derramar. Depois, enxague bem a chaleira com água tépida corrente.
- Kireç çözme işleminin suyun sertliğine bağlı olarak düzenli bir şekilde yapılması önerilir. Kireç çözücü ürünün talimatlarına uygun şekilde su ıstıcıyı su ve kireç çözücü ile doldurun. Suyu kaynatmayın, köpürüp taşabilir. Ardından, su ıstıcıyı taze su ile iyice yıkayın.
Ricerca ed eliminazione dei guasti / Solución de problemas / Resolución de problemas / Sorun giderme
This page is left blank intentionally

S
Komponenter
S
-
Ställ basen på ett plant och stabilt underlag. Sätt in kontakten i ett vägguttag. Överflödig sladd kan förvaras i bottenplattan.
-
Placer baseenheden på en fast og flad overflade. Sæt stikket i stikkontakten. Overskydende ledning kan rulles op i bunden af baseenheden.
-
Sijoita alusta tukevalle ja tasaiselle pinnalle. Kytke virtajohto pistorasiaan. Voit keriä ylimääräisen johdon alustan alle.
-
Plasser strømsokkelen på et fast og plant underlag. Sett støpselet inn i en stikkontakt. Ledning som er til overs kan kveiles opp i bunnen av sokkelen.

This page is left blank intentionally
CZ
Součásti
CZ
-
Chcete-li vyčistit sitkovaný filtr, uchopte a zvedněte filtrovací vložku. Čištění topné desky – na povrchu topné desky se mohou objevit skvrny od rzi. Odstranit je lze čisticím prostředkem na nerezavějící ocel.
-
Ak chcete vyčistiť sietkový filter, uchopte filter na vodný kameň a vyberte ho. Čistenie ohrevnej platne – na povrchu ohrevnej platne sa môžu objaviť hrdzavé škrvny. Odstrániť ich možno čistiacim prostriedkom na antikoro.
-
Для очистки сетчатого фильтра выньте сито. Чистка нагревающей поверхности: на нагревающей поверхности могут появляться поверхностные пятна ржавчины. Удалите их средством для чистки нержавеющей стали.
-
Для чищення сітчастого фільтра вийміть касету сітчастого фільтра. Чищення нагрівального елемента - на поверхні нагрівального елемента можуть з'явитись плями іржі. йх можна видалити за допомогою миючого засобу для поверхонь із нержавіючої сталі.
This page is left blank intentionally

PL
Elementy
PL
-
Ustaw podstawę na płaskiej, równej powierzchni. Włóż wtyczkę przewodu zasilającego do gniazdka. Nadmiar przewodu można zwinąć wewnątrz podstawy od spodu.
-
Helyezze a talapzatot szilárd, vízszintes felületre. Csatlakoztassa a tápkábelt egy fali aljzathoz. A felesleges kábelhossz visszatekercselhető a talpazat aljába.
-
Postolje stavite na čvrstu i ravnu podlogu. Priključite utikač napajanja u zidnu utičnicu. Višak kabela može se namotati oko donjeg dijela postolja uređaja.
-
Postavite osnovnu jedinicu na čvrstu i ravnu površinu. Uključite utikač u zidnu utičnicu. Višak kabla možete obmotati na dnu osnovne jedinice.

This page is left blank intentionally
RO
Componente
RO
-
Apăsați butonul pentru a deschide capacul, turnați apă în vas. De asemenea, vasul poate fi umplut prin orificiul de scurgere, fără a deschide capacul. Asigurați-vă că nivelul apei este vizibil în indicatorul pentru nivelul apei, fără să depășească marcajul Max.
-
Натиснете бутона, за да отворите капака, налейте вода в чайника. Също така можете да напълните каната през гърлото, без да отваряте капака. Проверете дали нивото на водата се вижда в индикатора за ниво на водата, като не надвишава отметката Мах.
-
Pritisnite gumb, da se pokrov odpre. Napolnite grelnik z vodo. Grelnik vode lahko napolnite tudi preko dulca, ne da bi bilo treba odpreti pokrov. Dodajte toliko vode, da bo gladina vidna na indikatorju višine vode, vendar največ do oznake Max.
-
Kaane avamiseks vajutage nuppu ja kallake vesi nõusse. Kannu saab täita ka noka kaudu, ilma kaant avamata. Kontrollige, et vee tase oleks veetaseme näidikult näha, kuid ei ületaks märgist Max.
-
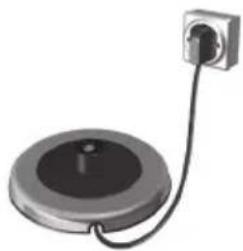
Puneți unitatea de bază pe o suprafață solidă și plată. Introduceți ștecherul în priză. Cablul aflat în exces poate fi infășurat în partea inferioară a bazei aparatului.
-
Поставете основата на равна и твърда повърхност. Включете щепсела в контакта. Излишният кабел може да бъде навит в долната част на основата.
-
Postavite podnožje na trdno in ravno površino. Vtikač priključite v vtičnico. Če je napajalni kabel predolg, ga lahko zvijete v dno podnožja.
-
Asetage kann alusele kindlal horisontaalpinnal. Sisestage toitepistik seinakontakti. Üleliigse juhtmeosa vöib aluse alla kokku kerida.

- Deconectați întotdeauna aparatul de la priză înainte de curățare. Nu clătiți și nu scufundați niciodată în apă vasul sau unitatea de bază. Doar ștergeți cu o cârpă umedă, fără să folosiți detergenți abrazivi. Ocazional, clătiți vasul cu apă curată.
- Преди почистване винаги изключвайте уреда от контакта. Никога не изплаквайте и не потапяйте чайника или основата във вода. Просто избършете с влажна кърпа, като не използвате абразивни препарати. От време на време изплаквайте чайника с чиста вода.
- Pred čiščenjem napravo vedno izključite iz napajanja. Grelnika ali podnožja nikoli ne splakujte ali potapljajte v vodo. Obrišite ju z vlažno krpo in ne uporabljajte jedkih čistilnih sredstev. Grelnik vode občasno splaknite s čisto vodo.
- Enne puhastamist ühendage seade alati vooluvõrgust välja. Ärge kunagi loputage või leotage kannu või kannu alust vees. Pühkige neid niiske lapiga, kuid ärge kasutage abrasiivseid pesuaineid. Loputage kannu aeg-ajalt puhta veega.

- Pentru a curăța filtrul din plasă, apucați de inserția sitei și ridicati-o. Curățarea plitei electrice - pot să apară pete superficiale de rugină pe plita electrică. Îndepărtați-le cu un agent de curățare a inoxului.
- За да почистите мрежестия филтър, хванете цедката и я извадете навън. Почистване на нагревателната плоча - по повърхността на нагревателната плоча могат да се появят петна от ръжда. Премахнете с препарат за почистване на неръждаема стомана.
- Če želite očistiti filtrirno mrežico, primate vstavek in ga dvignite. Čiščenje grelne plošče – na njeni površini se lahko pojavijo rjasti madeži. Odstranite jih s čistilnim sredstvom za nerjaveče jeklo.
- Kaitsefiltri puhastamiseks töstke äravõetav söel välja. Kuumutusplaadi puhastamine – kuumutusplaadile võivad tekkida pindmised roosteplekid. Eemaldage need roostevaba terase puhastamise vahendiga.

- Decalcifierea este recomandată cu regularitate, în funcție de duritatea apei. Umpleți vasul cu apă și cu agent de decalcifiere, în conformitate cu instrucțiunile produsului de decalcifiere. Nu fierbeți soluția, deoarece este posibil ca spuma să se reverse. Apoi, clătiți bine vasul cu apă proaspătă.
- Декалцифициране се препоръчва редовно, в зависимост от твърдостта на водата. Напълнете чайника с вода и дикалцифицирйте съгласно инструкциите на използвания декалцификатор. Не кипвайте разтвора, тъй като може да се разпени. След това изплакнете чайника с прясна вода.
- Odstranjevanje vodnega kamna je priporočljivo izvajati redno, odvisno od trdote vode. Napolnite grelnik z vodo in čistilnim sredstvom po navodilih za odstranjevanje vodnega kamna. Raztopine ne zavrite, saj se lahko speni. Natotemeljito splaknite grelnik s svežo vodo..
- Katlakivi eemaldamist on soovitatav teha regulaarselt, sõltuvalt vee karedusest. Täitke kann vee ja katlakivieemaldajaga vastavalt katlakivieemaldaja tootejuhistele. Ärge keetke lahust, sest see võib üle keeda. Seejärel loputage kannu põhjalikult puhta veega.
LV
Sastāvdaļas
LV
This page is left blank intentionally
This page is left blank intentionally
Thinking of you
Electrolux
Electrolux Floor Care & Small appliances AB
St. Goransgatan 143
S-105 45 Stockholm
Sweden
Share more of our thinking at
www.electrolux.com

Printed on recycled paper


- GB
- COMPONENTS
- DN
- TEILE
- READ THE FOLLOWING INSTRUCTION CAREFULLY BEFORE USING THE APPLIANCE FOR THE FIRST TIME
- D
- RECOMMENDED TEMPERATURES
- PLACE THE KETTLE ON THE BASE
- TO HEAT WATER TO SELECTED TEMPERATURE (NOT BOILING)
- TO BOIL WATER THEN KEEP IT WARM AT SELECTED TEMPERATURE
- TO HEAT WATER TO SELECTED TEMPERATURE (NOT BOILING) AND KEEP IT WARM
- OLD APPLIANCE
- ENTSORGUNG
- I
- COMPONENTI
- 1
- TEMPERATURE CONSIGLIATE
- RICERCA ED ELIMINAZIONE DEI GUASTI / SOLUCIÓN DE PROBLEMAS / RESOLUCIÓN DE PROBLEMAS / SORUN GIDERME
- S
- KOMPONENTER
- CZ
- SOUČÁSTI
- PL
- ELEMENTY
- RO
- COMPONENTE
- LV
- SASTĀVDAĻAS
- ELECTROLUX
Brand : ELECTROLUX
Model : EEWA7500
Category : Kettle