
AC4074 - Air purifier PHILIPS - Free user manual and instructions
Find the device manual for free AC4074 PHILIPS in PDF.


| Product Type | Air Purifier |
| Model | AC4074 |
| Brand | Philips |
| CADR (Clean Air Delivery Rate) | 320 m³/h |
| Recommended Room Size | Up to 50 m² |
| Filtration Stages | Pre-filter, Activated Carbon, HEPA (H13) |
| Noise Level | 20 – 50 dB(A) |
| Power Consumption | 10 – 50 W |
| Power Supply | 220 – 240 V, 50/60 Hz |
| Dimensions (L x W x H) | 310 x 310 x 570 mm |
| Weight | 6.8 kg |
| Display | Color Air Quality Indicator (Blue to Red) |
| Fan Speeds | 5 (Sleep, Speed 1-3, Turbo) |
| Auto Mode | Yes |
| Sleep Mode | Yes |
| Timer | 1 – 12 hours |
| Filter Replacement Indicator | Yes |
| Filter Lifetime | Approx. 12 months |
| Air Quality Sensor | Yes |
| Control Type | Touch buttons |
| Warranty | 2 years |
Frequently Asked Questions - AC4074 PHILIPS
User questions about AC4074 PHILIPS
0 question about this device. Answer the ones you know or ask your own.
Ask a new question about this device
Download the instructions for your Air purifier in PDF format for free! Find your manual AC4074 - PHILIPS and take your electronic device back in hand. On this page are published all the documents necessary for the use of your device. AC4074 by PHILIPS.
USER MANUAL AC4074 PHILIPS
Always there to help you
Register your product and get support at
www.philips.com/welcome

AC4072
AC4074
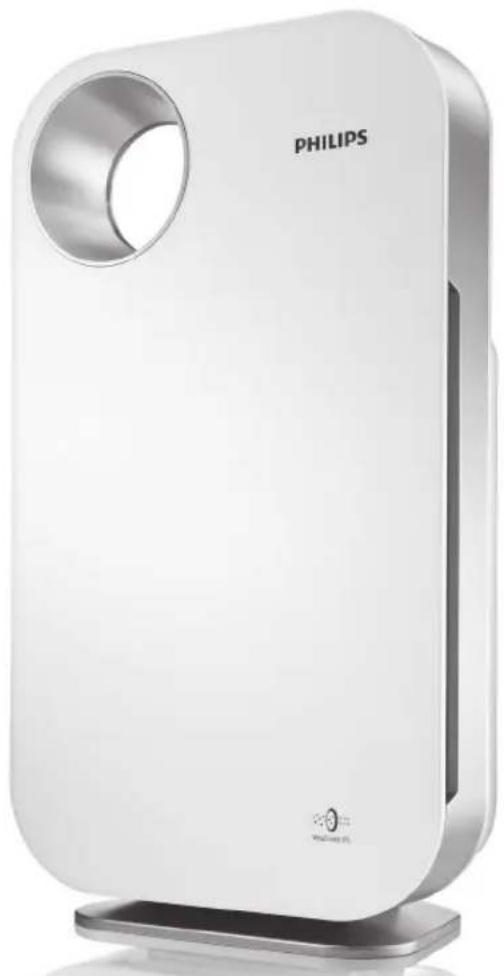
natural_image
White Philips air purifier device with circular vent and brand logo (no text-heavy elements)EN User Manual 3
ZH-T 使用手册 23
TH คู่มือผู้ใช้ 43


Contents
General description (Fig. 1) 5
Introduction 5
Important 6
Before first use 7
Using the appliance 9
Cleaning 13
Filter replacement 15
Storage 19
Accessories 19
Environment 19
Guarantee and service 19
Troubleshooting

General description (Fig. 1)
A Air quality light ring
B Air quality sensor outlet
C Air quality sensor
D Air quality sensor inlet
E Handle
F Air outlet
G Air inlet
H Cord storage facility
I Control panel
1 Light sensor for night mode
2 AIR QUALITY on/off button with light
3 Power on/off button
4 SILENT button with light
5 Power-on light
6 FAN SPEED button with light
7 AUTO button with light
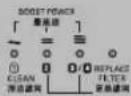
8 Fan speed lights (1, 2, 3 and boost power)/filter replacement lights
9 FAN SPEED indications
10 REPLACE FILTER indications
J Filter 4: HEPA filter
K Filter 3: activated carbon filter
L. Filter 2: formaldehyde filter (supplied with AC4074) or multi-care filter (supplied with AC4072)
M Filter 1: pre-filter
N Front panel
Introduction
Congratulations on your purchase and welcome to Philips! To fully benefit from the support that Philips offers, register your product at www.philips.com/welcome.
With this new living room air purifier you breathe cleaner air. For the best results, place the living room air purifier in a room where you spend most of your time, e.g. the living room.
Wherever there are people, plants or pets, there are airborne particles that can affect your well-being, especially if you suffer from allergies. Because of these particles, the air inside a room may be more polluted than the air in a large city.
Normally, particles are invisible and odourless. Nevertheless they can affect your health. The living room air purifier reduces the amount of animal dander and industrial pollutants in the air, and therefore improves the air quality. It also filters out ultrafine particles larger than 20 nanometres, including bacteria and some viruses. According to publications of the World Health Organization, the avian and human influenza viruses and the Legionella bacterium are larger than 20 nanometres.
Filtration in several stages
The living room air purifier has a unique multi-stage filtration system that ensures the best air quality:
- Stage 1: The pre-filter has been treated with antibacterial substances. It catches big particles like human hair, pet hair etc.
- Stage 2: The formaldehyde filter (supplied with AC4074) filters out formaldehyde and other volatile organic compounds (VOCs). In combination with the HEPA filter, the multi-care filter filters out dust, pollen and ultrafine particles larger than 20 nanometres, including bacteria and some viruses. According to publications of the World Health Organization, the avian and human influenza viruses and Legionella bacterium are larger than 20 nanometres.
Note: The AC4074 and AC4072 are suitable for both the formaldehyde filter and the multi-care filter. When you replace the filter present in your type, you can choose the filter (formaldehyde or multi-care) that suits your needs best.
- Stage 3: The activated carbon filter filters out odours and harmful gases effectively.
- Stage 4: The high-performance composite HEPA filter with antibacterial coating effectively filters out fine dust and cigarette smoke, while the antibacterial and anti-mould functions of organic antibacterial materials filters out germs and mould.
Important
Read this user manual carefully before you use the appliance and save it for future reference.
Danger
- Do not let water or any other liquid or flammable detergent enter the appliance to avoid electric shock and/or a fire hazard.
- Do not clean the appliance with water or any other liquid or a (flammable) detergent to avoid electric shock and/or a fire hazard.
Warning
- Check if the voltage indicated on the bottom of the appliance corresponds to the local mains voltage before you connect the appliance.
- If the mains cord is damaged, you must have it replaced by Philips, a service centre authorised by Philips or similarly qualified persons in order to avoid a hazard.
- Do not use the appliance if the plug, the mains cord or the appliance itself is damaged.
- This appliance is not intended for use by persons (including children) with reduced physical, sensory or mental capabilities, or lack of experience and knowledge, unless they have been given supervision or instruction concerning use of the appliance by a person responsible for their safety.
- Children should be supervised to ensure that they do not play with the appliance.
- Do not block the air inlet and outlet, e.g. by placing items on the air outlet or in front of the air inlet.
Caution
- This appliance is not a substitute for proper ventilation, regular vacuum cleaning or use of an extractor hood or fan while cooking.
-
If the wall socket used to power the appliance has poor connections, the plug of the appliance becomes hot. Make sure you plug the appliance into a properly connected wall socket.
-
Always place and use the appliance on a dry, stable, level and horizontal surface.
- Leave at least 20cm free space behind and on both sides of the appliance and leave at least 30cm free space above the appliance.
- Do not place anything on top of the appliance and do not sit on the appliance.
- Do not place the appliance directly below an air conditioner to prevent condensation from dripping onto the appliance.
- Make sure all filters are properly installed before you switch on the appliance.
- Only use the original Philips filters specially intended for this appliance. Do not use any other filters.
- Avoid knocking against the appliance (the air inlet and outlet in particular) with hard objects.
- Always lift or move the appliance by the handle at the back of the appliance.
- Do not insert your fingers or objects into the air outlet.
- Do not use this appliance when you have used indoor smoke-type insect repellents or in places with oily residues, burning incense or chemical fumes.
- Do not use the appliance near gas appliances, heating devices or fireplaces.
- Always unplug the appliance after use and before you clean it.
- Do not use the appliance in a room with major temperature changes, as this may cause condensation inside the appliance.
- The appliance is only intended for household use under normal operating conditions.
- Do not use the appliance in wet surroundings or in surroundings with high ambient temperatures, such as the bathroom, toilet or kitchen.
- The appliance does not remove carbon monoxide (CO) or radon (Rn). It cannot be used as a safety device in case of accidents with combustion processes and hazardous chemicals.
Electromagnetic fields (EMF)
This Philips appliance complies with all applicable standards and regulations regarding exposure to electromagnetic fields.
Before first use
Placing the filters
The appliance comes with all filters fitted inside, but you have to remove the packaging of the filters before you can use the appliance. Remove all filters, unpack them and place them back into the appliance as described below.
Tip: Place the appliance against a wall for more stability when you remove or insert filters.
Note: Make sure you insert the filters in the correct position.
ENGLISH

natural_image
Illustration of hands holding a device with a curved arrow indicating rotation (no text or symbols)1 Place your fingers in the recesses of the side panels and gently pull the top part of the front panel towards you. Then lift the hooks at the bottom of the panel out of the bottom of the appliance.

natural_image
Illustration of hands inserting a card into a device (no text or symbols visible)2 Remove all the filters from the appliance.
natural_image
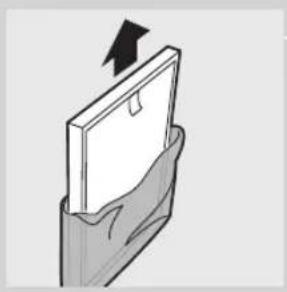
Illustration of a hand holding a blank document with an arrow pointing upward (no text or symbols)3 Remove all packaging material from the filters.

natural_image
Diagram of a door opening a fan inside a mechanical housing (no text or symbols visible)4 Put filter 4 (HEPA filter) back into the appliance. Note: Make sure that the side with the tag is pointing towards you.
natural_image
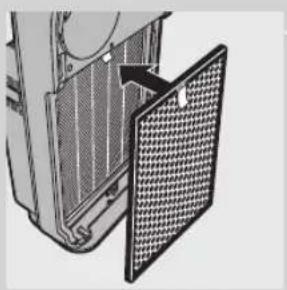
Diagram of a server rack with a mesh cover panel inserted, showing no text or symbols5 Put filter 3 (activated carbon filter) back into the appliance.

natural_image
Diagram of a door opening with a mesh vent and ventilation slots (no text or symbols)6 Put filter 2 (formaldehyde filter for AC4074 or multi-care filter for AC4072) back into the appliance.
Note: Make sure that the side with the tag is pointing towards you.

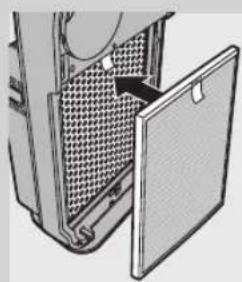
7 Place filter 1 (pre-filter) in the appliance.
Note: Make sure that the side with the two projections is pointing towards you.
Note: Make sure that all hooks are properly attached to the appliance.
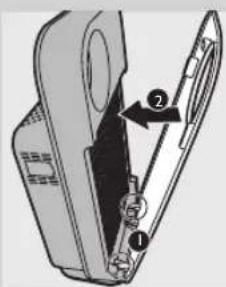
8 To reattach the front panel, insert the bottom hooks into the bottom of the appliance first (1). Then push the panel against the body of the appliance (2).
Using the appliance
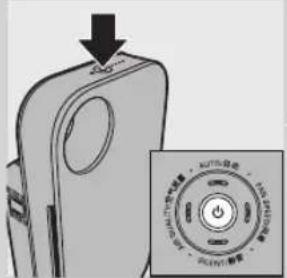
1 Put the plug in the wall socket
All lights go on twice and you hear a beep. Then the lights go out again.
2 Press the on/off button to switch on the appliance.
The power-on light and the AIR QUALITY light on the control panel go on.

natural_image
Abstract diagram with concentric circles and a black arrow, no text or symbols presentThe air quality light ring shows the quality of the air.
Air quality indication
Colour Air quality
Blue very good
Deep purple good
Purple fair
Red bad
To switch off the air quality light ring, press the AIR QUALITY button.
Note: The air quality light ring automatically goes on when the appliance is switched on.
The appliance automatically starts operating in the AUTO mode.
To switch off the appliance, press the on/off button again and unplug the appliance.
Note: When the humidity level in the room is very high, it is possible that condensation develops on the air quality sensor. As a result, the AIR QUALITY light on the control panel and the air quality light ring may indicate that the air quality is bad even though the air quality is good. In this case, the auto mode causes the appliance to run at high fan speed. You can solve this by cleaning the air quality sensor. If condensation develops frequently during periods of high humidity, we advise you to use one of the manual speed settings.
Fan speed lights/filter replacement lights
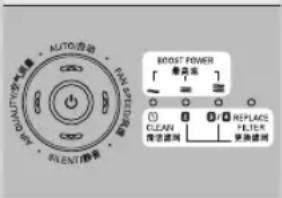
- The lights on the right-hand side of the control panel have a dual function: they either indicate the fan speed or they indicate that the filters should be replaced or cleaned.
- When lights 1 to 3/4 light up continuously, they indicate the current fan speed.
- When light 1 flashes, you have to clean the pre-filter. When lights 2 and/or 3/4 flash, you have to replace these filters. If lights 2 and/or 3/4 flash, the REPLACE FILTER light also flashes (see chapter 'Filter replacement' for more information).
- When lights 2, 3/4 and the REPLACE FILTER light are on continuously, the appliance is locked (see chapter 'Filter replacement lock' for more information).
Adjusting the air quality sensor sensitivity

People with certain health problems (e.g. allergies or asthma) have a greater need for healthy air. For this reason, the appliance allows you to adjust the sensitivity of the air quality sensor. When it is set to a higher sensitivity level, the appliance already starts cleaning the air at lower pollution levels to make the air even cleaner.
There are 3 sensitivity levels:
- standard
- sensitive
- extra sensitive
The pollution sensor is set to standard sensitivity. You can adjust the sensitivity of the air quality sensor in the following way:
1 If the appliance is already plugged in, unplug the appliance and wait for a few minutes.
2 Press the AIR QUALITY button and simultaneously put the mains plug in the wall socket.
The appliance beeps twice and one of the fan speed lights flashes to show the current sensitivity level of the air quality sensor.
Sensitivity level:
Fan speed light Sensitivity level
| ~ | extra sensitive |
| ≈ | sensitive |
| ≈ | standard |

3 Press the FAN SPEED button to adjust the sensitivity level of the air quality sensor.
One of the fan speed lights flashes to show the set sensitivity level of the air quality sensor.
4 Press the on/off button to switch off the appliance.
Note: When you change the sensitivity level, the appliance automatically starts operating at the set sensitivity level whenever you switch on the appliance.
Auto mode
When the appliance is switched on, the built-in air quality sensor automatically measures the ambient air quality. When the auto mode is activated, the appliance selects the most appropriate fan speed for the measured air quality.
1 Press the on/off button to switch on the appliance.
12 ENGLISH
![AUTO驱动 ALET ALET/驱动 RESET POWER [ 最高速 ] [ 0 ] [ 1 ] [ 2 ] [ 3 ] [ 4 ] [ 5 ] [ 6 ] [ 7 ] [ 8 ] [ 9 ] [ 10 ] [ 11 ] [ 12 ] [ 13 ] [ 14 ] [ 15 ] [ 16 ] [ 17 ] [ 18 ] [ 19 ] [ 20 ] [ 21 ] [ 22 ] [ 23 ] [ 24 ] [ 25 ] [ 26 ] [ 27 ] [ 28 ] [ 29 ] [ 30 ] [ 31 ] [ 32 ] [ 33 ] [ 34 ] [ 35 ] [ 36 ] [ 37 ] [ 38 ] [ 39 ] [ 40 ] [ 41 ] [ 42 ] [ 43 ] [ 44 ] [ 45 ] [ 46 ] [ 47 ] [ 48 ] [ 49 ] [ 50 ]](/content/2026/06/1272823/images/e5f28dee4c47ebb207340066f335b08fe5096f3e3da754569827780123ef55c0.jpg)

Note: When the appliance is operating in another mode and you want to activate the auto mode, simply press the AUTO button.
The AUTO light goes on.
The FAN SPEED light indicates at which fan speed the appliance is operating.
Note: When the air quality is very good and the appliance operates at a very low fan speed, the FAN SPEED light for the lowest speed setting does not go on. In this case only the power-on light and the AUTO light are on.
Note: The built-in air quality sensor measures the air quality and automatically selects the appropriate speed setting to ensure the best possible air quality in your room. When the air is clean, the appliance stops running. When the air quality deteriorates, the appliance starts running at a low fan speed and noise level so that the energy consumption is minimised.
Night mode
The appliance works in harmony with its surroundings. In auto mode, the appliance automatically switches to night mode when the room in which it is operating becomes dark. When the room has been dark for 3 minutes, the lights of the appliance go out, the fan speed and noise level are reduced and the energy consumption is minimised. If the room becomes bright again for 5 minutes or longer, the appliance resumes normal operation.
In night mode, the automatic control is still active. If the air is clean, the lights and the fan are off. If the air quality deteriorates, the appliance is activated and the lights and the fan come on again.
Note: The night mode only works when the appliance is operating in the auto mode.
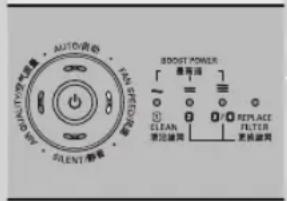
If you do not use the auto mode, you can select the desired fan speed yourself.
1 Press the on/off button to switch on the appliance.
2 Press the FAN SPEED button one or more times to select the desired fan speed.
The corresponding fan speed light and the indications above the lights show the set fan speed (1, 2, 3 or boost power).

Note: Select boost power if you need an extra strong airflow when the air in the room is very dirty. All three fan speed lights go on.
Silent mode
When you use the appliance in silent mode, it operates very quietly.
1 Press the on/off button to switch on the appliance.
2 Press the SILENT button to activate the silent mode.
The SILENT light goes on.
If you want to go back to the FAN SPEED mode or AUTO mode, simply press the FAN SPEED or AUTO button.

Cleaning
Always unplug the appliance before you clean it.
Never immerse the appliance in water or any other liquid.
Never use aggressive or flammable cleaning agents such as bleach or alcohol to clean any part of the appliance.
Only the pre-filter is washable. All other filters are NOT washable.
Body of the appliance
Regularly clean the inside and outside of the body to prevent dust from collecting on the inside and outside.
1 Wipe away dust with a soft dry cloth from the body of the appliance.
2 Clean the air inlet and the air outlet with a soft dry cloth.
Pre-filter
The pre-filter is washable.

- Clean the pre-filter when the first filter replacement light flashes to ensure optimal functioning of the appliance.

natural_image
Illustration of hands holding a device with a circular opening and an arrow indicating rotation (no text or symbols)1 Place your fingers in the recesses of the side panels and gently pull the top part of the front panel towards you. Then lift the hooks at the bottom of the panel out of the bottom of the appliance.
natural_image
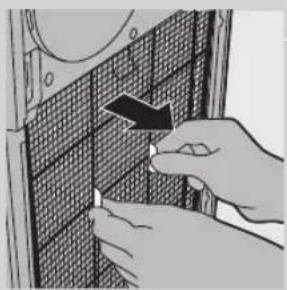
Hand inserting a grid into a device panel (no text or symbols visible)2 To remove the pre-filter, grab the two projections and pull the filter towards you.
3 Wash the pre-filter under a running tap. If the pre-filter is very dirty, use a soft brush to brush away the dust.
Tip: Alternatively, you can clean the pre-filter by removing the dust with a vacuum cleaner.
4 Air-dry the pre-filter.
Note: Make sure that the pre-filter is completely dry. If it is still wet, bacteria may multiply in it and shorten the lifetime of the pre-filter.
5 Put the pre-filter back into the appliance. Attach all hooks properly to the appliance.
Note: Make sure that the side with the two projections is pointing towards you.
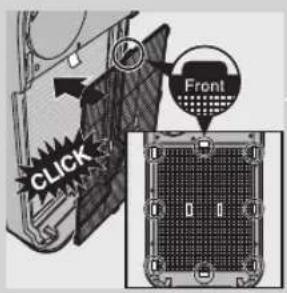
6 To reattach the front panel, insert the bottom hooks into the bottom of the appliance first (1). Then push the panel against the body of the appliance (2).

Air quality sensor

natural_image
Illustration of a hand holding a brush near a device with a black-and-white brush (no text or symbols visible)Clean the air quality sensor every 2 months for optimal functioning of the appliance. Clean it more frequently if you use the appliance in a dusty environment.
Note: When the humidity level in the room is very high, it is possible that condensation develops on the air quality sensor. As a result, the AIR QUALITY light on the control panel and the air quality light ring may indicate that the air quality is bad even though the air quality is good. In this case you have to clean the air quality sensor or use one of the manual speed settings.

natural_image
Illustration of a hand inserting a card into a banknote (no text or symbols visible)1 Clean the air quality sensor inlet and the air quality sensor outlet with a soft brush.
2 Remove the air quality sensor cover.
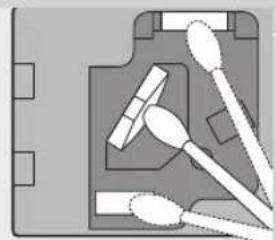
natural_image
Diagram of a medical or laboratory setup with surgical tools and tubing (no text or labels)3 Clean the air quality sensor, the dust inlet and the dust outlet with a lightly moistened cotton swab.
4 Dry them with a dry cotton swab.
5 Reattach the air quality sensor cover.
Filter replacement
Filter maintenance
This appliance is equipped with the Healthy air protect lock to ensure that the filters are in optimal condition when the appliance is operating. When one of the filters is almost full and has to be cleaned or replaced, the appropriate filter replacement light starts to flash. When you do not replace filter 2, filter 3 and/or filter 4, the appliance stops operating and the appliance is locked.
When the appliance is locked, the filter replacement light of the filter concerned lights up on continuously.
Note: Only replace a filter when the corresponding filter replacement light flashes. If you replace the filter before the filter replacement light starts flashing, the lifetime counter will not be reset but will continue counting the lifetime of the previous filter. As a result, the filter replacement light will start flashing much too soon.
Filter replacement lights
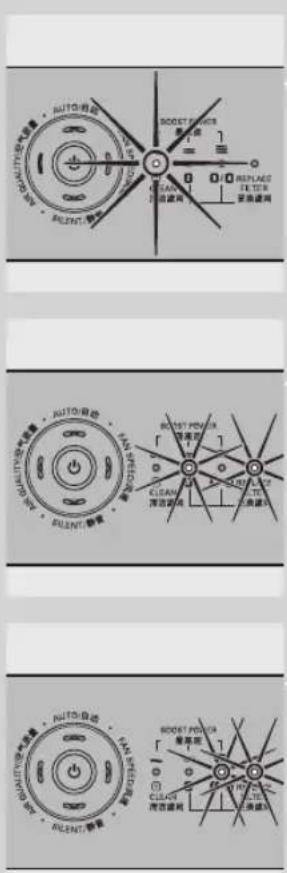
The filter replacement lights indicate which filter has to be cleaned or replaced.
- Filter replacement light 1 flashes: filter 1 (the pre-filter) has to be cleaned. See chapter 'Cleaning' for further instructions.
- Filter replacement light 2 flashes: filter 2 (the formaldehyde filter (supplied with AC4074) or multi-care filter (supplied with AC4072)) has to be replaced.
- Filter replacement light 3/4 flashes: the activated carbon filter and the HEPA filter have to be replaced.
Note: The HEPA filter and the activated carbon filter have a similar lifetime. Therefore they have to be replaced at the same time.
Filter replacement lock
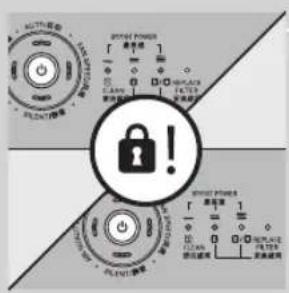
If you do not replace the filter in time, the appliance stops operating approx. 2 weeks after the filter replacement light started flashing. When the appliance is locked, it does not operate until you have replaced the full filter and pressed the reset button.
Note: When filter replacement lights 2 or 3/4 and REPLACE FILTER on the control panel are on continuously, the appliance is locked (see section 'Filter maintenance' in this chapter for more information).
How long it takes before the appliance is locked depends on the operating time and speed level selected after the filter replacement alert.
Approximately 1 day before the appliance locks, it beeps every 30 minutes to inform you that one of the filters needs to be replaced.
When the appliance is locked, you hear a beep when you press any button.
You can switch off the appliance by pressing the on/off button.
If the appliance is locked:
1 Check which filter needs to be replaced (see section 'Filter replacement alerts').
2 Switch off the appliance and unplug it.
3 Replace the appropriate filter (see section 'Replacing the filters').
Replacing the filters
Tip: Place the appliance against a wall for more stability when you remove or insert filters.
natural_image
Illustration of hands holding a white electronic device with a circular vent and an arrow indicating rotation (no text or symbols)1 Switch off the appliance and unplug it.
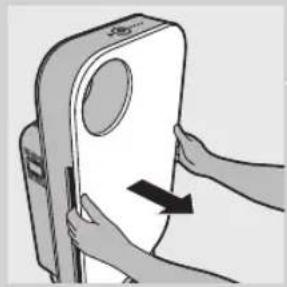
2 Place your fingers in the recesses of the side panels and gently pull the top part of the front panel towards you. Then lift the hooks at the bottom of the panel out of the bottom of the appliance.

natural_image
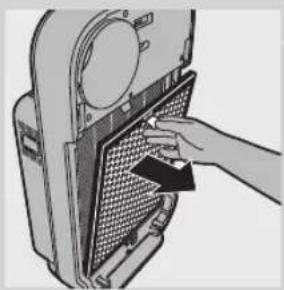
Close-up of hands installing or adjusting a grid-patterned panel (no text or symbols visible)3 To remove filter 1 (pre-filter), grab the two projections and pull the filter towards you.

natural_image
Illustration of a hand inserting a component into a device panel (no text or symbols visible)4 To remove filter 2 (formaldehyde filter for AC4074 or multi-care filter for AC4072), grab its tag and pull it towards you.
natural_image
Illustration of a hand inserting a component into a device panel (no text or symbols visible)5 To remove filter 3 (activated carbon filter), grab its tag and pull it towards you.

natural_image
Illustration of a hand inserting a card into a refrigerator panel (no text or symbols visible)6 To remove filter 4 (HEPA filter), grab its tag and pull it towards you.
7 Discard the filter that needs to be replaced and unpack the new filter.
natural_image
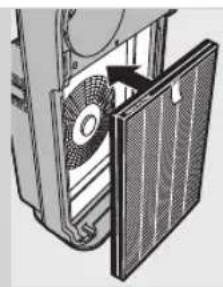
Diagram of a door with a fan inside, showing internal structure and airflow direction (no text or symbols)8 Put filter 4 (HEPA filter) back into the appliance.
Note: Make sure that the side with the tag is pointing towards you.
natural_image
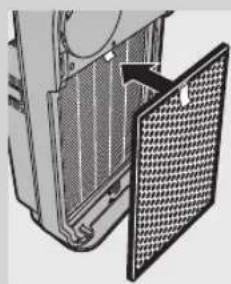
Diagram of a server rack with a mesh cover and directional arrow (no text or symbols)9 Put filter 3 (activated carbon filter) back into the appliance.

natural_image
Diagram of a computer tower with an open door and meshed panel (no text or symbols)10 Put filter 2 (formaldehyde filter for AC4074 or multi-care filter for AC4072) back into the appliance.
Note: Make sure that the side with the tag is pointing towards you.

11 Put filter 1 (pre-filter) back into the appliance.
Note: Make sure that the side with the two projections is pointing towards you.
Note: Make sure that all hooks are properly attached to the appliance.
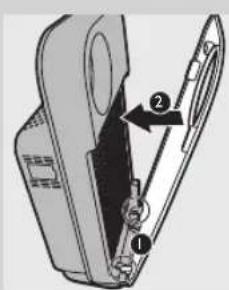
12 To reattach the front panel, insert the bottom hooks into the bottom of the appliance first (1). Then push the panel against the body of the appliance (2).
13 Put the plug in the wall socket and switch on the appliance again.

natural_image
Illustration of a smartphone with a black arrow pointing to the screen (no text or symbols)14 Press the filter reset button with a thin tool.
Note: You do not need to press the filter reset button after cleaning filter 1 (pre-filter).
Note: You cannot reset the appliance when you replace a filter before its filter replacement light starts flashing.
Note: You cannot reset the appliance if it is not plugged in and switched on.
Storage
1 To store the mains cord, wind it round the cord storage facility at the bottom of the appliance.
Accessories
New filters are available under the following type numbers:
Filter Type number
Filter 2: Formaldehyde filter AC4142
Filter 2: Multi-care filter AC4141
Filter 3: Activated carbon filter AC4143
Filter 4: HEPA filter AC4144
Environment

natural_image
Symbol of a trash bin crossed with no visible text or labels- Do not throw away the appliance with the normal household waste at the end of its life, but hand it in at an official collection point for recycling. By doing this, you help to preserve the environment.
Guarantee and service
If you need information or if you have a problem, please visit the Philips website at www.philips.com or contact the Philips Consumer Care Centre in your country (you find its phone number in the worldwide guarantee leaflet). If there is no Consumer Care Centre in your country, go to your local Philips dealer.
| Troubleshooting | |
| This chapter summarises the most common problems you could encounter with the appliance. If you are unable to solve the problem with the information below, contact the Consumer Care Centre in your country. | |
| Problem Possible solution | |
| The appliance doesn't work. | You ignored the filter replacement alerts. You did not replace the filter when the filter replacement light started flashing and did not respond when the appliance started to beep every 30 minutes after approx. 2 weeks. As a result, the appliance is now locked and you have to replace the filter and reset the appliance (see chapter 'Filter replacement') so that the appliance can operate again. |
| No air comes out of the air outlet | The appliance is not switched on. Put the plug in the wall socket and switch on the appliance. |
| The air quality is good and the auto mode is activated. In this case, the appliance switches off automatically when the air is clean to save electricity. | |
| The fan speed does not change when the AUTO mode is activated. | When the room becomes dark, the night mode is activated automatically when the appliance is in auto mode. In this case, the fan speed is set to a very low level. If you want to change the fan speed, press the FAN SPEED button one or more times to set the desired fan speed. |
| The airflow that comes out of the air outlet is significantly weaker than before. | The pre-filter is dirty. Clean the pre-filter (see chapter 'Cleaning'). |
| You haven't removed all packaging material from the filters. Make sure that you have removed all packaging material. | |
| The air quality does not improve, even though the appliance has been operating for a long time. | One of the filters has not been placed in the appliance. Make sure that all filters are properly installed in the following order, starting with the innermost filter: 1) HEPA filter, 2) activated carbon filter, 3) formaldehyde filter (supplied with AC4074) or multi-care filter (supplied with AC4072), 4) pre-filter. |
| The air quality sensor is wet. The humidity level in your room is high and causes condensation. Make sure that the air quality sensor is clean and dry (see chapter 'Cleaning'). | |
| The colour of the air quality light ring and the air quality light always stays the same. | The air quality sensor is dirty. Clean the air quality sensor (see chapter 'Cleaning'). |
| There is not enough ventilation in the room. Open a window, to improve the air circulation. | |
| I need cleaner air because I have an allergy. | You can change the air quality sensor sensitivity (see chapter 'Using the appliance') to make the appliance clean the air even better. |
| The appliance is extra loud. | You haven't removed all packaging material from the filters. Make sure that you have removed all packaging material. |
| The appliance still indicates that I need to replace a filter, but I already did. | Perhaps you did not press the filter reset button properly. Plug in the appliance, press the on/off button and press the filter reset button with a flat tool. |
Problem Possible solution
| The appliance stops operating, although the power-on light is still on. | The built in quality sensor has determined that the air quality is good and that the air does not need to be cleaned anymore. When the air quality deteriorates, the appliance starts running at a low fan speed and noise level so that the energy consumption is minimised. |
| The appliance does not work. Fan speed lights 1, 2 and 3 flash, all other lights are out. | This is a component defect. Contact the Consumer Care Centre in your country (you find its phone number in the worldwide guarantee leaflet). If there is no Consumer Care Centre in your country, go to your local Philips dealer. |
| The appliance does not work. Fan speed lights 1 and 2 flash, all other lights are out. | This is a component defect. Contact the Consumer Care Centre in your country (you find its phone number in the worldwide guarantee leaflet). If there is no Consumer Care Centre in your country, go to your local Philips dealer. |
| AC4074: The appliance does not work. The air quality light ring flashes blue, all other lights are out. | This is air particle sensor error or an air particle sensor and gas sensor error. Contact the Consumer Care Centre in your country (you find its phone number in the worldwide guarantee leaflet). If there is no Consumer Care Centre in your country, go to your local Philips dealer. |
| AC4074: The air quality light ring keeps flashing purple. | This is a gas sensor error. Switch off the appliance and unplug it. Take the appliance to your Philips dealer or an authorised Philips service centre. |


目錄
一般說明 (圖 1) 25
簡介 25
重要事項 26
第一次使用前 28
使用此產品 30
清潔 34
更換濾網 36
收納 39
配件 40
環境保護 40
保證書與服務 40
故障排除 40

一般說明 (圖 1)
natural_image
Diagram of a device with a mesh panel and an arrow pointing to a component (no text or symbols present)5 將濾網 3(活性碳濾網)裝回產品。
natural_image
Diagram of a door opening with a mesh vent and ventilation slots (no text or symbols)7 將濾網 1(預過濾網)裝回產品。
natural_image
Abstract diagram with concentric circles and a black arrow pointing upward (no text or symbols)空氣品質指示燈會顯示空氣品質。
空氣品質指示
顏色 空氣品質
藍色 優良
深紫色 良好
紫色 普通
紅色 不良
natural_image
Illustration of hands holding a device with a circular opening and an arrow indicating rotation (no text or symbols)
natural_image
Close-up of hands installing or adjusting a grid-patterned panel with an arrow pointing to the component (no text or symbols visible)預過濾網可水洗。
natural_image
Illustration of a hand using a brush to clean or store items on a surface (no text or symbols visible)natural_image
Hand inserting a card into a device (no text or symbols visible)2 取下空氣品質感測器的護蓋。

natural_image
Pure electrical circuit lines without any symbols更換濾網鎖
natural_image
Illustration of hands holding a device with a circular opening and an arrow indicating rotation (no text or symbols)natural_image
Close-up of hands installing or adjusting a grid panel on a device (no text or symbols visible)
natural_image
Illustration of a hand inserting a component into a device panel (no text or symbols visible)natural_image
Hand inserting a grid into a device panel (no text or symbols visible)natural_image
Illustration of a hand inserting a card into a device panel (no text or symbols visible)natural_image
Diagram of a door panel with a fan inside, showing internal structure without any text or symbolsnatural_image
Diagram of a door panel with a grid-patterned guard and an arrow pointing to the door (no text or symbols)9 將濾網 3(活性碳濾網)裝回產品。

natural_image
Diagram of a door opening with a mesh vent, showing internal structure (no text or symbols)natural_image
Illustration of a smartphone with a black arrow pointing to its screen (no text or symbols present)natural_image
Illustration of hands holding a device with a circular opening and an arrow indicating rotation (no text or symbols)natural_image
Illustration of hands inserting a card into a device (no text or symbols visible)natural_image
Illustration of a hand holding a piece of paper with an arrow indicating upward motion (no text or symbols)natural_image
Diagram of a door with a fan inside, showing internal structure without any text or symbolsnatural_image
Diagram of a server rack with a mesh cover and an arrow pointing to the side panel (no text or symbols present)natural_image
Diagram of a computer tower with an open door and meshed panel (no text or symbols)natural_image
Abstract diagram with concentric circles and a black arrow pointing upward (no text or symbols)The image contains no legible text or symbols.

มาตรฐาน

natural_image
Close-up of hands installing or adjusting a grid-patterned panel (no text or symbols visible)natural_image
Illustration of a hand using a tool to adjust or install a device component (no text or symbols visible)natural_image
Illustration of a hand inserting a card into a card slot (no text or symbols visible)natural_image
Diagram of a mechanical component with multiple tool-like elements (no text or symbols)natural_image
Illustration of hands holding a device with a circular opening and an arrow indicating rotation (no text or symbols)natural_image
Illustration of hands installing or adjusting a grid-patterned panel (no text or symbols visible)natural_image
Hand inserting a card into a device panel (no text or symbols visible)natural_image
Illustration of a hand inserting a component into a computer drive panel (no text or symbols visible)natural_image
Illustration of a hand inserting a fan into a device panel (no text or symbols visible)natural_image
Diagram of a mechanical device with a fan and ventilation cover (no text or symbols)natural_image
Diagram of a device with a mesh panel and an open door, showing no text or symbols.natural_image
Diagram of a computer tower with an open door and mesh insulation (no text or symbols)natural_image
Illustration of a smartphone with a black arrow pointing to its screen (no text or symbols present)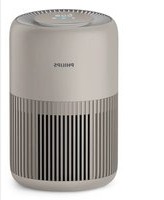
- Always there to help you
- Contents
- General description (Fig. 1)
- Introduction
- Filtration in several stages
- Important
- Danger
- Warning
- Caution
- Electromagnetic fields (EMF)
- Before first use
- Placing the filters
- ENGLISH
- Using the appliance
- Air quality indication
- Colour Air quality
- Fan speed lights/filter replacement lights
- Adjusting the air quality sensor sensitivity
- Sensitivity level:
- Auto mode
- ENGLISH
- Night mode
- Silent mode
- Cleaning
- Body of the appliance
- Pre-filter
- Air quality sensor
- Filter replacement
- Filter maintenance
- Filter replacement lights
- Filter replacement lock
- Replacing the filters
- Storage
- Accessories
- Filter Type number
- Environment
- Guarantee and service
- 目錄
- 一般說明 (圖 1)
- 顏色 空氣品質
- 更換濾網鎖
Brand : PHILIPS
Model : AC4074
Category : Air purifier