
SHAVER Series 5000 S5520 - Razor PHILIPS - Free user manual and instructions
Find the device manual for free SHAVER Series 5000 S5520 PHILIPS in PDF.


| Product Type | Electric Shaver |
| Brand | Philips |
| Model | SHAVER Series 5000 S5520 |
| Dimensions | Approx. 5.7 x 2.3 x 2.0 inches |
| Weight | Approx. 0.6 lbs (270 g) |
| Power Source | Rechargeable lithium-ion battery |
| Charging Time | 1 hour |
| Shaving Time | 50 minutes |
| Blade Material | Self-sharpening steel blades |
| Shaving System | CloseCut with rounded blade tips |
| Wet & Dry Use | Yes, fully washable |
| Display | LED display with battery level and travel lock indicator |
| Travel Lock | Yes, press and hold on/off button for 3 seconds |
| Pop-up Trimmer | Yes, for sideburns and mustache |
| Cleaning | Rinse under running water; cleaning brush included |
| Replacement Heads | Philips SH50 series (recommended every 2 years) |
| Safety Features | Automatic voltage adaptation (100-240 V), waterproof |
| Warranty | 2 years |
Frequently Asked Questions - SHAVER Series 5000 S5520 PHILIPS
User questions about SHAVER Series 5000 S5520 PHILIPS
0 question about this device. Answer the ones you know or ask your own.
Ask a new question about this device
Download the instructions for your Razor in PDF format for free! Find your manual SHAVER Series 5000 S5520 - PHILIPS and take your electronic device back in hand. On this page are published all the documents necessary for the use of your device. SHAVER Series 5000 S5520 by PHILIPS.
USER MANUAL SHAVER Series 5000 S5520 PHILIPS
Always here to help you
Register your product and get support at www.philips.com/welcome
series S5000


ENGLISH 4
INDONESIA 36
한국어 69
BAHASA MELAYU 100
ภาษาไทย 134
TIÊNG VIÊT 160
繁體中文 192
简体中文 221

272

295
Introduction
Congratulations on your purchase and welcome to Philips! To fully benefit from the support that Philips offers, register your product at www.philips.com/welcome.
General description (Fig. 1)
1 Protection cap for nose trimmer attachment (specific types only)
2 Click-on nose trimmer attachment (specific types only)
3 Comb for beard styler attachment (specific types only)
4 Click-on beard stylister attachment (specific types only)
5 Click-on trimmer attachment (specific types only)
6 Protection cap for shaving unit (specific types only)
7 Click-on shaving unit
8 On/off button
9 Turbo button (specific types only)
10 Handle
11 Socket for small plug
12 Battery charge indicator with 1 light
13 Battery charge indicator with 3 lights
14 Travel lock symbol
15 Replacement reminder
16 Cleaning reminder
17 Cleaning cartridge for SmartClean system
18 SmartClean system (specific types only)
19 Cap of SmartClean system
20 On/off button
21 Battery symbol
22 Cleaning symbol
23 Replacement symbol
24 Ready symbol
25 Adapter
26 Small plug
27 Pouch (specific types only)
Note: The accessories supplied may vary for different products. The box shows the accessories that have been supplied with your appliance.
Important safety information
Read this important information carefully before you use the appliance and its accessories and save it for future reference. The accessories supplied may vary for different products.
Danger
- Keep the adapter dry.
Warning
- The adapter contains a transformer. Do not cut off the adapter to replace it with another plug, as this causes a hazardous situation.
- This appliance is not intended for use by persons (including children) with reduced physical, sensory or mental capabilities, or lack of experience and knowledge, unless they have been given supervision or instruction concerning use of the appliance by a person responsible for their safety.
- Children should be supervised to ensure that they do not play with the appliance.
- Always unplug the shaver before you clean it under the tap.
- Always check the appliance before you use it. Do not use the appliance if it is damaged, as this may cause injury. Always replace a damaged part with one of the original type.

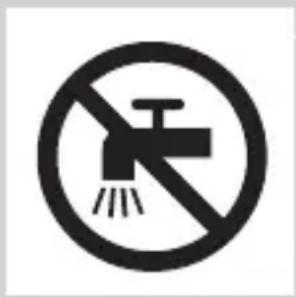
Caution
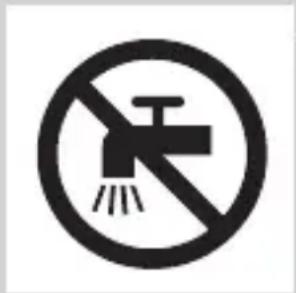
- Never immerse the cleaning system or the charging stand in water and do not rinse it under the tap.
- Never immerse the shaver in water. Do not use the shaver in the bath or in the shower.
- Never use water hotter than 80° C to rinse the shaver.
- Only use this appliance for its intended purpose as shown in the user manual.
- For hygienic reasons, the appliance should only be used by one person.
- Do not use the adapter in or near wall sockets that contain or have contained an electric air freshener to prevent irreparable damage to the adapter.
- Never use compressed air, scouring pads, abrasive cleaning agents or aggressive liquids such as petrol or acetone to clean the appliance.
- If your shaver comes with a cleaning system, always use the original Philips cleaning fluid (cartridge or bottle, depending on the type of cleaning system).
- Always place the cleaning system on a stable, level and horizontal surface to prevent leakage.
- If your cleaning system uses a cleaning cartridge, always make sure that the cartridge compartment is closed before you use the cleaning system to clean or charge the shaver.
- When the cleaning system is ready for use, do not move it to prevent leakage of cleaning fluid.
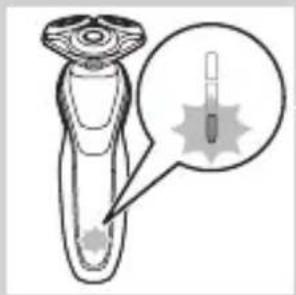
- Water may drip from the socket at the bottom of the shaver when you rinse it. This is normal and not dangerous because all electronics are enclosed in a sealed power unit inside the shaver.

Electromagnetic fields (EMF)
- This Philips appliance complies with all applicable standards and regulations regarding exposure to electromagnetic fields.
General
- This shaver can be safely cleaned under the tap.
- The appliance is suitable for mains voltages ranging from 100 to 240 volts.
- The adapter transforms 100-240 volts to a safe low voltage of less than 24 volts.
The display
Charging
Battery charge indicator with 3 lights
- Charging takes approx. 1 hour
- Quick charge (specific types only): When the appliance is connected to the mains, the lights of the battery charge indicator light up one after the other continuously. When the appliance contains enough energy for one shave, the bottom light of the battery charge indicator flashes slowly.
- If you leave the appliance connected to the mains, the charging process continues. To indicate that the appliance is charging, first the bottom light flashes and then lights up continuously.
Then the second light flashes and then lights up continuously, and so on until the appliance is fully charged.

ENGLISH8

Battery charge indicator with 1 light
- Charging takes approx. 1 hour.
- Quick charge (specific types only): When the appliance does not contain enough energy for one shave, the battery charge indicator flashes quickly. When the battery charge indicator starts flashing slowly, the appliance contains enough energy for oneshave.
- If you leave the appliance connected to the mains, the charging process continues. To indicate that the appliance is charging, the battery charge indicator flashes slowly.
Battery fully charged
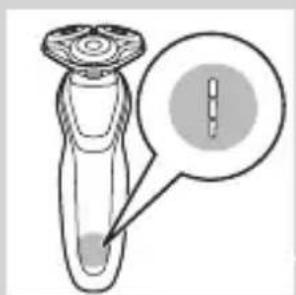
Note: You can also use this appliance directly from the mains.
Note: When the battery is full, the display switches off automatically after 30 minutes.
When the battery is fully charged, all lights of the battery charge indicator light up continuously.
- Battery charge indicator with 3 lights
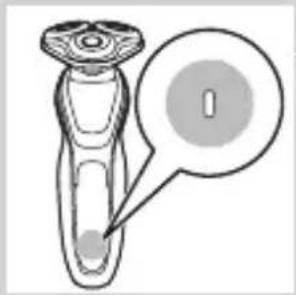
- Battery charge indicator with 1 light
Battery low

When the battery is almost empty, the battery charge indicator flashes orange.
- Battery charge indicator with 3 lights

- Battery charge indicator with 1 light
Remaining battery capacity

Battery charge indicator with 3 lights
- The remaining battery capacity is indicated by the lights of the battery charge indicator that light up continuously.
Cleaning reminder

For optimal shaving performance, we advise you to clean the shaver after every use.
- When you switch off the shaver, the cleaning reminder flashes to remind you to clean the shaver.
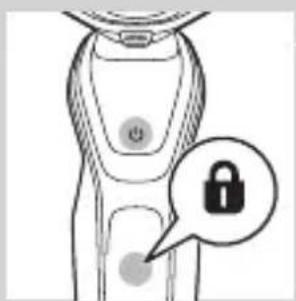
Travel lock
You can lock the shaver when you are going to travel. The travel lock prevents the shaver from being switched on by accident.
Activating the travel lock

1 Press the on/off button for 3 seconds to enter the travel lock mode.

- While you activate the travel lock, the travel lock symbol lights up continuously. When the travel lock is activated, the travel lock symbol flashes.
Deactivating the travel lock
1 Press the on/off button for 3 seconds.
- The travel lock symbol flashes and then lights up continuously. The shaver is now ready for use again.
Replacing shaving heads
For maximum shaving performance, we advise you to replace the shaving heads every two years.
- The appliance is equipped with a replacement reminder which reminds you to replace the shaving heads. The replacement reminder lights up white continuously.

Note: After replacing the shaving heads, you need to reset the replacement reminder by pressing the on/off button for 7 seconds.
Turbo setting (specific types only)
- The appliance is equipped with a Turbo or Turbo+ setting. This setting is intended for quicker and more intense shaving and makes hard-to-reach areas easier to shave.

Activating the Turbo setting
1 To activate the Turbo setting, press the Turbo button once.
Deactivating the Turbo setting
1 To deactivate the Turbo setting, simply press the Turbo button once again.
Charging
Charging takes approx. 1 hour.
Note: You can also use this appliance directly from the mains.
Charge the shaver before you use it for the first time and when the display indicates that the battery is almost empty.
Charging with the adapter

1 Insert the small plug into the appliance and put the adapter in the wall socket.
Charging in the SmartClean system (specific types only)

1 Put the small plug in the SmartClean system.
2 Put the adapter in the wall socket.
3 Press down the top cap to be able to place the shaver in the holder ('click').

4 Hold the shaver upside down above the holder. Make sure the front of the shaver points towards the SmartClean system.
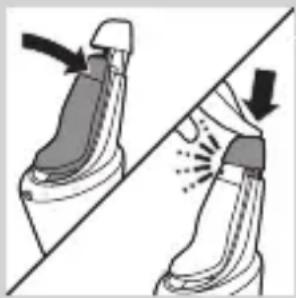
5 Place the shaver in the holder, tilt the shaver backwards and press down the top cap to connect the shaver ('click').
- The battery symbol flashes slowly to indicate the shaver is charging.
Using the shaver
Switching the appliance on and off

1 To switch on the appliance, press the on/off button once.
2 To switch off the appliance, press the on/off button once.
- Battery charge indicator with 3 lights: The display lights up for a few seconds to show the remaining battery status.
Shaving
Skin adaptation period
Your first shaves may not bring you the result you expect and your skin may even become slightly irritated. This is normal. Your skin and beard need time to adapt to any new shaving system.
We advise you to shave regularly (at least 3 times a week) with this shaver for a period of 3 weeks to allow your skin to adapt to the new shaver.
Note: You can also use the shaver directly from the mains.

1 Switch on the appliance.
2 Move the shaving heads over your skin in circular movements.
Note: Do not make straight movements.
3 Clean the shaver after use (see chapter 'Cleaning and maintenance').
Turbo setting (specific types only)
The appliance is equipped with a Turbo or Turbo+ setting for easy shaving of hard-to reach areas.
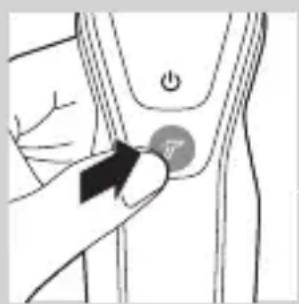
1 Switch on the shaver.
2 Press the Turbo button once to switch on the Turbo setting if you want to shave hard-to-reach areas more quickly.
3 Move the shaving heads over your skin in circular movements.

Note: Do not make straight movements.
4 To deactivate the Turbo setting simply press the Turbo button once.
Using the click-on attachments
Note: The accessories supplied may vary for different products. The box shows the accessories that have been supplied with your appliance.
Removing or attaching the click-on attachments
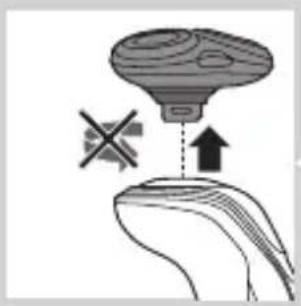
1 Make sure the appliance is switched off.
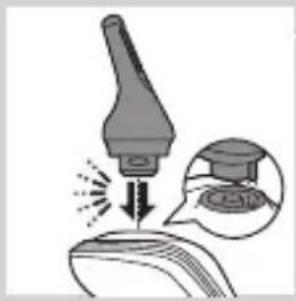
2 Pull the attachment straight off the appliance.
Note: Do not twist the attachment while you pull it off the appliance.

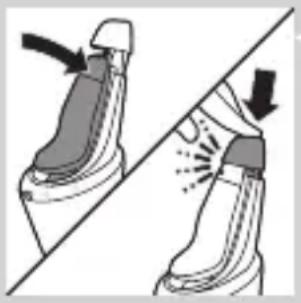
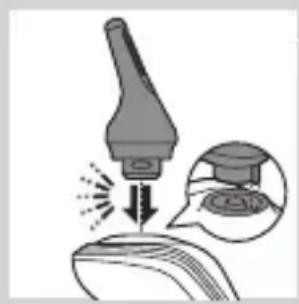
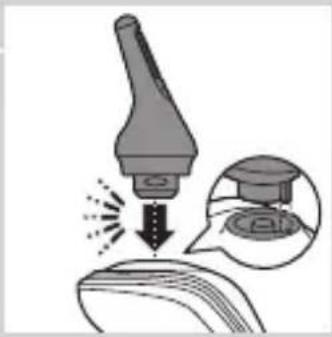
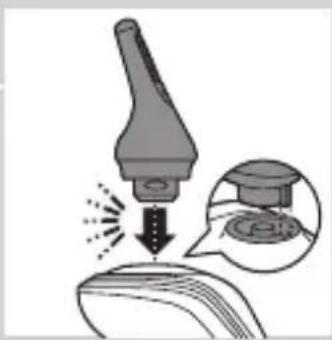
3 Insert the lug of the attachment into the slot in the top of the appliance. Then press down the attachment to attach it to the appliance ('click').
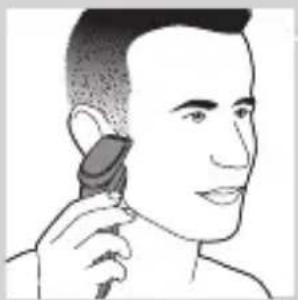
Using the trimmer attachment
You can use the trimmer attachment to groom your sideburns and moustache.
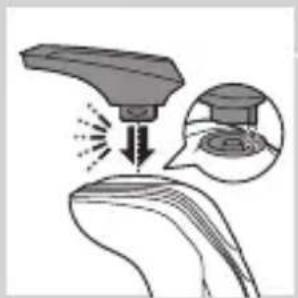
1 Make sure the appliance is switched off.
2 Insert the lug of the attachment into the slot in the top of the shaver. Then press down the trimmer attachment to attach it to the appliance ('click').
3 Switch on the appliance.
4 You can now start trimming.
5 Clean the attachment after use (see chapter ‘Cleaning and maintenance’).


Using the beard styler attachment
1 Make sure the appliance is switched off.
2 Insert the lug of the attachment into the slot in the top of the appliance. Then press down the attachment to attach it to the appliance ('click').
Using the beard styler attachment with comb
You can use the beard styler attachment with the comb attached to style your beard at one fixed setting, but also at different length settings. You can use it also to pre-trim any long hairs before shaving to have a more comfortable shave.
The hair length settings on the beard styler attachment correspond to the remaining hair length after cutting and range from 1 to 5mm.
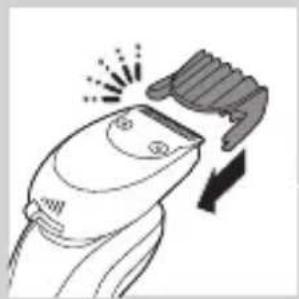
1 Slide the comb straight into the guiding grooves on both sides of the attachment ('click').
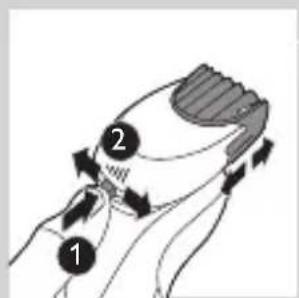
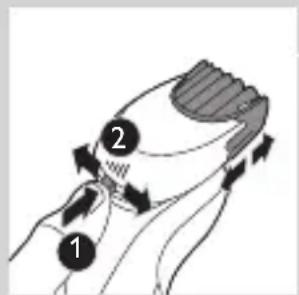
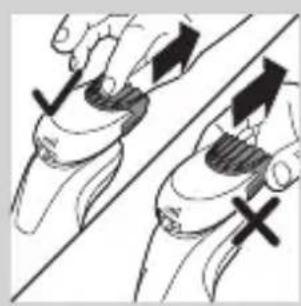
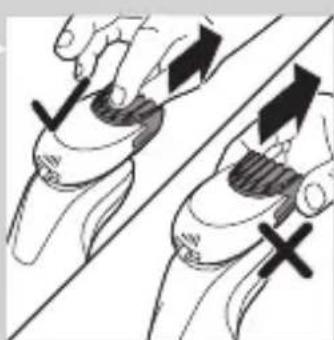
2 Press the length selector and then push it to the left or right to select the desired hair length setting.
3 Switch on the appliance.

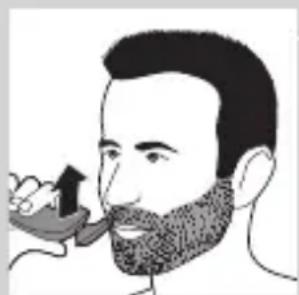
4 You can now start styling your beard by moving the attachment upwards with gentle pressure making sure the front of the comb is in full contact with the skin.
5 Clean the attachment after use (see chapter 'Cleaning and maintenance').


Using the beard styler attachment without comb
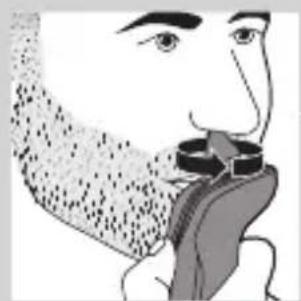
You can use the beard styler attachment without the comb to contour your beard, moustache, sideburns or neckline to a length of 0.5mm.
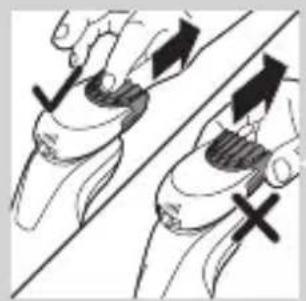
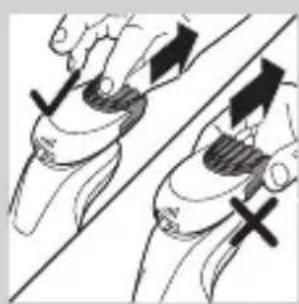
1 Pull the comb off the attachment.
Note: Grab the comb in the centre to pull it off the attachment. Do not pull at the sides of the comb.
2 Switch on the appliance.
3 You can now start contouring your beard, moustache, sideburns or neckline by moving the styler downwards with gentle pressure while holding it perpendicular to the skin.
4 Clean the attachment after use (see chapter 'Cleaning and maintenance').
Using the nose trimmer attachment
You can use the nose trimmer attachment to trim your nose hair. Make sure your nostrils are clean.
1 Insert the lug of the attachment into the slot in the top of the appliance. Then press down the attachment to attach it to the appliance ('click').
2 Switch on the appliance.
3 Carefully insert the attachment into one of your nostrils.
Do not insert the attachment more than 0.5cm into your nostrils.
4 Slowly move the attachment around to remove all unwanted hairs in your nostrils.
5 Clean the attachment after use (see chapter 'Cleaning and maintenance').
Trimming ear hair
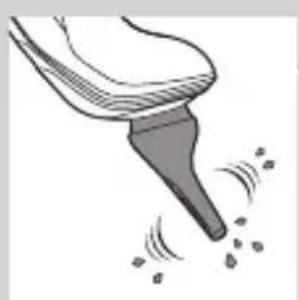
You can use the nose trimmer attachment to trim your ear hair. Make sure your outer ear channels are clean and free from wax.
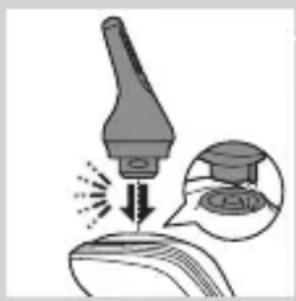
1 Insert the lug of the attachment into the slot in the top of the appliance. Then press down the attachment to attach it to the appliance ('click').
2 Switch on the appliance.
3 Slowly move the attachment along the rim of the ear to remove hairs that stick out beyond the rim.
4 Insert the attachment into the outer ear channel.
Do not insert the attachment more than 0.5cm into your ear channel, as this could damage the eardrum.
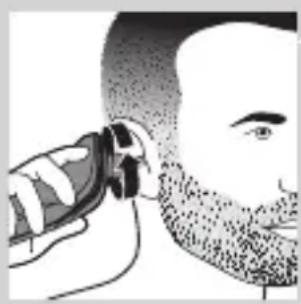
5 Slowly turn the attachment around to remove all unwanted hairs from your outer ear channel.
6 Clean the attachment after use (see chapter ‘Cleaning and maintenance’).
Cleaning and maintenance
Note: The accessories supplied may vary for different products. The box shows the accessories that have been supplied with your appliance.
Cleaning the shaver in the SmartClean system (specific types only)

Do not tilt the SmartClean system to prevent leakage.
Note: Hold the SmartClean system while you prepare it for use.
Note: If you clean the shaver in the SmartClean system once a week, the SmartClean cartridge will last approximately three months.
Preparing the SmartClean system for use

1 Put the small plug in the back of the SmartClean system.
2 Put the adapter in the wall socket.
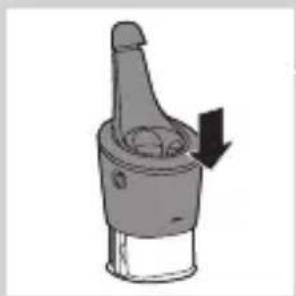
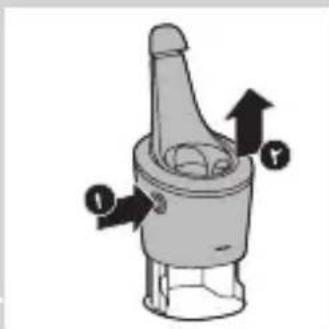
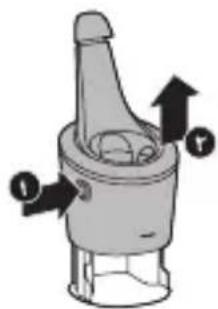
3 Press the button on the side of the SmartClean system and lift the top part of the SmartClean system.

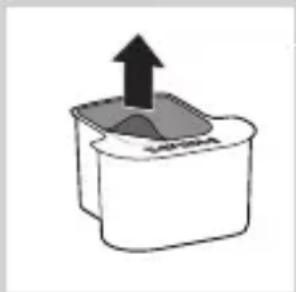
4 Pull the seal off the cleaning cartridge.

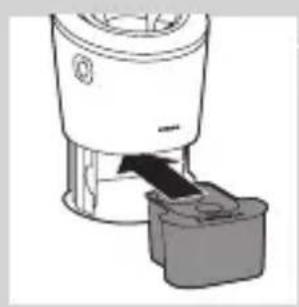
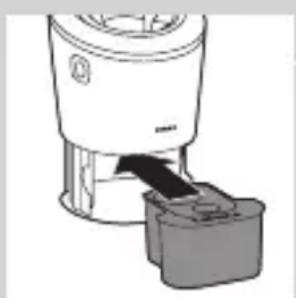
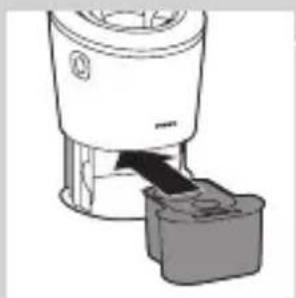
5 Place the cleaning cartridge in the SmartClean system.
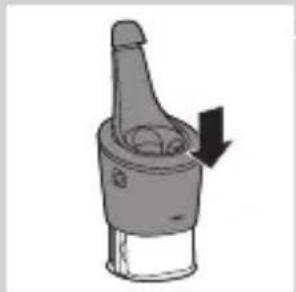
6 Push the top part of the SmartClean system back down ('click').

Using the SmartClean system
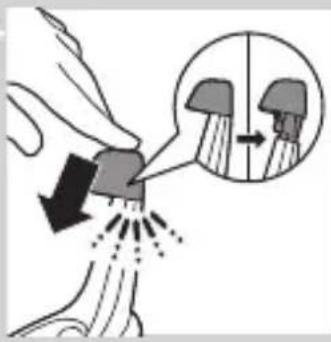
Always make sure to shake excess water off the shaver before you place it in the SmartClean system.

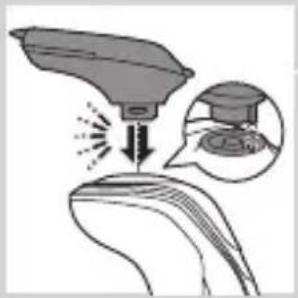
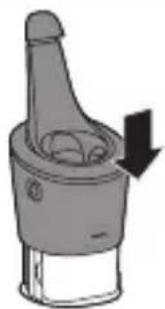
1 Press down the top cap to be able to place the shaver in the holder ('click').

2 Hold the shaver upside down above the holder. Make sure the front of the shaver points towards the SmartClean system.
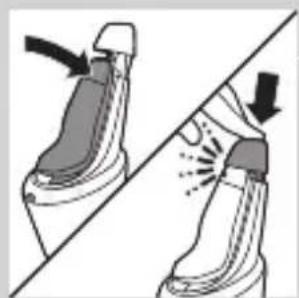
3 Place the shaver in the holder, tilt the shaver backwards and press down the top cap to connect the shaver ('click').
- The battery symbol flashes slowly to indicate that the shaver is charging.


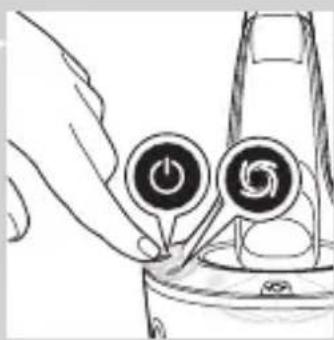
4 Press the on/off button on the SmartClean system to start the cleaning program.
- During the cleaning program (which takes approx. 10 minutes), the cleaning symbol flashes.
- When the cleaning program has been completed, the ready symbol lights up continuously. - The battery symbol lights up continuously to indicate that the shaver is fully charged. This takes approx. 1 hour.
Note: If you press the on/off button of the SmartClean system during the cleaning program, the program aborts. In this case, the cleaning symbol stops flashing.
Note: If you remove the adapter from the wall socket during the cleaning program, the program aborts.
Note: 30 minutes after the charging phase has been completed, the SmartClean system switches off automatically.
5 To let the shaver dry, you can leave it in the SmartClean system until your next shave. You can also remove the shaver from the SmartClean system, shake off excess water, open the shaving unit and let the shaver air dry.
Replacing the cartridge of the SmartClean System
Replace the cleaning cartridge when the replacement symbol flashes orange or when you are no longer satisfied with the cleaning result. If you clean the shaver in the SmartClean system once a week, the SmartClean cartridge will last approximately three months

1 Press the button on the side of the SmartClean system and lift the top part of the SmartClean system.

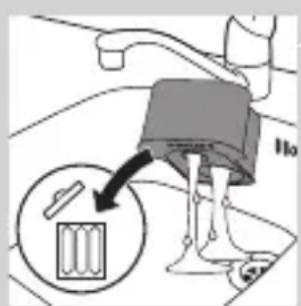
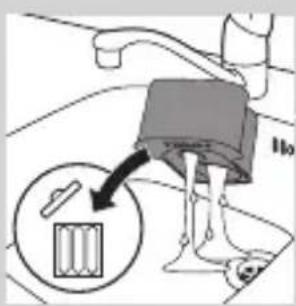
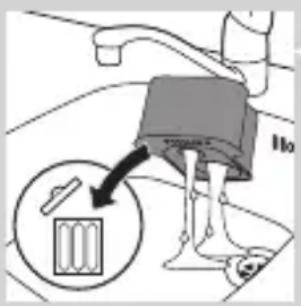
2 Take the empty cleaning cartridge from the SmartClean system and pour any remaining cleaning fluid out of the cleaning cartridge. You can simply pour the cleaning fluid down the sink.
3 Throw away the empty cleaning cartridge.
4 Unpack the new cleaning cartridge and pull the seal off the cartridge.
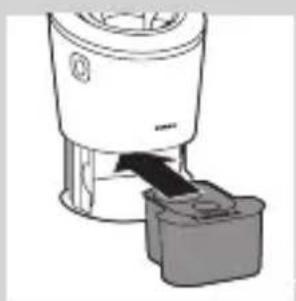
5 Place the new cleaning cartridge in the SmartClean system.
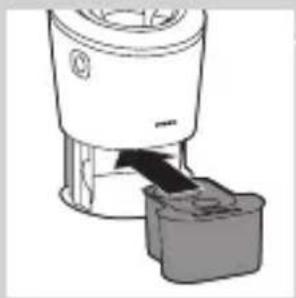
6 Push the top part of the SmartClean system back down ('click').

Cleaning the shaver under the tap
Clean the shaver after every shave for optimal shaving performance.
Be careful with hot water. Always check if the water is not too hot, to prevent your hands from getting burnt.
ENGLISH22

Never dry the shaving unit with a towel or tissue, as this may damage the shaving heads.
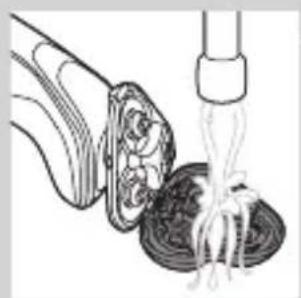
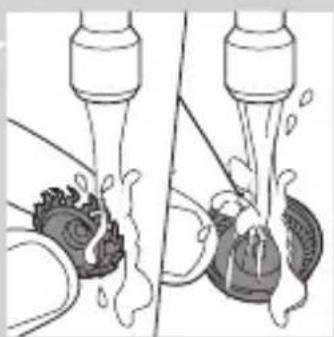
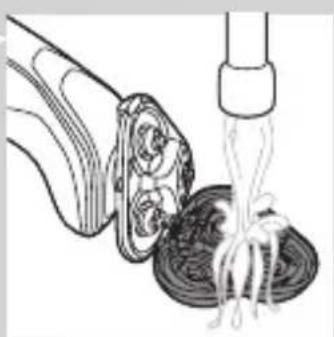
1 Rinse the shaving unit under a warm tap for some time.
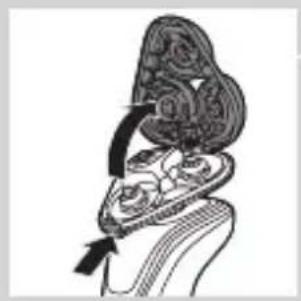
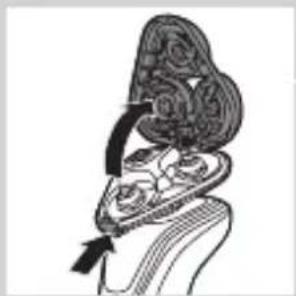
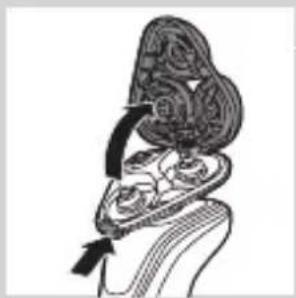
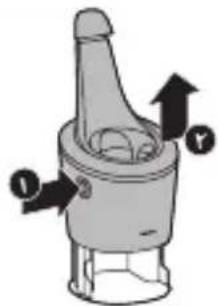
2 Press the release button and open the shaving unit.
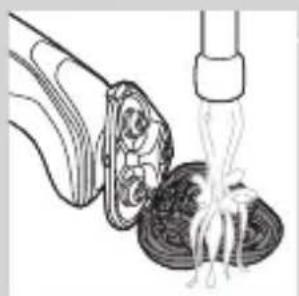
3 Rinse the shaving head holder under a warm tap for 30 seconds.
4 Carefully shake off excess water and let the shaving head holder dry.
5 Close the shaving head holder ('click').
Thorough cleaning method
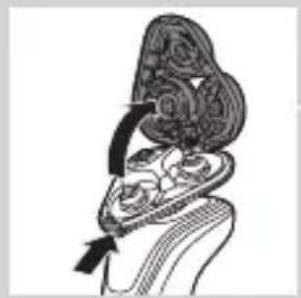
Make sure the appliance is switched off.
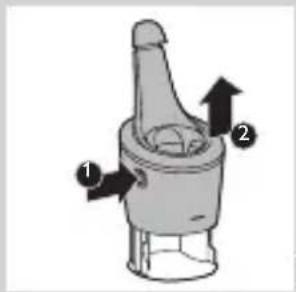
1 Press the release button and open the shaving unit.

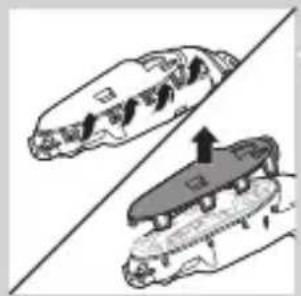
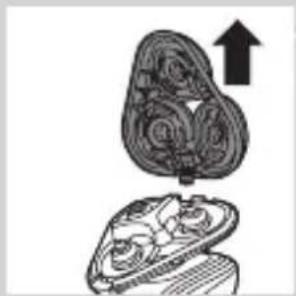
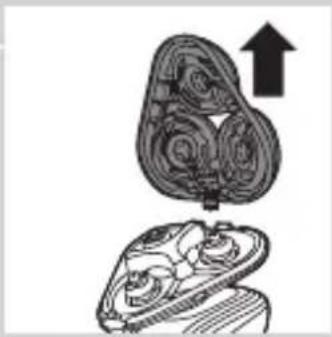
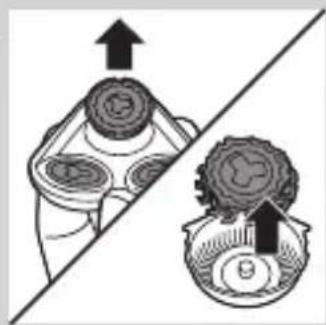
2 Pull the shaving head holder off the bottom part of the shaving unit.
![graph TD A["Step 1"] --> B["Step 2"] B --> C["Step 3"] C --> D["Step 4"] D --> A](/content/2026/06/1272685/images/1f191f3d9e5fa9a6f892aefe0beb89f423af00511d92793630f8080be2e43ca9.jpg)
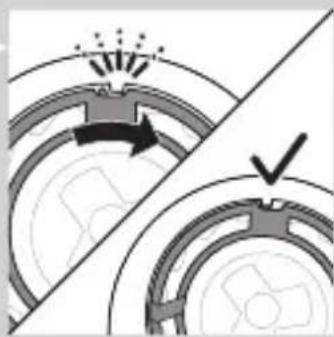
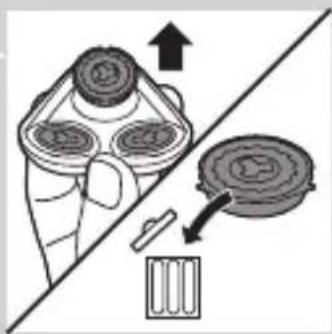
3 Turn the retaining rings anticlockwise and remove them.

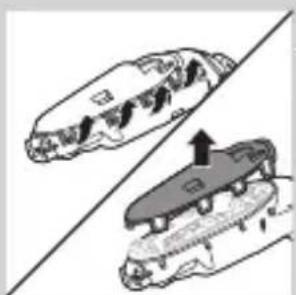
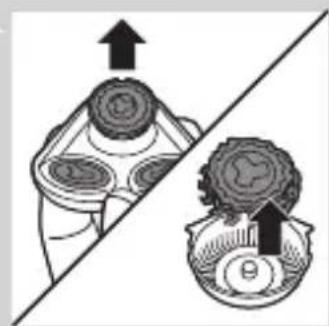
4 Remove the shaving heads from the shaving head holder. Each shaving head consists of a cutter and guard.

Note: Do not clean more than one cutter and guard at a time, since they are all matching sets. If you accidentally put a cutter in the wrong shaving guard, it may take several weeks before optimal shaving performance is restored.
5 Clean the cutter and guard under the tap.

6 After cleaning, place the cutter back into the guard.
![graph TD A["Input Node 1"] --> C["Processing Node"] B["Input Node 2"] --> C D["Input Node 3"] --> C C --> E["Output Node 1"] C --> F["Output Node 2"] C --> G["Output Node 3"]](/content/2026/06/1272685/images/5fa80b3c71fc0bd962bfef6da43ec293841468a977d7564d7dd74f4571c60a40.jpg)
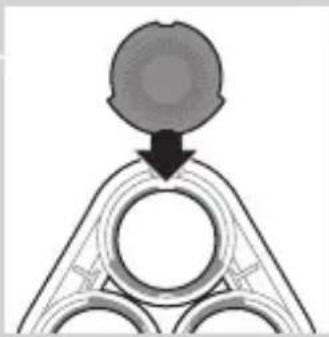
7 Put the shaving heads back into the shaving head holder.
ENGLISH24
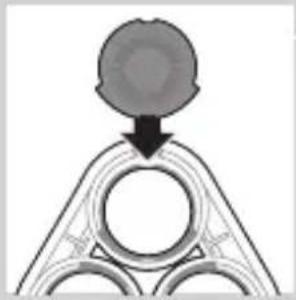
Note: Make sure the projections of the shaving heads fit exactly into the recesses of the shaving-head holder.
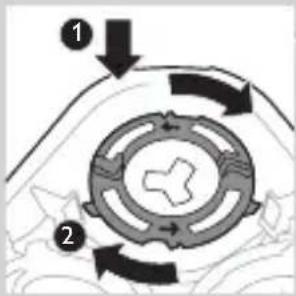
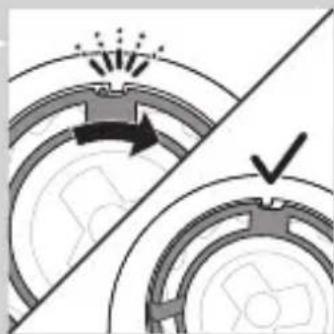
8 Place the retaining rings back onto the shaving head holder and turn them clockwise.
![graph TD A[" "] --> B[" "] B --> C[" "] C --> D[" "] D --> E[" "] style A fill:#f9f,stroke:#333 style B fill:#ccf,stroke:#333 style C fill:#cfc,stroke:#333 style D fill:#fcc,stroke:#333 style E fill:#ffc,stroke:#333](/content/2026/06/1272685/images/e13711924f17dbe5e3ad960b8ba93ab190f248dd4187ac7b33160d7093c6db74.jpg)
- Each retaining ring has two recesses and two projections that fit exactly in the projections and recesses of the shaving head holder.

- Turn the ring clockwise until your hear 'click' and the ring is fixed.

Note: Hold the shaving head holder in your hand when you reinsert the shaving heads and reattach the retaining rings. Do not place the shaving head holder on a surface when you do this, as this may cause damage.

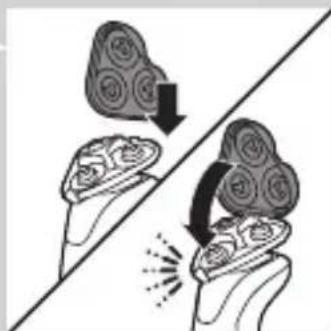
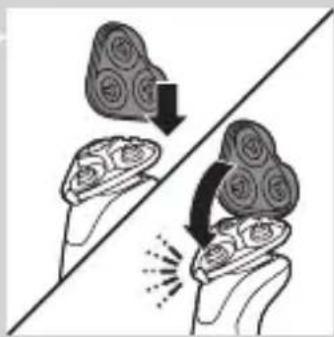
9 Reinsert the hinge of the shaving head holder into the slot of the shaving unit. Close the shaving head holder ('click').
Cleaning the click-on attachments
Never dry the trimmer or beard styler attachments with a towel or tissue, as this may damage the trimming teeth.
Cleaning the trimmer attachment
Clean the trimmer attachment every time you have used it.
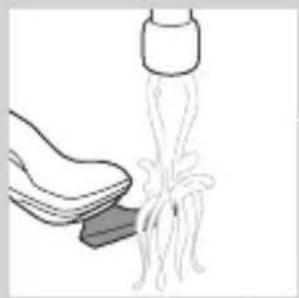
1 Switch on the appliance with the trimmer attachment attached.
2 Rinse the trimmer attachment under a hot tap for some time.
3 After cleaning, switch off the appliance.
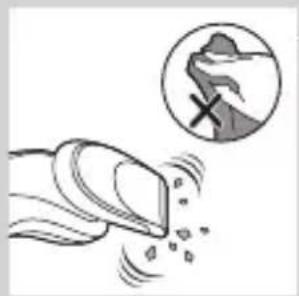
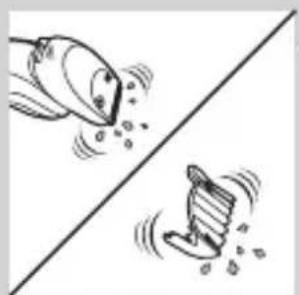
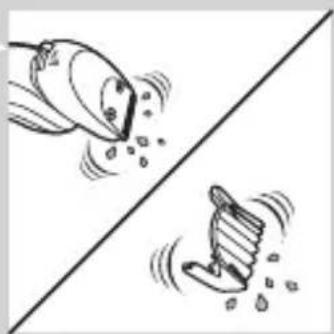
4 Carefully shake off excess water and let the trimmer attachment dry.
Tip: For optimal trimmer performance, lubricate the trimmer teeth with a drop of sewing machine oil every six months.

Cleaning the beard styler attachment
Clean the beard styler attachment every time you have used it.
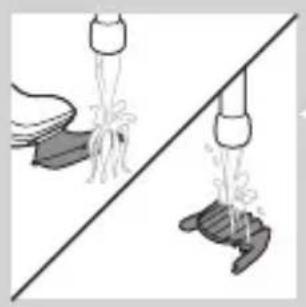
1 Pull the comb off the beard styler attachment.
Note: Grab the comb in the centre to pull it off the attachment. Do not pull at the sides of the comb.


2 Switch on the appliance.
3 Rinse the beard styler attachment and the comb separately under a hot tap for some time.
4 After cleaning, switch off the appliance.
5 Carefully shake off excess water and let the beard styler attachment and comb dry.
Tip: For optimal trimmer performance, lubricate the trimmer teeth with a drop of sewing machine oil every six months.
Cleaning the nose trimmer attachment
Clean the nose trimmer attachment every time you have used it.
1 Make sure the appliance is switched off.
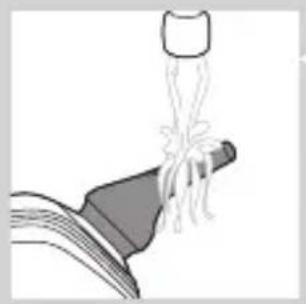
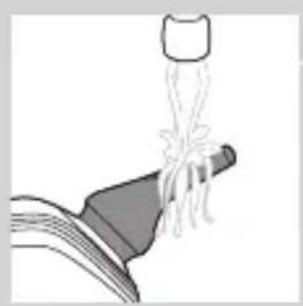
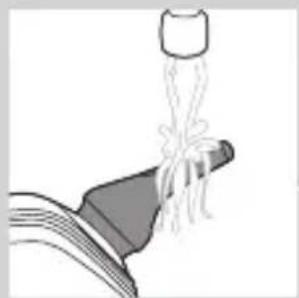
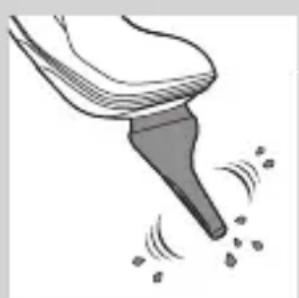
2 Rinse the cutting element of the nose trimming head with hot water.
3 Switch on the appliance and rinse the cutting element once more to remove any remaining hairs. Then switch off the appliance again.
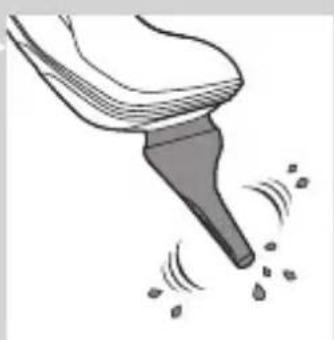
4 Carefully shake off excess water and let the nose trimmer attachment dry.
Tip: For optimal trimmer performance, lubricate the trimmer teeth with a drop of sewing machine oil every six months.
Storage

Note: The accessories supplied may vary for different products. The box shows the accessories that have been supplied with your appliance.
Note: We advise you to let the appliance and its attachments dry before you put the protection caps on the attachments and store the shaver in the pouch.
- Place the protection cap on the nose trimming head.
- Put the protection cap on the shaving head to protect it from dirt accumulation.
- Store the shaver in the pouch supplied.
Replacement
Replacing the shaving heads
For maximum shaving performance, we advise you to replace the shaving heads every two years.
Replacement reminder
The shaving unit symbol will light up to indicate that the shaving heads need to be replaced. Replace damaged shaving heads immediately. Only replace the shaving heads with original Philips shaving heads as specified in chapter ‘Ordering accessories’.
ENGLISH28
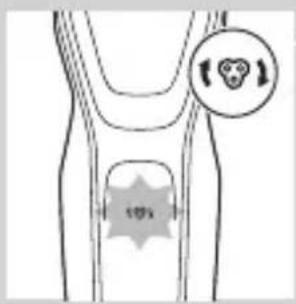
1 The shaving unit symbol lights up continuously when you switch off the shaver to indicate that the shaving heads need to be replaced.

2 Press the release button and open the shaving unit.

3 Pull the shaving head holder off the bottom part of the shaving unit.
![graph TD A["Step 1"] --> B["Step 2"] B --> C["Step 3"] C --> D["Step 4"] D --> A](/content/2026/06/1272685/images/15f820befc9835aca0398755f90271d58c3e3f0c6ac15bf92529c387852dc6ec.jpg)
4 Turn the retaining rings anticlockwise and remove them.

5 Remove the shavings heads from the shaving head holder and throw them away.

6 Place new shaving heads in the holder.

Note: Make sure the projections of the shaving heads fit exactly into the recesses of the shaving head holder.
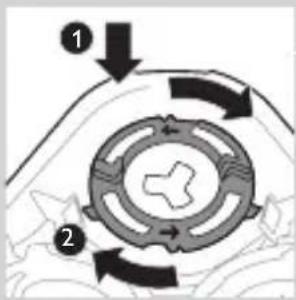
7 Place the retaining rings back onto the shaving heads and turn them clockwise.
![graph TD A[" "] --> B[" "] B --> C[" "] C --> D[" "] D --> E[" "] E --> F[" "] F --> G[" "] G --> H[" "] H --> I[" "] I --> J[" "] J --> K[" "] K --> L[" "] L --> M[" "] M --> N[" "] N --> O[" "] O --> P[" "] P --> Q[" "] Q --> R[" "] R --> S[" "] S --> T[" "] T --> U[" "] U --> V[" "] V --> W[" "]…](/content/2026/06/1272685/images/6b27a7c3ab2a964663b9588c9a90a009e7bae7199282b9176e3c2fb6ef03170b.jpg)
- Each retaining ring has two recesses and two projections that fit exactly in the projections and recesses of the shaving head holder.

- Turn the ring clockwise until your hear 'click' and the ring is fixed.

Note: Hold te shaving head holder in your hand when you reinsert the shaving heads and reattach the retaining rings. Do not place the shaving head holder on a surface when you do this, as this may cause damage.


8 Reinsert the hinge of the shaving head holder into the slot of the shaving unit. Close the shaving head holder ('click').
9 To reset the replacement reminder, press and hold the on/off button for approx. 7 seconds.
Ordering accessories
To buy accessories or spare parts, visit www.shop.philips.com/service or go to your Philips dealer. You can also contact the Philips Consumer Care Centre in your country (see the worldwide guarantee leaflet for contact details). The following parts are available:
- HQ8505 adapter
- SH50 Philips shaving heads
- HQ110 Philips Shaving Head Cleaning Spray
- RQ111 Philips beard styler attachment
- JC301, JC302, JC303, JC304, JC305 cleaning cartridge
Note: Availability of the accessories may differ per country.
Shaving heads
- We advise you to replace your shaving heads every two years. Always replace the shaving heads with original SH50 Philips shaving heads.

Recycling
Do not throw away the appliance with the normal household waste at the end of its life, but hand it in at an official collection point for recycling. By doing this, you help to preserve the environment.
Removing the rechargeable shaver battery

Only remove the rechargeable battery when you discard the shaver. Make sure the battery is completely empty when you remove it.
Be careful, the battery strips are sharp.
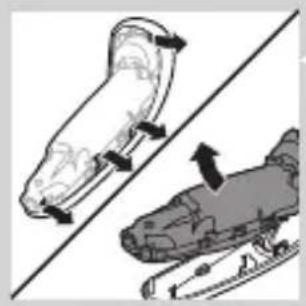
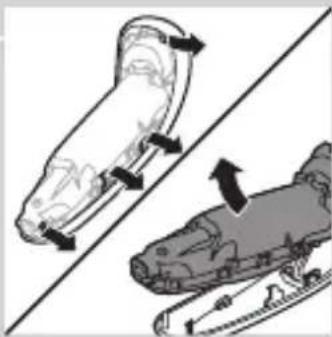
1 Remove the screw in the backpanel with a screwdriver. Then remove the back panel.
2 Bend the hooks aside and remove the power unit.
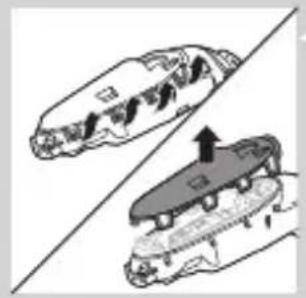
3 Break the snap hooks and remove the front panel of the power unit.

4 Take out the battery holder and cut the battery tags with a pair of cutting pliers.
Guarantee and support
If you need information or support, please visit www.philips.com/support or read the separate worldwide guarantee leaflet.
Guarantee restrictions
The shaving heads (cutters and guards) are not covered by the terms of the international guarantee because they are subject to wear.
Troubleshooting
This chapter summarises the most common problems you could encounter with the appliance. If you are unable to solve the problem with the information below, visit www.philips.com/support for a list of frequently asked questions or contact the Consumer Care Centre in your country.
Problem Possible cause Solution
The shaver does not shave as well as it used to.
The shaving heads are damaged or worn.
Replace the shaving heads (see chapter ‘Replacement’).
Hairs or dirt obstruct the shaving heads.
Clean the shaving heads by following the steps of the thorough cleaning method (see chapter ‘Cleaning and maintenance’).
The shaver does not work when I press the on/off button.
The rechargeable battery is empty.
Recharge the battery (see chapter ‘Charging’).
Problem Possible cause Solution
| The travel lock is activated. | Press the on/off button for 3 seconds to deactivate the travel lock. | |
| The shaving unit is soiled or damaged to such an extent that the motor cannot run. | Clean the shaving heads or replace them (see chapters 'Cleaning and maintenance' and 'Replacement'). | |
| The shaver is not entirely clean after I clean it in the SmartClean system. | You have not placed the shaver in the SmartClean system properly, so there is no electrical connection between the SmartClean system and the shaver. | Press down the top cap ('click') to ensure a proper connection between the shaver and the SmartClean system. |
| The cleaning cartridge is empty. The replacement symbol flashes to indicate you have to replace the cleaning cartridge. | Place a new cleaning cartridge in the SmartClean system (see chapter 'Cleaning and maintenance'). | |
| You have used another cleaning fluid than the original Philips cleaning cartridge. | Only use the original Philips cleaning cartridges. |
Problem Possible cause Solution
| The SmartClean system does not work when I press the on/off button. | The SmartClean system is not connected to the mains. | Put the small plug in SmartClean system and put the adapter in the wall socket. |
| The shaver is not fully charged after I charge it in the SmartClean system. | You have not placed the shaver in the SmartClean system properly. | Make sure you press the shaver in the SmartClean system until it locks into place and press down the top cap. |
| I replaced the shaving heads, but the replacement reminder symbol is still showing. | You have not reset the shaver. | Reset the shaver by pressing the on/off button for approx. 7 seconds (see chapter ‘Replacement’). |
| A shaving head symbol has suddenly appeared on the display. | This symbol is a replacement reminder. | Replace the shaving heads (see chapter ‘Replacement’). |
| The nose trimmer attachment pulls at the hairs. | You move the appliance too fast. | Do not move the appliance too fast. |
Problem Possible cause Solution
The nose trimmer attachment does not work.
The cutting element of the attachment is very dirty, for instance because some nasal mucus has dried inside the cutting element.
Clean the cutting element by rinsing it under the tap with hot water. Switch on the appliance and rinse the cutting element once more to remove any remaining hairs.
If rinsing the nose trimmer under the tap does not unblock the cutting element, then immerse it in a glass with warm water for a few minutes. Then switch on the appliance and rinse it under the tap.
Pendahuluan
Saat baterai hampir habis, indikator daya baterai akan berkedip oranye.
Mengaktifkan travel lock
Menonaktifkan travel lock
1 Tekan tombol on/off selama 3 detik.
Mengaktifkan setelan Turbo


1 Bilas unit pencukur di bawah keran air hangat selama beberapa saat.


2 Tekuk kait ke samping dan lepaskan unit daya.
3 Patahkan pengait kunci dan lepaskan panel depan unit daya.


주의
EMF(전자기장)
배터리 충전 표시등(표시등 3개)
배터리 충전 표시등(표시등 1개)
-배터리 충전 표시등(표시등 1개)
배터리 부족
-배터리 총전 표시등(표시등 1개)
남은 배터리 용량

배터리 충전 표시등(표시등 3개)
잠금 기능 해제
터보 설정 작동


스마트클린 시스템 사용 준비
스마트클린 시스템 사용


턱수염 스타일러 액세서리 세척

Apabila bateri hampir habis, penunjuk cas bateri berkelip jingga.

Menyahaktifkan kunci kembara
1 Tekan butang hidup/mati selama 3 saat.
Mengaktifkan tetapan Turbo



BAHASA MELAYU116


Menggantikan kartrij Sistem SmartClean


Penggantian


![graph TD A["1"] --> B["Central Component"] B --> C["2"] C --> A](/content/2026/06/1272685/images/46e269b6d95ce5694ad37a90143f381ac3b5a5596dbfdd6f2d6a8da1b83dbe56.jpg)
1 Simbol unit pencukur menyala secara berterusan apabila anda mematikan pencukur untuk menunjukkan bahawa kepala pencukur perlu digantikan.
2 Tekan butang pelepas dan buka unit pencukur.
Berhati-hati, jalur bateri sangat tajam.


Jaminan dan sokongan

ข้อควรระวัง
การเปลี่ยนขุดหัวโกน
ระยะปรับสภาพผิว





Taking place for the purpose of the following:



Tắt khóa du lịch
1 public health health care, public health care, public health care, public health care, public health care, public health care, public health care, public health care, public health care, public health care, public health care, public health care, public health care, public health care, public health care, public health care, public health care, public health care, public health care, public health care, public health care, public health care, public health care, public health care, public health care, public health care, private sector services and other services.
1 public sector public sector public sector public sector public sector public sector public sector public sector public sector public sector public sector public sector public sector public sector public sector public sector public sector public sector public sector public sector public sector public sector public sector public sector public sector public sector public sector public sector public sector public sector public sector public sector public sector public sector public sector public sector public sector public sector public sector public sector public sector public sector public sector public sector public sector public sector public sector public sector public sector public sector public Sector Public Sector Public Sector Public Sector Public Sector Public Sector Public Sector Public Sector Public Sector Public Sector Public Sector Public Sector Public Sector Public Sector Public Sector Public Sector Public Sector Public Sector Public Sector Public Sector Public Sector Public Sector Public Sector Public Sector Public Sector Public Sector Public Sector Public Sector Public Sector Public Sector Public Sector Public Sector Public Sector Public Sector Public Sector Public Sector Public Sector Public Sector Public Sector Public Sector Public Sector Public Sector Public Sector Public Sector Public Sector Public Sector Public Sector Public Sector Public Sector Public Sector Public Sector Private Sector Public Sector Private Sector Private Sector Private Sector Private Sector Private Sector Private Sector Private Sector Private Sector Private Sector Private Sector Private Sector Private Sector Private Sector Private Sector Private Sector Private Sector Private Sector Private Sector Private Sector Private Sector Private Sector Private Sector Private Sector Private Sector Private Sector Private Sector Private Sector Private Sector Private Sector Private Sector Private Sector Private Sector Private Sector Private Sector Private Sector Private Sector Private Sector Private Sector Private Sector Private Sector Private Sector Private Sector Private Sector Private Sector Private Sector Private Sector Private Sector Private Sector Private Sector Private Sector private sector private sector private sector private sector private sector private sector private sector private sector private sector private sector private sector private sector private sector private sector private sector private sector private sector private sector private sector private sector private sector private sector private sector private sector private sector private sector private sector private sector private sector private sector private sector private sector private sector private sector private sector private sector private sector private sector private sector private sector private sector private sector private sector private sector private sector private sector private sector private sector private sector private sector private-sector private sector private-sector private-sector private-sector private-sector private-sector private-sector private-sector private-sector private-sector private-sector private-sector private-sector private-sector private-sector private-sector private-sector private-sector private-sector private-sector private-sector private-sector private-sector private-sector private-sector private-sector private-sector private-sector private-sector private-sector private-sector private-sector private-sector private-sector private-sector private-sector private-sector private-sector private-sector private-sector private-sector private-sector private-sector private-sector private-sector private-sector private-sector private-sector private-sector private-sector private-sector private-
2 publicly state that the public is a state that the public is a state that the public is a state that the public is a state that the public is a state that the public is a state that the public is a state that the public is a state that the public is a state that the public is a state that the public is a state that the public is a state that the public is a state that the public is a state that the public is a state that the public is a state that the public is a state that the private sector is an unaffordable sector, which is not a private sector.







Bảo quản

9 public health information, public health information, public health information, public health information, public health information, public health information, public health information, public health information, public health information, public health information, public health information, public health information, public health information, public health information, public health information, public health information, public health information, public health information, public health information, public health information, public health information, public health information, public health information, public health information, public health information, public health information
Đặt mua phụ kiện

警告
電池充電指示燈,1個燈
注意:您也可以直接插電使用本產品。
- 電池充電指示燈,1 個燈
電量不足

- 電池充電指示燈,1 個燈
剩餘電池電量

電池充電指示燈,3個燈
解除旅行鎖
1 按住開關按鈕 3 秒鐘。

3 開啟產品。
4 這時即可開始修整。
繁體中文202

使用装上梳具的鬢角造型修容器配件
1 將梳具從配件取下。


1 將電鬍刀組以溫水沖洗一段時間。

2 按下釋放鈕打開電鬍刀組。

確定關閉本產品的電源。
1 按下釋放鈕打開電鬍刀組。

6 清洗後,請將刀片放回刀網中。
![graph TD A["Input Node"] --> B["Process Node"] C["Input Node"] --> B D["Input Node"] --> B](/content/2026/06/1272685/images/ae8420092ceaae5d2484d76b086ed3df2dd9a716695f732c8ab5ba6738e7e72c.jpg)
7 將電鬍刀刀頭裝回電鬍刀刀頭固定座。
繁體中文210

繁體中文212

收納
- 蓋上鼻毛修整刀頭保護蓋。
2 按下釋放鈕打開電鬍刀組。
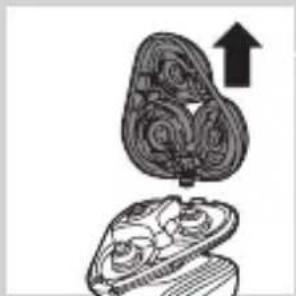
6 將新的電鬍刀刀頭放入固定座。




电池充电指示灯(1级指示)
- 充电约需 1 小时。
注意:您也可以直接插电使用本产品。
电池电量不足

- 电池充电指示灯(1级指示)
电池剩余电量

电池充电指示灯(3 级指示)
解除旅行锁
1 按开/关按钮 3 秒钟。

高速设置(仅限于特定型号)
3 启动产品。
4 现在可以开始修剪了。
使用带修剪梳的胡须造型器附件
1 将修剪梳从配件中拉出。

使用鼻毛修剪器配件
您可以使用鼻毛修剪器附件修剪鼻毛。
确保鼻腔是清洁的。
1 将配件的凸缘插入产品顶部的槽内。
您可以使用鼻毛修剪器附件修剪耳毛。
确保外耳道洁净无耳垢。
高效智能清洁系统使用准备
简体中文234
使用高效智能清洁系统


1 在热水龙头下冲洗剃须刀头部件片刻。
2 按释放按钮,打开剃须刀头部件。

确保产品电源已关闭。
1 按释放按钮,打开剃须刀头部件。
6 清洁后,将刀片放回网罩中。
![graph TD A["Input Node"] --> B["Process Node"] C["Input Node"] --> B D["Input Node"] --> B](/content/2026/06/1272685/images/25158b4e4a512364dcc3965871d55502364a5f3aaa428d547fccd9d3db705579.jpg)
7 将剃须刀头装回到剃须刀头支架中。


更换提醒
2 按释放按钮,打开剃须刀头部件。

只有在丢弃剃须刀时才可取下充电电池。
请确保在取下电池时电量已完全耗尽。
注意,电池带非常锋利。

1 用螺丝刀卸下背板中的螺钉。
然后卸下背板。
2 将钩子向外掰,取出电源部件。
3 脱开安全钩,取下电源部件的前面板。


ضمانت و پشعتباني

سفارش دادن لوازم

![graph TD A[" "] --> B[" "] B --> C[" "] C --> D[" "] D --> E[" "] style A fill:#f9f,stroke:#333 style B fill:#ccf,stroke:#333 style C fill:#cfc,stroke:#333 style D fill:#fcc,stroke:#333 style E fill:#ffc,stroke:#333](/content/2026/06/1272685/images/21d706949e14f7d3bf724c223cb5f74f4bc2d9f637f1d4d4ef5e8726d58ca2ee.jpg)


![graph TD A["Component 1"] --> B["Rotating Path"] B --> C["Actuator"] C --> D["Car cam"] D --> E["Return Path"] E --> F["Actuator"] F --> G["Car cam"] G --> H["Return Path"] H --> I["Actuator"] I --> J["Car cam"] J --> K["Return Path"] K --> L["Actuator"] L --> M["Car cam"] M --> N["Return Path"] N -…](/content/2026/06/1272685/images/965ca298ff12b5ca93445dbe71a96f55f67994bc6f4baf3f9fb2adc873e1eb30.jpg)

![graph TD A["Top Node"] --> B["Central Process"] B --> C["Bottom Path 1"] B --> D["Bottom Path 2"]](/content/2026/06/1272685/images/1ce91443e6977525e771e3f0e21518b2339472e755a45c0162512d77055ccc4e.jpg)
نگهداری
تعميض
تعويض سريهاي اصد鹵





![graph TD A["Top Node"] --> B["Process Node 1"] A --> C["Process Node 2"] A --> D["Process Node 3"]](/content/2026/06/1272685/images/0af22488e5bb1f622d479afc38c4e0e9452d8f1ee9aa557992fa0c20da0e28e7.jpg)

![graph TD A["Start"] --> B{Condition} B -->|Yes| C["Process Step 1"] B -->|No| D["Process Step 2"] C --> E["End"] D --> E style A fill:#f9f,stroke:#333 style E fill:#bbf,stroke:#333](/content/2026/06/1272685/images/196b954eec997164eb304a30e24cdb1f907bf6c38ac0df1f05793938774303ca.jpg)
![graph TD A[" "] --> B[" "] B --> C[" "] C --> D[" "] style A fill:#f9f,stroke:#333 style B fill:#ccf,stroke:#333 style C fill:#cfc,stroke:#333 style D fill:#fcc,stroke:#333](/content/2026/06/1272685/images/a18c40e38ac367db8f1ba24e4ea207a87983b6891a616ada25d527798968df29.jpg)
روش تميزکردن کامل








تميزکردن و نگلهداری


استفاده ازريش تراش
تعويض سريهاي اصدح
دکمه توريو (فقط مدلهاي خاص)
شارز کردن
يادآوری تمیزکردن
قفل مسافرتى
باتری ضعیف
صفحه نمايش
شارزکون
مقدمة
JC305.JC304.JC303.JC302.JC301


![graph TD A["Top Unit"] --> B["Central Process Unit"] B --> C["Bottom Unit"] B --> D["Bottom Unit"] style A fill:#ccc,stroke:#333 style B fill:#fff,stroke:#333 style C fill:#ccc,stroke:#333 style D fill:#ccc,stroke:#333](/content/2026/06/1272685/images/e2e196abe8aca456860de389887cef30cec7a3910ae1cd7878763f1f0ec0a221.jpg)
![graph TD A["①"] --> B["Directional Arrow"] B --> C["②"] C --> D["Directional Arrow"] D --> E["②"] E --> F["Directional Arrow"]](/content/2026/06/1272685/images/0057d13a9f216739e8b399848b5c8fc0726e6e719016deb6753082176c26571c.jpg)
الاستبideal


ال tangزين



![graph TD A[" "] --> B[" "] B --> C[" "] C --> D[" "] D --> E[" "] style A fill:#f9f,stroke:#333 style B fill:#ccf,stroke:#333 style C fill:#cfc,stroke:#333 style D fill:#fcc,stroke:#333 style E fill:#ffc,stroke:#333](/content/2026/06/1272685/images/b3154bfd6c8344250c68c10cf2f3d16976713b2c473cbbba567f5e0ae95337c9.jpg)







التنظيف والصيانة





الحادقة

الشحن
ت Connectivity Objective Shines Appearance Available.
قال التسفر

البطارية ضعيفة

بشاشة العرض
الشحن
مقدمة
- ALWAYS HERE TO HELP YOU
- INTRODUCTION
- GENERAL DESCRIPTION (FIG. 1)
- IMPORTANT SAFETY INFORMATION
- DANGER
- WARNING
- CAUTION
- ELECTROMAGNETIC FIELDS (EMF)
- GENERAL
- THE DISPLAY
- CHARGING
- BATTERY CHARGE INDICATOR WITH 3 LIGHTS
- ENGLISH8
- BATTERY CHARGE INDICATOR WITH 1 LIGHT
- BATTERY FULLY CHARGED
- BATTERY LOW
- REMAINING BATTERY CAPACITY
- CLEANING REMINDER
- TRAVEL LOCK
- ACTIVATING THE TRAVEL LOCK
- DEACTIVATING THE TRAVEL LOCK
- REPLACING SHAVING HEADS
- TURBO SETTING (SPECIFIC TYPES ONLY)
- ACTIVATING THE TURBO SETTING
- DEACTIVATING THE TURBO SETTING
- CHARGING WITH THE ADAPTER
- CHARGING IN THE SMARTCLEAN SYSTEM (SPECIFIC TYPES ONLY)
- USING THE SHAVER
- SWITCHING THE APPLIANCE ON AND OFF
- SHAVING
- SKIN ADAPTATION PERIOD
- USING THE CLICK-ON ATTACHMENTS
- REMOVING OR ATTACHING THE CLICK-ON ATTACHMENTS
- USING THE TRIMMER ATTACHMENT
- USING THE BEARD STYLER ATTACHMENT
- USING THE BEARD STYLER ATTACHMENT WITH COMB
- USING THE BEARD STYLER ATTACHMENT WITHOUT COMB
- USING THE NOSE TRIMMER ATTACHMENT
- TRIMMING EAR HAIR
- CLEANING AND MAINTENANCE
- CLEANING THE SHAVER IN THE SMARTCLEAN SYSTEM (SPECIFIC TYPES ONLY)
- PREPARING THE SMARTCLEAN SYSTEM FOR USE
- USING THE SMARTCLEAN SYSTEM
- 4 PRESS THE ON/OFF BUTTON ON THE SMARTCLEAN SYSTEM TO START THE CLEANING PROGRAM
- REPLACING THE CARTRIDGE OF THE SMARTCLEAN SYSTEM
- CLEANING THE SHAVER UNDER THE TAP
- ENGLISH22
- THOROUGH CLEANING METHOD
- ENGLISH24
- CLEANING THE CLICK-ON ATTACHMENTS
- CLEANING THE TRIMMER ATTACHMENT
- CLEANING THE BEARD STYLER ATTACHMENT
- CLEANING THE NOSE TRIMMER ATTACHMENT
- STORAGE
- REPLACEMENT
- REPLACING THE SHAVING HEADS
- REPLACEMENT REMINDER
- ENGLISH28
- ORDERING ACCESSORIES
- SHAVING HEADS
- RECYCLING
- REMOVING THE RECHARGEABLE SHAVER BATTERY
- GUARANTEE AND SUPPORT
- GUARANTEE RESTRICTIONS
- TROUBLESHOOTING
- PROBLEM POSSIBLE CAUSE SOLUTION
- PENDAHULUAN
- MENGAKTIFKAN TRAVEL LOCK
- MENONAKTIFKAN TRAVEL LOCK
- MENGAKTIFKAN SETELAN TURBO
- 주의
- EMF(전자기장)
- 배터리 충전 표시등(표시등 3개)
- 배터리 충전 표시등(표시등 1개)
- 배터리 부족
- 남은 배터리 용량
- 잠금 기능 해제
- 터보 설정 작동
- 스마트클린 시스템 사용 준비
- 스마트클린 시스템 사용
- 턱수염 스타일러 액세서리 세척
- MENYAHAKTIFKAN KUNCI KEMBARA
- 1 TEKAN BUTANG HIDUP/MATI SELAMA 3 SAAT
- MENGAKTIFKAN TETAPAN TURBO
- BAHASA MELAYU116
- MENGGANTIKAN KARTRIJ SISTEM SMARTCLEAN
- PENGGANTIAN
- JAMINAN DAN SOKONGAN
- ข้อควรระวัง
- การเปลี่ยนขุดหัวโกน
- ระยะปรับสภาพผิว
- TẮT KHÓA DU LỊCH
- BẢO QUẢN
- ĐẶT MUA PHỤ KIỆN
- 警告
- 電池充電指示燈,1個燈
- 電量不足
- 剩餘電池電量
- 電池充電指示燈,3個燈
- 解除旅行鎖
- 繁體中文202
- 使用装上梳具的鬢角造型修容器配件
- 繁體中文210
- 繁體中文212
- 收納
- 电池充电指示灯(1级指示)
- 电池电量不足
- 电池剩余电量
- 电池充电指示灯(3 级指示)
- 解除旅行锁
- 高速设置(仅限于特定型号)
- 使用带修剪梳的胡须造型器附件
- 使用鼻毛修剪器配件
- 高效智能清洁系统使用准备
- 简体中文234
- 更换提醒
- ضمانت و پشعتباني
- سفارش دادن لوازم
- نگهداری
- تعميض
- تعويض سريهاي اصد鹵
- روش تميزکردن کامل
- تميزکردن و نگلهداری
- استفاده ازريش تراش
- تعويض سريهاي اصدح
- دکمه توريو (فقط مدلهاي خاص)
- شارز کردن
- يادآوری تمیزکردن
- قفل مسافرتى
- باتری ضعیف
- صفحه نمايش
- شارزکون
- مقدمة
- JC305.JC304.JC303.JC302.JC301
- الاستبIDEAL
- ال TANGزين
- التنظيف والصيانة
- الحادقة
- الشحن
- قال التسفر
- البطارية ضعيفة
- بشاشة العرض
Brand : PHILIPS
Model : SHAVER Series 5000 S5520
Category : Razor