
B1-750-15YM - Tablet ACER - Free user manual and instructions
Find the device manual for free B1-750-15YM ACER in PDF.


| Product Type | Tablet |
| Brand | Acer |
| Model | B1-750-15YM |
| Display Size | 7 inches |
| Display Type | IPS LCD capacitive touchscreen, 1024 x 600 pixels |
| Operating System | Android 4.4 KitKat |
| Processor | 1.3 GHz quad-core Cortex-A7 |
| RAM | 1 GB |
| Internal Storage | 8 GB eMMC |
| Expandable Storage | microSD up to 32 GB |
| Battery Capacity | 3000 mAh Li-Ion |
| Dimensions | 191.7 x 108.8 x 8.9 mm |
| Weight | 280 g |
| Connectivity | Wi-Fi 802.11 b/g/n, Bluetooth 4.0, A-GPS |
| Rear Camera | 2 MP |
| Front Camera | 0.3 MP VGA |
| Ports | microUSB 2.0, 3.5mm headphone jack, microSD slot |
| Sensors | Accelerometer, ambient light sensor |
| Audio | Built-in mono speaker, microphone |
| Maintenance & Cleaning | Wipe with a soft, dry cloth. Do not use liquids or abrasive cleaners. |
| Safety Warnings | Avoid exposure to water, extreme temperatures, and magnetic fields. Do not attempt to disassemble. |
| Spare Parts & Repairability | Battery, screen, and other internal components are not user-replaceable. microSD card is accessible. Refer to authorized service center. |
| General Information | Full user manual available in PDF on the manufacturer's support page. |
Frequently Asked Questions - B1-750-15YM ACER
User questions about B1-750-15YM ACER
0 question about this device. Answer the ones you know or ask your own.
Ask a new question about this device
Download the instructions for your Tablet in PDF format for free! Find your manual B1-750-15YM - ACER and take your electronic device back in hand. On this page are published all the documents necessary for the use of your device. B1-750-15YM by ACER.
USER MANUAL B1-750-15YM ACER
natural_image
Exterior view of a black Acer tablet device with colorful wallpaper displayed on screen (no readable text or symbols beyond branding)User's Manual
© 2014 All Rights Reserved
Acer Iconia One 7 User's Manual
Covers: B1-750
Regulatory Model Number (RMN): A1408
This revision: October 2014
Sign up for an Acer ID and enjoy great benefits
Open the Acer Portal app from the Start screen to sign up for an Acer ID or sign in if you already have an Acer ID.
There are three great reasons for you to get an Acer ID:
- Build Your Own Cloud with Acer BYOC.
- Get the latest offers and product information.
- Register your device for warranty service.
For more information, please visit the Acer BYOC website:
www.acer.com/byoc-start

Important
This manual contains proprietary information that is protected by copyright laws. The information contained in this manual is subject to change without notice. Images provided herein are for reference only and may contain information or features that do not apply to your computer. Acer Group shall not be liable for technical or editorial errors or omissions contained in this manual.
Acer Iconia One 7
Model number: ____
Serial number:
Date of purchase: ____
Place of purchase: ____
TABLE OF CONTENTS
Getting started with your tablet 4
Features and functions 4
Unpacking your tablet.... 4
Getting to know your tablet.... 5
Turning on for the first time.... 6
Charging your tablet 8
Assembling the power adapter 8
Using your tablet 10
Using the touchscreen.... 10
The Home screen 10
The onscreen keyboard.... 16
Editing text.... 17
Shutting down your tablet 19
Connecting devices to your tablet 20
Connecting to AC power.... 20
Inserting a microSD card 20
Transferring files between your tablet and a PC.... 20
Connecting a Bluetooth device.... 21
Accessories 21
Going online 22
Managing Wi-Fi connections 22
Browsing the Internet.... 22
Setting up the Email application 23
Google services 23
Playing music 28
Multimedia playback 28
Managing people and contacts 30
Using the camera and camcorder 33
Camera/camcorder icons and indicators 33
Taking a photo 36
Shooting a video 36
Acer Touch WakeApp 38
How to use Touch WakeApp 38
Advanced settings 40
Wireless & Networks 40
Device.... 42
Personal.... 43
System.... 44
Updating your tablet's operating system 45
Resetting your tablet.... 46
FAQ and troubleshooting 47
Other sources of help 49
Specifications 50
End user license agreement 53
GETTING STARTED WITH YOUR TABLET
Features and functions
Your new tablet offers leading, easy-to-access multimedia and entertainment features. You can:
- Connect to the Internet via Wi-Fi.
- Access your email while on the move.
- Keep in touch with your friends via your People and social networking APPs.
Unpacking your tablet
Your new tablet comes packed in a protective box. Carefully unpack the box and remove the contents. If any of the following items are missing or damaged, contact your dealer immediately:
- Acer Iconia tablet
- Product setup and safety information
- USB cable
- AC adapter
- Warranty card

Note
Before using your tablet for the first time, you need to charge it for at least four hours. After that you can recharge the battery as needed.
Getting to know your tablet
Views
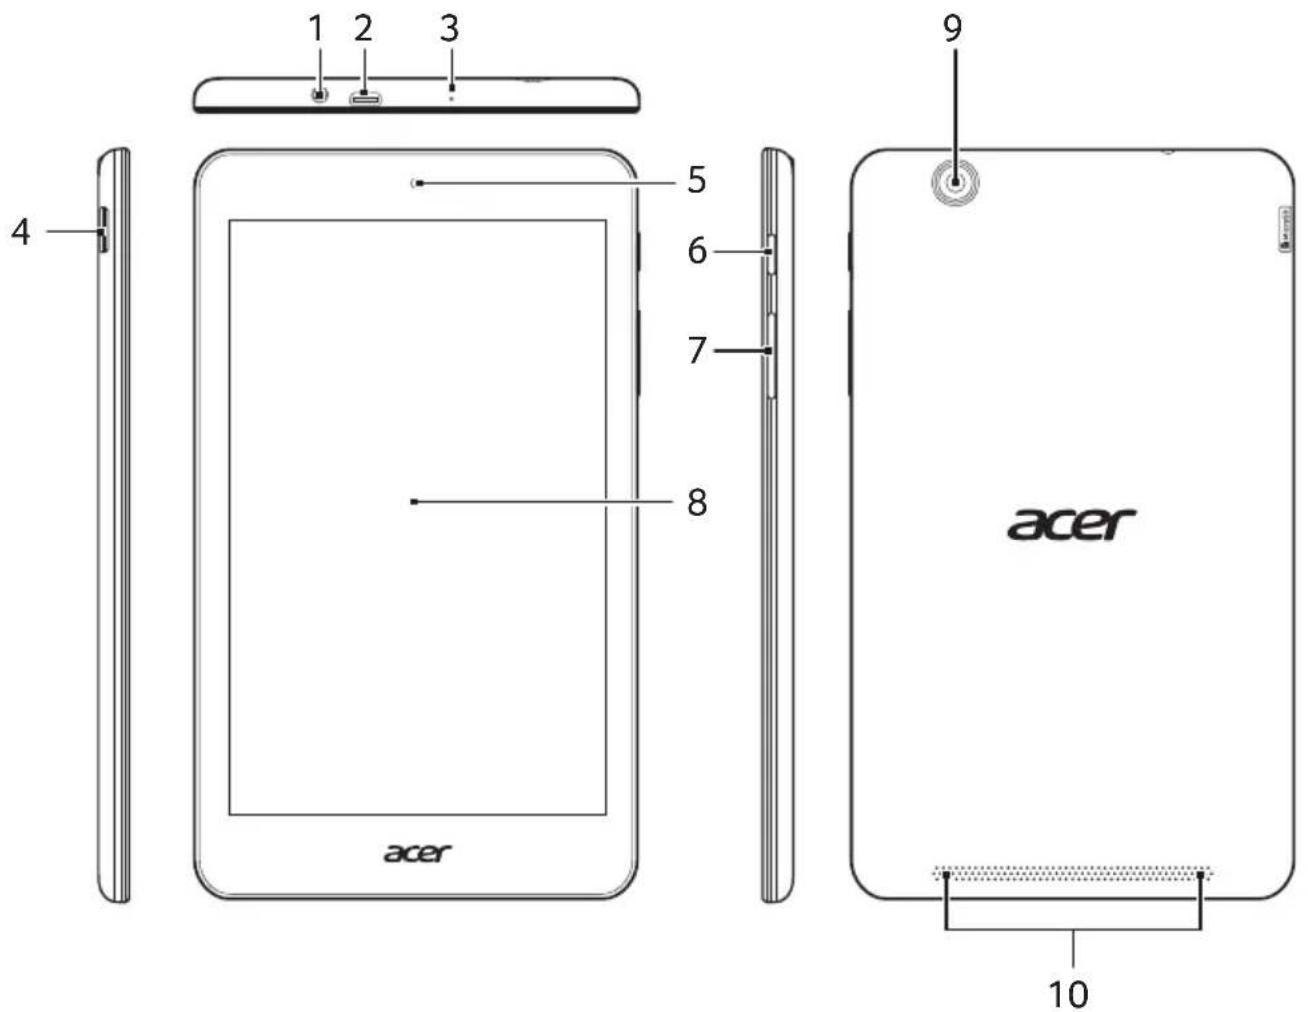
No. Item Description
| 1 | 3.5 mm headphone jack | Connects to stereo headphones. |
| 2 | Micro USB port (Slave) | Connects to a computer via a USB cable. Also serves as the charging port for the AC adapter. For more information, see Charging your tablet on page 8. |
| 3 Microphone | Receives audio for video chats and Internet calls. | |
| 4 microSD card slot Insert a microSD card into the slot. | ||
| 5 Front-facing camera | A 0.3-megapixel camera for video chats and self-portrait images. | |
| No. Item Description | |
| 6 Power button | Long press to turn the tablet on, press briefly to turn the screen on/off or enter sleep mode; press and hold to turn the tablet off. |
| 7 Volume control key | Increases and decreases the tablet volume. |
| 8 Touchscreen 8" capacitive touchscreen. | |
| 9 Rear-facing camera | A 5-megapixel camera for taking high-resolution images. |
| 10 Speakers Emit audio. | |
Turning on for the first time
To turn on your tablet, press and hold the power button until you see the Acer logo. Wait a moment for your tablet to boot up. You will then be asked some questions before you can use your tablet.
To start, tap to select your language then tap the arrow. Follow the rest of the instructions as they are displayed.

If the tablet's screen turns off, it has entered sleep mode. Briefly press the power button to wake it up. For more information see Waking your tablet on page 18. Alternatively, to wake your tablet using gestures, see Acer Touch WakeApp on page 38.
Sign in to or create a Google account
If you have Internet access, your tablet allows you to synchronize information with a Google account.
During the start-up process, you may create or sign in to an account, which will be used to synchronize your contact list, email, calendar and other information. If you do not yet have Internet access, or do not want to use this feature, then tap Skip.

Important
You must sign in to a Google Account to use Gmail, Hangouts, Google Calendar, and other Google Apps; to download APPs from Google Play; to back up your settings to Google servers; and to take advantage of other Google services on your tablet.
If you want to restore existing settings from another device with Android 2.0 (or later) installed, you must sign in to your Google account during setup. If you wait until after setup is complete, your settings will not be restored.
If you have multiple Google accounts, such as separate accounts for personal and business contacts, you can access and synchonize them from the Accounts settings section. See Multiple Google accounts on page 44
CHARGING YOUR TABLET
Assembling the power adapter
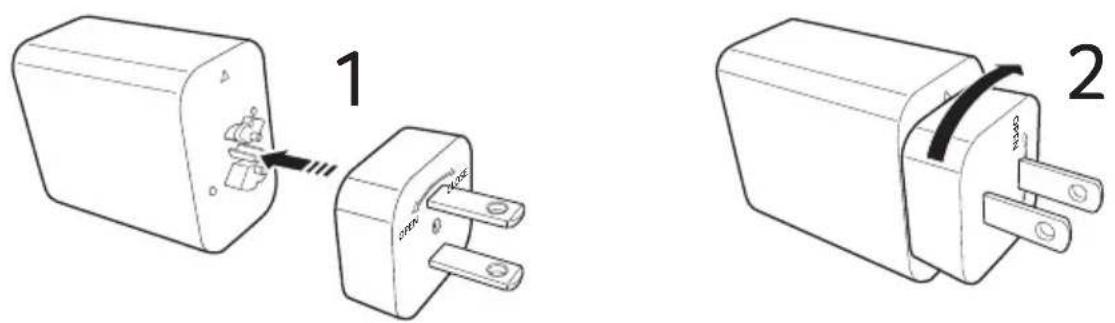
Your tablet is bundled with one of two types of USB power adapters: a fixed-prong type or a removable-prong type. Both types are described in this manual.
Fixed-prong type
The prongs and power adapter body form a complete piece, no assembly required. Simply slide the large end of the USB cable into the power adapter body (it will fit in only one direction). You cannot remove or switch the prongs with this type of adapter.

Removable-prong type
Align arrows on the power adapter head and body. Insert the head onto the power adapter body and turn the head towards "CLOSE" printed on the head until it clicks into place. Simply slide the large end of the USB cable into the power adapter body (it will fit in only one direction).
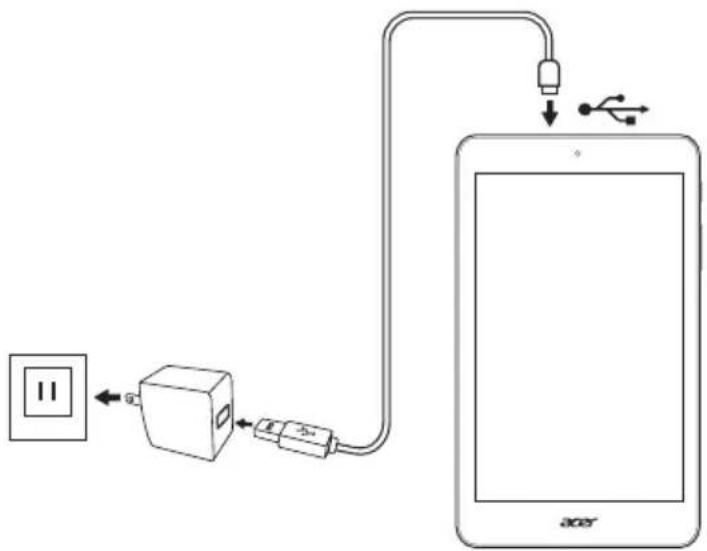
Connecting power
Connect the power connector to your tablet and plug the AC adapter into any AC outlet.

Warning
Only use an Acer-approved adapter to charge your device.

Note
It is normal for the tablet surface to become warm during charging or long periods of use.
USING YOUR TABLET
Using the touchscreen
Your tablet uses a touchscreen for selecting items and entering information. Use your finger to tap the screen.
Tap: Touch the screen once to open items and select options.
Drag: Hold your finger on the screen and drag across the screen to select text and images.
Tap and hold: Tap and hold an item to see a list of actions available for that item. On the pop-up menu that appears, tap the action you want to perform.
Scroll: To scroll up or down the screen, simply drag your finger up or down the screen in the direction that you want to scroll.
The Home screen
When you start your tablet, or wake it from power saving, it will display the Home screen. This screen gives you quick access to information and simple controls with widgets or shortcuts to APPs. Widgets display information such as the time and weather, or provide additional controls and direct access to APPs. Some have been pre-installed on your tablet, while others may be downloaded from Google Play.
The Home screen already features some useful controls and information.

Note
Bundled APPs differ depending on region and configuration.
Search
To search for APPs, files or for information on the internet, tap the Google bar at the top.

Simply enter the text you want to find. Tap the arrow or Enter key to search the internet, or tap one of the suggestions, APPs or files shown in the list.
In order to search or browse the internet, you must be connected to a wireless network. See Going online on page 22.
You can also choose what Google Search searches for. Within search, tap the Hide button (replaces Back) to hide the keyboard. Then tap the Menu icon > Settings > Tablet search. Select the APPs you want Google Search to search.
Voice search
If voice search is available, tap the microphone and speak your search request. See Voice Search on page 24.

Navigation
To navigate through menus and options, three (or more) icons are shown in the bottom-left corner.

Back Home Recent
Back
Tap this icon to go to the previous page, or to go up one level in a menu. This icon may be replaced with the hide icon in certain cases (such as if the keyboard or list of recent APPs is shown).
Hide
Home
Tap this icon to go directly to the Home screen.
Recent
Tap this icon to see recently opened APPs. Tap an application to open it, or tap anywhere on the screen to return to the Home screen.
The extended Home screen
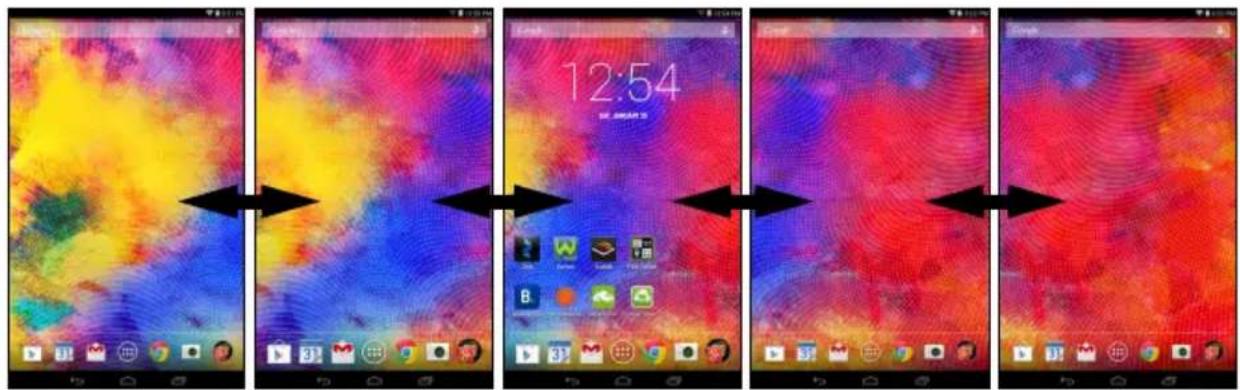
The Home screen extends to either side of the initial Home screen, giving you more room to add widgets or organize shortcuts. To view the extended Home screen, swipe your finger to the left or right.
A total of five pages are available, two to the left and two to the right. To change or add widgets on any of the screens see Personalizing the Home screen on page 15.
The application menu
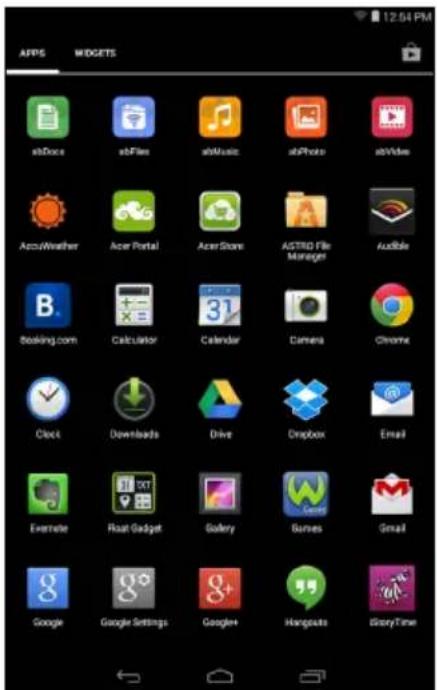
To access the application menu, tap ⓘ in the center of the application dock. The application menu displays APPs and widgets available on your tablet.
APPs are displayed in alphabetical order. Swipe to the left to see more APPs. When you are on the last page of APPs, swipe to the left to see widgets available on your tablet. See Personalizing the Home screen on page 15.
Tap the Play Store icon to open Google Play.
Adding an application to a Home screen
Tap and hold an icon to add a shortcut to one of your Home screens. When you select an icon, you are taken to the initial Home screen. You can drag the selected icon to any extended home screen.
Status and notification area
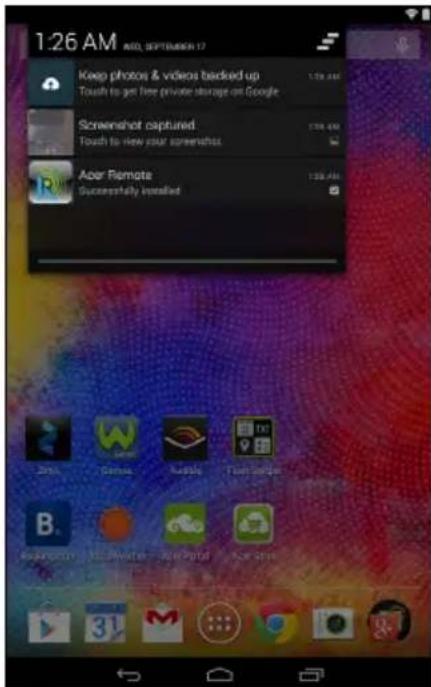
Status and notification icons are shown at the top of the screen. The top-right area displays a variety of information, such as time, battery status, and connectivity. The top-left area displays event icons, such as a new message.

Swipe down from the top-left side to display notification details such as current downloads and media controls such as "play/pause" and "next track" when music is playing. Swipe down from the top-right side to display Quick Settings.

Quick Settings icons

Note
Many Quick Settings icons turn green when active.
| Icon Name Description | ||
 | Battery | Displays current battery status. Tap to display battery life details. |
 | Settings Tap to display your device's settings menu. | |
 | Wi-Fi | Tap to toggle Wi-Fi on and off (waves indicate signal strength). Small "up" and "down" arrows mean information is being transmitted and received, respectively. Tap and hold to display Wi-Fi settings. |
| [X7C2] | Bluetooth | Tap to toggle Bluetooth on and off. Tap and hold to display Bluetooth settings. |
| [AHGB] | Location | Tap to toggle your device's location services on and off. Tap and hold to display location service settings. |
| [6XT0] | Airplane mode | Tap to toggle Airplane mode on and off. When on, all wireless connectivity is disconnected. |
| [H2AS] | Brightness | Tap to adjust the screen's brightness (button always remains green). |
 | Cast screen | Tap to connect to display a list of pre-paired devices. Tap the appropriate device to connect. If you are using a device for the first time, tap Cast screen then Settings. Tap and hold to display Bluetooth settings. |
 | Auto rotate | Tap to toggle automatic screen rotation on and off. |
| [TABA] | Touch WakeApp | Tap to open the Acer Touch WakeApp settings menu. |
Personalizing the Home screen

Note
If your device's battery is getting too hot, you will be notified and advised to turn off the device. If you fail to turn it off, it will shut down automatically.
You may personalize your Home screen by adding or removing application shortcuts or widgets, and by changing the wallpaper.
Adding or removing shortcuts or widgets
To add shortcuts or widgets, tap the APP menu icon in the bottom-center of the Home screen.
The APP menu contains a list of shortcuts to APPs you can drag to a Home screen.
Tap WIDGETS to see small APPs and links (such as custom shortcuts, contacts or bookmarks) that you can add to a Home screen. Widgets are small APPs that display constantly-updated information or quick shortcuts to APPs or special functions.
To move an APP or widget to the Home screen, tap and hold an item until it is selected. The Home screen will open. Drag the item to any free area on the screen. To view information about the APP or widget, drag it to the icon at the top of the screen.
To move the item to a different Home screen, drag it to the side of the screen, the Home screen will switch to the screen in that direction. Release the item when it is positioned correctly.
Removing an item from the Home screen
To remove an item from the Home screen, tap and hold the item until the Remove option appears at the top of the screen. Simply drag the item to the Remove option.

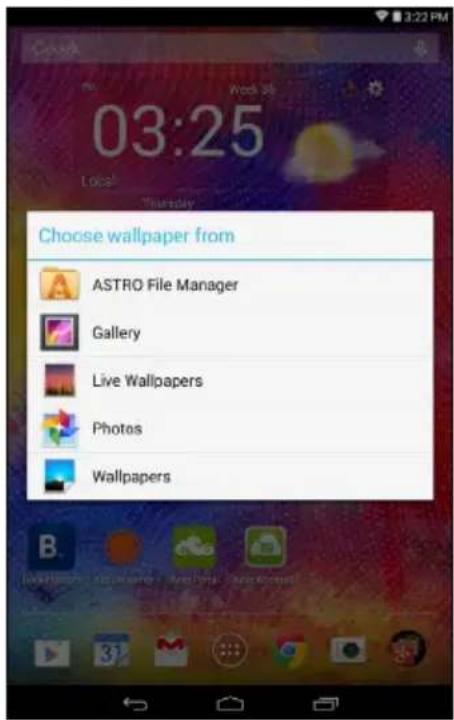
Changing the Home screen wallpaper
Tap and hold any open space on the Home screen. Here you can choose from a variety of options to set as the background to your device.
The onscreen keyboard
When you tap a text box to enter text, an onscreen keyboard will appear. Simply tap on keys to enter text.


Note
The layout of the keyboard varies slightly, depending on the application and information that is required.
Tap the ?123 button to see numbers and special characters, and then tap the \~ [< key to see more options. Tap and hold a key to select alternative characters (if available for that key), such as letters with accents or related symbols.
Changing Google keyboard settings
To use a different keyboard language or change settings, tap the Gear icon, then select either Input languages or Google keyboard settings. These settings include Auto-correction and keyboard sounds.

Predictive text or auto correction
The Google keyboard can provide predictive text input. As you tap the letters of a word, a selection of words are displayed above the keyboard that continue the sequence of letters tapped, or are a close match allowing for errors. The word list changes after every key press. If the word you need is displayed, you can tap on it to insert it into your text.
To turn predictive text on or off with the Google keyboard, tap the Gear icon, and then Google keyboard settings. Tap Auto correction or Show correction suggestions and select one of the options.
Editing text
You can select and edit text in certain APPs, such as text you have entered in a text field. Selected text can be cut or copied and later pasted within the same application, or to a different application.

Note
Certain APPs may not support text selection, or only support it in certain areas. Other APPs may offer specialized commands to select text.
Selecting text
To select text that you want to cut, copy, delete or replace:
- Tap the text you want to select. If you can select this text, a cursor is inserted below the text.
- Tap and hold the text or word you want to select. The selected text is highlighted, with a tab at each end of the selection.
- Drag either tab to expand or reduce the amount of selected text, or tap SELECT ALL.
- To cut or copy the text, tap the CUT or COPY button.
Inserting text
To type new text or add text that you have copied:
- Tap where you want to insert text. If you can select this text, a cursor is inserted below the text. To replace a word, double tap the word. In both cases, if you previously copied text, a PASTE button displays.
- If the cursor is not in the desired position, simply drag it to the correct position.

- Modify the text by typing or deleting text or tapping the PASTE button.
Waking your tablet
If the screen is off and the tablet does not react to any taps on the screen, then it has been locked and is in sleep mode.
To wake your tablet, press the power button. Your tablet will display the Lock screen. To unlock the screen, press the lock button and follow the lock to the right side of the circle.
Alternatively, to wake your tablet using gestures, see Acer Touch WakeApp on page 38.
Security Options
For additional security, you may set a code or number that must be entered to access the tablet, such as an unlock pattern (a set of dots that must be tapped in the correct order). Open the Home screen and tap APPs > Settings > Security > Screen lock. If you forget your unlock pattern, please refer to Unlock pattern on page 48.
Shutting down your tablet
If you won't use your tablet for an extended period of time, turn it off to save battery power. To turn off your tablet (even when locked), press and hold the power button for one second. Tap Power off and confirm the shut down. To force a shutdown, press and hold the power button until the tablet shuts down (about four seconds).
CONNECTING DEVICES TO YOUR TABLET
Connecting to AC power
See Charging your tablet on page 8
Inserting a microSD card
You may install a microSD card to expand your device's storage space. Ensure that the microSD card is inserted all the way into the card slot.

Note
Your tablet only supports microSD cards that use the FAT or FAT32 file system.
Check card capacity in the External SD card section of APPs > Settings > Storage.
Transferring files between your tablet and a PC
Your tablet and any connected storage devices can be accessed from a PC with a USB connection.
Connecting to a PC as a USB storage device
If you wish to transfer information between your device and your computer (either the microSD card in your device or the device's
internal memory), you can connect your device to a PC using the supplied USB cable.
-
Plug the USB sync cable into the micro USB connector on your device.
-
Plug the USB client connector into an available USB port on your computer.
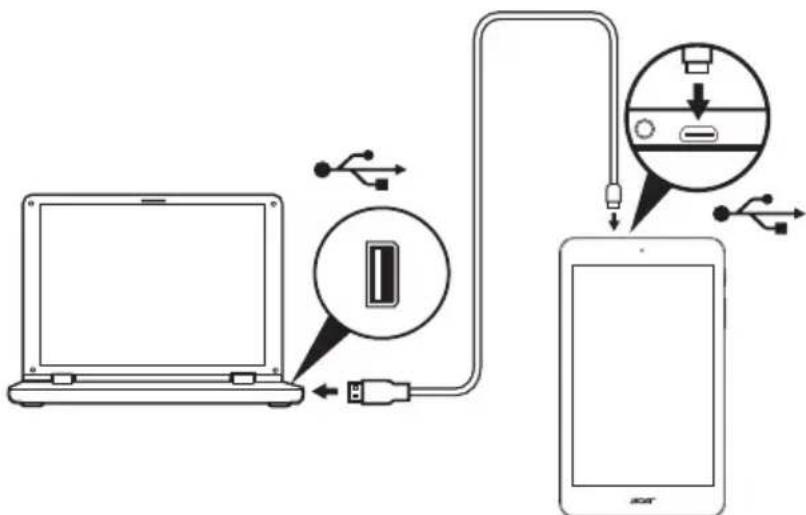
- Swipe down the top-left notification area and tap Connected as a media device to choose whether to connect as a Media device (MTP) (the default option) or Camera (PTP).
Your device will now be available as a drive in your computer's file explorer.
Connecting a Bluetooth device
Only A2DP stereo headsets (playback only, no microphone) are supported. Please check for updates to the tablet's software which may add support for additional Bluetooth devices.
For Bluetooth settings, tap APPs > Settings, then under WIRELESS & NETWORKS tap Bluetooth.
Turn Bluetooth on and tap Search for devices to scan for nearby devices.
Accessories
For a complete list of accessories, visit store.acer.com.
GOING ONLINE
Managing Wi-Fi connections
If you did not connect to a Wi-Fi network when you first started your tablet, or want to connect to a new network, tap APPs > Settings > Wi-Fi to manage your connection settings. Alternatively, swipe down from the top-right of the screen and tap the Wi-Fi button to toggle on and off the Wi-Fi connection.
If Wi-Fi is not on, tap the Wi-Fi ON switch and wait for your tablet to detect nearby networks. Tap the name of your network and enter a security password, if needed.
Browsing the Internet
In order to browse the Internet with your tablet, you must be connected to a network with a connection to the internet.
Using the browser
To start browsing, tap the Chrome icon on the Home screen, or open the application menu and select Chrome. To enter a website address, tap the address box at the top of the page. Enter the address using the keyboard and tap Go.
To view your bookmarks, adjust browser settings, and perform other tasks, tap the Menu icon.
Chrome enables you to open multiple tabs. When a page is open, tap the small New tab
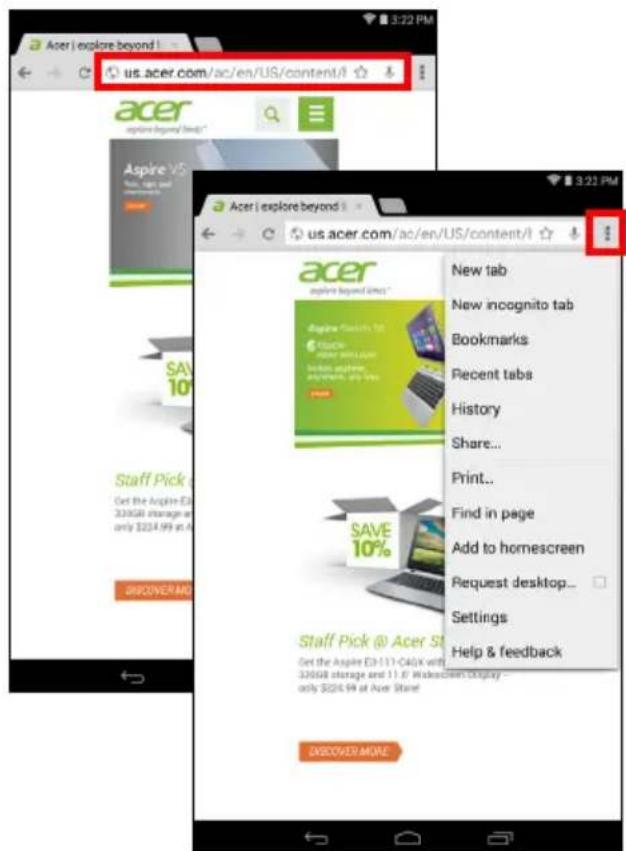
button. Simply tap one of the open tabs across the top of the screen to switch pages.

Setting up the Email application
The Email application enables you to access email from most popular email providers. Most accounts can be set up in two steps. Open the application menu and then tap Email to start setting up your email access.
Enter your email address and password tap Manual setup to enter the parameters manually or simply tap Next to finish the setup process.
The combined inbox feature of your tablet allows you to view emails from multiple accounts in a single inbox.
Google services

Note
APPs may not be available in all countries and regions.
You must activate a Google account before using Google services. The first time you access Google services, you must read and accept the Terms of Service.
The contents and design of Google Play varies by region. For example, in some regions, you can also browse for and purchase movies, books, magazines, or music. Updates may add new categories or change how to navigate Google Play at any time.
Setting up your Google email
- Make sure your tablet is connected to the internet.
- From the application menu tap Gmail.
If you did not enter a Gmail account address and password when you first started your tablet, follow the instructions.
Composing an email
- Make sure your tablet is connected to the internet.
-
Open the application menu and tap Gmail.
-
Tap
-
Enter the recipient's email address, the subject and message.
-
When you are finished composing your message, tap Send.

Voice Search

Note
Voice Search is available only in selected regions.
With voice actions, you can send emails, find directions to locations, search the internet and even send a note to yourself using your own voice. In Chrome, tap the microphone icon in the address bar for voice searches. When the Speak now prompt displays, state your command or query.

Play Store
Tap Play Store from the home screen or application menu to open Google Play. Here you can obtain a variety of add-on programs and APPs to enhance the functionality of your tablet.
You can browse Google Play by category or tap the search icon to search for a specific application.
For the best user experience, you are advised to not download APPs that use 3D graphics.
Once you have selected an application, tap the Install button to download and install the application. You will be told which services (contact information, wireless access, GPS, etc.) the application requires access in order to function correctly. If none of these services seem unusual, tap Accept & download to proceed with the installation.

You may keep track of the download progress from both the APP's page and the tablet's notification area.


Important
Some APPs may require payment before you can download them. You will need to have a Google Wallet account in order to pay for these APPs.
Using downloaded APPs
Once you've downloaded and installed an application, you may find it in the APPs or WIDGETS sections of the application menu.
Certain APPs provide both an APP and widget, or only provide a widget (with no application icon). See Personalizing the Home screen on page 15.
Uninstalling downloaded APPs
Once you've downloaded and installed an application, you may uninstall the application from APPs > Settings > Apps, then select the the APP you wish to uninstall and tap Uninstall. You also may uninstall the downloaded app by tapping and holding it and dragging it to Uninstall at the top of the screen. Dragging an APP icon to Remove on the Home screen only deletes the shortcut.
Google Hangouts
Tap Hangouts from the application menu to open Google Hangouts. Here you can see a list of your contacts connected to Google Hangouts services. Tap on a contact to open a chat session. After you have connected, you can open a video chat session.

PLAYING MUSIC
Multimedia playback
Your tablet comes supplied with a variety of programs that you can use to enjoy multimedia content.

Note
The available option of Google Play Music varies by region. For example, in some regions, Google Play Music can serve as cloud storage for your personal music collection and make it available on all your devices. Updates may change how to navigate these media APPs at any time.
Play Music
Use Play Music to listen to music and other audio files that you download or copy from your computer, USB drive, mass storage device, etc.
Tap APPs > Play Music to open the application.

Swipe in from the left side to display a list of views, such as Listen Now, My Library, and Playlists. The Listen Now drop-down list at the top-left stays the same across all views. Selecting "All music" displays all the music you have both on the tablet and in the cloud (if cloud
service is available in your area). Selecting "On device" displays only the music you currently have on the tablet.
General settings can also be accessed by swiping in from the left side and tapping Settings. Albums and invidividual tracks have their own Menu buttons as well, each with their own set of options.
You can return to the Home page while playing music. The current track along with basic music control functions appear in the notification area. See Status and notification area on page 13.
MANAGING PEOPLE AND CONTACTS
Your tablet features an address book that allows you to save contacts to the internal memory or your Google account.
Tap People from the application menu to view your contacts.
If you don't have any contacts stored on your tablet, you can sync with your Google account contacts, import contacts from a contact data file (vCard or csv) or add a new contact.
If you have activated a Google account that includes contacts, your contacts will be synchronized automatically. See Synchronization on page 43.

Importing contacts
Tap the ☐ Menu button and select Import/Export. Tap the option that describes where your contacts are stored. When the contacts are found, confirm to import the contacts in a new group.
Adding a new contact
Tap ☐ to add a new contact. If you have multiple accounts, you will be asked which account you want to use to store the contact. The contact will be synchronized with that account.
You may now edit the new contact entry.
The amount of information you can store for a contact on your SIM will be limited to their Name, Phone and Email. Storing contacts to your Google or Tablet contact list will allow you to store additional information such as: Address, Events, Groups, Notes, Nickname, Website, Relationship, etc.
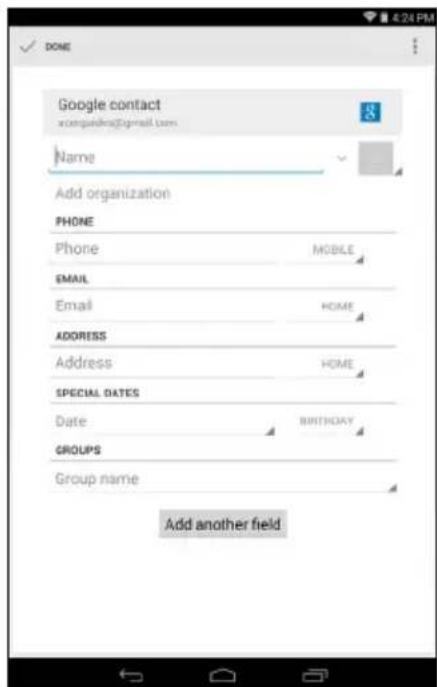
Editing a contact
If you have opened a new contact, you can enter information about the contact. To modify an existing contact, from the main screen select the contact in the list on the left. Then tap ☐Now simply tap on a box and enter the appropriate information or tap Add another field to enter additional information.
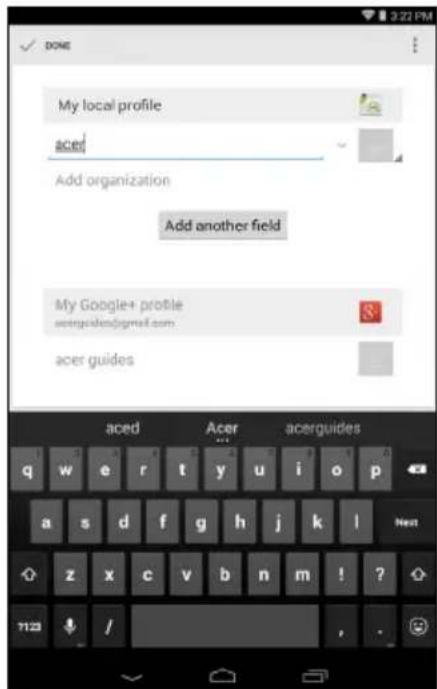

Note
Set each phone number to match the type of network as this can determine some functions, i.e. certain APPs only recognize ‘Mobile’ numbers as they require a function only available on a mobile network.
Editing a contact on your computer
If you have synchronized your Google account and contacts, you can use your computer to access and edit your contact list. Open the internet browser on your computer and go to contacts.google.com. Sign in to your account then select and edit contacts from the list; the next time your tablet synchronizes with your computer, these changes will also be made to your tablet's contact list.

Important
Back up your contacts before making any changes. Tap the Menu button and select Import/Export. You may then Export your contact list to your tablet's internal memory, or other options depending on installed APPs.
USING THE CAMERA AND CAMCORDER
Your tablet features a front- and rear-facing camera. This section will take you through all the steps in taking photos and videos with your tablet.

Note
It is recommended that you insert a microSD card into the microSD slot before using the camera.
You can only save photos and videos to internal memory or a microSD card, not an external USB storage device.
To activate the camera or camcorder, open the application menu and tap Camera.
Camera/camcorder icons and indicators

In the camera window, tap the Settings tab to display Camera, Camcorder, and General settings. Tap the Record button and the camcorder immediately begins recording. While recording, you are unable to access camera/camcorder settings. Tap the red Stop recording button to stop filming.
- Location: Set if the location (from GPS) is stored in the image information. A satellite icon appears on the screen when active.
- Location: Set if the location (from GPS) is stored in the image information. A satellite icon appears on the screen when active.
Settings menus

Note
Some of the following settings are not available for the front camera.
General
- Flash: Set the camera's flash to Automatic, On, or Off.
- Storage: Internal storage or SD card
- Location: Set if the location (from GPS) is stored in the image information. A satellite icon appears on the screen when active.
- Grid: Turns the grid on or off.
- Tutorial: View the camera tutorial.
- Reset to default: Return camera settings to the original conditions.
Camera
You may adjust the following:
- Picture Collage: Create fun and unique memories using Acer's picture collage. Mix and match picture effects, exposure values, and collage frames.

natural_image
Pure geometric diagram with triangles and a camera icon, no text or symbols present- Capture Mode: Choose different modes to take pictures in particular situations.
| Normal HDR |
| Continuous shooting Presentation capturing |
| Panorama |
| • Scenes: Adjust photo parameters for a particular environment. |
| None Landscape |
| Night Night portrait |
| Sports |
| • Effect: Applies a color effect to the image. |
| None Monochrome |
| Negative Sepia |
| • White Balance: Compensate for different lighting environments. |
| Auto Daylight |
| Cloudy Fluorescent lamp |
| Incandescent |
- Timer: Set the timer to Off, 3, 5, 10, or 15 seconds.
- EV (Exposure Value): Over- or under-exposes the image.
- ISO: Set the ISO value.
- Metering Modes: Choose how the camera handles exposure. Options include Auto, Spot, or Center.
- Image adjustment: Adjust the image's Brightness, Contrast, Saturation, and Sharpness.
- Scale: Choose the images aspect ratio, 16:9, 4:3, or 1:1.
- Resolution: Set the picture resolution, 4M (2560 x 1440), 2M (2048 x 1152), or 1M (1600 x 900).
- Touch Shutter: Toggle touch shutter on or off.
Camcorder
You may adjust the following:
- Record Mode: Choose to record in slow motion by 2x or 3x or time lapse your video by 1, 2, 5, or 10 seconds.
- Mute Video: Toggle video mute on or off.
- Resolution: Choose the video resolution, SD 480p or HD 720p.
Taking a photo
- Ensure the options described above are set to your preferences.
- Frame your subject and steady your tablet.
- Zoom in or out as needed using the zoom slider.

Note
When using zoom, the image on the screen does not represent the quality of the final image.
- Tap to take the photo.
Shooting a video
- Ensure the options described above are set to your preferences.
- Frame your subject and steady your tablet and zoom in or out as needed.
-
Tap to begin recording.
-
Tap | to stop recording.
Supported formats
See Formats supported: on page 50.
Viewing photos and videos
After you have taken your photo or video, it is automatically saved, normally to internal memory. You can view it by tapping the thumbnail in the corner of the screen. Alternatively, open the application menu and tap Gallery, then Camera. Select the photo or video you want to view (videos are marked with a small play symbol). From the Gallery you can share the file using various services and edit the image using various options. Tap to see which sharing options are available for the file or tap the menu icon to display image editing options.
ACER TOUCH WAKEAPP
Touch WakeApp is a convenient application that allows you to easily wake up your tablet from sleep mode and launch a defined app, using simple gestures.

natural_image
Silhouette of a hand pointing at a tablet screen (no text or symbols visible)Double-tap gesture
How to use Touch WakeApp
Enable Touch WakeApp Gestures
- Pull down the notification area from the right corner and tap the Settings icon.
- Tap Acer Touch WakeApp to view GESTURE CONFIGURATION.
- Slide ON to enable your desired item.
- Tap and hold the item you have enabled to open a list of apps that can be automatically launched after the tablet is woken up.
- Select your app and tap OK.
Alternatively, you may also tap Apps > Settings > Acer Touch WakeApp.

Note
If there are multiple user accounts on your tablet, the "Application Shortcuts" function will only be available on the Administrator account. All other users will only be able to wake up the system to the Home screen.
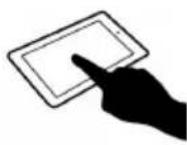
Double-tap gesture
Double-tap the screen with a finger to wake your tablet and launch the assigned app.
1
2

3

If your tablet is locked...
If your tablet is locked, for example by using a PIN, facial recognition, or a pattern, you will be required to perform the unlock action after using any of the gestures. Once you have unlocked the tablet, the screen will be rotated as necessary and then the app assigned to the gesture will launch.
ADVANCED SETTINGS
To access Settings, open the application menu and tap Settings.

Wireless & Networks
Adjusting Wi-Fi settings
Turn the ON/OFF button to enable Wi-Fi function. Tap Wi-Fi to display all your available wireless networks. Tap a network to connect to it; some wireless networks may require a password.
Adjusting Bluetooth settings
Displays all available devices you can use Bluetooth to exchange information with. Here you can switch Bluetooth on or off, rename the tablet, adjust the visibility timeout and show received files. Tap SEARCH FOR DEVICES to scan for nearby devices.
To connect to a device, tap the device in the list of available devices. You may be asked to enter a PIN on both devices to establish the connection.

Note
Only A2DP stereo headsets (playback only, no microphone) are supported. Please check for updates to the tablet's software which may add support for additional Bluetooth devices.
Data Usage
The Data Usage section shows how much data has been transmitted to your tablet, either in total or for each APP for an adjustable period of time. This information is useful if you are using a metered service.
More...
Putting your tablet in Airplane mode
You can enter Airplane mode (also known as flight mode) to turn off network and Bluetooth functions and use your tablet during a flight. Check with your airline to make sure this is permitted onboard.
Switch your tablet off during takeoff and landing as it may interfere with aircraft electronic systems.

Note
When Airplane mode is active, the 📂 icon is displayed in the status area.
To turn Airplane mode on or off, tap Settings, then under WIRELESS & NETWORKS tap More... > Airplane mode.
Alternatively, swipe down from the top-right side of the screen to toggle airplane mode on or off.
Virtual Private Network (VPN)
This option enables you to connect to a private network, such as a secure work or office environment.
Add a VPN by tapping Settings, then under WIRELESS & NETWORKS tap More... > VPN > Add VPN network.
You need to set a lock screen PIN or password before you can use credential storage.
APPs > Settings > More... > Mobile networks
Device
Sound
Adjust the volume of your tablet using the volume buttons on the side of the tablet. Alternatively, you can quickly set your tablet sound settings by tapping APPs > Settings > Sounds.
Display
You can adjust your tablet screen settings by tapping APPs > Settings > Display.
| Item Description | |
| Brightness Adjusts screen brightness. | |
| Wallpaper Set the Home screen background image. | |
| Sleep | Configure how long the tablet is idle before it goes to sleep mode. |
| Daydream | Controls what happens when the tablet is docked and/or sleeping. |
| Font size | Sets the font size so either more text is visible or the text is easier to read. |
| Cast screen | Send screen content to a compatible external display. |

Note
You can enable or disable the screen rotation function by swiping down from the top-right side of the screen and tapping the AUTO ROTATE button.
Apps
Closing an application
To close an active application, go to Settings > Apps. Swipe over to the RUNNING tab, then tap the program you wish to close. Tap Stop to close the program.
Uninstalling an application
You can remove programs installed on your tablet to free up extra storage memory. Tap the program icon from the application menu and drag it into the Uninstall area in the top-left corner.

Note
You cannot uninstall APPs that were pre-loaded on your tablet.
Alternatively, you can go to APPs > Settings and select Apps. Tap the application you wish to uninstall, tap Uninstall and confirm the uninstall.

Important
You should only remove programs if you are familiar with the Android operating system.
Personal
Synchronization
You can sync your calendar, email and contacts on your tablet and never worry about losing them again. Sync in real time or adjust it as you please. In the Application menu, tap Settings. Under ACCOUNTS, tap the appropriate account and again under ACCOUNTS, tap that account's email address to access the synchronization settings.
To add a new account, tap Add account. Select the type of account (Corporate, Email, Facebook, or Google) and then follow the onscreen instructions.
Google Sync
In Google, you can set synchronization for Browser, Calandar, Gmail and Google Photos. In your Google account's synchronization settings menu, tap the checkmark next to the item you would like to have auto-sync. Tap again to uncheck any for manual synchronization.
To manually synchronize an item, make sure the item is checked, tap the Menu icon and then tap Sync now.
Multiple Google accounts
If you have multiple Google accounts, such as separate accounts for personal and business contacts, you can access and synchonize them from the Accounts settings section. Tap APPs > Settings > Add account.
Changing language and text options
Set your language input preferences by tapping APPs > Settings > Language & input.
System
Setting the date and time
To set the date and time, tap APPs > Settings > Date & time.

Note
If you travel frequently or live in an area that uses daylight saving time, and have mobile network access, activate Automatic time zone from this menu. Your tablet will set the date and time based on information it receives from the network.
Setting alarms
There are two predefined alarms on your tablet by default. To add or edit alarm settings, tap Clock in the application menu and tap ☺Tap the ON/OFF switch next to a preset alarm to turn it on or off or tap the ☐create a new alarm.
Tap a preset alarm to edit it. You can:
- Set the alarm time.
- Give it a label (i.e., a name).
- Set which days to repeat the alarm.
- Set a ringtone.
- Enable or disable vibrate.
You can delete an alarm by tapping This action can be undone by tapping UNDO.

Updating your tablet's operating system
Your tablet can download and install system updates, adding support for new devices or expanding software options.
To check for updates, tap APPs > Settings > About tablet > System updates > Check now.

Note
Downloading new firmware can take up to 40 minutes, depending on your network speed. Do not press the power or reset button or access your tablet in any way during a system upgrade to prevent firmware installation failure.
Resetting your tablet
A clean boot restores your tablet to the factory settings.

Important
This will erase all your personal information, any contacts stored on your tablet and any programs you installed.
To perform a clean boot, open Settings from the application menu, then tap Backup & reset > Factory data reset; click Reset tablet and then Erase everything to format your tablet.
FAQ AND TROUBLESHOOTING
This section lists frequently asked questions that may arise during the use of your tablet, and gives easy answers and solutions to these questions.
| Aspect Question Answer | ||
| Audio | Why is there no sound coming from the device? | If the headset is plugged into the device, the speaker is automatically shut off. Disconnect the headset.Check that the device volume setting is not muted.Check that the volume control is not at its lowest setting. |
| Memory | Why do I have less storage than the specifications say? | A small amount of memory is reserved for system security. |
| Multimedia files | Why can’t I view my picture files? | You may be trying to view an image that is not supported.See Formats supported:on page 50 for more information. |
| Why can’t I view my video files? | You may be trying to view a video that is not supported.See Formats supported:on page 50 for more information. | |
| Why can’t I play my music files? | You may be trying to play a file that is not supported.See Formats supported:on page 50 for more information. | |
| System information and performance | How do I check the OS version of my device? | Tap APPs > Settings > About tablet to check the OS version (Kernel/build number) and other hardware and software information. |
| Where can I find my serial number ID? | Tap APPs > Settings > About tablet > Device Information. | |
| Power | I couldn't turn on the device. | The battery power may be depleted. Recharge the device.See Charging your tablet on page 8 for more information. |
| Storage | How do I check memory status? | To check storage status, go to Settings > Storage. |
| What do I do when my device's internal storage is full or almost full? | You may need to delete installed APPs or move media files to the micoSD card. | |
| Unlock pattern | I forgot my unlock pattern. | After five wrong entries, you can reset your unlock pattern. Tap Forgotten pattern? and enter your Google account username and password.You must have an active Google account on the tablet and an Internet connection.If this option is not available, please contact your local Acer service center. |
Aspect Question Answer
| Heat | The tablet heats up when charging or operating for a long period. | It is normal for the device to heat up when charging. When charging is complete, it will return to its normal temperature.It is also normal for the tablet to heat up during long periods of use, such as watching a video or playing a game.All Acer tablets are factory-tested before release. |
Other sources of help
| For information on: Refer to: | |
| Up-to-date information regarding your tablet | www.acer.com |
| Service enquiries support.acer.com | |
SPECIFICATIONS
Performance
- Intel Atom TM processor 1.33 GHz processor
- System memory:
- 1 GB of RAM
• 8 or 16 GB of flash memory
Google Android TM KitKat ® operating system
Display
- 7" TFT-LCD capacitive multi-touch screen
- 1280 x 800 resolution
Multimedia
• Built-in stereo speakers
- Built-in microphone
Formats supported:
| Type Formats | |
| Audio recording | AAC-LC, AMR-WB |
| Audio playback | AAC-LC, AAC, AAC+ (not raw AAC), AMR-NB, AMR-WB, MP3, OGG Vorbis, WAV |
| Video recording | H.264 BP, MPEG-4 SP, H.263 BP |
| Video playback | H.264 BP, H.264 MP, H.264 HP, MPEG-4 SP, H.263 BP |
USB connector
- Micro USB port
Power
• DC power-in (5.35 V, 2 A)
Connectivity
- Bluetooth 4.0
• Wi-Fi IEEE 802.11b/g/n - GPS
- GLONASS support
Camera
- Front camera
- 0.3-megapixel
- Rear camera
- 5-megapixel
- 1080p Full HD audio/video recording
Expansion
- microSD card slot (up to 32 GB)
Battery
• 13.3 Wh 3520 mAh 3.8 V 1-cell Li-polymer battery pack Battery life: Up to 7.0 hours (based on video playback test results)

Note
Length of battery operation will depend on power consumption which is based on system resource use. For example, constantly using the backlight or using power-demanding APPs will shorten battery life between charges.
Dimensions
| Height 193 mm |
| Width 114 mm |
| Thickness 8.6 mm |
| Weight 320 g |
Environment
Temperature
Operating: 0irc C to 35irc C
Non-operating: -20irc C to 60irc C
Humidity (non-condensing)
Operating: 20% to 80%
Non-operating: 20% to 80%
END USER LICENSE AGREEMENT
IMPORTANT - READ CAREFULLY: THIS END USER LICENSE AGREEMENT ("AGREEMENT") IS A LEGAL AGREEMENT BETWEEN YOU (EITHER AN INDIVIDUAL OR A SINGLE ENTITY), AND ACER INC. INCLUDING ITS SUBSIDIARIES ("ACER") FOR THE SOFTWARE (WHETHER PROVIDED BY ACER OR BY ACER'S LICENSORS OR SUPPLIERS) THAT ACCOMPANIES THIS AGREEMENT, INCLUDING ANY ASSOCIATED MEDIA, PRINTED MATERIALS AND RELATED USER ELECTRONIC DOCUMENTATION WHICH MAY BE BRANDED "ACER", "GATEWAY", "PACKARD BELL", OR "EMACHINES" ("SOFTWARE"). AGREEMENTS RELATING TO ANY OTHER PRODUCT OR TOPIC ARE NEITHER INTENDED NOR SHOULD THEY BE IMPLIED. BY INSTALLING THE ACCOMPANYING SOFTWARE OR ANY PORTION THEREOF, YOU AGREE TO BE BOUND BY THE TERMS AND CONDITIONS OF THIS AGREEMENT. IF YOU DO NOT AGREE TO ALL OF THE TERMS AND CONDITIONS OF THIS AGREEMENT, DO NOT CONTINUE THE INSTALLATION PROCESS AND IMMEDIATELY DELETE ALL INSTALLED FILES, IF ANY, OF THE ACCOMPANYING SOFTWARE FROM YOUR DEVICE.
IF YOU DO NOT HAVE A VALIDLY-LICENSED COPY OF THE APPLICABLE SOFTWARE, YOU ARE NOT AUTHORIZED TO INSTALL, COPY OR OTHERWISE USE THE SOFTWARE, AND HAVE NO RIGHTS UNDER THIS AGREEMENT.
The Software is protected by U.S. and international copyright laws and conventions as well as other intellectual property laws and treaties. The Software is licensed, not sold.
GRANT OF LICENSE
Acer grants to you the following non-exclusive and non-transferable rights with respect to the Software. Under this Agreement, you may:
- Install and use the Software only on a single designated device. A separate license is required for each device on which the Software will be used;
- Make one copy of the Software solely for backup or archival purposes;
- Make one hard copy of any electronic documents included in the Software, provided that you receive the documents electronically.
RESTRICTIONS
You may NOT:
- Use or copy the Software except as provided in this Agreement;
- Rent or lease the Software to any third party;
- Modify, adapt, or translate the Software in whole or in part;
- Reverse engineer, decompile, or disassemble the Software or create derivative works based upon the Software;
- Merge the Software with any other program or modify the Software, except for your personal use; and
- Sublicense or otherwise make the Software available to third parties, except that you may, after prior written notification to Acer, transfer the Software as a whole to a third party so long as you do not retain any copies of the Software and such third party accepts the terms of this Agreement.
- Transfer your rights under this Agreement to any third parties.
- Export the Software in contravention of applicable export laws and regulations, or (i) sell, export, re-export, transfer, divert, disclose technical data, or dispose of, any Software to any
prohibited person, entity, or destination including, without limitation, Cuba, Iran, North Korea, Sudan and Syria; or (ii) use any Software for any use prohibited by the laws or regulations of the United States.
SUPPORT SERVICES
Acer is not obligated to provide technical or other support for the Software.
ACER LIVE UPDATE
Certain software contains elements that enable the use of the Acer Live Update service, which allows for updates for such software to be automatically downloaded and installed on your device. By installing the software, you hereby agree and consent that Acer (or its licensors) may automatically check the version of such software that you are using on your device and may provide upgrades to such software that may be automatically downloaded on to your device.
OWNERSHIP AND COPYRIGHT
Title, ownership rights and intellectual property rights in and to the Software and all copies thereof shall remain with Acer or Acer's licensors or suppliers (as applicable). You do not have or shall not gain any proprietary interest in the Software (including any modifications or copies made by or for you) or any related intellectual property rights. Title and related rights in the content accessed through the Software is the property of the applicable content owner and may be protected by applicable law. This license gives you no rights to such contents. You hereby agree:
- Not to remove any copyright or other proprietary notices from the Software;
- To reproduce all such notices on any authorized copies you make; and
- To use best efforts to prevent any unauthorized copying of the Software.
TRADEMARKS
This Agreement does not grant to you any rights in connection with any trademarks or service marks of Acer or of Acer's licensors or suppliers.
DISCLAIMER OF WARRANTIES
TO THE MAXIMUM EXTENT PERMITTED BY APPLICABLE LAW, ACER, ITS SUPPLIERS, AND ITS LICENSORS, PROVIDE THE SOFTWARE "AS IS" AND WITH ALL FAULTS, AND HEREBY DISCLAIM ALL OTHER WARRANTIES AND CONDITIONS, EITHER EXPRESS, IMPLIED OR STATUTORY, INCLUDING, BUT NOT LIMITED TO, ANY IMPLIED WARRANTIES, DUTIES OR CONDITIONS OF MERCHANTABILITY, OF FITNESS FOR A PARTICULAR PURPOSE, OF ACCURACY OR COMPLETENESS OF RESPONSES, OF RESULTS, OF WORKMANLIKE EFFORT, OF LACK OF VIRUSES, AND OF LACK OF NEGLIGENCE, ALL WITH REGARD TO THE SOFTWARE AND THE PROVISION OF OR FAILURE TO PROVIDE SUPPORT SERVICES. ALSO, THERE IS NO WARRANTY OR CONDITION OF TITLE, QUIET ENJOYMENT, QUIET POSSESSION, CORRESPONDENCE TO DESCRIPTION OR NON-INFRINGEMENT WITH REGARD TO THE SOFTWARE.
EXCLUSION OF INCIDENTAL, CONSEQUENTIAL AND CERTAIN OTHER DAMAGES
TO THE MAXIMUM EXTENT PERMITTED BY APPLICABLE LAW, IN NO EVENT SHALL ACER, ACER'S SUPPLIERS, OR ACER'S LICENSORS, BE LIABLE FOR ANY SPECIAL, INCIDENTAL, INDIRECT, PUNITIVE, OR CONSEQUENTIAL DAMAGES WHATSOEVER (INCLUDING, BUT NOT LIMITED TO, DAMAGES FOR LOSS OF PROFITS OR CONFIDENTIAL OR OTHER INFORMATION, FOR BUSINESS INTERRUPTION, FOR PERSONAL INJURY, FOR LOSS OF PRIVACY, FOR FAILURE TO MEET ANY DUTY INCLUDING OF GOOD FAITH OR OF REASONABLE CARE, FOR NEGLIGENCE, AND FOR ANY OTHER PECUNIARY OR OTHER LOSS WHATSOEVER) ARISING OUT OF OR IN ANY WAY RELATED TO THE USE OF OR INABILITY TO USE THE SOFTWARE, THE PROVISION OF OR FAILURE TO PROVIDE SUPPORT SERVICES, OR OTHERWISE UNDER OR IN CONNECTION WITH ANY PROVISION OF THIS AGREEMENT, EVEN IN THE EVENT OF THE FAULT, TORT (INCLUDING
NEGLIGENCE), STRICT LIABILITY, BREACH OF CONTRACT OR BREACH OF WARRANTY OF ACER OR ITS SUPPLIERS OR LICENSORS, AND EVEN IF ACER AND ITS SUPPLIERS AND LICENSORS HAVE BEEN ADVISED OF THE POSSIBILITY OF SUCH DAMAGES. LIMITATION OF LIABILITY AND REMEDIES
NOTWITHSTANDING ANY DAMAGES THAT YOU MIGHT INCUR FOR ANY REASON WHATSOEVER (INCLUDING, WITHOUT LIMITATION, ALL DAMAGES REFERENCED ABOVE AND ALL DIRECT OR GENERAL DAMAGES), THE ENTIRE LIABILITY OF ACER, ITS SUPPLIERS, AND ITS LICENSORS, UNDER ANY PROVISION OF THIS AGREEMENT, AND YOUR EXCLUSIVE REMEDY FOR ALL OF THE FOREGOING, SHALL BE LIMITED TO THE AGGREGATE AMOUNT PAID BY YOU FOR THE SOFTWARE. THE FOREGOING LIMITATIONS, EXCLUSIONS AND DISCLAIMERS (INCLUDING DISCLAIMER OF WARRANTIES AND EXCLUSION OF INCIDENTAL, CONSEQUENTIAL AND CERTAIN OTHER DAMAGES ABOVE) SHALL APPLY TO THE MAXIMUM EXTENT PERMITTED BY APPLICABLE LAW, EVEN IF ANY REMEDY FAILS ITS ESSENTIAL PURPOSE; PROVIDED, HOWEVER, THAT BECAUSE SOME JURISDICTIONS DO NOT ALLOW THE EXCLUSION OR LIMITATION OR LIABILITY FOR CONSEQUENTIAL OR INCIDENTAL DAMAGES, THE ABOVE LIMITATION MAY NOT APPLY TO YOU.
TERMINATION
Without prejudice to any other rights, Acer may immediately terminate this Agreement without notice if you fail to comply with any terms and conditions of this Agreement.
In such event, you must:
- Cease all use of the Software;
- Destroy or return to Acer the original and all copies of the Software; and
- Delete the Software from all devices on which it was resident.
All disclaimers of warranties and limitation of liability set forth in this Agreement shall survive termination of this Agreement.
GENERAL
This Agreement represents the complete agreement between you and Acer relating to this license for the Software and supersedes all prior agreements, communications, proposals and representations between the parties and prevails over any conflicting or additional terms of any quote, order, acknowledgement or similar communication. This Agreement may only be modified by a written document signed by both parties. If any provision of this Agreement is held by a court of competent jurisdiction to be contrary to law that provision will be enforced to the maximum extent permissible and the remaining provisions of this Agreement will remain in full force and effect.
ADDITIONAL PROVISIONS APPLICABLE TO THIRD PARTY SOFTWARE AND SERVICES
Software provided hereunder by Acer's licensors or suppliers ("Third Party Software") is made available to you for your personal, non-commercial use only. You may not use the Third Party Software in any manner that could damage, disable, overburden, or impair the services provided by Acer's licensors or suppliers hereunder ("Third Party Services"). Furthermore, you may not use the Third Party Software in any manner that could interfere with any other party's use and enjoyment of the Third Party Services, or the services and products of Acer's licensors' or suppliers' third party licensors. Your use of the Third Party Software and Third Party Services is also subject to additional terms and conditions and policies which can be accessed through our global website.
Privacy policy
During registration you will be asked to submit some information to Acer. Please refer to Acer's privacy policy at www.acer.com/worldwide/support/swa.htm or your local Acer website.
- User's Manual
- Sign up for an Acer ID and enjoy great benefits
- There are three great reasons for you to get an Acer ID:
- Important
- TABLE OF CONTENTS
- Getting started with your tablet 4
- Charging your tablet 8
- Using your tablet 10
- Connecting devices to your tablet 20
- Going online 22
- Playing music 28
- Managing people and contacts 30
- Using the camera and camcorder 33
- Acer Touch WakeApp 38
- Advanced settings 40
- FAQ and troubleshooting 47
- GETTING STARTED WITH YOUR TABLET
- Features and functions
- Unpacking your tablet
- Note
- Getting to know your tablet
- Turning on for the first time
- Sign in to or create a Google account
- CHARGING YOUR TABLET
- Assembling the power adapter
- Fixed-prong type
- Removable-prong type
- Connecting power
- Warning
- USING YOUR TABLET
- Using the touchscreen
- The Home screen
- Search
- Voice search
- Navigation
- Back
- Home
- Recent
- The extended Home screen
- The application menu
- Adding an application to a Home screen
- Status and notification area
- Quick Settings icons
- Personalizing the Home screen
- Adding or removing shortcuts or widgets
- Removing an item from the Home screen
- Changing the Home screen wallpaper
- The onscreen keyboard
- Changing Google keyboard settings
- Predictive text or auto correction
- Editing text
- Selecting text
- Inserting text
- Waking your tablet
- Security Options
- Shutting down your tablet
- CONNECTING DEVICES TO YOUR TABLET
- Connecting to AC power
- Inserting a microSD card
- Transferring files between your tablet and a PC
- Connecting to a PC as a USB storage device
- Connecting a Bluetooth device
- Accessories
- GOING ONLINE
- Managing Wi-Fi connections
- Browsing the Internet
- Using the browser
- Setting up the Email application
- Google services
- Setting up your Google email
- Composing an email
- Play Store
- Using downloaded APPs
- Uninstalling downloaded APPs
- Google Hangouts
- PLAYING MUSIC
- Multimedia playback
- Play Music
- MANAGING PEOPLE AND CONTACTS
- Importing contacts
- Adding a new contact
- Editing a contact
- Editing a contact on your computer
- USING THE CAMERA AND CAMCORDER
- Settings menus
- General
- Camera
- Camcorder
- Taking a photo
- Shooting a video
- Supported formats
- Viewing photos and videos
- ACER TOUCH WAKEAPP
- How to use Touch WakeApp
- Enable Touch WakeApp Gestures
- Double-tap gesture
- If your tablet is locked...
- ADVANCED SETTINGS
- Wireless & Networks
- Adjusting Wi-Fi settings
- Adjusting Bluetooth settings
- Data Usage
- More...
- Putting your tablet in Airplane mode
- Virtual Private Network (VPN)
- Device
- Sound
- Display
- Apps
- Closing an application
- Uninstalling an application
- Personal
- Synchronization
- Google Sync
- Multiple Google accounts
- Changing language and text options
- System
- Setting the date and time
- Setting alarms
- Updating your tablet's operating system
- Resetting your tablet
- FAQ AND TROUBLESHOOTING
- SPECIFICATIONS
- Performance
- Multimedia
- Formats supported:
- USB connector
- Power
- Connectivity
- Expansion
- Battery
- END USER LICENSE AGREEMENT
- GRANT OF LICENSE
- RESTRICTIONS
- SUPPORT SERVICES
- ACER LIVE UPDATE
- OWNERSHIP AND COPYRIGHT
- TRADEMARKS
- DISCLAIMER OF WARRANTIES
- TERMINATION
- ADDITIONAL PROVISIONS APPLICABLE TO THIRD PARTY SOFTWARE AND SERVICES
- Privacy policy
Brand : ACER
Model : B1-750-15YM
Category : Tablet