
Coolfreeze CDF 36 - Refrigerator WAECO - Free user manual and instructions
Find the device manual for free Coolfreeze CDF 36 WAECO in PDF.


| Product type | Portable fridge-freezer |
| Brand | Waeco |
| Model | Coolfreeze CDF 36 |
| Net capacity | 36 liters |
| Dimensions (W x D x H) | 55 x 34 x 40 cm |
| Weight | 12 kg |
| Power supply | 12V/24V DC and 230V AC |
| Energy consumption | Approx. 0.5 kWh/24h |
| Temperature range | -18°C to +10°C |
| Cooling type | Compressor |
| Main functions | Refrigeration, freezing, eco mode |
| Maintenance and cleaning | Clean the interior with a damp cloth and mild detergent |
| Safety | Reverse polarity protection, door lock |
| Spare parts and repairability | Parts available via after-sales service |
| General information | Portable device for camping and leisure |
Frequently Asked Questions - Coolfreeze CDF 36 WAECO
User questions about Coolfreeze CDF 36 WAECO
0 question about this device. Answer the ones you know or ask your own.
Ask a new question about this device
Download the instructions for your Refrigerator in PDF format for free! Find your manual Coolfreeze CDF 36 - WAECO and take your electronic device back in hand. On this page are published all the documents necessary for the use of your device. Coolfreeze CDF 36 by WAECO.
USER MANUAL Coolfreeze CDF 36 WAECO
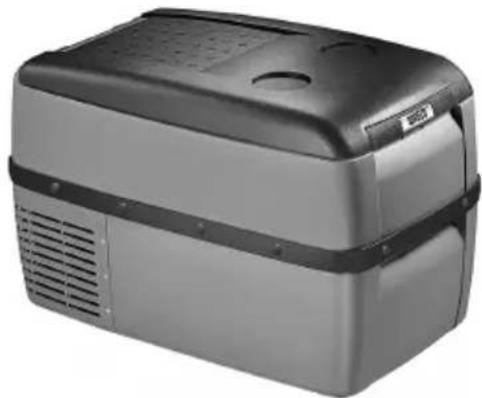
natural_image
Exterior view of a modern refrigerated appliance (no visible text or symbols)CDF18
natural_image
Exterior view of a black and gray electric oven (no visible text or symbols)CDF36
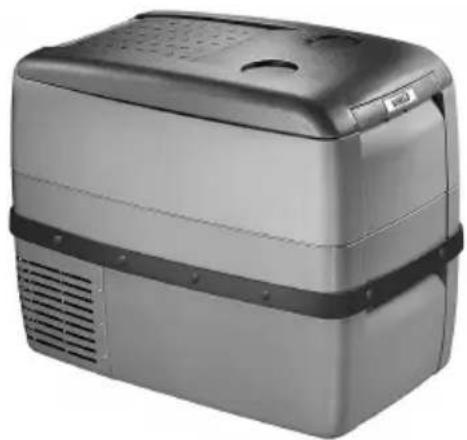
natural_image
Exterior view of a modern stainless steel water heater with ventilation slots and a perforated top (no text or symbols visible)CDF46
CoolFreeze CDF18, CDF36, CDF46

4
CDF36, CDF46
5

6
7

CDF36, CDF46
● 220–240 V: CoolPower EPS100
● 110–240 V: CoolPower MPS35
● 220–240 V: WAECO CoolPower EPS100
● 110–240 V: WAECO CoolPower MPS35

Please read this operating manual carefully before starting the device. Keep it in a safe place for future reference. If the device is passed on to another person, this operating manual must be handed over to the user along with it.
The manufacturer cannot be held liable for damage resulting from improper usage or incorrect operation.
Contents
1 Explanation of symbols 21
2 Safety instructions 22
3 Scope of delivery 24
4 Intended use 25
5 Function description....25
6 Operation 27
7 Cleaning and maintenance 33
8 Guarantee 33
9 Troubleshooting....34
10 Disposal 34
11 Technical data 35
1 Explanation of symbols

DANGER!
Safety instruction: Failure to observe this instruction will cause fatal or serious injury.

WARNING!
Safety instruction: Failure to observe this instruction can cause fatal or serious injury.

CAUTION!
Safety instruction: Failure to observe this instruction can lead to injury.

NOTICE!
Failure to observe this instruction can cause material damage and impair the function of the product.

NOTE
Supplementary information for operating the product.
▶ Action: This symbol indicates that action is required on your part. The required action is described step-by-step.
√This symbol describes the result of an action.
Fig. 1 5, page 3: This refers to an element in an illustration. In this case, item 5 in figure 1 on page 3.
2 Safety instructions
2.1 General safety

WARNING!
- Do not operate the device if it is visibly damaged.
- If this device's power cable is damaged, it must be replaced by the manufacturer, customer service or a similarly qualified person in order to prevent safety hazards.
- This device may only be repaired by qualified personnel. Improper repairs can lead to considerable hazards.
- This device can be used by children aged 8 years or over, as well as by persons with diminished physical, sensory or mental capacities or a lack of experience and/or knowledge, providing they are supervised or have been taught how to use the device safely and are aware of the resulting risks.
- Cleaning and user maintenance must not be carried out by children without supervision.
● Children must not play with the device.
● Children must be supervised to ensure that they do not play with the device.
● Always keep and use the device out of the reach of children under the age of 8 years.
- Do not store any explosive substances such as spray cans with a flammable propellant in the device.

CAUTION!
- Disconnect the device from the mains – before each cleaning and maintenance – after every use
- Food may only be stored in its original packaging or in suitable containers.

NOTICE!
- Check that the voltage specification on the type plate corresponds to that of the energy supply.
- Only connect the device to a DC plug socket in the vehicle (e. g. cigarette lighter) with the DC cable.
● Never pull the plug out of the socket by the cable. - Disconnect the cooler and other power consuming devices from the battery before connecting the quick charging device.
- Disconnect the cooler or switch it off when you turn off the engine. Otherwise you may discharge the battery.
- The cooling device is not suitable for transporting caustic materials or materials containing solvents.
2.2 Operating the device safely

DANGER!
- Do not touch exposed cables with your bare hands.

CAUTION!
- Before starting the device, ensure that the power supply line and the plug are dry.

NOTICE!
- Do not use electrical devices inside the cooler unless they are recommended by the manufacturer for the purpose.
- Do not place the device near naked flames or other heat sources (heaters, direct sunlight, gas ovens etc.).
● Danger of overheating!
Ensure at all times that there is sufficient ventilation so that the heat that arises during operation does not build up. Make sure that the device is sufficiently far away from walls and other objects so that the air can circulate.
● Ensure that the ventilation openings are not covered.
- Do not fill the inner container with ice or fluid.
● Never immerse the device in water.
● Protect the device and the cable against heat and moisture.
3 Scope of delivery
fig. 1, page 3, shows the scope of delivery.
Item Quantity Description
1 1 Compressor cooler
2 1 Connection cable for DC connection
- 1 Operating manual
3.1 Accessories
To operate the cooler using an AC power supply, we recommend using the following mains adapter from WAECO.
Available as accessory (not included in scope of delivery):
● 220–240 V: CoolPower EPS100
● 110–240 V: CoolPower MPS35
4 Intended use

The compressor cooler is suitable for cooling and freezing foodstuffs. The compressor cooler is also suitable for use on boats.
The compressor cooler is designed to be operated from a 12 V== or 24 V=== on-board socket of a vehicle (e.g. DC socket), boat or mobile home.

NOTE
To operate the device at the AC mains supply, we recommend using one of the following WAECO rectifiers:
● 220–240 V: CoolPower EPS100
● 110–240 V: CoolPower MPS35

CAUTION! Health hazard!
Please check if the cooling capacity of the device is suitable for storing the food or medicine you wish to cool.
5 Function description
The cooler can chill products, keep them cool as well as freeze them. A maintenance-free, CFC-free refrigerant circuit with compressor provides the cooling. The extra strong CFC-free insulation and powerful compressor ensure especially fast cooling.
The cooler is designed for mobile use.
When used on boats, the cooler can be withstand a constant heel (inclination) of 30irc .

An integrated dual-stage (CDF18) / three-stage (CDF36, CDF46) battery monitor prevents your vehicle battery from excessive discharging.
5.1 Operating and display elements
CDF18
Operating panel and connection socket (fig. 2, page 3):
| Item Description Explanation | |
| 1 TEMPERATURE Temperature controller, cooling temperature at the end positions: | |
| COLD: +10 °C | |
| FREEZE: -18 °C | |
| 2 POWER Operating display | |
| LED is lit green: Device is switched on and ready for operation | |
| LED is lit yellow: Set temperature has been reached | |
| 3 ERROR LED flashes red: Switched on device is not ready for operation | |
| 4 BATTERY MONITOR | Switch-on device/battery monitor: |
| 0: Device is switched off | |
| HIGH: Device is switched on, bat-tery monitor is in HIGH mode | |
| LOW: Device is switched on, bat-tery monitor is in LOW mode | |
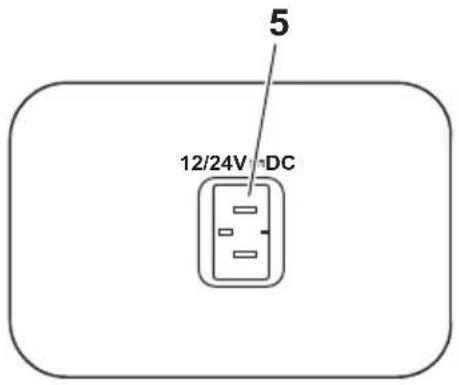
| 5 12/24V DC | Connection socket DC voltage supply |
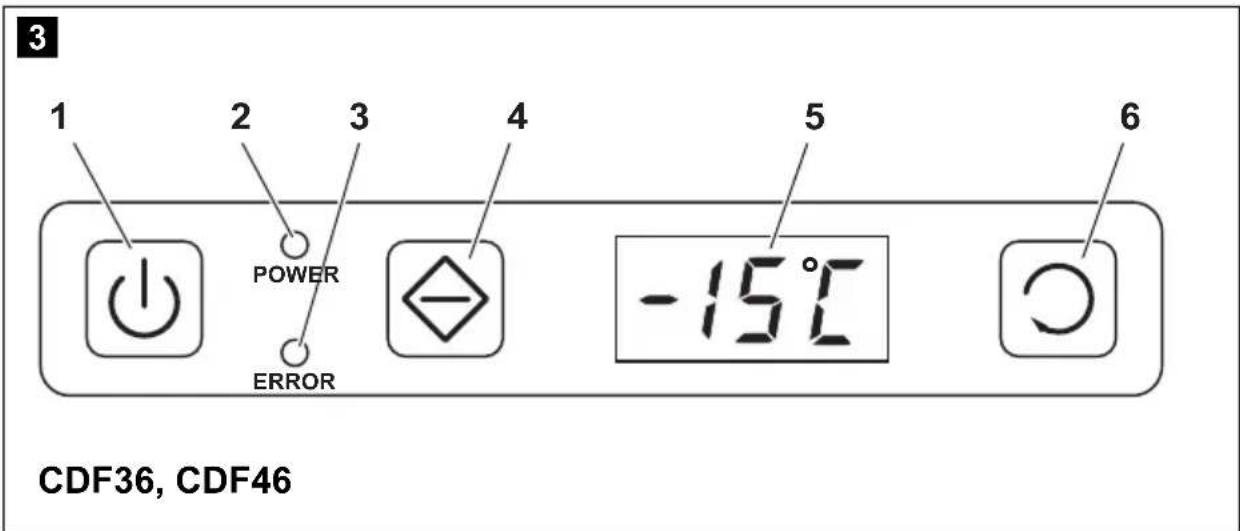
CDF36, CDF46
Operating panel and connection socket (fig. 3, page 3, fig. 4, page 4):
| Item Description Explanation | |
| 1 ONOFF button | Switches the cooler on or off when the button is pressed for between one and two seconds |
| 2 POWER Status indication | |
| 3 ERROR LED flashes red: Device is switched on but not ready for operation | |
| 4 SET | Selects the input mode– Temperature setting– Celsius or Fahrenheit display– Set battery monitor |
| 5 – | Display, shows the informationThe first three digits of the four-digit display show the temperature, the fourth digit shows the temperature unit (°C or °F). |
| 6 ADJUST | Press once to increase the valuePress once to decrease the value |
6 Operation
6.1 Before initial use

NOTE
Before starting your new cooler for the first time, you should clean it inside and outside with a damp cloth for hygienic reasons (please also refer to the chapter “Cleaning and maintenance” on page 33).
6.2 Energy saving tips
- Choose a well ventilated installation location which is protected against direct sunlight.
- Allow warm food to cool down first before placing it in the device to keep cool.
- Do not open the cooling device more often than necessary.
- Do not leave the cooler unit open for longer than necessary.
● Defrost the cooler once a layer of ice forms. - Avoid unnecessary low temperatures.
6.3 Connecting the cooler
The cooler can be operated with 12 V or 24 V DC.

NOTICE! Danger of damaging the device!
Disconnect the cooler and other consumer units from the battery before you connect the battery to a quick charging device.
Overvoltage can damage the electronics of the device.
For safety reasons the cooler is equipped with an electronic system to prevent the polarity reversal. This protects the cooler against short-circuiting when connecting to a battery.
▶ Plug the 12/24-V connection cable (fig. 1 2, page 3) into the DC voltage socket and also into the cigarette lighter or a 12 V or 24 V socket.
6.4 Using the battery monitor
If the cooler is operated when the vehicle ignition is switched off, the cooler switches off automatically as soon as the supply voltage falls below a set level. The cooler will switch back on once the battery has been recharged to the restart voltage level.

NOTICE! Danger of damage!
When switched off by the battery monitor, the battery will no longer be fully charged. Avoid starting repeatedly or operating current consumers without longer charging phases. Ensure that the battery is recharged.
In “HIGH” mode, the battery monitor responds faster than at the levels “LOW” and “MED” (see the following table).
CDF18:
| Battery monitor mode LOW HIGH | ||
| Switch-off voltage at 12 V | 10,2 V ± 0,3 V | 11,2 V ± 0,3 V |
| Restart voltage at 12 V | 11,2 V ± 0,3 V | 12,2 V ± 0,3 V |
| Switch-off voltage at 24 V | 22,0 V ± 0,3 V | 23,9 V ± 0,3 V |
| Restart voltage at 24 V | 23,3 V ± 0,3 V | 25,1 V ± 0,3 V |
CDF36, CDF46:
| Battery monitor mode LOW MED HIGH | ||||
| Switch-off voltage at 12 V | 10,1 | V | 11,4 | V |
| Restart voltage at 12 V | 11,1 | V | 12,2 | V |
| Switch-off voltage at 24 V | 21,5 | V | 24,1 | V |
| Restart voltage at 24 V | 23,0 | V | 25,3 | V |

NOTE
When the cooler is supplied by the starter battery, select the battery monitor mode "HIGH". If the cooler is connected to a supply battery, the battery monitor mode "LOW" will suffice.
If you wish to operate the cooler from the AC mains, set the battery monitor to the "LOW" position.
CDF36, CDF46: Setting the battery monitor mode
This is how to select the battery monitor mode:
▶Switch on the cooler.
▶Press the "SET" button three times.
▶Use the “ADJUST” button to select the battery monitor mode.
6.5 Using the cooler

NOTICE! Danger of overheating!
Ensure at all times that there is sufficient ventilation so that the heat that generated during operation can dissipate. Ensure that the ventilation slots are not covered. Make sure that the device is sufficiently far away from walls and other objects so that the air can circulate.
▶Place the cooler on a firm foundation.
Make sure that the ventilation slots are not covered and that the heated air can dissipate.
▶ Close the cooler, see chapter “Connecting the cooler” on page 28.

NOTICE! Danger from excessively low temperature!
Ensure that the only those objects are placed in the cooler that are intended to be cooled at the selected temperature.
Locking the cooler
▶Close the lid.
▶ Press the lock (fig. 5 1, page 4) down, until it latches in place audibly.
CDF18: Switching on the cooler
▶ Slide the sliding switch "BATTERY MONITOR" to HIGH if you wish to operate from a starter battery or to "LOW" if you want to operate from a supply battery.

NOTE
If you wish to operate the cooler from the AC mains, set the battery monitor to the "LOW" position.
√The "POWER" LED is lit green.
√The cooler starts cooling the interior.
▶Set the cooling temperature with the temperature controller "TEMPERA-TURE".
√ When the cooling temperature has been reached, the "POWER" LED is lit yellow.
CDF36, CDF46: Switching on the cooler
▶Press the "ON/OFF" button for three seconds.
√The "POWER" LED is lit green.
√The display switches on and shows the current cooling temperature.
√The cooler starts cooling the interior.

NOTE
If you wish to operate the cooler from the AC mains, set the battery monitor to the "LOW" position.
CDF18: Switching off the cooler
▶Empty the cooler.
To Switch the cooler off: Slide the sliding switch "BATTERY MONITOR" to "0":
▶Pull out the connection cable.
If you do not want to use the cooler for a longer period of time:
▶Leave the cover slightly open. This prevents odour build-up.
CDF36, CDF46: Switching off the cooler
▶Empty the cooler.
▶Switch the cooler off.
▶Unplug the connection cable.
If you do not want to use the cooler for a longer period of time:
▶Leave the lid slightly open. This prevents build-up of odours.
6.6 Setting the temperature
CDF36, CDF46:
▶Press the "SET" button once.
▶Use the "ADJUST" button to set the cooling temperature.
The set cooling temperature then appears in the display for a few seconds. The display flashes several times before it returns to the current temperature.
6.7 Selecting the temperature unit
CDF36, CDF46:
You can switch the temperature display between Celsius and Fahrenheit. To do this, proceed as follows:
▶Switch on the cooler.
▶Press the "SET" button twice.
▶Use the “ADJUST” button to set the Celsius or Fahrenheit temperature unit.
6.8 Defrosting the cooler
Humidity can form frost in the interior of the cooling device or on the vaporiser. This reduces the cooling capacity. Defrost the device in good time to avoid this.

NOTICE! Danger of damaging the device!
Never use hard or pointed tools to remove ice or to loosen objects which have frozen in place.
To defrost the cooler, proceed as follows:
▶Take out the contents of the cooling device.
▶If necessary, place them in another cooling device to keep them cool.
▶Switch off the device.
▶Leave the cover open.
▶Wipe off the defrosted water.
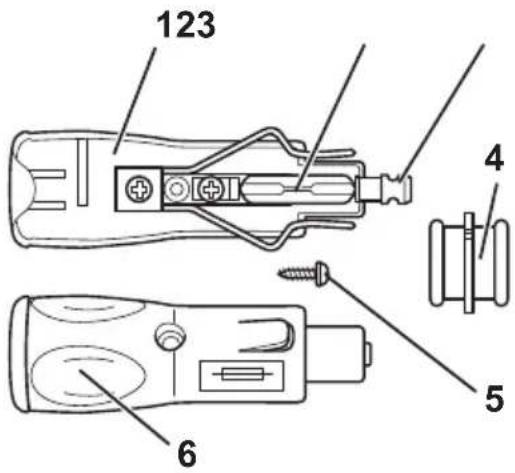
6.9 Replacing the plug fuse (12/24 V)
▶ Pull the adapter sleeve (fig. 6 4, page 4) off of the plug.
▶ Unscrew the screw (fig. 6 5, page 4) out of the upper half of the housing (fig. 6 1, page 4).
▶ Carefully raise the upper half of the housing from the lower (fig. 6 6, page 4) half.
▶ Take out the contact pin (fig. 6 3, page 4).
▶ Replace the defective fuse (fig. 6 2, page 4) with a new one that has the same rating (8A 32V).
▶Re-assemble the plug in the reverse order.
6.10 Replacing the light bulb (CDF36, CDF46)
▶ Press the switch pin (fig. 7 2, page 4) downwards so that the transparent part (fig. 7 1, page 4) of the lamp can be removed at the front.
▶Replace the light bulb.
▶Press the lamp back into the housing.
7 Cleaning and maintenance

WARNING!
Always disconnect the device from the mains before you clean and service it.

NOTICE! Risk of damage
● Never clean the cooler under running water or in dish water.
- Do not use abrasive cleaning agents or hard objects during cleaning as these can damage the cooler.
▶Occasionally clean the device interior and exterior with a damp cloth.
▶Make sure that the air inlet and outlet vents on the device are free of any dust and dirt, so that heat can be released and the device is not damaged.
8 Guarantee
The statutory warranty period applies. If the product is defective, please contact the manufacturer's branch in your country (see the back of the instruction manual for the addresses) or your retailer.
For repair and guarantee processing, please include the following documents when you send in the device:
● A copy of the receipt with purchasing date
● A reason for the claim or description of the fault
9 Troubleshooting
| Fault Possible cause Suggested remedy | ||
| Device does not function, LED does not glow. | No voltage is flowing from the DC power socket in your vehicle. | The ignition must be switched on in most vehicles to supply current to the DC power socket. |
| No voltage present in the AC voltage socket. | Try using another plug socket. | |
| The device does not cool (plug is inserted, POWER LED is lit). | Defective compressor. This can only be repaired by an authorised repair centre. | |
| The device does not cool (plug is inserted, ERROR LED flashes). | Battery voltage is too low. | Test the battery and charge it as needed. |
| When operating from the DC power socket: The ignition is on and the device is not working and the LED is not lit.Pull the plug out of the socket and make the following checks. | The DC socket is dirty. This results in a poor electrical contact. | If the plug of your cooler becomes very warm in the DC socket, either the socket must be cleaned or the plug has not been assembled correctly. |
| The fuse of the 12/24 V plug has blown. | Replace the fuse (5 A) in the 12 V plug, see chapter “Replacing the plug fuse (12/24 V)” on page 32. | |
| The vehicle fuse has blown. | Replace the vehicle's 12/24 V socket fuse (usually 15 A). Please refer to your vehicle's operating manual. | |
| ERROR LED flashes for longer than 2 minutes, as follows: 3 flashes, pause, 3 flashes, pause, ... | Defective device. This can only be repaired by an authorised repair centre. | |
10 Disposal
▶Place the packaging material in the appropriate recycling waste bins wherever possible.

If you wish to finally dispose of the product, ask your local recycling centre or specialist dealer for details about how to do this in accordance with the applicable disposal regulations.
11 Technical data
| WAECO CoolFreeze | |||
| CDF18 CDF36 CDF46 | |||
| Item no.: 9105330241 9105330186 9105330187 | |||
| Contains: 18 I 31 I 39 I | |||
| Voltage: 12/24 V--- | |||
| Rated current: | |||
| 12 V---: | 3.5 | A | 5.0 |
| 24 V---: | 1.9 | A | 2.5 |
| Cooling capacity: | +10 °C to -18 °C | +10 °C to -15 °C | |
| Climate class: | N or T | ||
| Ambient temperature: | +16 °C – +43 °C | ||
| Dimensions (WxHxD) in mm: | 465 x 414 x 300 | 560 x 380 x 340 | 560 x 475 x 340 |
| Weight: | 9.5 kg | 12.5 kg | 13.7 kg |
| Tests/Certification: |    | ||

NOTE
At ambient temperatures above 32\ °C ( 90\ °F ) the minimum temperature cannot be achieved.
The coolant circuit contains R134a.
● 110–240 V : CoolPower MPS35.
4 Usage conforme

● 110–240 V : CoolPower MPS35.

● 220–240 V: CoolPower EPS100
● 110–240 V: CoolPower MPS35.
4 Uso adecuado

● 220–240 V: CoolPower EPS100
● 110–240 V: CoolPower MPS35

● 220–240 V: CoolPower EPS100
● 110–240 V: CoolPower MPS35.
● 220–240 V: CoolPower EPS100
● 110–240 V: CoolPower MPS35

● 220–240 V: CoolPower EPS100
● 110–240 V: CoolPower MPS35
● 220–240 V: CoolPower EPS100
● 110–240 V: CoolPower MPS35

● 220–240 V: CoolPower EPS100
● 110–240 V: CoolPower MPS35.
4 Korrekt brug

● 220–240 V: CoolPower EPS100
● 110–240 V: CoolPower MPS35

● 220–240 V: CoolPower EPS100
● 110–240 V: CoolPower MPS35.
● 110–240 V: CoolPower MPS35

AKTA! Hälsorisk!
● Fare for overoppheting!
● 220–240 V: CoolPower EPS100
● 110–240 V: CoolPower MPS35.
4 Tiltenkt bruk

● 220–240 V: CoolPower EPS100
● 110–240 V: CoolPower MPS35

FORSIKTIG! Helsefare!
PASS PÅ! Fare for overoppheting!
● 220–240 V: CoolPower EPS100
● 110–240 V: CoolPower MPS35.
● 110–240 V: CoolPower MPS35

HUOMIO! Terveysriski!
● 220–240 V: CoolPower EPS100
● 110–240 V: CoolPower MPS35
● 220–240 V: WAECO CoolPower EPS100
● 110–240 V: WAECO CoolPower MPS35

● 220–240 B: CoolPower EPS100
● 110–240 B: CoolPower MPS35
● 220–240 B: WAECO CoolPower EPS100
● 110–240 B: WAECO CoolPower MPS35

● 220–240 V: CoolPower EPS100
● 110–240 V: CoolPower MPS35
● 220–240 V: WAECO CoolPower EPS100
● 110–240 V: WAECO CoolPower MPS35

● 220–240 V: CoolPower EPS100
● 110–240 V: CoolPower MPS35
● 220–240 V: WAECO CoolPower EPS100
● 110–240 V: WAECO CoolPower MPS35

● 220–240 V: CoolPower EPS100
● 110–240 V: CoolPower MPS35
● 220–240 V: WAECO CoolPower EPS100
● 110–240 V: WAECO CoolPower MPS35

UPOZORNENIE! Ohrozenie zdravia!
● 220–240 V: CoolPower EPS100
● 110–240 V: CoolPower MPS35
● 220–240 V: WAECO CoolPower EPS100
● 110–240 V: WAECO CoolPower MPS35

Dometic Australia Pty. Ltd.
1 John Duncan Court
Varsity Lakes QLD 4227
1800 212121
+61 7 55076001
Mail: sales@dometic-waeco.com.au
AUSTRIA
Dometic Austria GmbH
The Gateway · 25 Canton Road,
Tsim Sha Tsui · Kowloon
+852 24611386
+852 24665553
Mail: info@dometic-waeco.com.hk
HUNGARY
Dometic Plc. Sales Office
Kerékgyártó u. 5.
H-1147 Budapest
+36 1 468 4400
昌 +36 1 468 4401
Dometic Italy S.r.l.
Via Virgilio, 3
I-47100 Forli
+39 0543 754901
+39 0543 756631
Mail: info@dometic.it
NORWAY
Dometic Norway AS
Skolmar 24
N-3232 Sandefjord
+47 33428450
吕 +47 33428459
Mail: firmapost@waeco.no
POLAND
Dometic Poland Sp. z o.o.
Ul. Puławska 435A
02-801 Warszawa
+48 22 414 32 00
+48 22 414 32 01
Mail: info@dometic.pl
RUSSIA
Dometic RUS LLC
Komsomolskaya square 6-1
107140 Moscow
+7 495 780 79 39
+7 495 916 56 53
Mail: info@dometic.ru
SLOVAKIA
Dometic Slovakia Sales Office Bratislava
Nádražná 34/A
SK-900 28 Ivanka pri Dunaji
+421 2 45 529 680
Mail: bratislava@dometic.com
SPAIN
Dometic Spain S.L.
Avda. Sierra del Guadarrama, 16
E-28691 Villanueva de la Cañada
Madrid
+34 902 111 042
+34 900 100 245
Mail: info@dometic.es
SWEDEN
Dometic Scandinavia AB
Gustaf Melins gata 7
Dometic Switzerland AG
Riedackerstrasse 7a
CH-8153 Rümlang (Zürich)
+41 44 8187171
吕 +41 44 8187191
Mail: info@dometic-waeco.ch
TAIWAN
WAECO Impex Ltd.
Taipei Office
9F.-10, No. 1180, Zhongzheng Rd.,
Zhonghe Dist., New Taipei City 23586
+886 2 22237225
昌 +886 2 81926742
Mail: marketing@waeco.com.tw
UNITED KINGDOM
Dometic UK Ltd.
Dometic House · The Brewery
Blandford St. Mary
Dorset DT11 9LS
+44 844 626 0133
昌 +44 844 626 0143
Mail: sales@dometic.co.uk
UNITED ARAB EMIRATES
Dometic Middle East FZCO
P. O. Box 17860
S-D 6, Jebel Ali Freezone
Dubai
+971 4 883 3858
+971 4 883 3868
Mail: info@dometic.ae
UNITED STATES OF AMERICA
Dometic Marine Division
2000 N. Andrews Ave. Extension
Pompano Beach, FL 33069 USA
+1 954 973 2477
+1 954 979 4414
Mail: marinesales@dometicusa.com

- CoolFreeze CDF18, CDF36, CDF46
- Contents
- Explanation of symbols
- DANGER!
- WARNING!
- CAUTION!
- NOTICE!
- NOTE
- Safety instructions
- General safety
- Operating the device safely
- Scope of delivery
- Item Quantity Description
- Accessories
- Intended use
- CAUTION! Health hazard!
- Function description
- Operating and display elements
- CDF18
- CDF36, CDF46
- Operation
- Before initial use
- Energy saving tips
- Connecting the cooler
- NOTICE! Danger of damaging the device!
- Using the battery monitor
- NOTICE! Danger of damage!
- CDF36, CDF46: Setting the battery monitor mode
- Using the cooler
- NOTICE! Danger of overheating!
- NOTICE! Danger from excessively low temperature!
- Locking the cooler
- CDF18: Switching on the cooler
- CDF36, CDF46: Switching on the cooler
- CDF18: Switching off the cooler
- CDF36, CDF46: Switching off the cooler
- Setting the temperature
- CDF36, CDF46:
- Selecting the temperature unit
- Defrosting the cooler
- Replacing the plug fuse (12/24 V)
- Replacing the light bulb (CDF36, CDF46)
- Cleaning and maintenance
- NOTICE! Risk of damage
- Guarantee
- Troubleshooting
- Disposal
- Technical data
- Usage conforme
- Uso adecuado
- Korrekt brug
- AKTA! Hälsorisk!
- ● Fare for overoppheting!
- Tiltenkt bruk
- FORSIKTIG! Helsefare!
- PASS PÅ! Fare for overoppheting!
- HUOMIO! Terveysriski!
- UPOZORNENIE! Ohrozenie zdravia!
- Dometic Australia Pty. Ltd.
- AUSTRIA
- Dometic Austria GmbH
- HUNGARY
- Dometic Plc. Sales Office
- Dometic Italy S.r.l.
- NORWAY
- Dometic Norway AS
- POLAND
- Dometic Poland Sp. z o.o.
- RUSSIA
- Dometic RUS LLC
- SLOVAKIA
- Dometic Slovakia Sales Office Bratislava
- SPAIN
- Dometic Spain S.L.
- SWEDEN
- Dometic Scandinavia AB
- Dometic Switzerland AG
- TAIWAN
- WAECO Impex Ltd.
- UNITED KINGDOM
- Dometic UK Ltd.
- UNITED ARAB EMIRATES
- Dometic Middle East FZCO
- UNITED STATES OF AMERICA
- Dometic Marine Division
Brand : WAECO
Model : Coolfreeze CDF 36
Category : Refrigerator