
Advance 25 - MIDI Keyboard AKAI - Free user manual and instructions
Find the device manual for free Advance 25 AKAI in PDF.


| Product type | MIDI controller keyboard |
| Brand | AKAI |
| Model | Advance 25 |
| Number of keys | 25 keys |
| Key type | Dynamic with velocity and aftertouch |
| Controllers | 8 backlit pads, 8 rotary encoders, 9 faders, pitch and modulation wheels |
| Connectivity | USB 2.0 (Type B), MIDI In/Out (DIN 5-pin), sustain pedal input |
| Power | USB bus (5V, 500mA) |
| Compatibility | Windows 7/8/10/11, macOS 10.10+, iOS (with adapter), Linux (via USB MIDI) |
| Included software | MPC Beats, Ableton Live Lite, VIP3.0 (Virtual Instrument Player) |
| Dimensions (W x D x H) | 410 x 160 x 60 mm |
| Weight | 1.6 kg |
| Materials | Reinforced plastic chassis, polycarbonate keys |
| Care and cleaning | Unplug before cleaning. Use a dry soft cloth. Do not use abrasive products. |
| Safety | Use only with shielded USB cables. Do not expose to moisture or extreme temperatures. |
| Spare parts and repairability | Spare parts are not available to the public. Repair by AKAI authorized center. |
| Warranty | 2 years (according to local legislation) |
Frequently Asked Questions - Advance 25 AKAI
User questions about Advance 25 AKAI
0 question about this device. Answer the ones you know or ask your own.
Ask a new question about this device
Download the instructions for your MIDI Keyboard in PDF format for free! Find your manual Advance 25 - AKAI and take your electronic device back in hand. On this page are published all the documents necessary for the use of your device. Advance 25 by AKAI.
USER MANUAL Advance 25 AKAI
Thank you for purchasing the Advance 25. At Akai Professional, we know how serious music is to you. That's why we design our equipment with only one thing in mind—to make your performance the best it can be.
Box Contents
Advance 25
USB Cable
Software Installation Card
Quickstart Guide
Safety & Warranty Manual
Important: Visit akaipro.com and find the webpage for Advance 25 to download the complete User Guide.
Support
For the latest information about this product (system requirements, compatibility information, etc.) and product registration, visit akaipro.com.
Initial Setup
1. Software/Driver Download and Installation
To download and install the required drivers, VIP software application, and virtual instruments:
- Go to akaipro.com and register your product. If you don't have an Akai Professional account yet, you will be prompted to create one.
- In your Akai Professional account, download the Advance Driver and VIP Plus (containing the VIP software application and bundled virtual instruments).
- Open the file and double-click the installer application: .exe (Windows) or .dmg (macOS).
- Follow the on-screen instructions to complete the installation.
Note: By default, VIP will be installed in [your hard drive] \ Program Files \ VstPlugins (Windows) or Applications (macOS). A shortcut will be created on your Desktop, as well.
To download additional plugins and audio content:
- Open VIP.
- In VIP, click Store.
- In the Store panel, select and download the plugins and audio content you want to use with VIP. Follow the on-screen instructions for each selection.
Important: When installing these plugins, we recommend installing them on your computer's internal hard drive rather than on an external hard drive.
2. Controller Setup
Here is just an example of how to use Advance 25 to your setup. Items not listed under Introduction >Box Contents are sold separately.

flowchart
graph TD
    A["AKAI PROFESSIONAL"] -->|Power (optional)| B["Computer"]
    A -->|External MIDI Sound Module (optional)| C["MPC"]
    A -->|Expression Pedal (optional)| D["Sustain Pedal (optional)"]
    A -->|External MIDI Sound Module (optional)| E["External MIDI Sound Module (optional)"]
3. Software-Controller Configuration
This section describes how to start using your Advance 25. We recommend using Advance 25 with the included VIP software which you can use to perform with, create, edit, and manage multiple plugin patches simultaneously. To learn more about how you can use Advance 25 in each kind of setup, please see the Basic Operation chapter.
Make sure you have installed the software (described earlier in 1. Software/Driver Download and Installation) and connected Advance 25 to your computer, external MIDI equipment, and/or other devices (described earlier in 2. Controller Setup).
With VIP in Your DAW
To set up Advance 25 with VIP in your DAW:
-
Power on your Advance 25, and open your DAW in your computer.
-
Make sure Advance 25 is selected as a controller in your DAW—you can usually do this in your DAW's Preferences, Device Setup, or Options.
-
In your DAW, create a new MIDI track (i.e., not an audio track).
-
Open VIP in your DAW as you would open a standard plugin. By default, VIP is installed in the following location, depending on your operating system and desired plugin format:
-
Windows (VST): [your hard drive]\Program Files\VstPlugins
• macOS (VST): Library/Audio/Plug-Ins/VST
• macOS (AU): Library/Audio/Plug-Ins/Components
• macOS (AAX): Library/Application Support/Avid/Audio/Plug-Ins -
In VIP, click the Settings menu and select Plugin Manager.
-
At the bottom of the Plugin Manager window, click one of the Plugin Folder fields, and then select the folder where your instrument plugins are located on your computer. You can select up to two locations (one for each Plugin Folder field).
-
Click Scan. VIP will scan the folder/folders for available plugins, which will appear in the list. When the process is complete, click OK to close the Settings window. VIP will return to its main window and begin importing the patches (presets) for all of your scanned plugins. This can take several minutes.
- On Advance 25, turn the Data Dial to browse your list of patches in the display (the plug-in name will appear under the patch name). Press the Data Dial to load one.
To learn more about how you can use Advance 25 in this kind of setup, please see Basic Operation > Setup Scenarios > With VIP in Your DAW.
With VIP in Standalone Mode (Without a DAW)
To set up Advance 25 with VIP in Standalone Mode:
- Power on your Advance 25.
- Open VIP. By default, VIP is installed in [your hard drive] \ Program Files \ VstPlugins (Windows) or Applications (macOS).
- In VIP, click the Settings menu and select Plugin Manager.
- At the bottom of the Plugin Manager window, click one of the Plugin Folder fields, and then select the folder where your instrument plugins are located on your computer. You can select up to two locations (one for each Plugin Folder field).
- Click Scan. VIP will scan the folder/folders for available plugins, which will appear in the list. When the process is complete, click OK to close the Settings window. VIP will return to its main window and begin importing the patches (presets) for all of your scanned plugins. This can take several minutes.
- On Advance 25, turn the Data Dial to browse your list of patches in the display (the plug-in name will appear under the patch name). Press the Data Dial to load one.
To learn more about how you can use Advance 25 in this kind of setup, please see Basic Operation > Setup Scenarios > With VIP in Standalone Mode (Without a DAW).
With Your DAW Only
To set up Advance 25 with your DAW only:
- Power on your Advance 25, and open your DAW in your computer.
- Make sure Advance 25 is selected as a controller in your DAW—you can usually do this in your DAW's Preferences, Device Setup, or Options.
- In your DAW, create a new MIDI track (i.e., not an audio track).
To learn more about how you can use Advance 25 in this kind of setup, please see Basic Operation > Setup Scenarios > With Your DAW Only.
With External MIDI Equipment (Without a Computer)
To set up Advance 25 with external MIDI equipment:
- Power on your Advance 25 and your external MIDI device.
- If you are using a standard power adapter connected to Advance 25's Power Input, you can start playing immediately. Advance 25 is automatically set to send all of its MIDI messages to your external MIDI device via the MIDI Out.
If you are using a USB charger to power Advance 25, set any relevant controls to send their MIDI messages out of the MIDI Out. Any controls set to transmit only over the USB Port will not be sent to your external MIDI device.
To learn more about how you can use Advance 25 in this kind of setup, please see Basic Operation > Setup Scenarios > With External MIDI Equipment (Without a Computer).
Features
Top Panel

-
Keyboard: This 25-note keyboard is velocity-sensitive and, in conjunction with the Octave Up/Down buttons, can control a 10-octave range.
-
Octave Down/Up: Use these buttons to shift the keyboard's range up or down. Press both buttons simultaneously to reset the octave shift to "zero."
-
Pitch-Bend Wheel: Moving this wheel sends MIDI Pitch Bend information on a selected MIDI channel and port.
-
Modulation Wheel: Moving this wheel sends continuous controller data—MIDI CC #01 (modulation), by default.
-
Arp / Config: Press this button to enable or disable the internal Arpeggiator whose rate is based on the current Tempo and Time Division settings. The Arpeggiator will function on notes being played on the keyboard only. You can also sync the Arpeggiator to an internal or external MIDI Clock source. Press Shift and this button to configure the Arpeggiator's settings.
-
Latch: Press this button to activate or deactivate the Arpeggiator's Latch feature. When the Arpeggiator is on and Latch is enabled, you can press a combination of keys on the keyboard and the Arpeggiator continue to arpeggiate these notes even after you release the keys. Pressing a new combination of keys will start a new arpeggiation.
Tip: While holding down a combination of keys on the keyboard, add more notes to that arpeggiated chord by pressing additional keys.
-
Encoders: Use these 360° knobs to send MIDI CC or Increment/Decrement messages to your software or external MIDI device.
-
Switches: Use these switches to send MIDI CC, Program Change, or Program Bank messages to your software or external MIDI device. They can function as momentary or toggle (latching) switches. If Time Division is activated, these switches select the time division of the Arpeggiator and Note Repeat features.
-
Pads: Use these pads to send MIDI Note messages to your software or external MIDI sound module. The pads are pressure- and velocity-sensitive, which makes them very responsive and intuitive to play when triggering drum hits or other samples.
- Pad Bank: Use this button to cycle through Pad Banks A, B, C, and D. Between these 4 banks with 8 pads per bank, you can access up to 32 MIDI events.
- Time Div: Use this button and the switches to select the current Time Division, which determines the rate of the Note Repeat and Arpeggiator features. While Time Division is active, the switches will not send any of their normal MIDI CC, Program Change, or Program Bank messages.
- Full Level: Press this button to activate or deactivate Full Level. When Full Level is active, the pads always play at their maximum velocity no matter how hard or soft you hit them.
- Note Repeat / Config: Use this button to activate or deactivate Note Repeat. While Note Repeat is active, striking a pad causes its note to retrigger at a rate based on the current Tempo and Time Division settings. You can also sync Note Repeat to an internal or external MIDI Clock source. Press Shift and this button to configure Note Repeat's settings.
- Tap Tempo: Tap this button at the desired rate to enter a new tempo.
Important: This feature does not work when the Advance 25 is set to External sync.
-
Display: Use this full-color display to view Advance 25's menus, options, parameters, and settings.
-
Page Left/Right: Use these buttons to move between the available pages in the display.
-
Data Dial: Use this dial to change parameter values, settings, etc. in the display. Pressing the dial also functions as an Enter button.
-
Cursors: Use these buttons to navigate through the menus and options in the current page in the display.
-
Mode Buttons: Press one of these buttons to enter its primary mode (labeled above the button). Press and hold Shift and then press one of these buttons to its secondary mode (labeled under the button). See Basic Operation > Modes for more information.
-
Shift: Press and hold this button to enable secondary functions of certain other buttons on Advance 25.
-
Transport Control Buttons: These three buttons are dedicated buttons for sending conventional transport control commands: Stop, Play, and Record. These can be set to send MIDI (Start/Stop), pre-assigned MIDI CC values, MMC (MIDI Machine Control), and MMC/MIDI SysEx. The PTEX setting is for use with Avid® Pro Tools® Express only.
-
Loop: Press and hold this button to activate the Loop or Repeat feature in your software. This button is considered a transport control, so it can be set to send the same messages as the other transport control buttons: MIDI (Start/Stop), pre-assigned MIDI CC values, MMC (MIDI Machine Control), and MMC/MIDI SysEx. The PTEX setting is for use with Avid® Pro Tools® Express only.
Important: Your software must be able to loop or repeat in order to use this feature. Also, make sure that you are using the Advance 25 Preset named after your particular software. If your software does not have a corresponding Advance 25 Preset, configure the Transport Format in Global Mode so it communicates properly with your software.
Rear Panel
-
Cable Restraint: You can secure a power adapter cord to this restraint to help avoid disconnecting it accidentally.
-
Power Button: Press this button to power the Advance 25 on or off.
-
Power Input: Connect this power input to a power outlet using an optional power adapter (6 V DC, 1 A, center-positive, sold separately). Alternatively, if you want to use Advance 25 to control an external MIDI device and without a computer connection, you can connect Advance 25's USB Port to a power outlet using a standard USB charger (sold separately).
Important: If you use a USB charger to power Advance 25, set any relevant controls to send their MIDI messages out of the MIDI Out. Any controls set to transmit only over the USB Port will not be sent to a device connected to the MIDI Out.
- USB Port: Use a standard USB cable to connect this USB port to your computer. The computer's USB port provides ample power to Advance 25. If you connect it to a USB hub, make sure it is a powered hub. This connection is also used to send and receive MIDI data to and from your computer.
You can also power Advance 25 by connecting this USB port to a power outlet using a standard USB charger (sold separately). If you do this, set any relevant controls to send their MIDI messages out of the MIDI Out. Any controls set to transmit only over the USB Port will not be sent to a device connected to the MIDI Out.
When using Advance 25 with external MIDI equipment:
- If an external device is connected to the MIDI Out, your computer can send MIDI messages out along this path: Computer → Advance 25 → External Device.
-
If an external device is connected to the MIDI In, the external device sends MIDI messages in along this path: External Device Advance 25 Computer. MIDI messages can then be sent to an external device via the MIDI Out, but they must pass through the computer first.
-
MIDI Out: Use a standard five-pin MIDI cable to connect this MIDI Out to the MIDI In of an external MIDI device (e.g., a synthesizer, sequencer, drum machine, etc.). Please see the above USB Port description for information about how MIDI messages are routed while using Advance 25.
-
MIDI In: Use a standard five-pin MIDI cable to connect this MIDI In to the MIDI Out of an external MIDI device (e.g., another MIDI controller). The MIDI messages sent to this MIDI In computer via the USB port. Please see the above USB Port description for information about how MIDI messages are routed while using Advance 25.
-
Sustain Pedal Input: Connect an optional 1/4" (6.35 mm) TS sustain pedal to this input.
-
Expression Pedal Input: Connect an optional 1/4" (6.35 mm) TRS expression pedal to this input.
-
Kensington ^® Lock Slot: You may use this Kensington lock slot to secure the Advance 25 to a table or other surface.
Basic Operation
You can use Advance 25 in your setup in a few different ways, described here. We also recommend downloading the full User Guide to learn more and get the most use out of your Advance 25. Visit akaipro.com and find the webpage for Advance 25 to download the User Guide.
Setup Scenarios
With VIP in Your DAW
The included VIP software lets you get the most control and function out of your Advance 25. VIP is essentially a host for your plugins, a hub where you can create, edit, and manage your patches (presets) for your various plugins. When VIP is used as a plugin, as in this scenario, all audio from VIP will be sent into your DAW on its track. You can switch between Advance 25's Control Mode to control VIP or MIDI Mode to control your DAW (see the Modes section for more information).
Tip: You can use Control Edit Mode to assign some knobs to MIDI CC messages instead of VST parameters. This lets you control your plugin and your DAW while in Control Mode. See Modes > Control Edit Mode for more information.
Tip: As with other plugins, you can use multiple instances of VIP in your DAW, each on its own track.
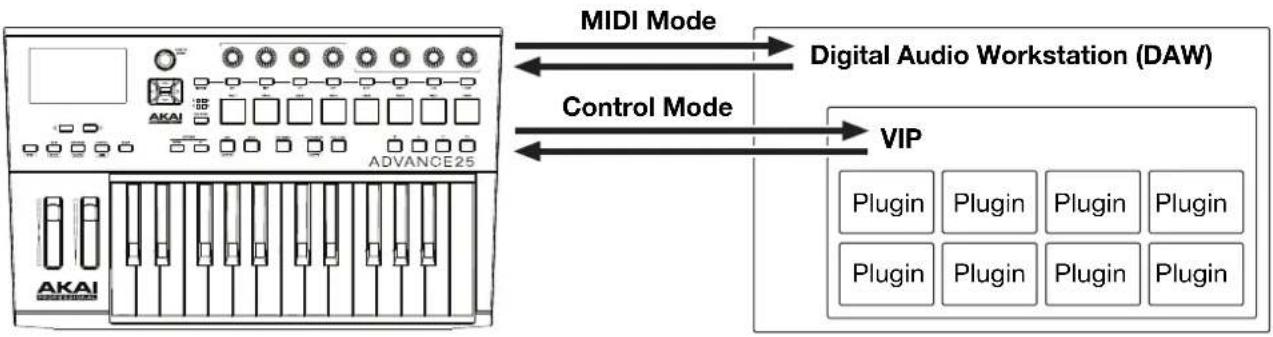
flowchart
graph LR
    A["ADVICE25"] -->|MIDI Mode| B["Digital Audio Workstation (DAW)"]
    A -->|Control Mode| C["VIP"]
    C --> D["Plugin Plugin Plugin Plugin"]
    C --> E["Plugin Plugin Plugin Plugin"]
With VIP in Standalone Mode (Without a DAW)
You can use VIP in Standalone Mode without a DAW. This works the same way as when used as a plugin (described above) except the audio is routed to your computer's sound card instead of to your DAW. You can use Advance 25's Control Mode to control VIP (see the Modes section for more information).

flowchart
graph LR
    A["Device 25"] -->|Control Mode| B["VIP"]
    B --> C["Plugin"]
    B --> D["Plugin"]
    B --> E["Plugin"]
    B --> F["Plugin"]
    B --> G["Plugin"]
    A --> H["ADVICE 25"]
With Your DAW Only
You can use Advance 25 as a standard USB MIDI controller for your music creation software. We've created presets for several popular DAWs so you can use Advance 25 with your projects in the most logical and intuitive way possible. You can use Advance 25's MIDI Mode to control your DAW (see the Modes section for more information).

flowchart
graph LR
    A["ADVICE25"] -->|MIDI Mode| B["Digital Audio Workstation (DAW)"]
With External MIDI Equipment (Without a Computer)
You can connect an external MIDI device (synth, drum machine, etc.) to Advance 25's MIDI Out, letting you use Advance 25 to control it, whether or not you're connected to a computer. If you aren't connected to a computer, though, remember to power Advance 25 externally (see Features > Rear Panel > Power Input). You can use Advance 25's MIDI Mode to control your DAW (see the Modes section for more information)
Display and Navigation
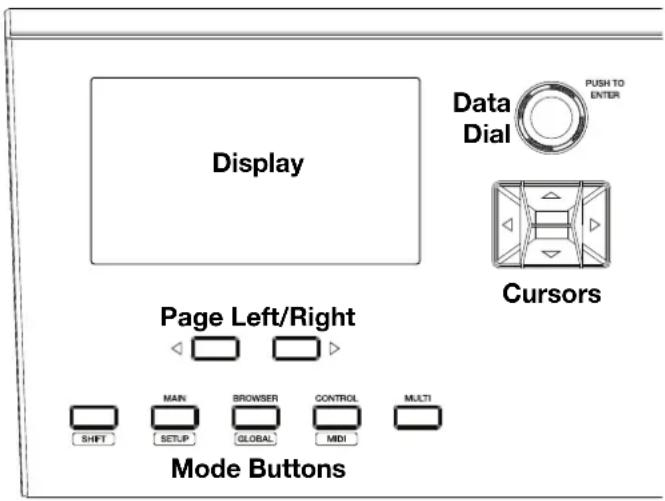
Advance 25's display shows information about its current mode and operations. You can navigate its different modes, pages, etc. by using the following controls:
- Data Dial: Use this dial to change a selected parameter values, settings, etc. in the display. Press the dial to enter or confirm a command or setting.
- Cursors: Use these buttons to navigate through the menus and options in the current page in the display.
- Page Left/Right: Use these buttons to move between the available pages in the display. When there is a page available to the left or right of the current one, the corresponding button will light up.
- Mode Buttons: Press one of these buttons to enter its primary mode (labeled above the button). Press and hold Shift and then press one of these buttons to its secondary mode (labeled under the button).
The display contains the essential information you'll need during performance, recording, or production. When using VIP, though, the VIP software window on your computer may contain additional information, depending on the current mode. Keep this in mind while exploring the different modes in VIP (see the following Modes section for more information).
Modes
Advance 25 has ten different modes of operation. Enter each mode by pressing its corresponding Mode Button (or Shift and the button, if it is a secondary button command). Note that a mode's appearance may depend on whether or not you are using the VIP software.
Main Mode
When using VIP, Main Mode shows a list of all available patches for all plugins in VIP.
- Use the Cursors to move between different fields and tabs. You can change some global settings in this mode (MIDI channel (MIDI Ch), octave (Oct), and transposition (Trans)), as well.
- Use the Data Dial to move through the list of patches or to change a value or setting.

- Press the Page Left button to access Key Control mode, which enables you to lock the playable notes to a specific key and scale or the chords of a progression.
o Use the Cursors to move between different fields and tabs.
o Use the Data Dial to change a value or setting.
- Press the Page Right button to view the DAW Control screen. This screen shows a list of all available instances of VIP. The current instance is highlighted yellow. The left column shows the patch name, the center column shows the plugin name, and the right column indicates which keyboard is controlling the current instance.
o Turn the Data Dial to select another instance of VIP and then press it to confirm your choice.
Note: Only the encoders and switches will control this currently selected instance of VIP. The pads and keys will send their MIDI note messages to record-armed tracks in your DAW. Keep this in mind as you switch between instances of VIP and/or record-arm/-disarm tracks in your DAW.
When not using VIP, Main Mode shows a list of available presets that let you use Advance 61 to control your DAW. This is the same as in Setup Mode.
Setup Mode
Setup Mode shows a list of available presets that let you use Advance 25 to control your DAW. We've pre-mapped each so you can use Advance 25 to control your DAW in the most logical and intuitive way possible.
- Use the Cursors to move between different fields and tabs. You can change some global settings in this mode (MIDI channel (MIDI Ch), octave (Oct), and transposition (Trans)), as well.
- Use the Data Dial to change a value or setting.

Browser Mode
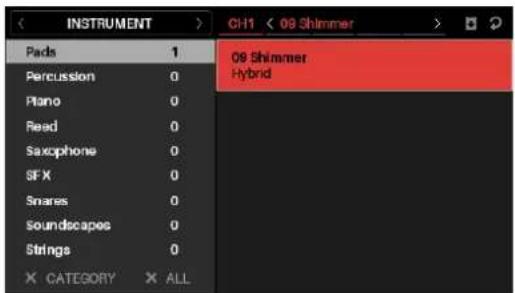
Browser Mode lets you browse and select patches of your plugins. You can access this mode only when using VIP.
- Use the Cursors to move between different fields and tabs.
- Use the Data Dial to select a plugin or patch.
- Use the Page Left/Right buttons to view each plugin category (Plugin, Instrument, Style, etc).
Global Mode
Global Mode lets you set parameters and make changes to Advance 25's general settings that are not specific to a preset.
- Use the Page Left/Right buttons to view each page of settings.
- Use the Cursors to select the setting you want to edit.
- Use the Data Dial to change a value or setting.
Important: To retain your new settings for future sessions, save them. To do this, use the Page Right button to move to the right-most page, select Save Global Settings, and press the Data Dial. Without saving, the settings will return to their default settings once you power off your Advance 25.
| GLOBAL | |
| Common Channel | A1 |
| Note Display Type | Name |
| Screen Contrast | 10 |
| Transport Format | MIDI |
| Octave | 0 |
| Trans | 0 |
Control Mode
Control Mode shows you the current settings of Advance 25's controls in VIP. You can access this mode only when using VIP.
Orange/yellow controls are assigned to parameters in VIP. Green/aqua controls are assigned to MIDI CC messages, which are sent to your DAW.
- Press the Control Mode Button to view each set of controls (encoders, switches, and pads).
- Use the Page Left/Right buttons to view each bank of that control type.
- Hold Shift and turn the Data Dial to select the desired channel within your multi.
- Use the Cursors to select a control. Alternatively, turn or press a control to select it directly.
- Press the Data Dial to enter Control Edit Mode.
Note: You can use Control Edit Mode to assign some knobs to MIDI CC messages instead of VST parameters (VST Param). This lets you control your plugin and your DAW in the same Control Mode page.

gauge
| Category | Value | | ---------------- | ------ | | Attack | +18% | | Decay | +28% | | Release | -8% | | Cutoff | -10% | | Part A Arp Rate | 16 | | Fine Tune | 0 cent | | Master Level | -7.2 dB| | Part A Edit 1 | 45% |Control Edit Mode
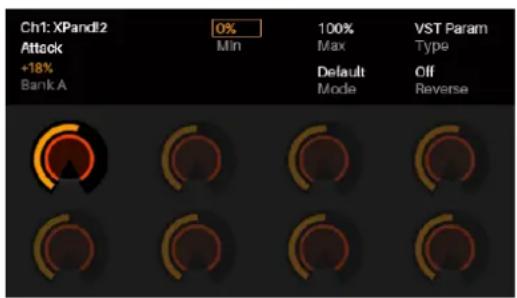
Control Edit Mode lets you edit the parameters of your controls (minimum values, maximum values, CC or note numbers, etc.) for the current patch in VIP. You can access this mode only when using VIP.
Orange/yellow controls are assigned to parameters in VIP. Green/aqua controls are assigned to MIDI CC messages, which are sent to your DAW.
Because VIP lets you control multiple patches, make sure you have selected the one you want before making adjustments in this mode.
- Press the Control Mode Button to view each set of controls (encoders, switches, and pads).
- Use the Page Left/Right buttons to view each bank of that control type.
- Use the Cursors to select the parameter you want to edit. Alternatively, turn or press a control to select it directly.
- Turn the Data Dial to change a value or setting.
- Press the Data Dial to save your changes and return to the normal Control Mode (described above).
- Press and hold Shift and press the Data Dial to access Learn Mode, which lets you assign parameters for the plugin or patch to VIP's encoders and switches, and assign chords or notes to VIP's pads.
Important: To edit parameters for the keybed, enter Global Mode instead.
MIDI Mode
MIDI Mode shows you the current settings of Advance 25's controls when used with your DAW.
- Press Shift and the Control Mode Button to view each set of controls (encoders, switches, and pads).
- When viewing the pads, use the Page Left/Right buttons to view each pad bank.
- Use the Cursors to select a control. Alternatively, turn or press a control to select it directly.
- Press the Data Dial to enter MIDI Edit Mode.
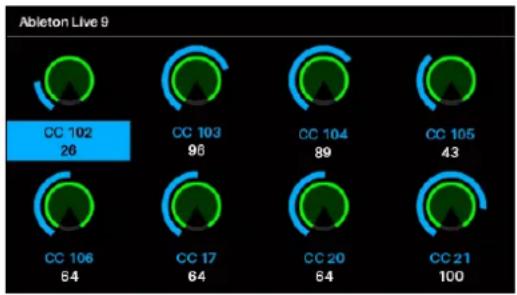
gauge
Ableton Live 9 | Category | Value | |---|---| | CC 102 | 26 | | CC 103 | 95 | | CC 104 | 89 | | CC 105 | 43 | | CC 106 | 64 | | CC 17 | 64 | | CC 20 | 64 | | CC 21 | 100 |MIDI Edit Mode
MIDI Edit Mode lets you edit the parameters of your controls (minimum values, maximum values, CC or note numbers, etc.) when used with your DAW.
- Press Shift and the Control Mode Button to view each set of controls (encoders, switches, pads, footswitch, expression pedal, modulation wheel, and pitch-bend wheel).
- When viewing the pads, use the Page Left/Right buttons to view each pad bank.
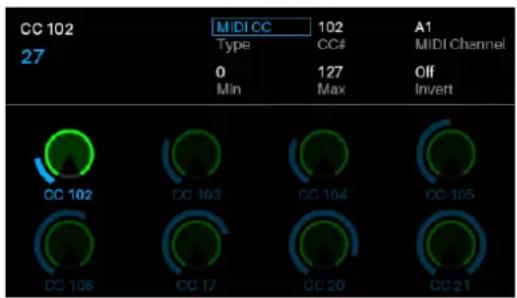
- Use the Cursors to select the parameter you want to edit. Alternatively, turn or press a control to select it directly.
- Turn the Data Dial to change a value or setting.
- Press the Data Dial when viewing an encoder, switch, or pad page to save your changes and return to the normal MIDI Mode (described above).
Important: To edit parameters for the keybed, enter Global Mode instead.
Multi Mode
Multi Mode lets you use your Advance 25 to control a multi in VIP. A multi is collection of 2–8 patches (from 1 or more plugins). Each patch is assigned to a channel, and each slot has an assigned color. When using a multi, you can simultaneously control volume, panning, solos, and mutes for each channel in a mixer-style interface. You can do this only when using VIP.
Multi Mode also contains the channel strips for the 4 buses and the master channel. Each channel of a multi sends its audio to the master channel and can also send it to each independent bus.

bar
| Category | Value | |---|---| | 09 Shimmer | -8 | | 02 Chuffing | -6 | | 11 70's Smack Bass | -4 | | 09 Belly Arp Pad | -2 |- Press the Multi button to cycle between the pages for Level & Pan, Sends, and Inserts.
- Use the Page Left/Right buttons to move between each view of 4 channels, the bus Sends, and the Master Channel.
- Use the Cursors to select a channel, bus, or insert slot.
- Press a switch to solo a channel.
- Press a pad to mute a channel.
- Turn an encoder to adjust the volume of a channel or the level of a bus send.
- Press Shift and turn an encoder to adjust the panning of a channel.
- Press the Data Dial to enter Multi Edit Mode.
Multi Edit Mode
Multi Edit Mode lets you edit the various settings of each channel when using Advance 25 (keyboard range, transposition, MIDI channel, and mute or solo status).
- Use the Cursors to select the parameter you want to edit.
- Use the Data Dial to change a value or setting.
- Press the Multi Mode Button or Data Dial to exit Multi Edit Mode and return to Multi Mode.
- To add a patch to a channel (or change a patch in a channel):
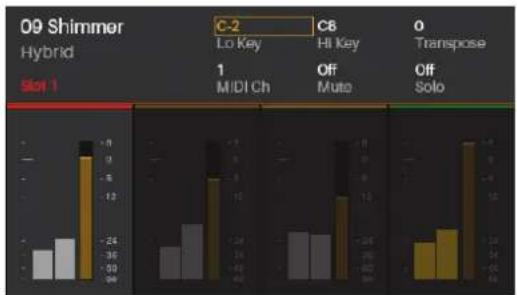
bar
| Category | Condition | Value | |---|---|---| | C-2 | Hybrid | -35 | | C-2 | Sol 1 | -24 | | CB | Hybrid | -8 | | CB | Sol 1 | -12 | | 0 | Hybrid | -36 | | 0 | Sol 1 | -26 | | Transpose | Hybrid | -24 | | Transpose | Sol 1 | -24 | | Off | MIDI Ch | -10 | | Off | Muto | -14 | | Off | Solo | -24 | | Off | Sol 1 | -10 |- Press Browser to enter Browser Mode.
- Use the Cursors to move to the Channel tab at the top of the page (CH#). The number indicates the currently selected channel of the multi.
- Turn the Data Dial to select the desired slot (CH1–CH8) or Insert Slot (for channels 1–8, sends B1–B4, and Master Channel) and then press the Data Dial.
- Use the Data Dial and Cursors as you would in Browser Mode to select and load a patch. That patch will then be loaded to the channel of the multi. Repeat Steps 2–4 to add more patches.
- You can still use the following Multi Mode controls while in Multi Edit Mode:
o Press a switch to solo a channel.
o Press a pad to mute a channel.
o Turn an encoder to adjust the volume of a channel.
o Press Shift and turn an encoder to adjust the panning of a channel.
o Use the Page Left/Right buttons to move between each view of 4 channels (the original channel's parameters will remain in the display, though).
Modo de navegador
Modo global
gauge
| Metric | Value | | --- | --- | | Custom | - | | Attack | -18% | | Decay | +28% | | Release | -8% | | Cutoff | -10% | | Part A Arp Rate | 16 | | Fine Tune | 0 percent | | Master Level | -7.2 dB | | Part A Edit 1 | +45% |bar
LEVEL & PAN | Category | M | S | |---|---|---| | 09 Shimmer | -14 | -5 | | 02 Chuffing | -24 | -12 | | 11 70's Smack Bass | -24 | -6 | | 09 Belly Arp Pad | -38 | -24 | | 09 Belly Arp Pad | -53 | -12 | | 09 Belly Arp Pad | -60 | -12 | | 09 Belly Arp Pad | -6 | 6 | | 09 Belly Arp Pad | -60 | 6 | | 09 Belly Arp Pad | -68 | 6 | The chart displays a vertical bar chart with values ranging from -12 to 6. The bars are grouped by instrument type (e.g., “Shimmer”, “Chuffing”, “Smack Bass”, “Belly Arp Pad”) and labeled with the corresponding instrument name. The Y-axis represents numerical values, and the X-axis is implicitly categorical by instrument type. The legend indicates the color coding: black for “M”, gray for “S”, yellow for “M” and “S”. The most significant data point is the value of 6 in the yellow bar for the “Belly Arp Pad” category, which appears to be the highest value in the chart. The chart includes a title and axis labels in English. The visual emphasizes relative performance or measurement across different instruments.Assistance technique
gauge
| Metric | Value | |--------|-------| | Attack | +18% | | Decay | +25% | | Release | -8% | | Cutoff | -10% | | Part A Arp Rate | 16 | | Fine Tune | 0 cont | | Master Level | -7.2 dB | | Part A Edit 1 | 45% |bar
| Category | Value | |---|---| | 09 Shimmer | -8 | | 02 Chuffing | -6 | | 11 70's Smack Bass | -4 | | 09 Belly Arp Pad | -24 | | 11 70's Smack Bass | -24 | | 09 Belly Arp Pad | -24 | | 11 70's Smack Bass | -24 | | 09 Belly Arp Pad | -24 |Modalità globale
gauge
| Metric | Value | | --- | --- | | Attack | +18% | | Decay | -28% | | Release | -8% | | Cutoff | -10% | | Part A Arp Rate | 16 | | Fine Tune D point | 7.2 dB | | Master Level | 45% | | Part A Edit 1 | 45% |
Global-Modus
gauge
| Metric | Value | | --- | --- | | Attack | +15% | | Decay | +28% | | Release | -6% | | Cutoff | -10% | | Part A Arp Rate | 16 | | Fine Tune | 0 cent | | Master Level | -7.2 dB | | Part A Edit 1 | 45% |bar
| Feature | Level & PAN | |---|---| | 09 Shimmer | -5 | | 02 Chuffing | -8 | | 1170's Smack Bass | -6 | | 09 Belly Arp Pad | -4 |bar
| Channel | Value 1 | Value 2 | |---|---|---| | 09 Shimmer Hybrid | -15 | -18 | | C-2 Lo Key | -5 | -3 | | C8 Hi Key | 6 | -24 | | 0 Transpose | 7 | -26 | | C-2 Lo Key Press To Clear Slot | 8 | -12 | | C-2 Lo Key All MIDI Ch | 9 | -10 | | C-2 Lo Key All MIDI Ch | 10 | -8 | | C-2 Lo Key All Output | 11 | -6 | | C-2 Lo Key All Output MIDI Ch | 12 | -4 | | C-2 Lo Key All Output Output | 13 | -2 | | C-2 Lo Key All Output MIDI Ch | 14 | 0 | | C-2 Lo Key All Output Output MIDI Ch | 15 | 2 | | C-2 Lo Key All Output Output Output MIDI Ch | 16 | 4 | | C-2 Lo Key All Output Output Output MIDI Ch | 17 | 6 | | C-2 Lo Key All Output Output Output MIDI Ch | 18 | 8 | | C-2 Lo Key All Output Output Output MIDI Ch | 19 | 10 | | C-2 Lo Key All Output Output Output MIDI Ch | 20 | 12 | | C-2 Lo Key All Output Output Output MIDI Ch | 21 | 14 | | C-2 Lo Key All Output Output Output MIDI Ch | 22 | 16 | | C-2 Lo Key All Output Output Output MIDI Ch | 23 | 18 | | C-2 Lo Key All Output Output Output MIDI Ch | 24 | 20 | | C-2 Lo Key All Output Output Output MIDI Ch | 25 | 22 | | C-2 Lo Key All Output Output Output MIDI Ch | 26 | 24 | | C-2 Lo Key All Output Output Output MIDI Ch | 27 | 26 | | C-2 Lo Key All Output Output Output MIDI Ch | 28 | 28 | | C-2 Lo Key All Output Output Output MIDI Ch | 29 | 30 | | C-2 Lo Key All Output Output Output MIDI Ch | 30 | 32 | | C-2 Lo Key All Output Output Output MIDI Ch | 31 | 34 | | C-2 Lo Key All Output Output Output MIDI Ch | 32 | 36 | | C-2 Lo Key All Output Output Output MIDI Ch | 33 | 38 | | C-2 Lo Key All Output Output Output MIDI Ch | 34 | 40 | | C-2 Lo Key All Output Output Output MIDI Ch | 35 | 42 | | C-2 Lo Key All Output Output Output MIDI Ch | 36 | 44 | | C-2 Lo Key All Output Output Output MIDI Ch | 37 | 46 | | C-2 Lo Key All Output Output Output MIDI Ch | 38 | 48 | | C-2 Lo Key All Output Output Output MIDI Ch | 39 | 50 | | C-2 Lo Key All Output Output Output MIDI Ch | 40 | 52 | | C-2 Lo Key All Output Output Output MIDI Ch | 41 | 54 | | C-2 Lo Key All Output Output Output MIDI Ch | 42 | 56 | | C-2 Lo Key All Output Output Output MIDI Ch | 43 | 58 | | C-2 Lo Key All Output Output Output MIDI Ch | 44 | 60 | | C-2 Lo Key All Output Output Output MIDI Ch | 45 | 62 | | C-2 Lo Key All Output Output Output MIDI Ch | 46 | 64 | | C-2 Lo Key All Output Output Output MIDI Ch | 47 | 66 | | C-2 Lo Key All Output Output Output MIDI Ch | 48 | 68 | | C-2 Lo Key All Output Output Output MIDI Ch | 49 | 70 | | C-2 Lo Key All Output Output Output MIDI Ch | 50 | 72 | | C-2 Lo Key All Output Output Output MIDI Ch | 51 | 74 | | C-2 Lo Key All Output Output Output MIDI Ch | 52 | 76 | | C-2 Lo Key All Output Output Output MIDI Ch | 53 | 78 | | C-2 Lo Key All Output Output Output MIDI Ch | 54 | 80 | | C-2 Lo Key All Output Output Output MIDI Ch | 55 | 82 | | C-2 Lo Key All Output Output Output MIDI Ch | 56 | 84 | | C-2 Lo Key All Output Output Output MIDI Ch | 57 | 86 | | C-2 Lo Key All Output Output Output MIDI Ch | 58 | 88 | | C-2 Lo Key All Output Output Output MIDI Ch | 59 | 90 | | C-2 Lo Key All Output Output Output MIDI Ch | 60 | 92 | | C-2 Lo Key All Output Output Output MIDI Ch | 61 | 94 | | C-2 Lo Key All Output Output Output MIDI Ch | 62 | 96 | | C-2 Lo Key All Output Output Output MIDI Ch | 63 | 98 | | C-2 Lo Key All Output Output Output MIDI Ch | 64 | 100 | | C-2 Lo Key All Output Output Output MIDI Ch | 65 | -100 | | C-2 Lo Key All Output Output (Output) - Cross To Clear Slot - All MIDI Ch - All Mali Ch - All Mali Out (Output) - Cross to Clear Slot - All Mali Out (Output) - Cross to Clear Slot - All Mali Out (Output) - Cross to Clear Slot - All Mali Out (Output) - Cross to Clear Slot - All Mali Out (Output) - Cross to Clear Slot - All Mali Out (Output) - Cross to Clear Slot - All Mali Out (Output) - Cross to Clear Slot - All Mali Out (Output) - Cross to Clear Slot - All Mali Out (Output) - Cross to Clear Slot - All Mali In (Output) - Cross to Clear Slot - All Mali In (Output) - Cross to Clear Slot - All Mali In (Output) - Cross to Clear Slot - All Mali In (Output) - Cross to Clear Slot - All Mali In (Output) - Cross to Clear Slot - All Mali In (Output) - Cross to Clear Slot - All Mali In (Output) - Cross to Clear Slot - All Mali In (Output) - Cross to Clear Slot - All Mali In (Output) = Cross to Clear Slot - All Mali In (Output) = Cross to Clear Slot - All Mali In (Output) = Cross to Clear Slot - All Mali In (Output) = Cross to Clear Slot - All Mali In (Output) = Cross to Clear Slot - All Mali In (Output) = Cross to Clear Slot - All Mali In (Output) = Cross to Clear Slot - All Mali In (Output) = Cross to Clear Slot - All Mali In (Output) = Cross to Clear Spot (Output) = Cross to Clear Spot (Output) = Cross to Clear Spot (Output) = Cross to Clear Spot (Output) = Cross to Clear Spot (Output) = Cross to Clear Spot (Output) = Cross to Clear Spot (Output) = Cross to Clear Spot (Output) = Cross to Clear Spot (Output) = Cross to Clear Spot (Output) = Cross to Clear Spot (Output) = Cross to Clear Spot (Output) = Cross to Clear Spot (Output) / Cross to Clear Spot (Output) = Cross to Clear Spot (Output) = Cross to Clear Spot (Output) = Cross to Clear Spot (Output) = Cross to Clear Spot (Output) = Cross to Clear Spot (Output) = Cross to Clear Spot (Output) = Cross to Clear Spot (Output) = Cross to Clear Spot (Output) = Cross to Clear Spot (Output) = Cross to Clear Spot (Output) = Cross to Clear Spot (Output) = Cross to Clear Spots (Output) = Cross to Clear Spot (Output) = Cross to Clear Spot (Output) = Cross to Clear Spot (Output) = Cross to Clear Spot (Output) = Cross to Clear Spot (Output) = Cross to Clear Spot (Output) = Cross to Clear Spot (Output) = Cross to Clear Spot (Output) = Cross to Clear Spot (Output) = Cross to Clear Spot (Output) = Cross to Clear Spot (Output) = Cross to Clear Spot (Output) <100 C-3 Box Plot: The chart displays the distribution of values for each channel and category. The data is presented in a single column format with values ranging from approximately -18 to +18. The legend indicates two distinct series: 'Cross' and 'Mildi'. The chart is divided into four sections: 'Cross', 'Mildi', and 'Transpose'. The values are explicitly labeled on the chart.Technical Specifications
| Keyboard | 25 velocity- and pressure-sensitive keys10-octave range with Octave Down/Up buttonsPitch-bend wheelModulation wheel |
| Encoders | 8 360° assignable encoders1 360° encoder with push function for display navigation |
| Pads | 8 velocity- and pressure-sensitive pads; multicolor-backlit |
| Switches | 8 assignable switches; amber-backlit23 function switches; amber-backlit4 directional cursor buttons |
| Display | 3.75" x 2.125" (95.3 mm x 54 mm) full-color LCD |
| Connections | 1 1/4" (6.35 mm) TRS expression pedal input1 1/4" (6.35 mm) TS sustain pedal input1 5-pin MIDI input1 5-pin MIDI output1 USB port1 power adapter input |
| Power | 6 V DC, 1 A, center-positive |
| Dimensions(width x depth x height) | 19.2" x 11.5" x 3.4"48.8 cm x 29.2 cm x 8.6 cm |
| Weight | 6.8 lbs.3.1 kg |
Specifications are subject to change without notice.
Trademarks and Licenses
Akai Professional is a trademark of inMusic Brands, Inc., registered in the U.S. and other countries.
Portions of the Advance 25 software are Copyright ©2014 The FreeType Project (freetype.org). All rights reserved.
Avid and Pro Tools are trademarks or registered trademarks of Avid Technology, Inc. in the U.S. and other countries. Pro Tools Express ©2012 Avid Technology, Inc. All rights reserved.
Kensington and the K & Lock logo are registered trademarks of ACCO Brands.
macOS is a trademark of Apple Inc., registered in the U.S. and other countries.
Windows is a registered trademark of Microsoft Corporation in the United States and other countries.
VST is a trademark of Steinberg Media Technologies GmbH.
All other product or company names are trademarks or registered trademarks of their respective owners.
AKAI®
PROFESSIONAL


- Box Contents
- Support
- Initial Setup
- Software/Driver Download and Installation
- To download and install the required drivers, VIP software application, and virtual instruments:
- To download additional plugins and audio content:
- Controller Setup
- Software-Controller Configuration
- With VIP in Your DAW
- To set up Advance 25 with VIP in your DAW:
- With VIP in Standalone Mode (Without a DAW)
- To set up Advance 25 with VIP in Standalone Mode:
- With Your DAW Only
- To set up Advance 25 with your DAW only:
- With External MIDI Equipment (Without a Computer)
- To set up Advance 25 with external MIDI equipment:
- Features
- Top Panel
- Rear Panel
- Basic Operation
- Setup Scenarios
- Display and Navigation
- Modes
- Main Mode
- Setup Mode
- Browser Mode
- Global Mode
- Control Mode
- Control Edit Mode
- MIDI Mode
- MIDI Edit Mode
- Multi Mode
- Multi Edit Mode
- Modo de navegador
- Modo global
- Assistance technique
- Modalità globale
- Global-Modus
- Trademarks and Licenses
Brand : AKAI
Model : Advance 25
Category : MIDI Keyboard