
2100 series HD8652 - Coffee machine PHILIPS - Free user manual and instructions
Find the device manual for free 2100 series HD8652 PHILIPS in PDF.


| Product Type | Espresso Machine |
| Model | 2100 Series HD8652 |
| Brand | Philips |
| Dimensions (H x W x D) | 30 x 25 x 35 cm |
| Weight | 7.2 kg |
| Power Supply | 220-240 V, 50-60 Hz |
| Power Consumption | 1450 W |
| Water Tank Capacity | 1.5 L |
| Bean Hopper Capacity | 250 g |
| Pump Pressure | 15 bar |
| Brew Group | Removable, dishwasher-safe |
| Grinder Type | Ceramic burr grinder, adjustable |
| Functions | Espresso, lungo, hot water |
| Milk Frother | Panarello wand |
| Water Filter | AquaClean (optional) |
| Descaling Indicator | Yes, automatic alert |
| Auto Shut-off | After 30 minutes of inactivity |
| Cleaning | Rinse brew group weekly, descale every 3 months |
| Safety Features | Auto shut-off, drip stop valve |
| Spare Parts Availability | Brew group, water tank, drip tray, AquaClean filters |
Frequently Asked Questions - 2100 series HD8652 PHILIPS
User questions about 2100 series HD8652 PHILIPS
0 question about this device. Answer the ones you know or ask your own.
Ask a new question about this device
Download the instructions for your Coffee machine in PDF format for free! Find your manual 2100 series HD8652 - PHILIPS and take your electronic device back in hand. On this page are published all the documents necessary for the use of your device. 2100 series HD8652 by PHILIPS.
USER MANUAL 2100 series HD8652 PHILIPS
natural_image
Black Philips Easy cappuccino milk tea machine with water filter and glass cups (no visible text or symbols on main device)PHILIPS
-1
-1
1_
1

4 English
Contents
Introduction 4
Important 5
Warning 5
Caution 6
Electromagnetic fields (EMF) 7
Machine overview (Fig. 1)____7
First installation 8
Installing the machine 8
Filling the water tank 8
Filling the coffee bean container 9
Heating up the machine 9
Installing the Intenza+ water filter 10
Using the machine 11
Brewing 1 or 2 cups of espresso ____ 11
Brewing milk- based beverages 12
Brewing cappuccino 12
Frothing milk 13
Hot water 13
Adjusting the machine 14
Adjusting the grinding degree 14
Adjusting the coffee volume with the MEMO function 15
Adjusting the cappuccino volume with the MEMO function 15
Cleaning and maintenance 15
Quick clean of the milk system 16
Cleaning the automatic milk frother (daily) 16
Full milk carafe cleaning with milk circuit cleaner (monthly) 16
Cleaning the brew group 19
Lubrication 21
Descaling the machine 22
Descaling procedure 22
Preparation 22
Descaling cycle 23
Rinsing cycle 23
Interruption of the descaling process 24
Meaning of light signals 25
Troubleshooting 27
Recycling 30
Guarantee and support 30
Ordering maintenance products 30
Technical specifications 31
Introduction
Dear customer, we thank you for buying this Philips 2100 series automatic espresso machine! To fully benefit from the support that Philips offers, please register your product at www.philips.com/welcome. The machine is
suitable for preparing espresso coffee using whole coffee beans. It can also dispense steam and hot water. In this user manual you find all the information you need to install, use, maintain and get the best out of your machine.
For more product information and instruction videos, have a look on our website www.philips.com/support.
Important
This machine is equipped with safety features. Nevertheless, read and follow the safety instructions carefully and only use the machine as described in these instructions, to avoid accidental injury or damage due to improper use of the machine. Keep this user manual for future reference.
Warning
- Connect the machine to a wall socket with a voltage matching the technical specifications of the machine.
- Connect the machine to an earthed wall socket.
- Do not let the power cord hang over the edge of a table or counter, or touch hot surfaces.
- Never immerse the machine, mains plug or power cord in water (danger of electrical shock).
- Do not pour liquids on the power cord connector.
- Never direct the hot water jet towards body parts: danger of burns.
- Do not touch hot surfaces. Use handles and knobs.
-
Remove the mains plug from the wall socket to switch off the machine.
-
If a malfunction occurs.
- If the machine will not be used for a long time.
-
Before cleaning the machine.
-
Pull on the plug, not on the power cord.
- Do not touch the mains plug with wet hands.
- Do not use the machine if the mains plug, the power cord or the machine itself is damaged.
- Do not make any modifications to the machine or its power cord.
- Only have repairs carried out by a service center authorized by Philips to avoid a hazard.
6 English
- The machine should not be used by children younger than 8 years old.
- This machine can be used by children aged from 8 years and above and by persons with reduced physical, sensory or mental capabilities or lack of experience and knowledge if they have been given supervision or instruction concerning use of the machine in a safe way and if they understand the hazards involved.
- Cleaning and user maintenance shall not be made by children unless they are older than 8 and supervised.
- Keep the machine and its cord out of the reach of children aged less than 8 years.
- Children should be supervised to ensure that they do not play with the machine.
- Never insert fingers or other objects in the coffee grinder.
Caution
- This machine is intended for normal household use only. It is not intended for use in environments such as staff kitchens of shops, offices, farms or other work environments.
- Always put the machine on a flat and stable surface. Keep it in upright position, also during transport.
- Do not place the machine on a hotplate or directly next to a hot oven, heater or similar source of heat.
- Only put roasted coffee beans in the bean hopper. If ground coffee, instant coffee, raw coffee beans or any other substance is put in the coffee bean hopper, it may cause damage to the machine.
- Let the machine cool down before inserting or removing any parts. The heating surfaces may retain residual heat after use.
- Never fill the water tank with warm, hot or sparkling water, as this may cause damage to the water tank and the machine.
-
Never use souring pads, abrasive cleaning agents or aggressive liquids such as petrol or acetone to clean the machine. Simply use a soft cloth dampened with water.
-
Descale your machine regularly. The machine indicates when descaling is needed. Not doing this will make your appliance stop working properly. In this case repair is not covered under your guarantee.
- Do not keep the machine at temperatures below 0irc C. Water left in the heating system may freeze and cause damage.
- Do not leave water in the water tank when the machine is not used over a long period of time. The water can be contaminated. Use fresh water every time you use the machine.
Electromagnetic fields (EMF)
This Philips appliance complies with all applicable standards and regulations regarding exposure to electromagnetic fields.
Machine overview (Fig. 1)
1 Control panel
2 Steam/ milk clean icon
3 Control dial
4 Coffee bean icons
5 Espresso button (Memo function)
6 Cappuccino button (Memo function)
7 Hot water icon
8 Descaling light
9 Warning light
10 2-cups/memo light
11 Water tank empty light
12 On/off button with light
13 Hot water/steam wand with protective handle
14 Water tank
15 Coffee dispensing spout
16 Automatic milk frother
17 Milk tube connector
18 Suction tube
19 Top of the milk carafe
20 Pin on top of the milk carafe
21 Milk carafe
22 Drip tray full indicator
23 Drip tray cover
24 Drip tray
25 Coffee grounds container
26 Brew group
27 Service door
28 Grinder adjustment knob
29 Ceramic coffee grinder
30 Coffee bean container
31 Grinding degree adjustment tool
32 Lid of coffee bean container
8 English
First installation
Installing the machine
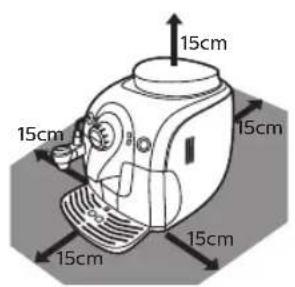
1 Remove all packaging material from the machine.
2 Place the machine on a table or worktop away from the tap, the sink and heat sources.
Note: Leave at least 15 cm of free space above, behind and on both sides of the machine.

natural_image
Diagram showing a cable connector inserted into a socket, with a plug inserted (no text or symbols present)3 Insert the small plug into the socket located on the back of the machine.
4 Insert the plug into the wall socket.

natural_image
Diagram of a car interior showing dashboard, seatbelt, and handrail (no text or symbols)5 Remove the protective sticker from the drip tray and slide the drip tray into the guiding grooves in the front of the machine.
Note: Make sure the drip tray is fully inserted.

natural_image
Diagram of a hand pump mechanism with directional arrows (no text or labels)6 Insert the automatic milk frother.
Filling the water tank
1 Turn the automatic milk frother to the left.

natural_image
Mechanical assembly diagram showing a clamping mechanism with no visible text or symbols2 Remove the water tank from the machine.
3 Rinse the water tank under the tap.

4 Fill the water tank with cold tap water up to the MAX indication.
5 Slide the water tank back into the machine.
Filling the coffee bean container
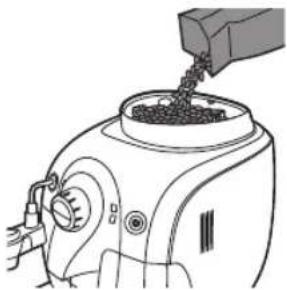
natural_image
Line drawing of a hand pouring granular material into a machine (no text or symbols)1 Fill the coffee bean container with espresso beans.
Note: Only use espresso beans. Never use ground coffee, unroasted coffee beans or caramelised coffee beans, as this may cause damage to the machine.
2 Put the lid on the coffee bean container.
Heating up the machine
During the initial heat-up process, fresh water flows through the internal circuit to heat up the machine. This takes a few seconds.
1 Place a big cup under the hot water/steam wand and the coffee spout. Make sure the control dial points to one of the coffee bean icons.
2 Press the on/off button.
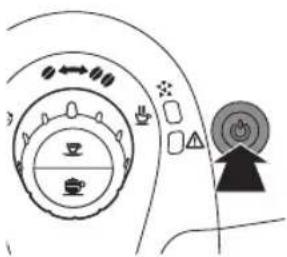
natural_image
Diagram of a vehicle's rearview and side view showing circular components with directional arrows and a central fan (no text or symbols)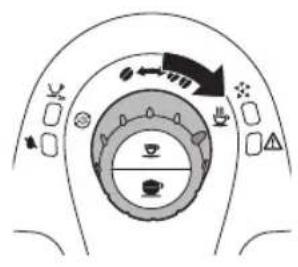
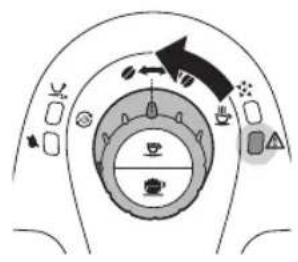
3 When the warning light flashes quickly, turn the control dial to the hot water icon and wait a few seconds.
- The warning light goes out and some water comes out of the hot water/steam wand or automatic milk frother.
flowchart
graph TD
    A["Top Left"] --> B["Top Right"]
    B --> C["Bottom Left"]
    C --> D["Bottom Right"]
    D --> E["Left"]
    D --> F["Right"]
    style A fill:#f9f,stroke:#333
    style B fill:#ccf,stroke:#333
    style C fill:#cfc,stroke:#333
    style D fill:#fcc,stroke:#333
    style E fill:#ffc,stroke:#333
    style F fill:#cff,stroke:#333
4 After a few seconds, when hot water stops coming out of the hot water/steam wand and the warning light flashes slowly, turn the control dial back to the single bean icon.
- The machine is heating up and the on/off button flashes slowly.
- When the machine has heated up, it performs an automatic rinsing cycle to clean the internal circuit with fresh water. Water flows from the coffee spout.
- When the on/off button lights up continuously, the machine is ready for the manual rinsing cycle.
Note: You can stop the automatic rinsing cycle by pressing the espresso or the cappuccino button.
Note: The automatic rinsing cycle also takes place 60 minutes after the appliance switches to standby mode or switches off.
Installing the Intenza+ water filter
We advise you to install the Intenza+ water filter as this prevents scale build-up in your machine. You can buy the Intenza+ water filter separately. For more details, see chapter 'Guarantee and support', section 'Ordering maintenance products'.

natural_image
Diagram of a 3D rectangular container with an arrow pointing to a small cylindrical component inside, no text or symbols present.1 Remove the small white filter from the water tank and store it in a dry place.
Note: Please keep the small white filter for future use. You will need it for the descaling process.

natural_image
Hand placing a small object into a clear container (no text or symbols visible)2 Remove the filter from its packaging and immerse it in cold water with the opening pointing upwards. Press the sides of the filter gently to let out the air bubbles.

3 Turn the knob of the filter to the setting that corresponds to the water hardness of the area you live in.
a Very soft water/ soft water
b Hard water (default)
c Very hard water
Note: You can test the water hardness with a water hardness test strip.

natural_image
Illustration of a hand holding a mechanical device inside a transparent container (no text or symbols visible)4 Place the filter in the empty water tank. Press it down until it cannot move any further.
5 Fill the water tank with fresh water up to the MAX indication and slide it into the machine.
6 Let the machine brew hot water until the water tank is empty (see chapter 'Using the machine', section 'Hot water').
7 Refill the water tank with fresh water up to the MAX indication and slide it back into the machine.
- The on/off button lights up continuously. The machine is ready for use.
Using the machine
To guarantee perfect espresso, the machine regularly rinses its inner circuit with water. This automatic rinsing cycle takes place 60 minutes after the appliance switches to standby mode or switches off. During the automatic rinsing cycle, some of the water flows through the inner circuit directly into the drip tray. Empty the drip tray regularly.
Brewing 1 or 2 cups of espresso
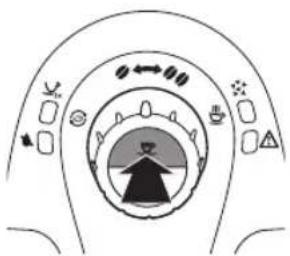
1 Make sure the on/off button light lights up continuously and the control dial points to the desired coffee strength bean icon.
2 Place 1 or 2 cups under the coffee spout.
3 Select the coffee strength by turning the dial to one or two beans. Select 2 beans for a stronger taste.
4 Press the espresso button.
flowchart
graph TD
    A["Start"] --> B{Decision Point}
    B --> C["Process Chamber"]
    C --> D{Decision Point}
    D --> E["End"]
    style C fill:#99ccff,stroke:#333
    style D fill:#99ccff,stroke:#333
Note: You can interrupt the brewing cycle at any time. Press the same button that you pressed to start brewing coffee.
- Press the espresso button once to brew 1 cup of coffee.
- Press the espresso button twice to brew 2 cups of coffee.
- When brewing 2 cups of coffee the 2-cup light lights up. The machine grinds the required amount of coffee beans for one cup and then fills both cups half. Then the machine grinds coffee beans for one cup again and fills both cups fully.
Note: When the machine is left in standby mode, it switches off automatically after 60 minutes.
12 English
Brewing milk- based beverages
Note: Use cold milk (at a temperature of approximately 5irc C/ 41irc F) with a protein content of at least 3% to ensure an optimal frothing result. You can use whole milk, semi-skimmed milk, soy milk and lactose free milk.
Brewing cappuccino
Warning: Danger of burning! Dispensing may be preceded by small jets of hot water. When steam is used, the hot water/steam wand and automatic milk frother could be hot. Only grab the steam wand by its protective handle.

natural_image
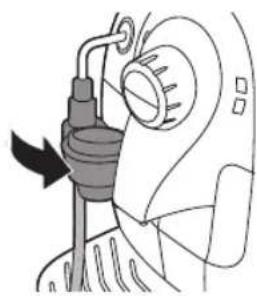
Line drawing of a hand pump mechanism with no text or symbols1 Attach the automatic milk frother to the hot water/steam wand.
natural_image
Illustration of a hand operating a handheld device with a knob and lever (no text or symbols)2 Turn the hot water/steam wand with the automatic milk frother towards the machine until the automatic milk frother touches the machine and is in horizontal position.
3 Remove the lid of the milk carafe and pour the milk in the milk carafe. Close the lid of the milk carafe.
4 Insert the other end of the suction tube into the milk carafe till the bottom of the milk carafe.

natural_image
Illustration of a coffee maker using a stand mixer device (no text or symbols visible)5 Place a large cup under the automatic milk frother and the coffee spout.
6 Select the coffee strength by turning the dial to one or two beans. Select 2 beans for a stronger taste.
flowchart
graph TD
    A["开始"] --> B{条件判断}
    B -->|是| C["执行操作"]
    B -->|否| D["结束"]
    C --> E["循环处理"]
    E --> F["输出结果"]
    style A fill:#f9f,stroke:#333
    style F fill:#ccf,stroke:#333

natural_image
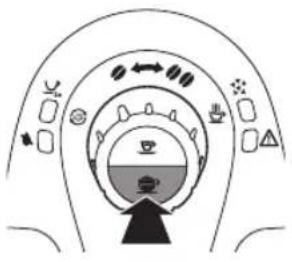
Illustration of a rectangular water heater with a handle and internal structure (no text or symbols)7 Press the cappuccino button. The machine dispenses first the milk and then coffee.
- It will take a few seconds before the machine stops dispensing.
Note: If you want to interrupt the brewing cycle press the cappuccino button again.
8 The amount of coffee and milk can be customized, see chapter 'Adjusting the machine', section 'Adjusting coffee and milk length'.
9 Place a cup under the automatic milk frother. Perform a quick clean dispensing hot water for 3-5 seconds after brewing a cappuccino, see chapter 'Cleaning and maintenance', section 'Quick Clean of the milk system'.
10 Remove the milk tube connector from the automatic milk frother.
11 Plug the milk connector to the pin on the milk container lid and put the milk container in the fridge.
Note: After dispensing a milk based beverage perform a quick clean of the milk system by dispensing hot water for 5 seconds.
Frothing milk
Warning: Danger of burning! Dispensing may be preceded by small jets of hot water. When steam is used, the hot water/steam wand and automatic milk frother could be hot. Only grab the steam wand by its protective handle.
1 Follow steps 1 to 5 from 'Brewing cappuccino' and turn the dial to the steam/milk clean icon to froth milk.
2 Turn the control dial to one or two coffee beans icon to stop frothing milk.
Hot water

natural_image
Line drawing of a coffee machine with a cup, no text or symbols presentWarning: Danger of scalding! Dispensing may be preceded by small jets of hot water. Use the appropriate protective handle only.
1 Make sure the on/off button lights up continuously. If the on/off button flashes slowly, the machine is heating up.
2 Remove the automatic milk frother. Keep the protective handle on the hot water/steam wand.
3 Place a cup under the hot water/steam wand.
14 English

4 Turn the control dial to the hot water icon.
- Water comes out of the hot water/steam wand.

5 Turn the control dial back to one of the coffee bean icons when the cup contains the preferred amount of hot water.
Adjusting the machine
You can adjust the grinding degree and coffee volume to obtain coffee that is perfectly customised to your taste.
Adjusting the grinding degree
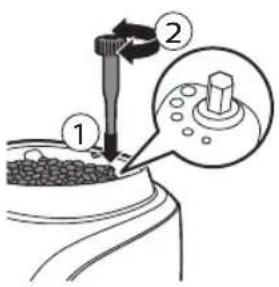
You can adjust the grinding degree of the machine. The ceramic coffee grinder guarantees accurate and perfect grinding and coarseness for every cup of coffee. It ensures full aroma preservation, delivering the perfect taste in every cup.
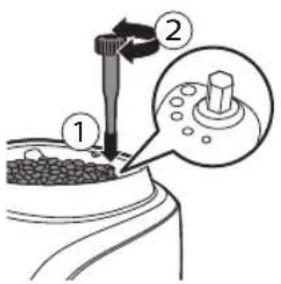
- Press the grinding degree adjustment knob firmly and then turn it one notch at a time.
- There are 5 different grinding degree settings you can choose from. The smaller the dot, the stronger the coffee.
- The difference becomes noticeable after you have brewed 2-3 cups f coffee at the new setting.
Warning: Do not turn the grinding degree adjustment knob more than one notch at a time to prevent damage to the grinder.
Adjusting the coffee volume with the MEMO function
You can adjust the coffee volume to your taste and the size of your cups.
The espresso button can be programmed.
1 Place one cup under the coffee dispensing spout.
2 Press and hold the espresso button. Release the button when the machine starts to grind coffee beans.
- The 2-cups light and the on/off button flash slowly.
3 Press the espresso button when the cup contains the desired amount of coffee.
The machine automatically saves the new setting.
Adjusting the cappuccino volume with the MEMO function
You can adjust the coffee volume to your taste and the size of your cups. The cappuccino button can be programmed.
1 Place a cup under the coffee dispensing spout.
2 Press and hold the cappuccino button. Release the button when the machine starts to grind coffee beans.
- The 2-cup light and the on/off button flash slowly.
3 Press the cappuccino button again when the cup contains the desired amount of milk.
The machine automatically saves the new setting.
Cleaning and maintenance
Regular cleaning and descaling prolongs the lifetime of your machine and ensures optimum quality and taste of your coffee.
Warning: Never use scouring pads, abrasive cleaning agents or aggressive liquids to clean the machine.
Warning: Always unplug the machine and let it cool down before you clean it.
Note: None of the detachable parts are dishwasher-proof. Rinse them under the tap.
Quick clean of the milk system
Note: After brewing a cappuccino perform a quick clean of the milk system.
1 Place a cup under the automatic milk frother.
2 Turn the control dial to the hot water icon.
3 Dispense HOT WATER for 5 seconds
4 Turn the control dial to one of the coffee bean icons to stop hot water dispensing.
Cleaning the automatic milk frother (daily)
1 Place a cup under the automatic milk frother.
2 Insert the suction tube into a cup filled with fresh water.
3 Turn the control dial to the steam/milk clean icon.
4 Dispense hot water for 5 seconds.
5 Turn the control dial to one of the coffee beans to stop hot water dispensing.
Full milk carafe cleaning with milk circuit cleaner (monthly)
Monthly cleaning of the automatic milk frother
Monthly cleaning of the automatic milk frother consists of two cleaning cycles carried out in sequence: the first cycle requires the use of Saeco milk circuit cleaner dissolved in water and the second cycle uses only water to rinse the circuit.
Caution: If the machine has been recently used, the steam tube and the automatic milk frother could be hot.
Note: Before you start the procedure, make sure that the water tank is filled up to the MAX level.

Cleaning cycle with milk circuit cleaner and water.
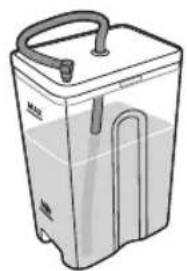
1 Pour the content of a Saeco milk circuit cleaner sachet into the milk carafe and fill the milk carafe with water up to the MAX level. Close the lid of the milk carafe.
2 Insert the other end of the suction tube into the milk carafe till the bottom of the milk carafe.
3 Place a large container under the milk dispensing spout.
4 Turn the control dial to the steam/milk clean icon.
- The machine dispenses the cleaning solution through the milk dispensing spout.
5 Let the machine dispense water until the water tank empty light lights up.
6 Detach the suction tube from the machine. Rinse the milk carafe thoroughly and fill it with fresh water up to the MAX level.
7 Repeat steps 3 to 6.
Cleaning the parts of the automatic milk frother
The automatic milk frother comprises four parts that must be disassembled:

1 Suction tube
2 Milk frother lid
3 Rubber ring
4 Milk frother
5 Rubber cover
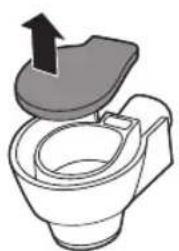
How to clean the automatic milk frother
1 Remove the automatic milk frother from the steam tube.
Caution: If the machine has been recently used, the steam tube and the automatic milk frother could be hot.
2 Remove the suction tube from the milk frother lid.

natural_image
Diagram of a mechanical device with a cable and directional arrow indicating motion (no text or symbols)3 Remove the rubber ring from the automatic milk frother.

natural_image
Mechanical component diagram showing a valve with a handle and a cylindrical shaft, no text or symbols present4 To detach the automatic milk frother, press the sides (1) and remove it by pulling it out while making slight lateral movements (2).

5 Remove the rubber lid from the milk frother.
6 Rinse the components with lukewarm water.
Note: You can also clean these components in the dishwasher.
natural_image
Illustration of a toilet with a lid and upward arrow indicating airflow or movement (no text or symbols)18 English

natural_image
Illustration of a hand using a mortar to press or press over a mechanical component (no text or symbols visible)7 To reassemble, press in the middle to attach the rubber lid to the milk frother and make sure it is in place.
natural_image
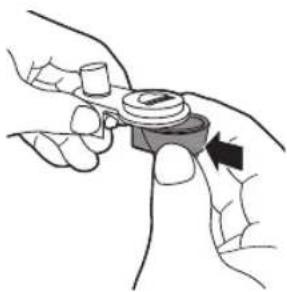
Illustration of hands holding a small mechanical component with a black arrow indicating rotation (no text or symbols)8 Attach the automatic milk frother to the milk frother lid. When the two parts lock into place, you hear a click.

natural_image
Diagram of a mechanical device with a handle and lever, no text or symbols present9 Insert the suction tube into the automatic milk frother.

natural_image
Diagram of a mechanical component with a circular top and base, showing a downward arrow indicating motion or force (no text or symbols present)10 Place the rubber ring back onto the automatic milk frother.

natural_image
Line drawing of a washing machine with a stand and bucket (no text or symbols)11 Attach the automatic milk frother back to the hot water/steam wand.
Cleaning the brew group
Warning: Do not clean the brew group in the dishwasher and do not use washing-up liquid or a cleaning agent to clean it.
Clean the brew group once a week.
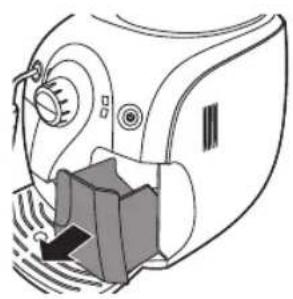
1 Switch off the machine and unplug it.
2 Remove the coffee grounds container from the machine.
natural_image
Technical line drawing of a mechanical device with no visible text or symbols3 Open the service door.

natural_image
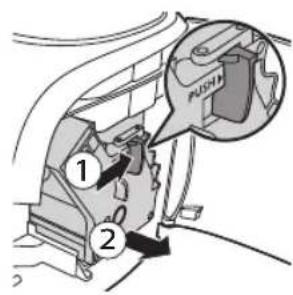
Diagram of a mechanical device with directional arrow indicating motion (no text or symbols)4 Press the PUSH button and pull at the grip of the brew group to remove it from the machine.
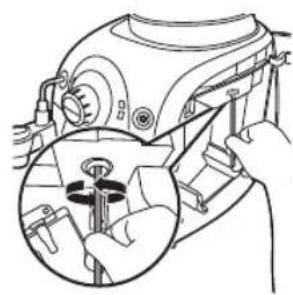
5 Clean the coffee exit duct thoroughly with a spoon handle or another round-tipped kitchen utensil.
6 Clean the inside of the machine with a damp cloth.
natural_image
Technical line drawing of a mechanical assembly with a magnified inset showing a hand operating a tool (no text or symbols present)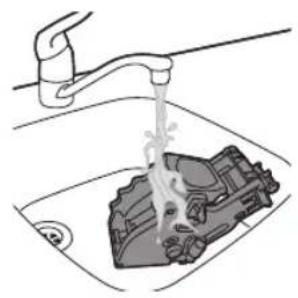
natural_image
Illustration of a hand washing a car inside a sink with a faucet (no text or symbols)7 Rinse the outside of the brew group under a lukewarm tap.
Warning: Never use any washing-up liquid or other cleaning agent to clean the brewing unit.
Warning: Do not dry the brew group with a cloth to prevent fibers from collecting inside the brewing unit. After rinsing, just shake excess water off the brewing unit or let it air-dry.

natural_image
Mechanical component diagram showing a gear-like structure with a highlighted circular component (no text or symbols)8 Before you slide the brew group back into the machine, make sure the two reference signs on the side match. If they do not match, perform the following step:

natural_image
Technical line drawing of a mechanical device with no visible text or symbols- Make sure the lever is in contact with the base of the brew group.
9 Make sure the locking hook of the brew group is in the correct position.

natural_image
Diagram of a mechanical component with a checkmark indicating assembly or inspection (no text or symbols present)- To position the hook correctly, push it upwards until it is in uppermost position.

natural_image
Diagram of a device with a switch and cross mark, no text or symbols presentNote: The hook is not correctly positioned if it is still in bottommost position.

natural_image
Technical line drawing of a mechanical component with no visible text or symbols10 Slide the brew group back into the machine along the guiding rails on the sides until it clicks into position.
Warning: Do not press the PUSH button.
11 Close the service door.

natural_image
Diagram of a mechanical device with a button and directional arrow (no text or symbols)12 Slide the coffee grounds container back into the machine.
Lubrication
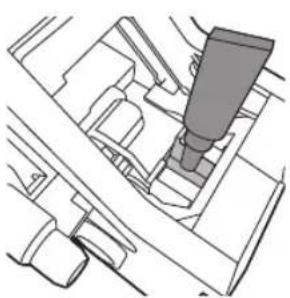
For optimal performance of the machine you have to lubricate the brew group. See table below for the lubrication frequency. For support visit our website: www.philips.com/support.
Type of usage
Nr of daily products Lubrication frequency
| Low 1-5 Every 4 months |
| Normal 6-10 Every 2 months |
| Heavy >10 Monthly |
natural_image
Technical line drawing of a mechanical assembly with no visible text or symbols1 Switch off the machine and unplug it.
2 Remove the brew group and rinse it under a lukewarm tap as described in section 'Weekly cleaning of the brew group'.
3 Apply a thin layer of grease around the shaft in the bottom of the brew group.
22 English

natural_image
Technical line drawing of a mechanical assembly with a lever and housing (no text or symbols)4 Apply a thin layer of grease to the rails on both sides (see figure).
5 Insert the brew group as described in section 'Weekly cleaning of the brew group'.
You can use the grease tube multiple times.
Descaling the machine
Scale builds up inside the machine during use. It is essential to descale the machine when the orange descaling light lights up continuously. Only use the special Philips Saeco descaling solution to descale the machine. The Philips Saeco descaling solution is designed to ensure optimal performance of the machine. You can buy the Philips Saeco descaling solution in the online shop at www.shop.philips.com/service.
Note: The use of other descaling products may cause damage to the machine and leave residues in the water.
Warning: Never drink the water with descaling mixture that you pour into the water tank or any water with residues that comes out of the machine during the descaling procedure.
Note: For more on-line support please visit our dedicated descaling page: www.philips.com/descale.
Descaling procedure
The descaling procedure lasts approximately 30 minutes and consists of a descaling cycle and a rinsing cycle.
Preparation
1 Switch off the machine.
Warning: If you do not switch off the machine, you cannot enter the descaling
2 Empty the drip tray and place it back. Remove the automatic milk frother (if present).
3 Empty the water tank and remove the Intenza+ water filter (if present). Pour the entire bottle of the Philips/Saeco descaling solution into the water tank.
4 Add water to the descaling solution in the water tank up to the MAX indication.
5 Make sure the control dial is set to the coffee bean icon.
6 Place a bowl under the hot water/steam wand and coffee dispensing spout.
flowchart
graph TD
    A["Input"] --> B{Control}
    B -->|Yes| C["Output"]
    B -->|No| D["Feedback Loop"]
    D --> E["Control Unit"]
    E --> F["Output"]
    style A fill:#f9f,stroke:#333
    style F fill:#bbf,stroke:#333
Descaling cycle
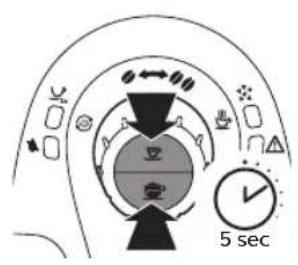
1 Press the espresso button and cappuccino button simultaneously for approximately 5 seconds. - The orange descaling light flashes slowly during the entire descaling cycle.

2 Turn the control dial to the hot water icon and brew hot water. Let hot water flow out of the hot water/steam wand for 10 seconds. 3 Turn the control dial back to the single bean icon. Wait approximately 1 minute to let the descaling solution act. 4 Press the espresso button to brew a cup of espresso. Wait approximately 1 minute to let the descaling solution act.
Note: During the descaling process, the coffee grinding function does not work. If you press the espresso button, only water will flow out of the machine.
5 Repeat steps 2 to 4 until the 'water tank empty' light lights up continuously.
Rinsing cycle
1 Remove the water tank from the machine and rinse it.
2 Fill the water tank with fresh tap water up to the MAX indication and slide the water tank back into the machine.
3 Empty the big cup and place it back onto the drip tray under the hot water/steam wand.
4 Press the espresso button and brew a cup of espresso. Repeat this twice.

natural_image
Diagram of a biological or geological cross-section with concentric circles and directional arrows, no readable text or symbols present.24 English

5 Turn the control dial to the hot water icon.
6 Let hot water flow out of the hot water/steam wand until the 'water tank empty' light lights up continuously.
Note: If you want to interrupt the water flow, turn the control dial back to the coffee bean icon. To restart the water flow, turn it back to the hot water icon.
7 Remove the drip tray, rinse it and place it back.
8 Reattach the automatic milk frother.
9 Remove the water tank and rinse it.
10 Reinstall the Intenza+ water filter (if present).
11 Fill the water tank with fresh tap water up to the MAX indication and slide the water tank back into the machine.
12 Press the on/off button to switch off the machine.
When you switch the machine back on, it is ready for use again.
Interruption of the descaling process
If the machine gets stuck in the descaling procedure, you can press the on/off button. This allows you to complete the descaling procedure. Follow the steps below to make sure your machine is ready to brew coffee again.
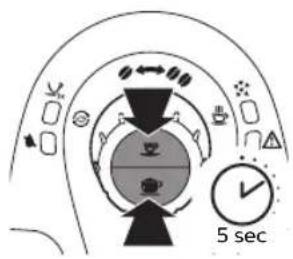
1 Press the espresso button and cappuccino button simultaneously for approximately 5 seconds.
2 Remove the drip tray, rinse it and place it back.
3 Remove the water tank and rinse it.
4 Fill the water tank with fresh tap water up to the MAX indication and slide the water tank back into the machine.
5 Press the espresso button and brew a cup of espresso. Repeat this twice.
6 Turn the control dial to the hot water icon. Let hot water flow out of the hot water/steam wand until the water tank empty light lights up continuously.
7 Remove the drip tray, rinse it and place it back.
8 Reattach the automatic milk frother.
9 Remove the water tank and rinse it.
10 Reinstall the Intenza+ water filter (if present).
11 Fill the water tank with fresh tap water up to the MAX indication and slide the water tank back into the machine.
12 Press the on/off button to switch off the machine.
When you switch the machine back on, it is ready for use again.

natural_image
Diagram of a circular structure with directional arrows and a central symbol, possibly representing a mechanical or architectural component (no readable text or labels)Meaning of light signals
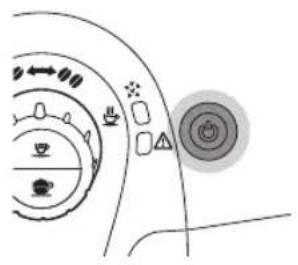
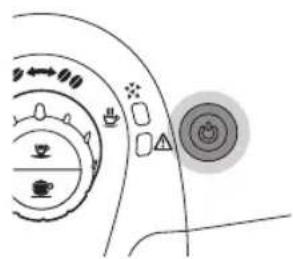
- The on/off button light lights up continuously. The machine is ready for use.

natural_image
Diagram showing a sequence of icons and symbols arranged in curved and rectangular patterns, with no readable text or labels.- The on/off button flashes slowly. The machine is warming up or performing a procedure.

natural_image
Diagram showing a stylized food and beverage scene with icons and shapes (no readable text or symbols)- The on/off button flashes quickly. The machine is overheated. Brew a cup of hot water to cool down the machine.

- The descaling and on/off button lights light up continuously. You have to descale the machine. Follow the instructions in chapter 'Descaling the machine'.

- The descaling light flashes slowly. The machine is in the descaling cycle.
English

- The 2-cup and on/off button lights flash slowly. The machine is programming the amount of coffee to brew. Follow the instructions in chapter 'Using the machine', section 'Adjusting the coffee volume'.
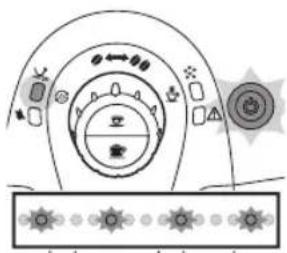
- The 2-cup light lights up continuously and the on/off button flashes slowly. The machine is brewing two cups of coffee.

- The water tank empty light lights up continuously. The water level is low. Fill the water tank with fresh water up to the MAX level.
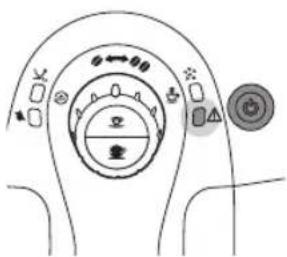
- The warning light lights up continuously and the on/off button light goes out. The coffee grounds container is full. Empty the coffee grounds container while the machine is on. Make sure that the warning light flashes before you reinsert the coffee grounds container.

- The warning and on/off button lights light up continuously. The coffee bean container is empty. Refill the coffee bean container.

- The warning light flashes quickly. There is no water in the internal circuit. Turn the control dial to the hot water icon and let hot water come out of the machine until the water flows continuously. See chapter 'Preparing for use' section 'Heating up the machine'. Follow steps 3 and 4.

- The warning light flashes slowly. The brewing unit is not correctly inserted, the coffee grounds container is not inserted, the service door is open or the control dial is not in the correct position. Make sure the brewing unit and coffee grounds container are inserted correctly, the service door is closed and the control dial is in the correct position. If you cannot take out the brewing unit or place it back, switch the machine off and back on again.

flowchart
graph TD
    A["Start"] --> B{Decision}
    B -->|Yes| C["Process Step 1"]
    B -->|No| D["Process Step 2"]
    C --> E["End"]
    D --> E
    E --> F["Final Process"]
- All the lights flash slowly and simultaneously. The machine is out of order. Switch off the machine for 30 seconds, then switch it back on. Try this two or three times. If the machine does not reset, contact the Philips Consumer Care Centre.
Troubleshooting
This chapter summarises the most common problems you could encounter with the machine. If you are unable to solve the problem with the information below, visit www.philips.com/support for a list of frequently asked questions or contact the Philips Consumer Care Centre in your country.
| Problem | Cause Solution | |
| There is water under the machine. | The drip tray is too full and overflowed. | Empty the drip tray when the drip tray full indicator pops up through the drip tray. Always empty the drip tray before you start descaling the machine. |
| The machine is not placed on a horizontal surface. | Place the machine on a horizontal surface so that the drip tray full indicator works properly. | |
| The machine does not switch on. | The machine is disconnected. | Make sure the small plug is inserted into the socket. Plug in and switch on the machine. |
28 English
| The machine is stuck in the descaling procedure. | The descaling process has been interrupted or proceeded in an incorrect order. | Press the on/off button. You can restart the descaling procedure or follow the instructions in chapter ‘Descaling the machine’, section ‘Interruption of the descaling process’. |
| The coffee is not hot enough. The cups you use are cold. | Preheat the cups by rinsing them with hot water. | |
| You added milk. Whether the milk you add is warm or cold, it will always decrease the temperature of the coffee to some extent. | ||
| The coffee temperature decreases over time. | The machine has not been descaled in time. | Descale the machine. |
| No hot water or steam comes out of the hot water/steam wand. | The hot water/steam wand is clogged. | Check if the hole of the hot water/steam wand is clogged. If so, clean the hole with a pin. |
| The automatic milk frother may be dirty. | Clean the automatic milk frother. | |
| Replace the water filter (if present). | Remove the water filter en try again to dispense hot water. If this works replace the water filter. | |
| The coffee has too little crema or is watery. | The grinder is set to a coarse setting. | Adjust the grinder to a finer setting. |
| The coffee blend is not the correct one. | Try another coffee blend. | |
| The machine is performing its self-adjustment. | Brew a few cups of coffee. | |
| The brew group is dirty. Clean the brew group. | ||
| The brew group cannot be removed. | The brew group is not positioned correctly. | Close the maintenance door. Switch the machine off and back on again. Wait for the machine ready screen to appear and then remove the brew group. |
| The coffee grounds container is not removed. | Remove the coffee grounds container before removing the brew group. | |
| The machine is still in the descaling process. | You cannot remove the brew group when the descaling process is active. First complete the descaling process and then remove the brew group. | |
| The brew group cannot be inserted. | The brew group is not in the correct position. | The brew group was not put in rest position before it was placed back.Make sure that the lever is in contact with the base of the brew group and that the hook of the brew group is in the correct position. |
| Place the drip tray and the coffee grounds container back. Leave the brew group out. Close the maintenance door and switch the machine on and off.Then try to reinsert the brew group. | ||
| The machine grinds the coffee beans but no coffee comes out. | The grind is set too fine. Adjust the grinder to a coarser setting. | |
| The brew group is dirty. Clean the brew group. | ||
| The coffee dispensing spout is dirty. | Clean the coffee dispensing spout and its holes with a pipe cleaner. | |
| The coffee exit duct is blocked. | Clean the coffee exit duct with the handle of the multifunctional tool or a spoon handle. | |
| The coffee is too weak. The grinder is set to a coarse setting. | Adjust the ceramic coffee grinder to a finer setting (see chapter ‘Using the machine’, section ‘Adjusting the grinding degree’). | |
| The machine is performing its selfadjustment. | Brew a few cups of coffee to let the machine adjust itself to the new grinding settings. | |
| The coffee blend is not the correct one. | Use a different type of coffee beans. | |
| The drip tray is quickly filled. This is normal. The machine uses water to rinse the internal circuit and brew group. Some water flows through the internal system directly into the drip tray. | Empty the drip tray when the 'drip tray full' full indicator pops up through the drip tray cover. | |
| Place a cup under the dispensing spout to collect rinsing water. | ||
| The brew group or the drains behind or under the brew group may be blocked.Rinse the brew group with lukewarm water and clean the upper filter carefully. Also clean the inside of the machine with a soft, damp cloth. | ||
30 English
| There is not enough coffee in my cup. | There is no water in the internal circuit. | Air may be present in the internal circuit. Rinse the internal circuit of the machine by turning the control dial to the hot water icon and letting some hot water flow out of the machine. |
| The cup volume has been changed. | Set with the memo function the cup volume. | |
| The brew group is dirty. | Clean the brew group (see chapter ‘Cleaning and maintenance’, section ‘Cleaning the brew group’). | |
| The milk does not froth. The automatic milk frother is dirty or not assembled or installed correctly. | Clean the automatic milk frother and make sure it is correctly assembled or installed. | |
| The type of milk used is not suitable for frothing. | Different types of milk result in different amounts of froth and different froth qualities. Semi-skimmed or full-fat cow’s milk give good results. | |
Recycling
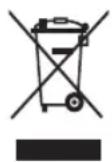
- This symbol means that this product shall not be disposed of with normal household waste (2012/19/EU).
- Follow your country's rules for the separate collection of electrical and electronic products. Correct disposal helps prevent negative consequences for the environment and human health.
Guarantee and support
If you need information or support, please visit www.saeco.com/support or read the separate guarantee leaflet.
If you need information or support, please contact the Philips Saeco hotline in your country. Contacts are included in the warranty booklet supplied separately or visit www.saeco.com/support.
Ordering maintenance products
- Intenza+ water filter (CA6702)
- Lubricant (HD5061)
- Descaling solution (CA6700)
Technical specifications
| Feature | Value/ location |
| Nominal voltage Inside of service door | |
| Power rating Inside of service door | |
| Size (w x h x d) 295mm x 325mm x 420mm | |
| Weight 6.9 kg | |
| Material Plastic | |
| Cord length 0.8m -1.2m | |
| Water tank capacity 1000ml | |
| Cup size Up to 95mm | |
| Coffee bean container capacity 170g | |
| Coffee grounds container capacity 8 cakes | |
| Pump pressure 15 bar | |
| Boiler Stainless steel | |
| Safety devices Thermal fuse | |
32 繁體中文
内容
natural_image
Diagram showing a cable being inserted into a plug, with no text or symbols present.natural_image
Diagram of a mechanical device with a gear and lever mechanism (no text or symbols)natural_image
Diagram of a hand pump mechanism with no visible text or symbols6 安裝自動奶泡機。
加水至水箱内

natural_image
Mechanical assembly diagram showing a clamping mechanism with no visible text or symbolsnatural_image
Line drawing of a hand pouring granular material into a device (no text or symbols)flowchart
graph TD
    A["Central Node"] --> B["Circle Node 1"]
    A --> C["Circle Node 2"]
    B --> D["Circle Node 3"]
    C --> E["Circle Node 4"]
    D --> F["Arrow to Center"]
    E --> G["Arrow to Right"]
    F --> H["Arrow to Left"]
    G --> I["Arrow to Right"]
2 按下開關按鈕。

natural_image
Diagram of a rectangular device with an arrow pointing to a central component (no text or symbols)natural_image
Illustration of a hand placing a small object into a glass container (no text or symbols)natural_image
Illustration of a hand holding a mechanical component inside a container (no text or symbols visible)natural_image
Diagram of a circular mechanical or electrical component with directional arrows and symbols, no readable text or labels present.沖煮奶類飲料
4 按下義式濃縮咖啡按鈕。
natural_image
Diagram of a hand pump mechanism with directional arrow (no text or labels)
natural_image
Line drawing of a hairdryer with a hand operating the brush (no text or symbols)
natural_image
Illustration of a coffee maker using a stand mixer machine (no text or symbols visible)1 將自動奶泡機裝至熱水/蒸氣棒。
natural_image
Illustration of a rectangular water heater with a handle and side panel (no text or symbols)natural_image
Line drawing of a coffee machine with a coffee cup, no text or symbols present
flowchart
graph TD
    A["Start"] --> B{Condition}
    B -->|Yes| C["Process Step 1"]
    B -->|No| D["Process Step 2"]
    C --> E["End"]
    D --> F["End"]
調整咖啡機
natural_image
Diagram of a mechanical device with a curved handle and arrow indicating direction (no text or symbols)2 從奶泡機上蓋拆除吸塵管。

natural_image
Mechanical component diagram showing a valve with a cylindrical shaft and upward arrow (no text or symbols)3 從自動奶泡機拆除橡膠圈。

natural_image
Illustration of a toilet with a lid and upward arrow indicating airflow (no text or symbols)natural_image
Illustration of a hand using a mortar to press or press over a mechanical component (no text or symbols visible)natural_image
Illustration of hands holding a small mechanical component with a black arrow indicating rotation (no text or symbols)natural_image
Diagram of a mechanical device with a handle and lever, no text or symbols present9 將吸塵管裝入自動奶泡機。

natural_image
Diagram of a mechanical component with a circular top and base, showing a downward arrow indicating motion or force (no text or symbols present)10 將橡膠圈裝回自動奶泡機。

natural_image
Line drawing of a washing machine with a stand and bucket (no text or symbols)11 將自動奶泡機裝回熱水/蒸氣棒。
清洗沖煮組件
natural_image
Technical line drawing of a mechanical device with no visible text or symbols每週清潔沖煮組件一次。
natural_image
Diagram of a mechanical device with internal components and directional arrow (no text or symbols)3 打開維修門蓋。

natural_image
Technical line drawing of a mechanical device with a magnified inset showing internal components (no text or symbols)natural_image
Illustration of a kitchen sink with a hand pouring liquid into a mechanical component (no text or symbols)7 在水龍頭下以溫水沖洗沖煮組件外部。
natural_image
Technical line drawing of a mechanical device with no visible text or symbols確定拉桿接觸到沖煮組件底部。
natural_image
Diagram of a mechanical device with a lever and housing (no text or symbols)natural_image
Diagram of a mechanical device with a cross mark indicating a disassembly or disassembly (no text or symbols present)natural_image
Diagram of a mechanical device with a handle and internal components, no visible text or symbolsnatural_image
Diagram of a mechanical device with a knob and internal components, showing no text or symbols.12 將咖啡粉槽推回咖啡機中。
潤滑
natural_image
Technical line drawing of a mechanical assembly with a central component (no text or symbols)natural_image
Technical line drawing of a mechanical assembly with a lever and housing (no text or symbols)natural_image
Diagram of a circular structure with internal components and directional arrows, no readable text or symbols present.指示燈號的意義
natural_image
Diagram of a coffee machine interior with directional arrows and a circular control knob (no text or symbols)natural_image
Diagram of a spacecraft with orbital paths and a star-shaped target (no text or symbols)natural_image
Diagram of a spacecraft or spacecraft with orbital paths and a star-shaped target (no text or symbols)
- PHILIPS
- English
- Contents
- Introduction
- Important
- Warning
- English
- Caution
- Electromagnetic fields (EMF)
- Machine overview (Fig. 1)
- English
- First installation
- Installing the machine
- Filling the water tank
- Filling the coffee bean container
- Heating up the machine
- Installing the Intenza+ water filter
- Using the machine
- Brewing 1 or 2 cups of espresso
- English
- Brewing milk- based beverages
- Brewing cappuccino
- Frothing milk
- Hot water
- English
- Adjusting the machine
- Adjusting the grinding degree
- Warning: Do not turn the grinding degree adjustment knob more than one notch at a time to prevent damage to the grinder.
- Adjusting the coffee volume with the MEMO function
- Adjusting the cappuccino volume with the MEMO function
- Cleaning and maintenance
- Warning: Never use scouring pads, abrasive cleaning agents or aggressive liquids to clean the machine.
- Warning: Always unplug the machine and let it cool down before you clean it.
- Quick clean of the milk system
- Cleaning the automatic milk frother (daily)
- Full milk carafe cleaning with milk circuit cleaner (monthly)
- Monthly cleaning of the automatic milk frother
- Cleaning cycle with milk circuit cleaner and water.
- Cleaning the parts of the automatic milk frother
- How to clean the automatic milk frother
- English
- Cleaning the brew group
- Warning: Do not press the PUSH button.
- Lubrication
- English
- Descaling the machine
- Descaling procedure
- Preparation
- Descaling cycle
- Rinsing cycle
- English
- Interruption of the descaling process
- Meaning of light signals
- English
- Troubleshooting
- English
- Recycling
- Guarantee and support
- Ordering maintenance products
- 繁體中文
- 内容
- 加水至水箱内
- 沖煮奶類飲料
- 調整咖啡機
- 清洗沖煮組件
- 指示燈號的意義
Brand : PHILIPS
Model : 2100 series HD8652
Category : Coffee machine