
DA 2806 EXT - Range hood MIELE - Free user manual and instructions
Find the device manual for free DA 2806 EXT MIELE in PDF.


| Product type | Range hood |
| Brand | Miele |
| Model | DA 2806 EXT |
| Mounting | Integrated (built-in) under cabinet |
| Width | 60 cm |
| Depth | 50 cm |
| Height (min-max) | 60-110 cm (with telescopic duct) |
| Weight | Approximately 15 kg |
| Power supply | 230 V, 50 Hz |
| Maximum power consumption | 200 W (motor) + 6 W (lighting) |
| Control type | Electronic touch controls |
| Number of speeds | 4 speeds + intensive mode |
| Lighting | 2 integrated LED bulbs |
| Filtration type | Metal grease filter (washable) + Activated charcoal filter (optional) |
| Max airflow (extraction) | Up to 650 m³/h |
| Max noise level | 65 dB(A) |
| Special functions | Automatic shut-off, filter saturation indicator, remote control |
| Maintenance and cleaning | Grease filter dishwasher-safe; charcoal filter to be replaced every 6-12 months |
| Safety | Automatic cut-off in case of overheating, child safety |
| Spare parts and repairability | Filters, bulbs, motor, electronic board available via Miele service |
| General information | Made in Germany, 2-year warranty |
Frequently Asked Questions - DA 2806 EXT MIELE
User questions about DA 2806 EXT MIELE
0 question about this device. Answer the ones you know or ask your own.
Ask a new question about this device
Download the instructions for your Range hood in PDF format for free! Find your manual DA 2806 EXT - MIELE and take your electronic device back in hand. On this page are published all the documents necessary for the use of your device. DA 2806 EXT by MIELE.
USER MANUAL DA 2806 EXT MIELE
en Remote control for cooker hoods Operating instructions
Warning and Safety instructions .... 10
Overview and function.... 11
Using the remote control 11
Signing on/off the remote control 12
To activate/deactivate feature lighting 13
To activate/deactivate the height adjustment function ∨ ∧....13
Cleaning and care 14
Cleaning the remote control.... 14
Changing the battery 14
To avoid the risk of accidents and damage to the cooker hood, please read the instructions for your cooker hood carefully before using it for the first time. They contain important notes on its safety, installation, use and maintenance. Miele cannot be held liable for any damage caused by non-compliance with these instructions.
Keep these instructions in a safe place and ensure that all users are familiar with the contents. Pass them on to any future owner of the appliance.
This remote control is for use with Miele cooker hoods only.
Do not allow children to play with the remote control.
▶ Important information on handling the remote control battery:
- Do not short circuit or recharge the battery, or throw it into a fire. Danger of explosion.
- Do not throw old batteries away with your general household waste. Please dispose of them in a designated battery collection and recycling system.

① LED light
② Hob lighting control
③ Control for switching the fan off and for selecting a lower power level
④ Control for switching the fan on and for selecting a higher power level
⑤ On/Off control for feature lighting (depending on cooker hood model)
⑥ Run-on option control
⑦ Controls for raising and lowering the canopy
(depending on cooker hood model)
Using the remote control
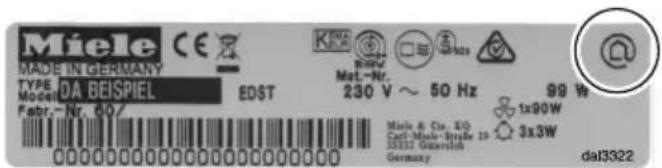
The remote control can be used with any Miele cooker hood which has the Miele@home symbol @ on the data plate.
The main functions can be selected via the cooker hood or by remote control. The indicator light on the remote control unit will light up briefly when a function is selected by remote control.
Please see the description of functions in the operating instructions for the cooker hood.
Programming, e.g. of the operating hours counter, can only be done from the cooker hood controls.
The maximum operating range of the remote control is approx. 10 m. However, this may be less depending on the physical conditions present in the room (e.g. furniture, walls).
The rear of the remote control unit is magnetic which allows it to be attached to various metal surfaces.
The remote control must be signed on so that it can be used.
Signing on and off must be done at the same time on the cooker hood and the remote control. Signing on/off mode has to be accessed on the cooker hood first, then on the remote control.
To access Signing on/off mode on the cooker hood
■ Pess the run-on option control 5½15 for approx. 10 seconds until the indicator for power level 1 lights up.
■ Then press in turn,
- the "—" control (1 sensor)*,
- then the "+" control (IS sensor)*,
- then the lighting control ⚙️.
■ Then access the Signing on/off mode on the remote control immediately.
To access Signing on/off mode on the remote control
■ Pess both arrow controls ∨ ∧ at the same time and hold for about 5 seconds until the remote control LED flashes.
■ Pess the lighting control ⚙️.
To start the signing on procedure
In Sigmig on/off mode press the "+" control (IS sensor)* on the cooker hood first and then the "+" control on the remote control.
The search for a signal will start. The remote control LED will flash steadily.
After approx. 30 seconds the remote control LED will flash on and off 4 times at short intervals. The connection has been established. The LED will go out after a short while.
■ Confirm signing on with the cooker hood run-on option control 515. All indicator lights will go out.
The remote control can now be used.
If you do not confirm your selection within 4 minutes, activation will not take place.
To cancel the signing on procedure
If it is not possible sign on the procedure can be cancelled by pressing the run-on option control 515 on the cooker hood and on the remote control.
■ The signing on procedure must then be repeated. To do this the cooker hood and the remote control must first be signed off.
To sign off
In Signing on/off mode press the "-" control (1 sensor)* on the cooker hood and then the "-" control on the remote control.
The remote control LED will flash steadily.
After approx. 10 seconds the remote control LED will flash on and off twice with a longer interval between the flashes. The remote control has now been signed off. The LED will go out after a short while.
■ Confirm the signing off procedure by pressing the run-on option control 5½15 on the cooker hood. All indicators will go out.
Please bear in mind that disabling the signal will also disable any Con@ctivity 2.0 function and this will have to be activated again.
* for appliances with sensor controls
To activate/deactivate feature lighting
If your cooker hood has feature lighting in addition to the hob lighting, e.g. glass edge feature lighting, it can be switched on and off using the remote control.
This function must also be activated on the remote control.
■ Pess both arrow controls ∨ ∧ at the same time and hold for about 5 seconds until the remote control LED flashes.
■ Pess the control for the feature lighting ☑.
■ activate press the "+" control, to deactivate press the "-" control
Programming is completed automatically.
To activate/deactivate the height adjustment function ∨ ∧
If your cooker hood has a motorised height-adjustable canopy, this can be adjusted using the remote control.
This function must also be activated on the remote control.
■ Pess both arrow controls ∨ ∧ at the same time and hold for about 5 seconds until the remote control LED flashes.
■ Press the button for the run-on option 5n15.
■ activate press the "+" control, to deactivate press the "-" control
Programming is completed automatically.
Cleaning the remote control
■ Only can the surface with a damp cloth. Do not use too much water to avoid moisture penetrating the casing.
Changing the battery
Use only the type of battery listed. Do not use rechargeable batteries.
The remote control requires one 3 V CR 2032 battery.
The battery must be changed if cooker hood functions can no longer be selected using the remote control or if the LED light on the remote control does not light up, or only lights up dimly when a control is pressed.
Cooker hood functions can still be selected using the cooker hood controls.

■ Use a screwdriver to loosen the two screws on the back and remove the cover.
■ Remove the old battery and replace with a new one, making sure the polarity is correct.
■ Replace the cover.
■ Dispose of the old battery responsibly.

- Warning and Safety instructions .... 10
- Overview and function.... 11
- Using the remote control 11
- Signing on/off the remote control 12
- To activate/deactivate feature lighting 13
- To activate/deactivate the height adjustment function ∨ ∧....13
- Cleaning and care 14
- Cleaning the remote control.... 14
- Changing the battery 14
- Using the remote control
- To access Signing on/off mode on the cooker hood
- To access Signing on/off mode on the remote control
- To start the signing on procedure
- To cancel the signing on procedure
- To sign off
- To activate/deactivate feature lighting
- To activate/deactivate the height adjustment function ∨ ∧
- Cleaning the remote control
- Changing the battery
Brand : MIELE
Model : DA 2806 EXT
Category : Range hood