
DBX-62 - Baby monitor ALECTO - Free user manual and instructions
Find the device manual for free DBX-62 ALECTO in PDF.


| Product type | Video baby monitor |
| Brand | Alecto |
| Model | DBX-62 |
| Parent unit dimensions (L x W x H) | Approximately 12 x 6 x 4 cm |
| Baby unit dimensions | Approximately 10 x 8 x 12 cm |
| Parent unit weight | Approximately 150 g |
| Baby unit weight | Approximately 200 g |
| Parent unit power supply | Rechargeable Li-ion battery, 3.7 V |
| Baby unit power supply | 5 V DC power adapter (included) |
| Parent unit battery life | Approximately 10 hours on standby |
| Maximum range | Up to 300 meters in open field |
| Operating frequency | 2.4 GHz |
| Main features | Infrared video, two-way communication, temperature sensor, lullabies |
| Parent unit screen | 2.8-inch color LCD screen |
| Temperature sensor | Yes, integrated into the baby unit |
| Night vision | Yes, with infrared LED |
| Two-way communication | Yes, with speaker and microphone |
| Lullabies | Yes, several built-in melodies |
| Maintenance and cleaning | Clean with a soft, dry cloth. Do not immerse. |
| Safety | CE certified, compliant with European safety standards |
| Spare parts and repairability | Replaceable battery, power adapter available as an option |
| General information | 2-year warranty, user manual included |
Frequently Asked Questions - DBX-62 ALECTO
User questions about DBX-62 ALECTO
0 question about this device. Answer the ones you know or ask your own.
Ask a new question about this device
Download the instructions for your Baby monitor in PDF format for free! Find your manual DBX-62 - ALECTO and take your electronic device back in hand. On this page are published all the documents necessary for the use of your device. DBX-62 by ALECTO.
USER MANUAL DBX-62 ALECTO
natural_image
Product photo of a Alacto medical device with a circular device and digital display showing temperature, no visible text or symbols on the device itself.INHOUDSOPGAVE
1 INTRODUCTIE
1.1 BEOOGD GEBRUIK....3
2 OVERZICHTEN
2.1 OVERZICHT OUDER-UNIT EN LADER 4
2.2 OVERZICHT DISPLAY OUDER-UNIT 5
2.3 OVERZICHT BABY-UNIT 6
3 INSTALLATIE
3.1 OUDER-UNIT 7
3.2 BABY-UNIT 8
3.3 TAFELSTATIEF / OPHANGKOORD 9
3.4 PLAATSINGSTIPS....9
4 WERKING
4.1 AANRAAKSCHERM BEDIENEN.... 10
4.2 IN/UITSCHAKELEN 10
4.3 VERBINDINGSCONTROLE 10
4.4 LUISTEREN....11
4.5 NACHTLAMPJE 11
4.6 SLAAPMUZIEKJES 12
4.7 VOEDINGSTIMER....12
4.8 TERUGSPREKEN NAAR DE BABY-UNIT 14
4.9 RIEMCLIP 14
5 INSTELLINGEN
5.1 MICROFOONGEVOELIGHEID EN ZEND-INDICATIE.... 15
5.2 DISPLAYTALEN 15

natural_image
Simple line drawing of a rectangular object with a central hole and a numbered label '8' on the right side (no text or symbols on the object itself)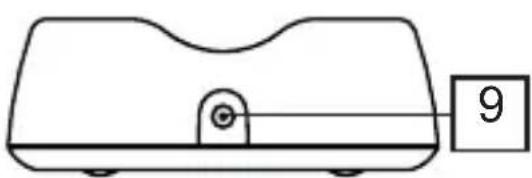
natural_image
Simple line drawing of a mechanical component with a numbered label (9) on the right side, no text or symbols present.natural_image
Diagram of a mobile phone showing internal components and battery casing (no text or symbols)natural_image
Line drawing of a portable electric shaver with cable and plug (no text or symbols)natural_image
Line drawing of a circular device connected to a cable with an attached terminal (no text or symbols)
natural_image
Diagram of a mechanical device with directional arrows indicating motion or force (no text or symbols)natural_image
Diagram of a battery pack assembly with arrows indicating direction (no text or symbols)natural_image
Diagram of a circular device with internal components and an arrow pointing to it (no text or symbols)natural_image
Simple line drawing of a mobile phone with an arrow pointing to the screen (no text or symbols)Toets ♘gedurende 3 seconden indrukken om de baby-unit of de ouder-unit in te schakelen.

Timer inschakelen.
natural_image
Diagram of a circular device with concentric rings and star-shaped internal pattern, marked with number 1 (no text or symbols)
natural_image
Diagram of concentric circular layers with star patterns inside, no text or symbols presentnatural_image
Diagram of a mechanical device inside a circular frame, showing internal components and directional arrows (no text or labels)natural_image
Simple line drawing of a rectangular object with a central horizontal bar and a small circular mark, labeled '8' on the right (no text or symbols on the object itself)
natural_image
Simple line drawing of a mechanical component with a numbered label (9) on the right side, no text or symbols present.natural_image
Diagram of a mobile phone casing showing internal components and external casing with directional arrows (no text or symbols)ATTENTION: PLACEZ UNIQUEMENT LE PAQUET DE BATTERIE RECHARGEABLE LIVRE AVEC! D'AUTRES MODELS PLACES POURRAIENT CAUSER DES DOMMAGES OU MEME EXPLOSER.
natural_image
Diagram of a device with a circular component and connected cable, showing no text or symbols
natural_image
Diagram of a mechanical device with directional arrows indicating motion or force (no text or symbols)natural_image
Diagram showing battery assembly and disassembly process (no text or symbols)natural_image
Simple line drawing of a circular object with internal patterns and an arrow pointing to it (no text or symbols)natural_image
Simple line drawing of a mobile phone with an arrow pointing to the screen (no text or symbols)natural_image
Diagram of a circular device with concentric rings and a central cluster of stars, marked with number 1 (no text or symbols present)
natural_image
Diagram of concentric circular layers with star patterns inside, no text or symbols present5.7 FONCTION VIBRATION:
natural_image
Diagram of a device with internal components and an arrow pointing to a component (no text or symbols present)CAUSES POSSIBLES ET SOLUTIONS:
Keen Ocean Industrial Ltd.
Keen Ocean Industrial Ltd.
4.2 ON/OFF SWITCHING 62
4.3 CONNECTION CHECK 62
4.4 LISTENING 63
4.5 NIGHT LIGHT 63
4.6 LULLABIES....64
4.7 FEEDING TIMER 64
4.8 TALKING BACK TO THE BABY UNIT 66
4.9 BELT CLIP 66
5 SETTINGS
5.1 MICROPHONE SENSITIVITY AND TRANSMISSION INDICATION 67
5.2 DISPLAY LANGUAGES....67
5.3 DISPLAY LIGHT BRIGHTNESS 68
5.4 NAME OF THE BABY UNIT 68
5.5 TEMPERATURE ALARM 69
5.6 ALARM TONE 70
5.7 VIBRATION FUNCTION 70
6 EXPANSION
6.1 CODING SWITCH 71
6.2 REGISTERING 71
6.3 USING MULTIPLE BABY UNITS.... 72
6.4 DEREGISTERING 73
7 GENERAL INSTRUCTIONS AND TIPS
7.1 BATTERY CHECK 74
7.2 BATTERY LIFE 75
7.3 POWER SUPPLY 75
7.4 APRS (variable transmission power).... 75
7.5 MAINTENANCE....76
7.6 ENVIRONMENT 76
8 PROBLEM-SOLVING....77
9 DECLARATION OF CONFORMITY....78
10 TECHNICAL SPECIFICATIONS 78
11 WARRANTY....79
1 INTRODUCTION
1.1 INTENDED USE:
The Alecto DBX-62 is a wireless baby intercom to remotely listen to sounds coming from the baby room. Alecto DBX-63 is an add-on baby unit for use with the DBX-62. You can register up to 4 separate baby units, so you can listen to a maximum of 4 baby units with a single parent unit.
Attention:
Only use the baby intercom as an additional peace of mind, it can never serve as a replacement for an adult or human (baby) sitter.
This baby intercom has a range of 1000 meters in an open field and up to 150 meters indoors; this range depends on local conditions (concrete walls, other baby intercoms, wireless phones, etc.).
Before every use, always check whether the baby intercom is functioning correctly. In addition to checking the baby intercom's range and connection, it's recommended to check its connection by ear while in use.
The DBX-62/63 may not be used for anything else besides detecting sounds within your own private surroundings; any person located in the room that's being listened to must be informed about the baby intercom being used.
You are not required to have a license for the use of this baby intercom. The system can be freely applied in any domestic situation. However, an interference-free signal transmission cannot always be guaranteed.
2 OVERVIEWS
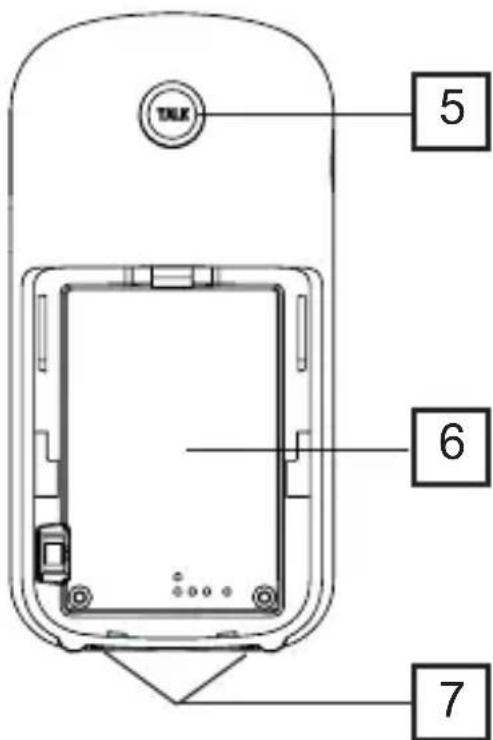
2.1 PARENT UNIT AND CHARGER OVERVIEW:


natural_image
Simple line drawing of a rectangular object with a small circular hole and a numbered label '8' on the right side (no text or symbols on the object itself)
natural_image
Simple line drawing of a mechanical component with a numbered label (9) on the right side, no text or symbols present.- LCD screen, please see the next page
- power button, press and hold for 3 seconds to turn the parent-unit on or off
- built-in microphone for the talk-back function
- built-in speaker
5. TALK button
- press and hold to talk back to the baby unit, release to listen
-
battery compartment
-
recharging contacts
8. monitoring light
- attention, does not turn off when the battery is fully charged
- power adaptor input
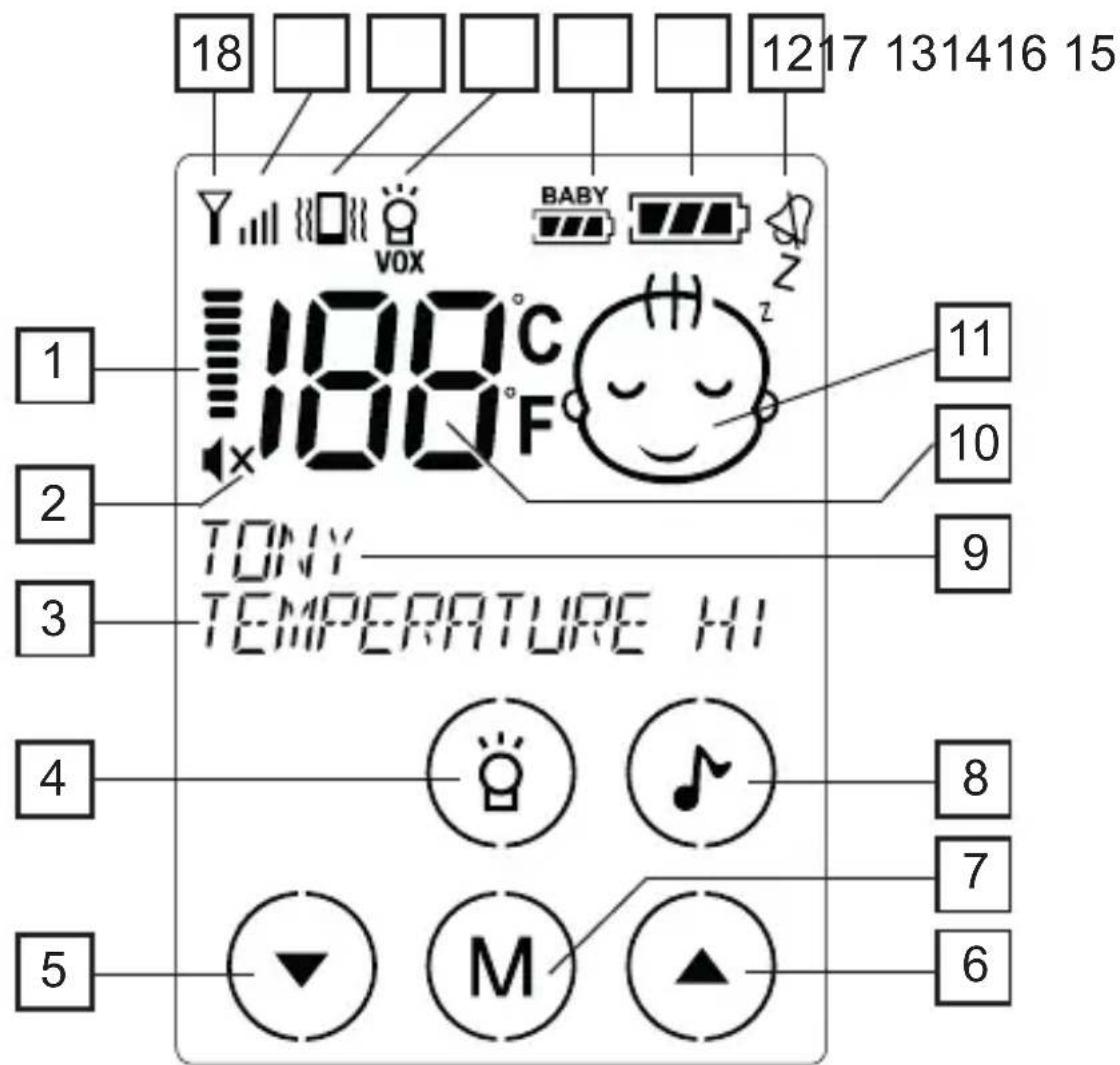
2.2 PARENT UNIT DISPLAY OVERVIEW:
-
volume indication
-
appears in case of 'sound off'
-
text row
-
night light on/off switch
-
decrease volume, also a scroll button ▼ for settings and functions
-
increase volume, also a scroll button ▲for settings and functions
-
menu button
-
lullabies on/off switch
-
text row
-
temperature display
-
indication of whether the baby is quiet or crying
-
appears when the alarm tone is turned off
-
indication of the battery charge state of the parent unit
-
indication of the battery charge state of the baby unit
-
night light on/off/VOX indication
-
vibration function on/off indication
-
indication of reception strength
-
flashes when the connection is lost with the baby unit
2.3 BABY UNIT OVERVIEW:
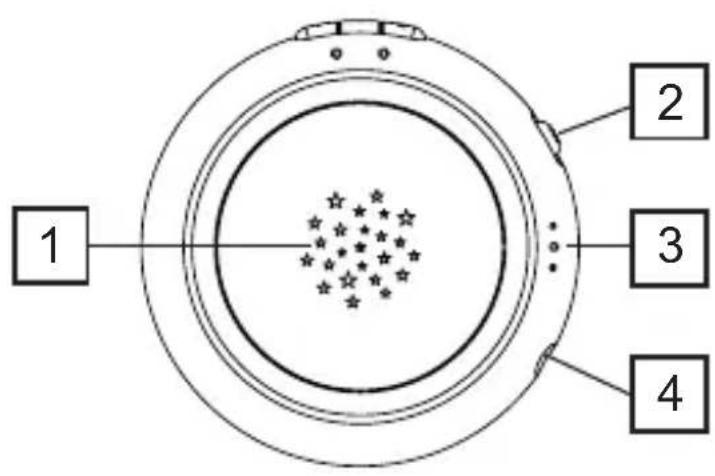

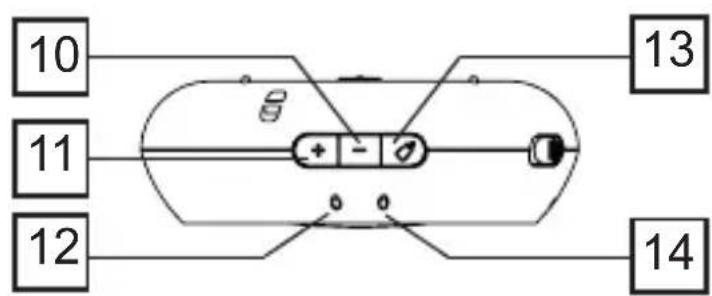
- night light
- on/off sliding switch
- built-in microphone
- power adaptor input
- built-in speaker
- built-in temperature sensor
- provision for suspension cord
- table stand
- battery coverl
-
- button
-
- button
- on/off indication
- feeding timer
- send indication
- coding switch for use of multiple baby units
3 INSTALLATION
3.1 PARENT-UNIT:
The parent-unit is powered by the supplied battery pack. This battery pack can be charged using the supplied power adaptor combined with the charger.

natural_image
Diagram of a mobile phone showing internal components and battery casing (no text or symbols)-
Slide the battery cover off the parent unit.
-
Insert the supplied battery pack into the parent-unit and connect the plug with the parent-unit. Pay attention, the plug only fits one way. Never force its connection.
ATTENTION: ONLY INSTALL THE SUPPLIED BATTERY PACK! INSTALLING DIFFERENT MODELS CAN CAUSE DAMAGE OR EVEN EXPLOSION

natural_image
Line drawing of a portable electric shaver connected to a cable (no text or symbols)-
Place the battery cover back onto the parent-unit.
-
Connect the power adaptor with the wider plug to the DC5V input at the rear of the charger and plug the power adaptor into a 230 Volts wall socket.

Only connect the supplied adaptor. Connecting any other power adaptor can cause damage to the baby intercom or even fire.
- Place the parent-unit onto the charger. The CHARGE indicator on the charger will be lit while the battery pack is being charged.
Attention: the CHARGE indicator on the charger remains lit, even when the battery is fully charged.
3.2 BABY-UNIT:
The baby-unit is powered by the supplied power adaptor with the small plug.

natural_image
Line drawing of a circular device connected to a cable with an attached terminal (no text or symbols)
Only connect the supplied adaptor. Connecting any other power adaptor can
cause damage to the baby intercom or even fire.
For mobile use, you can install 3 batteries (excl.).

natural_image
Diagram of a mechanical device with directional arrows indicating movement or force (no text or symbols)- Fold out the table stand and slide the battery cover downwards off the baby unit.

natural_image
Diagram of a battery pack assembly with arrows indicating direction (no text or symbols)- Install 3x ordinary alkaline batteries, 1.5 V, type AAA according the markings inside the battery compartment.
You may also install rechargeable batteries, but because the baby-unit is not provided with a charger function, you must recharge these batteries using an external battery charger.
- Place the battery cover back onto the baby-unit and lock it using the locking tab.
When connecting the power adapter, you can leave the batteries in place. By inserting the adaptor plug, the batteries will be automatically disconnected.
3.3 TABLE STAND / SUSPENSION CORD:

You can choose to put the baby unit onto a surface by folding out the table stand or you can suspend the baby unit using a suspension cord (not included).
3.4 PLACEMENT TIPS:

- Do NOT place the baby-unit in bed with the baby, maintain a distance of 1 to 2 meters between the baby and the baby-unit.
• MAKE SURE THE BABY CANNOT TOUCH THE ADAPTOR CABLE. - Do not expose the baby-unit or parent-unit to direct sunlight or humid areas. This baby intercom is not water-proof, penetrating moisture can cause damage to the electronics.
4 USE
Don't forget that this baby intercom is merely an extra piece of mind.
The device can never replace the physical and monitoring presence of a parent or babysitter.
4.1 PARENT UNIT TOUCH-SCREEN:
To prevent functions from being switched on or off by accident, the operation of the touch-screen is set to sleep mode. You can activate the operation mode by briefly pressing the ⏻button, the display light will turn on.
Don't forget that some buttons must be pressed briefly and others must be pressed for a longer time, please see the user instructions.
4.2 ON/OFF SWITCHING:
Baby-unit:

natural_image
Diagram of a circular device with internal components and an arrow pointing to it (no text or symbols)Slide the ON/OFF switch to the ON position to turn the baby unit on or to the OFF position to turn the baby unit off.
Parent-unit:

natural_image
Simple line drawing of a mobile phone with an arrow pointing to the screen (no text or symbols)Press and hold the ⏻ button for 3 seconds to turn on the baby-unit or parent-unit.
Press and hold the ⏻ button again for 3 seconds to turn off the baby-unit or parent-unit.
4.3 CONNECTION CHECK:
As soon as you switch on the parent-unit, it will start searching for the baby-unit.
If the parent-unit still hasn't located the baby-unit after 30 seconds (because it's still turned off or out of range.)
Every few seconds a warning tone will sound while the display light flashes. Additionally, the antenna symbol ⚡will flash while the text “OUT OF RANGE” appears in the display.
You can stop this warning tone by briefly pressing the ⏻ button. As soon as the parent unit is connected to the baby unit, all of these warnings will stop.
4.4 LISTENING:
Reception volume:
You can adjust the volume of the parent-unit using the button ▼ and
- briefly press the button to activate the touch-screen
- Press to increase the volume
-
Press to decrease the volume
-
You can choose from 8 volume levels or turn the sound off
- an 'x' will appear behind the speaker symbol when the
volume is switched off (✗)
- the set volume level will be shown of the display


Optical sound notification:
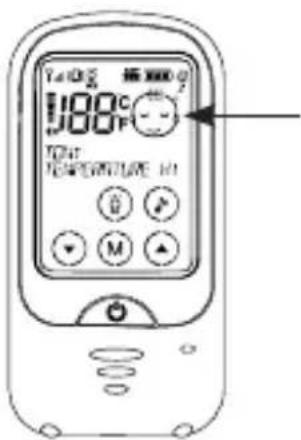
A baby symbol will appear in the display as soon as the baby starts crying:

baby sleeping

baby crying
4.5 NIGHT LIGHT:
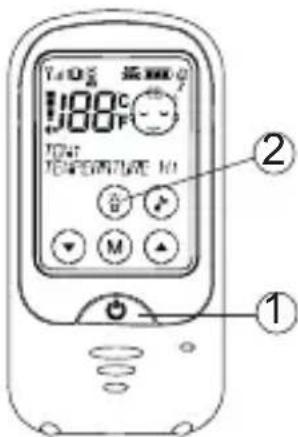
The baby-unit is provided with a built-in night light. You can turn this light on/off or on automatic as follows:
- briefly press the button to activate the touch-screen
- press and hold the button for 1 second
• appears in the display = night light on
- appears in the display = night light in automatic mode (on when the baby is crying, off when the baby is quiet)
- no light in the display = night light off
4.6 LULLABIES:
The DBX-62 is pre-programmed with 6 different lullabies and sounds that you can set via the parent unit. After selecting your desired sound, it will be played for up to 15 minutes.
- briefly press the button to activate the touch-screen
- press and hold the 🎨 button for 1 second to start playback
- you can use the ▼ and buttons to select a different song or sound
- playback will stop automatically after 15 minutes or you can repeat instructions 1 and 2 above to stop playback earlier
- use the + and – buttons on the baby unit to adjust the volume
- the sound of the lullabies can be heard at the parent unit through the microphone of the baby unit; you can decrease the volume of the parent unit if this bothers you
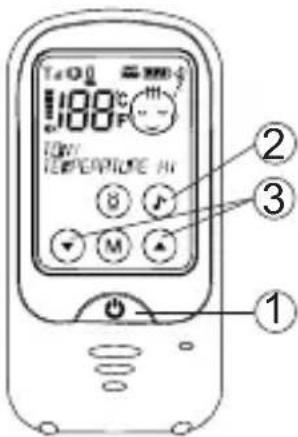
4.7 FEEDING TIMER:
The DBX-62 parent unit can emit a signal when it's time for your baby to be fed. First you must set how many hours are in between feeding times:
- briefly press the button to activate the touch-screen
- press and hold the M button for 3 seconds to open the menu
- use the ▼ and buttons to select the option FEEDING TIME
- briefly press the M button
- use the ▼ and buttons to select the time in between feeding times in increments of half an hour
- briefly press the button to confirm your selection and to leave the menu
- you only have to set this time once, but you'll
need to adjust it again when the time in between feeding times changes or when you prefer to turn this function off (by selecting ‘off’ in the above step 5)

Switching on the timer.
You can turn on the feeding alarm on the parent unit as follows:
- briefly press the button to activate the touch-screen
- press and hold the M button for 3 seconds to open the menu
- use the ▼ and buttons to select the option START TIMER
- briefly press the M button to start the timer and to leave the menu
- the timer time you have set will now appear in the display directly underneath the name ‘BABY’ (or the name you programmed yourself) and will slowly count down
- at 0.00 the unit will emit beep tones for up to 20 seconds while the text ‘FEEDING TIME’ appears in the display

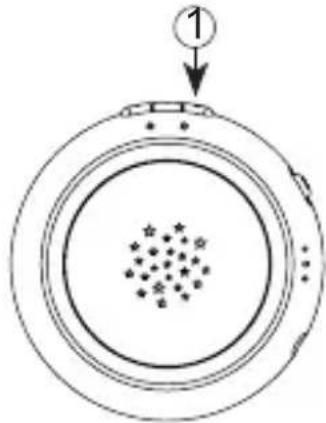
You can now also use the baby unit to turn on the alarm for the next feeding time: ①
- briefly press the button on the baby unit to activate the alarm for the next feeding time, the unit will emit 2 beep tones.
natural_image
Diagram of a circular device with concentric rings and a central cluster of dots, labeled with number 1 (no text or symbols beyond the label)
Attention: only when the baby unit is in com- munication with the parent unit you can turn on the alarm for the next feeding time. If you don't hear 2 beep tones after pressing the button, the connection between the baby unit and parent unit is lost. You can now speak into the baby unit to make it transmit (the red light turns on) and press the button again or you can activate the feeding time alarm via the parent unit.
4.8 TALKING BACK TO THE BABY UNIT:
- Press the TALK button on the parent unit to talk back to the baby unit.
- Press and hold the button while talking and release the button to listen.
- Use the + and - buttons to adjust the volume at the baby unit.

4.9 BELT CLIP:
The parent unit is provided with a belt clip. You can use this clip to attach the unit to your clothing. The belt clip is easily detached by bending one of the belt clip ends somewhat open.
5 SETTINGS
5.1 MICROPHONE SENSITIVITY AND TRANSMISSION INDICATION:
You can set on which sound level the baby unit starts transmitting. For this, use the + and – buttons on the baby unit.
+ button, higher sensitivity | - button, lower sensitivity

natural_image
Diagram of concentric circular layers with star-shaped markers at center (no text or symbols)During setup, the light will flash to indicate the selected level:
- 1x flash: the baby must cry loudly before the baby unit starts transmitting
- 5x flashes: the baby unit will start transmitting at any low sound
While in use, the light will turn on when the baby unit is transmitting sounds to the parent unit. When you are in the baby room, use this light to check the sound level that triggers the baby unit.
5.2 DISPLAY LANGUAGES:
The various settings and notifications in the display of the parent unit can be shown in different languages. In the factory the unit is set to the Dutch language, but you can select another language as follows:
- briefly press the button to activate the touch-screen
- press and hold the M button for 3 seconds to open the menu
- use the ▼ and buttons to select the option LANGUAGE
- briefly press the M button
- use the ▼ and buttons to select your desired language
- briefly press the button to confirm you selection and to leave the menu
- you can choose from: Dutch, English, Italian, Spanish, French and German

5.3 DISPLAY LIGHT BRIGHTNESS:
You can adjust the intensity of the display light as follows:
-
briefly press the button to activate the touch-screen
-
press and hold the M button for 3 seconds to open the menu
-
use the ▼ and buttons to select the option BRIGHTNESS
-
briefly press the M button
-
use the ▼ and buttons to select the desired brightness
-
briefly press the button to confirm you selection and to leave the menu
• you can choose from 8 brightness levels
- a high brightness level ensures good readability, but also uses more power.

5.4 NAME OF THE BABY UNIT:
Instead of the standard name "BABY-1" of the baby unit, you can program your own chosen name.
-
briefly press the button to activate the touch-screen
-
press and hold the M button for 3 seconds to open the menu
-
use the ▼ and buttons to select the option NAME
-
briefly press the M button
-
use the ▼ and buttons to select the desired baby unit (only when using multiple baby units)
-
briefly press the M button, 'BABY 1' will appear in the display (or another name you already set earlier) and the cursor ( ) will flash underneath the first letter
-
change the first letter using the ▼ and ▲ buttons and briefly press the M button
-
repeat step 7 until the name is fully entered
-
briefly press the button to confirm you selection and to leave the menu
- you can choose any of the 26 letters in the alphabet, the numbers 0-9 and a space

- the name has a maximum length of 14 characters, including spaces
- you cannot correct a mistake; in this case, leave the setting and start again
5.5 TEMPERATURE ALARM:
The display of the parent unit shows the temperature transmitted by the baby unit. You can assign a minimum or maximum temperature to this function and have the unit sound an alarm when these values are exceeded:
- briefly press the button to activate the touch-screen
- press and hold the M button for 3 seconds to open the menu
- use the ▼ and buttons to select the option TEMP ALARM
- briefly press the M button
-
use the ▼ and buttons to select whether you want to set or adjust the lower or the upper limit
-
briefly press the M button
-
use the ▼ and ▲ buttons to adjust the selected temperature limit and briefly press the M button
-
repeat step 5-7 if you want to set the other temperature limit
-
briefly press the button to confirm the set temperature limits and to leave the menu
• the upper limit can be set between -3^ and 50^
- the lower limit can be set between -19^ C and 3 degrees lower than the upper limit
- select "OFF" if you don't want to set an upper or lower limit
- when the set temperature limit is exceeded, the temperature display will start flashing while ‘TOO WARM’ or ‘TOO COLD’ is shown
- if the ALARM TONE function is activated, you'll also hear short notification tones
- don't forget that the temperature display is only an indication, you'll have to take a tolerance of +/- 2°C into account
- at temperatures above 50^ and under -19^ , ‘--’ will appear in the display
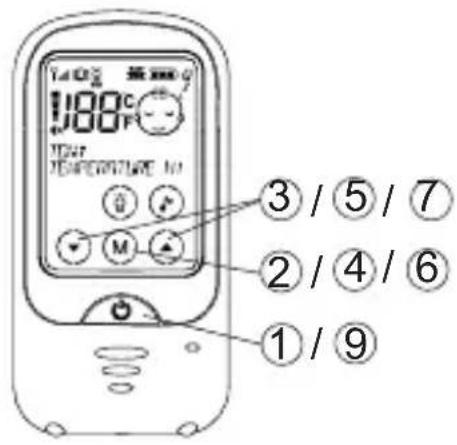
5.6 ALARM TONE:
You can set the unit to emit a clear alarm tone when temperature limits are exceeded, when the battery is low or when the baby unit is out of range. You can turn this function on or off as follows:
-
briefly press the button to activate the touchscreen
-
press and hold the M button for 3 seconds to open the menu
-
use the ▼ and buttons to select the option ALARM TONE
-
briefly press the M button
-
use the ▼ and buttons to turn this function on (ON) or off (OFF)
-
briefly press the button to confirm you selection and to leave the menu
- will appear in the display when the alarm tone is switched off
- this setting only turns the alarm tone on or off; the alarm itself is not changed
- when the alarm tone sounds, you can turn it off by briefly pressing the button
• this does not turn off the feeding time alarm
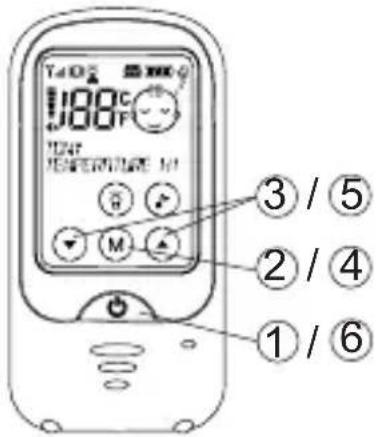
5.7 VIBRATION FUNCTION:
If you're carrying the parent unit with you in a noisy room (e.g. while vacuum cleaning) or you don't want sounds from the parent unit bothering other people and you have set the volume to 0, you can switch on the vibration function:
-
briefly press the button to activate the touch-screen
-
press and hold the M button for 3 seconds to open the menu
-
use the ▼ and buttons to select the option VIBRATION FUNCTION
-
briefly press the M button
-
use the ▼ and buttons to turn this function on (ON) or off (OFF)
-
briefly press the button to confirm you selection and to leave the menu
• will appear in the display when the vibration function is switched on

6 EXPANSION
The DBX-62 is capable of registering up to 4 baby units. This way you can monitor 4 babies and because you can assign an individual name to each unit, you can directly determine which child is crying. Additionally, for each baby unit you can set the talk-back function, feeding timer, room temperature, lullabies and night light.
6.1 CODING SWITCH:
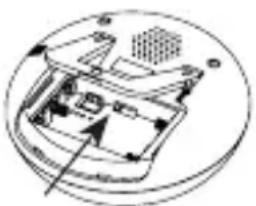
natural_image
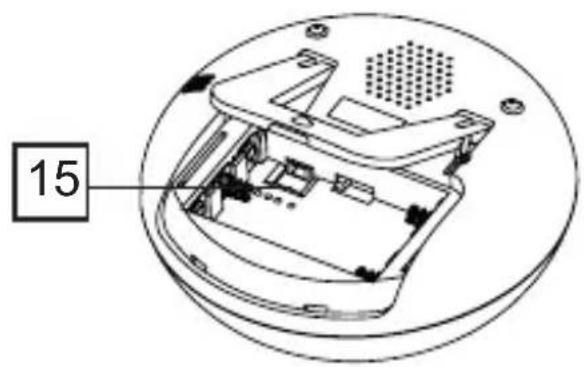
Diagram of a mechanical device inside a circular frame, showing internal components and directional arrows (no text or labels)In the battery compartment you'll find a coding switch with 4 positions corresponding with baby units 1, 2, 3 and 4. Make sure to set an individual code for each baby unit.
6.2 REGISTERING:

Upon expanding, you must register (re-register) ALL baby units, also the baby units that were already registered.
Preparation:
Both the parent unit and baby unit must be switched off (parent unit: briefly press and hold the button until the display is completely blank, baby unit: slide the power switch to the OFF position), but the power supply (adaptor or batteries) must be connected).
- press and hold the TALK button on the rear of the parent unit
- now press and hold the button for approximately 3 seconds until the parent unit turns on and P/PAIRING appears in the display with the P flashing. Now release both buttons
- press and hold the + button on the baby unit
- now slide the power switch to the ON position, the red light will turn on, and release the + button
- briefly press the 🎨 button, the display of the parent unit will show 'PAIRING BABY X (*) OK and you'll hear 2 beep tones from the baby unit you just registered
- repeat instructions 3, 4 and 5 for the other baby units
- finally, turn the parent unit and all baby units off and back on
- the registration is now complete
*: X = 1-4, corresponding to the position of the coding switch
6.3 USING MULTIPLE BABY UNITS:
- To make the use of multiple baby units easier, you can assign real names to the baby units instead of ‘baby-1’, ‘baby-2’, etc. For this, see paragraph 5.4.
- When all babies are sleeping and the baby units are all set to sleep mode, the parent unit will first show the status of baby unit 1 (temperature, battery indication, night light or lullabies are switched in, etc.), after 15 seconds the status of baby unit 2, then unit 3 and finally unit 4. This cycle is repeated for as long as all babies are sleeping (or quiet).
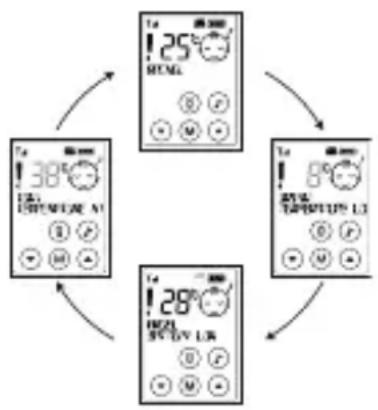
flowchart
graph TD
    A["10A 38℃/°C"] --> B["12A 25℃/°C"]
    B --> C["14A 28℃/°C"]
    C --> D["16A 38℃/°C"]
    D --> A
    style A fill:#f9f,stroke:#333
    style B fill:#ccf,stroke:#333
    style C fill:#cfc,stroke:#333
    style D fill:#fcc,stroke:#333
- Unregistered baby units will be skipped.
- When a baby unit is registered, but not in communication with the parent unit (out of range, empty battery, switched off), the parent unit will emit a warning signal. Only after the cause for this out-of-range notification is cleared, will the parent unit switch over to the next baby unit.
- As soon as one of the babies starts crying, the parent unit will instantly indicate the sound and status of the baby unit where the crying is coming from. Don't forget that baby unit 1 always has the priority; this means that when all babies are crying, the parent unit will indicate the status of baby unit 1. The sequence is: baby-1,
baby-2, baby-3, baby-4.
- When several babies are crying, the status of the first crying baby will be shown (see above sequence) in the display, but the display will indicate that another baby is crying.
Brian is crying, his status is indicated and you'll hear the sound
Angel is also crying

You can now briefly press the ⏻ button to switch priority and check the status and sounds of Angel (in the situation mentioned above).
- For each baby unit, you can turn the night light on or off, turn the lullabies on or off and activate the feeding timer (feeding intervals are the same for all baby units). For turning these functions on or off and talking back to the baby unit, the parent unit must be in communication with the concerned baby unit (the name of this baby unit must be shown in the display).
6.4 DEREGISTERING:
- Defective baby units or units no longer in use must be erased from the parent unit's memory to prevent the parent unit from constantly indicating an out-of-range error for that baby unit.
You can do this by re-registering the baby units that are still in use. Only the baby unit you're no longer using should not be re-registered. It is not possible to deregister a specific baby unit at the parent unit.
7 GENERAL INSTRUCTIONS AND TIPS
7.1 BATTERY CHECK:
The display of the parent unit will indicate the battery charge status of both the parent unit and the baby unit.

As soon as the battery of the parent unit or baby unit becomes exhausted, the symbol will flash in the display, the warning "WEAK BATTERY" will appear and the unit will emit beep tones. You can turn these beep tones off by briefly pressing the button.

- When the baby unit is powered by the power adaptor, the display will always indicate full batteries, whether batteries are installed or not
- The POWER indicator on the baby unit shows the battery status. As long as this light remains lit, the batteries are OK. When this light starts flashing, please replace the batteries or connect the adaptor.
- The battery indication will scroll - - - while the batteries of the parent unit are being charged.
7.2 BATTERY LIFE:
With a fully charged battery pack (parent unit) or with full batteries (baby unit), the baby monitor can function for 12 to 20 hours.
The times mentioned above are references only and depend on settings and use (a higher volume, the night light being switched, how often and for how long the baby is crying, the quality of the batteries, etc.).
7.3 POWER SUPPLY:
Adaptors:
When using adaptors, only use the supplied adaptors. Connecting power adaptors other than the supplied adaptors can cause damage to the electronics of the baby intercom.
Batteries:
In the parent-unit, you may only install a RECHARGEABLE battery pack of the type Lithium-Polymer, voltage 3.7V, power 720mAh.
In the baby-unit, you can install any normal or rechargeable batteries of the type AAA or pencil cell. However, rechargeable batteries must be charged using a separate battery charger.
7.4 APRS (variable transmission power):
The DBX-62 is provided with the APRS transmission system. This Automatic Power Reduction System monitors the transmitting power at which the parent unit and baby unit exchange signals, ensuring a minimum in transmission power while maintaining a 100% reliable signal transfer.
This means that the baby unit will never transmit with more power than what is required for a good connection.
7.5 MAINTENANCE:
Only clean the baby monitor with a moist cloth; never use chemical cleaners. Before any cleaning, you must disconnect the adapters. Before cleaning, any connected power adaptors must be disconnected.
7.6 ENVIRONMENT:
The packaging of this baby video monitor can be discarded as waste paper. At the end of the product's life span, it must not be disposed of as normal domestic waste. You must bring it to a collection point for the recycling of electric and electronic equipment.

You must bring exhausted or defective batteries to your local depot for small chemical waste or to dedicated battery collection points. Never discard batteries as normal domestic waste.
8 PROBLEM-SOLVING
PROBLEM:
POSSIBLE CAUSE AND SOLLUTION:
Warning tones from the parent-unit:
Check the display of the parent unit, it shows the cause of the alarm.
In case of 'OUT OF RANGE':
The communication between parent-unit and baby-unit is interrupted. This interruption can be caused by external interference, wait for a while to see if the connection restores itself. If this happens often, the parent-unit and baby-unit may be at their maximum range, try to reduce the distance between the two devices.
Possible additional checks:
- check whether the baby-unit is switched on
- check the power to the baby-unit
- check the distance between parent-unit and baby-unit, reduce if required
Baby unit won't transmit
The bay unit is not turned on, also check the power supply (adaptor or batteries)
The microphone sensitivity is set too low, increase it (see paragraph 5.1)
Baby unit is transmitting almost continuously
The microphone sensitivity is set too high, making the baby unit transmitting almost continuously, decrease it (see paragraph 5.1)
No sound from the parent-unit:
The volume is turned off, turn the volume on.
Beep tone from the parent-unit:
The volume is set too high, creating feedback.
• decrease the volume at the parent-unit
- increase the distance between parent-unit and baby-unit
9 DECLARATION OF CONFORMITY
The Alecto DBX-62/63 meets all essential requirements and provisions as described in the European Directive 1999/5/EC. The declaration of conformity is available on the website WWW.ALECTO.NL

10 TECHNICAL SPECIFICATIONS
Frequency: 863 - 870 MHz
No. of channels: 53 (set automatically)
Baby unit power: power adapte: 6VDC 500mA (incl) + S04-003-0060-00500
Parent unit power: power adapte: 5VDC 600mA - (incl.) + S04-003-0050-00600
battery pack: LiPo, 3.7V 720mAh rechargeable (incl.)
Transmission power: 25 mW max.
Recommended ambient temperature: -10^ to +50^ Storage temperature: -20^ to +60^
11 WARRANTY
For the Alecto DBX-62/63 you have a warranty of 24 months from the date of purchase. During this period, we guarantee the free repair of defects caused by material and workmanship errors. All this subjected to the final assessment of the importer.
If you notice any defect, first refer to the user's manual. If the manual provides no definite answer, please contact the supplier of this baby video monitor or contact customer service of Alecto on telephone number 073 6411 355 (Netherlands), 03 238 5666 (Belgium), 018 0503 0085 (Germany) or via the Internet www.alecto.nl.
THE WARRANTY BECOMES NULL AND VOID:
In case of improper use, incorrect connections, leaking and/or incorrectly installed batteries, use of unoriginal parts or accessories, negligence and in case of defects caused by moisture, fire, flooding, lightning and natural disasters. In case of unauthorised modifications and/or repairs performed by third parties. In case of incorrect transportation of the device without adequate packaging and when the device is not accompanied by this warranty card and proof of purchase. The warranty does not cover connecting cables, plugs and batteries.
All further liability, especially concerning any consequential damages, is excluded.

Service Help




WWW.ALECTO.INFO SERVICE@ALECTO.NL

NL 073 6411 355 (Lokaal tarief)
BE 03 238 5666 (Lokaal tarief) (Tarif local)



- INHOUDSOPGAVE
- INTRODUCTIE
- OVERZICHTEN
- INSTALLATIE
- WERKING
- INSTELLINGEN
- Timer inschakelen.
- ATTENTION: PLACEZ UNIQUEMENT LE PAQUET DE BATTERIE RECHARGEABLE LIVRE AVEC! D'AUTRES MODELS PLACES POURRAIENT CAUSER DES DOMMAGES OU MEME EXPLOSER.
- FONCTION VIBRATION:
- CAUSES POSSIBLES ET SOLUTIONS:
- SETTINGS
- EXPANSION
- GENERAL INSTRUCTIONS AND TIPS
- INTRODUCTION
- INTENDED USE:
- Attention:
- OVERVIEWS
- PARENT UNIT AND CHARGER OVERVIEW:
- TALK button
- monitoring light
- PARENT UNIT DISPLAY OVERVIEW:
- BABY UNIT OVERVIEW:
- INSTALLATION
- PARENT-UNIT:
- ATTENTION: ONLY INSTALL THE SUPPLIED BATTERY PACK! INSTALLING DIFFERENT MODELS CAN CAUSE DAMAGE OR EVEN EXPLOSION
- BABY-UNIT:
- TABLE STAND / SUSPENSION CORD:
- PLACEMENT TIPS:
- USE
- PARENT UNIT TOUCH-SCREEN:
- ON/OFF SWITCHING:
- CONNECTION CHECK:
- LISTENING:
- Reception volume:
- Optical sound notification:
- NIGHT LIGHT:
- LULLABIES:
- FEEDING TIMER:
- Switching on the timer.
- TALKING BACK TO THE BABY UNIT:
- BELT CLIP:
- MICROPHONE SENSITIVITY AND TRANSMISSION INDICATION:
- DISPLAY LANGUAGES:
- DISPLAY LIGHT BRIGHTNESS:
- NAME OF THE BABY UNIT:
- TEMPERATURE ALARM:
- ALARM TONE:
- VIBRATION FUNCTION:
- CODING SWITCH:
- REGISTERING:
- Preparation:
- USING MULTIPLE BABY UNITS:
- DEREGISTERING:
- BATTERY CHECK:
- BATTERY LIFE:
- POWER SUPPLY:
- Adaptors:
- Batteries:
- APRS (variable transmission power):
- MAINTENANCE:
- ENVIRONMENT:
- PROBLEM-SOLVING
- PROBLEM:
- POSSIBLE CAUSE AND SOLLUTION:
- DECLARATION OF CONFORMITY
- TECHNICAL SPECIFICATIONS
- WARRANTY
- THE WARRANTY BECOMES NULL AND VOID:
Brand : ALECTO
Model : DBX-62
Category : Baby monitor