
TH-48LFE8E - Monitor PANASONIC - Free user manual and instructions
Find the device manual for free TH-48LFE8E PANASONIC in PDF.


| Product type | Professional LED Monitor |
| Brand | Panasonic |
| Model | TH-48LFE8E |
| Screen size | 48 inches (121.9 cm) |
| Resolution | 1920 x 1080 (Full HD) |
| Panel type | IPS LCD with LED backlight |
| Brightness | 500 cd/m² |
| Contrast ratio | 1200:1 |
| Viewing angle | 178° horizontal and vertical |
| Dimensions (without stand) | 109.7 x 64.0 x 7.6 cm |
| Weight (without stand) | 22.5 kg |
| Power supply | 100-240 V AC, 50/60 Hz |
| Power consumption (max) | 180 W |
| Standby power consumption | Less than 0.5 W |
| Video inputs | HDMI x2, DisplayPort x1, DVI-D x1, VGA x1 |
| Audio input | 3.5 mm jack |
| Audio output | 3.5 mm jack, built-in speakers (10 W x2) |
| Main features | Multi-display, rotation function, OSD menu, child lock, timer |
| Wall mounting | VESA standard 400 x 400 mm |
| Maintenance and cleaning | Use a soft, dry cloth. Do not use chemical products. |
| Safety | Grounding, automatic shutdown in case of overheating, adequate ventilation |
| Spare parts and repairability | Repairability index: 7.5/10 (power supply, motherboard, LCD panel available) |
| General information | Operating temperature: 0°C to 40°C, humidity: 20% to 80% |
Frequently Asked Questions - TH-48LFE8E PANASONIC
User questions about TH-48LFE8E PANASONIC
0 question about this device. Answer the ones you know or ask your own.
Ask a new question about this device
Download the instructions for your Monitor in PDF format for free! Find your manual TH-48LFE8E - PANASONIC and take your electronic device back in hand. On this page are published all the documents necessary for the use of your device. TH-48LFE8E by PANASONIC.
USER MANUAL TH-48LFE8E PANASONIC
Operating Instructions
FULL HD LCD Display For business use
English
Español
Français
Model No. TH-43LFE8U 43-inch model
TH-48LFE8U 48-inch model
TH-55LFE8U 55-inch model
TH-65LFE8U 65-inch model
TH-43LFE8E 43-inch model
TH-48LFE8E 48-inch model
TH-55LFE8E 55-inch model
TH-65LFE8E 65-inch model
For more detailed instructions, refer to the Operating instructions on the CD-ROM.
- Please read these instructions before operating your set and retain them for future reference.
- Illustrations and screens in this Operating Instructions are images for illustration purposes, and may be different from the actual ones.
- Descriptive illustrations in this Operating Instructions are created mainly based on the 48-inch model.
Contents
Important Safety Instructions 2
FCC STATEMENT....3
Important Safety Notice 4
Safety Precautions....5
Precautions for use 7
Accessories 9
Connections....11
Identifying Controls 14
Basic Controls 16
Specifications 18
Software License 20
Limited Warranty 21
LIMITED WARRANTY STATEMENT 22
Customer Service 23

WARNING: To reduce the risk of electric shock, do not remove cover or back.
No user-serviceable parts inside. Refer servicing to qualified service personnel.

The lightning flash with arrow-head within a triangle is intended to tell the user that parts inside the product are a risk of electric shock to persons.

The exclamation point within a triangle is intended to tell the user that important operating and servicing instructions are in the papers with the appliance.
WARNING :
To prevent damage which may result in fire or shock hazard, do not expose this apparatus to rain or moisture.
Do not place containers with water (flower vase, cups, cosmetics, etc.) above the set.
(including on shelves above, etc.)
WARNING :
1) To prevent electric shock, do not remove cover. No user serviceable parts inside. Refer servicing to qualified service personnel.
2) Do not remove the grounding pin on the power plug. This apparatus is equipped with a three pin grounding-type power plug. This plug will only fit a grounding-type power outlet. This is a safety feature. If you are unable to insert the plug into the outlet, contact an electrician.
Do not defeat the purpose of the grounding plug.
Important Safety Instructions
1) Read these instructions.
2) Keep these instructions.
3) Heed all warnings.
4) Follow all instructions.
5) Do not use this apparatus near water.
6) Clean only with dry cloth.
7) Do not block any ventilation openings. Install in accordance with the manufacturer's instructions.
8) Do not install near any heat sources such as radiators, heat registers, stoves, or other apparatus (including amplifiers) that produce heat.
9) Do not defeat the safety purpose of the polarized or grounding-type plug. A polarized plug has two blades with one wider than the other. A grounding type plug has two blades and a third grounding prong. The wide blade or the third prong are provided for your safety. If the provided plug does not fit into your outlet, consult an electrician for replacement of the obsolete outlet.
10) Protect the power cord from being walked on or pinched particularly at plugs, convenience receptacles, and the point where they exit from the apparatus.
11) Only use attachments / accessories specified by the manufacturer.
12) Use only with the cart, stand, tripod, bracket, or table specified by the manufacturer, or sold with the apparatus. When a cart is used, use caution when moving the cart / apparatus combination to avoid injury from tip-over.
13) Unplug this apparatus during lightning storms or when unused for long periods of time.
14) Refer all servicing to qualified service personnel. Servicing is required when the apparatus has been damaged in any way, such as power-supply cord or plug is damaged, liquid has been spilled or objects have fallen into the apparatus, the apparatus has been exposed to rain or moisture, does not operate normally, or has been dropped.
15) To prevent electric shock, ensure the grounding pin on the AC cord power plug is securely connected.
FCC STATEMENT
This equipment has been tested and found to comply with the limits for a class A digital device, pursuant to Part 15 of the FCC Rules. These limits are designed to provide reasonable protection against harmful interference when the equipment is operated in a commercial environment. This equipment generates, uses and can radiate radio frequency energy and, if not installed and used in accordance with the instructions manual, may cause harmful interference to radio communications. Operation of this equipment in a residential area is likely to cause harmful interference in which case the user will be required to correct the interference at his own expense.
FCC CAUTION:
To assure continued compliance, follow the attached installation instructions and use only the provided power supply cord. Any changes or modifications not expressly approved by Panasonic Corp. of North America could void the user's authority to operate this device.
Declaration of Verification
Model No.
TH-43LFE8U, TH-48LFE8U
TH-55LFE8U, TH-65LFE8U
Responsible Party:
Panasonic Corporation of North America
Two Riverfront Plaza, Newark, New Jersey
07102-5490
Contact Source:
Panasonic System Communications Company of North America
1-877-655-2357
General Contact:
http://www.panasonic.com/contactinfo
This device complies with Part 15 of the FCC Rules and all applicable IC RSS standards. Operation is subject to the following two conditions: (1) This device may not cause harmful interference, and (2) this device must accept any interference received, including interference that may cause undesired operation.
CANADIAN NOTICE:
This Class A digital apparatus complies with Canadian ICES-003.
WARNING:
- Not for use in a computer room as defined in the Standard for the Protection of Electronic Computer/Data Processing Equipment, ANSI/NFPA 75.
- For permanently connected equipment, a readily accessible disconnect device shall be incorporated in the building installation wiring.
- For pluggable equipment, the socket-outlet shall be installed near the equipment and shall be easily accessible.
Note:
Image retention may occur. If you display a still picture for an extended period, the image might remain on the screen. However, it will disappear when a general moving picture is displayed for a while.
Trademark Credits
- Microsoft ^ , Windows ^ , Windows Vista ^ , Windows ^ 7, Windows ^ 8 and Internet Explorer ^ are the registered trademarks or trademarks of Microsoft Corporation in the United States and/or other countries.
•Macintosh, Mac, Mac OS, OS X and Safari are the trademarks of Apple Inc. registered in the United States and other countries. - PJLink is a registered or pending trademark in Japan, the United States, and other countries and regions.
•HDMI, the HDMI Logo, and High-Definition Multimedia Interface are trademarks or registered trademarks of HDMI Licensing LLC in the United States and other countries. - JavaScript is a registered trademark or a trademark of Oracle Corporation and its subsidiary and associated companies in the United States and/or other countries.
•RoomView, Crestron RoomView and Fusion RV are registered trademarks of Crestron Electronics, Inc, and Crestron Connected is the trademark of Crestron Electronics, Inc.
Even if no special notation has been made of company or product trademarks, these trademarks have been fully respected.
Important Safety Notice
WARNING
1) To prevent damage which may result in fire or shock hazard, do not expose this appliance to dripping or splashing.
Do not place containers with water (flower vase, cups, cosmetics, etc.) above the set. (including on shelves above, etc.)
No naked flame sources, such as lighted candles, should be placed on / above the set.
2) To prevent electric shock, do not remove cover. No user serviceable parts inside. Refer servicing to qualified service personnel.
3) Do not remove the earthing pin on the power plug. This apparatus is equipped with a three pin earthing-type power plug. This plug will only fit an earthing-type power outlet. This is a safety feature. If you are unable to insert the plug into the outlet, contact an electrician.
Do not defeat the purpose of the earthing plug.
4) To prevent electric shock, ensure the earthing pin on the AC cord power plug is securely connected.
CAUTION
This appliance is intended for use in environments which are relatively free of electromagnetic fields.
Using this appliance near sources of strong electromagnetic fields or where electrical noise may overlap with the input signals could cause the picture and sound to wobble or cause interference such as noise to appear.
To avoid the possibility of harm to this appliance, keep it away from sources of strong electromagnetic fields.
IMPORTANT: THE MOULDED PLUG FOR YOUR SAFETY, PLEASE READ THE FOLLOWING TEXT CAREFULLY.
This display is supplied with a moulded three pin mains plug for your safety and convenience. A 5 amp fuse is fitted in this plug. Shall the fuse need to be replaced, please ensure that the replacement fuse has a rating of 5 amps and that it is approved by ASTA or BSI to BS1362.
Check for the ASTA mark or the BSI mark on the body of the fuse.
If the plug contains a removable fuse cover, you must ensure that it is refitted when the fuse is replaced.
If you lose the fuse cover the plug must not be used until a replacement cover is obtained.
A replacement fuse cover can be purchased from your local Panasonic dealer. Do not cut off the mains plug.
Do not use any other type of mains lead except the one supplied with this display.
The supplied mains lead and moulded plug are designed to be used with this display to avoid interference and for your safety.
If the socket outlet in your home is not suitable, get it changed by a qualified electrician.
If the plug or mains lead becomes damaged, purchase a replacement from an authorized dealer.
WARNING : — THIS DISPLAY MUST BE EARTHED.
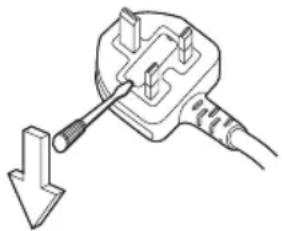
How to replace the fuse.
Open the fuse compartment with a screwdriver and replace the fuse.
natural_image
Line drawing of a plug with a screwdriver inserted, showing a downward arrow (no text or symbols)Safety Precautions
WARNING
Setup
This LCD Display is for use only with the following optional accessories.
Use with any other type of optional accessories may cause instability which could result in the possibility of injury.
(All of the following accessories are manufactured by Panasonic Corporation.)
- Pedestal
TY-ST43PE8 (for 43/48/55-inch models)
TY-ST65PE8 (for 65-inch model)
We are not responsible for any product damage, etc. caused by failures in the installation environment for the pedestal or wall-hanging bracket even during the warranty period.
Always be sure to ask a qualified technician to carry out set-up.
Small parts can present choking hazard if accidentally swallowed. Keep small parts away from young children. Discard unneeded small parts and other objects, including packaging materials and plastic bags/sheets to prevent them from being played with by young children, creating the potential risk of suffocation.
Do not place the Display on sloped or unstable surfaces and ensure that the Display does not hang over the edge of the base.
• The Display may fall off or tip over.
Install this unit at a location with minimal vibration and which can support the weight of the unit.
- Dropping or falling of the unit may cause injury or malfunction.
Do not place any objects on top of the Display.
- If foreign objects or water get inside the Display, a short-circuit may occur which could result in fire or electric shock. If any foreign objects get inside the Display, please consult your local Panasonic dealer.
Transport only in upright position!
- Transporting the unit with its display panel facing upright or downward may cause damage to the internal circuitry.
Ventilation should not be impeded by covering the ventilation openings with items such as newspapers, table cloths and curtains.
For sufficient ventilation, see page 7.
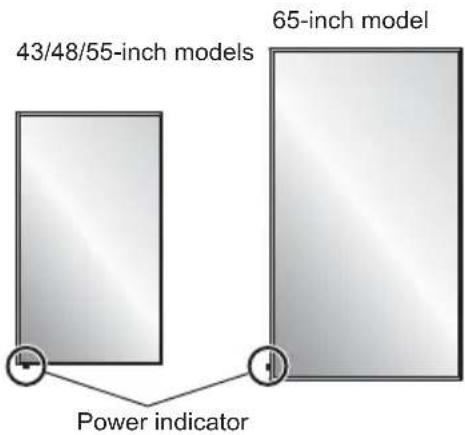
When installing the Display vertically;
When installing the Display vertically, be sure that the Power Indicator comes to the downside. Heat is generated and it may cause fire or damage to the Display.
Cautions for Wall or Pedestal Installation
- Wall or Pedestal installation should be performed by an installation professional. Installing the Display incorrectly may lead to an accident that results in death or serious injury. Use the optional Pedestal.
- When installing on a wall, a wall hanging bracket that conforms to VESA standards must be used.
• 43/48-inch models: VESA 200×200 55/65-inch models: VESA 400×400 (see page 7) - If you terminate the use of the Display on the Wall or Pedestal, ask a professional to remove the Display as soon as possible.
- When mounting the Display on the wall, prevent the mounting screws and power cable from contacting metal objects inside the wall. An electric shock may occur if they contact metal objects inside the wall.
Do not install the product to a place where the product is exposed to direct sunlight.
- If the screen is exposed to direct sunlight, the liquid crystal panel may have adverse effect.
■ When using the LCD Display
The Display is designed to operate on 110 - 127 or 220 - 240 V AC, 50/60 Hz.
Do not cover the ventilation holes.
- Doing so may cause the Display to overheat, which can cause fire or damage to the Display.
Do not stick any foreign objects into the Display.
- Do not insert any metal or flammable objects into the ventilations holes or drop them onto the Display, as doing so can cause fire or electric shock.
Do not remove the cover or modify it in any way.
• High voltages which can cause severe electric shocks are present inside the Display. For any inspection, adjustment and repair work, please contact your local Panasonic dealer.
Ensure that the mains plug is easily accessible.
65-inch model
The mains plug shall be connected to a mains socket outlet with a protective earthing connection.
Do not use any power supply cord other than that provided with this unit.
- Doing so may cause short-circuit, generates heat, etc., which could cause electric shock or fire.
Do not use the supplied power supply cord with any other devices.
- Doing so could cause electric shock or fire.
Securely insert the power supply plug as far as it will go.
- If the plug is not fully inserted, heat may be generated which could cause fire. If the plug is damaged or the wall socket is loose, they shall not be used.
Do not handle the power supply plug with wet hands.
- Doing so may cause electric shocks.
Do not do anything that may damage the power cable. When disconnecting the power cable, pull on the plug body, not the cable.
- Do not damage the cable, make any modifications to it, place heavy objects on top of it, heat it, place it near any hot objects, twist it, bend it excessively or pull it. To do so may cause fire and electric shock. If the power cable is damaged, have it repaired at your local Panasonic dealer.
Do not remove covers and NEVER modify the Display yourself
- Do not remove the rear cover as live parts are accessible when it is removed. There are no user serviceable parts inside. (High-voltage components may cause serious electrical shock.)
- Have the Display checked, adjusted, or repaired at your local Panasonic dealer.
Keep the supplied AAA/R03/UM4 batteries out of reach of children. If accidentally swallowed, it will be harmful to the body.
- Please contact a doctor immediately in case you doubt that the child may have swallowed it.
If the Display is not going to be used for any prolonged length of time, unplug the power supply plug from the wall outlet.
Picture noise may occur if you connect / disconnect the connection cables of the input terminals you are currently not watching, or if you turn the power of the video equipment on / off, but it is not a malfunction.
To prevent the spread of fire, keep candles or other open flames away from this product at all times.


CAUTION
If problems or malfunction occur, stop using immediately.
■ If problems occur, unplug the power supply plug.
- Smoke or an abnormal odour come out from the unit.
- No picture appears or no sound is heard, occasionally.
- Liquid such as water or foreign objects got inside the unit.
• The unit has deformed or broken parts.
If you continue to use the unit in this condition, it could result in fire or electric shock.
- Turn the power off immediately, unplug the power supply plug from the wall outlet, and then contact the dealer for repairs.
• To cut off the power supply to this Display completely, you need to unplug the power supply plug from the wall outlet.
• Repairing the unit yourself is dangerous, and shall never be done.
• To enable to unplug the power supply plug immediately, use the wall outlet which you can reach easily.
■ When using the LCD Display
Do not bring your hands, face or objects close to the ventilation holes of the Display.
• Heated air comes out from the ventilation holes at the top of Display will be hot. Do not bring your hands or face, or objects which cannot withstand heat, close to this port, otherwise burns or deformation could result.
At least 2 people are required to carry or unpack this unit.
- If this is not observed, the unit may drop, resulting in injury.
Be sure to disconnect all cables before moving the Display.
- If the Display is moved while some of the cables are still connected, the cables may become damaged, and fire or electric shock could result.
Disconnect the power supply plug from the wall socket as a safety precaution before carrying out any cleaning.
• Electric shocks can result if this is not done.
Clean the power cable regularly to prevent it becoming dusty.
- If dust built up on the power cord plug, the resultant humidity can damage the insulation, which could result in fire. Pull the power cord plug out from the wall outlet and wipe the mains lead with a dry cloth.
Do not step on, or hang from the display or the Pedestal.
• They might tip over, or might be broken and it may result in injury. Pay special attention to the children.
Do not reverse the polarity (+ and -) of the battery when inserting.
- Mishandling the battery may cause its explosion or leakage, resulting in fire, injury or damage to surrounding properties.
- Insert the battery correctly as instructed. (see page 10)
Remove the batteries from the remote control transmitter when not using for a long period of time.
- The battery may leak, heat, ignite or burst, resulting in fire or damage to surrounding properties.
Do not burn or breakup batteries.
- Batteries must not be exposed to excessive heat such as sunshine, fire or the like.
Precautions for use
Cautions when installing
Do not set up the Display outdoors.
• The Display is designed for indoor use.
Environmental temperature to use this unit
- When using the unit where it is below 1 400 m (4 593 ft) above sea level: 0 °C to 40 °C (32 °F to 104 °F)
- When using the unit at high altitudes (1 400 m (4 593 ft) and higher and below 2 800 m (9 186 ft) above sea level): 0 °C to 35 °C (32 °F to 95 °F)
Do not install the unit where it is 2 800 m (9 186 ft) and higher above sea level.
- Failure to do so may shorten the life of the internal parts and result in malfunctions.
About space when installing
When using the pedestal (optional accessory), leave a space of 10 cm (3 15/16") or more at the top, left and right, and 5 cm (1 31/32") or more at the rear, and also keep the space between the bottom of the display and the floor surface.
If using some other setting-up method, follow the manual of it. (If there is no specific indication of installation dimension in the+ installation manual, leave a space of 10 cm (3 15/16") or more at the top, bottom, left and right, and 5 cm (1 31/32") or more at the rear.)
Minimum distance:
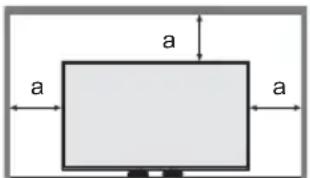

a: 10 cm (3 15/16")
b: 5 cm
(1 31/32")
About the screws used when using a wall hanging bracket that conforms to VESA standards
| Inch model | Screw pitch for installation | Depth of screw hole | Screw (quantity) |
| 43 200 mm × 200 mm 16 mm | M6 (4) | ||
| 48 200 mm × 200 mm 16 mm | M6 (4) | ||
| 55 400 mm × 400 mm 16 mm | M6 (4) | ||
| 65 400 mm × 400 mm 20 mm | M8 (4) |
For 43/48/55-inch models
Screw holes other than the above have also been provided on this unit, however, the screw holes in the above table are recommended.
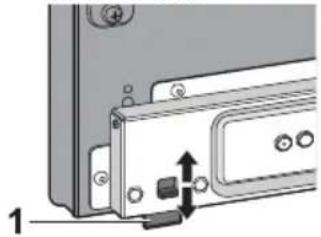
Be careful of the movable structure of the power indicator and remote control sensor.
- As factory default, the power indicator and remote control sensor are stored in the main unit. For normal use, pull out the remote control sensor from the edge side of the main unit by operating the lever on the rear panel. Depending on the setup condition such as when using the multi display, store the remote control sensor in the main unit. (see page 14)
Do not grab the liquid crystal panel.
- Do not forcibly press the liquid crystal panel, or push it with a pointed object. Applying a strong force to the liquid crystal panel will cause unevenness of the screen display, resulting in malfunction.
Depending on the temperature or humidity conditions, uneven brightness may be observed. This is not a malfunction.
- This unevenness will disappear while applying current continuously. If not, consult the distributor.
Cleaning and maintenance
The front of the display panel has been specially treated. Wipe the surface of the display panel gently using only a cleaning cloth or a soft, lint-free cloth.
- If the surface is particularly dirty, wipe with a soft, lint-free cloth which has been soaked in pure water or water in which neutral detergent has been diluted 100 times, and then wipe it evenly with a dry cloth of the same type until the surface is dry.
- Do not scratch or hit the surface of the panel with fingernails or other hard objects, otherwise the surface may become damaged. Furthermore, avoid contact with volatile substances such as insect sprays, solvents and thinner, otherwise the quality of the surface may be adversely affected.
If the cabinet becomes dirty, wipe it with a soft, dry cloth.
- If the cabinet is particularly dirty, soak the cloth in water to which a small amount of neutral detergent has been added and then wring the cloth dry. Use this cloth to wipe the cabinet, and then wipe it dry with a dry cloth.
- Do not allow any detergent to come into direct contact with the surface of the Display. If water droplets get inside the unit, operating problems may result.
- Avoid contact with volatile substances such as insect sprays, solvents and thinner, otherwise the quality of the cabinet surface may be adversely affected or the coating may peel off. Furthermore, do not leave it for long periods in contact with articles made from rubber or PVC.
Usage of a chemical cloth
- Do not use a chemical cloth for the panel surface.
- Follow the instructions for the chemical cloth to use it for the cabinet.
Wired LAN
When setting up the Display at a place, where electric statistic occurs often, take a sufficient anti-static measure before start using.
- When the Display is used at a location, where static electricity occurs often, such as on a carpet, communications of the wired LAN are disconnected more often. In that case, remove static electricity and the noise source that may cause problems with an antistatic mat, and re-connect the wired LAN.
• In rare cases, the LAN connection is disabled due to static electricity or noise. In that case, turn off the power of the Display and the connected devices once and then re-turn on the power. Connect the LAN.
The Display may not work properly due to strong radio wave from the broadcast station or the radio.
- If there is any facility or equipment, which outputs strong radio wave, near the installation location, set up the Display at a location sufficiently far from the source of the radio wave. Or, wrap the LAN cable connected to the LAN terminal by using a piece of metal foil or a metal pipe, of which is grounded at both ends.
Disposal
When disposing the product, ask your local authority or dealer about the correct methods of disposal.
Accessories
Accessories Supply
Check that you have the accessories and items shown
Operating Instructions (Book)
Operating Instructions (CD-ROM)

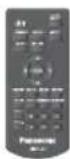
Remote Control Transmitter×1
N2QAYA000099
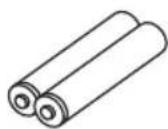
Batteries for the Remote Control Transmitter
(AAA/R03/UM4 type × 2)

Clamper × 3

For TH-43LFE8U,
TH-48LFE8U,
TH-55LFE8U and
TH-65LFE8U
Warranty card × 1
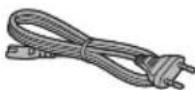
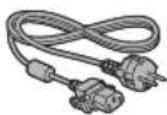
Power supply cord
TH-43LFE8U, TH-48LFE8U, TH-55LFE8U

TH-43LFE8E, TH-48LFE8E, TH-55LFE8E

TH-65LFE8U
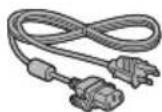
TH-65LFE8E

Attention
- Store small parts in an appropriate manner, and keep them away from young children.
- In case you lost accessories, please consult your dealer.
- Dispose the packaging materials appropriately after taking out the items.
Remote Control Batteries
- Pull and hold the hook, then open the battery cover.

natural_image
Illustration of a gray rectangular device with a handle and mounting holes (no text or symbols)- Insert batteries - note correct polarity (+ and -).

natural_image
Illustration of a remote control device with a pointer pointing to the interior (no text or symbols)AAA/R03/UM4 type
- Replace the cover.
Helpful Hint
- For frequent remote control users, replace old batteries with Alkaline batteries for longer life.

Precaution on battery use
Incorrect installation can cause battery leakage and corrosion that will damage the remote control transmitter.
Disposal of batteries should be in an environment-friendly manner.
Observe the following precaution:
- Batteries shall always be replaced as a pair. Always use new batteries when replacing the old set.
- Do not combine a used battery with a new one.
- Do not mix battery types (example: "Zinc Carbon" with "Alkaline").
- Do not attempt to charge, short-circuit, disassemble, heat or burn used batteries.
- Battery replacement is necessary when remote control acts sporadically or stops operating the Display set.
- Do not burn or breakup batteries.
- Batteries must not be exposed to excessive heat such as sunshine, fire or the like.
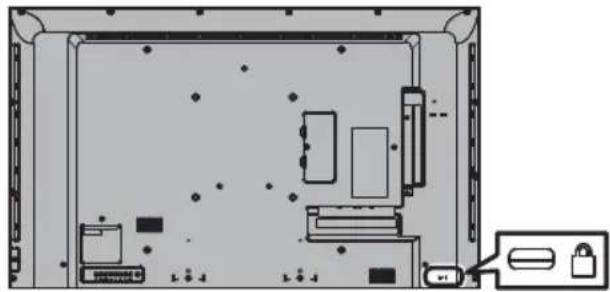
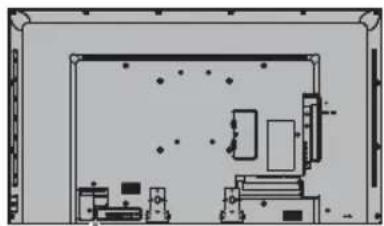
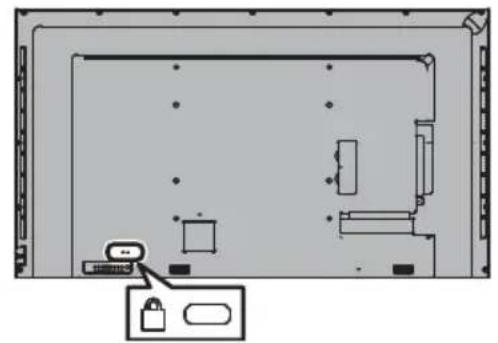
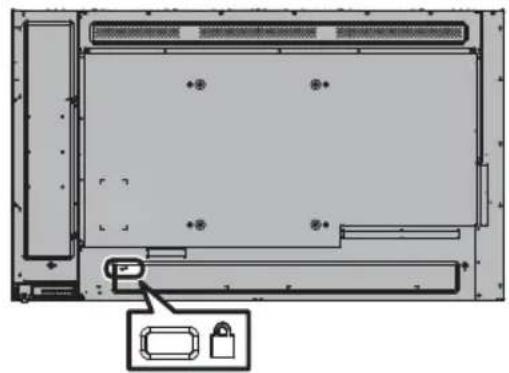
Kensington security
This security slot is compatible with the Kensington security cables.
43-inch model
natural_image
Diagram of an internal device layout with labeled components and a lock icon pointing to a device (no text or symbols present)48-inch model

natural_image
Top-down schematic of an electronic device casing with internal components and a lock icon (no text or labels)55-inch model

natural_image
Diagram of a computer monitor rear panel with an icon pointing to a device (no text or symbols present)65-inch model

natural_image
Technical diagram of a computer monitor with an open panel and two labeled buttons (no text or symbols present)Connections
AC cord connection and fixing
43/48/55-inch models
Back of the unit
natural_image
Top-down schematic of a room layout with furniture and fixtures (no text or labels)Insert the AC cord securely all the way seated on the back side of the unit.

Insert the plug until the line is hidden.
65-inch model
- The AC cord for the 65-inch model has a 3-pin plug with earth.
Back of the unit

natural_image
Technical diagram of a computer monitor with an open rear panel and a button, showing no text or symbols.AC cord fixing

Plug the connector into the display unit.
Plug the AC cord until it clicks.
Note
- Make sure that the AC cord is locked on both the left and right sides.
Unplug the AC cord

natural_image
Pure mechanical diagram showing a piston-like component with arrows indicating downward force or direction (no text or symbols)Unplug the connector pressing the two knobs.
Note
- When disconnecting the AC cord, be absolutely sure to disconnect the AC cord plug at the socket outlet first.
- The supplied AC cord set is for this unit exclusive use. Do not use this for other purposes.
Cable fixing
Note
- 3 clampers are supplied with this unit. Fix the cables at 3 locations using the holes of clampers as shown below.
If you need more clampers, purchase them from your dealer. (Available from the customer service)
1. Attach the clamper

2. Bundle the cables

Video equipment connection

1 AV IN (VIDEO): Composite Video Input Terminal
Connect to video equipment such as VCR or DVD player, etc.
2 PC IN: PC Input Terminal
Connect to video terminal of PC, video equipment with "Y, PB(CB), PR(CR)" or "R, G, B" output.
3 A V I N HDMI Input Terminal
(HDMI 1, Connect to video equipment such as HDMI 2): VCR or DVD player, etc.
4 DVI-D IN: DVI-D Input Terminal
Connect to video equipment with DVI-D output.
5 SERIAL IN: Serial Control Terminal
Control the Display by connecting to PC.
6 LAN: LAN Terminal
Control the Display by connecting to Network.
7 USB: USB Memory Terminal
Connect the USB memory to use the USB media player function. Also, this can be used to supply power of up to 5V/1A to an external device when receiving images.
8 IR IN, IR OUT: Infrared Signal Input/output Terminal
Use this when operating more than one display with one remote control.
9 AUDIO IN: Audio input terminal shared with DVI-D IN and PC IN
10 AUDIO OUT: Analogue Audio Output Terminal
Connect to audio equipment with analogue audio input terminal.
( Note
- If the outer shape of the plug of a connection cable is large, it may come in contact with the plug of an adjacent connection cable. Use a connection cable with the suitable plug size for the terminal alignment.
Identifying Controls
Main Unit

natural_image
Blank whiteboard with a small icon in the corner (no text or symbols)65-inch model
natural_image
Diagram of a computer monitor with an attached drive and indicator finger (no text or symbols)43/48/55-inch

- The power indicator and remote control sensor can be taken in and out by sliding the lever on the rear panel.
- It is also possible to store the part by pushing it directly
Note
- For normal use, pull out the power indicator and remote control sensor from the edge side of the main unit by operating the lever on the rear panel. Depending on the setup condition such as when using the multi display, store them in the main unit.
1 Power Indicator / Remote control sensor The Power Indicator will light.
When the power of the unit is ON (Main Power On / Off switch: ON)
• Picture is displayed: Green
- Power OFF (Standby) with remote control: Red When [Network control] is set to [On]: Orange (Red/Green)
• Power OFF with "Power management" function: Orange (Red/Green)
"Power management" function
When the power of the unit is OFF (Main Power On Off switch: OFF): No light
Note
The unit will still consume some power as long as the power cord is still inserted into the wall outlet.
When the power indicator is orange, power consumption during standby is generally larger than that of when the power indicator is red.

1 External Input Terminal
- Connect to video equipment, PC, etc. (see page 13)
2
• Turns the power On / Off.
3 (INPUT signal selection)
- Selects the connected device.
4
• Each time the
- Configures the item on menu screen.
• Switches aspect mode.
Remote Control Transmitter

1 Standby (ON/OFF) button (∅ / |
- Turns the power on or off when the Display is turned on at the power switch.(see page 16)
2 POSITION
3 SETUP
4 ENTER / Cursor buttons (▼▲)
• Used to operate the menu screens.
5 ZOOM
- Enters the digital zoom mode.
6 DEFAULT
- Resets the settings of picture, sound, etc., to defaults.
7 MUTE
• Sound mute on / off.
8 ASPECT
- Adjusts the aspect.
9 VOL + / VOL -
• Adjusts sound volume level.
10 AUTO SETUP
- Automatically adjusts the position/size of the screen.
11 INPUT
• Switches input to display on the screen.
12 PICTURE
13 SOUND
14 RECALL
- Displays the current setting status of Input mode, Aspect mode, etc.
15 RETURN
• Used to return to the previous menu.
16 FUNCTION GROUP
17 OFF TIMER
• Switches to stand-by after a fixed period.
18 Numeric buttons (1 - 6)
- Used as shortcut buttons by assigning frequently used operations.
19 Signal emission
Note
- In this manual, buttons of the remote control and the unit are indicated as < >. (Example: .)
The operation is mainly explained indicating the remote control buttons but you can also operate with the buttons on the unit when there are the same buttons.
Basic Controls

Operate pointing the remote control directly at the unit's Remote Control Sensor.

Note
- For normal use, pull out the remote control sensor from the edge side of the main unit by operating the lever on the rear panel. (see page 14)
- Do not put an obstacle between the remote control sensor of the main unit and the remote control.
- Operate the remote control in front of the remote control sensor or from the area where the sensor can be seen.
- Do not subject the remote control sensor of the main unit to the direct sunlight or strong fluorescent light.
1 Connect the AC cord plug to the Display.
(see page 11)
2 Connect the plug to the socket outlet.
Note
- Main plug types vary between countries. The power plug shown at left may, therefore, not be the type fitted to your set.
- When disconnecting the AC cord, be absolutely sure to disconnect the AC cord plug at the socket outlet first.
3 Press the on the unit to turn the set on: Power-On.
• Power Indicator: Green (Picture is displayed.)
- When the power of the unit is ON, remote control operation is possible.
■ To turn the power ON/OFF with the remote control
Press the standby (ON/OFF) button to turn the Display on.
• Power Indicator: Green (Picture is displayed.)
Press the standby (ON/OFF) button to turn the Display off.
• Power Indicator: Red (standby)
Press the
Note
- During operation of the "Power management" function, the power indicator turns orange in the power off state.
■ When the Unit is turned on for the first time ■ Power ON message
Following screen will be displayed.
Set with the remote control. Unit buttons are invalid.
1 Select the language with ▲ and press .

2 Select [Year] / [Month] / [Day] / [Hour] / [Minute] with ▲ and set with .◀◀
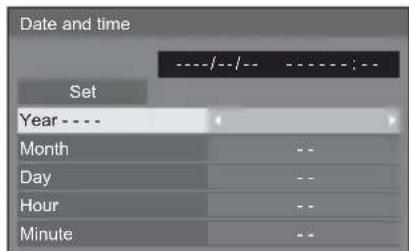
3 Select [Set] with ▲ and press .

4 For vertical installation, select [Portrait] with ▲ and press .

Note
- Once the items are set, the screens won't be displayed when switching on the unit next time.
After the setting, the items can be changed in the following menus.
[OSD language]
[Date and time]
[Display orientation]
The following message may be displayed when turning the unit power ON:
No activity power off Precautions
'No activity power off' is enabled.
When [No activity power off] in the [Setup] menu is set to [Enable], a warning message is displayed every time the power is turned ON.
"Power management" Information
Last turn off due to 'Power management'.
When "Power management" is functioned, an information message is displayed every time the power is turned ON.
These message displays can be set with the following menu:
• [Options] menu
Power on message(No activity power off)
Power on message(Power management)
Specifications
Model No.
43-inch model : TH-43LFE8U
48-inch model : TH-48LFE8U
55-inch model : TH-55LFE8U
65-inch model : TH-65LFE8U
43-inch model : TH-43LFE8E
48-inch model : TH-48LFE8E
55-inch model : TH-55LFE8E
65-inch model : TH-65LFE8E
Power Consumption
TH-43LFE8U: 135 W
TH-48LFE8U: 150 W
TH-55LFE8U: 170 W
TH-65LFE8U: 160 W
TH-43LFE8E: 135 W
TH-48LFE8E: 150 W
TH-55LFE8E: 170 W
TH-65LFE8E: 160 W
Power off condition
0.3 W
Stand-by condition
0.5 W
LCD Display panel
43-inch model
43-inch VA panel (LED backlight), 16:9 aspect ratio
48-inch model
48-inch VA panel (LED backlight), 16:9 aspect ratio
55-inch model
55-inch IPS panel (LED backlight), 16:9 aspect ratio
65-inch model
65-inch VA panel (LED backlight), 16:9 aspect ratio
Screen size
43-inch model
940 mm (W) × 529 mm (H) × 1 079 mm (diagonal) /
37.0" (W) ×20.8" (H) × 42.5" (diagonal)
48-inch model
1 054 mm (W) × 592 mm (H) × 1 209 mm (diagonal) /
41.4" (W) × 23.3" (H) × 47.6" (diagonal)
55-inch model
1 209 mm (W) × 680 mm (H) × 1 387 mm (diagonal) /
47.6" (W) × 26.7" (H) × 54.6" (diagonal)
65-inch model
1 428 mm (W) × 803 mm (H) × 1 638 mm (diagonal) /
56.2" (W) × 31.6" (H) × 64.5" (diagonal)
(No. of pixels)
2 073 600 (1 920 (W) × 1 080 (H))
Dimensions (W × H × D)
43-inch model
969 mm × 560 mm × 61 mm /
38.2" × 22.1" × 2.4"
48-inch model
1 082 mm × 624 mm × 62 mm /
42.6" × 24.6" × 2.5"
55-inch model
1 239 mm × 712 mm × 62 mm /
48.8" × 28.0" × 2.5"
65-inch model
1 451 mm × 829 mm × 62 mm /
57.2" × 32.7" × 2.5"
Mass
43-inch model
approx. 8.7 kg / 19.2 lbs net
48-inch model
approx. 11.5 kg / 25.4 lbs net
55-inch model
approx. 16.0 kg / 35.3 lbs net
65-inch model
approx. 36.2 kg / 79.9 lbs net
Power source
TH-43/48/55/65LFE8U:
110 - 127 V AC, 50/60 Hz
TH-43/48/55/65LFE8E:
220 - 240 V AC, 50/60 Hz
Operating condition
Temperature
0 °C to 40 °C (32 °F to 104 °F) ^*1
Humidity
20 % to 80 % (no condensation)
Storing condition
Temperature
-20 °C to 60 °C (-4 °F to 140 °F)
Humidity
20 % to 80 % (no condensation)
Connection terminals
HDMI 1
HDMI 2
TYPE A Connector × 2 ^2
Audio signal:
Linear PCM (sampling frequencies - 48 kHz, 44.1 kHz, 32 kHz)
DVI-D IN
DVI-D 24 Pin:
Compliance with DVI Revision 1.0
Content Protection:
Compatible with HDCP 1.1
PC IN
High-Density Mini D-sub 15 Pin:
Compatible with DDC2B
Y/G:
1.0 Vp-p (75 Ω) (with sync)
0.7 Vp-p (75 Ω) (without sync)
P_B/C_B/B:
0.7 Vp-p (75 Ω)
PR/CR/R:
0.7 Vp-p (75 Ω)
HD/VD:
1.0 - 5.0 Vp-p (high impedance)
VIDEO
Shared with DVI-D IN and PC IN
AUDIO OUT
For RJ45 network connections,
compatible with PJLink
Communication method:
RJ45 10BASE-T/100BASE-TX
IR IN
Mini jack (M3)
IR OUT
Mini jack (M3)
USB
TYPE A USB Connector
5V DC / 1A (USB 3.0 is not supported.)
Sound
Speakers
43/48/55-inch models:
80 mm × 30 mm × 2 pcs
65-inch model:
96 mm × 27 mm × 2 pcs
Audio Output
20 W [10 W + 10 W] (10 % THD)
Remote Control Transmitter
Power source
3 V DC (battery (AAA/R03/UM4 type) × 2)
Operating range
Approx. 7 m (22.9 ft)
(when operated directly in front of receptor)
Mass
Approx. 63 g / 2.22 ozs (including batteries)
Dimensions (W × H × D)
44 mm × 106 mm × 20.5 mm /
1.74" × 4.18" × 0.81"
*1: Environmental temperature to use this unit at high altitudes (1 400m (4 593 ft) and higher and below 2 800 m (9 186 ft) above sea level): 0 °C to 35 °C (32 °F to 95 °F)
*2: VIERA LINK is not supported.
Note
- Design and specifications are subject to change without notice. Mass and dimensions shown are approximate.
- This equipment complies with the EMC standards listed below.
EN55022, EN55024, EN61000-3-2, EN61000-3-3.
This product incorporates the following software:
(1) the software developed independently by or for Panasonic Corporation,
(2) the software owned by third party and licensed to Panasonic Corporation,
(3) the software licensed under the GNU General Public License, Version 2.0 (GPL V2.0),
(4) the software licensed under the GNU LESSER General Public License, Version 2.1 (LGPL V2.1), and/or
(5) open source software other than the software licensed under the GPL V2.0 and/or LGPL V2.1.
The software categorized as (3) - (5) are distributed in the hope that it will be useful, but WITHOUT ANY WARRANTY, without even the implied warranty of MERCHANTABILITY or FITNESS FOR A PARTICULAR PURPOSE. For details, see the license conditions displayed by selecting [Software licenses], following the specified operation from the initial setting menu of this product.
At least three (3) years from delivery of this product, Panasonic will give to any third party who contacts us at the contact information provided below, for a charge no more than our cost of physically performing source code distribution, a complete machine-readable copy of the corresponding source code covered under GPL V2.0, LGPL V2.1 or the other licenses with the obligation to do so, as well as the respective copyright notice thereof.
Contact Information:
oss-cd-request@gg.jp.panasonic.com
Notice about AVC/VC-1/MPEG-4
This product is licensed under the AVC Patent Portfolio License, VC-1 Patent Portfolio License and MPEG-4 Visual Patent Portfolio License for the personal use of a consumer or other uses in which it does not receive remuneration to (i) encode video in compliance with the AVC Standard, VC-1 Standard and MPEG-4 Visual Standard (“AVC/VC-1/MPEG-4 Video”) and/or (ii) decode AVC/VC-1/MPEG-4 Video that was encoded by a consumer engaged in a personal activity and/or was obtained from a video provider licensed to provide AVC/VC-1/MPEG-4 Video. No license is granted or shall be implied for any other use. Additional information may be obtained from MPEG LA, LLC. See http://www.mpegla.com.
Panasonic Solutions Company
Unit of Panasonic Corporation of
North America
Two Riverfront Plaza, Newark,
New Jersey 07102-5490
Panasonic Professional Flat Panel Display Limited Warranty
Panasonic Solutions Company. (referred to as “the Warrantor”) will repair this product and all included accessories with new or refurbished parts, free of charge in the USA or Puerto Rico, of the original purchase in the event of a defect in materials or workmanship as follows:
| Models or Parts | Part Warranty | Labor Warranty |
| Professional Flat Panel Display | 2 Years 2 Years |
On-site or carry-in service in the USA and Puerto Rico may be obtained during the warranty period by contacting Panasonic Solutions Company Service toll free at 1-877-655-2357.
This warranty is extended only to the original purchaser and is non transferable. A purchase receipt or other proof of date of original purchase will be required before warranty service is rendered.
This warranty only covers failures due to defects in materials or workmanship, which occur during normal use. The warranty does not cover damage which occur in shipment, or failures which are caused by products not supplied by the warrantor, or failures which result from improper installation, set-up adjustments, improper antenna, inadequate signal pickup, maladjustment of consumer controls, improper operation, power line surge, improper voltage supply, lighting damage, or service by anyone other than an authorized repair facility, or damage that is attributable to acts of God.
LIMITS AND EXCLUSIONS
There are no express warranties except as listed above.
THE WARRANTOR SHALL NOT BE LIABLE FOR INCIDENTAL OR CONSEQUENTIAL DAMAGES (INCLUDING, WITHOUT LIMITION, DAMAGE TO DISCS) RESULTING FROM THE USE OF THIS PRODUCT, OR ARISING OUT OF ANY BREACH OF THE WARRANTY. ALL EXPRESS AND IMPLIED WARRANTIES, INCLUDING THE WARRANTIES OF MERCHANTABILITY AND FITNESS FOR PARTICULAR PURPOSE, ARE LIMITED TO THE APPLICABLE WARRANTY PERIOD SET FORTH ABOVE.
Some states do not allow the exclusion or limitation of incidental or consequential damages, or limitations on how long an implied warranty lasts, so the above exclusions or limitations may nor apply to you. This warranty gives you specific legal rights and you may other rights, which vary from state to state.
If you have a problem with this product that is not handled to your satisfaction, then write the Consumer Affairs Department at the Company address indicated above.
In the USA and Puerto Rico
FOR SERVICE
CALL TOLL FREE
1-877-655-2357
| WARRANTY COVERAGE PERIOD EXCEPTIONS | ||
| Item | Parts | Labour |
| Video Tape | 30 days—Replacement only | N/A |
| P2/SD Cards | (Content not covered) | N/A |
| Video Heads | 1 year or 2,000 hrs. | Whether comes first |
| DS Video Heads | 1 year or 1,000 hrs. | Whether comes first |
| Maintenance Items | 90 days | 90 days |
| Colour Camera CCD | 2 years | 2 years |
| BTH Series LCD Monitors | 2 years | 2 years |
| DLPR Proyclors | 3 years or 17,000 hrs. | Whether comes first |
| 2,500 ANSI Luminans | 3 years or 2,500 hrs. | Whether comes first |
| LCD Proyclors below | 3 years or 1,500 hrs. | Whether comes first |
| Projector Lamps | 50% of the red lamp life or 1 year. | Whether comes first |
| 103 inch Plasma dimplies | 3 years (burn-in not covered) | 3 years |
| Hard Drive Disk Unit | 1 year plus balance (if any) of the original Guatemala's limited Warranty. (Content not covered) | 1 year |
| • Dust, smoke, rental/staging environment and twenty-tour/seven operation,tramacally decreases the interval between performances or routine preventivemaintenance required to maintain this warranty coverage. | ||
LIMITED WARRANNTY STATEMENT
5770 Ambler Drive, Mississauga, Ontario L4W 2T3
Panasonic Canada Inc.
Customer Service
Customer Service Directory
Obtain information products and operative assistant; localize the closer distributor or Service Center; buy spare parts and accessories by our web site to Latin American:
http://www.lar.panasonic.com
Also you may contact us directly by our Contact Center:
Panama 800-PANA (800-7262)
Colombia 1-8000-94PANA (1-8000-947262) - National Line
635-PANA (635-7262) - Bogota Line
Ecuador 1800-PANASONIC (1800-726276)
Costa Rica 800-PANA737 (800-7262737)
El Salvador 800-PANA (800-7262)
Guatemala 1-801-811-PANA (1-801-811-7262)
Chile 800-260602
From a cell phone: 245-2520
Venezuela 800-PANA-800 (800-7262-800)
Uruguay 0-800-PANA (0800-7262)
Mexico Service
To obtain information in the Republic of Mexico contact us at:
Or you may contact us in the next following phones numbers:
01800-VIP-PANA (01800-847-7262) - Interior
(55) 5000-1200 - Mexico D.F. and Metropolitan Area
Information for Users on Collection and Disposal of Old Equipment and used Batteries
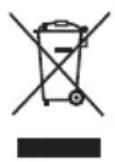
These symbols on the products, packaging, and/or accompanying documents mean that used electrical and electronic products and batteries should not be mixed with general household waste. For proper treatment, recovery and recycling of old products and used batteries, please take them to applicable collection points, in accordance with your national legislation and the Directives 2002/96/EC and 2006/66/EC.
By disposing of these products and batteries correctly, you will help to save valuable resources and prevent any potential negative effects on human health and the environment which could otherwise arise from inappropriate waste handling.

For more information about collection and recycling of old products and batteries, please contact your local municipality, your waste disposal service or the point of sale where you purchased the items.
Penalties may be applicable for incorrect disposal of this waste, in accordance with national legislation. For business users in the European Union
If you wish to discard electrical and electronic equipment, please contact your dealer or supplier for further information.

[Information on Disposal in other Countries outside the European Union]
These symbols are only valid in the European Union. If you wish to discard these items, please contact your local authorities or dealer and ask for the correct method of disposal.
Note for the battery symbol (bottom two symbol examples):
This symbol might be used in combination with a chemical symbol. In this case it complies with the requirement set by the Directive for the chemical involved.
USA only: Disposal may be regulated in your community due to environmental considerations. For disposal or recycling information, please visit Panasonic website:
http://www.panasonic.com/environmental or call 1-888-769-0149.
Customer's Record
The model number and serial number of this product may be found on its rear panel. You should note this serial number in the space provided below and retain this book, plus your purchase receipt, as a permanent record of your purchase to aid in identification in the event of theft or loss, and for Warranty Service purposes.
Model Number Serial Number
For TH-43LFE8U, TH-48LFE8U, TH-55LFE8U and TH-65LFE8U
Panasonic System Communications Company of North America
Unit of Panasonic Corporation of North America
Executive Office :
Two Riverfront Plaza, Newark, New Jersey 07102-5490
Panasonic Canada Inc.
5770 Ambler Drive
Mississauga, Ontario
L4W 2T3
For TH-43LFE8E, TH-48LFE8E, TH-55LFE8E and TH-65LFE8E
Pursuant to the directive 2004/108/EC, article 9(2)
Panasonic Testing Centre
Panasonic Service Europe, a division of Panasonic Marketing Europe GmbH
Winsbergring 15, 22525 Hamburg, F.R. Germany
Panasonic®
(Tipo AAA/R03/UM4 × 2)

Abrazadera × 3

Para TH-43LFE8U,
TH-48LFE8U,
TH-55LFE8U y
TH-65LFE8U
natural_image
Illustration of a flatbed tray with a clip and handle (no text or symbols)natural_image
Illustration of a remote control device with a screwdriver inserted (no text or symbols)Tipo AAA/R03/UM4
natural_image
Diagram of a computer monitor rear panel with labeled ports and connectors (no text or symbols present)natural_image
Diagram of a device interior with labeled components and an icon pointing to a lock (no text or symbols present)natural_image
Top-down schematic of a computer monitor showing internal components and a small device (no text or labels)natural_image
Diagram of a computer monitor rear panel with an icon indicating a lock or lock component (no text or symbols present)Conexiones
natural_image
Top-down schematic of a room layout with furniture and fixtures (no text or labels)natural_image
Technical line drawing of a mechanical component with no visible text or symbolsnatural_image
Diagram of a mechanical assembly with arrows indicating force or direction (no text or symbols)natural_image
Blank whiteboard with a small icon in the corner (no text or symbols)natural_image
Diagram of a computer monitor with an attached key and a directional arrow indicating movement (no text or symbols present)natural_image
Diagram of a device with a labeled component (1), showing internal structure without any text or symbols.Power on message(No activity power off)
Power on message(Power management)
Especificaciones
Nº de modelo
2.073.600 (1.920 (AN) x 1.080 (AL))
Dimensiones (AN x AL x FO)
Modelo de 43 pulgadas 969 mm × 560 mm × 61 mm / 38,2" × 22,1" × 2,4" Modelo de 48 pulgadas 1.082 mm × 624 mm × 62 mm / 42,6" × 24,6" × 2,5" Modelo de 55 pulgadas 1.239 mm × 712 mm × 62 mm / 48,8" × 28,0" × 2,5" Modelo de 65 pulgadas 1.451 mm × 829 mm × 62 mm / 57,2" × 32,7" × 2,5"
Peso
1,74" × 4,18" × 0,81"
Panasonic Canada Inc.
5770 Ambler Drive
Mississauga, Ontario
L4W 2T3
Para los modelos TH-43LFE8E, TH-48LFE8E, TH-55LFE8E and TH-65LFE8E
Winsbergring 15, 22525 Hamburg, F.R. Germany
Panasonic®
Mode d'emploi
(type AAA/R03/UM4 × 2)
Attache × 3

Pour les modèles
TH-43LFE8U,
TH-48LFE8U,
TH-55LFE8U et
TH-65LFE8U
natural_image
Illustration of a flatbed rectangular object with a triangular clip and a small protrusion, no text or symbols present.natural_image
Illustration of a remote control device with a pointed tip and three buttons (no text or symbols)Type AAA/R03/UM4
- Replacez le couvercle.
Conseil utile
natural_image
Diagram of a computer monitor rear panel with labeled ports and an icon pointing to a lock (no text or symbols present)Modèle 48 pouces

natural_image
Diagram of a device interior layout with labeled components and an icon pointing to a lock (no text or symbols present)Modèle 55 pouces
natural_image
Diagram of a computer monitor rear panel with labeled ports and connectors (no text or symbols present)Modèle 65 pouces
natural_image
Technical diagram of a computer monitor rear panel with an inset showing a lock and a small device (no text or symbols present)Connexions
natural_image
Pure electrical circuit lines without any symbolsnatural_image
Technical line drawing of a mechanical component with no visible text or symbolsnatural_image
Pure mechanical diagram showing a piston-like component with arrows indicating downward force or direction (no text or symbols)natural_image
Blank whiteboard with a small icon in the corner (no text or symbols)Modèle 65 pouces

1 Bouton Standby (ON/OFF - ⏻ / |
3 SETUP (CONFIGURATION)
16 FUNCTION (FONCTION)
17 OFF TIMER (Minuterie veille)
Dimensions (L × H × P)
| Modèle 43 pouces |
| 969 mm × 560 mm × 61 mm / |
| 38.2" × 22.1" × 2.4" |
| Modèle 48 pouces |
| 1 082 mm × 624 mm × 62 mm / |
| 42.6" × 24.6" × 2.5" |
| Modèle 55 pouces |
| 1 239 mm × 712 mm × 62 mm / |
| 48.8" × 28.0" × 2.5" |
| Modèle 65 pouces |
| 1 451 mm × 829 mm × 62 mm / |
| 57.2" × 32.7" × 2.5" |
Poids
3 V CC (pile (type AAA/R03/UM4) × 2)
Dimensions (L × H × P)
44 mm × 106 mm × 20,5 mm /
1,74" × 4,18" × 0,81"
Panasonic Canada Inc.
5770 Ambler Drive, Mississauga, Ontario L4W 2T3
CERTIFICAT DE GARANTIE LIMITÉE
RESTRICTIONS À LA GARANTIE
Item
Cassettes vidéo
Cartes P2/SD
Tetes video
Têtes vidéo D5
Articles de maint
Canteur d'image
Panasonic System Communications Company of North America
Une unité de Panasonic Corporation of North America
Bureau exécutif :
Two Riverfront Plaza, Newark, New Jersey 07102-5490
Panasonic Canada Inc.
5770 Ambler Drive
Mississauga, Ontario
L4W 2T3
Pour les modèles TH-43LFE8E, TH-48LFE8E, TH-55LFE8E et TH-65LFE8E
Panasonic Testing Centre
Panasonic Service Europe, a division of Panasonic Marketing Europe GmbH
Winsbergring 15, 22525 Hamburg, F.R. Germany
- Operating Instructions
- English
- Español
- Français
- Contents
- WARNING :
- Important Safety Instructions
- FCC STATEMENT
- FCC CAUTION:
- CANADIAN NOTICE:
- WARNING:
- Note:
- Trademark Credits
- Important Safety Notice
- WARNING
- CAUTION
- IMPORTANT: THE MOULDED PLUG FOR YOUR SAFETY, PLEASE READ THE FOLLOWING TEXT CAREFULLY.
- WARNING : — THIS DISPLAY MUST BE EARTHED.
- How to replace the fuse.
- Safety Precautions
- Setup
- Cautions for Wall or Pedestal Installation
- ■ When using the LCD Display
- 65-inch model
- Do not reverse the polarity (+ and -) of the battery when inserting.
- Remove the batteries from the remote control transmitter when not using for a long period of time.
- Do not burn or breakup batteries.
- Precautions for use
- Cautions when installing
- Do not set up the Display outdoors.
- Environmental temperature to use this unit
- Do not install the unit where it is 2 800 m (9 186 ft) and higher above sea level.
- About space when installing
- Be careful of the movable structure of the power indicator and remote control sensor.
- Do not grab the liquid crystal panel.
- Depending on the temperature or humidity conditions, uneven brightness may be observed. This is not a malfunction.
- Cleaning and maintenance
- The front of the display panel has been specially treated. Wipe the surface of the display panel gently using only a cleaning cloth or a soft, lint-free cloth.
- If the cabinet becomes dirty, wipe it with a soft, dry cloth.
- Usage of a chemical cloth
- Wired LAN
- When setting up the Display at a place, where electric statistic occurs often, take a sufficient anti-static measure before start using.
- The Display may not work properly due to strong radio wave from the broadcast station or the radio.
- Disposal
- When disposing the product, ask your local authority or dealer about the correct methods of disposal.
- Accessories
- Accessories Supply
- Power supply cord
- Attention
- Remote Control Batteries
- Helpful Hint
- Precaution on battery use
- Observe the following precaution:
- Kensington security
- Connections
- AC cord connection and fixing
- Note
- Cable fixing
- Attach the clamper
- Bundle the cables
- AV IN (VIDEO): Composite Video Input Terminal
- PC IN: PC Input Terminal
- A V I N HDMI Input Terminal
- DVI-D IN: DVI-D Input Terminal
- SERIAL IN: Serial Control Terminal
- LAN: LAN Terminal
- USB: USB Memory Terminal
- IR IN, IR OUT: Infrared Signal Input/output Terminal
- AUDIO IN: Audio input terminal shared with DVI-D IN and PC IN
- AUDIO OUT: Analogue Audio Output Terminal
- ( Note
- Identifying Controls
- Main Unit
- Power Indicator / Remote control sensor The Power Indicator will light.
- External Input Terminal
- 2
- (INPUT signal selection)
- 4
- <+ (Unit)> / <- (Unit)>
- < ▲ (Unit)> / < ▼ (Unit)>
- 7
- Remote Control Transmitter
- Standby (ON/OFF) button (∅ / |
- POSITION
- SETUP
- ENTER / Cursor buttons (▼▲)
- ZOOM
- DEFAULT
- MUTE
- ASPECT
- VOL + / VOL -
- AUTO SETUP
- INPUT
- PICTURE
- SOUND
- RECALL
- RETURN
- FUNCTION GROUP
- OFF TIMER
- Numeric buttons (1 - 6)
- Signal emission
- Basic Controls
- Connect the AC cord plug to the Display.
- Connect the plug to the socket outlet.
- Press the on the unit to turn the set on: Power-On.
- ■ To turn the power ON/OFF with the remote control
- ■ When the Unit is turned on for the first time ■ Power ON message
- Select the language with ▲ and press .
- Select [Year] / [Month] / [Day] / [Hour] / [Minute] with ▲ and set with .◀◀
- Select [Set] with ▲ and press .
- For vertical installation, select [Portrait] with ▲ and press .
- No activity power off Precautions
- "Power management" Information
- Specifications
- Model No.
- Power Consumption
- Power off condition
- Stand-by condition
- LCD Display panel
- Screen size
- (No. of pixels)
- Dimensions (W × H × D)
- Mass
- Power source
- Operating condition
- Temperature
- Humidity
- Storing condition
- Connection terminals
- HDMI 1
- HDMI 2
- DVI-D IN
- PC IN
- VIDEO
- AUDIO OUT
- IR IN
- IR OUT
- USB
- Sound
- Speakers
- Audio Output
- Operating range
- Notice about AVC/VC-1/MPEG-4
- Panasonic Professional Flat Panel Display Limited Warranty
- LIMITS AND EXCLUSIONS
- LIMITED WARRANNTY STATEMENT
- Customer Service
- Customer Service Directory
- http://www.lar.panasonic.com
- Mexico Service
- Information for Users on Collection and Disposal of Old Equipment and used Batteries
- [Information on Disposal in other Countries outside the European Union]
- Note for the battery symbol (bottom two symbol examples):
- Customer's Record
- For TH-43LFE8U, TH-48LFE8U, TH-55LFE8U and TH-65LFE8U
- Panasonic System Communications Company of North America
- Executive Office :
- Panasonic Canada Inc.
- For TH-43LFE8E, TH-48LFE8E, TH-55LFE8E and TH-65LFE8E
- Panasonic®
- Conexiones
- Especificaciones
- Nº de modelo
- Dimensiones (AN x AL x FO)
- Peso
- Para los modelos TH-43LFE8E, TH-48LFE8E, TH-55LFE8E and TH-65LFE8E
- Mode d'emploi
- Conseil utile
- Connexions
- Bouton Standby (ON/OFF - ⏻ / |
- SETUP (CONFIGURATION)
- FUNCTION (FONCTION)
- OFF TIMER (Minuterie veille)
- Poids
- Dimensions (L × H × P)
- CERTIFICAT DE GARANTIE LIMITÉE
- Bureau exécutif :
- Pour les modèles TH-43LFE8E, TH-48LFE8E, TH-55LFE8E et TH-65LFE8E
Brand : PANASONIC
Model : TH-48LFE8E
Category : Monitor