
Cruise 4.0 R - Outboard motor Torqeedo - Free user manual and instructions
Find the device manual for free Cruise 4.0 R Torqeedo in PDF.

User questions about Cruise 4.0 R Torqeedo
0 question about this device. Answer the ones you know or ask your own.
Ask a new question about this device
Download the instructions for your Outboard motor in PDF format for free! Find your manual Cruise 4.0 R - Torqeedo and take your electronic device back in hand. On this page are published all the documents necessary for the use of your device. Cruise 4.0 R by Torqeedo.
USER MANUAL Cruise 4.0 R Torqeedo
Operating Manual (English)
Cruise T
Torpeedo Service Center 94/96
natural_image
Technical line drawing of a mechanical device with gears and levers (no text or symbols)natural_image
Technical line drawing of a torque pump assembly (no text or symbols)natural_image
Line drawing showing a hand pressing a button on a device while the other hand controls a remote control panel (no text or symbols)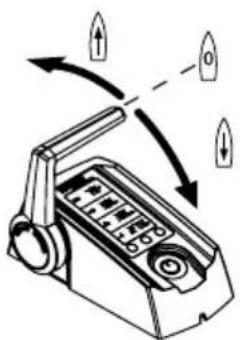
natural_image
Diagram of a device with directional arrows indicating rotation or movement (no text or symbols)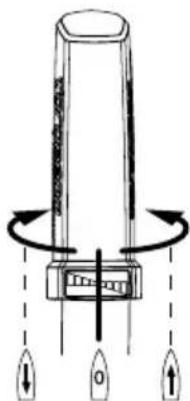

Andere Anzeigen:
Batteriespannung
Batterie-Ladestand
Ferngas/Pinne in Stopp-Position bringen
natural_image
Diagram of a handheld device with directional arrows indicating motion or rotation (no text or symbols)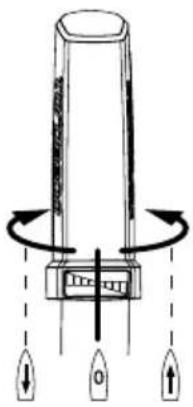
natural_image
Line drawing of a hand holding a device with an arrow indicating left motion (no text or symbols)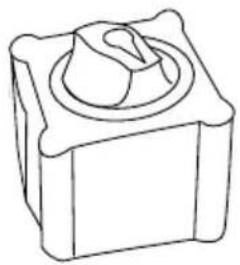
natural_image
Line drawing of a mechanical component with a central circular feature (no text or symbols)
natural_image
Technical line drawing of a mechanical device with no visible text or symbols5.5 Pylon
natural_image
Simple line drawing of a trash bin with two crossed lines indicating no waste or discharge (no text or symbols)GARANTIESCHEIN
Your satisfaction with our products is very important to us. Every product has been produced and tested with extraordinary diligence. If nevertheless a warranty claim should occur, we would like to help you as fast and effectively as we can.
For a smooth process we need your cooperation:
- Please complete this Warranty Claim Form.
- Please provide a copy of your proof of purchase (invoice, receipt).
-
Please look for the nearest Torqueedo Service location under www.torqueedo.com in the Service Centre section. Contact the Service Centre you choose before you send in the product. Please understand that we have to reject received products which the Service Centre was not notified of.
-
Please ensure suitable packaging.
- Please be advised that lithium batteries are designated as Hazardous Material. The dispatch of the battery with a transport company has to be organized according to the formalities for dangerous goods and packed in the original packaging.
- Please observe the warranty conditions as listed in the Instruction Manuals.
Contact Details
| First Name | Last Name |
| Address | City, State, Zip Code / Postcode |
| Country | |
| Telephone No. | Mobile No. |
| When existing: Customer ID | |
Details of claim
| Exact product name Serial No. of motor / battery | |
| Date of purchase | Hours of use (approx.) |
| Dealer where product was purchased Address of dealer (City, Zip Code, Country) | |
| Detailed description of problem (including error message, in which situation the error occurred...) | |
| RMA number (Only if product is sent to Torpeedo Service Center directly, not to Service Partners) | |
Thank you very much for your cooperation, the Torpeedo Service
Europe & international: service_international@torqeedo.com T +49 - 8153 - 92 15 - 126 F +49 - 8153 - 92 15 - 329 A list of Certified Service Centres can be found under www.torqueedo.com, Service Center
Dear customer,
We are delighted that you have chosen our motor. In terms of drive technology and efficiency, your Torpeedo Cruise outboard motor is cutting-edge technology. It has been designed and manufactured with the utmost care and with a special focus on comfort, user-friendliness, safety, and has been extensively tested before delivery.
Please take the time to read this operating manual carefully so that you can use the motor properly and enjoy it for a long time.
We constantly strive to improve Torpeedo products. Should you have any comments on the design and use of our products, please do not hesitate to contact us.
Please feel free to contact us about any Torpeedo product inquiries you may have. All points of contact are listed on the reverse.
We hope you have a lot of fun with this product.
Your torqeedo team
Content
- Important safety and operating instructions.... 54
- Legally prescribed information 56
2.1 Identification and technical data 56
2.2 EU Conformity declaration 58
- Equipment and operating elements.... 59
3.1 Scope of supply 59
3.2 Survey operating instruments and components 60
3.2.1 Survey operating instruments and components for Cruise R....60
3.2.2 Survey operating instruments and components for Cruise T 61
- Starting up 62
4.1 Mounting of drive to the boat (Cruise R and Cruise T) 62
4.2 Mounting of remote control (only for Cruise R) 64
4.3 Fixing of steering (only for Cruise R) 65
4.4 Mounting of remote throttle control (Cruise R) / tiller (Cruise T) with integrated display and magentic key 65
4.5 Basic information on battery supply.... 66
4.5.1 Short remarks on battery supply 66
4.5.2 Serial/parallel linking of batteries 67
4.6 Connecting of Cruise R/T to Power 26-104 lithium battery/batteries.... 68
4.6.1 Cruise 2.0 R/T 68
4.6.2 Cruise 4.0 R/T 70
4.7 Connecting of Cruise R/T to lead batteries (Gel, AGM), or conventional lithium batteries 72
4.8 Prevention of damage when connecting other devices to traction batteries....74
4.9 Using solar panels and generators....76
- Operation 76
5.1 Driving operation.... 76
5.2 Multifunction display with signal tone 77
5.3 Remote throttle control (Cruise R)/ tiller (Cruise T) with integrated display and Magnetic Kill Switch 79
5.3.1 Use of battery charge display when operating with Power 26-104 battery 79
5.3.1.1 Establishing communication between Power 26-104 and Cruise outboards .... 79
5.3.1.2 Setup menu for display options.... 80
5.3.1.3 How to switch on/off the battery....80
5.3.2 Use of of battery charge display when operating with other batteries 80
5.3.2.1 Set-up of battery charge 80
5.3.2.2 Usage and Calibration of battery charge display.... 81 5.3.3 Exceptional functions / emergency situations.... 83
5.3.4 Error message / Troubleshooting.... 84
5.4 Transom mount 86
5.5 Pylon 87
-
Dismantling 88
-
Storage and care instructions 88
7.1 Corrosion protection 88
7.2 Changing the propeller 89
7.3 Other care instructions.... 89
7.4 Maintenance....90
7.5 Trailering boats equipped with outboard....90
- Warranty conditions 91
8.1 Extent of warranty....91
8.2 Warranty process 92
-
Accessories 92
-
Disposal instructions 94
Torpeedo Service Center.... 94/96
1. Important safety and operating instructions

DANGER
This symbol warns about any danger of injury to you and other people.
Torqueedo motors are designed to operate safely and reliably as long as they are used according to the operating manual. Please read this manual carefully before you start the motor. Ignoring these instructions can cause property damage or personal injury. Torqeedo accepts no liability for any damage caused by actions that contradict this operating manual.
To ensure safe operation of the motor:
- Check the status and function of the outboard motor (including emergency stop switch) before each use.
- Please note that the GPS-based range calculation is subject to constant currents and winds. Changes to the direction of travel, currents and wind directions may significantly affect the displayed remaining range.
- If you are running the motor at full throttle in high ambient temperatures, the motor may reduce speed automatically to reduce battery temperature. A blinking thermometer in the display informs about this operation (temperature, protection, mode).
- Familiarize yourself with all the motor controls. For instance, you should be able to stop the motor quickly if necessary.
- Only allow adults who have been instructed on how to operate the motor to run it.
- Follow the boat manufacturer's instructions on the permissible motorization of your boat. Do not exceed the capacity limits.
- Stop the motor immediately if someone goes overboard.
- Never operate the motor if someone is in the water close to the boat.
- In addition to these selected warnings, please comply with the complete operating manual.
- Torpeedo has the right to refuse warranty claims in cases where the object of purchase was in any way retrofitted, modified, or equipped with other parts or accessories not expressly approved or recommended by Torpeedo.

WATCH OUT!
This symbol warns of danger of damage that may be caused to or by outboard motor.
In the following you will find a selection of the most important instructions for handling of Torqueedo motors. Apart from these instructions, please observe the complete operating manual to prevent damage to or by your motor.
- Only operate the motor while the propeller is submerged in water. If the motor is running „in air“ for a longer period of time, the shaft seals are getting damaged which seal the motor at the drive shaft against water intrusion. Additionally, the motor might overheat.
- Cruise R/ Cruise T models are protected against dirt and water according to protection rating IP67 (30 minutes under water at a depth of 1 meter)
- After use, the motor should as a general rule, be taken out of the water. Use the tilt mechanism to do so.
- Rinse the motor with fresh water after operation in salt water or brackish water.
- You extend the lifespan of your battery if you do not expose it to hot environments for longer than necessary.
- Comply with the following rules if you are storing your battery for a longer period of time. Storage for around six months: Charging level when stored 50%. Storage for a whole year: Charging level when stored 100%. If the battery is to be stored for several years the charging level should be checked once a year in order to prevent the battery from deep discharging.
- If the motor has malfunctions an error code is shown on the display. After resolving the error the motor can be restarted again from the stop-position of the tiller. Depending on the error code displayed it may be necessary to switch the motor off using the "on/off" button on the tiller. You find descriptions and details in the "Error messages/trouble shooting" chapter in this operating manual.
- Do not leave the motor in the water when the boat is moved by other drives (e.g. while sailing, towing the boat) to prevent damage to the electronics.
- When leaving the boat turn main switch into "OFF" position to prevent accidental operation of motor and limit battery discharge during storage. It is additionally mandatory to completely switch off the Power 26-104.
- Do not operate the motor and the main switch when completely submerged or permanently exposed to splashing water.
- In order to maintain a smooth movement of the throttle handle we recommend to keep the area between the handle and the metal base lubricated (e.g. WD40 or Wet-protect).
- Inspection of sacrificial anode on a regular basis, at least every 6 months. Replace if needed.
- If you charge your batteries, please make sure to use only galvanically insulated chargers. Your dealer can probably assist you in selecting the proper charger. Furthermore, turn the main switch of the cable set in the „off“ position in order to avoid damages due to electrolysis while charging.
- When using the Torpeedo Cruise in conjunction with a Torpeedo Power battery, a one-time registration (Enumeration) of the batteries is necessary in order to establish the communication between the components. See chapter 5.3.1.1.
2. Legally prescribed information
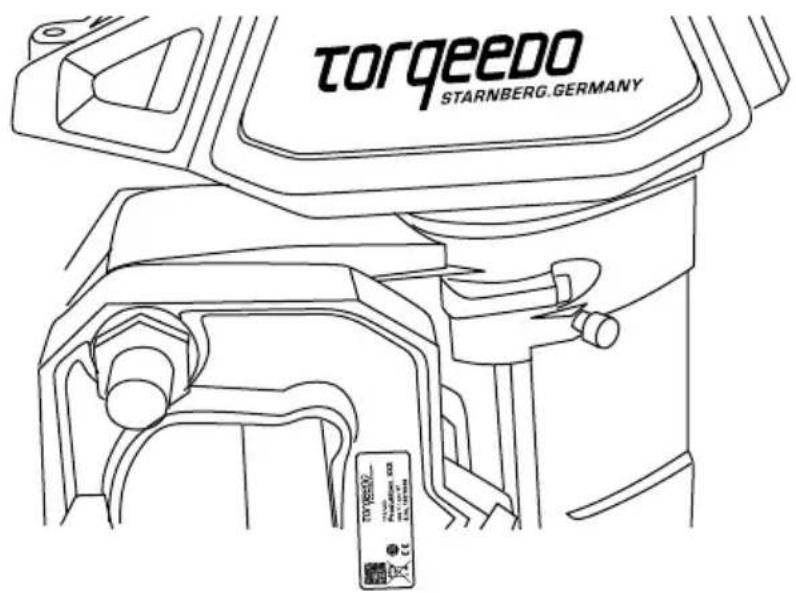
2.1 Identification and technical data
You will find type plates comprising complete product designation on the spots indicated in the figure.
Explanation and description of symbols
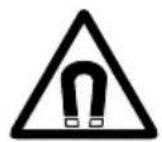
Magnetic field Read operating n

carefully

Keep away from pacemakers and other medical implants – min. 50 cm / 20 inch

Keep away from magnetic cards (e.g. credit cards) and other magnetic information media – min. 50 cm/20 in.
Technical Data
| Type Cruise 2.0 R/T Cruise 4.0 R/T | ||
| Input power in watts 2,000 4,000 | ||
| Rated voltage in volts 24.0 - 25.9 48.0 – 51.8 | ||
| Propulsion power in watts 1,120 2,240 | ||
| Comparable petrol outboards(propulsive power) | 5 HP 8 HP | |
| Comparable petrol outboards (thrust) 6 HP 9.9 HP | ||
| Cut-off voltage Li 21V PB 18V Li 42V PB 36V | ||
| Maximum overall efficiency in % 56 56 | ||
| Static thrust in lbs* | 115 | 189 |
| Total weight in kg/lbs | 15.3 (RS)/16.2 (RL)17.5 (TS)/18.6 (TL) | 16.1 (RS)/17.0 (RL)18.3 (TS)/19.4 (TL) |
| Shaft length in cm / inches | 62.5 / 24.6 (S) / 75.5 / 29.7 (L) | 62.5 / 24.6 (S) / 75.5 / 29.7 (L) |
| Propeller dimensions in inches | 12 x 10 | 12 x 10 |
| Max. propeller speed in rpm | 1,300 1,300 | |
| Control | Remote throttle / Tiller | Remote throttle / Tiller |
| Steering | Provision for connecting to standard remote steering, lockable360°; lockable | Provision for connecting to standard remote steering, lockable360°; lockable |
| Tilting device | Manual with grounding protection | Manual with grounding protection |
| Trimm device | Manual, 4-step | Manual, 4-step |
| Stepless forward/reverse drive | Yes | Yes |
* Torpeedo static thrust measurement is based on internationally accepted ISO standards. Static thrust figures for conventional trolling motors are typically measured differently, which results in higher values. To compare Torpeedo static thrust data with conventional trolling motors, add approximately 50% to the Torpeedo static thrust values.
2.2 EU Conformity declaration
We herewith declare and confirm that the products designated in the following
1230-20 - Cruise 0.8 R S 1230-00 - Cruise 2.0 R S 1232-00 - Cruise 4.0 R S
1231-20 - Cruise 0.8 R L 1231-00 - Cruise 2.0 R L 1233-00 - Cruise 4.0 R L
1234-20 - Cruise 0.8 T S 1234-00 - Cruise 2.0 T S 1236-00 - Cruise 4.0 T S
1235-20 - Cruise 0.8 T L 1235-00 - Cruise 2.0 T L 1237-00 - Cruise 4.0 T L
are in compliance with the material protection requirements stipulated in the following directives:
• Directive 2014/30/EU of the European Parliament and of the Council of 26 February 2014 on the harmonisation of the laws of the Member States relating to electromagnetic compatibility
Applied harmonized standards:
- EN 61000-6-2:2005 - Electromagnetic compatibility (EMC) - Part 6-2: Generic standards - Immunity for industrial environments (IEC 61000-6-2:2005)
- EN 61000-6-3:2007 + A1:2011 - Electromagnetic compatibility (EMC) - Part 6-3: Generic standards - Emission standard for residential, commercial and light-industrial environments (IEC 61000-6-3:2006 + A1:2010)
- Directive 2006/42/EC of the European Parliament and of the Council of 17 May 2006 on machinery, and amending Directive 95/16/EC (recast)
Applied harmonized standard:
• EN ISO 12100:2010 - Safety of machinery - General principles for design - Risk assessment and risk reduction (ISO 12100:2010)
Authorized person in charge of the documentation pursuant to Annex II Paragraph 1 Section A. No. 2, 2006/42/EC:
Last Name, First Name: Zwez, Michael
Position in the manufacturer's company: Quality Representative
This declaration is valid for all specimens which are manufactured in accordance with the relevant production drawings which are an integral part of the technical documentation.
This declaration is made for an on behalf of the manufacturer Torqeedo GmbH.
Name: Torqeedo GmbH
Position in the manufacturer's company: Managing Director
Gilching, January 27th, 2015
Document: 203-00001
Month.Year: 01.2015

3. Equipment and operating elements
3.1 Scope of supply
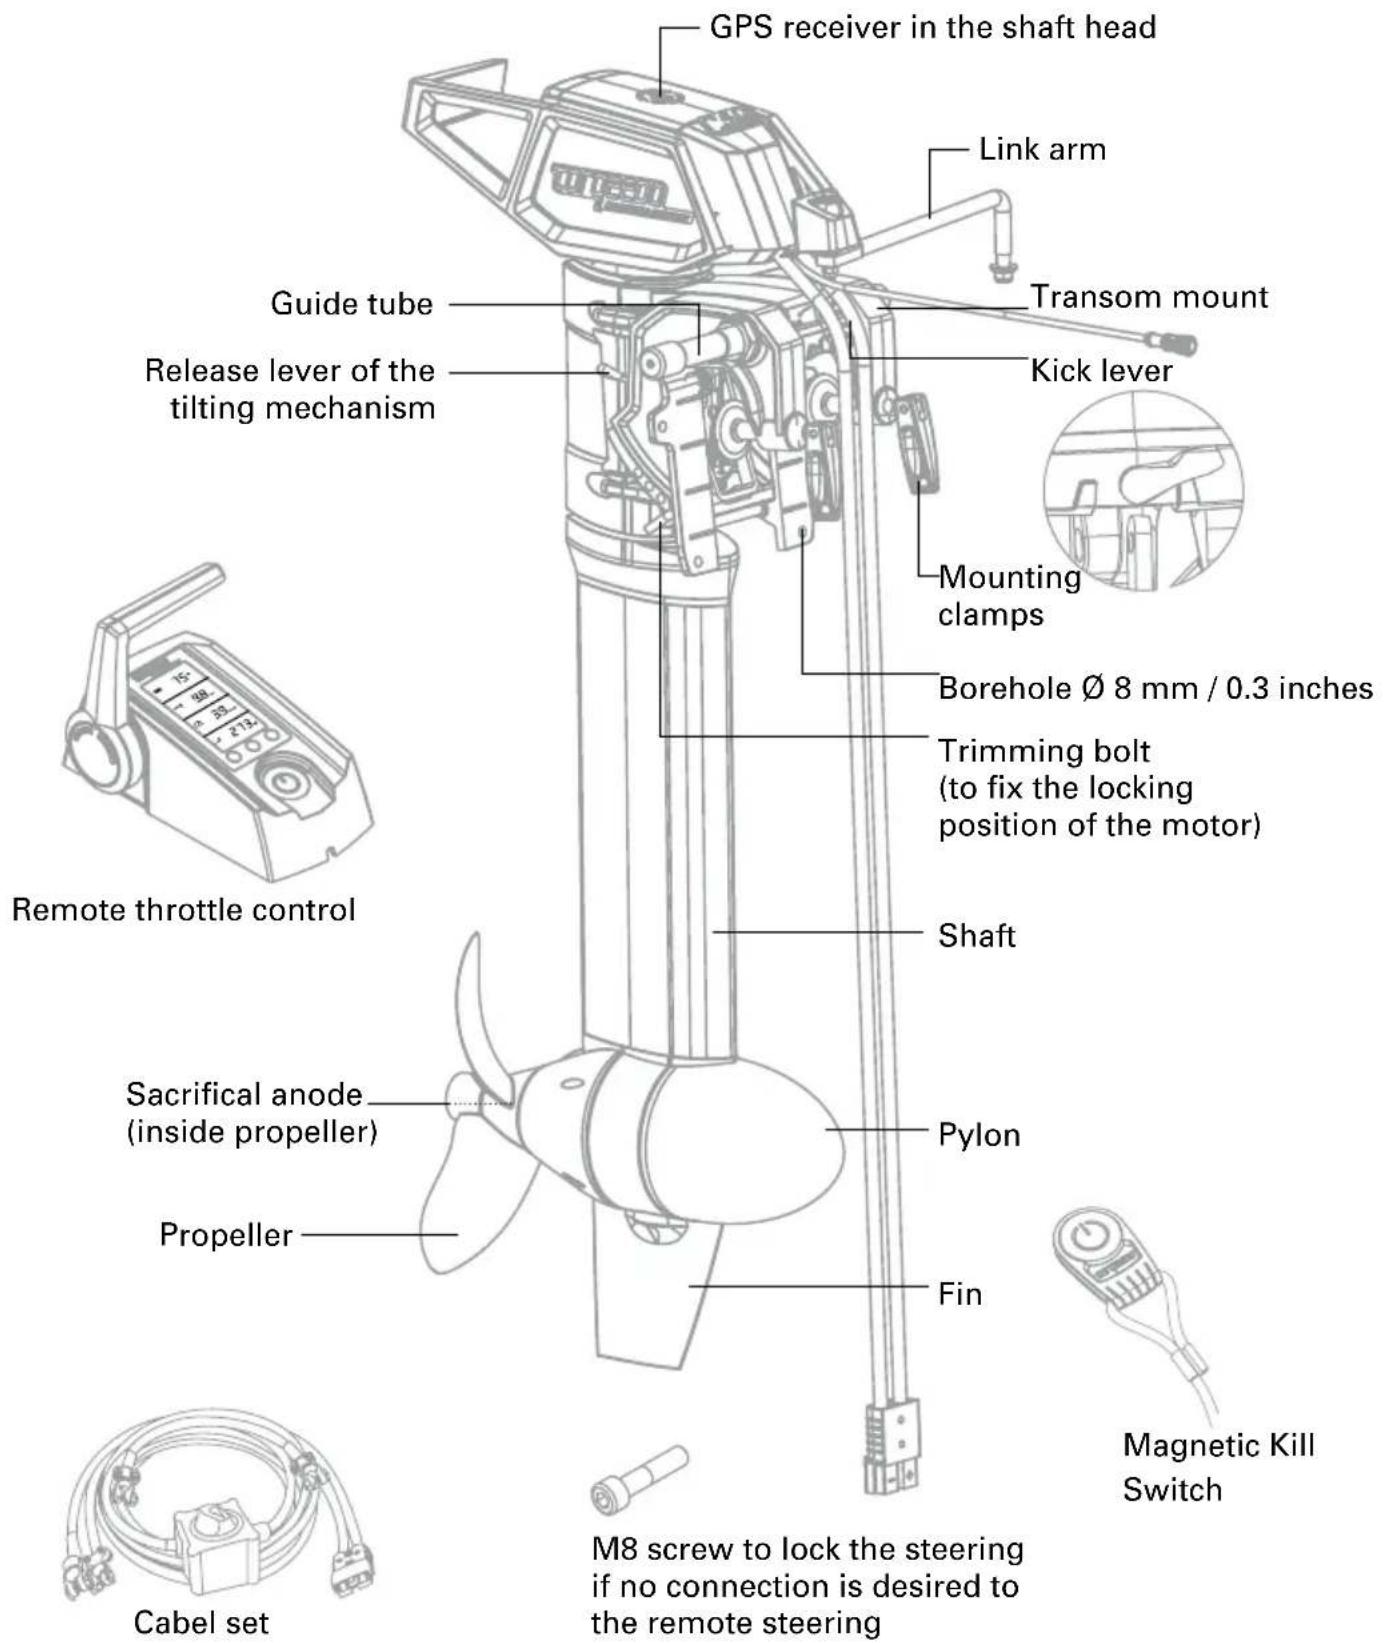
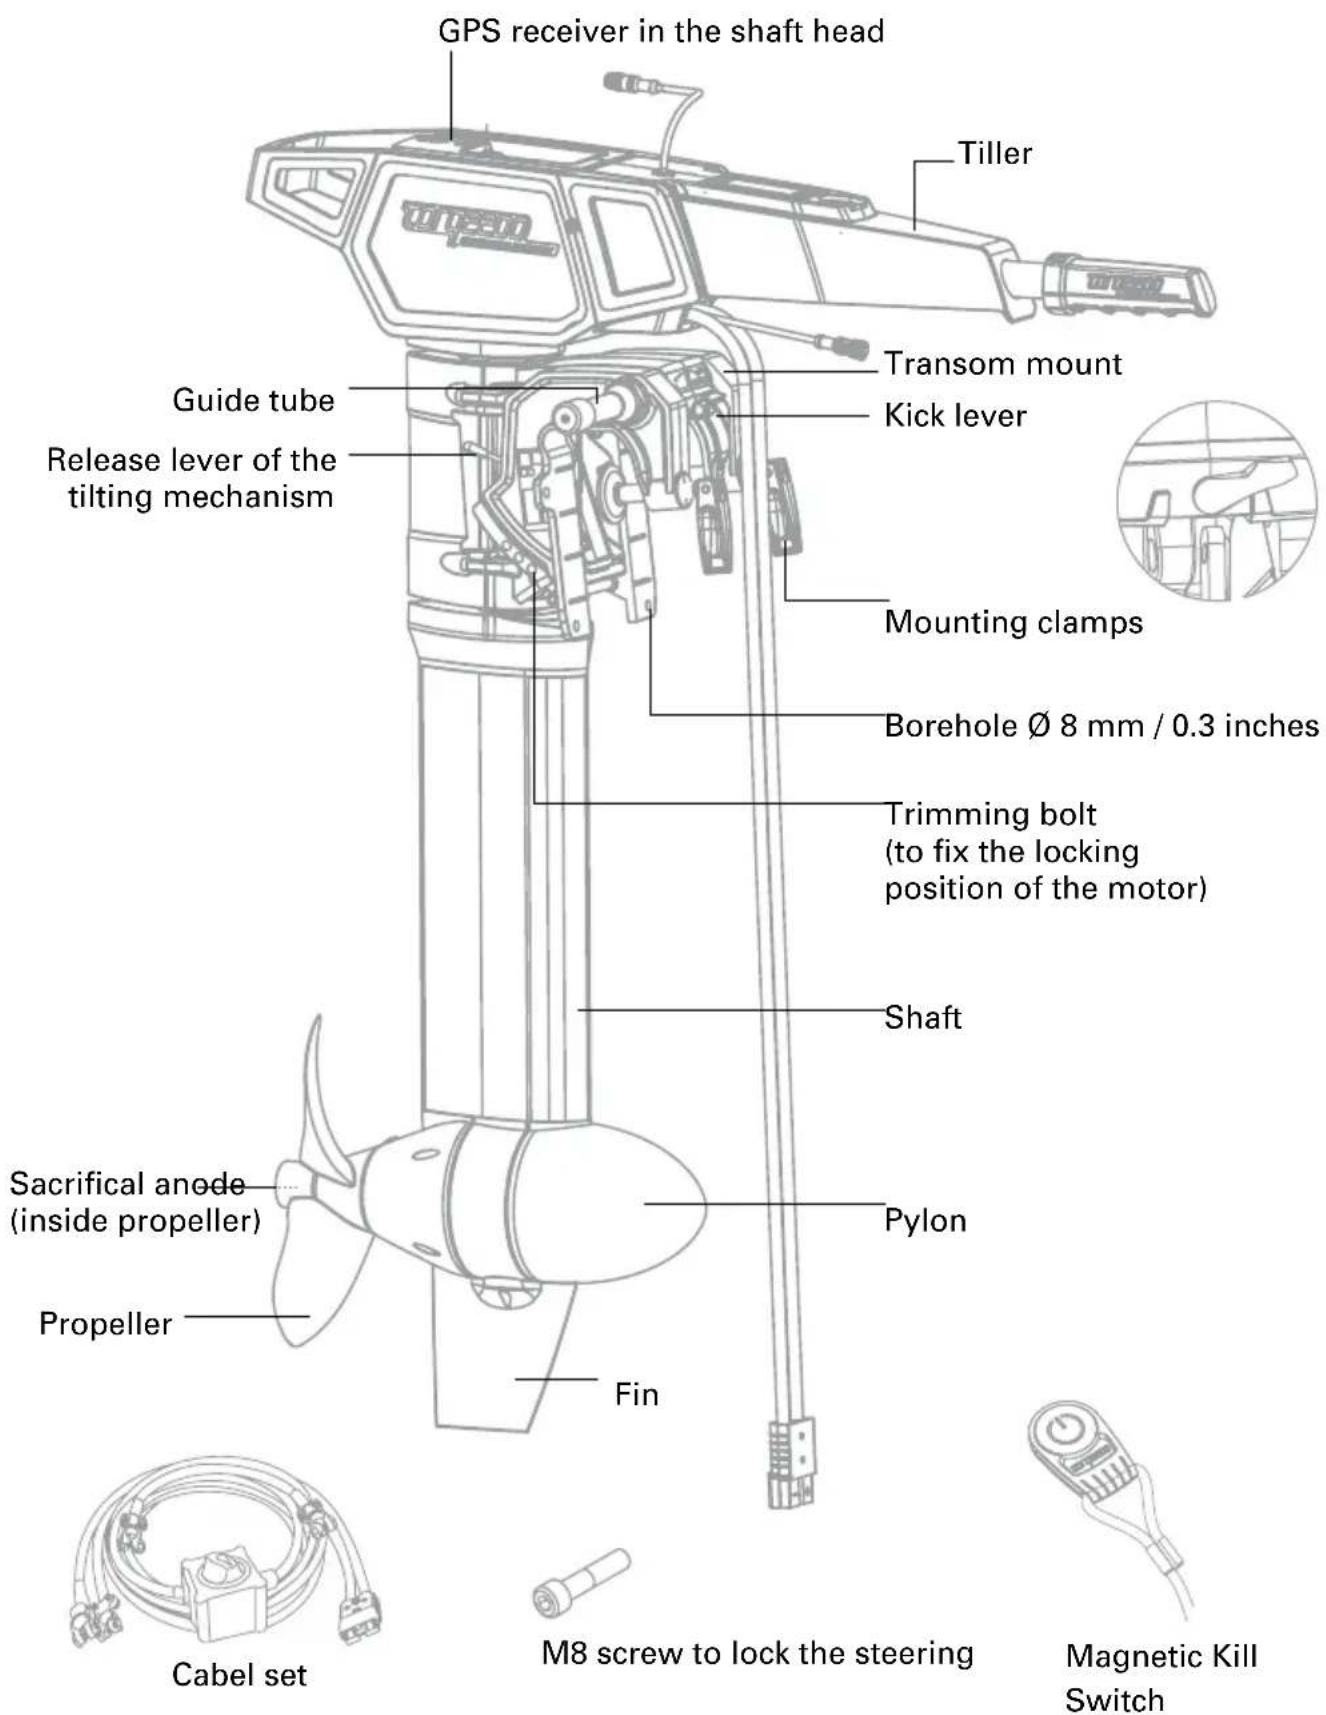
Complete scope of supply of Cruise models includes the following elements:
- Complete motor with pylon, propeller, shaft and transom mount (with guide tube for remote steering), connection cables for cable set
- Remote throttle control with integrated display connection cables and fixing material (only Cruise R)
• Tiller (only Cruise T) - Link arm and small parts for connecting the remote steering (only Cruise R)
• Magnetic Kill Switch - Cable set with main switch, fuse and bridging cable (1 piece for Cruise 2.0 R/T, 3 pieces for Cruise 4.0 R/T)
• M8 screw to lock the steering - Operating manual
- Warranty certificate
- Packaging
3.2 Survey operating instruments and components
3.2.1 Survey operating instruments and components for Cruise R
3.2.2 Survey operating instruments and components for Cruise T
4. Starting up

- Ensure secure foothold when fixing the outboard.
- Mount outboard first (ensure a proper foothold before) and remote throttle/tiller and battery afterwards.
• Take care not to crush hands or fingers.
4.1 Mounting of drive to the boat (Cruise R and Cruise T)
Note: For better clarity in this chapter we will use solely drawings of Cruise R. Instructions, however, also are relevant for Cruise T – mounting is identical.

- Please ensure that the kick lever at the transom mount is in the "Lock" position until the outboard is fitted onto the boat.
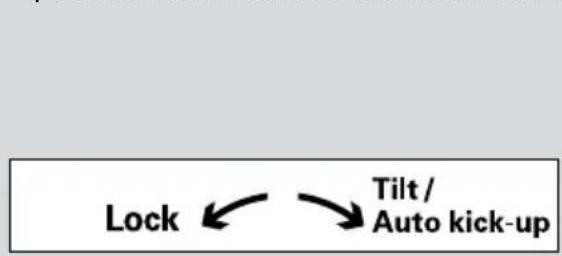
flowchart
graph TD
    A["Lock"] --> B["Tilt / Auto kick-up"]
natural_image
Technical line drawing of a mechanical device with no visible text or symbols- Do not lay the cable around sharp edges.
- Remove the parts supplied with the Cruise from the packaging.
- Hang the drive on the transom or the motor holder of your boat and tighten the two mounting clamps.
- As an alternative, the motor can be secured with four bolts ( 8 mm / 0.3 inches, not supplied) to the transom of the boat using the holes located on the transom bracket.
-
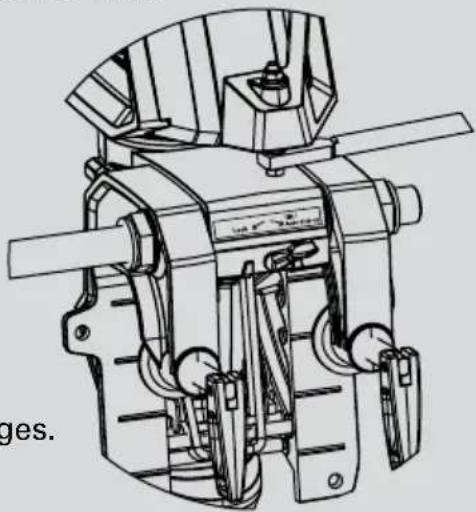
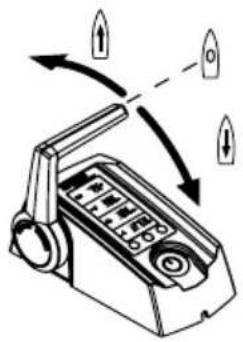
The following steps are required to set the engine perfectly to the water surface (trimming):
-
First tilt the motor up. To do so the kick lever must be in the "Tilt/Auto kick-up" position.
- Tilt the motor up by pulling the handle on the back end of the aluminum cage until the engine clicks into one of the upper positions.
- Remove the trimming bolt's retaining ring and pull it out of the transom mount.
- Select the trimming position you want and insert the trimming bolt into the corresponding borehole. You must insert the trimming bolt through both side walls of the transom mount. Finally you must fix the trimming bolt again with the retaining ring.
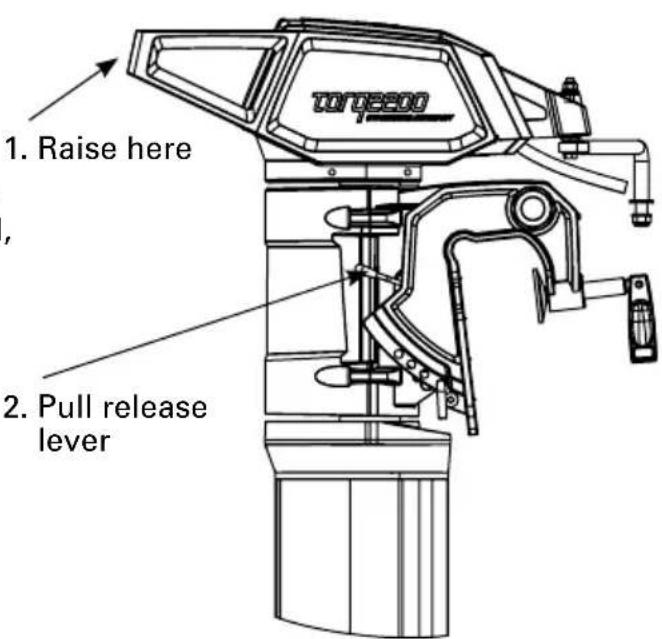
- In order to move the motor downwards again you must first lift the motor onto the handle of the aluminum cage above the release position and then press the lever again to release the tilt mechanism (refer to drawing). With the lever pressed, allow the motor to move down to the desired position slowly.
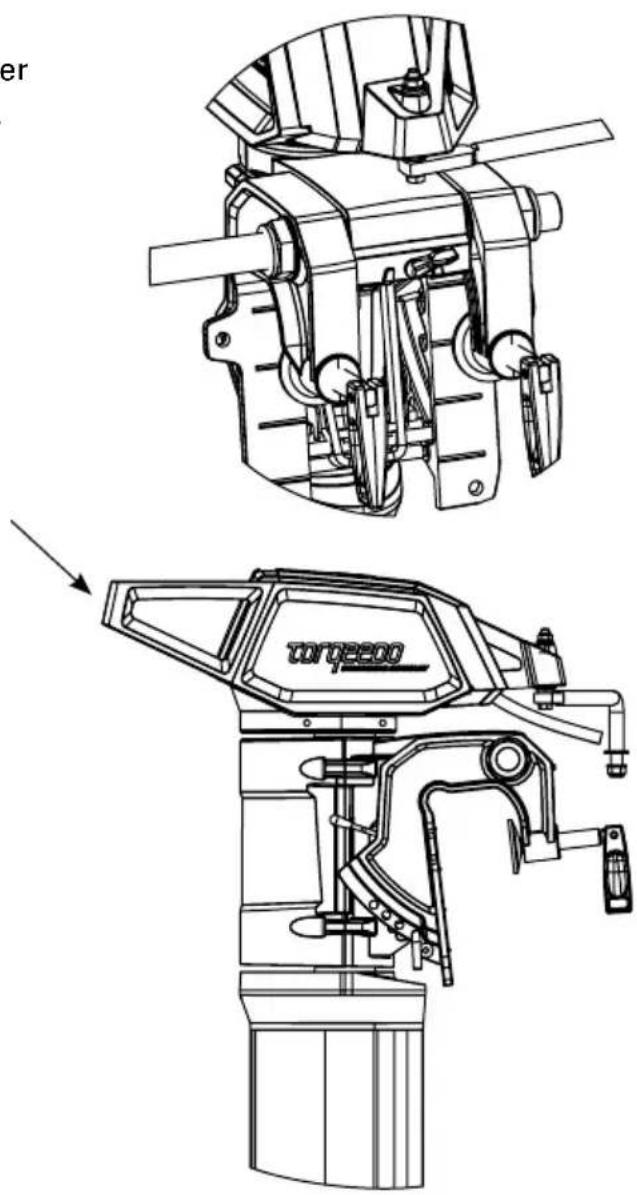
4.2 Mounting of remote control (only for Cruise R)
To connect your Cruise R outboard to a remote steering system you need the following parts:
- Remote steering system (not supplied) e.g. Teleflex Light Duty Steering System
- Link arm (supplied) to connect the remote steering system with the aluminum cage on the shaft head
The following steps are required for installation:
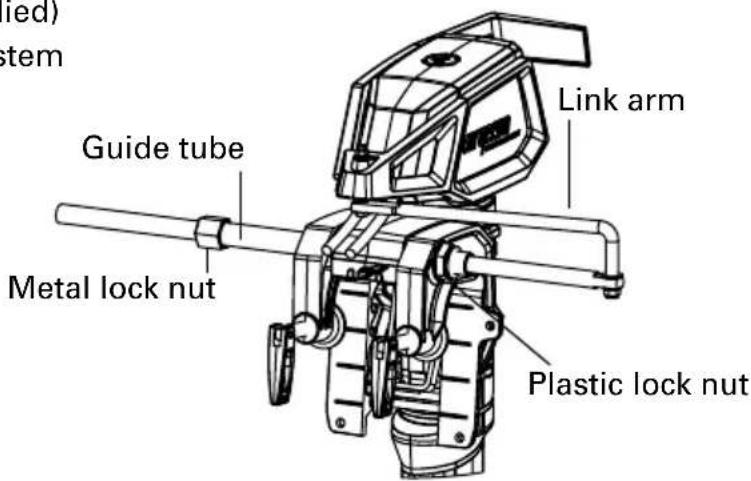
- Connect the remote steering system with the guide tube. To do so, push the thrust rod of the remote steering system through the guide tube and fix it with the metal lock nut of the remote steering system. When tightening the lock nut ensure that you do not alter the shape of the guide tube.
- Screw the plastic lock nut to the free end of the guide tube.
- Insert the bent end of the link arm into the thrust rod borehole and fix the connection with the appropriate nut.
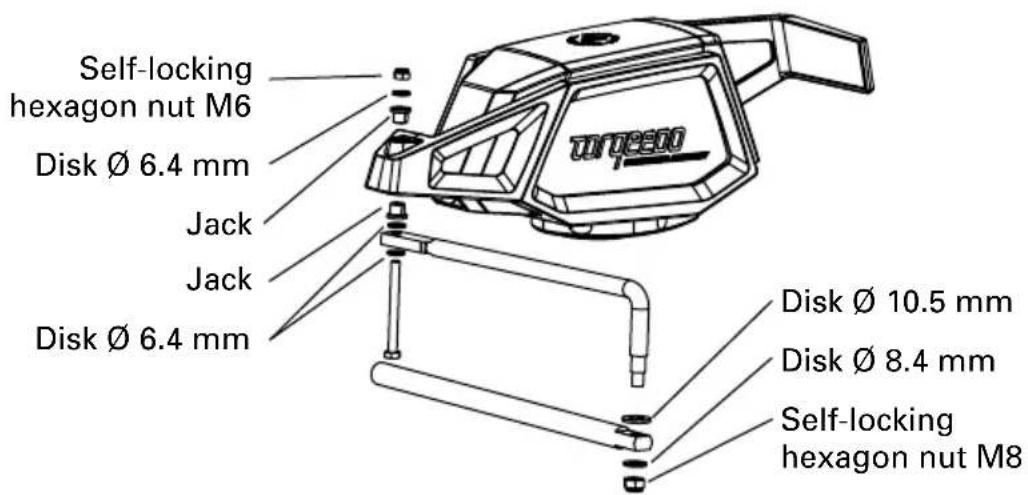
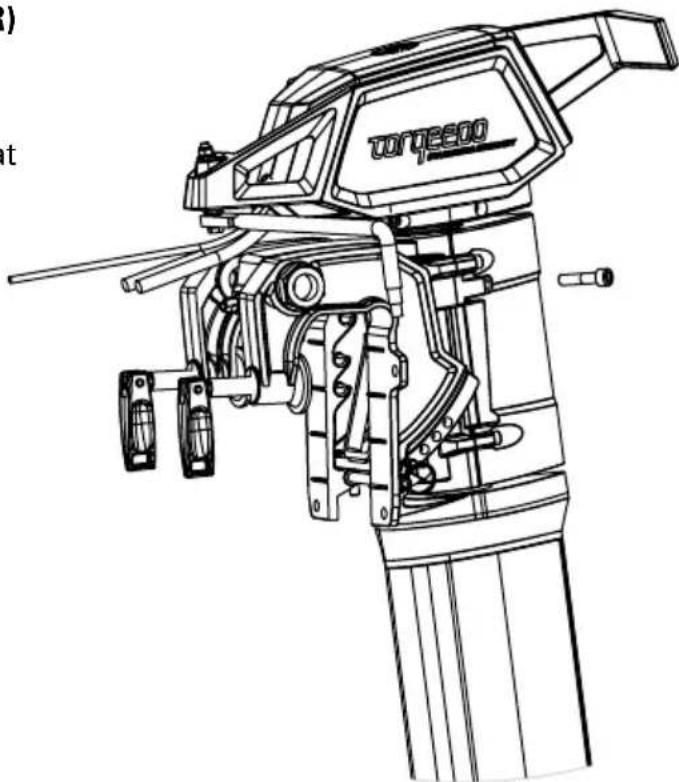
- Fix the other end of the link arm to the borehole of the aluminum cage. For this purpose, please make sure to use only the enclosed small parts in accordance with the drawing.
- Fix the other parts of your remote steering system as per the manufacturer's instructions.
4.3 Fixing of steering (only for Cruise R)
If the Cruise R is not connected to remote steering - e.g. for operation on sail boats that steer with the rudder – the motor can be fixed in a steering position.
To do so, turn the M8 screw supplied in the appropriate opening on the back of the transom mount and tighten it.
natural_image
Technical line drawing of a torque pump assembly (no text or symbols)4.4 Mounting of remote throttle control (Cruise R) / tiller (Cruise T) with integrated display and magentic key
- Lay the black connection cable that extends from the shaft head to the location you wish to assemble the remote throttle. Ensure that the cable is not subject to clamping during any steering movement.
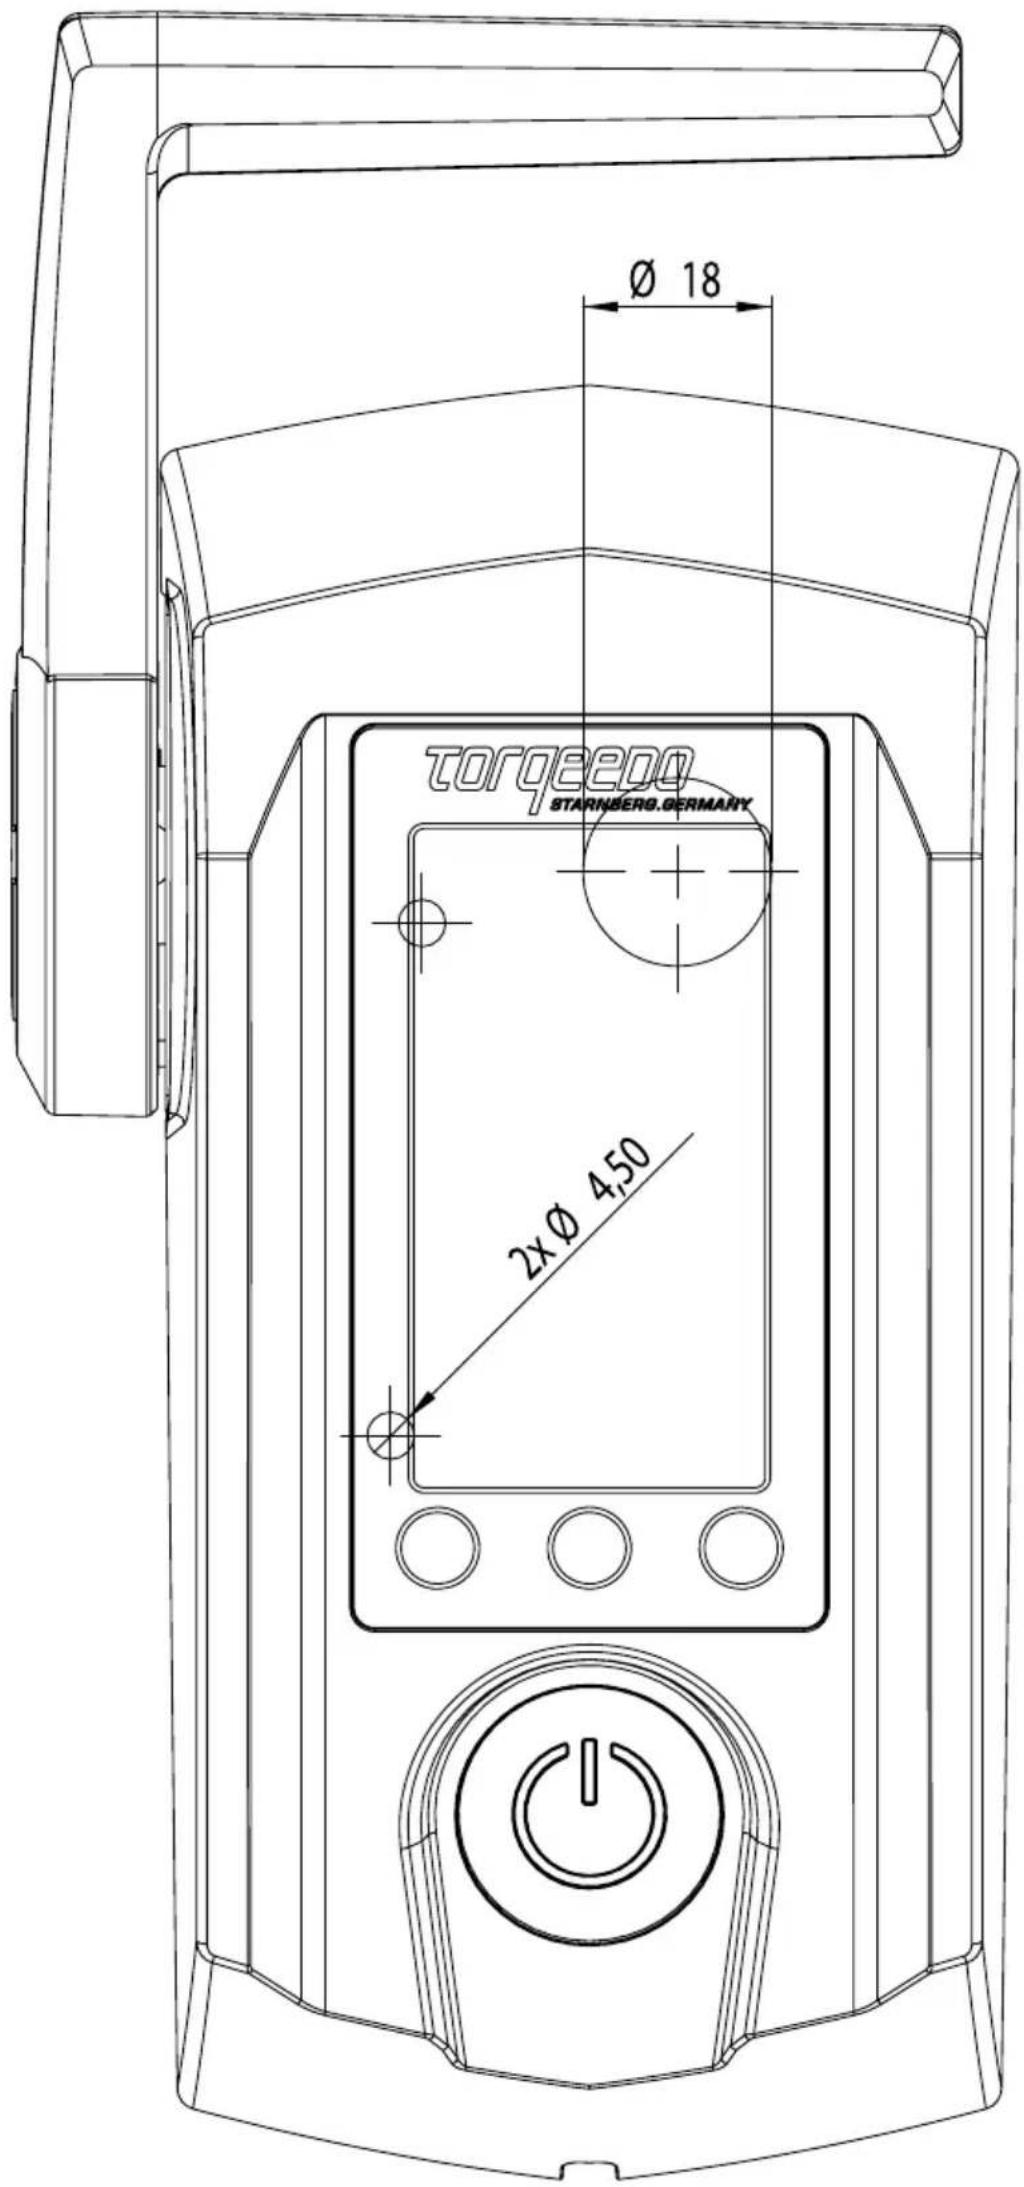
- Mount the remote throttle in the desired position. The boring image required is found at the end of this manual. To screw it firmly, use a screw with a M4 thread included in the supply scope.
- Before finally tightening the remote throttle, screw the plug of the connection cable to the appropriate jack on the underside of the remote throttle.
- Tiller version (Cruise T)
Insert tiller without pressure from above within its seat in shaft head and tilt it forward. Connect tiller's data cable with socket provided within shaft head covering
For mounting of remote throttle control we enclose a drilling template in original size at the end of this manual.
Cruise T: Connecting of tiller
Place tiller from above – without force – into the allotted seats in shaft head and tilt it forward. Connect tiller data cable with socket in shaft head cover. Use the fixing pin to secure the tiller against falling out accidentally.
4.5 Basic information on battery supply
Principally, Cruise R and Cruise T models may be operated with lead-acid, lead-gel, AGM or lithium-based batteries.
For performance and ease of operation reasons, Torqeedo recommends to connect the Power 26-104 (cf. chapter 4.6).
You may, however, also connect conventional lithium based batteries as well as lead-acid, lead-gel or AGM batteries without any problem (chapter 4.7)
4.5.1 Short remarks on battery supply
In general the Cruise models can be operated with lead-gel, AGM or lithium-based batteries.
We do not recommend using starter batteries as they can be damaged after a few cycles if the discharge is lower. If lead-based batteries are to be used we recommend so-called "traction batteries" or "deep cycle batteries" that have been designed for an average depth of discharge per cycle of 80 % as they are used for example in fork lift trucks. So-called "marine" batteries can also be used. Here we recommend higher nominal capacities (at least 180 Ah) so as not to exceed a 50 % depth of discharge.
To calculate the travel times and range of the batteries, you need to know the battery capacity. In the following, this is stated in watt-hours [Wh]. The number of watt-hours can easily be matched with the input power of the motor in watts [W]: The Cruise 2.0 R has an input power of 2,000 W and consumes 2,000 Wh in one hour at full speed. The Cruise 4.0 R has an input power of 4,000 W and consumes 4,000 Wh in one hour at full speed. The nominal capacity of a battery [Wh] is calculated by multiplying the charge [Ah] with the nominal voltage [V]. So a battery with 12 V and 100 Ah has a nominal capacity of 1,200 Wh.
In general, lead-acid, lead-gel and AGM batteries do not fully provide the battery's calculated nominal capacity. This is in particular due to the high current capabilities of lead batteries. In order to counteract this effect we recommend using larger batteries. For lithium based batteries this effect is negligible.
In addition to the actual available battery capacity of the boat type, the selected output level (lower life and range at higher speed) and the external temperature also play an important role for the range and life expected.
We recommend that you achieve the required battery capacity in Wh using as few parallel connections as possible with as few big batteries as possible. So, to give yourself a battery capacity of e.g. 4,800 Wh (at 24 V) it is better to use two 12 V / 200 Ah batteries rather than several parallel and serial linked batteries (e.g. four 12 V / 100 Ah batteries). Firstly, this avoids safety risks from battery configurations. And secondly, capacity differences between the batteries that already exist at the time of the configuration or that develop later have a negative effect on the overall battery system (capacity loss, also called drifting). When charging your battery, make sure to only use galvanic isolated chargers. If you charge your batteries, please make sure to use only galvanically insulated chargers. We recommend the use of one battery charger per 12-V battery. Your dealer can probably assist you in selecting the proper charger. Furthermore, turn the main switch of the cable set in the „off“ position in order to avoid damages due to electrolysis while charging.
4.5.2 Serial/parallel linking of batteries
To avoid safety risks, capacity losses and contact point losses with serial and parallel battery configurations, always only combine the same type of batteries (same capacity, same age, same manufacturer, same state of charge).

- Serial and parallel configured batteries must always have the same state of charge. That is why you must use only the same type of batteries in configurations (same capacity, same age, same manufacturer, same state of charge) and fully charge each battery separately in your charger before you connect it up. Differences in the state of charge can lead to extremely high compensatory currents or overloads on the cables and plugs or the battery itself. In extreme cases this could even cause fire or injury.
- When working with or near batteries avoid wearing metal jewelry and laying tools on the batteries as this could result in a short circuit.
- When connecting batteries ensure the right polarity.
- Only use Torpeedo cable set. When using different cables there is a risk of wrong dimensioning and local overheating and even fire. When using other cables consult a specialist.
4.6 Connecting of Cruise R/T to Power 26-104 lithium battery/batteries
Congratulations! You have opted for the state-of-the-art battery technology!
4.6.1 Cruise 2.0 R/T
Cruise 2.0 R/T operates with a power supply of between 20 V and 30 V (referring to nominal voltage). This means it may be operated with at least one Torpeedo Power 26-104 lithium-battery.
Power 26-104 is connected as follows :
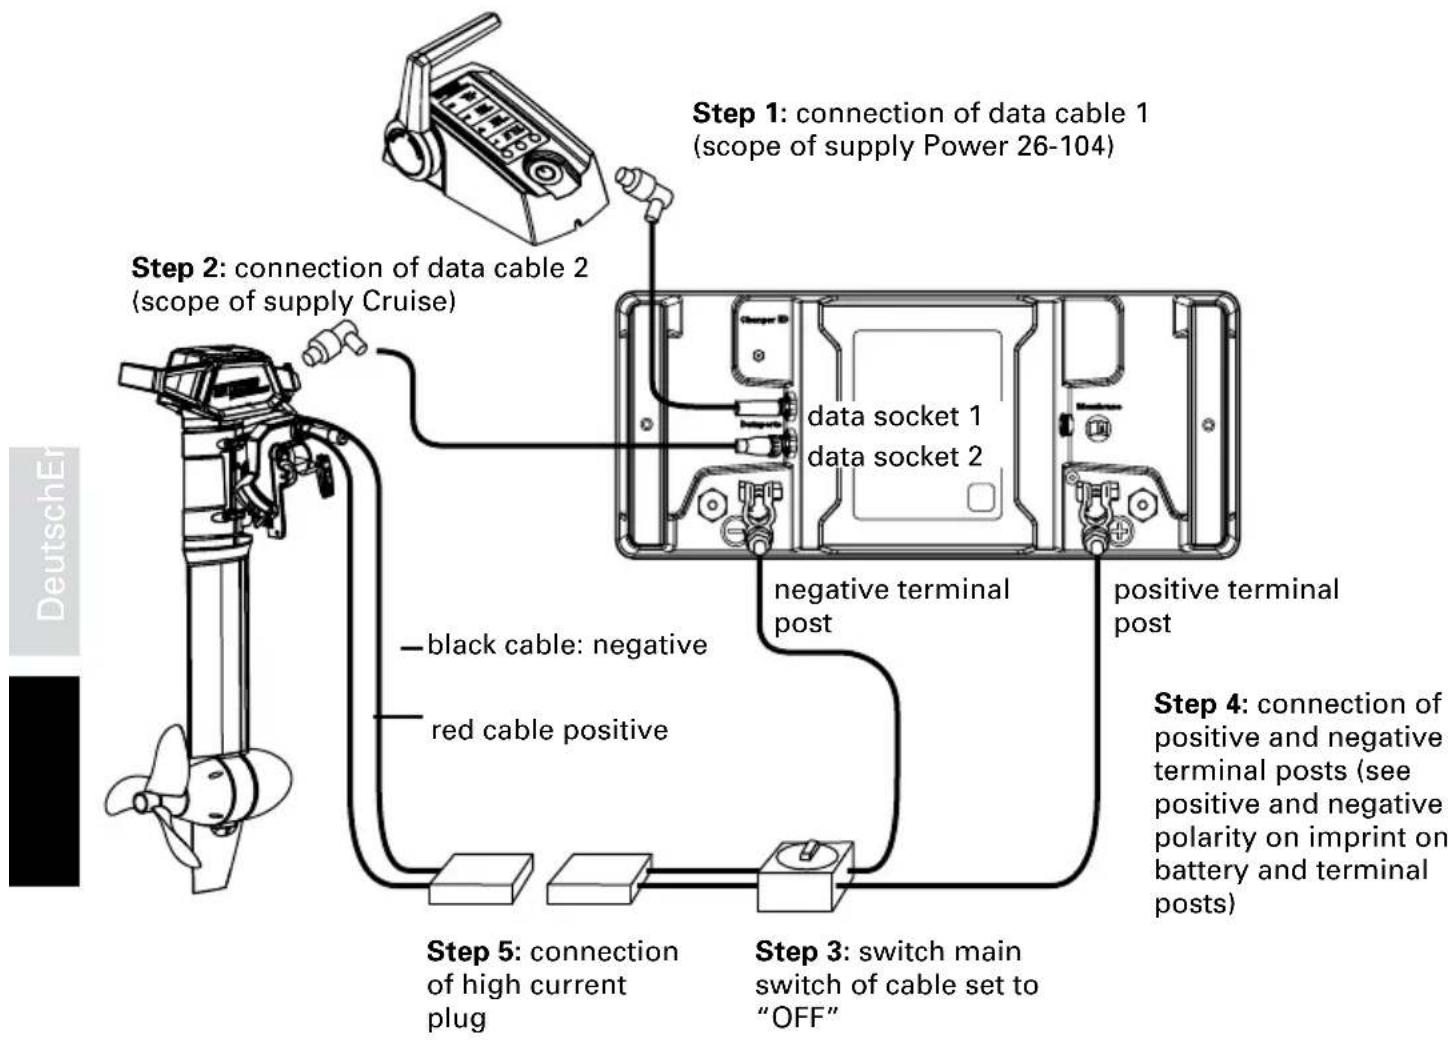
Connecting of Cruise 2.0 R
flowchart
graph TD
    A["DeutschEr"] --> B["Step 1: connection of data cable 1 (scope of supply Power 26-104)"]
    B --> C["Step 2: connection of data cable 2 (scope of supply Cruise)"]
    C --> D["Step 3: switch main switch of cable set to "OFF""]
    D --> E["Step 4: connection of positive and negative terminal posts (see positive and negative polarity on imprint on battery and terminal posts)"]
    E --> F["Step 5: connection of high current plug"]
    F --> G["black cable: negative"]
    F --> H["red cable positive"]
    G --> I["data socket 1"]
    H --> J["data socket 2"]
    I --> K["negative terminal post"]
    J --> L["positive terminal post"]
Connecting of Cruise 2.0 T

flowchart
graph TD
    A["Step 1: connection of data cable (plug beneath tiller)"] --> B["Step 2: switch main switch of cable set to "OFF""]
    B --> C["Step 3: connection of positive and negative terminal posts (see positive and negative polarity on imprint on battery and terminal posts)"]
    C --> D["Step 4: connection of high current plug"]
    D --> E["black cable: negative"]
    D --> F["red cable positive"]
    E --> G["data socket"]
    F --> H["negative terminal post"]
    G --> I["positive terminal post"]
Please be aware that you need to establish communication between outboard and battery as described in chapter 5.3.1.1.
Notes:
- Adapter cable set / Power battery is provided with a 125 A fuse. In case of shortcircuits, fuse will cut the electrical circuit to prevent further damage.
- You may also connect several Power 26-104 to your outboard. More information please find in operating manual of Power 26-104.

- Incorrect configuration of lithium batteries leads to much higher short circuit currents than configurations with lead batteries. That is why you must follow the installation instructions very carefully and only use the Torpeedo cable set to connect up your motor.
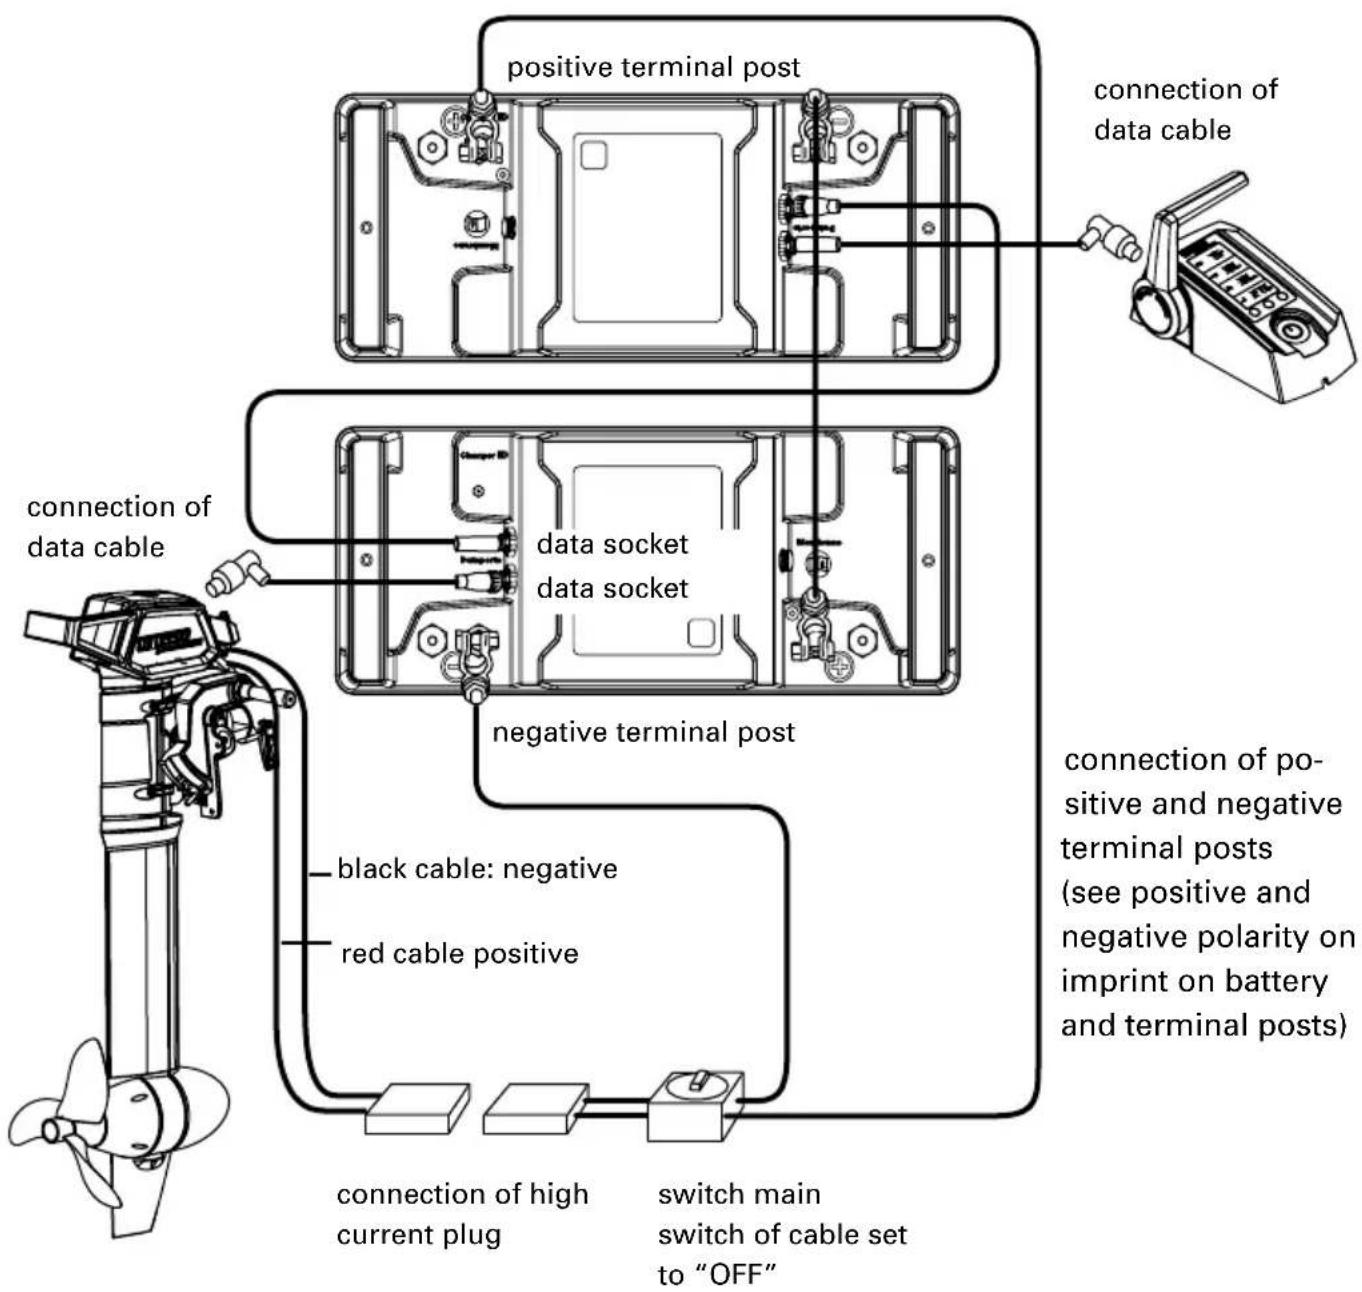
4.6.2 Cruise 4.0 R/T
Cruise 4.0 R/T operates with a power supply of between 42 V and 58 V (referring to nominal voltage). This means it may be operated with at least two Power 26-104 lithium-batteries.
Connecting of Cruise 4.0 R/T to 2 Power 26-104 takes place analogically to connection of Cruise 2.0 R/T (refer to chapter 4.6.1). Moreover please connect both Power 26-104 from positive terminal of first battery to negative terminal of second battery with cable bridge. Moreover, also connect both data sockets of Power batteries to each other. Terminal connection will then be as follows:
Connecting of Cruise 4.0 R/T to two Power 26-104 batteries
flowchart
graph TD
    A["Motor with propeller"] --> B["connection of data cable"]
    B --> C["connection of positive terminal post"]
    C --> D["connection of data cable to the terminal"]
    D --> E["negative terminal post"]
    E --> F["connection of positive and negative terminal posts (see positive and negative polarity on imprint on battery and terminal posts)"]
    F --> G["switch main switch of cable set to "OFF""]
    G --> H["black cable: negative"]
    G --> I["red cable positive"]
    H --> J["connection of high current plug"]
    I --> K["connection of high current plug to the terminal"]
Please be aware that you need to establish communication between outboard and battery as described in chapter 5.3.1.1.
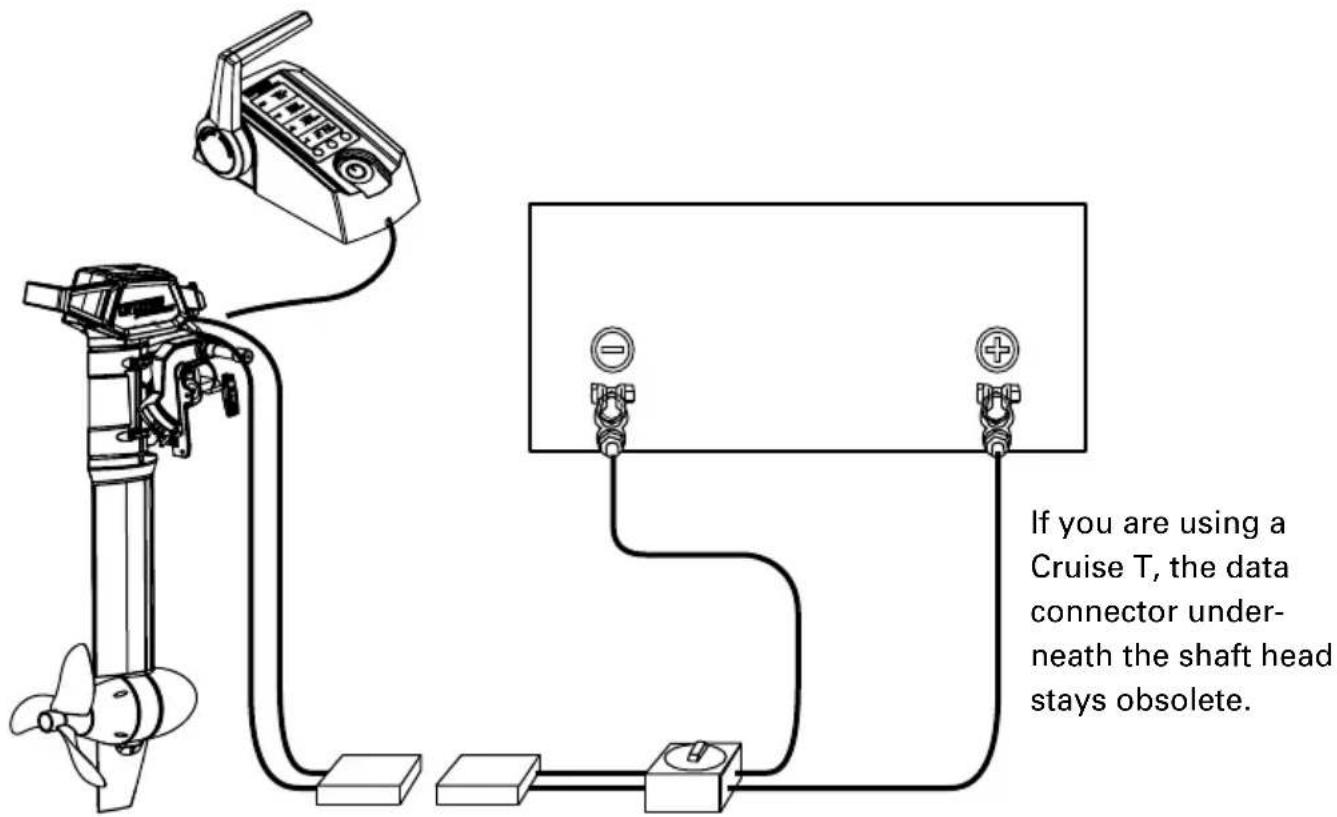
When using the Cruise with different batteries, make sure to connect the data cable coming from the remote throttle directly to the motor.
4.7 Connecting of Cruise R/T to lead batteries (Gel, AGM), or conventional lithium batteries
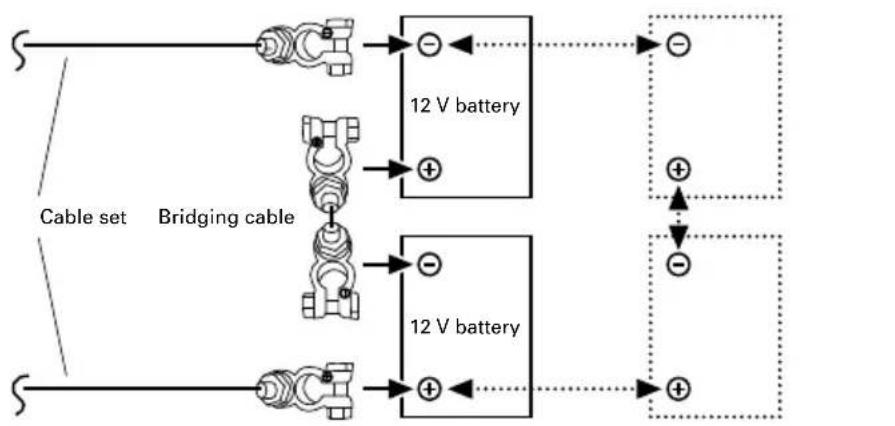
Cruise 2.0 R/T operates with a power supply of between 20 V and 30 V (referring to nominal voltage). This means it may be operated with serially connected 12 V batteries.
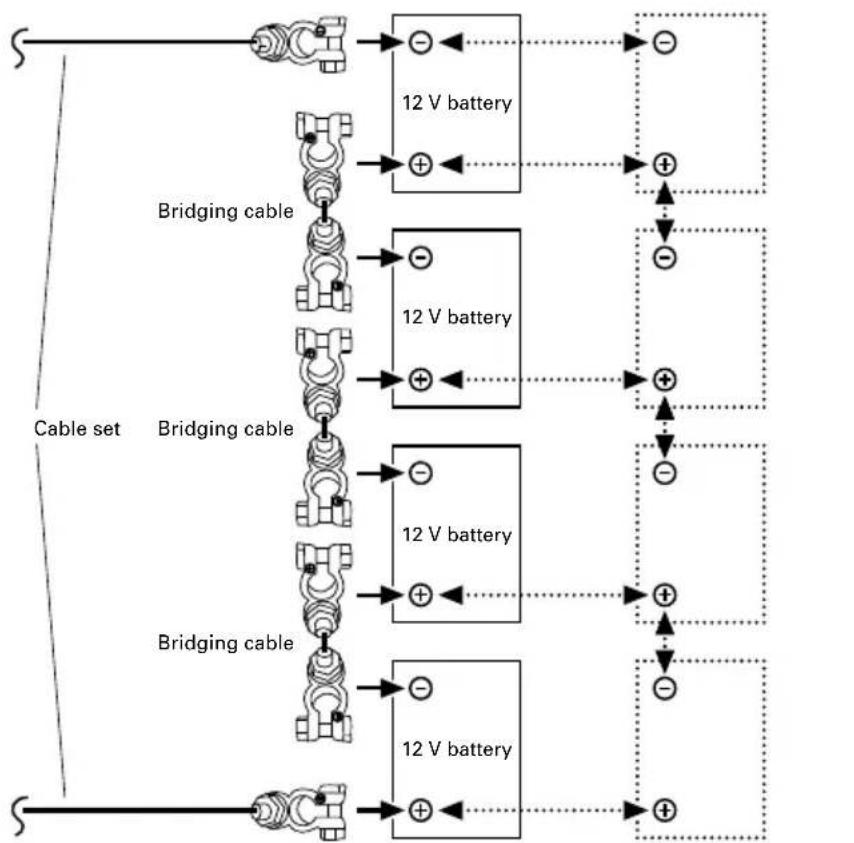
Cruise 4.0 R/T operates with a power supply of between 42 V and 58 V (referring to nominal voltage). This means it may be operated with four serially connected 12 V batteries.
To increase capacity, several pairs of serially connected 12V batteries may be connected in parallel.
- Make sure that main switch of cable set is in "OFF" position; otherwise switch it into "OFF" position.
- Connect cable set according to the following drawings for Cruise 2.0 R/T respectively 4.0 R/T. Pay attention to correct polarity of terminals and terminal posts, connection of positive and negative terminal posts (visible on imprint of batteries and terminal posts)
When using the Cruise with different batteries, make sure to connect the data cable coming from the remote throttle directly to the motor.
Connecting of Cruise T to two 12 V batteries
flowchart
graph LR
    A["Cable set"] --> B["12 V battery"]
    B --> C["+"]
    D["Bridging cable"] --> E["12 V battery"]
    E --> F["+"]
    G["Cable set"] --> H["12 V battery"]
    H --> I["+"]
    J["Cable set"] --> K["12 V battery"]
    K --> L["+"]
    M["Cable set"] --> N["12 V battery"]
    N --> O["+"]
    P["Cable set"] --> Q["12 V battery"]
    Q --> R["+"]
    S["Cable set"] --> T["12 V battery"]
    T --> U["+"]
    V["Cable set"] --> W["12 V battery"]
    W --> X["+"]
    Y["Cable set"] --> Z["12 V battery"]
    Z --> AA["+"]
    AB["Cable set"] --> AC["12 V battery"]
    AC --> AD["+"]
    AE["Cable set"] --> AF["12 V battery"]
    AF --> AG["+"]
    AH["Cable set"] --> AI["12 V battery"]
    AI --> AJ["+"]
    AK["Cable set"] --> AL["12 V battery"]
    AL --> AM["+"]
    AN["Cable set"] --> AO["12 V battery"]
    AO --> AP["+"]
    AQ["Cable set"] --> AR["12 V battery"]
    AR --> AS["+"]
    AT["Cable set"] --> AU["12 V battery"]
    AU --> AV["+"]
    AW["Cable set"] --> AX["12 V battery"]
    AX --> AY["+"]
    AZ["Cable set"] --> BA["12 V battery"]
    BA --> BB["+"]
    BC["Cable set"] --> BD["12 V battery"]
    BD --> BE["+"]
    BF["Cable set"] --> BG["12 V battery"]
    BG --> BH["+"]
    BI["Cable set"] --> BJ["12 V battery"]
    BJ --> BK["+"]
    BL["Cable set"] --> BM["12 V battery"]
    BM --> BN["+"]
    BO["Cable set"] --> BP["12 V battery"]
    BP --> BQ["+"]
    BR["Cable set"] --> BS["12 V battery"]
    BS --> BT["+"]
    BU["Cable set"] --> BV["12 V battery"]
    BV --> BW["+"]
    BX["Cable set"] --> BY["12 V battery"]
    BY --> BZ["+"]
    CA["Cable set"] --> CB["12 V battery"]
    CB --> CC["+"]
    CD["Cable set"] --> CE["12 V battery"]
    CE --> CF["+"]
    DG["Cable set"] --> DH["12 V battery"]
    DH --> DI["+"]
    DJ["Cable set"] --> DK["12 V battery"]
    DK --> DL["+"]
    DV["Cable set"] --> DV["A"]
    DV --> DVB["A"]
Optional extension of the battery capacity via parallel connection with 12 V batteries
Connecting of Cruise T to four 12 V batteries
flowchart
graph TD
    A["Switch"] --> B["Switch"]
    B --> C["12 V battery"]
    C --> D["+"]
    D --> E["+"]
    E --> F["+"]
    F --> G["+"]
    G --> H["+"]
    H --> I["+"]
    I --> J["+"]
    J --> K["+"]
    K --> L["+"]
    L --> M["+"]
    M --> N["+"]
    N --> O["+"]
    O --> P["+"]
    P --> Q["+"]
    Q --> R["+"]
    R --> S["+"]
    S --> T["+"]
    T --> U["+"]
    U --> V["+"]
    V --> W["+"]
    W --> X["+"]
    X --> Y["+"]
    Y --> Z["+"]
    Z --> AA["+"]
    AA --> AB["+"]
    AB --> AC["+"]
    AC --> AD["+"]
    AD --> AE["+"]
    AE --> AF["+"]
    AF --> AG["+"]
    AG --> AH["+"]
    AH --> AI["+"]
    AI --> AJ["+"]
    AJ --> AK["+"]
    AK --> AL["+"]
    AL --> AM["+"]
    AM --> AN["+"]
    AN --> AO["+"]
Optional extension of the battery capacity via parallel connection with 12 V batteries
- Now connect the high current plug of the cable set to the high current plug of the motor.
- Switch the master switch of the cable set to the "ON" position.
Now batteries are serially connected with each other: Battery capacity [Wh] and voltage [V] of battery block rise with the number of serially connected batteries.
Charge [Ah] of batteries does not change with serial connection (for instance: after serial connection, two serially connected 12 V/100 Ah batteries of 1,200 Wh each will have 24 V, 100 Ah and 2,400 Wh).
Cable set is equipped with a 125 A fuse. In case of a short circuit, fuse cuts circuit and prevents any further damage.
After battery installation transfer battery bank data, via remote throttle, to on-board computer (chapter 5.3, „Set-up mode“) to be up to date about state of charge and range.

- Serial and parallel configured batteries must always have the same state of charge. That is why you must use only the same type of batteries in configurations (same capacity, same age, same manufacturer, same state of charge) and fully charge each battery separately in your charger before you connect it up. Differences in the state of charge can lead to extremely high compensatory currents or overloads on the cables and plugs or the battery itself. In extreme cases this could even cause fire or injury.
- Cable cross section for interconnection of batteries must be 25 mm ^2 . Take care that battery poles are clean and corrosion free.
- Firmly tighten screws of battery terminals for fixing to battery poles.
- Disconnect the battery when leaving the boat for a longer time.
4.8 Prevention of damage when connecting other devices to traction batteries

Torpeedo recommends running the Cruise 2.0/2.0 R on its own battery bank. Other devices such as fish finders, lights, radio, etc. should be supplied with an additional battery and not be connected to the same battery bank as the motor.
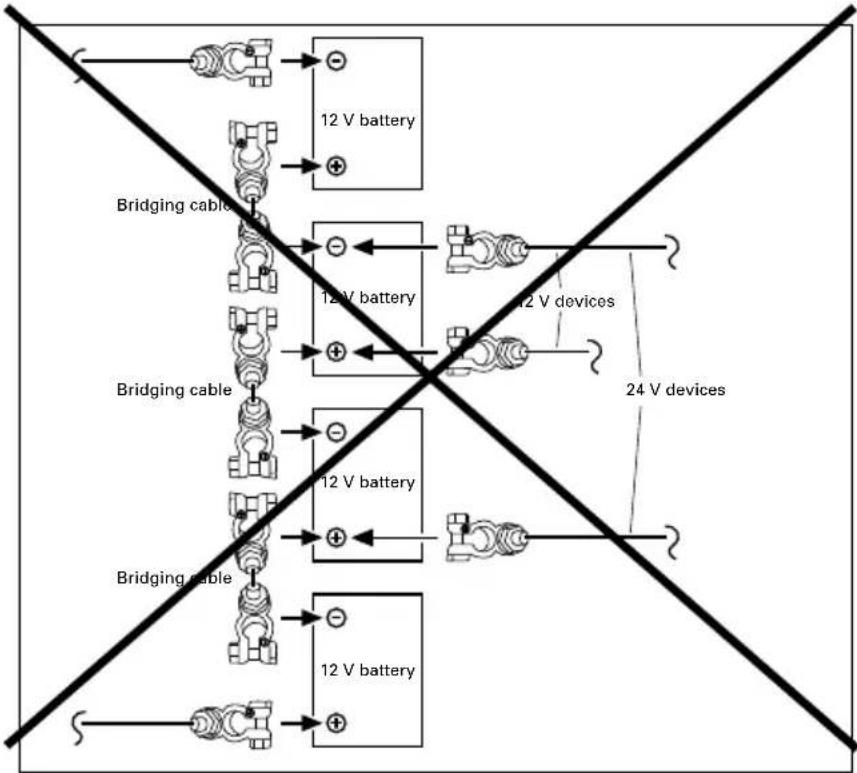
Connecting other devices to the same battery bank causes uneven discharge of an individual battery as well as the risk of electrolysis in case of incorrect wiring.
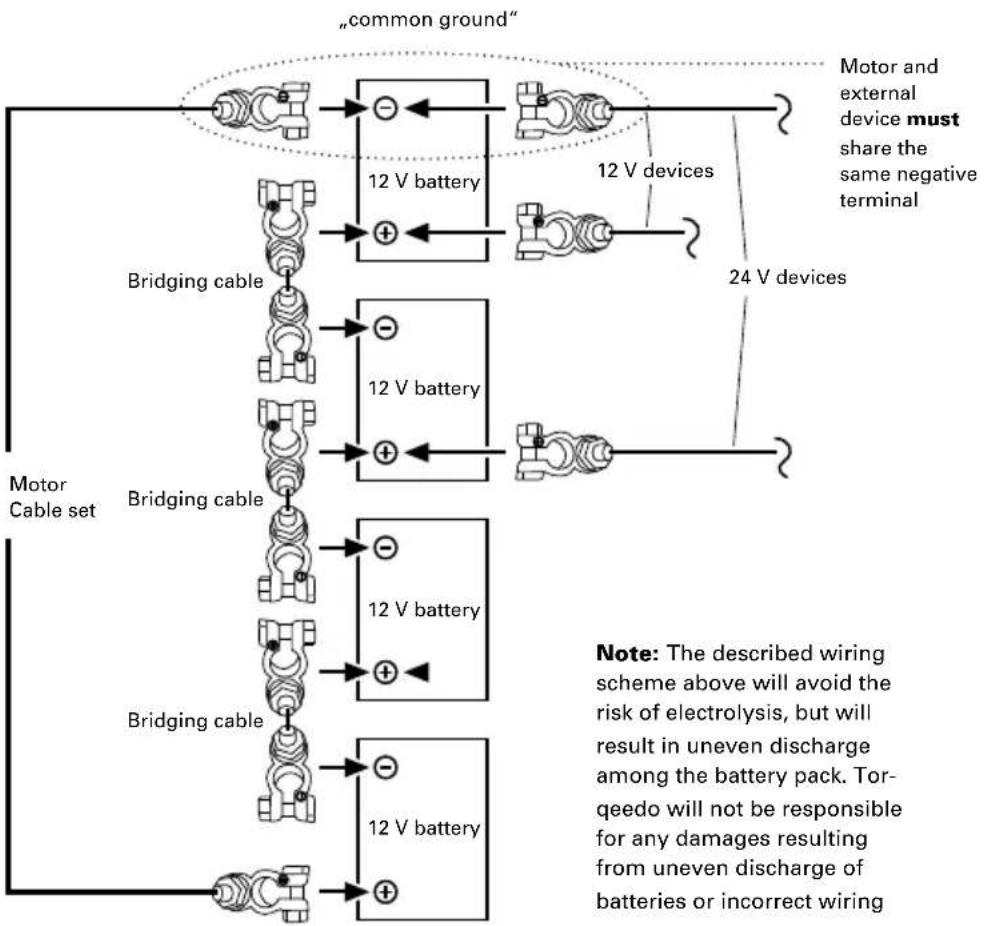
If it is still desired to use a 12 V or a 24 V device on one or two batteries of the same battery bank as the motor, the different equipment(s) and outboard motor must share the same negative terminal of battery bank („common ground“). See the following figure:
flowchart
graph TD
    A["common ground"] --> B["12 V battery"]
    B --> C["Motor and external device must share the same negative terminal"]
    B --> D["24 V devices"]
    E["Bridging cable"] --> F["12 V battery"]
    F --> G["Motor Cable set"]
    H["Bridging cable"] --> I["12 V battery"]
    I --> J["Motor Cable set"]
    K["Bridging cable"] --> L["12 V battery"]
    L --> M["Motor Cable set"]
    N["Note: The described wiring scheme above will avoid the risk of electrolysis, but will result in uneven discharge among the battery pack. Tor-eedo will not be responsible for any damages resulting from uneven discharge of batteries or incorrect wiring"]
Note: The described wiring scheme above will avoid the risk of electrolysis, but will result in uneven discharge among the battery pack. Tor-eedo will not be responsible for any damages resulting from uneven discharge of batteries or incorrect wiring
flowchart
graph TD
    A["12 V battery"] --> B["Bridging cable"]
    B --> C["12V battery"]
    C --> D["12 V devices"]
    D --> E["24 V devices"]
    F["Bridging cable"] --> G["12 V battery"]
    G --> H["12 V battery"]
    H --> I["12 V battery"]
    I --> J["12 V battery"]
    K["Bridging cable"] --> L["12 V battery"]
    L --> M["12 V battery"]
    M --> N["12 V battery"]
    O["Bridging cable"] --> P["12 V battery"]
    P --> Q["12 V battery"]
    Q --> R["12 V battery"]
4.9 Using solar panels and generators
Solar panels and generators can only be used if a battery bank is connected between them and the motor. The battery bank will even out voltage peaks of the solar panels and generators (acts as a buffer) which will avoid damages due to overvoltage.
Use a Torqueedo charger to charge Power 26-104 from generator. Do not connect generators directly with Power 26-104. To connect the Power 26-104 with a solar charger a specified solar charge controller is available. Never connect a solar panel directly to the Power 26-104; and never connect any solar battery chargers to the Cruise.
5. Operation
5.1 Driving operation
To start the motor, switch it on, apply Magnetic Kill Switch and turn the tiller handle from the stop-position into the desired direction.
1.2.3.
natural_image
Line drawing showing a hand pressing a button labeled '###' and a handheld device with control knobs (no text or symbols present)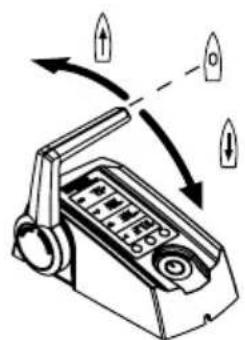

- The Magnetic Kill Switch may affect the operation of pacemakers. Keep the Magnetic Kill Switch away from pacemakers (at least 50 cm / 20 inches).
- The Magnetic Kill Switch may affect electronic and magnetic instruments (e.g. compass). Check whether instruments on board are affected before starting the journey.
- Don't fix the Magnetic Kill Switch to the remote throttle control/the tiller.
- Tie the Magnetic Kill Switch to your wrist or your life vest to stop the motor in the event you should fall overboard.
- Check the function of the Magnetic Kill Switch before each trip.

- The Magnetic Kill Switch may delete magnetic information media (especially credit and debit cards etc.). Keep the Magnetic Kill Switch away from credit cards and other magnetic information media.
5.2 Multifunction display with signal tone
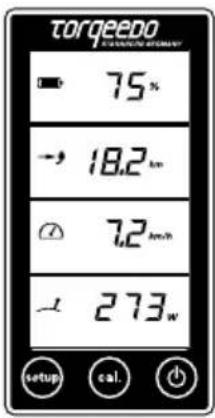
Remote throttle/tiller comprise an integrated display or an on board computer and three buttons. By pressing "ON/OFF" button for 1 second, you will switch the motor on. Pressing the button again for 1 second will switch the motor off again. (Keep in mind: after pressing 5 seconds, batteries will switch off when operating with 26-104 batteries. Motor may be switched off in any operation mode. After one hour without any activity, system switches off automatically. By pressing again, you put the motor in operation again.
By means of „setup“ button, units of display may be adjusted. To do so, follow the instructions given in chapter 5.3.
Sample message in normal operation:
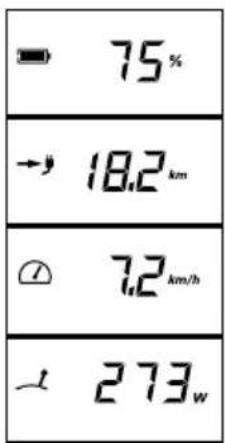
Battery charge status in percent
Remaining range at current speed
Speed over ground
Current consumption in Watts
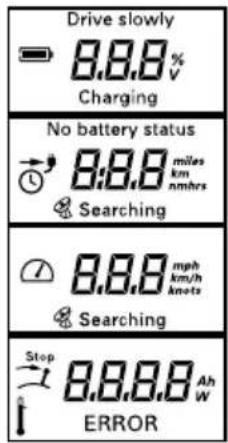
Other messages:
Drive slowly: pops up when battery capacity is < 30%.

Charging: is being displayed under charging.
GPS module integrated into battery pack is searching for satellite signals for speed determination. As long as no GPS signal is received display in second field will always indicate "remaining range at current speed" (indication of time) and a clock symbol will be displayed. If remaining run-time is more than 10 hours, remaining running time will be displayed in whole hours. If it is less, remaining running time is displayed in hours and minutes. GPS module stops signal searching after
5 minutes if no signal has been received. To activate search again, switch off the system on "ON/OFF" button and then on again.
Stop This symbol is displayed when tiller or remote throttle shall be brought into middle position (stop position). Without doing so, starting will be impossible.
Is displayed in case of overtemperature of motor or batteries (operating with Power 26-104). In this case, motor will decrease power independently.
Error: In case of errors, in the undermost box, "Error" symbol and an error code will be displayed. The code will indicate the component causing the error and the error itself. Chapter 5.3.4. describes any error codes.
In case of a drop of charge level below 30%, three beeps will be emitted (Cruise T Models only). Signal beep is repeated in case of drop of charge level below 20% resp. 10%.

Watch the charge status while operating the motor.
5.3 Remote throttle control (Cruise R)/ tiller (Cruise T) with integrated display and Magnetic Kill Switch
5.3.1 Use of battery charge display when operating with Power 26-104 battery
5.3.1.1 Establishing communication between Power 26-104 and Cruise outboards / Enumeration
Please check whether the batteries are physically existent and have all been switched on. Commissioning only works if the system is able to communicate with the existing batteries.
To establish communication between battery and outboard, a one-time calibration is necessary.
Switch the main switch of your system to the ON position.
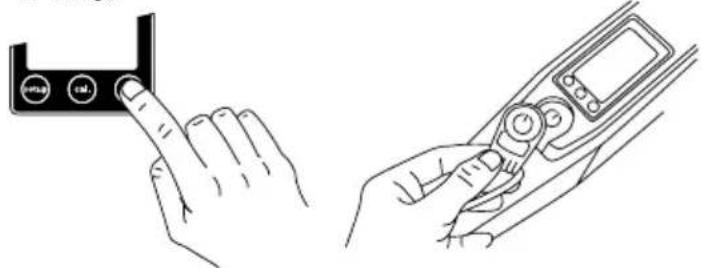
Then push the following buttons in rapid succession: first the ON-OFF push-button underneath the display (in the remote throttle control or on the peen), and right afterwards (briefly) the CAL push-button underneath the display.
The screen will now change to ENU and display the start of the enumeration procedure. The components establish the communication with each other automatically. The screen will display the progress of the enumeration in percent and the number of detected batteries.
After the process is completed, the progress counter shows 100% and the number of connected batteries.
Restart the system after completion of the process by pushing the ON-OFF push-button. Motor and battery are now communicating directly with each other. This enables you – among others – to look up the charge state of your batteries on the display.
Please note the following: If you want to operate the Cruise with a different battery bank, enumeration must be repeated. Otherwise, error E84 will be displayed.
Please be aware, that for older Cruise models, the communication between outboard and Power 26-104 may not be available. Contact Torpeedo Service for questions.
5.3.1.2 Setup menu for display options
- To enter the setup menu press the "setup" button.
- Select the units in which the remaining range is displayed. Push the button in the center of the display to select between kilometers, miles, nautical miles, and hours. You confirm your selection by pressing "setup" again.
- Now, enter the speed indicator setting. You can choose between kilometers per hour, miles per hour, and knots. Again you select the units with central button. Confirm your selection by pressing "setup" again.
- Then, choose whether the battery status shall be displayed in percent or in volts.
5.3.1.3 How to switch on/off the battery
Turning on: To switch on the Power 26-104, shortly press ON/OFF switch on remote throttle or tiller display.

Switching off only the motor: To switch off the motor, press ON/OFF switch until blackscreen of the display: motor is switched off, batteries still run.

Switch off the motor and battery(ies): In order to also switch off the battery, keep the ON/OFF button on the remote throttle or tiller display pressed for 5 seconds until "Off" icon is displayed.
5.3.2 Use of battery charge display when operating with other batteries
5.3.2.1 Set-up of battery charge
The following set up steps are necessary before first commissioning:
- To enter the setup menu press the "setup" button.
- Select the units in which the remaining range is displayed. Push the button in the center of the display to select between kilometers, miles, nautical miles, and hours. You confirm your selection by pressing "setup" again.
-
Now, enter the speed indicator setting. You can choose between kilometers per hour, miles per hour, and knots. Again you select the units with central button. Confirm your selection by pressing "setup" again.
-
Then, choose whether the battery status shall be displayed in percent or in volts.
-
The next step is to supply the on-board computer with information about the batteries. Start with entering whether the motor is connected with lithium batteries from the Torqueedo power series or with lead-gel or AGM batteries. Select "Li" for lithium or "Pb" for lead-gel or AGM batteries. Confirm your selection by pressing "setup" again.
-
Enter the size of the battery bank with which the motor is connected. For this enter ampere-hours (Ah) for the battery bank. Please use the throttle lever to select the correct number of ampere-hours. Pushing the "setup" button will confirm your selection and exit the setup-menu. Please note that for instance a battery bank consisting of two serially connected batteries of 12 volt and 200 Ah each has a total capacity of 200 Ah with 24 volt (not 400 Ah)
The capacity in percent and the remaining range can only be displayed after completing the setup and after the first calibration (entering the charge level, see capter 5.3.3.2).
Display example in normal operation
when setup has not been completed:
Display example in normal operation
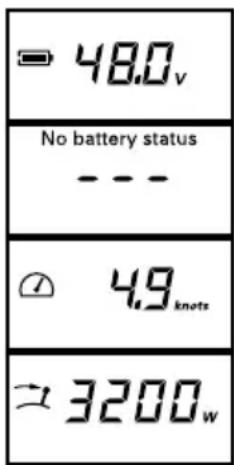
Battery voltage
Can not be represented
Speed
Input power consumption
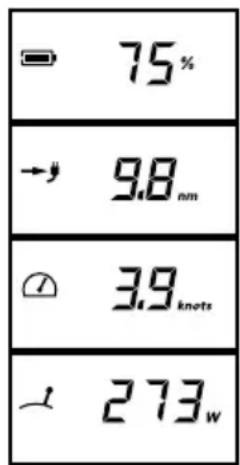
Battery charge status
Remaining range at current speed
Speed
Input power consumption
5.3.2.2 Usage and calibration of battery charge display
Having entered the battery information in the setup-menu, the on-board computer now knows the capacity of the battery bank. When the motor is in use, the on-board computer measures the consumed power and determines the remaining battery charge in percent and the remaining range based on the current speed.
The calculation of the remaining range takes into account the fact that lead-based batteries do not provide their full capacity at higher electrical currents. Depending on the battery used this effect may result in the battery charge indicator showing a relatively high charge level in percent but the remaining range at full throttle is very low. By moving slower you can still use the available battery charge.
To use the indicator of the battery charge status and remaining range in your Cruise, your assistance is required in two ways:
- Whenever you start a journey with fully charged batteries, information that the batteries are charged needs to be entered into the system. To do so press the "cal" button in the center of the display before the journey begins. The display shows the value 100% for the charge level. To confirm the value and exit the calibration menu press the "cal" button again.
As deep discharges of lead-based batteries adversely affect the lifespan of the batteries, we recommend starting a journey whenever possible with fully charged batteries. When you switch the motor on without having charged the batteries since the last use (e.g. when pausing the journey or after a very short journey) the on-board computer uses the most recently saved charge level and calculates the subsequent charge levels and range from that point.
If you have partially charged the batteries the on-board computer falsely assumes the most recent charging level and under-estimates your charge and range.
-
At the beginning of each season the on-board computer has to be calibrated in order to take into account the aging of the battery bank. To do so use the fully charged battery bank on your boat and deplete it following the instructions below.
-
Charge the battery to 100% full.
- Enter the information that the batteries are fully charged into the system as described above by pushing the "cal" button twice.
- Deplete the battery down to a voltage level of 21.7 V (Cruise 2.0) or 43.4 V respectively (Cruise 4.0).
- During depletion of the battery, the motor may be stopped but not switched off.
- During the last half hour of the depletion, the input power of the motor must range between 50 and 400 watts.
• After reaching the voltage level mentioned above, the motor will switch off automatically. The information system has measured the ageing of the battery and the calibration is complete.
Please be aware: if you try to do the entire depletion on low power while the boat is tied up in port, this may – depending on the size of your battery bank – take more than a day. It should be easier to go through the final phase of a calibration run after a trip, when the battery is already depleted to a certain degree.
If you would like to monitor the voltage level of the battery during the calibration, you can use the multifunctional display of the outboard as a voltage indicator (respective instructions are shown under 5.3.2.2).
If you conduct the calibration on the open water (and not tied up in port) please note that the motor stops automatically when the aforementioned conditions are fulfilled, thus signaling the completion of the calibration. The motor can be switched on afterwards to head towards port. Note that the remaining range is low.
The calibration helps the on-board computer to learn how much capacity the battery bank that is supplying the motor has lost through aging. These values are included in the calculation of future charge level indications in percent and ranges. The on-board computer overwrites the values stored in the set up menu for ampere-hours for your battery bank. If you want to assess the status of the battery bank and check the capacity loss, go into the setup menu, look up the value for ampere-hours and compare it with the original values. Please do not change the value set during the calibration journey as otherwise the on-board computer will make false assumptions.

- When using the motor with lead-based batteries (gel or AGM) please note that the values displayed for the range are based on the average performance curves of various batteries. Lead-based batteries are available in qualities that vary strongly. Therefore the indicated outstanding range can not be exact for lead-based batteries.
- False information on the charge level (eg. due to pressing the "cal" button twice when the batteries are not full) results in the on-board computer over-estimating the battery's charge level and your range.
- At the beginning of each season the on-board computer has to be calibrated in order to take into account the aging of the battery bank.
- Other devices that are connected to the motor's battery supply can not be considered when calculating the remaining charge level and range. In this case your batteries' charge level and outstanding range are lower than indicated on the display
- Charging the battery bank during the journey (e.g. using solar systems, wind turbines or generators) cannot be taken into account by the on-board computer. In this case your batteries' charge level and outstanding range are higher than indicated on the display.
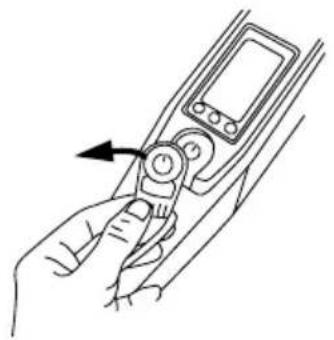
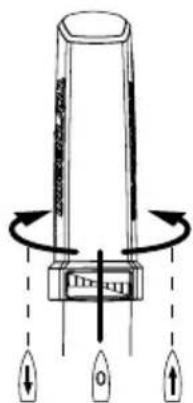
5.3.3 Exceptional functions / emergency situations
There are 3 ways to stop the motor:
1.2.3.
Turn remote throttle control/ tiller to stop position
Remove magnetic on/off key
Switch main switch of cable set to OFF respectively ",0" position
natural_image
Illustration of a handheld device with directional arrows indicating motion (no text or symbols)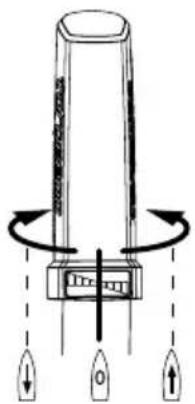
natural_image
Diagram of a device with three directional arrows indicating rotation or movement (no text or symbols)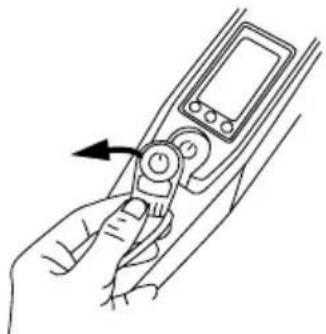
natural_image
Line drawing of a hand holding a handheld device with an arrow indicating the left side (no text or symbols present)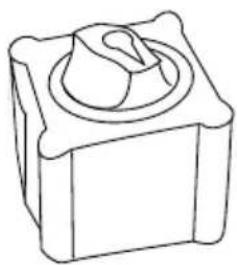
natural_image
Line drawing of a mechanical component with a central knob and square base (no text or symbols)
- All repair works shall be performed by authorized Torpeedo service centres only. Any unauthorised attempts at repair or reconstruction will result in immediate guarantee and warranty forfeiture.
- Please note that opening the pylon or the internal shaft head cover will result in guarantee and warranty forfeiture.
- In warranty cases please observe the warranty information at the beginning of these operating instructions.
5.3.4 Error message / Troubleshooting
| Display Cause What to do | ||
| E02 Stator over-temperature (motor overheating) | Motor can be used again after a short wait about 10 minutes). Contact Torpeedo Service. | |
| E05 | Motor/propeller blocked | Switch main switch to "OFF" position, then remove blockage and turn propeller one revolution by hand. Reconnect motor cable. |
| E06 Voltage in the motor too low | Low battery charging status. Motor can potentially be used again slowly from the stop position. | |
| E07 Motor overcurrent Continue at low output. | ||
| E08 Circuit board overheating Motor can be used again after a short wait about 10 minutes). Contact Torpeedo Service. | ||
| E21 Tiller calibration defective • Re-calibrate: Press "cal" button for 10 seconds. • The display shows "cal up": Press tiller forward to full gas then press the "cal" button. • The display shows "cal stp": Return tiller to central position then press the "cal" button. • The display shows "cal dn": Press tiller backward to full gas then press the "cal" button. | ||
| E22 Magnetic sensor defective Re-calibrate (refer to E21) | ||
| E23 Value range false Re-calibrate (refer to E21) | ||
| E30 Motor communication error | Check the motor cable's plug-in connection. Check the motor cable for damage. | |
| E32 Tiller/Remote throttle Check the plug-in connections. Check the cable. | ||
| E33 General communication error | Check the plug-in connections and cables. Switch the motor off and on again. | |
| E43 Battery empty Charge battery. Motor can potentially be used again slowly from the stop position. | ||
| Other error codes | Faulty Contact Torpeedo Service and notify them of the error code. | |
| No function of display | No voltage or defective Check the voltage supply source, the main fuse, and the main disconnect switch. In case of fault-free voltage supply: Contact the Torpeedo Service. | |
Battery error codes (only in combination with Power 26-104)
| Display Cause What to do | ||
| E70 | Battery outside temperature range during charging | System can be operated when battery is inside temperature range again. Disconnect the charger for better cooling. Switch battery OFF and ON. |
| E71 | Battery outside temperature range during discharging | System can be operated when battery is inside temperature range again. Stop or reduce current drawn from battery for better cooling. Switch battery OFF and ON. |
| E72 | Battery FETs outside temperature range | System can be operated when battery is inside temperature range again. Switch battery OFF and ON. |
| E73 Overcurrent during discharging Remove cause for overcurrent. Switch battery OFF and ON. | ||
| E74 Overcurrent during charging | Disconnect charger. Use only Torpeedo charger. Switch battery OFF and ON. | |
| E75 Pyro-fuse released Contact Torpeedo service. | ||
| E76 Voltage too low Charge battery. | ||
| E77 | Voltage too high during charging | Disconnect charger. Use only Torpeedo charger. Switch battery OFF and ON. |
| E78 Battery over-charged | Disconnect charger. Use only Torpeedo charger. Switch battery OFF and ON. | |
| E79 Electronic battery malfunction Contact Torpeedo Service. | ||
| E80 Deep discharge Contact Torpeedo Service. | ||
| E81 Water-sensor deployed | Ensure that the battery is dry/in a dry place. If needed clean battery housing incl.its water detector. Switch battery OFF and ON. | |
| E82 | Disbalancing among different batteries | Charge all batteries individually to full. |
| E83 Software version error | Batteries with different software versions were connected. Contact Torpeedo Service. | |
| E84 | Number of batteries does not match enumeration process results | Check battery connections. The expected number of batteries is shown in the display under the error code. Check function of individual batteries. Potentially re-establish communication between outboard and battery as described under 5.3.1.1. |
| E85 Disbalancing within one battery | During the next charging process: do not disconnect charger from the battery. Leave charger connected to the battery after the charging process is completed for at least 24 hours. | |
5.4 Transom mount
The tilt mechanism allows both tilting and trimming the motor.
You can tilt the motor to remove it from the water (e.g. when it is not in use or when you land the boat in shallow water).
Trimming allows you to set the motor perfectly to the water surface. For this there are 4 possible trimming positions.
See chapter 4.1 (Fitting the drive onto the boat) to find out how to tilt and trim the motor.
The kick lever in the "Tilt/Auto kick-up" position enables the motor to be kicked up if it touches the bottom. In this position it is not possible to reverse at full speed.
Automatic kick-up is switched off in the "Lock" position. This enables reversing at full speed.

- Please ensure that the kick lever for revers drive is in the "Lock" position.
Lock


Tilt/ Auto kick-up
natural_image
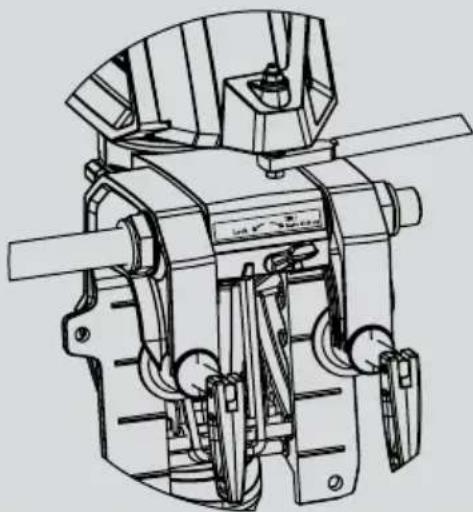
Technical line drawing of a mechanical device with no visible text or symbols5.5 Pylon
The motor and the electronic control system are located in the pylon. They generate the propulsion. In addition, several protective functions are integrated:
- Temperature protection: If the motor overheats, the motor control system reduces the output of the drive until a temperature equilibrium is established between generated and disposed heat. If a critical temperature was exceeded, the motor will come to a stop and the error code E02, E08, or E46 will be shown in the display.
- Under-voltage protection: If the voltage falls below 18 V for Cruise 2.0 models or 36 V for Cruise 4.0 models (or under 21 V / 42 V if the motor is run with lithium batteries), the electronic controller switches the drive off to prevent over-discharging the batteries. The display shows error code E43.
- Blocking protection: If the propeller is blocked or stuck, the motor would normally take in too much power. In this case, the motor is switched off within a few hundredths of a second to protect the electronics, motor winding and propeller. After removing the blockage you can switch the motor on again. If there is a blockage the display shows error code E05.
- Cable break protection: In case of damage to one of the connecting cables, i.e. in case of an interrupted connection to the remote control, the motor will either not start at all or will come to a stop. The error code E30 will appear in the display.
- Throttle control: The speed at which the propeller adjusts to a changed throttle position is limited in order to protect mechanical drive parts and to avoid short-term peak current.

- In case of motor malfunctions, an error code will pop up on display. After elimination of malfunction, motor may move on from stop position. Please refer to chapter 5.3.4. for any description and details.
Fin supports steering motion and secures propeller in case of ground contacts.

- Only run the motor when propeller is under water. If propeller moves in air for longer periods, shaft sealant rings that seal the motor to the drive shaft may be damaged and motor itself may be overheated.
- After use, the motor should as a general rule, be taken out of the water. To do so, you may use the tilt mechanism of transom mount.
6. Dismantling
- Remove Magnetic Kill Switch from remote throttle (Cruise R)/tiller (Cruise T) and switch off motor completely by pressing "on/off" button on the display. Set the battery main switch to the off or neutral position.
- Unplug connection between motor, cable set, and remote throttle (Cruise R)/ tiller (Cruise T).
- Unhinge the motor and place it on a flat surface.

• The pylon may be hot.

• Make sure the motor is dry before you store it.
- Ensure you do not bend the cable around sharp edges.
7. Storage and care instructions
7.1 Corrosion protection
Materials were chosen with a high level of corrosion-resistance. Most of the materials used in the Cruise are, as with most leisure maritime products, classed as “seawater resistant”, not “seawater-proof”.

• After use, the motor should as a general rule, be taken out of the water. You can do this using the tilt mechanism of the transom bracket.
- Rinse the motor with fresh water after operation in salt water or brackish water.
• Only store the motor in a dry condition.
- Check the sacrificial anode regularly, at least every 6 months. Replace as needed.
- Regularly spray cable contacts, data sockets, and data plugs with WD 40 or an equivalent product.
- The threads of the transom mounting bolts need to be relubricated regularly with marine grease (e.g. LiquiMoly).
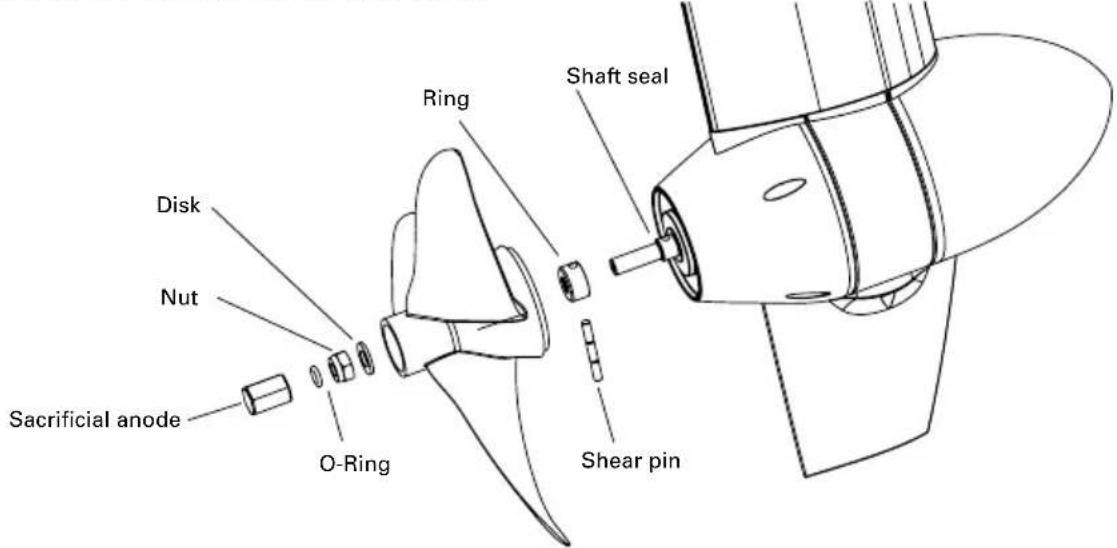
7.2 Changing the propeller
- Turn the battery master switch to the "OFF" position or neutral position.
- Loosen the sacrificial anode (for disassembly it is best to use a 17 mm 12-point long reach socket). Remove the O-ring seal by loosening the underlying nut. This makes it simpler to slide the O-ring seal off the shaft (again, use a 17 mm 12-point long reach socket for this purpose).
- Pull the propeller off the shaft together with the washer.
- Pull the shear pin out of the motor shaft, remove the ring or washers.
- Turn the battery master switch to the "ON" position. Let the motor run at slow speed and check the shaft sealing ring for smooth shaft operation. In case of a damaged or unbalanced shaft please contact Torpeedo's Service Dept.
- Turn the battery master switch to the "OFF" position or neutral position. Mount the ring, then insert the shear pin.
- Slide the propeller onto the shaft all the way to the stop, then rotate the groove in the propeller until it is in line with the shear pin.
- Slide the washer over the shaft and tighten the hexagon locknut to the propeller (11 Nm).
- Refasten the O-ring seal.
- Helpful hints for items 8 and 9: If necessary, use an auxiliary tool such as a centre punch, a tapered punch or a mandrel on which to slide the disk, the nut, and finally the O-ring seal.
- Refasten the sacrificial anode (7.5 Nm).
7.3 Other care instructions
To clean the motor you can use any cleaning agents suitable for plastic - follow the manufacturer's instructions. Cockpit sprays available for cars achieve good results on the plastic surfaces of the Cruise models.
7.4 Maintenance
The maintenance is supposed to be performed according to the service interval schedule, depending on either a given time interval or the operating hours, whichever occurs first. Please be sure to use the service manual enclosed in the delivery.

- Maintenance has to be performed by qualified personal only. Please contact Torqeedo Service.
- If the instructions in chapter 7.1 and 7.3 are not adhered to, the maintenance intervals should be shortened.
| Service actions | After every 5 years or after every 700 operating hours (whatever comes first) | |
| O-ring seals (gasket rings) | Replace O-rings and shaft seals (sealing rings of drive shaft) | ■ |
| Propeller shaft Visual inspection | ■ | |
| Cylindrical pin Exchange | ■ | |
| Data cables and connectors Visual inspection | ■ | |
| Battery cable Visual inspection | ■ | |
| Power cable contacts at motor head | Apply battery terminal grease | ■ |
| Power connector Visual inspection | ■ | |
7.5 Trailering boats equipped with outboard
During trailering and transportation of the boat with mounted outboard, the motor should be tilted down into a vertical position. If there is not enough ground clearance to use the vertical position of the mounted outboard, the outboard should be tilted up for trailering. In this case, do use an appropriate outboard support device.
Ensure local and country-specific regulations for trailering of boats are understood and adhered to.

• Make sure before starting your journey and during your journey that there is no risk of ground contact of the motor.
- When trailering the motor in tilted position, do not use the tilt lock on the transom bracket to support the motor. Use an appropriate outboard support device.
8. Warranty conditions
8.1 Extent of warranty
Torpeedo GmbH, Friedrichshafener Straße 4a, 82205 Gilching - Germany, guarantees the final purchaser of a Torpeedo outboard motor that the product is free from material and manufacturing faults during the period stated below. Torpeedo will indemnify the final purchaser for any expense to repair a material or manufacturing fault. This indemnification obligation does not cover the incidental costs of a warranty claim or any other financial losses (e.g. costs for towing, telecommunications, food, accommodation, loss of earnings, loss of time etc.).
The warranty ends two years after the date on which the product was delivered to the final purchaser. Products that are used commercially or by public authorities - even if only temporarily - are excluded from this two-year warranty. In these cases, the statutory warranty applies. The right to make a claim under the warranty runs out six months after discovery of a fault. All warranty claims revert to the original date of purchase.
Torpeedo decides whether faulty parts are repaired or replaced. Distributors and dealers who repair Torpeedo motors have no authority to make legally binding statements on behalf of Torpeedo.
Normal wear and tear and routine servicing are excluded from the warranty.
Torpeedo is entitled to refuse a warranty claim if:
- the warranty was not correctly submitted (especially failure to contact Torpeedo before returning goods, failure to present a completely filled-in warranty certificate and proof of purchase, see Warranty process).
• the product has been used improperly. - the safety, operating and care instructions in the manual were not observed.
- the product was in any way altered or modified or parts and accessories were added that are not expressly permitted or recommended by Torpeedo.
- previous services or repairs were not carried out by firms authorized by Torpeedo, or non-original parts were used unless the consumer can prove that the facts that led to the warranty being void did not affect the development of the fault.
As well as the rights arising from this warranty, the customer also has legal warranty claim rights arising from the purchase contract with the dealer that are not hampered by this warranty.
8.2 Warranty process
Adhering to the following warranty process is a prerequisite to the satisfaction of any warranty claims.
Before dispatching any apparently faulty goods, it is imperative to coordinate the delivery with Torqueedo Services. You can contact us by phone, email or mail. You can find the contact details on the back of this manual. Please understand that we are unable to deal with products of which we have not been notified and will therefore refuse to accept delivery.
When shipping products to us for repair or under warranty, please pay attention to the following requirements:
- Please note the RMA Number well visible on the outside of the transport packaging.
- Please provide a completed warranty certificate with your shipment. The warranty certificate form is located on page 49 of this manual, it will be also available as a download from our website. The completed certificate must provide contact details, product details, serial number, and a brief description of the problem.
- Please provide a proof of purchase. The proof of purchase must indicate also the date of purchase (e.g. transaction receipt).
When returning the motor to the Service Center, we recommend keeping the original Torqueedo packaging. If this is no longer available packaging that excludes transport damage must be used as this is not included in the warranty.
We are available to answer any questions regarding the warranty process - simply use the details on the back cover.
- Accessories
| Item no. Product Description | ||
| 1204-00 | Cable set extension Cruise | Extension for Cruise cable set, 2 m / 6 ft long |
| 1217-00 | Twin-CruiseControl Set | For twin applications with Cruise 2.0 R and 4.0 R models, consists of aluminium twin throttle lever with dual info display and 56 cm/ 22 inch tie bar for connecting the two motors |
| 1905-00 | Sacrificial anode for Cruise | Sacrificial anode for all Cruise models |
| 1915-00 | Spare propellerCruise R models | 12" x 10" variable-pitch-variable-camber (VPCP) propeller, developed especially for the torque characteristic and performance range of Torpeedo motors; made of high-impact resistant, glass-fiber reinforced PBT (Polybutylene terephthalate), complete with nuts, disc springs, and cylinder pin |
| Item no. | Product Description | |
| 1916-00 | Spare propeller v19/p4000 | For Cruise models with production year 2009 onwards (serial numbers >5000), fast, efficient, weedless |
| 1923-00 | Spare propeller v30/p4000 | For Cruise models with production year 2009 onwards (serial numbers >5000), for planing applications with lighter boats. |
| 1924-00 | TorqTrac | Smartphone app with improved onboard computer functions. Suitable for Travel 503/1003, Ultralight, Cruise R and Cruise T models. Including data cable with bluetooth module to connect outboard and smart-phone. |
| 2103-00 | Power 26-104 | High-performance lithium battery, 2,685 Wh, nominal voltage, 25.9 V, charge 104 Ah, weight 25 kg/ 55.1 lbs, including battery management system with integrated protection against overload, short circuit, deep discharge, wrong polarity connection, overtemperature, and submer-sion, waterproof to IP67 |
| 2206-00 | Charger 350 W for Power 26-104 | Charge capacity 350 W, charges Power 26-104 from 0-100% in 11 hours, waterproof to IP65 |
| 2207-00 | Solar charge controller for Power 26-104 | Solar charge controller tailored specifically to the characteristics of Power 26-104. Allows for safe and convenient charging of Power 26-104 from standard photovoltaic modules (PV modules not included in scope of delivery). Integrated MPPT ensures maximum possible power yield from the attached PV modules. Very high efficiency. Output power max 232 watts (8 A, 29.05 V) |
| 2208-00 | Charger 1200 W for Power 26-104 | Charge current 40 A, charges Torpeedo Power 26-104 from 0-100% in max. 3 hours, waterproof to IP65 |
| 2304-00 | On/off switch for Power 26-104 | Switch to activate and deactivate Power 26-104, IP67, with LED indicator displaying on/off status, required if Power 26-104 is used without Cruise outboards. |
| 9258-00 | Fin for Cruise R/T | Aluminium fin coated with polyurethane (PU) foam for the Cruise models with part no. 1230-00 to 1237-00, improved protection in case of grounding |
| 1921-00 | Remote throttle cable extension, 1.5 m / 4.9 ft | Extension cable connection for Travel 503/1003, Ultra-light and CruiseT as well as Cruise R models. Allows for longer distance between the throttle/tiller and motor |
| 1922-00 | Remote throttle cable extension, 5 m/ 15 ft | Extension cable connection for Travel 503/1003, Ultra-light and Cruise T as well as Cruise R models. Allows for longer distance between tiller or throttle and motor/battery |
| 1919-00 | Long throttle arm | Longer tiller handle, 60 cm/35.4 inches long, for Travel and Cruise T models |
10. Disposal instructions
Torpeedo Cruise motors are manufactured in accordance with EU Directive 2002/96. This directive regulates the disposal of electrical and electronic devices to protect the environment.
You can, in line with local regulations, hand in the motor at a collecting point. From there it will be professionally disposed.

natural_image
Symbol of a trash bin crossed out by two diagonal lines (no text or labels)Torqueedo Corporate Offices
Torqeedo GmbH
Friedrichshafener Straße 4a
82205 Gilching
Germany
Torqueedo Inc.
171 Erick Street, Unit A-1
Crystal Lake, IL 60014
USA
info@torqeedo.com
T +49 - 8153 - 92 15 - 100
F +49 - 8153 - 92 15 - 319
usa@torpeedo.com
T +1 - 815 - 444 88 06
F +1 - 847 - 444 88 07
Torpeedo Service Centers
Germany / Austria / Switzerland
Torqeedo GmbH
- Service Center -
Friedrichshafener Straße 4a
82205 Gilching
Germany
North America
Torqueedo Inc.
171 Erick Street, Unit A-1
Crystal Lake, IL 60014
USA
service@torqeedo.com
T +49 - 8153 - 92 15 - 126
F +49 - 8153 - 92 15 - 329
service_usa@torpeedo.com
T +1 - 815 - 444 88 06
F +1 - 847 - 444 88 07
All other countries
Contact details of Service Centers are available
under www.torpeedo.com in the "Service" section.
Torpeedo Corporate Offices
Torqeedo GmbH
Friedrichshafener Straße 4a
82205 Gilching
Germany
Torqueedo Inc.
171 Erick Street, Unit A-1
Crystal Lake, IL 60014
USA
info@torqeedo.com
T +49 - 8153 - 92 15 - 100
F +49 - 8153 - 92 15 - 319
usa@torqeedo.com
T +1 - 815 - 444 88 06
F +1 - 847 - 444 88 07
Torqueedo Service Centers
Germany / Austria / Switzerland
Torqeedo GmbH
- Service Center -
Friedrichshafener Straße 4a
82205 Gilching
Germany
North America
Torqueedo Inc.
171 Erick Street, Unit A-1
Crystal Lake, IL 60014
USA
service@torqeedo.com
T +49 - 8153 - 92 15 - 126
F +49 - 8153 - 92 15 - 329
service_usa@torqeedo.com
T +1 - 815 - 444 88 06
F +1 - 847 - 444 88 07
All other countries
Contact details of Service Centers are available
under www.torpeedo.com in the "Service" section.
- Andere Anzeigen:
- Pylon
- GARANTIESCHEIN
- Content
- Important safety and operating instructions
- DANGER
- WATCH OUT!
- Legally prescribed information
- Identification and technical data
- Explanation and description of symbols
- EU Conformity declaration
- Equipment and operating elements
- Scope of supply
- Survey operating instruments and components
- Survey operating instruments and components for Cruise R
- Survey operating instruments and components for Cruise T
- Starting up
- Mounting of drive to the boat (Cruise R and Cruise T)
- Mounting of remote control (only for Cruise R)
- Fixing of steering (only for Cruise R)
- Mounting of remote throttle control (Cruise R) / tiller (Cruise T) with integrated display and magentic key
- For mounting of remote throttle control we enclose a drilling template in original size at the end of this manual.
- Cruise T: Connecting of tiller
- Basic information on battery supply
- Short remarks on battery supply
- Serial/parallel linking of batteries
- Connecting of Cruise R/T to Power 26-104 lithium battery/batteries
- Cruise 2.0 R/T
- Connecting of Cruise 2.0 R
- Connecting of Cruise 2.0 T
- Please be aware that you need to establish communication between outboard and battery as described in chapter 5.3.1.1.
- Notes:
- Cruise 4.0 R/T
- Connecting of Cruise 4.0 R/T to two Power 26-104 batteries
- Connecting of Cruise R/T to lead batteries (Gel, AGM), or conventional lithium batteries
- Prevention of damage when connecting other devices to traction batteries
- Using solar panels and generators
- Operation
- Driving operation
- Multifunction display with signal tone
- Sample message in normal operation:
- Other messages:
- Remote throttle control (Cruise R)/ tiller (Cruise T) with integrated display and Magnetic Kill Switch
- Use of battery charge display when operating with Power 26-104 battery
- Establishing communication between Power 26-104 and Cruise outboards / Enumeration
- Setup menu for display options
- How to switch on/off the battery
- Use of battery charge display when operating with other batteries
- Set-up of battery charge
- The capacity in percent and the remaining range can only be displayed after completing the setup and after the first calibration (entering the charge level, see capter 5.3.3.2).
- Usage and calibration of battery charge display
- Exceptional functions / emergency situations
- 1.2.3.
- Error message / Troubleshooting
- Transom mount
- Dismantling
- Storage and care instructions
- Corrosion protection
- Changing the propeller
- Other care instructions
- Maintenance
- Trailering boats equipped with outboard
- Warranty conditions
- Extent of warranty
- Warranty process
- Disposal instructions
- Torqueedo Corporate Offices
- Torpeedo Service Centers
- Germany / Austria / Switzerland
- North America
- All other countries
- Torpeedo Corporate Offices
- Torqueedo Service Centers
Brand : Torqeedo
Model : Cruise 4.0 R
Category : Outboard motor