
BD-J5100 - Blu-ray player SAMSUNG - Free user manual and instructions
Find the device manual for free BD-J5100 SAMSUNG in PDF.


| Product type | Blu-ray player |
| Brand | Samsung |
| Model | BD-J5100 |
| Dimensions (W x D x H) | 430 x 200 x 40 mm |
| Weight | 1.5 kg |
| Power supply | AC 100-240V, 50/60 Hz |
| Power consumption | 15 W (standby < 0.5 W) |
| Supported disc formats | Blu-ray, DVD, CD |
| Video output | HDMI (1080p/720p) |
| USB port | Yes (media playback) |
| Network | No (standalone player) |
| Main functions | Playback Blu-ray/DVD/CD, zoom, repeat, search |
| Maintenance and cleaning | Clean with a soft dry cloth, do not use liquids |
| Safety | Do not expose to moisture, do not open the device |
| Spare parts and repairability | Remote control included. Repair by a professional only |
| General information | User manual available in PDF at notice-facile.com |
Frequently Asked Questions - BD-J5100 SAMSUNG
User questions about BD-J5100 SAMSUNG
0 question about this device. Answer the ones you know or ask your own.
Ask a new question about this device
Download the instructions for your Blu-ray player in PDF format for free! Find your manual BD-J5100 - SAMSUNG and take your electronic device back in hand. On this page are published all the documents necessary for the use of your device. BD-J5100 by SAMSUNG.
USER MANUAL BD-J5100 SAMSUNG
Blu-ray™ Disc Player user manual
imagine the possibilities
Thank you for purchasing this Samsung product.
To receive more complete service,
please register your product at
www.samsung.com/register
ENGLISH
Safety Information
Warning
CAUTION
RISK OF ELECTRIC SHOCK DO NOT OPEN
CAUTION: TO REDUCE THE RISK OF ELECTRIC SHOCK, DO NOT REMOVE THE COVER (OR BACK). THERE ARE NO USER SERVICEABLE PARTS INSIDE. REFER ALL SERVICING TO QUALIFIED PERSONNEL.
- The slots and openings in the cabinet and in the back or bottom are provided for necessary ventilation. To ensure reliable operation of this apparatus, and to protect it from overheating, these slots and openings must never be blocked or covered.
- Do not place this apparatus in a confined space, such as a bookcase, or built-in cabinet, unless proper ventilation is provided.
- Do not place this apparatus near or over a radiator or heat register, or where it is exposed to direct sunlight.
-
Do not place vessels (vases etc.) containing water on this apparatus. A water spill can cause a fire or electric shock.
-
Do not expose this apparatus to rain or place it near water (near a bathtub, washbowl, kitchen sink, or pool, etc.). If this apparatus accidentally gets wet, unplug it and contact an authorized dealer immediately.
- This apparatus uses batteries. In your community, there might be environmental regulations that require you to dispose of these batteries properly. Please contact your local authorities for disposal or recycling information.

This symbol indicates that high voltage is present inside. It is dangerous to make any kind of contact with any internal part of this product.

This symbol indicates that important literature concerning operation and maintenance has been included with this product.
- Do not overload wall outlets, extension cords or adaptors beyond their capacity, since this can result in fire or electric shock.
- Route power-supply cords so that they are not likely to be walked on or pinched by items placed on or against them. Pay particular attention to cords at the plug end, at wall outlets, and the point where they exit from the apparatus.
- To protect this apparatus from a lightning storm, or when it is left unattended and unused for long periods of time, unplug it from the wall outlet and disconnect the antenna or cable system. This will prevent damage to the set due to lightning and power line surges.
- Before connecting the AC power cord to the DC adaptor outlet, make sure the voltage designation of the DC adaptor corresponds to the local electrical supply.
- Never insert anything metallic into the open parts of this apparatus. Doing so may create a danger of electric shock.
-
To avoid electric shock, never touch the inside of this apparatus. Only a qualified technician should open this apparatus.
-
Make sure to plug the power cord in until it is firmly seated. When unplugging the power cord from a wall outlet, always pull on the power cord's plug. Never unplug by pulling on the power cord. Do not touch the power cord with wet hands.
- If this apparatus does not operate normally - in particular, if there are any unusual sounds or smells coming from it - unplug it immediately and contact an authorized dealer or service center.
- Maintenance of Cabinet.
Before connecting other components to this product, be sure to turn them off. If you move your product suddenly from a cold place to a warm place, condensation may occur on the operating parts and lens and cause abnormal disc playback. If this occurs, unplug the product, wait for two hours, and then connect the plug to the power outlet. Then, insert the disc, and try to play back again. - Be sure to pull the power plug out of the outlet if the product is to remain unused or if you are leaving the house for an extended period of time (especially when children, elderly, or disabled people will be left alone in the house).
- Accumulated dust can cause an electric shock, an electric leakage, or a fire by causing the power cord to generate sparks and heat or the insulation to deteriorate.
- Contact an authorized service center for information if you intend to install your product in a location with heavy dust, high or low temperatures, high humidity, chemical substances, or where it will operate 24 hours a day such as in an airport, a train station, etc. Failing to do so may lead to serious damage of your product.
- Use only a properly grounded plug and wall outlet.
- An improper ground may cause electric shock or equipment damage. (Class I Equipment only.)
- To turn this apparatus off completely, you must disconnect it from the wall outlet. Consequently, the wall outlet and power plug must be readily accessible at all times.
- Do not allow children to hang on the product.
- Store the accessories (battery, etc.) in a location safely out of the reach of children.
- Do not install the product in an unstable location such as a shaky self, a slanted floor, or a location exposed to vibration.
- Do not drop or strike the product. If the product is damaged, disconnect the power cord and contact a service center.
- To clean this apparatus, unplug the power cord from the wall outlet and wipe the product using a soft, dry cloth. Do not use any chemicals such as wax, benzene, alcohol, thinners, insecticide, air fresheners, lubricants, or detergent. These chemicals can damage the appearance of the product or erase the printing on the product.
- Do not expose this apparatus to dripping or splashing. Do not put objects filled with liquids, such as vases on the apparatus.
- Do not dispose of batteries in a fire.
- Do not plug multiple electric devices into the same wall socket. Overloading a socket can cause it to overheat, resulting in a fire.
- There is danger of an explosion if you replace the batteries used in the remote with the wrong type of battery. Replace only with the same or equivalent type.
- WARNING - TO PREVENT THE SPREAD OF FIRE, KEEP CANDLES AND OTHER ITEMS WITH OPEN FLAMES AWAY FROM THIS PRODUCT AT ALL TIMES.

• To reduce the risk of fire or electric shock, do not expose this appliance to rain or moisture.
FCC NOTE (for U.S.A)
This equipment has been tested and found to comply with the limits for a Class B digital device, pursuant to Part 15 of the FCC rules. These limits are designed to provide reasonable protection against harmful interference in a residential installation. This equipment generates, uses and can radiate radio frequency energy and, if not installed and used in accordance with the instructions, may cause harmful interference to radio or television reception, which can be determined by turning the equipment off and on.
The user is encouraged to try to correct the interference by one or more of the following measures:
• Reorient or relocate the receiving antenna.
- Increase the separation between the equipment and receiver.
- Connecting this equipment into an outlet on a circuit different from that to which the receiver is connected.
- Consult the dealer or an experienced radio/TV technician for help.
This class B digital product meets all requirements of the Canadian Interference - Causing Equipment Regulations.
Note to CATV system installer
This reminder is provided to call the CATV system installer's attention to Article 820-40 of the National Electrical Code (Section 54 of Canadian Electrical Code, Part I) that provides guidelines for proper grounding and, in particular, specifies that the cable ground shall be connected to the grounding system of the building as close to the point of cable entry as practical.
CLASS 1 LASER PRODUCT
This Compact Disc player is classified as a CLASS 1 LASER product. Use of controls, adjustments or performance of procedures other than those specified herein may result in hazardous radiation exposure.
DANGER :
- VISIBLE AND INVISIBLE LASER RADIATION WHEN OPEN. AVOID DIRECT EXPOSURE TO BEAM. (FDA 21 CFR)
CAUTION :
- CLASS 3B VISIBLE AND INVISIBLE LASER RADIATION WHEN OPEN. AVOID EXPOSURE TO THE BEAM. (IEC 60825-1)
- THIS PRODUCT UTILIZES A LASER. USE OF CONTROLS OR ADJUSTMENTS OR PERFORMANCE OF PROCEDURES OTHER THAN THOSE SPECIFIED HEREIN MAY RESULT IN HAZARDOUS RADIATION EXPOSURE. DO NOT OPEN COVER AND DO NOT REPAIR YOURSELF. REFER SERVICING TO QUALIFIED PERSONNEL.
CLASS 1 LASER PRODUCT KLASSE 1 LASER PRODUKT LUOKAN 1 LASER LAITE KLASS 1 LASER APPARAT PRODUCTO LÁSER CLASE 1

NOTES
■ If the Region number of a Blu-ray Disc/DVDs does not correspond to the Region number of this product, the product cannot play the disc-
Precautions
Important Safety Instructions
Read these operating instructions carefully before using the unit. Follow all the safety instructions listed below. Keep these operating instructions handy for future reference.
- Read these instructions.
- Keep these instructions.
- Heed all warnings.
- Follow all instructions.
- Do not use this apparatus near water.
-
Clean only with a dry cloth.
-
Do not block any ventilation openings. Install in accordance with the manufacturer's instructions.
- Do not install near any heat sources such as radiators, heat registers, stoves, or other apparatus (including AV receivers) that produce heat.
- Do not defeat the safety purpose of the polarized or grounding-type plug. A polarized plug has two blades with one wider than the other. A grounding type plug has two blades and a third grounding prong. The wide blade or the third prong are provided for your safety. If the provided plug does not fit into your outlet, consult an electrician for replacement of the obsolete outlet.
- Protect the power cord from being walked on or pinched particularly at plugs, convenience receptacles, and the point where it exits the apparatus.
- Only use attachments/accessories specified by the manufacturer.
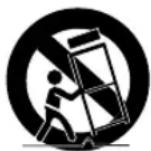
- Use only with the cart, stand, tripod, bracket, or table specified by the manufacturer, or sold with the apparatus. When a
cart is used, use caution when moving the cart/apparatus combination to avoid injury from tip-over. - Unplug this apparatus during lightning storms or when unused for long periods of time.
- Refer all servicing to qualified service personnel. Servicing is required when the apparatus has been damaged in any way, such as when the power-supply cord or plug is damaged, liquid has been spilled or objects have fallen into the apparatus, the apparatus has been exposed to rain or moisture, does not operate normally, or has been dropped.
Contents
SAFETY INFORMATION
Warning 2
Precautions 3
GETTING STARTED
Before using the User Manual 4
Logos of Discs the player can play 5
Accessories 6
Front Panel 7
Rear Panel 7
Remote Control 7
CONNECTIONS
Connecting to a TV 8
Connecting to an Audio System 8
Connecting to a Network Router 9
SETTINGS
The Setup Procedure 9
Menu Navigation 9
Accessing the Settings Menu .... 10
Picture Settings 10
Sound Settings 11
Network Settings 12
System Settings 13
Language Settings 14
Security Settings.... 14
General Settings 14
Support Settings 14
MEDIA PLAY
Playing a Commercially Recorded Disc .... 15
Playing Files on a USB Device 15
Playing a Disc with User Recorded
Content 16
Using DLNA 16
Controlling Video Playback 17
Controlling Music Playback 17
Playing Photo Contents 19
APPENDIX
Troubleshooting 19
Specifications 20
Getting Started
Before using the User Manual
Disc Types and Contents your player can play
| Media Disc Type Details | ||
| VIDEO | Blu-ray Disc BD-ROM or BD-RE/-R recorded in the BD-RE format. | |
| DVD-VIDEO DVD-RW DVD-R DVD+RW DVD+R | DVD-VIDEO, recorded DVD+RW/DVD-RW(V)/DVD-R/+R that have been recorded and finalized, or a USB storage media containing MKV or MP4 contents. | |
| MUSIC | CD-RW/-R, DVD-RW/-R, BD-RE/-R | Music recorded on CD-RW/-R, DVD-RW/-R, BD-RE/-R or a USB storage media containing MP3 or WMA contents. |
| PHOTO | CD-RW/-R, DVD-RW/-R, BD-RE/-R | Photos recorded on CD-RW/-R, DVD-RW/-R, BD-RE/-R or a USB storage media containing JPEG contents. |

NOTES
- The player may not play certain CD-RW/-R and DVD-R because of the disc type or recording conditions.
- If a DVD-RW/-R has not been recorded properly in DVD video format, it will not be playable.
- Your player will not play content that has been recorded on a DVD-R at a bit-rate that exceeds 10 Mbps.
- Your player will not play content that has been recorded on a BD-R or USB device at a bitrate that exceeds 25 Mbps.
- Playback may not work for some types of discs, or when you use specific functions, such as angle change and aspect ratio adjustment. Information about the discs is written in detail on the disc box. Please refer to this if necessary.
■ When you play a BD-J title, loading may take longer than a normal title or some functions may perform slowly.
Disc types your player cannot play
HD DVD
• DVD-ROM/PD/MV, etc
DVD-RAM
• Super Audio CD (except CD layer)
• DVD-RW (VR mode)
• CVD/CD-ROM/CDV/CD-G/CD-I/LD (CD-
3.9 GB DVD-R
for Authoring.
Gs play audio only, not graphics.)
Region Code
Both players and discs are coded by region. These regional codes must match for a disc to play. If the codes do not match, the disc will not play.
The Region Code for this player is displayed on the rear panel of the player.
| Disc Type | Region Code | Area |
| Blu-ray Disc | North America, Central America, South America, Korea, Japan, Taiwan, Hong Kong and South East Asia. | |
| Europe, Greenland, French territories, Middle East, Africa, Australia and New Zealand. | ||
| India, China, Russia, Central and South Asia. | ||
| DVD-VIDEO | The U.S., U.S. territories and Canada | |
| Europe, Japan, the Middle East, Egypt, Africa, Greenland | ||
| Taiwan, Korea, the Philippines, Indonesia, Hong Kong | ||
| Mexico, South America, Central America, Australia, New Zealand, Pacific Islands, Caribbean | ||
| Russia, Eastern Europe, India, North Korea, Mongolia | ||
| China |
Blu-ray Disc BD-LIVE
NTSC broadcast system in U.S.A, Canada, Korea, Japan
Supported File Formats
Notes on the USB connection
- Your player supports USB storage media, MP3 players, digital cameras, and USB card readers.
- The player does not support folder or file names longer than 128 characters.
- Some USB/External HDD/digital camera devices may not be compatible with the player.
- Your player supports the FAT16, FAT32, and NTFS file systems.
- Connect USB devices directly to the player's USB port. Connecting through a USB cable may cause compatibility problems.
- Inserting more than one memory device into a multi-card reader may cause the reader to operate improperly.
- The player does not support the PTP protocol.
-
Do not disconnect a USB device during a "loading" process.
-
The bigger the image resolution, the longer the image takes to display.
- This player cannot play MP3 files with DRM (Digital Rights Management) downloaded from commercial sites.
- Your player only supports video with a frame rate under 30fps (frames per second).
- Your player only supports USB Mass Storage Class (MSC) devices such as thumb drives and USB HDD. (HUB is not supported.)
- Certain USB HDD Devices, multi-card readers and thumb drives may not be compatible with this player.
- If some USB devices require excessive power, they may be limited by the circuit safety device.
- If playback from a USB HDD is unstable, provide additional power by plugging the HDD into a wall socket.
If the problem continues, contact the USB HDD manufacturer.
• SAMSUNG is not responsible for any data file damage or data loss. - Your player does not support NTFS compressed files, sparse files, or encrypted files.
• You can repair or format a USB device on your Desktop PC. (MS-Windows OS only)
Video File Support
| File Extension Container Video Codec Audio Codec Resolution | ||||
| *.avi | AVI | MP4v3 | MPS Dolby Digital DTS WMA PCM | 1920x1080 |
| H.264 BP/MP/HP | 1920x1080 | |||
| *.mkv | MKV | VC-1 AP | MP3 Dolby Digital DTS | 1920x1080 |
| H.264 BP/MP/HP | 1920x1080 | |||
| *.wmv | WMV (wmv9) | VC-1 AP | WMA | 1920x1080 |
| VC-1 SM | 1920x1080 | |||
| *.mp4 | MP4 | MP4 (mp4v) | AAC | 1920x1080 |
| H.264 BP/MP/HP | 1920x1080 | |||
| *.mpg*.mpeg | MPEG | MPEG1 | MP1, 2 Dolby Digital DTS | 1920x1080 |
| MPEG2 | 1920x1080 | |||
| H.264 BP/MP/HP | 1920x1080 | |||
- Limitations
- Even when a file is encoded by a supported codec listed above, the file might not be played if its content has a problem.
- Normal playback is not guaranteed if the file's container information is wrong or the file itself is corrupted.
- Files having a higher Bit rate/frame rate than standard may stutter during sound/video playback
- The Seek (skip) function is not available if the file's index table is damaged.
- Video decoder
- Supports up to H.264 Level 4.1 and AVCHD
- Does not support H.264 FMO/ASO/RS and VC1 SP/MP/AP L4
- MPEG4 SP, ASP :
Below 1280 x 720 : 60 frames max
Above 1280 x 720 : 30 frames max - Does not support GMC 2 or higher
- Audio decoder
- Supports WMA 7, 8, 9 and STD
- Does not support WMA sampling rate of 22050Hz mono.
- AAC: Max sampling rate: 96Khz (8, 11, 12, 16, 22, 24, 32, 44.1, 48, 64, 88.2, 96)
Max bitrate: 320kbps
Music File Support
| File Extension Container Audio Codec Support Range | |||
| *.mp3 | MP3 MP3 | - | |
| *.wma | WMA WMA | * Sampling rates (in kHz) - 8, 11, 16, 22, 32, 44.1, 4 * Bit rates - All bit-rates from 5kbps to 355kbps | |
Picture File Support
| File Extension Type | Resolution | |
| *.jpg**.jpeg*.jpe | JPEG | 15360x8640 |
| *.png | PNG | 15360x8640 |
AVCHD (Advanced Video Codec High Definition)
- This player can play back AVCHD format discs. These discs are normally recorded and used in camcorders.
• The AVCHD format is a high definition digital video camera format. - The MPEG-4 AVC/H.264 format compresses images with greater efficiency than the conventional image compressing format.
- Some AVCHD discs use the "x.v.Color" format. This player can play back AVCHD discs that use "x.v.Color" format.
• "x.v.Color" is a trademark of Sony Corporation. - "AVCHD" and the AVCHD logo are trademarks of Matsushita Electronic Industrial Co., Ltd. and Sony Corporation.
NOTES
■ Some AVCHD format discs may not play, depending on the recording condition. AVCHD format discs need to be finalized.
■ "x.v.Color" offers a wider color range than normal DVD camcorder discs.
Accessories
Check for the supplied accessories shown below.
 |  |  |
| Batteries for Remote Control (AAA Size) | User Manual | Remote Control |
Batteries for Remote Control (AAA Size)
User Manual
Remote Control
Front Panel
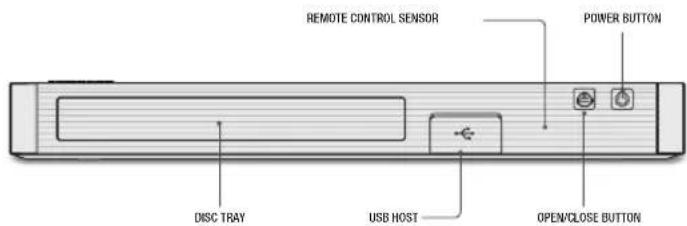

NOTES
- You can perform software upgrades using the USB Host jack with a USB flash memory stick only.
■ Please open and pull out the USB cover before inserting USB device.
Rear Panel

Remote Control
Tour of the Remote Control

Installing batteries

natural_image
Mechanical assembly diagram showing a pipe fitting with an arrow indicating motion (no text or symbols)
NOTES
■ If the remote does not operate properly:
- Check the polarity (+/-) of the batteries.
- Check if the batteries are drained.
- Check if the remote sensor is blocked by obstacles.
- Check if there is any fluorescent lighting nearby.
! CAUTION
■ Dispose of batteries according to local environmental regulations. Do not put them in the household trash.
■ Do not dispose of batteries in a fire
■ Do not short circuit, disassemble or overheat the batteries.
■ Danger of explosion if battery is incorrectly replaced. Replace only with the same or equivalent type.
Connections
Connecting to a TV
Connect an HDMI cable (not supplied) from the HDMI OUT jack on the back of the product to the HDMI IN jack on your TV.
- Do not connect the power cord to the wall outlet until you have made all the other connections.
- When you change the connections, turn off all devices before you start.

flowchart
graph TD
    A["TV"] --> B["Audio Video"]
    B --> C["Monitor"]
    C --> D["+"]
    D --> E["+"]
    style A fill:#f9f,stroke:#333
    style B fill:#ccf,stroke:#333
    style C fill:#cfc,stroke:#333
    style D fill:#fcc,stroke:#333
    style E fill:#cff,stroke:#333

NOTES
If you use an HDMI-to-DVI cable to connect to your display device, you must also connect the Digital Audio Out on the player to an audio system to hear audio.
■ An HDMI cable outputs digital video and audio, so you don't need to connect an audio cable.
■ Depending on your TV, certain HDMI output resolutions may not work. Please refer to the user manual of your TV.
- When you connect the player to your TV using the HDMI cable or to a new TV, and then turn it on for the first time, the player automatically sets the HDMI output resolution to the highest supported by the TV.
■ A long HDMI cable may cause screen noise. If this occurs, set HDMI Deep Color to Off in the menu.
■ To view video in the HDMI 720p, 1080i, or 1080p output mode, you must use a High speed HDMI cable.
■ HDMI outputs only a pure digital signal to the TV.
If your TV does not support HDCP (High-bandwidth Digital Content Protection), random noise appears on the screen.
Connecting to an Audio System
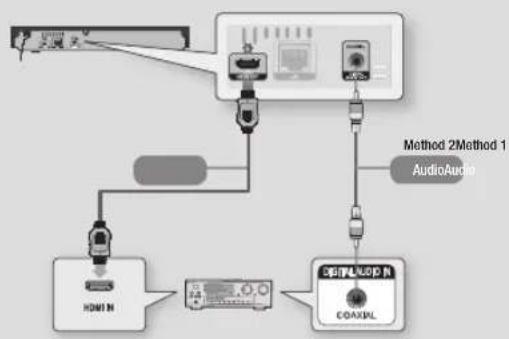
You can connect the Blu-ray player to an audio system using one of the methods illustrated below.
- Do not connect the power cord to the wall outlet until you have made all the other connections.
- When you change the connections, turn off all devices before you start.
Method 1 Connecting to an HDMI compatible AV receiver
- Connect an HDMI cable (not supplied) from the HDMI OUT jack on the back of the product to the HDMI IN jack on your receiver.
• Best quality (Recommended)
Method 2 Connecting to an AV receiver with a Digital Coaxial Cable
- Using a digital Coaxial cable (not supplied), connect the Coaxial Digital Audio Out jack on the product to the Digital Coaxial In jack of the receiver.
• Good quality - You will hear sound only through the front two speakers with Digital Output set to PCM.
flowchart
graph TD
    A["Input"] --> B["USB Interface"]
    B --> C["Audio Audio"]
    C --> D["Coaxial Audio"]
    D --> E["Output"]
    F["Method 2"] --> G["AudioAudio"]
Connecting to a Network Router
You can connect your player to your network router using one of the methods illustrated below.
To use the DLNA network functionality, you must connect your PC to your network as shown in the illustrations.
Wired Network

flowchart
graph TD
    A["Router"] --> B["PC"]
    B --> C["Router with Internet"]
    C --> D["PC with Internet"]
    D --> E["PC with Internet"]
    E --> F["PC with Internet"]
    F --> G["PC with Internet"]
    G --> H["PC with Internet"]
    H --> I["PC with Internet"]
    I --> J["PC with Internet"]
    J --> K["PC with Internet"]
    K --> L["PC with Internet"]
    L --> M["PC with Internet"]
    M --> N["PC with Internet"]
    N --> O["PC with Internet"]
    O --> P["PC with Internet"]
    P --> Q["PC with Internet"]
    Q --> R["PC with Internet"]
    R --> S["PC with Internet"]
    S --> T["PC with Internet"]
    T --> U["PC with Internet"]
    U --> V["PC with Internet"]
    V --> W["PC with Internet"]
    W --> X["PC with Internet"]
    X --> Y["PC with Internet"]
    Y --> Z["PC with Internet"]
    Z --> AA["PC with Internet"]
    AA --> AB["PC with Internet"]
    AB --> AC["PC with Internet"]
    AC --> AD["PC with Internet"]
    AD --> AE["PC with Internet"]
    AE --> AF["PC with Internet"]
    AF --> AG["PC with Internet"]
    AG --> AH["PC with Internet"]
    AH --> AI["PC with Internet"]
    AI --> AJ["PC with Internet"]
    AJ --> AK["PC with Internet"]
    AK --> AL["PC with Internet"]
    AL --> AM["PC with Internet"]
    AM --> AN["PC with Internet"]
    AN --> AO["PC with Internet"]
    AO --> AP["PC with Internet"]
    AP --> AQ["PC with Internet"]
    AQ --> AR["PC with Internet"]
    AR --> AS["PC with Internet"]
    AS --> AT["PC with Internet"]
    AT --> AU["PC with Internet"]
    AU --> AV["PC with Internet"]
    AV --> AW["PC with Internet"]
    AW --> AX["PC with Internet"]
    AX --> AY["PC with Internet"]
    AY --> AZ["PC with Internet"]
    AZ --> BA["PC with Internet"]
    BA --> BB["PC with Internet"]
    BB --> BC["PC with Internet"]
    BC --> BD["PC with Internet"]
    BD --> BE["PC with Internet"]
    BE --> BF["PC with Internet"]
    BF --> BG["PC with Internet"]
    BG --> BH["PC with Internet"]
    BH --> BI["PC with Internet"]
    BI --> BJ["PC with Internet"]
    BJ --> BK["PC with Internet"]
    BK --> BL["PC with Internet"]
    BL --> BM["PC with Internet"]
    BM --> BN["PC with Internet"]
    BN --> BO["PC with Internet"]
    BO --> BP["PC with Internet"]
    BP --> BQ["PC with Internet"]
    BQ --> BR["PC with Internet"]
    BR --> BS["PC with Internet"]
    BS --> BT["PC with Internet"]
    BT --> BU["PC with Internet"]
    BU --> BV["PC with Internet"]
    BV --> BW["PC with Internet"]
    BW --> BX["PC with Internet"]
    BX --> BY["PC with Internet"]
    BY --> BZ["PC with Internet"]

NOTES
- Internet access to Samsung's software update server may not be allowed, depending on the router you use or your ISP's policy. For more information, contact your ISP (Internet Service Provider).
■ DSL users, please use a router to make a network connection.
Settings
The Setup Procedure
- The Home screen will not appear if you do not configure the Setup.
- The OSD (On Screen Display) may change in this player after you upgrade the software version.
- The access steps may differ depending on the menu you selected.
- After the Setup process is complete, you can then operate the panel buttons and remote control.
After you have connected the player to your TV, turn on the TV and player. When you turn on the player the first time, the player's Setup screen appears on the TV. The Setup procedure lets you set the On Screen Display (OSD) and menu languages, the aspect ratio (screen size), the network type, and connect the player to your network.

NOTES
■ The Home menu will not appear if you do not configure the Setup except as noted below.
■ If you press the BLUE (D) button during network setup, you can access the Home menu even if the network setup is not completed yet.
■ When you return to the Home menu, the full screen mode is cancelled automatically.
■ If you want to display the Setup screen again to make changes, press the ▲ button on the front panel of the player for more than 5 seconds with no disc inserted. This resets the player to its default settings.
■ After the Setup process is complete, you can operate the HDMI-CEC function.
If you want to use the Anynet+(HDMI-CEC) function to aid in the initial set up process, please follow the instructions below.
1) Connect the player to an Anynet+(HDMI-CEC) compliant Samsung TV using HDMI Cable.
2) Set the Anynet+(HDMI-CEC) feature to On in both the TV and the player.
3) Set the TV to the Setup Procedure.
- If you leave the player in the stop mode for more than 5 minutes without using it, a screen saver will appear on your TV. If the player is left in the screen saver mode for more than 25 minutes, the power will automatically turn off.
Menu Navigation

| 1 | HOME Button : Press to move to the Home menu. |
| 2 | RETURN Button Return to the previous menu |
| 3 | (Enter) / DIRECTION Button ;Move the cursor or select an item.Activate the currently selected item.Confirm a setting. |
| 4 | EXIT Button : Press to exit the current menu. |
- Home Menu

| 1 | Selects VIDEOS. |
| 2 | Selects MUSIC. |
| 3 | Selects Settings. |
| 4 | Selects Change Device. |
| 5 | Selects PHOTOS. |
| 6 | Selects PLAY DISC. |
| 7 | Selects applications. |
| 8 | Selects More applications. |

NOTES
■ The Videos, Photos, and Music options require that you have an appropriate disc inserted into the player or a USB flash device attached to the player.
Accessing the Settings Menu
To access the Settings menu and sub-menus, follow these steps:
-
Press the POWER button. The Home Menu appears.
-
Press the ▲▼◀▶ buttons to select Settings, and then press the 📊 button.
- Press the ▲▼ buttons to select the desired submenu, and then press the Ⓖ button.
- Press the ▲▼ buttons to select the desired item, and then press the button.
- Press the EXIT button to exit the menu.

NOTES
■ The access steps may differ depending on the menu you selected. The OSD (On Screen Display) may change in this player after you upgrade the software version.
Picture Settings
You can configure various display options such as the TV Aspect Ratio, Resolution, etc.
TV Aspect Ratio
Depending on the type of television you have, you may want to adjust the screen size setting.

NOTES
■ Depending on the disc type, some aspect ratios may not be available.
■ If you select an aspect ratio and option which is different than the aspect ratio of your TV screen, the picture might appear to be distorted.
BD Wise (Samsung TVs only)
BD Wise is Samsung's latest interconnectivity feature.
When you connect a Samsung player and a Samsung TV with BD Wise to each other via HDMI, and BD Wise is on in both the player and TV, the player outputs video at the video resolution and frame rate of the Blu-ray Disc/DVDs.

NOTES
■ When BD Wise is on, the Resolution setting automatically defaults to BD Wise and BD Wise appears in the Resolution menu.
■ If the player is connected to a device that does not support BD Wise, you cannot use the BD Wise function.
■ For proper operation of BD Wise, set the BD Wise menu of both the player and the TV to On.
Resolution
Lets you set the output resolution of the HDMI video signal to Auto, 1080p, 1080i, 720p or 480p. The number indicates the number of lines of video per frame. The i and p indicate interlaced and progressive scan, respectively. The more lines, the higher the quality.
Resolution according to the output mode
- Blu-ray Disc/E-contents/Digital Contents playback
| Output Setup | HDMI / connected | |
| HDMI Mode | ||
| Blu-ray Disc | E-contents/ Digital contents | |
| BD Wise | Resolution of Blu-ray Disc | 1080p |
| Auto | Max. Resolution of TV input | Max. Resolution of TV input |
| 1080p@60F (Movie Frame : Off) | 1080p@60F | 1080p@60F |
| Movie Frame : Auto (24Fs) | 1080p@24F | 1080p@24F |
| 1080i 1080i | 1080i | |
| 720p 720p | 720p | |
| 480p 480p | 480p | |
- DVD playback
| Setup\Output | HDMI / connected |
| HDMI Mode | |
| BD Wise 480i | |
| Auto Max. Resolution of TV input | |
| 1080p 1080p | |
| 1080i 1080i | |
| 720p 720p | |
| 480p 480p | |

NOTES
If the TV you connected to the player does not support Movie Frame or the resolution you selected, the message "If no pictures are shown after selecting 'Yes', please wait for 15 seconds to return to the previous resolution." appears. If you select Yes, the TV's screen will go blank for 15 seconds, and then the resolution will revert to the previous resolution automatically.
If the screen stays blank after you have changed the resolution, remove all discs, and then press and hold the ▲ button on the front of the player for more than 5 seconds. All settings are restored to the factory default. Follow the steps on the previous page to access each mode and select the Display Setup that your TV will support.
■ When the factory default settings are restored, all stored user BD data is deleted.
■ The Blu-ray Disc must have the 24 frame feature for the player to use the Movie Frame (24Fs) mode.
Movie Frame (24Fs)
Setting the Movie Frame (24Fs) feature to Auto allows you to adjust the player's HDMI output to 24 frames per second for improved picture quality. You can enjoy the Movie Frame (24Fs) feature only on a TV supporting this frame rate. You can select Movie Frame only when the player is in the HDMI 1080p output resolution modes.
HDMI Color Format
Lets you set the color space format for HDMI output to match the capabilities of the connected device (TV, monitor, etc).
HDMI Deep Color
Lets you output video from the HDMI OUT jack with Deep Color. Deep Color provides more accurate color reproduction with greater color depth.
Progressive Mode
Lets you improve picture quality when viewing DVDs.
Sound Settings
Digital Output
Lets you select the digital audio output format that is suitable for your TV or AV Receiver. For more details, please refer to the Digital Output Selection table below.
Digital Output Selection
| Setup PCM | Bitstream (Unprocessed) | Bitstream (Re-encoded DTS) | Bitstream (Re-encoded Dolby D) | ||||
| Connection | HDMI Receiver | Coaxial | HDMI Receiver | Coaxial | HDMI Receiver or Coaxial | HDMI supported AV receiver or Coaxial | |
| Audio Stream on Blu-ray Disc | PCM Up to 7.1ch PCM 2ch | PCM PCM 2ch Re-encoded DTS | Re-encoded Dolby Digital * | ||||
| Dolby Digital P | PCM 2ch PCM 2ch Dolby Digital Dolby Digital Re-encoded DTS | Re-encoded Dolby Digital * | |||||
| Dolby Digital Plus | PCM 2ch PCM 2ch | Dolby Digital Plus | Dolby Digital Plus | Re-encoded DTS | Re-encoded DTS | Re-encoded Dolby Digital * | |
| Dolby TrueHD | PCM 2ch PCM 2ch Dolby True HD Dolby Digital Re-encoded DTS | Re-encoded Dolby Digital * | |||||
| DTS | PCM 2ch | PCM 2ch | DTS | DTS | Re-encoded DTS | Re-encoded Dolby Digital * | |
| DTS-HD High Resolution Audio | PCM 2ch PCM 2ch | DTS-HD High Resolution Audio | DTS Re-encoded DTS | Re-encoded Dolby Digital * | |||
| DTS-HD Master Audio | PCM 2ch PCM 2ch | DTS-HD Master Audio | DTS Re-encoded DTS | Re-encoded Dolby Digital * | |||
| Audio Stream on DVD | PCM | PCM 2ch | PCM 2ch | PCM 2ch | PCM 2ch | PCM 2ch | PCM 2ch |
| Dolby Digital | PCM 2ch | PCM 2ch | Dolby Digital | Dolby Digital | Dolby Digital | Dolby Digital | |
| DTS | PCM 2ch | PCM 2ch | DTS | DTS | DTS | DTS | |
| Definition for Blu-ray Disc | Any | Decodes main feature audio and BONUSVIEW audio stream together into PCM audio and add Navigation Sound Effects. | Outputs only main feature audio stream so that your AV receiver can decode the audio bitstream.You will not hear BONUSVIEW audio and Navigation Sound Effects. | Decodes main feature audio and BONUSVIEW audio and BONUSVIEW audio stream together into PCM audio and add Navigation Sound Effects, then re-encodes the PCM audio into DTS bitstream | Decodes main feature audio and BONUSVIEW audio and BONUSVIEW audio stream together into PCM audio and add Navigation Sound Effects, then re-encodes the PCM audio into Dolby Digital bitstream | ||
* If Source Stream is 2ch, "Re-encoded Dolby D" Settings are not applied.
Blu-ray Discs may include three audio streams:
- Main Feature Audio : The audio soundtrack of the main feature.
- BONUSVIEW audio: An additional soundtrack such as the director or actor's commentary.
- Navigation Sound Effects: When you choose a menu navigation selection, a Navigation Sound Effect may sound. Navigation Sound Effects are different on each Blu-ray Disc.

NOTES
■ Be sure to select the correct Digital Output or you will hear no sound or just loud noise.
■ If the HDMI device (AV receiver, TV) is not compatible with compressed formats (Dolby Digital, DTS), the audio signal outputs as PCM.
■ Regular DVDs do not have BONUSVIEW audio and Navigation Sound Effects.
■ Some Blu-ray Discs do not have BONUSVIEW audio and Navigation Sound Effects.
■ If you play MPEG audio soundtracks, the audio signal outputs as PCM regardless of your Digital Output selections (PCM or Bitstream).
If your TV is not compatible with compressed multi-channel formats (Dolby Digital, DTS), the player may output PCM 2ch downmixed audio even though you selected Bitstream (either Re-encoded or Unprocessed) in the setup menu.
If your TV is not compatible with PCM sampling rates over 48kHz, the player may output 48kHz downsampled PCM audio even though you set PCM Downsampling to Off.
PCM Downsampling
Lets you choose to have 96KHz PCM signals downsampled to 48KHz before they are outputted to an amplifier. Choose On if your amplifier or receiver is not compatible with a 96KHz signal.
Dynamic Range Control
Lets you apply dynamic range control to Dolby Digital, Dolby Digital Plus, and Dolby TrueHD audio.
- Auto : Automatically controls the dynamic ^1 . In the Home menu, press the range of Dolby TrueHD audio, based on ▲▼◀▶ buttons to select Settings, information in the Dolby TrueHD soundtrack, and then press the 📋 button. Also turns dynamic range control on for Dolby Digital and Dolby Digital Plus.
- Off: Leaves the dynamic range uncompressed, letting you hear the original sound.
- On : Tums dynamic range control on for all three Dolby formats. Quieter sounds are made louder and the volume of loud sounds is reduced.
Downmixing Mode
Lets you select the multi-channel downmix method that is compatible with your stereo system. You can choose to have the player downmix to normal stereo or to surround compatible stereo.
Network Settings
Please contact your ISP to find out if your IP address is static or dynamic. If it is dynamic - and most are - we recommend using the Auto procedure for network setup. This is easiest and will work in the majority of cases. If it is static, you must use the manual set up procedure. Network setup directions start below.

NOTES
■ This unit can only be connected to a Network via a wired connection.
Wired Network Settings
In the Home menu, press the ▲▼◀▶ buttons to select Settings, and then press the Ⓗ button.
- Press the ▲▼ buttons to select Network, and then press the 📄 button.
- Press the ▲▼ buttons to select Wired Network Settings, and then press the C button. The Wired Network Settings screen appears.
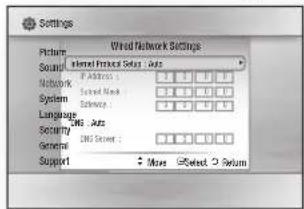
-
In the Internet Protocol Setup field, select Auto if it is not selected. (Press C to select Auto, and then preC.)
-
The Auto Function acquires and fills in the values for IP Address, Subnet Mask, etc., automatically.

NOTES
■ This process can take up to five minutes.
- After the Network Function has acquired the network values, press the RETURN button.
- Select Network Test, and then press 📄 to ensure the player has connected to your network.
- When the Network Test is complete, press the RETURN twice to return to the Main Menu.
- If the Network Function does not acquire the network values, go to the directions for Manual Setup.
Manual Network Setup
Before you start manual network setup, you need the network setting values. To get the network setting values, contact your ISP (Internet Service Provider) or your network administrator.
To enter the Network Settings into your player, follow these steps:
- In the Home menu, press the ▲▼◀▶ buttons to select Settings, and then press the Ⓗ button.
- Press the ▲▼ buttons to select Network, and then press the button.
- Press the ▲▼ buttons to select Wired Network Settings, and then press the 📋 button. The Wired Network Settings screen appears.
- Select the Internet Protocol Setup field, and then press the C button.
- Press the ▲▼ buttons to select Manual, and then press the button.
- Press the ▼ button to go to the first entry field (IP Address).
- Use the number buttons on your remote to enter numbers.
- When done with each field, use the ▶ button to move to the next field. You can also use the other arrow buttons to move up, down, and back.
- Enter the IP Address, Subnet Mask, and Gateway values in the same way.
-
Press the ▼ button to go to DNS.
-
Press the ▼ button to go to the first DNS entry field.
- Enter the numbers as above.
- Press the RETURN button on your remote control.
- Run a Network Test to ensure the player has connected to your network.
Network Test
Use this menu item to check whether your network connection is working or not.
Network Status
Use to check whether a connection to a network and the Internet has been established.
Device Name
Device Name function allows you to change player's name by selecting from device name list.
BD-Live Internet Connection
Set to allow or prohibit an Internet connection when you use the BD-LIVE service.
- Allow (All) : The Internet connection is allowed for all BD-LIVE contents.
- Allow (Valid Only) : The Internet connection is allowed only for BD-LIVE contents containing a valid certificate.
• Prohibit : No Internet connection is allowed for any BD-LIVE content.
■ What is a valid certificate?
When the player uses BD-LIVE to send the disc data and a request to the server to certify the disc, the server uses the transmitted data to check if the disc is valid and sends the certificate back to the player.
■ The Internet connection may be restricted while you are using BD-LIVE contents.

NOTES
Using BD-LIVE™
Once the player is connected to the network, you can enjoy various movie-related service contents using a BD-LIVE compliant disc.
- Attach a USB memory stick to the USB jack on the front of the player, and then check its remaining memory. The memory device must have at least 1GB of free space to accommodate the BD-LIVE services.
- Insert a Blu-ray Disc that supports BD-LIVE.
- Select an item from various BD-LIVE service contents provided by the disc manufacturer.

NOTES
■ The way you use BD-LIVE and the provided contents may differ, depending on the disc manufacturer.
The DLNA Function
DLNA lets you play music, video, and photo files located in your PC on the player.
To use DLNA with your player, you must connect the player to your network. (See pages 12\~13).
To use DLNA with your PC, you must install DLNA software on your PC.
System Settings
Setup
By using the Setup function, you can set the language, Network Settings, etc. For more information about the Setup function, refer to the Setup section of this user manual (See page 9).
Quick Start
You can turn on the power quickly by decreasing the boot time.

NOTES
■ If this function is set to On, Standby power consumption will be increased.
Anynet+ (HDMI-CEC)
Anynet+ is a convenient function that offers linked operations with other Samsung players that have the Anynet+ feature.
To operate this function, connect this player to an Anynet+ Samsung TV with an HDMI cable.
With Anynet+ on, you can operate this player using a Samsung TV remote control and start disc playback simply by pressing the PLAY button on the TV's remote control.
For more information, please see the TV user manual.

NOTES
■ This function is not available if the HDMI cable does not support CEC.
■ If your Samsung TV has an Anynet+ logo, then it supports the Anynet+ function.
■ Depending on your TV, certain HDMI output resolutions may not work.
Please refer to the user manual of your TV.
If you have Anynet+ turned on, when you turn off the product, disconnect, and then reconnect the power cable, the product turns on automatically to re-establish the Anynet+ connection. After about 15 seconds, it turns off again automatically.
■ Some Samsung TVs, when connected to this product using the Anynet+ function will, when you turn them on, display a warning popup message saying no connection has been found. Never-the-less, the Anynet+ connection is properly established and available to use.
BD Data Management
Enables you to manage the downloaded contents you accessed through a Blu-ray disc that supports the BD-LIVE service and stored on a flash drive.
You can check the device's information including the storage size, delete the BD data, or change the Flash memory device.

NOTES
In the external memory mode, disc playback may be stopped if you disconnect the USB device in the middle of playback.
- Your player supports the FAT16, FAT32, and NTFS file systems. We recommend you use USB devices that support USB 2.0 protocol with 4 MB/sec or faster read/write speed.
■ The Resume Play function may not work after you format the storage device.
■ The total memory available to BD Data Management may differ, depending on the conditions.
Language Settings
You can select the language you prefer for the On-Screen menu, Disc menu, Audio, and Subtitles.

NOTES
■ The selected language will only appear if it is supported on the disc.
Security Settings
When you access this function for the first time, the PIN screen appears. Enter the default PIN - 0000 - using the number buttons. To change the PIN, use the Change PIN function. Each time you access the Security Settings hereafter, you must enter that four digit PIN. If you don't change the PIN, continue using the default PIN.
BD Parental Rating
Prevents playback of Blu-ray Discs with specific age ratings unless the 4 digit PIN is entered.
DVD Parental Rating
This function works in conjunction with DVDs that have been assigned an age rating or numeric rating that indicates the maturity level of the content. These numbers help you control the types of DVDs that your family can watch. Select the rating level you want to set. For example, if you select Level 6, discs rated above 6 - Level 7 and 8 - will not play A larger number indicates more mature content. When the DVD Parental Rating function is on, you must enter the 4 digit PIN to play discs with restricted rating levels.
Change PIN
Change the 4-digit password used to access security functions.
To change the PIN, follow these steps:
- Select Change PIN, and then press the 📄 button. The Enter old PIN screen appears.
- Enter the old PIN. If you never changed the PIN, enter the default PIN: 0000. The Enter new PIN screen appears.
-
Enter the new PIN in the Enter new PIN fields.
-
Re-enter the new PIN in the Confirm new PIN fields. The "PIN is changed successfully." message appears.
- Press the 📄 button.
If you forget your password
- Remove any discs.
- Press and hold the ▲ button on the front panel for 5 seconds or more. All settings will revert to the factory settings.
■ When the factory default settings are restored, all the user stored BD data will be deleted.

NOTES
General Settings
Time Zone
Lets you specify the time zone that is applicable to your area.
Support Settings
Software Upgrade
The Software Upgrade menu allows you to upgrade the player's software for performance improvements or additional services.
By Online
To upgrade By Online, follow these steps:
- In the player's menu, go to Settings > Support > Software Upgrade
- Select By Online, and then press the 📄 button. The Connecting to Server message appears.
- A popup message will appear if an update is available.
- If you select Yes, download process started. (Never turn the player on or off manually during an upgrade.)
- When the update is completed, the player will restart automatically.

NOTES
■ The upgrade is complete when the player turns off, and then turns on again by itself.
■ Never turn the player off or back on manually during the update process.
Samsung Electronics takes no legal responsibility for player malfunction caused by an unstable Internet connection or consumer negligence during a software upgrade.
■ No disc should be in the product when you upgrade the software By Online.
By USB
To upgrade by USB, follow these steps:
- Visit www.samsung.com/bluraysupport.
-
Download the latest USB software upgrade zip archive to your computer.
-
Unzip the zip archive to your computer. If there is a new software version You should have a single RUF file with available, the player notifies you with a the same name as the zip file. popup message.
- Copy the RUF file to a USB flash drive.
- Make sure there is no disc in the player, and then insert the USB flash drive into the USB port of the player.
- In the player's menu, go to Settings > Support > Software Upgrade.
- Select By USB.
- To upgrade the firmware, select Yes in the Pop-up. The player turns off automatically, then restarts, and begins the download. (Never turn the player on or off manually during an upgrade.)
- The update progress popup appears.

NOTES
■ No disc should be in the product when you upgrade the software using the USB Host jack.
■ When the software upgrade is done, check the software details in the software Upgrade menu.
■ Do not turn off the player during the software upgrade. It may cause the player to malfunction.
■ Software upgrades using the USB Host jack must be performed with a USB flash memory stick only.
Auto Upgrade Notification
If you have connected the player to your network, and then set Auto Upgrade Notification on, the player automatically notifies you when a new software version is available for the player.
To set Auto Upgrade Notification on, follow these steps:
- Select Auto Upgrade Notification, and then press the 📄 button.
-
Use the ▲▼ buttons to select On, and then press the 📄 button.
-
When the update is completed, the player will restart automatically.

NOTES
■ The upgrade is complete when the player turns off, and then turns on again by itself.
■ Never turn the player off or on manually during the update process.
Samsung Electronics takes no legal responsibility for player malfunction caused by an unstable Internet connection or consumer negligence during software upgrade.
Contact Samsung
Provides contact information for assistance with your player.
Terms of Service Agreement
Lets you view the general disclaimer regarding third party contents and services.
Reset
Returns all settings to their factory defaults except for the network settings.
Media Play
Playing a Commercially Recorded Disc
- Press the ▲ button to open the disc tray.
- Place a disc gently into the disc tray with the disc's label facing up.
- Press the ▲ button to close the disc tray. Playback starts automatically.
Playing Files on a USB Device
There are two methods you can use to play or view multimedia files located on a USB device through your player.
Method 1
- Turn the player on.
- Connect the USB device to the USB port on the front panel of the player. The New Device Connected pop-up appears.
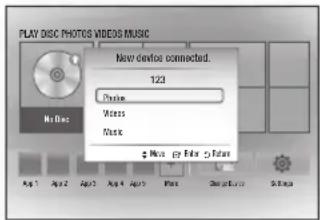

NOTES
■ If the pop-up does not appear, go to Method 2.
- Use the ▲▼ buttons to select Photos, Videos or Music, and then press the 📄 button. The Photos, Videos & Music screen appears listing the content of the device. Depending on how the contents is arranged, you will see either folders, individual files, or both.

NOTES
■ Even though the player will display folders for all content types, it will only display files of the Content Type you selected in Step 3. For example, if you selected music, you will only be able to see music files. You can change this selection by returning to the Photos, Videos & Music screen and going to Step 3 in Method 2 below.
- If necessary, use the ▲▼◀▶ buttons to select a folder, and then press the Ⓤ button.
- Select a file to view or play, and then press the button.
- Press the RETURN button to exit a folder or the EXIT button to return to the Home screen.
- Go to pages 17\~19 for instructions that explain how to control playback of videos, music, and pictures on a USB device.
Method 2
- Turn the player on.
- Connect the USB device to the USB port on the front panel of the player. Select Change Device and then press the ▲▼ button to select USB. Press the Ⓗ button.

- Use the ▲▼◀▶ buttons to select PHOTOS, VIDEOS or MUSIC on the Home screen, and then press the button. The Photos, Videos & Music screen appears listing the content of the device. Depending on how the contents is arranged, you will see either folders, individual files, or both.

NOTES
■ Even though the player will display folders for all content types, it will only display files of the Content Type you selected in Step 3. For example, if you selected music, you will only be able to see music files. You can change this selection by returning to the Photos, Videos & Music screen and repeating Step 3.
4. If necessary, use the ▲▼◀▶ buttons to select a folder, and then press the Ⓗ button.
- Use the ▲▼◀▶ buttons to select a file to view or play, and then press the Ⓗ button.
- Press the RETURN button to exit a folder or the EXIT button to return to Home screen.
- Go to pages 17\~19 for instructions that explain how to control playback of videos, music, and pictures on a USB device.

NOTES
■ If you insert a disc when playing a USB device, the device mode changes to "Disc" automatically.
Playing a Disc with User Recorded Content
You can play multimedia files you have recorded on Blu-ray, DVD, or CD discs.
- Place a user recorded disc into the disc tray with the disc's label facing up, and then close the tray.
- Use the ◀▶ buttons to select the type of content you want to view or play - VIDEOS, PHOTOS, or MUSIC - and then press the 📄 button.

NOTES
■ Even though the player will display folders for all content types, it will only display files of the Contant Type you selected in Step 2. For example, if you selected music, you will only be able to see music files. You can change this selection by returning to the Home screen and repeating Step 2.
- A screen appears listing the contents of the disc. Depending on how the contents are arranged, you will see either folders, individual files, or both.
- If necessary, use the ▲▼◀▶ buttons to select a folder, and then press the Ⓗ button.
- Use the ◀▶▲▼ buttons to select a file to view or play, and then press the 📊 button.
- Press the RETURN button one or more times to exit a current screen, exit a folder, or to return to the Home screen. Press the EXIT button to return directly to the Home Screen.
- Go to pages 17\~19 for instructions that explain how to control playback of videos, music, and pictures on a disc.
Using DLNA
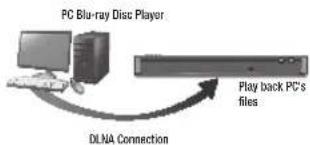
flowchart
graph TD
    A["PC Blu-ray Disc Player"] -->|Data Transfer| B["DLNA Connection"]
    B --> C["Play back PC's files"]
-
Connect the Blu-ray Disc Player, your PC, and/or your DLNA compatible device to the same wireless network.
-
Follow the directions in the DLNA software Installation/Instruction manual to set up devices and files for playing or viewing.
- Select Change Device on the player's Home screen, and then press the 📄 button. In the list of DLNA connected devices that appears, select your PC or other DLNA compatible device, and then press the 📄 button.
- Use the ◀▶ buttons to select the type of content you want to view or play - VIDEOS, PHOTOS, or MUSIC - and then press the button
NOTES
■ Even though the player will display folders for all content types, it will only display files of the Content Type you selected in Step 4. For example, if you selected music, you will only be able to see music files. You can change this selection by returning to the Home screen and repeating Step 4.
- A screen appears listing the contents of the PC or DLNA device. Depending on how the contents are arranged, you will see either folders, individual files, or both.
- If necessary, use the ▲▼◀▶ buttons to select a folder, and then press the 📄 button.
-
Use the ◀▶▲▼ buttons to select a file to view or play, and then press the C button.
-
Press the RETURN button one or more times to exit a current screen, exit a folder, or to return to the Home screen. Press the EXIT button to return directly to the Home Screen.
- Go to pages 17\~19 for instructions that explain how to control playback of videos, music, and pictures on a disc.
Controlling Video Playback
You can control the playback of video content located on a Blu-ray disc, DVD, CD, USB device, or your computer. Depending on the media, some of the functions described in this manual may not be available.
During Blu-ray or DVD disc playback, the Full screen button does not operate.
Buttons on the Remote Control used for Video Playback

1 Playback related buttons
The player does not play sound in Search, Slow or Step mode.
• To return to normal speed playback, press the ▶ button.
| button | Starts playback. |
| button | Stops playback. |
| button | Pauses playback. |
| Fast Motion Play | During playback, press theorbutton.Each time you press theorbutton, the playback speed will change. |
| Slow Motion Play | In pause mode, press thebutton.Each time you press thebutton, the playback speed will change. |
| Step Motion Play | In pause mode, press thebutton.Each time you press thebutton, a new frame appears. |
| Skip Motion Play | During playback, press theorbutton.Each time you press theorbutton, the disc moves to the previous or next chapter or file. |
2 Using the disc menu, title menu, popup menu, and title list
| DISC MENU button | During playback, press this button to start the disc menu function. |
| TITLE MENU button | During playback, press this button to start the title menu function. |
| POPUP MENU button | During playback, press this button to start the popup menu function. |
Controlling Music Playback
You can control the playback of music located on a Blu-ray disc, DVD, CD, USB device, or your computer.
Buttons on the Remote Control used for Music Playback
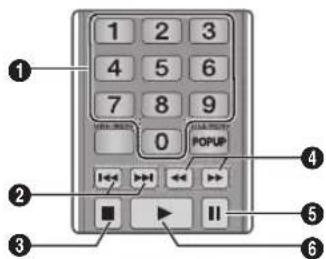
| 1 | NUMBER buttons (Audio CD (CD-DA) only): During Playlist playback, press the desired track number. The selected track is played. |
| 2 | Skip: During playback, press theorbutton to move to the previous or next file of the playlist. |
| 3 | button: Stops a track. |
| 4 | Fast Play (Audio CD (CD-DA) only)During playback, press theorbutton. Each time you press theorbutton, the playback speed will change. |
| 5 | Pause: Pauses a track. |
| 6 | button: Plays the currently selected track. |
Repeat an Audio CD (CD-DA)/MP3
- During Playlist playback, press the TOOLS button.

- Press the ◀▶ buttons to select Track, All, Shuffle, or Off.
- Press the button.
| Off | Songs are played in the order in which they were recorded. |
| (○) Track | The current song is repeated. |
| (○) All | All songs are repeated. |
| (∞) Shuffle | Shuffle plays songs in random order. |
Playlist
- To move to the Music List, press the ☐ or RETURN button. The Music List screen appears.

-
Press the ▲▼◀▶ buttons to move to a desired track, and then press the YELLOW (C) button. A check appears on the track. Repeat this procedure to select additional tracks.
-
To remove a track from the list, move to the track, and then press the YELLOW (C) button again. The check on the track is cancelled.
-
When done, press the button. The tracks you selected are displayed on the right side of the screen. The player plays the first track.
-
To change the play list, press the button or RETURN button to return to the Music List. Repeat Steps 2, 3, and 4.
-
To cancel the play list and return to the Home screen, press the RETURN or EXIT button.
NOTES
■ You can create a playlist with up to 99 tracks on Audio CDs (CD-DA).
- If you remove all the tracks from a play list and then press the button, the player lists and plays all the tracks on the disc.
Ripping
Lets you copy audio files contents from an Audio-CD (CD-DA) to USB/HDD device.
-
Open the disc tray. Place the audio (CD-DA) disc on the tray, and close the tray. Insert a USB device into the USB jack on the front of the product.
-
In Stop mode, press the ▲▼◀▶ buttons to move to a desired track, and then press the YELLOW (C) button. A check appears on the track. Repeat this procedure to select additional tracks.
-
To remove a track from the list, move to the track, and then press the YELLOW (C) button again. The check on the track is cancelled.
-
When done, press the TOOLS button and then select the Rip using the ▲▼ buttons, and then press the C button. The Rip pop-up appears.
-
Use the ▲▼ buttons to select the device to store the ripped files to, and then press the Ⓗ button.
NOTES
■ Do not disconnect the device while ripping is in progress.
-
If you want to cancel ripping, press the 📄 button and then select Yes. Select No to continue ripping.
-
When ripping is complete, the "Ripping is completed." message appears. Press the 📋 button to go back to the Playback screen.
NOTES
■ This function may not be supported by some discs.
■ On the Ripping screen, you can also choose Select All and Deselect All.
- Use Select All to select all tracks. This cancels your individual track selections.
- Use Deselect All to deselect all selected tracks at once.
Disc Copy to USB
Lets you copy video/photo/music contents from data Disc to USB/HDD device.
-
Open the disc tray. Place the data disc on the tray, and close the tray. Insert a USB device into the USB jack on the front of the product. The new device pop-up appears.
-
Press the ▲ button, and then press the ◀▶ to select Blu-ray, DVD or CD.
-
Use the ▲▼ buttons to select Photos, Videos or Music, and then press the 📄 button. The Photos, Videos & Music screen appears listing the content of the device. Depending on how the contents is arranged, you will see either folders, individual files, or both.
NOTES
■ Even though the player will display folders for all content types, it will only display files of the Content Type you selected in Step 3. For example, if you selected music, you will only be able to see music files. You can change this selection by returning to the Photos, Videos & Music screen and repeating Step 3.
-
In Stop mode, use the ▲▼◀▶ buttons to select the VIDEOS, PHOTOS, or MUSIC, and then press the YELLOW (C) button. A check appears to the left of the desired item.
-
Repeat Step 4 to select and check additional desired item.
-
To remove a desired item from the list, press the YELLOW (C) button again. The check on the desired item is removed.
-
When done, press the TOOLS button and then select the Copy to USB using the ▲▼ buttons, and then press the Ⓐ button. The Copy to USB pop-up appears.
-
Use the ▲▼ buttons to select the device to store the copied files, and then press the 🔒 button.

NOTES
■ Do not disconnect the device while copying is in progress.
-
If you want to cancel copying, press the button and then select Yes. Select No to continue ripping.
-
When copying is complete, the "Copying is completed." message appears. Press the 📋 button to go back to the Playback screen.

NOTES
■ This function may not be supported by some discs.
■ On the Copying screen, you can also choose Select All and Deselect All.
- Use Select All to select all item. This cancels your individual item selections.
- Use Deselect All to deselect all selected item at once.
Playing Photo Contents
You can control the playback of photo content located on a Blu-ray disc, DVD, CD, USB device, or your computer.
Using the Tools Menu
During playback, press the TOOLS button.
| Start Slide Show/Stop Slide Show | Select to start or stop the slide show. |
| Slide Show Speed | Select to set a slide show's speed. |
| Background Music | Select to listen to music while viewing a slide show. |
| Zoom | Select to enlarge the current picture. (Enlarge up to 4 times) |
| Rotate | Select to rotate the picture. (This will rotate the picture either clockwise or counter clockwise.) |
| Information | Shows the picture information. |

NOTES
■ Depending on the disc or storage device, the Tools menu may differ.
■ To enable the background music function, the photo file must be in the same storage media as the music file.
However, the sound quality can be affected by the bit rate of the MP3 file, the size of the photo, and the encoding method.
■ You can't enlarge the subtitle and PG graphic in the full screen mode.
Appendix
Troubleshooting
Before requesting service, please try the following solutions.
| PROBLEM SOLUTION | |
| No operation can be performed with the remote control. | Check the batteries in the remote control. They may need replacing.Operate the remote control at a distance of no more than 20 feet from the player.Remove batteries and hold down one or more buttons for several minutes to drain the microprocessor inside the remote control to reset it. Reinstall batteries and try to operate the remote control again. |
| Disc does not play. | Ensure that the disc is installed with the label side facing up.Check the region number of the Blu-ray Disc/DVD. |
| Disc Menu does not appear. | Ensure that the disc has disc menus. |
| The prohibition message appears on the screen. | This message appears when an invalid button is pressed.The Blu-ray Disc/DVD's software doesn't support the feature (e.g., angles).You've requested a title or chapter number or search time that is out of range. |
| Play mode differs from the Setup Menu selection. | Some of the functions selected in the Setup Menu may not work properly if the disc is not encoded with the corresponding function. |
| The screen ratio cannot be changed. | The Screen Ratio is fixed on your Blu-ray Disc/DVD.This is not a problem with the player. |
| No audio. | Make sure you have selected the correct Digital Output in the Audio Options Menu. |
| The screen is blank. | If the HDMI output is set to a resolution your TV cannot support (for example, 1080p), you may not see a picture on your TV.Press the ▲ button (on front panel) for more than 5 seconds with no disc inside. All settings will revert to the factory settings.When the factory default settings are restored, all stored user BD data is deleted. |
| Forgot password | Press the ▲ button (on front panel) for more than 5 seconds with no disc inside. All settings including the password will revert to the factory settings.Don't use this unless absolutely necessary.When the factory default settings are restored, all stored user BD data is deleted. |
| The picture is noisy or distorted | Make sure that the disc is not dirty or scratched.Clean the disc. |
| No HDMI output. | Check the connection between the TV and the HDMI jack of the player.Check if your TV supports 480p, 720p, 1080i, or 1080p HDMI input resolutions. |
| Abnormal HDMI output screen. | If random noise appears on the screen, it means that TV does not support HDCP (High-bandwidth Digital Content Protection). |
| If you experience other problems. | Go to the contents and find the section of the user manual that contains the explanations regarding the current problem, and follow the procedure once aIf the problem still cannot be solved, please contact your nearest Samsung authorized service center. |
| DLNA function | |
| I can see folders shared through DLNA, but I cannot see the files. | DLNA shows only files corresponding to the Image, Music, and Movie categories. Files that do not correspond to these categories are not displayed |
| Video is played intermittently. | Check if the network is stable.Check if the network cable is properly connected and if the network is overload |
| DLNA connection between Player and PC is unstable. | The IP address under the same subnetwork should be unique. If they are not, IP interference can cause this phenomenon.Check if you have a firewall enabled.If so, disable the firewall function. |
| BD-LIVE | |
| I cannot connect to the BD-LIVE server. | Check whether the network connection is working or not by using the Network Status menu.Check whether the USB memory device is connected to the player.The memory device must have at least 1GB of free space to accommodate the BD-LIVE service.You can check the available size in BD Data Management.Check whether the BD-LIVE Internet Connection menu is set to Allow(All).If all above fails, contact the contents provider or update the player to the latest firmware. |
| When using the BD-LIVE service, an error occurs. | The memory device must have at least 1GB of free space to accommodate the BD-LIVE service.You can check the available size in BD Data Management. |

NOTES
■ When the factory default settings are restored, all stored user BD data is deleted.
Repairs
If you contact us to repair your player, an administration fee may be charged if either:
-
An engineer is called out to your home at your request and there is no defect in the product.
-
You bring the unit to a repair center and there is no defect in the product.
We will provide you with the amount of the administration fee before we make a home visit or begin any work on your player.
We recommend you read this manually thoroughly, search for a solution on line at www.samsung.com, or contact Samsung Customer Care before seeking to repair your player.
| Specifications | ||
| General | Weight 2.2 lbs | |
| Dimensions 11.4 (W) X 8.7 (D) X 1.5 (H) inches | ||
| Operating Temperature Range +41°F to +95°F | ||
| Operating Humidity Range 10 % to 75 % | ||
| USB | Type A USB 2.0 | |
| DC output | 5V 0.5A Max. | |
| HDMI | Video 1080p, 1080l, 720p, 480p | |
| Audio PCM, Bitstream | ||
| Audio Output Digital Audio Output Coaxial | ||
| Network Ethernet 100BASE - TX Terminal | ||
- Network speeds equal to or below 10Mbps are not supported.
- Design and specifications are subject to change without prior notice.
- For the power supply and power consumption, refer to the label attached to the player.
- Weight and dimensions are approximate.
Compliance and Compatibility Notice
NOT ALL discs are compatible
- Subject to the restrictions described below and those noted throughout this Manual, including the Disc Type and Characteristics section of this user manual, disc types that can be played are: pre-recorded commercial BD-ROM, DVD-VIDEO, and Audio CD (CD-DA) discs; BD-RE/-R, DVD-RW/-R discs; and CD-RW/-R discs.
- Discs other than those listed above cannot be and are not intended to be played by this player. Some of the discs listed above may not play due to one or more reasons provided below.
-
Samsung cannot assure that this player will play every disc bearing the BD-ROM, BD-RE/-R, DVD-VIDEO, DVD-RW/-R, DVD+RW/+R and CD-RW/-R logos, and this player may not respond to all operating commands or operate all features of every disc. These and other disc compatibility and player operation issues with new and existing format discs are possible because:
-
Blu-ray is a new and evolving format and this player may not operate all features of Blu-ray Discs because some features may be optional, additional features may have been added to the Blu-ray Disc format after the production of this player, and certain available features may be subject to delayed availability;
- not all new and existing disc format versions are supported by this player;
- new and existing disc formats may be revised, changed, updated, improved and/or supplement
- some discs are produced in a manner that allows specific or limited operation or restricts features during playback;
- some discs bearing the BD-ROM, BD-RE/-R, DVD-VIDEO, DVD-RW/-R, DVD+RW/+R and CD-RW/-R logos may still be non-standardized discs;
- some discs may not be played depending on their physical state or recording conditions;
- problems and errors can occur during the creation of Blu-ray Disc or DVD software and/or the manufacture of discs;
- this player operates differently than a standard DVD player or other AV equipment; and/or
-
for reasons noted throughout this user manual and for other reason(s) discovered and posted by SAMSUNG customer care center.
-
If you encounter disc compatibility or player operation problems, please contact SAMSUNG customer care center.
You may also contact SAMSUNG customer care center for possible updates on this player. - For additional information on playback restrictions and disc compatibility, refer to the Precautions, Before Reading the user manual, Disc Types and Characteristics, and Before Playing sections of this user manual.
- For Blu-ray Disc Player progressive scan output : CONSUMERS SHOULD NOTE THAT NOT ALL HIGH DEFINITION TELEVISION SETS ARE FULLY COMPATIBLE WITH THIS product AND MAY CAUSE ARTIFACTS TO BE DISPLAYED IN THE PICTURE. IN CASE OF PROGRESSIVE SCAN PICTURE PROBLEMS, IT IS RECOMMENDED THAT THE USER SWITCH THE CONNECTION TO THE 'STANDARD DEFINITION' OUTPUT. IF THERE ARE QUESTIONS REGARDING OUR TV SET COMPATIBILITY WITH THIS product, PLEASE CONTACT OUR CUSTOMER SERVICE CENTER.
Copy Protection
- Because AACS (Advanced Access Content System) is approved as the content protection system for the Blu-ray Disc format, similar to use of CSS (Content Scramble System) for the DVD format, certain restrictions are imposed on playback, analog signal output, etc., of AACS protected contents.
The operation of this product and restrictions on this product may vary depending on your time of purchase as those restrictions may be adopted and/or changed by AACS after the production of this product. Furthermore, BD-ROM Mark and BD+ are additionally used as content protection systems for the Blu-ray Disc format, which imposes certain restrictions including playback restrictions for BD-ROM Mark and/or BD+ protected contents. To obtain additional information on AACS, BD-ROM Mark, BD+, or this product, please contact SAMSUNG customer care center. - Many Blu-ray Disc/DVDs are encoded with copy protection. Because of this, you should only connect your Player directly to your TV, not to a VCR. Connecting to a VCR results in a distorted picture from copy-protected Blu-ray Disc/DVDs.
- Under the U.S. Copyright laws and Copyright laws of other countries, unauthorized recording, use, display, distribution, or revision of television programs, videotapes, Blu-ray Discs, DVDs, and other materials may subject you to civil and/or criminal liability.
Cinavia Notice: This product uses Cinavia technology to limit the use of unauthorized copies of some commercially-produced film and videos and their soundtracks. When a prohibited use of an unauthorized copy is detected, a message will be displayed and playback or copying will be interrupted. More information about Cinavia technology is provided at the Cinavia Online Consumer Information Center at http://www.cinavia.com. To request additional information about Cinavia by mail, send a postcard with your mailing address to: Cinavia Consumer Information Center, P.O. Box 86851, San Diego CA, 92138, USA.
This product incorporates proprietary technology under licence from Verance Corporation and is protected by U.S. Patent 7,369,677 and other U.S. and worldwide patents issued and pending as well as copyright and trade secret protection for certain aspects of such technology. Cinavia is a trademark of Verance Corporation. Copyright 2004-2013 Verance Corporation. All rights reserved by Verance. Reverse engineering or disassembly is prohibited.
Network Service disclaimer
All content and services accessible through this device belong to third parties and are protected by copyright, patent, trademark and/or other intellectual property laws. Such content and services are provided solely for your personal noncommercial use. You may not use any content or services in a manner that has not been authorized by the content owner or service provider. Without limiting the foregoing, unless expressly authorized by the applicable content owner or service provider, you may not modify, copy, republish, upload, post, transmit, translate, sell, create derivative works, exploit, or distribute in any manner or medium any content or services displayed through this device.
THIRD PARTY CONTENT AND SERVICES ARE PROVIDED "AS IS." SAMSUNG DOES NOT WARRANT CONTENT OR SERVICES SO PROVIDED. EITHER EXPRESSLY OR IMPLIEDLY, FOR ANY PURPOSE. SAMSUNG EXPRESSLY DISCLAIMS ANY IMPLIED WARRANTIES, INCLUDING BUT NOT LIMITED TO, WARRANTIES OF MERCHANTABILITY OR FITNESS FOR A PARTICULAR PURPOSE. SAMSUNG DOES NOT GUARANTEE THE ACCURACY, VALIDITY, TIMELINESS, LEGALITY, OR COMPLETENESS OF ANY CONTENT OR SERVICE MADE AVAILABLE THROUGH THIS DEVICE AND UNDER NO CIRCUMSTANCES, INCLUDING NEGLIGENCE, SHALL SAMSUNG BE LIABLE, WHETHER IN CONTRACT OR TORT, FOR ANY DIRECT, INDIRECT, INCIDENTAL, SPECIAL OR CONSEQUENTIAL DAMAGES, ATTORNEY FEES, EXPENSES, OR ANY OTHER DAMAGES ARISING OUT OF, OR IN CONNECTION WITH, ANY INFORMATION CONTAINED IN, OR AS A RESULT OF THE USE OF ANY CONTENT OR SERVICE BY YOU OR ANY THIRD PARTY, EVEN IF ADVISED OF THE POSSIBILITY OF SUCH DAMAGES.
Third party services may be terminated or interrupted at any time, and Samsung makes no representation or warranty that any content or service will remain available for any period of time. Content and services are transmitted by third parties by means of networks and transmission facilities over which Samsung has no control. Without limiting the generality of this disclaimer, Samsung expressly disclaims any responsibility or liability for any interruption or suspension of any content or service made available through this device.
Samsung is neither responsible nor liable for customer service related to the content and services. Any question or request for service relating to the content or services should be made directly to the respective content and service providers.
License
- Manufactured under license from Dolby Laboratories. Dolby and the double-D symbol are trademarks of Dolby Laboratories.
DOLBY. TRUEHD
- For DTS patents, see http://patents.dts.com. Manufactured under license from DTS Licensing Limited. DTS, the Symbol, & DTS and the Symbol together are registered trademarks, and DTS 2.0+Digital Out is a trademark of DTS, Inc. © DTS, Inc. All Rights Reserved.
dts 2.0+Digital Out
- The terms HDMI and HDMI High-Definition Multimedia Interface, and the HDMI Logo are trademarks or registered trademarks of HDMI Licensing LLC in the United States and other countries.
HDMI
• Oracle and Java are registered trademarks of Oracle and/or its affiliates. Other names may be trademarks of their respective owners

• Open Source License Notice
- In the case of using open source software, Open Source Licenses are available on the product menu.
- Blu-ray Disc™, Blu-ray™ and the logos are trademarks of the Blu-ray Disc Association
- DLNA, the DLNA Logo and DLNA CERTIFIED ^ are trademarks, service marks, or certification marks of the Digital Living Network Alliance.
dlna CERTIFIED
SAMSUNG
LIMITED WARRANTY TO ORIGINAL PURCHASER
Samsung Electronics Canada Inc.(SECA), warrants that this product is free from defective material and workmanship.
SECA further warrants that if this product falls to operate properly within the specified warranty period and the failure is due to improper workmanship or defective materials, SECA will repair or replace the product at its option.
All warranty repairs must be performed by a SECA Authorized Service Center. (The name and address of the location nearest you can be obtained by calling toll free: 1-800-SAMSUNG)
LABOR
One year (Carry-in)
PARTS
One year
On carry-in models, transportation to and from the service center is the customer's responsibility.
The original dated sales receipt must be retained by the customer and is the only acceptable proof of purchase. It must be presented to the authorized service center at the time service is requested.
EXCLUSIONS (WHAT IS NOT COVERED)
This warranty does not cover damage due to accident, fire, food and/or other acts of God; misuse, incorrect line voltage, improper installation, improper or unauthorized repairs, commercial use or damage that occurs in shipping. Exterior and interior finish lamps, glass are not covered under this warranty. Customer adjustments which are explained in the instruction manual are not covered under the terms of this warranty. This warranty will automatically be voided for any unit found with a missing or altered serial number. This warranty is valid only on products purchased and used in Canada.
Samsung Electronics Canada Inc
Demy Rd West
Mississauga, On. L5N 0B9
Telp : 1-800-SAMSUNG (726-7864)
Fax:(905)542-1199
Website: www.samsung.com/ca

Samsung Electronics Canada Inc
2050 Derry Rd West
Mississauga, On. L5N 0B9
If you have any questions or comments relating to Samsung products, please contact the SAMSUNG customer care center.
| Area Contact Center | Web Site | |
| ▪ North America | ||
| CANADA 1-800-SAMSUNG(726-7864) | www.samsung.com/ca/support (English)www.samsung.com/ca_fr/support (French) | |
| U.S.A- Consumer Electronics | 1-800-SAMSUNG(726-7864) www.samsung.com/us/support | |
| ▪ Latin America | ||
| MEXICO 01-800-SAMSUNG(726-7864) www.samsung.com/mw/support | ||
| ARGENTINE 0800-333-3733 www.samsung.com/ar/support | ||
| URUGUAY 000-405-437-33 | www.samsung.com/latin/support (Spanish)www.samsung.com/latin_en/support (English) | |
| PARAGUAY 009-800-542-0001 | www.samsung.com/latin/support (Spanish)www.samsung.ccm/latin_en/support (English) | |
| BRAZIL | 0800-124-421 (Demais cidades e regiões)4004-0000 (Capitais e grandes centros) | www.samsung.com/br/support |
| CHILE 800-SAMSUNG(726-7864) www.samsung.com/cl/support | ||
| BOLIVIA 800-10-7260 www.samsung.com/cl/support | ||
| COLOMBIA | Bogotá 600 12 72Gratis desde cualquiler parte del país 01 8000112 112 o desde su celular #SAM(726) | www.samsung.com/co/support |
| COSTA RICA | 0-800-507-726700-800-1-SAMSUNG (726-7864) | www.samsung.com/latin/support (Spanish)www.samsung.com/latin_en/support (English) |
| DOMINICA 1-800-751-2676 | www.samsung.com/latin/support (Spanish)www.samsung.com/latin_en/support (English) | |
| Area Contact Center | Web Site | |
| ECUADOR | 1-800-10-726701-800-SAMSUNG (726-6786) | www.samsung.com/latn/support (Spanish)www.samsung.com/latin_en/support (English) |
| EL SALVADOR | 800-6225 | www.samsung.com/latn/support (Spanish)www.samsung.com/latin_en/support (English) |
| GUATEMALA | 1-800-299-00131-800-299-0033 | www.samsung.com/latn/support (Spanish)www.samsung.com/latin_en/support (English) |
| HONDURAS | 800-27919267800-2791-9111 | www.samsung.com/latn/support (Spanish)www.samsung.com/latin_en/support (English) |
| JAMAICA | 1-800-234-72671-800-SAMSUNG (726-7864) | www.samsung.com/latn/support |
| NICARAGUA | 001-800-5077267 | www.samsung.com/latn/support (Spanish)www.samsung.com/latin_en/support (English) |
| PANAMA | 800-7267800-0101 | www.samsung.com/latn/support (Spanish)www.samsung.com/latin_en/support (English) |
| PERU | 0-800-777-08Desde celulares por favor llamar al número336 8686 | www.samsung.com/pe/support |
| PUERTO RICO | 1-800-682-3180 | www.samsung.com/latn/support (Spanish)www.samsung.com/latin_en/support (English) |
| TRINIDAD& TOBAGO | 1-800-SAMSUNG(726-7864) | www.samsung.com/latn/support (Spanish)www.samsung.com/latin_en/support (English) |
| Venezuela | 0-800-SAMSUNG (726-7864) | www.samsung.com/ve/support |

SAMSUNG
BD-J5100
natural_image
Diagram showing a mechanical component being inserted into a cylindrical device, with an arrow indicating the insertion direction (no text or symbols present)
REMARQUE
flowchart
graph TD
    A["Router"] --> B["Service large bande"]
    A --> C["Service large bande"]
    A --> D["Service large bande"]
    A --> E["Service large bande"]
    A --> F["Service large bande"]
    A --> G["Service large bande"]
    A --> H["Service large bande"]
    A --> I["Service large bande"]
    A --> J["Service large bande"]
    A --> K["Service large bande"]
    A --> L["Service large bande"]
    A --> M["Service large bande"]
    A --> N["Service large bande"]
    A --> O["Service large bande"]
    A --> P["Service large bande"]
    A --> Q["Service large bande"]
    A --> R["Service large bande"]
    A --> S["Service large bande"]
    A --> T["Service large bande"]
    A --> U["Service large bande"]
    A --> V["Service large bande"]
    A --> W["Service large bande"]
    A --> X["Service large bande"]
    A --> Y["Service large bande"]
    A --> Z["Service large bande"]
    A --> AA["Service large bande"]
    A --> AB["Service large bande"]
    A --> AC["Service large bande"]
    A --> AD["Service large bande"]
    A --> AE["Service large bande"]
    A --> AF["Service large bande"]
    A --> AG["Service large bande"]
    A --> AH["Service large bande"]
    A --> AI["Service large bande"]
    A --> AJ["Service large bande"]
    A --> AK["Service large bande"]
    A --> AL["Service large bande"]
    A --> AM["Service large bande"]
    A --> AN["Service large bande"]
    A --> AO["Service large bande"]
    A --> AP["Service large bande"]
    A --> AQ["Service large bande"]
    A --> AR["Service large bande"]
    A --> AS["Service large bande"]
    A --> AT["Service large bande"]
    A --> AU["Service large bande"]
    A --> AV["Service large bande"]
    A --> AW["Service large bande"]
    A --> AX["Service large bande"]
    A --> AY["Service large bande"]
    A --> AZ["Service large bande"]
    A --> BA["Service large bande"]
    A --> BB["Service large bande"]
    A --> BC["Service large bande"]
    A --> BD["Service large bande"]
    A --> BE["Service large bande"]
    A --> BF["Service large bande"]
    A --> BG["Service large bande"]
    A --> BH["Service large bande"]
    A --> BI["Service large bande"]
    A --> BJ["Service large bande"]
    A --> BK["Service large bande"]
    A --> BL["Service large bande"]
    A --> BM["Service large bande"]
    A --> BN["Service large bande"]
    A --> BO["Service large bande"]
    A --> BP["Service large bande"]
    A --> BQ["Service large bande"]
    A --> BR["Service large bande"]
    A --> BS["Service large bande"]
    A --> BT["Service large bande"]
    A --> BU["Service large bande"]
    A --> BV["Service large bande"]
    A --> BW["Service large bande"]
    A --> BX["Service large bande"]
    A --> BY["Service large bande"]
    A --> BZ["Service large bande"]

REMARQUE

REMARQUE
Samsung Electronics Canada Inc
2050 Derry Rd West
Mississauga, On. L5N 0B9
Telp : 1-800-SAMSUNG (726-7864)
Samsung Electronics Canada Inc
2050 Derry Rd West
Mississauga, On. L5N 0B9
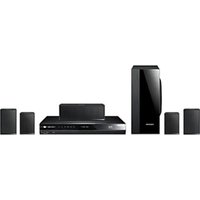
- Blu-ray™ Disc Player user manual
- imagine the possibilities
- Safety Information
- Warning
- CAUTION
- RISK OF ELECTRIC SHOCK DO NOT OPEN
- FCC NOTE (for U.S.A)
- Note to CATV system installer
- CLASS 1 LASER PRODUCT
- DANGER :
- CAUTION :
- CLASS 1 LASER PRODUCT KLASSE 1 LASER PRODUKT LUOKAN 1 LASER LAITE KLASS 1 LASER APPARAT PRODUCTO LÁSER CLASE 1
- NOTES
- Precautions
- Important Safety Instructions
- Contents
- GETTING STARTED
- CONNECTIONS
- SETTINGS
- MEDIA PLAY
- APPENDIX
- Before using the User Manual
- Disc types your player cannot play
- Region Code
- Supported File Formats
- Notes on the USB connection
- - Limitations
- - Video decoder
- - Audio decoder
- AVCHD (Advanced Video Codec High Definition)
- Accessories
- ! CAUTION
- Connecting to a TV
- Connecting to an Audio System
- Method 1 Connecting to an HDMI compatible AV receiver
- Method 2 Connecting to an AV receiver with a Digital Coaxial Cable
- Connecting to a Network Router
- The Setup Procedure
- Accessing the Settings Menu
- Picture Settings
- TV Aspect Ratio
- BD Wise (Samsung TVs only)
- Resolution
- Resolution according to the output mode
- Movie Frame (24Fs)
- HDMI Color Format
- HDMI Deep Color
- Progressive Mode
- Sound Settings
- Digital Output
- PCM Downsampling
- Dynamic Range Control
- Downmixing Mode
- Network Settings
- Wired Network Settings
- Manual Network Setup
- To enter the Network Settings into your player, follow these steps:
- Network Test
- Network Status
- Device Name
- BD-Live Internet Connection
- Using BD-LIVE™
- The DLNA Function
- System Settings
- Setup
- Quick Start
- Anynet+ (HDMI-CEC)
- BD Data Management
- Language Settings
- Security Settings
- BD Parental Rating
- DVD Parental Rating
- Change PIN
- If you forget your password
- General Settings
- Time Zone
- Support Settings
- Software Upgrade
- By Online
- By USB
- Auto Upgrade Notification
- Contact Samsung
- Terms of Service Agreement
- Reset
- Playing a Commercially Recorded Disc
- Playing Files on a USB Device
- Method 1
- Method 2
- Playing a Disc with User Recorded Content
- Using DLNA
- Controlling Video Playback
- Buttons on the Remote Control used for Video Playback
- Playback related buttons
- Using the disc menu, title menu, popup menu, and title list
- Controlling Music Playback
- Buttons on the Remote Control used for Music Playback
- Repeat an Audio CD (CD-DA)/MP3
- Playlist
- Ripping
- Disc Copy to USB
- Playing Photo Contents
- Using the Tools Menu
- Troubleshooting
- Repairs
- Compliance and Compatibility Notice
- Copy Protection
- Network Service disclaimer
- License
- SAMSUNG
- LIMITED WARRANTY TO ORIGINAL PURCHASER
- EXCLUSIONS (WHAT IS NOT COVERED)
- REMARQUE
- Pines 2000 - 5000
- The most popular
- The least popular
Brand : SAMSUNG
Model : BD-J5100
Category : Blu-ray player