
CK26 - Alarm Clock Sunstech - Free user manual and instructions
Find the device manual for free CK26 Sunstech in PDF.


| Product Type | Digital alarm clock radio |
| Brand | Sunstech |
| Model | CK26 |
| Dimensions | 13.9 x 8.1 x 4.7 cm |
| Power Supply | 3 AAA 1.5 V batteries (not included) |
| Display | Backlit LED |
| Clock Functions | 12/24 h format, calendar (day, month, date, working days) |
| Alarm Functions | Single alarm and working days mode (Mon-Fri) |
| Settings | Hour, minute, date, month, year |
| Backlight | Activation by 10-second press on the top button |
| Warranty | 2 years |
| Manufacturer | AFEX SUNS, S.A., Barcelona, Spain |
| Care | Clean with a soft, dry cloth; do not immerse or use abrasive products |
| Safety | Do not expose to water, dust, temperatures >40°C, or disassemble the device |
| Environmental Information | WEEE compliant; recycle separately from household waste |
| Country of Manufacture | China |
Frequently Asked Questions - CK26 Sunstech
User questions about CK26 Sunstech
0 question about this device. Answer the ones you know or ask your own.
Ask a new question about this device
Download the instructions for your Alarm Clock in PDF format for free! Find your manual CK26 - Sunstech and take your electronic device back in hand. On this page are published all the documents necessary for the use of your device. CK26 by Sunstech.
USER MANUAL CK26 Sunstech
Instruction manual of Digital Alarm Clock


safety precaution

- DO NOT place objects on top of the device, as objects may scratch the device.

- DO NOT expose the device to dirty or dusty environments.

- DO NOT place the device on an uneven or unstable surface.

- DO NOT insert any foreign objects into the device.

- DO NOT expose the device to strong magnetic or electrical field.

- DO NOT expose the device to direct sunlight as it can damage the device. Keep it away from heat sources.

- DO NOT store your device in temperatures higher than 40°C(104°F). The internal operating temperature for this device is from 20°C(68°F) to 60°C(140°F).

- DO NOT use the device in the rain.

- Please check with your Local Authority or retailer for proper disposal of electronic products.

- The device and adaptor may product some heat during normal operation of charging. To prevent discomfort or injury from heat exposure, DO NOT leave the device on your lap.
- POWER INPUT RATING: Refer to the rating label on the device and be sure that the power adaptor complies with the rating. Only use accessories specified by the manufacturer.

- Clean the device with a soft cloth. If needed, dampen the cloth slightly before cleaning. Never use abrasives or cleaning solutions.

- Always power off the device to install or remove external devices that do not support hot-plug.
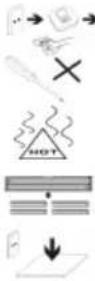
- Disconnect the device from an electrical outlet and power off before cleaning the device.
- DO NOT disassemble the device. Only a certified service technician should perform repair.
- The device has apertures to disperse heat. DO NOT block the device ventilation, the device may become hot and malfunction as a result.
- Risk of explosion if battery replaced by an incorrect type. Dispose of used batteries according to the instruction.
- PLUGGABLE EQUIPMENT: the socket-outlet shall be installed near the equipment and shall be easily accessible.
INTRODUCTION
Congratulations on your purchase of the CK26 Digital Alarm Clock.
Features of model CK26 include:
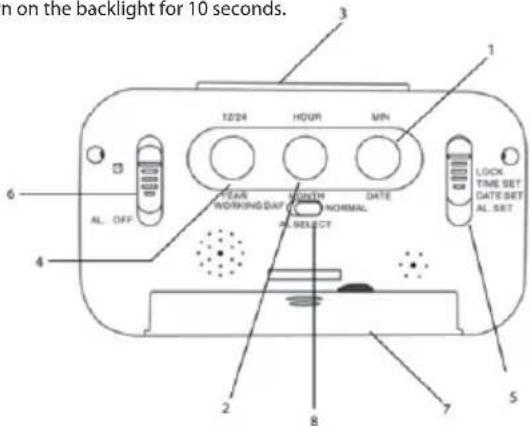
- LED Backlight for night viewing, -Press to turn on the backlight for 10 seconds.
-
Alarms (Single and weekday Alarm)
-
Minute/Date setting button
- Hour/Month setting button
3.Light-up button
4.Year/12 hour/24 hour setting button
5.Function selection toggle switch - Alarm control toggle switch
7.Battery cover - Alarm day select button
MAIN FEATURE
A. CLOCK WINDOW
-Displays clock function
B. SET BUTTON (right button on back side)
-Press to toggle among the following displays:
Lock Mode > Time setting mode> Date setting mode> Alarm setting mode
-Slide the button enter in the clock setting mode.
C. ALARM Function
- Alarm toggle: Left button on back side.
-Press turn on Alarm toggle enter Alarm mode.
-Slide SET button into Alarm setting mode when the respective alarm mode is in display, then the alarm mode will blink, press hour button to reach the desired hour, press minute button to reach the desired minute.
-Press hour setting button to reach the desired hour.
D. 12/24hr SYSTEM & YEAR BUTTON
set 12/24 hours system:
-Slide the SET button into Lock mode
-Press to switch 12/24 hr system. when 'AM' appears, it means 12hr.
press 12/24 & year button again, 'AM' will disappear, it means 24hr system.
-set year mode:
-Slide SET button into date set mode, the date setting mode will blink.
Press 12/24 hr & year button to reach the desired years.
E.HOUR & MONTH BUTTON
set hour:
- Slide SET button into time set mode, the time mode will blink. Press hour & month button to reach the desired hour. set month:
-Slide SET button into date set mode, the month mode will blink. Press hour & month button to reach the desired hour.
F. MINUTE * DATE BUTTON
set minute:
- Slide SET button into time set mode, the time mode will blink. Press minute & date button to reach the desired minute.
set date:
-Slide SET button into date set mode, the month mode will blink. Press minute & date button to reach the desired date.
G. WORKING DAY & NORMAL ALARM BUTTON
-Slide the working day & normal alarm button into switch the alarm function between working day mode and normal mode.
-Slide the button into 'working day' side, 'Monday-Friday' is shown on displays.
J. BATTERY COMPARTMENT
-Uses 3 "AAA" battery.
BATTERY INSTALLATION
Insert Three "AAA" Alkaline battery according to the polarity indicated in the battery compartment.
RESETTING THE UNIT
In case of malfunction or abnormal display, take out and re-install the batteries. All settings will be cleared and reset to their default values.
HOW TO USE THE LED BACKLIGHT
Press the top button to turn on the LED backlight for 10 seconds.
MAINTENANCE
When handled properly, this unit is engineered to give you years of satisfactory service. Here are a few product care instructions:
- Do not immerse the unit in water. If the unit comes in contact with water, dry it immediately with a soft lint-free cloth.
- Do not clean the unit with abrasive or corrosive materials. Abrasive cleaning agents may scratch the plastic parts and corrode the electronic circuit.
- Do not subject the unit to excessive: force, shock, dust, temperature, or humidity. Such treatment may result in malfunction, a shorter electronic life span, damaged batteries, or distorted parts.
- Do not tamper with the unit's internal components. Doing so will terminate the unit's warranty and may cause damage.
- Only use new batteries as specified in this instruction manual.
- Read this instruction manual thoroughly before operating the unit.
SPECIFICATIONS
Clock Functions
Calendar: Weekday /Month / Date
Clock Time: 12 / 24 hour format
Hour Offset: +/- 1 second
General Specification
Battery Type: 3 "AAA" size 1.5V battery
Unit Dimension: 13.9 cm x 8.1 cm x 4.7 Cm (L x W x T)
Unit Weight : 0.170 kg (without battery)
CAUTION
- The content of this manual is subject to change without further notice.
- Due to printing limitation, the displays shown in this manual may differ from the actual display.
Made in China
Warranty conditions
- The warranty of this product is for 2 years since the purchase date.
- The warranty will exclude breakdowns caused by bad use of the product, wrong installation or installation in not desirable places for a proper maintenance of the product, rips, updates of the products that are not the supplied by the brand, pieces wore away for its use or for not domestic or inappropriate use. Also are excluded breakdowns caused for manipulations of the products by people or companies alien to our company.
- For any request regarding the warranty terms, the purchase receipt must be attached.

Correct disposal of this Product
(Waste Electrical & Electronic Equipment(WEEE) Your product is designed and manufactured with high quality materials and components which can be recycled and reused. This symbol means that electrical and electronic equipment, at their end of-life should be disposed of separately from your household waste. Please dispose of this equipment at your local community waste collection /recycling centre. In the European Union there are separate collection systems for used electrical and electronic products. Please help us to conserve the environment we live in!
DECLARATION OF CONFORMITY
Council Directive(s) to which conformity is declared:
Directive (2004/108/EC) - EMC
Directive (2006/95/EC) - LVD
Directive (2011/65/EU) - RoHS
Application of the Standards:
EN 61000-3-2:2006+A1:2009+A2:2009
EN 61000-4-3:2006+A1:2008+A2:2010
EN 55022:2010 EN 55024:2010
EN 61000-3-3:2008 EN 61000-4-2:2009
EN 61000-4-4:2012 EN 61000-4-5:2006
EN 61000-4-6:2009 EN 61000-4-8:2010
EN 61000-4-11:2004 IEC 62321:2008
Manufacturer's name:
AFEX SUNS, S.A.
Manufacturer's address:
C/Pallars 189, 08005 Barcelona
Type of equipment:
DIGITAL ALARM CLOCK
Trade:
SUNSTECH
Model no.:
CK26
We, the undersigned, hereby declare under our sole responsibility that the specified equipment is in conformity with the above Directive(s) and Standard(s)
Place: Barcelona
(Signature)
Victor Planas Bas
(Full name)
Date: 23 - January - 2015
General Manager
(Position)
sunstech ^12
safety precaution
Directive (2004/108/EC) - EMC Directive (2006/95/EC) - LVD Directive (2011/65/EU) - RoHS
Director General (Cargo)

safety precaution

DÉCLARATION DE CONFORMITÉ
Directive (2004/108/EC) - EMC
Directive (2006/95/EC) - LVD
Directive (2011/65/EU) - RoHS

safety precaution

CARACTERÍSTICA PRINCIPAL
A. JANELA DO RELÓGIO
Directive (2004/108/EC) - EMC
Directive (2006/95/EC) - LVD
Directive (2011/65/EU) - RoHS

- safety precaution
- INTRODUCTION
- MAIN FEATURE
- HOW TO USE THE LED BACKLIGHT
- MAINTENANCE
- SPECIFICATIONS
- CAUTION
- Warranty conditions
- Correct disposal of this Product
- DECLARATION OF CONFORMITY
- sunstech 12
- Directive (2004/108/EC) - EMC Directive (2006/95/EC) - LVD Directive (2011/65/EU) - RoHS
- DÉCLARATION DE CONFORMITÉ
- CARACTERÍSTICA PRINCIPAL
Brand : Sunstech
Model : CK26
Category : Alarm Clock