
ICBIW-30 - Wine cellar Sub-Zero - Free user manual and instructions
Find the device manual for free ICBIW-30 Sub-Zero in PDF.


| Product Type | Built-in Wine Cellar |
| Brand | Sub-Zero |
| Model | ICBIW-30 |
| Bottle Capacity | 24 bottles (standard 75 cl) |
| Dimensions (H x W x D) | 87.6 cm x 60.6 cm x 59.7 cm |
| Net Weight | 68 kg |
| Power Supply | 115 V, 60 Hz, 2.8 A |
| Temperature Range | +5 °C to +18 °C |
| Temperature Zones | Single Zone |
| Humidity Control | Passive Humidity System |
| Interior Lighting | Dimmable LED |
| Ventilation | Low Vibration Fan |
| Door | Solid Door, Reversible (optional) |
| Exterior Finish | Brushed Stainless Steel, Customizable with Panel |
| Shelves | 4 sliding wooden shelves |
| Lock | Security Lock (key included) |
| Open Door Alarm | Yes, after 60 seconds |
| Charcoal Filter | Activated Charcoal Filter Included |
| Refrigerant Gas Type | R-600a |
| Climate Class | SN (10 °C to 32 °C) |
| Noise Level | 34 dB |
| Annual Consumption | Approximately 150 kWh/year |
| Manufacturer Warranty | 2 years parts and labor |
| Spare Parts Available | Yes, via Sub-Zero after-sales service |
| Repairability | Repairability index: 7.5/10 |
Frequently Asked Questions - ICBIW-30 Sub-Zero
User questions about ICBIW-30 Sub-Zero
0 question about this device. Answer the ones you know or ask your own.
Ask a new question about this device
Download the instructions for your Wine cellar in PDF format for free! Find your manual ICBIW-30 - Sub-Zero and take your electronic device back in hand. On this page are published all the documents necessary for the use of your device. ICBIW-30 by Sub-Zero.
USER MANUAL ICBIW-30 Sub-Zero
GUIDA ALL'USO E ALLA MANUTENZIONE
3 Integrated Features
3 Interactive Controls
4 Storage
6 Operation
7 Care Recommendations
7 Troubleshooting
a Sub-Zero Warranty
Customer Care
The model and serial number are listed on the product rating plate. Refer to page 3 for rating plate location. For warranty purposes, you will also need the date of installation and name of your authorized Sub-Zero dealer. Record this information below for future reference.
SERVICE INFORMATION
| Model Number |
| Serial Number |
| Date of Installation |
| Certified Service Name |
| Certified Service Number |
| Authorized Dealer |
| Dealer Number |
Important Note
To ensure this product is installed and operated as safely and efficiently as possible, take note of the following types of highlighted information throughout this guide:
IMPORTANT NOTE highlights information that is especially important.
CAUTION indicates a situation where minor injury or product damage may occur if instructions are not followed.
WARNING states a hazard that may cause serious injury or death if precautions are not followed.
Integrated Features
| FEATURE | PG | |
| 1 | Product Rating Plate | 2 |
| 2 | Interactive Control Panel | 3 |
| 3 | Freshness Cards | 4 |
| 4 | Door Shelves | 4 |
| 5 | Dairy Compartment | 4 |
| 6 | Glass Shelves | 4 |
| 7 | Refrigerator Drawers | 4 |
| 8 | Ice Container | 5 |
| 9 | Storage Drawers | 5 |
| 10 | Air Purification System | 6 |
| 11 | Automatic Ice Maker | 6 |
| 12 | Water Dispenser (dispenser models) | 6 |
| 13 | Condenser (behind grille) | 7 |
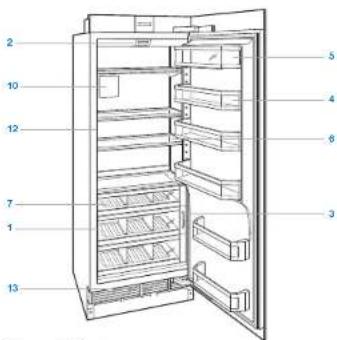
Column all refrigerator.
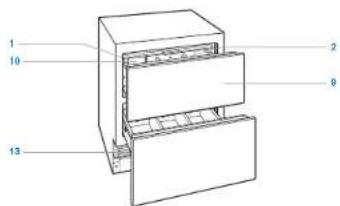
Drawer all refrigerator.

Tall combination.
Interactive Control Panel
For initial start up, touch and hold on the control panel for 2 seconds.
Temperature can be adjusted in one-degree increments on the home screen. Combination units have separate temperature controls for refrigerator and freezer. Temperatures are preset at 3°C and -18°C. To change temperature, touch the temperature being adjusted, then press ‘+’ or ‘-’ until desired temperature is displayed. Refer to the illustration below.
Once temperature has been adjusted, additional features can be activated or deactivated from the options screen. Touch ▶ to view the options screen. Refer to the illustration below.
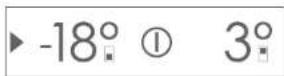
Home screen.
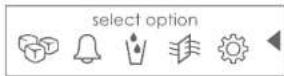
Options screen.
| OPTIONS SCREEN | PG | |
| Touch to activate or deactivate ice maker system and max ice feature. | 6 | |
| Touch to activate or deactivate door/drawer alarm. | 3 | |
| Touch to activate or deactivate water dispenser. | 6 | |
| Touch to activate or deactivate air purification system. | 6 | |
| Touch to view settings screen. | 3 | |
| SETTINGS SCREEN | |
| Touch to view model information. | |
| Touch to select temperature unit, Fahrenheit or Celsius. | |
| Touch to adjust control panel brightness and contrast. | |
| Touch to adjust door/drawer alarm volume and pitch. | |
| Touch to adjust door/drawer alarm duration. | |
| Touch to enter Sabbath mode. | |
| Touch to view troubleshooting and service information. | |
| Touch to set clock. | |
| Touch to select smart home options. | |
| Touch to select language options. | |
| Touch to adjust soft on lighting. | |
STORAGE
Keeping Food At Its Best
This Sub-Zero features a unique dual refrigeration system to keep food fresher longer.
With the Sub-Zero dual refrigeration system, individual refrigerator and freezer systems have been designed to maintain accurate, consistent temperatures and proper humidity levels for longer food life expectancy. Dual refrigeration eliminates transfer of fresh food odors to frozen food and ice and does not freeze the moisture out of the air in the fresh food section.
For handy tips and information on how to maximize food freshness, refer to the freshness cards stored in the refrigerator.
Refrigerator Storage
DOOR SHELVES
To remove a door shelf or the dairy compartment, lift from the bottom and slide out. To reinstall, place in the desired position and slide the shelf down onto the guides. Refer to the illustration below.
IMPORTANT NOTE: If door opening is limited to 90°, door shelves may need to be removed before removing a storage drawer or glass shelf.

Door shelf removal.
GLASS SHELVES
To remove or adjust a glass shelf, tilt up, then lift up and out. To reposition, insert shelf in the tracks along the back wall, then lower the front until it locks into position. Refer to the illustration below.
The stationary glass shelf at the bottom of the compartment should be placed with beveled edge facing front. Hear support legs space the shelf away from the back wall to ensure proper air flow through the unit.
IMPORTANT NOTE: Use care when handling glass shelves to prevent breakage or scratching the interior,
CAUTION
Glass shelves should warm to room temperature before immersing in warm water.

Glass shelf removal.
REFRIGERATOR DRAWERS
To remove a refrigerator drawer, pull open until the drawer stops. Lift the front of the drawer slightly and pull straight out. To reinstall, pull drawer carrier out and align the bottom of the drawer with the carrier. Refer to the illustration below. Dividers in refrigerator drawers can be removed by pulling straight up. To replace, align tabs on the divider with notches in the drawer and push down.
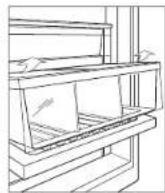
Refrigerator drawer removal.
STORAGE
Freezer Storage
FREEZER BASKETS
To remove, pull forward until basket stops. Pull the two plastic tabs located behind the bottom two corners of the basket forward, then lift up and out. Refer to the illustration below. To reinstall, push drawer slides in. Align the basket with slides and push back until it stops. Press down on the front of the basket to engage slides. Refer to the illustration below.
If door opening is limited to 90°, the top basket must be removed before removing the middle or lower basket.

Freezer basket removal.
ICE CONTAINER
Column | To remove ice container, pull freezer drawer open until it stops and lift container out. To reinstall, pull drawer carrier out and align the bottom of the container with the carrier. Refer to the illustration below.
Tall and drawer | To remove ice container, pull freezer drawer open until it stops and lift container out. To reinstall, place in the drawer with tabs on the bottom of the container aligned with slots in the drawer. Refer to the illustration below.
The ice maker must be turned off by touching 📋 when the ice storage container is removed. The unit is equipped with a 3-minute delay after the ice container is removed, to ensure cubes are not ejected before ice maker can be deactivated or ice container is reinstalled.
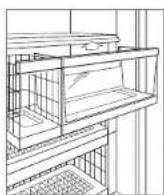
Column ice container.
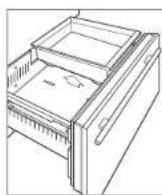
Tall and drawer ice container.
Storage Drawers
CRISPER COVER
The crisper cover in the upper storage drawer can be slid closed or left open.
To remove, pull the upper drawer all the way out, raise the front edge of the crisper cover and pull it forward out of the drawer. Refer to the illustration below.
DRAWER DIVIDERS
To remove or adjust a short divider, flex the long divider slightly, then pull upward. Refer to the illustration below.
To remove a long divider, the short dividers must be removed. Pull divider up until it stops, rotate counterclockwise, then pull upward. To reinstall, align grooves with drawer tabs, rotate clockwise, then slide down.
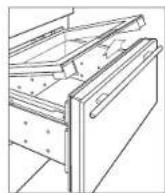
Crisper cover.

Drawer dividers.
DRAWER REMOVAL
To remove, pull open until drawer stops. Raise the drawer front and pull out drawer. To reinstall, raise the front of drawer and place onto the slides. Align the back of the drawer with hooks on the slide, then align the white pegs at the front of the slide with holes at the front of the drawer. Refer to the illustration below.
IMPORTANT NOTE: For drawer models, the upper drawer has a control cable that must be disconnected before removing the drawer. Refer to the illustration below.

Drawer removal.
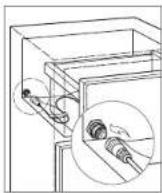
Control cable (drawers).
OPERATION
Air Purification System
The advanced air purification system of Sub-Zero Integrated models reduces bacteria, odors and ethylene gas, which causes premature ripening in fruits and vegetables. If your unit is equipped with an air purification system, the cartridge has been factory installed and is located on the back wall of the refrigerator (back of upper drawer for drawer models).
To initiate air purification, touch on the options screen. The cartridge will last approximately one year. 'Change Air Purifier' will appear on the control panel when the cartridge needs to be replaced. Touch 'Snooze' to delay reminder for 24 hours or until cartridge can be replaced.

AIR PURIFIER LAMP CONTAINS MERCURY
Manage in accordance with disposal laws. In the U.S. visit earth911.com or call 800-222-7820.
AIR PURIFICATION CARTRIDGE REPLACEMENT
To access the air purification cartridge, grasp the outside cover from the bottom and rotate upward (top and rotate downward for drawers). Refer to the illustrations below.
2 Grasp the black cover from the top and rotate down-ward. The cartridge will pop out and can be removed.
3 Remove the new cartridge from packaging and insert with connector pointing downward.
4 Once in position, close the black cover. Then rotate the outside cover downward (upward for drawers).
5 Once the cartridge has been replaced, follow instructions on the control panel. The cartridge life cycle will reset for approximately one year.

Air purification cartridge (column and tall).
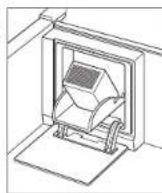
Air purification cartridge (drawers).
Ice Maker Operation
To initiate ice production, touch the indicator on the options screen. A single highlighted cube indicates the ice maker is active. Three highlighted cubes indicate the max ice feature is active. Max ice increases ice production up to 30% for a 24-hour period. During that period, some components may run at a higher speed resulting in a unique audible tone. This is typical and will revert back after 24 hours or when the ice container is full. To deactivate the ice maker, touch until no cubes are highlighted. After initial start-up, discard the first few batches of ice. The ice may contain impurities from new plumbing connections.
If ice is not used regularly it may fuse together. To avoid, discard ice and allow ice maker to replenish.
The ice maker must be turned off by touching ⬤ when the ice storage container is removed. The unit is equipped with a 3-minute delay after the ice container has been removed, to ensure cubes are not ejected before the ice maker can be deactivated or ice container is reinstalled.
Sabbath
This appliance is certified by Star-K to meet strict religious regulations in conjunction with specific instructions found on www.star-k.org.
For Sabbath mode, from the settings screen, touch ☆ and follow instructions on the control panel.
Water Dispenser
The water dispenser is located inside the refrigerator on the left wall. Press a glass against the dispenser to activate water flow. Water flow will stop when the glass is pulled away. Refer to the illustration below.
The chilled water reservoir tank holds approximately 1.2 L of filtered water. It may take several hours to chill the water to refrigerator temperature during the original fill and after a large amount of water is dispensed.
To fill the tank, press a glass against the dispenser until water begins to flow. A safety feature was incorporated into the dispenser to limit continuous water flow to 60 seconds. If water does not dispense within 60 seconds, remove the glass, then reapply to the dispenser until water begins to flow. Once the tank is full, discard the first few glasses of water. It may contain impurities from new plumbing connections.

Water dispenser.
CARE RECOMMENDATIONS
TROUBLESHOOTING
Cleaning
INTERIOR CLEANING
To clean interior surfaces and all removable parts, wash with a mild solution of soap, water and baking soda. Rinse and dry thoroughly. Avoid getting water on lights and control panel.
CAUTION
Do not use vinegar, rubbing alcohol or other alcohol-based cleaners on any interior surface.
STAINLESS STEEL EXTERIOR
Use a nonabrasive stainless steel cleaner and apply with a soft lint-free cloth. To bring out the natural luster, lightly wipe surface with a water-dampened microfiber cloth followed by a dry polishing chamois. Always follow the grain of stainless steel.
CONDENSER CLEANING
CAUTION
Before cleaning the condenser, turn power off at the control panel. Wear gloves to avoid injury from sharp condenser fins.
The condenser is located behind the grille. Remove the kickplate by extracting the two mounting screws. Refer to the illustration below. Use a soft bristle brush and vacuum to remove dust and lint from the condenser. Clean the condenser every three to six months.
IMPORTANT NOTE: To avoid damaging condenser fins, vacuum in the direction of the fins.
CAUTION
Failure to clean the condenser could result in temperature loss, mechanical failure or damage.
VACATIONS
For extended vacations, turn power off at the control panel. Empty the unit and block doors open slightly to let fresh air in and keep interior dry.

Condenser location.
Troubleshooting
UNIT OPERATION
No lights or cooling.
- Verify power is on.
- Verify electrical power to unit and home circuit breaker is on.
No lights in refrigerator or freezer.
- Door/drawer may have been left ajar which has disabled lights to eliminate excess heat. If lights are out, close door/drawer for one hour. If lights are still out, contact Sub-Zero factory certified service.
- LED Interior lighting must be replaced by Sub-Zero factory certified service.
Frost, condensation or ice build up inside unit.
- Verify condenser is clean.
- Verify door/drawer is closing properly.
- Verify door/drawer has not been left ajar.
- Verify door/drawer gasket does not have rips or tears. If it does, contact Sub-Zero factory certified service.
If icing is heavy, turn unit off and use a hair dryer to melt ice. Hair dryer should be set on low and kept moving at all times. Once ice has melted, wipe up water with a cloth or paper towel.
High temperatures, unit runs excessively or unit giving off too much heat.
- Verify condenser is clean.
- Verify door/drawer is closing properly.
- Verify door/drawer has not been left ajar.
- Increased ambient temperatures may cause compressors to run longer.
- If temperature display shows 3° and -18°, but is not cooling, unit may be in showroom mode. Contact your authorized Sub-Zero dealer.
No water from dispenser.
- Wait one hour, then try dispenser again. Contact contact your authorized Sub-Zero dealer if unresolved.
TROUBLESHOOTING
Troubleshooting
ICE PRODUCTION
No ice.
- Verify ice cube indicator appears in control panel display.
- Verify ice maker has been on for at least 24 hours.
- Verify freezer temperature near -18°C.
- Verify ice container is properly installed.
- Verify ice maker arm in down position.
- Verify water is being supplied to unit.
Blue or green ice.
- Possible copper supply line corrosion. Contact plumber to clean or replace.
Black flecks in cubes. - Stop use and contact Sub-Zero factory certified service.
Bad taste. - Defrost freezer and clean with soap and water.
- Place coffee grounds or charcoal briquettes in freezer to absorb odor.
Hollow cubes.
- Clean condenser. Contact Sub-Zero factory certified service if unresolved.
ODOR
- Unit should be cleaned before using for the first time. This will clear any odors that may have been trapped during shipping.
- Replace air purification cartridge.
- Clean unit and shelving thoroughly.
- Uncovered food could create odor which may require cleaning.
SERVICE
- Maintain the quality built into your product by contacting Sub-Zero factory certified service.
- When contacting service, you will need the model and serial number of your unit. Both numbers are listed on the product rating plate. Refer to page 3 for rating plate location.
- For warranty purposes, you will also need the date of installation and name of your authorized Sub-Zero dealer. This information should be recorded on page 2.
Sub-Zero Products Limited Warranty
INTERNATIONAL PRODUCTS
FULL TWO YEAR WARRANTY
For two years from the date of original installation, your Sub-Zero product warranty covers all parts and labor to repair or replace, under normal residential use, any part of the product that proves to be defective in materials or workmanship. All service provided by Sub-Zero under the above warranty must be performed by Sub-Zero factory certified service, unless otherwise specified by Sub-Zero, Inc. Service will be provided during normal business hours.
FULL FIVE YEAR SEALED SYSTEM WARRANTY
For five years from the date of original installation, your Sub-Zero product warranty covers all parts and isoor to repair or replace, under normal residential use, the compressor, condenser, evaporator, drier and all connecting tubing that prove to be defective in materials or workmanship. All service provided by Sub-Zero under the above warranty must be performed by Sub-Zero factory certified service, unless otherwise specified by Sub-Zero, Inc. Service will be provided during normal business hours.
SUBZERO
Sub-Zero, Sub-Zero & Design, Dual Reignington, Gonzans Care, The Living Kitchen, Great American Küche, The Fine Art of Kitchen Design, and Ingredients as registered trademarks and service marks of Sub-Zero, Inc. Wolf, Wolf & Design, Wolf Gourmet, W/S Design and the coordinated application laws are registered trademarks and service marks of Rock Aolience, Inc. (collectively, the "Company Markets"), all other trademarks or registered trademarks are properly of their respective owners in the United States and other countries.
Combi allo.
Panel de control interactivo
PRODUITS INTERNATIONAUX
À USAGE MÊNAGER UNIQUEMENT
GARANTIE TOTALE DE DEUX ANS
Hohe Kombination

- Customer Care
- Important Note
- Interactive Control Panel
- Keeping Food At Its Best
- Refrigerator Storage
- DOOR SHELVES
- GLASS SHELVES
- REFRIGERATOR DRAWERS
- Freezer Storage
- FREEZER BASKETS
- ICE CONTAINER
- Storage Drawers
- CRISPER COVER
- DRAWER DIVIDERS
- DRAWER REMOVAL
- Air Purification System
- AIR PURIFIER LAMP CONTAINS MERCURY
- AIR PURIFICATION CARTRIDGE REPLACEMENT
- Ice Maker Operation
- Sabbath
- Water Dispenser
- Cleaning
- INTERIOR CLEANING
- CAUTION
- STAINLESS STEEL EXTERIOR
- CONDENSER CLEANING
- VACATIONS
- Troubleshooting
- UNIT OPERATION
- ICE PRODUCTION
- ODOR
- SERVICE
- Sub-Zero Products Limited Warranty
- INTERNATIONAL PRODUCTS
- FULL TWO YEAR WARRANTY
- FULL FIVE YEAR SEALED SYSTEM WARRANTY
- Panel de control interactivo
- PRODUITS INTERNATIONAUX
- GARANTIE TOTALE DE DEUX ANS
Brand : Sub-Zero
Model : ICBIW-30
Category : Wine cellar