
Omnia 2 - E-reader Icarus - Free user manual and instructions
Find the device manual for free Omnia 2 Icarus in PDF.


| Product Type | LCD E-reader |
| Display | 7-inch TFT-LCD, 800x480 pixels, 250 cd/m² |
| Storage | 32GB internal; microSD up to 16GB (FAT/NTFS) |
| Supported Ebook Formats | EPUB, PDF, TXT, FB2, PDB, HTML |
| Supported Audio Formats | MP3, WMA, AAC, WAV, OGG |
| Supported Video Formats | MPEG-1/2/4, XviD, DivX, H.263/264, RM/RMVB, MKV, MOV, VOB, FLV, WMV (up to 720p) |
| Photo Formats | JPEG, BMP, GIF |
| Connectivity | USB 2.0 High Speed, 3.5mm audio jack, micro USB power |
| Battery Life | Reading up to 8h; Music up to 40h; Video up to 7h |
| Charging | DC 5V, 1.2A; full charge approx. 6 hours |
| Dimensions | 187.4 x 128.5 x 11.8 mm |
| Weight | 280 g |
| DRM Support | Adobe DRM via Adobe Digital Editions |
| Sensors | G-sensor for auto screen rotation |
| Cleaning Instructions | Clean screen with soft cloth; avoid abrasives |
| Safety Precautions | Avoid extreme temperatures, moisture, direct sunlight; keep volume moderate |
| Spare Parts Availability | microSD card user-replaceable; battery replacement via authorized dealer |
| Warranty | Consult authorized dealer; faulty service may void warranty |
Frequently Asked Questions - Omnia 2 Icarus
User questions about Omnia 2 Icarus
0 question about this device. Answer the ones you know or ask your own.
Ask a new question about this device
Download the instructions for your E-reader in PDF format for free! Find your manual Omnia 2 - Icarus and take your electronic device back in hand. On this page are published all the documents necessary for the use of your device. Omnia 2 by Icarus.
USER MANUAL Omnia 2 Icarus
ICARUS Omnia (G2) (M701BK)
User Manual
Table of contents
Disclaimer 5
Introduction 5
Inside the box
Parts and controls
Turning on/and off
Charging
Inserting a memory card
The Home menu
Importing and transferring content 12
Importing content
Importing DRM content
Authorization
Transferring DRM ebooks
Reading books 15
Opening books
Book page interface
Turning a page
Adjusting font size
Zooming in/out
Using the Option menu while reading
Adding bookmarks
Deleting bookmarks
Opening bookmarks in the Home menu
Opening bookmarks in the current book
Go to page
Auto flip
Book information
Screen rotation
Display settings
Add to favorites
Playing music 22
Music player
Playing video 24
Using the Option menu during video playback
Viewing pictures 26
Zooming in/out
Slideshow
Thumbnail view
File explorer 27
Copy-paste files
Deleting files
Settings 28
Time and date
Standby
Format memory
About product
Power management
Restore factory defaults
Language
Screen rotation
Manual
Troubleshooting 30
Precaution and maintenance 31
Technical specifications 33
Disclaimer
All the information, design and specifications contained in this manual were correct at the time of publication. However, as the product is under development and upgrading, the final device may have a slightly difference in appearance or modified functionality than presented in this manual.
Introduction
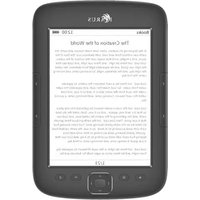
The ICARUS Omnia is an ebook reader with full color display screen. It supports many ebook formats, including content encrypted with Adobe DRM. The Omnia is more than an e-reader though! You can also use it to listen to music, view your pictures or watch movies.
Inside the box
- ICARUS Omnia M701BK LCD e-reader
- USB cable
- Quick start guide
Parts and Controls
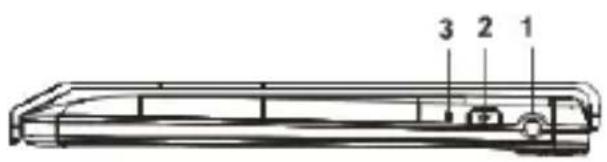


1 Headphone jack – to insert head/earphones
2 Power button - press and hold for 3 second to turn on/off, press and hold 6 seconds to reset
3 LED indicator – shows charging status
4 Menu button – to open the pop-up menu
5 Zoom button – press to adjust font size or to zoom in/out
6 Play/pause button – to start/pause playback
7 Back buttons – to go back one menu / step
8 Previous page button – to go the previous page
9 Joystick / navigation keys – to navigate the menus
10 Next page button – to go to the next page
11 Micro USB port – to connect to a computer/charger
12 Micro SD card slot – insert micro SD memory cards here for additional storage space
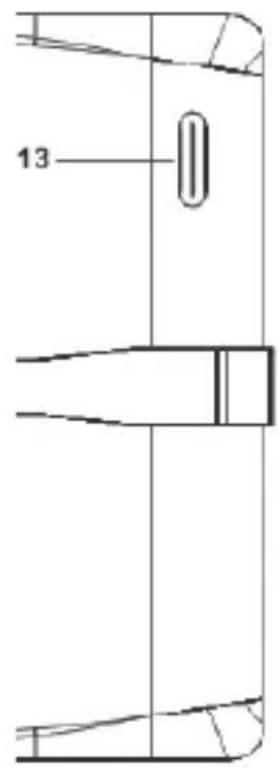
13 Speaker – do not block this area during music playing
Turning on and off
Press and hold the [Power] button for 3 seconds to turn on the Omnia.
- It may take a few moments for the Omnia to turn on and loading the content.
- If the Omnia does not turn on, charging is required.
- To turn off the Omnia, press and hold [Power] button for 3 seconds.
Charging
You need to charge the the Omnia prior to using it for the first time or when battery power is low.
- Charge the Omnia using the USB cable by connecting it to a computer or the optional ICARUS AC USB charger.
- Please turn the Omnia to standby mode to shorten the charging process.
- It will take about 6 hours to fully charger the Omnia in standby mode (LCD off)
- When the Omnia is charging, it will enter into standby mode after remains idle for 60 s. Press the [Power] button to wake up the Omnia.
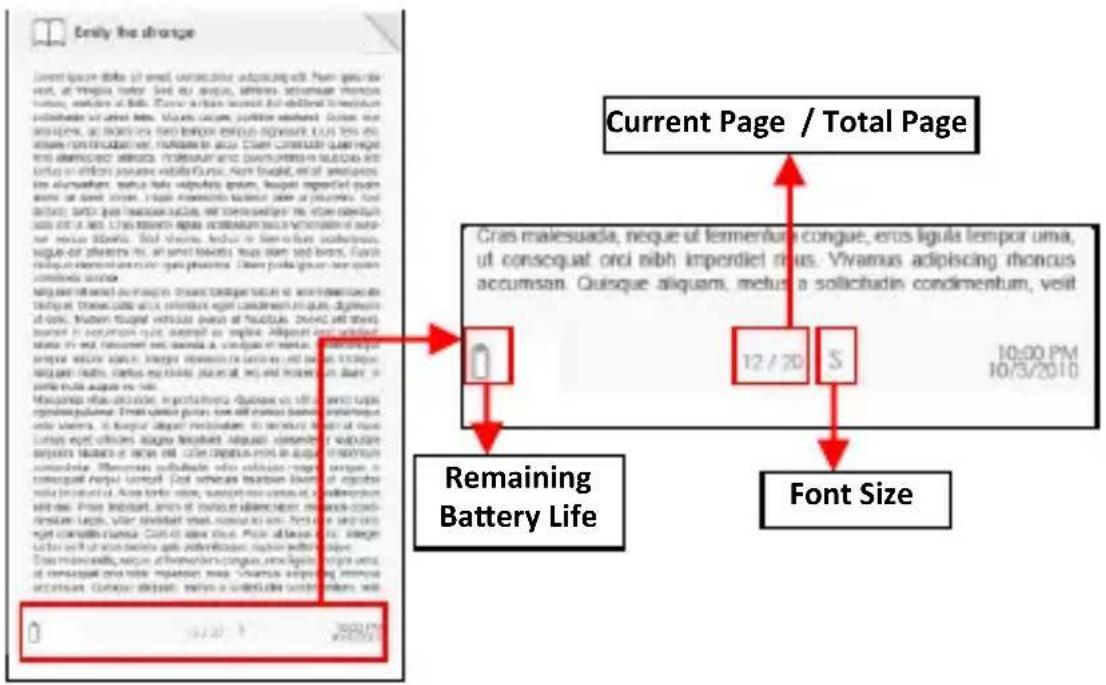
- The battery status is displayed at the bottom left corner.

flowchart
graph LR
    A["Battery Full"] --> B["Battery Low"]
    B --> C["Battery Low"]
    C --> D["Battery Low"]
    D --> E["Battery Low"]
    E --> F["Battery Low"]
    F --> G["Battery Low"]
    G --> H["Battery Low"]
    H --> I["Battery Low"]
    I --> J["Battery Low"]
    J --> K["Battery Low"]
    K --> L["Battery Low"]
    L --> M["Battery Low"]
    M --> N["Battery Low"]
    N --> O["Battery Low"]
    O --> P["Battery Low"]
    P --> Q["Battery Low"]
    Q --> R["Battery Low"]
    R --> S["Battery Low"]
    S --> T["Battery Low"]
    T --> U["Battery Low"]
    U --> V["Battery Low"]
    V --> W["Battery Low"]
    W --> X["Battery Low"]
    X --> Y["Battery Low"]
    Y --> Z["Battery Low"]
    Z --> AA["Battery Low"]
    AA --> AB["Battery Low"]
    AB --> AC["Battery Low"]
    AC --> AD["Battery Low"]
    AD --> AE["Battery Low"]
    AE --> AF["Battery Low"]
    AF --> AG["Battery Low"]
    AG --> AH["Battery Low"]
    AH --> AI["Battery Low"]
    AI --> AJ["Battery Low"]
    AJ --> AK["Battery Low"]
    AK --> AL["Battery Low"]
    AL --> AM["Battery Low"]
    AM --> AN["Battery Low"]
    AN --> AO["Battery Low"]
    AO --> AP["Battery Low"]
    AP --> AQ["Battery Low"]
    AQ --> AR["Battery Low"]
    AR --> AS["Battery Low"]
    AS --> AT["Battery Low"]
    AT --> AU["Battery Low"]
    AU --> AV["Battery Low"]
    AV --> AW["Battery Low"]
    AW --> AX["Battery Low"]
    AX --> AY["Battery Low"]
    AY --> AZ["Battery Low"]
    AZ --> BA["Battery Low"]
    BA --> BB["Battery Low"]
    BB --> BC["Battery Low"]
    BC --> BD["Battery Low"]
    BD --> BE["Battery Low"]
    BE --> BF["Battery Low"]
    BF --> BG["Battery Low"]
    BG --> BH["Battery Low"]
    BH --> BI["Battery Low"]
    BI --> BJ["Battery Low"]
    BJ --> BK["Battery Low"]
    BK --> BL["Battery Low"]
    BL --> BM["Battery Low"]
    BM --> BN["Battery Low"]
    BN --> BO["Battery Low"]
    BO --> BP["Battery Low"]
    BP --> BQ["Battery Low"]
    BQ --> BR["Battery Low"]
    BR --> BS["Battery Low"]
    BS --> BT["Battery Low"]
    BT --> BU["Battery Low"]
    BU --> BV["Battery Low"]
    BV --> BW["Battery Low"]
    BW --> BX["Battery Low"]
    BX --> BY["Battery Low"]
    BY --> BZ["Battery Low"]
Inserting a Memory Card
The Omnia supports Micro SD cards in both FAT and NTFS file system. NTFS is needed to copy file with size larger than 4GB.
To insert a Memory card:
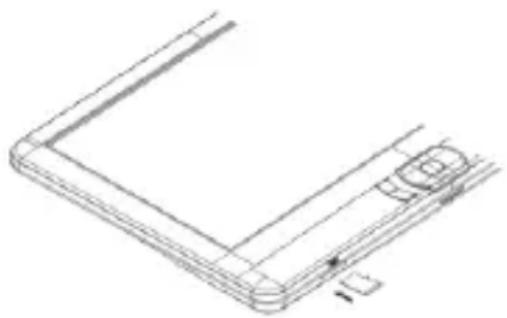
- Check that the micro SD card is in the correct position with the contact pin facing upwards as illustrated below. You may damage the card and the Omnia if the micro SD card is not inserted in correct position.
natural_image
Line drawing of a smartphone rear panel with a scroll wheel and a small button, no text or symbols present- Push the micro SD card into the card slot until it clicks.
- To remove the SD card, push the micro SD card once again until it clicks.
- When a micro SD card is inserted in or ejected from the Omnia, it may take few seconds for the Omnia to update the content.
- Please avoid inserting or ejecting an SD card when other operations are running as this may cause the system to hang.
- Do Not remove the card if the content inside the card is being played. This will halt the operation of the Omnia and cause the Omnia to restart.
- If the system is not responding, press and hold the
Limitations of the NTFS file system:
- Books in the card are not recognized by ADE when connected to PC.
- Direct copying of files from the internal memory to the memory card is not supported.
The Home menu
When the Omnia is turned on, you will enter into the Home Menu.

1. Continue Reading
-displays the page of the last read book. Press
2. Library
-displays the list of books available. Move the cursor to desired book and press
3. Battery Indicator
-displays battery status during operation
4. Page Number
-displays current page number and total available pages.
5. Time & Date
-display current time and date, you can set this from the [Settings]
6. File Directory
- indicates the location where the file is stored. SD – SD card, INT – internal memory
Press the directional key to move cursor to desired item. Selected item will be highlighted in dark.
Press
To exit from Option menu, move cursor to and press
Alternatively, press the
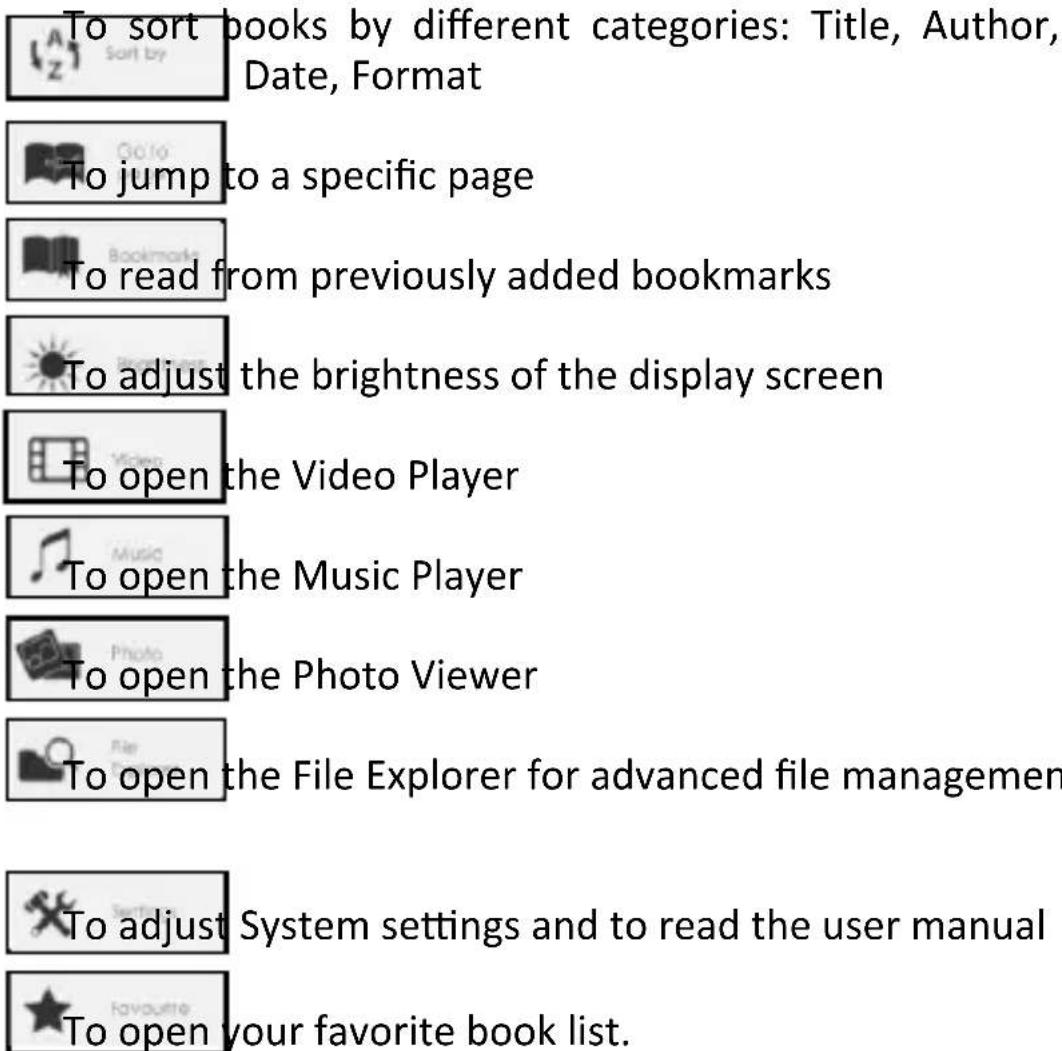
The other options available in the Option menu are:
Importing and transferring content
Importing Content
- The Omnia supports the USB Mass Storage Device function.
- To import contents (ebooks, video, audio, photo etc) into the Omnia, connect the Omnia to PC via the supplied USB cable.
- Upon successful connection to PC, the Omnia will enter USB mode and all operation will be halted.
- Go to [My Computer], double click on the Omnia's disk to open.
- Perform normal file management operation like other USB device.
Importing DRM Content
The Omnia supports Adobe DRM contents. Adobe Digital Editions (ADE) is required.
Installing Adobe Digital Editions (ADE)
- ADE is a free program by Adobe that is necessary for transferring DRM protected content from your computer to an e-reader
- You can download the installer from http://www.adobe.com/products/digitaleditions/#fp.
- For first time user, you will need to get a free adobe ID from adobe website. Click on the [get an Adobe ID online] link as illustrated:

- Enter your email address and complete the online form as per instructed.
Authorization
- Upon registration, return to the ADE window. Enter the username and password to activate your Adobe account.
- After activation, connect the Omnia to PC. ADE will detect the Omnia and you are prompted to authorize device.
- After authorization, you will be able to find the Omnia recognized in ADE as below. Contents inside the Omnia will be displayed on the right hand windows.

- You can now start downloading or buying ebooks from online Ebook stores supporting Adobe DRM.
- Purchased or downloaded ebooks will be stored in [My Digital Editions] in [My Documents].
Transferring DRM ebooks
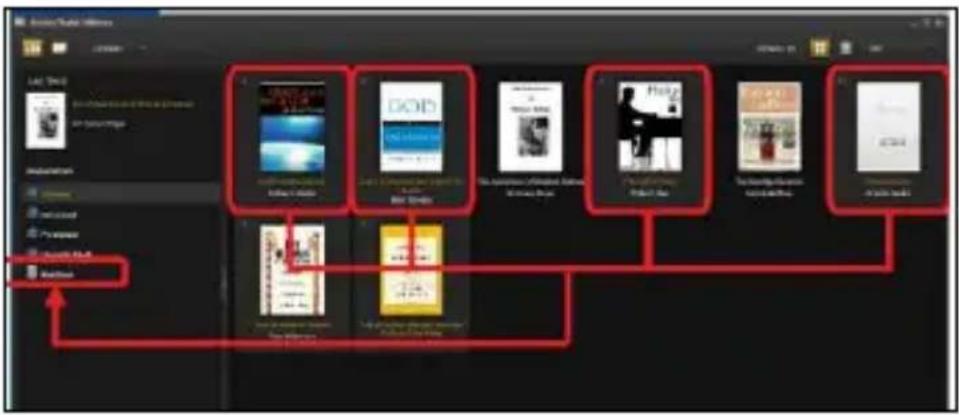
- From ADE menu, click on [All Items] on the left hand column
- Items in [My Digital Editions] will be listed down in right window.
- Select the desired item(s) to be transferred,
+ to select multiple files. - Drag and drop the selected item(s) into the Omnia's Drive located on the last row of the left side column as illustrated below.
Notes on using Adobe Digital Editions (ADE)
Each ADE ID supports only 6 devices, this includes the master device (the Omnia) and the slave device (SD card).
When the Omnia is restored to default settings, ALL DRM activation record and data (including DRM books purchased) will be erased from the Omnia. You are required to authorize the device with your ADE ID again.
When the number of authorized device has exceeded the allowable amount, you will come across the following error message:

To request for extension and reset of your ADE ID, go to http://www.adobe.com/support/digitaleditions/ → [Submit a web case]. You are required to key in your ADE ID info.
Reading books
Opening Books
• Books transferred to Omnia will be listed in Home Menu.
- Omnia supports ebooks in epub, pdf, and txt format.
- Use the
Book Page Interface
Turning a page
While reading a book, press the
Adjusting Font Size
- While reading, press the
menu.
- There a 5 font sizes available:
Small, Medium, Large, XLarge, XXLarge.
- Move the cursor to the desired font size then press
- It may take some time for the fonts to be resized.

Zooming In/Out
- You will need to use zooming function to enlarge images available in the ebook (epud & pdf file)
- From the size menu, select [Enlarge]
• The Zoom menu will appear.

- Move the cursor to the desired zoom level and press
- In zoom mode, use
• Page turning is disabled in zoom mode.
- Press
Using the Option Menu while Reading
While reading, press the

- ICARUS Omnia (G2) (M701BK)
- Table of contents
- File explorer 27
- Settings 28
- Troubleshooting 30
- Precaution and maintenance 31
- Technical specifications 33
- Disclaimer
- Introduction
- Inside the box
- Parts and Controls
- Turning on and off
- Charging
- Inserting a Memory Card
- To insert a Memory card:
- Limitations of the NTFS file system:
- The Home menu
- Continue Reading
- Library
- Battery Indicator
- Page Number
- Time & Date
- File Directory
- Importing and transferring content
- Importing Content
- Importing DRM Content
- Installing Adobe Digital Editions (ADE)
- Authorization
- Transferring DRM ebooks
- Notes on using Adobe Digital Editions (ADE)
- Reading books
- Opening Books
- Book Page Interface
- Turning a page
- Adjusting Font Size
- Zooming In/Out
- Using the Option Menu while Reading
- Adding a Bookmark
- Deleting a Bookmark
- Opening bookmarks in the Home Menu
- Opening a bookmark in the Current Book
- Go to Page
- Auto Flip
- Book Information
- Screen Rotation
- Display Settings
- Add to Favorite
- Playing music
- Music Player
- Playing video
- Using the Option Menu during Video Playback
- To Display Subtitles during Video Playback
- Viewing pictures
- Zoom In/Out Picture
- Slideshow
- Thumbnail view
- File explorer
- Copy / Paste files
- Deleting Files
- Settings
- Time & Date
- Device Standby
- Format Memory
- About Product
- Power Management
- Restore Factory Defaults
- Language
- User's Manual
- Troubleshooting
- The Omnia is not responding or can't be turned on.
- Battery Life seems short
- A Book cannot be read
- The Omnia cannot be operated during USB connection
- Precautions and maintenance
- On Battery
- On Operation
- On the Headphone
- On Cleaning and Maintenance
- On Micro SD memory cards
- Technical specifications
- Display
- Storage memory
- Media File Format supported
- Connectivity
- Miscellaneous
- Battery life
- Minimum system requirement (USB Mass Storage)
- Physical properties
- Copyrights and Trademark Notice
Brand : Icarus
Model : Omnia 2
Category : E-reader