eXceL E1050BK - E-reader Icarus - Free user manual and instructions
Find the device manual for free eXceL E1050BK Icarus in PDF.


| Product Type | E-reader |
| Brand | Icarus |
| Model | eXceL E1050BK |
| Display | 10.3-inch E Ink Carta, 1872 x 1404 pixels (227 PPI) |
| Touchscreen | Yes, capacitive touch with Wacom stylus support |
| Front Light | Adjustable warm and cool LED front light |
| Dimensions | 249 x 177 x 6.8 mm (9.8 x 7.0 x 0.27 in) |
| Weight | Approx. 380 g (13.4 oz) |
| Battery | Rechargeable lithium polymer, 2000 mAh |
| Charging | USB-C, 5V/2A |
| Storage | 32 GB internal (expandable via microSD up to 64 GB) |
| Connectivity | Wi-Fi 802.11 b/g/n, Bluetooth 5.0 |
| Supported Formats | PDF, EPUB, MOBI, TXT, HTML, RTF, FB2, DJVU, CBR, CBZ |
| Operating System | Android 10 (customized for e-reader) |
| Processor | Quad-core 1.8 GHz |
| RAM | 2 GB |
| Main Functions | Book reading, note-taking, annotation, dictionary, web browsing, app support |
| Maintenance | Clean with soft dry cloth; avoid exposure to moisture or direct sunlight |
| Safety | Do not disassemble; keep away from water; use only approved charger |
| Spare Parts and Repairability | Contact Icarus support or authorized service center; battery and screen replaceable by professionals |
| General Information | Color: Black; includes USB cable, stylus, quick start guide |
Frequently Asked Questions - eXceL E1050BK Icarus
User questions about eXceL E1050BK Icarus
0 question about this device. Answer the ones you know or ask your own.
Ask a new question about this device
Download the instructions for your E-reader in PDF format for free! Find your manual eXceL E1050BK - Icarus and take your electronic device back in hand. On this page are published all the documents necessary for the use of your device. eXceL E1050BK by Icarus.
USER MANUAL eXceL E1050BK Icarus
Contents of the box....6
Outline....7
Controls 9
Basic Operations.... 10
Reading Books.... 12
Internal Storage 18
Internal Storage Menu.... 19
Reading books.... 19
Memory Card 20
Reading history.... 22
Dictionary.... 23
Installing Dictionaries.... 24
Using the Dictionary.... 26
Pictures 27
Pictures Menu 28
Music.... 29
Play Interface 29
Scribbling 30
Notes.... 31
Webbrowser 32
Wi-Fi Configuration.... 32
Web Browser 33
Browser Menu.... 34
Applications.... 36
Settings.... 37
Technical Specifications 40
Connecting to a computer 40
Charging 40
Software Updates.... 41
Disclaimer 41
Preface
Thank you for purchasing the ICARUS eXcel. e-reader, the most advanced 9.7" E-Ink Pearl e-reader on the market!
The eXceL is powered by a 16-level grayscale e-ink screen that looks and feels like paper. Passive lighting and diffuse surface relax your eyes and reduce eye strain. With the hand-writing system, you can take notes while reading and sketch up ideas that happen to emerge. The eXceL takes full advantage of new-generation e-ink screens: extremely low power consumption. Each full charge can sustain a few weeks' reading. The eXceL comes with viewers for most popular ebook and image formats, including
PDF/HTML/DJVU/DJV/CHM/EPUP/TXT/FB2/RTF/DOC/DOCX/
XLS/XLSX/PPT/PPTX and MobiPocket (NON-DRM). All of our viewers have standard features such as layout management, font adjustment, full text search, zooming, and page re-flow. The ICARUS eXcel is the new reading experience.
Guidelines
For safe and efficient use of the product, please follow the instructions in this guide.
Do not leave the product in direct sunlight for long periods and do not use in extreme high or low temperature environments. This can cause damage to the product and may damage electronic components and/or the battery.
Do not put or use the eXcel. in areas of high humidity. Avoid any liquid getting into the product as this can damage the internal electronic circuit.
Copyright © 2011 ICARUS Reader. All rights reserved.
4/41
Always place the product on a stable surface. Violently shaking or dropping the product will cause damage to the product and its electronic components.
Do not press on the screen or put heavy weights on it.
Do not expose your product to magnetic fields.
Please use only original ICARUS ^™ accessories, do not use third party components or third party accessories.
Do not attempt to repair or take the product apart. This will void your warranty. Only qualified personnel from ICARUS or an authorized ICARUS maintenance centre can repair the product.
Do not use the rechargeable battery if it is damaged in any way.
If the battery leaks liquid, please clean the eXceL and replace the battery.
If liquid has leaked from the battery and comes in contact with human skin, please carefully rinse and consult a doctor.
Please properly dispose of old and waste batteries.
Do not use chemical solvent to clean the surface of the product. Please use a soft cloth to wipe off the dust from the surface of the screen of cover.
Product disposal instructions
Product that include the WEEE [The Waste of Electrical and Electronic Equipment] symbol, should not be placed in the normal household rubbish, but should be disposed by using the appropriate WEEE disposal facility. These facilities may be advised to you by your local council or the retailer from which the product was purchased.
Operating temperature is 0°C to 50°C | Storage temperature is -20°C to 70°C
The latest downloads and product news is available at our website:
www.icarusreader.com
Precautions
Avoid applying excessive force to the display. The device uses a glass-based display is thus liable to break if mistreated.
Never open the device as this will invalidate any warranty or manufacturer's responsibility. Please contact your ICARUS retailer when you have any technical difficulties.
Do NOT expose the device to excessive moisture, rain or heat sources caused by heating equipment.
Be aware that screen breakage as caused by the end-user is never covered by the ICARUS product warranty. Warranty on batteries is limited to a period of 6 months as of the moment of purchase.
Contents of the box
√ ICARUS eXceL E1050BK e-reader
√ USB Cable
√ Quick Start Guide
√ Warranty Card
Outline
Front View
Copyright © 2011 ICARUS Reader. All rights reserved.
Bottom and Side View

Copyright © 2011 ICARUS Reader. All rights reserved.
8/41
Controls
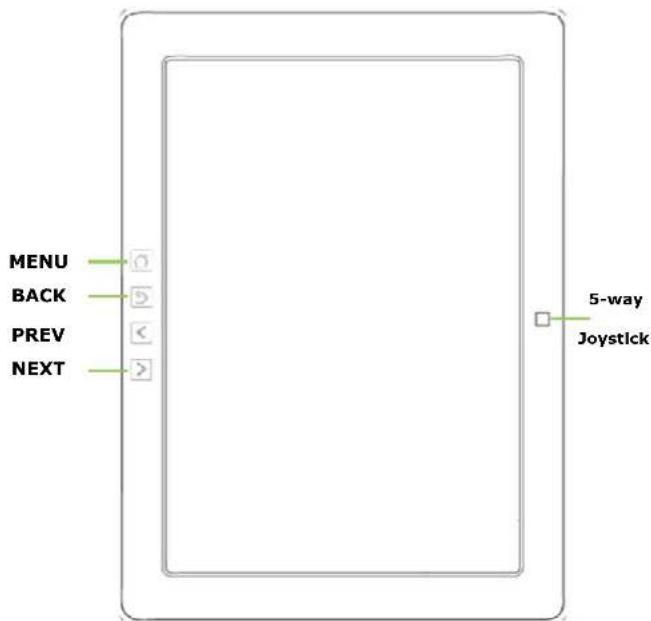
| Power On/Off button | Press the power key to turn the device onPress the power key and hold for 2 seconds to turn the device offPress the power key and release it immediately, to turn into sleep modePress the power key and release it immediately to wake the device from sleep mode |
| MENU button | Press the menu key to pop up the menuAlternatively the menu icon can be tapped w/the stylus |
| BACK button | Press to go back to the previous step or menuPress to exit the current viewPress to go back to the parent directory |
| NEXT button | Press to turn to next screen while viewing documentsPress to turn to next screen while browsing documents in the main view |
| PREV button | Press to go back to the previous screen while viewing documentPress to go back to the previous screen while browsing documents in the main view |
| 5-way Navigation Joystick | Move to navigate items on the current screen, e.g. navigate from Library to SD Card by moving joystick.Move to turn back or move forward / to flip the page of a document back or forthPress down the joystick to confirm, like the OK button. |
| Volume button | Press to increase the volume by pressing Vol+Press to decrease the volume by pressing Vol- |
| Headphone Jack | To insert headphones with 3.5mm diameter |
| SD Card Slot | To insert memory cards as expansion |
| Reset | To reset the device, insert a small pin into the hole, and then press the power button to reboot when the |
Copyright © 2011 ICARUS Reader. All rights reserved.
Basic Operations
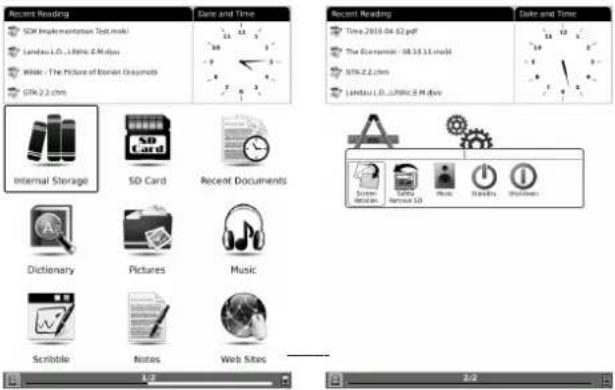
Press and hold the Power Button to turn on the device. It will automatically enter the main menu on Home screen after the start-up screen. The main menu includes Library, Reading history, Dictionary, Pictures, Music, Scribbling, Notes, Web Browser, Applications and Settings. Press the PREV/NEXT PAGE Buttons to turn pages. Move the 5-way Navigation Joystick to navigate to the desired Icon. Press down the 5-way Navigation Joystick to confirm the option. Press the Back Button to return the previous operations.
On the Home page, press the MENU Button to pop up the Desktop Menu. Press the Navigation Joystick to select the desired short cut icon (Screen Rotation, Safely Remove SD, Music, Standby and Shutdown) and to confirm.
Reading History
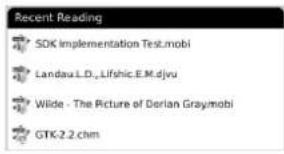
The 4 most recent files will be displayed on the Reading History widget. Press the Navigation Joystick to select the file and press down the joystick to confirm.

Date and Time
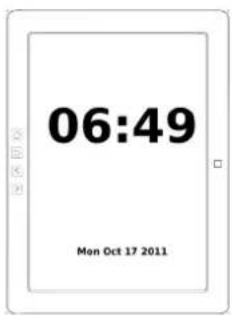
This widget display current time. Press the Navigation Joystick to select this widget and to confirm, time and date will be showed on the screen as a screen saver. Press the BACK Button to exit.
Reading Books
Press the Navigation Joystick to select the desired book and to start reading. Press the PREV/NEXT PAGE Button to turn pages. Press the BACK Button to exit reading. Press the MENU Button to popup the menu and choose an item to enter the submenu detailed as follows. The content of the submenu will be different according to the file format.
| A | Font | By RatioConfigure the font size by several font levels: 100% to 500%. This function is |
Copyright © 2011 ICARUS Reader. All rights reserved.
12/41
| Configure the font size and/or shape while viewing document. | activated while viewing PDF/ePub, and 25% to 400% for CHM/HTML document.By NumbersConfigure the font size by the actual number. This function is activated while viewing TXT/Mobi(non-drm)/DOC document. | |
 | Style | Press this icon to enter the submenu to adjust line spacing. |
 | Font Family | Configures the font family for viewing a document. The existing font families of thedevice are shown on the menu. |
 | Encoding | Configures the encoding type for viewing text-based document. The available encoding types are shown on the menu. |
 | Navigation | Navigation operations are used for accessing websites and viewing html- based documents, e.g. CHM /HTML. |
 | RotateScreen | To change the orientation of the screen. The screen rotates between 0^ and 360^ . |
 | Full Screen | For toggling between full screen viewing and viewing with status bar. |
 | SafelyRemove SD | For safely removing a SD card from the device. |
 | Music | Launch the music player by clicking this button. |
Copyright © 2011 ICARUS Reader. All rights reserved.
 | Standby | To turn the device into standby, click this button. In standby, the device stops working and a screen saver (picture) appears. The device consumes very little power while in stand by. Pressing any key can wake up the device from standby status. |
 | Shutdown | Shut down the device by clicking this button. |
| [2442] | Zooming | Hide MarginAuto hides the margin of files.To PageTo zoom the current page/image to fit the screen.To WidthTo zoom the current page/image to fit the width of the screen. |
| Adjust the zoom of the current screen. The screen can be scaled by fixed value.The screen can also be scaled up by selecting a zoom level). | To HeightTo zoom the current page/image to fit the height of the screen.Selection ZoomScales up the thecurrent screen by selecting a box. The content in the selected box is enlarged to fill the whole drawing area.By RatioTo zoom the current page/image by ratio. | |
 | Annotations | Add AnnotationTake annotation on the text of current |
Copyright © 2011 ICARUS Reader. All rights reserved.
| Annotations mean a group of annotation operations, including annotating & sketching. | screen. The annotated texts are highlighted.Erase AnnotationTo erase annotations on the current screen. The annotations are erased when you click on them or drag the stylus through them.All AnnotationsTo display all of the annotations by list.The highlighted texts as well as the corresponding page numbers are displayed on the list view.SketchTo sketch on the content area of the current screen by using the stylus.Erase SketchTo erase existing sketches with the stylus.The sketches are erased when you click on them or drag the stylus through them.Merge SketchTo merge your sketch to PDF, system will automatically generate a new PDF file to save what you made.Sketch ColorsTo select the color of sketches. Now black and white are supported.Sketch ShapesTo select the shape (line width) of sketches. Now five levels of line widths are supported. | |
| Layout | Single PageOnly one page is displayed on the screen.Scroll PagesMultiple pages can be displayed on the screen. If there are enough blanks besides one page on the screen, the parts of adjacent pages fill these blanks. There is a small spacing between two pages. | |
| Select the layout of pages while viewing documents. | ||
Copyright © 2011 ICARUS Reader. All rights reserved.
| Thumbnail ViewTo view the books in 4 thumbnails view. | ||
| Tools | SearchTo search for a pattern in current document. The search results are highlighted.Table of ContentTo open the table of contents. Press the PREV/NEXT PAGE Buttons to turn pages if available. Press the Navigation Joystick to select the desired item and to confirm the option.NOTE: The function is available only when the table of contents is in the form of hyperlinks.Slide showTo continuously display the pages of a document by slide show.Glyph emboldenTo adjust the display contrast of PDF/ePub, from level 1 to level 5, the contrast will be more and more dark.Add BookmarkTo add a bookmark of the current page.Delete BookmarkTo delete the bookmark of current page.Show BookmarksTo show all bookmarks in a list view. The front text portion as well as the number of the bookmarked page is displayed in an item. You can jump to the target page by selecting the bookmark item.Previous ViewTo go to the previous view to retrace the path within a document. Select itemPrevious View to return to previous screen | |
| Tools represent a group of assistant functions for better reading. | ||
| while browsing document. Next View Select item Next View to go to next screen while browsing document. This button is activated only if you have chosen Previous View. Go To Page Press the virtual keypad to input the page number. Press → to backspace. Press the Navigation Joystick to move to the OK icon to go to the selected page. Show/Hide Hyperlinks To display or not display hyperlinks of files(e.g. PDF, doc) Clock To show you how much you have read. Dictionary Lookup Look up the explanation of a pattern string. Please refer to Chapter of Dictionary for details. Text to Speech Select Text to Speech icon to start from the first line of each page. Select this start/stop icon to start or stop speaking. Select this setting menu to set speaker, speed and style. Hand Tool Select the hand tool item in the menu to enable browsing through document by stylus. Mark & Copy Press the mark icon to select a word and press copy icon to copy what you mark. | ||

Internal Storage
The device supports more than 18 types of file formats, including EPUB, PDF, FB2, MOBI, TXT, RTF, PDB, HTM, HTML, CHM, DJVU, DJV, XLS/XLSX, PPT/PPTX, and DOC/DOCX. It also supports compressed files in ZIP and RAR formats. Supports more formats in subsequent firmware upgrade.
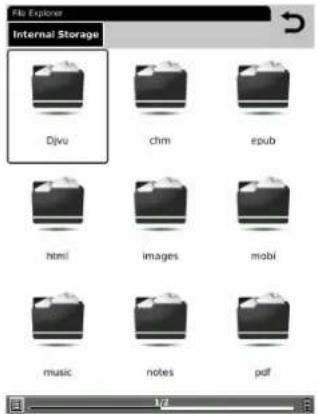
Copyright © 2011 ICARUS Reader. All rights reserved.
18/41
Internal Storage Menu
In the Internal Storage list, press the Menu Button to popup Internal Storage Menu. Move the Navigation Joystick to select the option and to confirm. Press the BACK Button to exit.
| View | Details ViewDisplay the contents in details. The details includes name, last access time, read count and reading progress. | |
| View means the way of displaying and arranging contents in main view. | Thumbnail ViewTo view the books in thumbnails view.SortSort the files by Name, Type, Size, Access Time, Ascending and Descending. | |
| File | SearchSearch for a target file by given pattern. The search results are displayed in the main view. | |
| File means the operations to a file. | RenameTo rename a selected files.CopyCutDelete | |
Reading books
Press the Navigation Joystick to select the desired book and to start reading. Press the PREV/NEXT PAGE Buttons to turn pages. Press the BACK Button to exit the reading. Press the MENU Button to enter the submenu.
Note:
Please refer to Recent Reading/Reading Books for more detailed instructions.

Memory Card
All the files on a SD memory card are displayed in the list. The device supports expansion storage of SD card up to 32GB.
You do not need to store files in corresponding file folders; you can put them anywhere on the memory card. The device can recognize various kinds of files automatically.

| dicts | This folder is for dictionary format in StarDict storage. Please refer to the chapter on Dictionaries for more detailed instructions. |
| fonts | This folder is for fonts files storage. You can put font files into this folder and select what you like font when you reading. |
Copyright © 2011 ICARUS Reader. All rights reserved.
20/41
| handwriting | The folder is for handwriting files storage to recognize what you write (including chinese.dat, Europe.dat, Japanese.dat). |
| manual | This folder contains the User Manual in PDF-format. Press the PREV/NEXT Page Buttons to turn pages. Press BACK to return to main menu. Press the MENU Button to enter Books Menu. |
| notes_template | The folder is for notes template files storage, you can add more PNG formats file to this folder. |
| snapshot | This is the default folder for saved capture screen. |
| tts | The folder is for TTS (Text To Speech) files storage, you can add more TTS file to this folder. |
Note: above folders is a system default folder, you can add your own folder to storage all kinds of files there.

Reading history
Select the Reading history icon; all of the recently read documents are displayed. The four most recent files will be shown on Recent Reading widget.
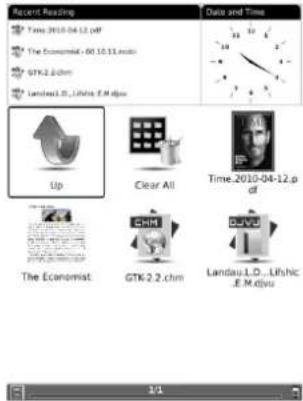
| Press this Up icon to return to the home screen. | |
| Press this Clear All icon to clear all recent reading files. |

Dictionary
StarDict-compatible dictionaries can be installed on the eXceL. You can download many dictionaries on www.icarusreader.com in the Products section of the website.
![/ 5Cniks; 'Bniks/ n [U] stone like marble ... oodles / 5udiz; 'udiz/ n [pl] - (of sth) (inflm ... oomph / Umf; jmf/ n (inflm □) energy: enthusi... ooze / u:z; uz/ v 1 [pr, lp] - from/out of sth; op / Cp; Bp/ n (inflm □) = operation 3. op (also Op) abbr 编写 = opus: Beethoven's Pi... op art / 5Cp B:t; 'Bp Brt/ (also optical art) for... opacity / EU5pAsEtl; o'pAsEtl/ (also opaquene... opal / 5EUpl; 'opf/ n bluish-white or milky-whi... 1 2 3 4 5 6 7 8 9 0 q w e r t y u i o a s d f g h j k l z x c v b n m p . + - " , - ; - Shift Symbol Language Write 22:43](/content/2026/06/1254388/images/0a7480bc9306cd46694a294483ebb6b222a09385a68b21a1915d67f6ecad0ef1.jpg)

Dictionaries
Select Dictionaries to show the dictionary list.
| Similar Words | Select Similar Words to show the similar words group. |
| Explanation Select | Explanation to show the translation content. |
| Lookup | Input letters by software keyboard and then select Lookup to show the translation. |
Installing Dictionaries
Create a new folder named dicts in root directory of the memory card. Download the desired dictionary files in dicts folder. The dictionary will be installed automatically.
NOTE:
User can download these free dictionaries from:
- http://xdf.revdanica.com/down/index.php - Make sure you download them In the StarDict format. Use the pulldown menu on the right-hand side to change from XDXF to StarDict.
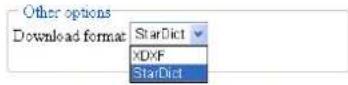
Open the downloaded file with an archive extractor like winrar or winzip and extract the downloaded dictionary files to the "dicts" folder of SD card.
For every dictionary you should have a separate folder.
The final folder structure should look something like this:
SDROOT - dicts - dict_a - dict_a.idx
SDROOT - dicts - dict_a - dict_a.dict.dz
and for another dictionary (called dict_b here):
SDROOT - dicts - dict_b - dict_b.idx
SDROOT - dicts - dict_b - dict_b.dict.dz
Finally, open a file and use the menu to enable the dictionary. Click on a word. Keep trying until it works.
Using the Dictionary
Input the keyword In the text box. Press the Navigation Joystick upward/downward to select the desired word in the list. Press the Navigation Joystick rightward/leftward to move the cursor.
Press the Dictionaries icon to select the desired dictionary. Press the Navigation Joystick to confirm the option and press the BACK Button to exit.
NOTE:
The Dictionary can be used alone, but it can also be enabled while reading books.

Pictures
Photos saved on SD card are automatically displayed in the list. The device supports picture formats such as TIFF, JPEG, GIF, BMP, and PNG.
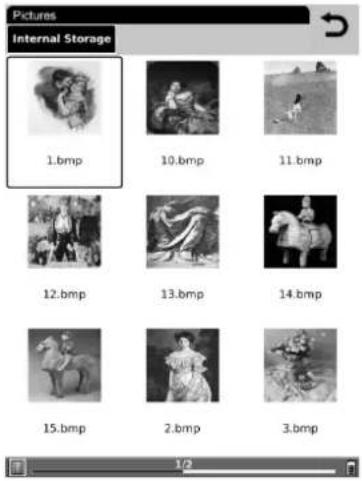
Copyright © 2011 ICARUS Reader. All rights reserved.
27/41
Pictures Menu
While In the Pictures list, press the Menu Button to enter the Pictures Menu. Press the Navigation Joystick to select the option and to confirm. Press the BACK Button to exit.
 | View | Details ViewDisplay the contents in details. The details includes name, last access time, read count and reading progress. |
| View means the way of displaying and arranging contents in the main view. | Thumbnail ViewTo view the books in 4 thumbnails view.SortSort the files by Name, Type, Size, Access Time, Ascending and Descending. | |
 | File | SearchSearch for target file by given pattern.The search results are displayed in the main view. |
| File means the operations of a file. | RenameTo rename a selected files.CopyCutDelete | |

Music
Music files saved on a SD card or Internal Storage are displayed in the list. The device supports MP3 and WAV files formats.
Play Interface
Press the function button to play the desired track. On the Play Interface screen the following operations can be performed.

Note: Background Music Mode
During music playback, press the Back Button to enter the Background
Music Mode, in which you can use the device for playing music. To exit the mode, select the Music icon on the home screen or press the
MENU button popup shortcut to enter the music playback screen, and then select to quit the music player.

Scribbling
- Select the Scribble icon to enter the Create Scribble interface.
- Select the Create Scribble icon to choose a template for scribble.
- You can add your own templates to SD card in notes_template folder.


Notes
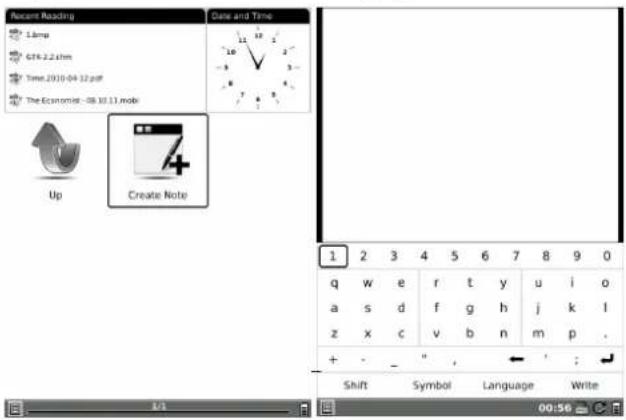
Create Notes
-Highlight 'Create Note' and press the Navigation Joystick to create a new note.
- Click on the keypad to input characters.
- Press the BACK Button to pop up the notes dialog box. Highlight YES to save the new notes. Highlight NO to exit to the new notes interface without save.
- Input characters to create a file name. Highlight OK to confirm.

Webbrowser
Before browsing a website you need to access a network through the Wi-Fi Configuration.
Wi-Fi Configuration
At the Wi-Fi configuration interface, follow the steps below to enable WIFI.

• Make sure the Wi-Fi is turned on
- The Hardware Address is displayed after the Wi-Fi switch is turned on.
- The device will search for the available Wi-Fi automatically. The available Wi-Fi connection will be displayed in the list.
- Select to add a new SSID.
- Select to refresh Wi-Fi access points.
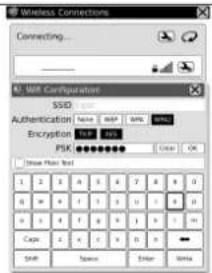
- Select a wireless network with the Navigation Joystick and press it to connect to WI-FI.
- Enter the password if the network is encrypted. Connection will be established automatically.
Web Browser
Upon the successful Wi-Fi connection, select the icon and press the Navigation Joystick to enter Browser mode. It will automatically enter the preset homepage.
![WIKEDIA Wiki <|im_start|> Dominates the most popular topics The articles about the purpose of media for other news. http://www.100.com/100.com/ "Old anniversary's media news. For all articles at used in WIKEDIA we see this work." "What's our news has been. For the WIKFare of WIKHAFs, we see this topic today." I will be a very useful example that allows the creation and collecting it at the number of articles and people with a main reason using a meaningful or language as "WHAT'S this book" (http://www.100.com/100.com/100.com/100.com/100.com/100.com/100.com/100.com/100.com/100.com/100.com/100.com/100.com/100.com/100.com/100.com/100.com/100.com/100.com/100.com/100.com 2016 Google Search - I'm Feeling Lucky Monitoring: New York Times - How much Go to Engle City Google Search - I'm Feeling Lucky Google Search - I'm Feeling Lucky Google Search - I'm Feeling Lucky Google Search - I'm Feeling Lucky Google Search - I'm Feeling Lucky Google Search - I'm Feeling Lucky Google Search - I'm Feeling Lucky Google Search - I'm Feeling Lucky Google Search - I'm Feeling Lucky Google Search - I'm Feeling Lucky Google Search - I'm Feeling Lucky Google Search - I'm Feeling Lucky Google Search - I'm Feeling Lucky Google Search- [http://www.100.com/100.com] Google Search - I'm Feeling Lucky Google Search - I'm Feeling Lucky Google Search - I'm Feeling Lucky Google Search - I'm Feeling Lucky Google Search - I'm Feeling Lucky Google Search - I'm Feeling Lucky Google Search - I'm Feeling Lucky Google Search - I'm Feeling Lucky Google Search - I'm Feeling Lucky Google Search - I'm Feeling Lucky Google Search - I'm Feeling Lucky Google Search - I'm Feeling Lucky Google Search -I'm Feeling Lucky Google Search -I'm Feeling Lucky Google Search -I'm Feeling Lucky Google Search -I'm Feeling Lucky Google Search -I'm Feeling Lucky Google Search -I'm Feeling Lucky Google Search -I'm Feeling Lucky Google Search -I'm Feeling Lucky Google Search -I'm Feeling Lucky Google Search -I'm Feeling Lucky Google Search -I'm Feeling Lucky Google Search -I'm Feeling Lucky Google Search -I'm Feeling Lucky](/content/2026/06/1254388/images/b37d2fac83fadc1f70e53f5eaaa49d5cf22b03c0aae7bf3d66f9078cabb4fd7d.jpg)
Browser Menu
Press the Menu Button to browse a web page detailed as follows:
| Tool Bar←→→× | Tool bar provides four functions: going back to the previous website, going forward to the next website, refreshing the current website, or stop the loading of the current page. |
| Clock | By selecting the clock icon, it can show the current time and reading time. |
| Virtual keyboard | By selecting this virtual keyboard icon, you can input letters to the address bar. |
| Refresh | Select this refresh icon to refresh the web page. |
| Website icon | Select this website icon to input a website address and go to that website directly. |
| Battery | ■ Select the Power Manage icon to set the time until standby and automatic shut down for the device. If the time of shutdown is set, the device won't enter standby status anymore; in the other side, if the time of standby is set, the device won't shutdown automatically. |
| Proxy | Select this icon to set the proxy for accessing the internet. |
| Tools | Don't Save Account -Don't automatically preserve Internet account dataHide Account - Hide the Internet accountDelete Password - Delete the Internet account |
Copyright © 2011 ICARUS Reader. All rights reserved.
| Clear Cookies - Clear all cookiesDon't Auto-load Image - Open this option and the browser will not load images. |
NOTE:
Through the built-in web browser, you can access the specified websites. You can input text on a website by the stylus. A virtual keyboard appears after you click on a web form. The input text string is displayed on the form after you confirm the input is done.

Applications
In this Application, you can find the Calendar, Clock and Games and apps. More applications will be added later.
◀ 2012 ▶
| January | February | ||||||||||||
| Sun | Mon | Tue | Wed | Thu | Fri | Sat | Sun | Mon | Tue | Wed | Thu | Fri | Sat |
| 1 | 2 | 3 | 4 | 5 | 6 | 7 | 1 | 2 | 3 | 4 | |||
| 8 | 9 | 10 | 11 | 12 | 13 | 14 | 5 | 6 | 7 | 8 | 9 | 10 | 11 |
| 13 | 16 | 17 | 18 | 19 | 20 | 21 | 12 | 13 | 14 | 15 | 16 | 17 | 18 |
| 22 | 23 | 24 | 25 | 26 | 27 | 28 | 19 | 20 | 21 | 22 | 23 | 24 | 25 |
| 29 | 30 | 31 | 26 | 27 | 28 | 29 | |||||||
March
| Sun | Mon | Tue | Wed | Thu | Fri | Sat | Sun | Mon | Tue | Wed | Thu | Fri | Sat |
| 1 | 2 | 3 | 1 | 2 | 3 | 4 | 5 | 6 | 7 | ||||
| 4 | 5 | 6 | 7 | 8 | 9 | 10 | 8 | 9 | 10 | 11 | 12 | 13 | 14 |
| 11 | 12 | 13 | 14 | 15 | 16 | 17 | 15 | 16 | 17 | 18 | 19 | 20 | 21 |
| 18 | 19 | 20 | 21 | 22 | 23 | 24 | 22 | 23 | 24 | 25 | 26 | 27 | 28 |
| 25 | 26 | 27 | 28 | 29 | 30 | 31 | 29 | 30 |
May
| Sun | Mon | Tue | Wed | Thu | Fri | Sat | Sun | Mon | Tue | Wed | Thu | Fri | Sat |
| 1 | 2 | 3 | 4 | 5 | 1 | 2 | |||||||
| 6 | 7 | 8 | 9 | 10 | 11 | 12 | 3 | 4 | 5 | 6 | 7 | 8 | 9 |
| 13 | 14 | 15 | 16 | 17 | 18 | 19 | 10 | 11 | 12 | 13 | 14 | 15 | 16 |
| 20 | 21 | 22 | 23 | 24 | 25 | 26 | 17 | 18 | 19 | 20 | 21 | 22 | 23 |
| 27 | 28 | 29 | 30 | 31 | 24 | 25 | 26 | 27 | 28 | 29 | 30 |
11:08
Sat Apr 21 2012

Settings
Press the Settings icon to enter the Settings mode directly. In the Settings mode, the following settings can be adjusted.
 | LanguageSelect the desired language. |
 | DateTo adjust the value, press the Navigation Joystick to move the cursor. Press the Joystick to confirm. |
 | Default FontMove the Navigation Joystick to select the font and press down to confirm the option.Installing Fonts:Create a new folder named fonts in root directory of the memory card. Download the desired font files in fonts folder and restart the device. The font will be installed automatically. |
 | Preferred ApplicationsYou can select different applications for reading, such as Pdf Reader/FB Reader/Cool Reader/Html Reader/Office Reader. |
 | Start SettingCustomize your boot option; select opening recently read documents or opening the main interface when booting the device. |
 | Screen UpdateSet the refreshing rates, make full screen refreshing after reading certain amount of pages, for example, every 3/5/7/9 pages, or always. |
 | Power ManagementIn Power Management you can set the time of standby and automatic shutdown for the device. If the time of shutdown is set, the device won't enter standby status anymore; on the other hand, if the time of standby is set, the device won't shutdown automatically. |
 | Format FlashSelect Format Flash to format the internal flash. Note, after doing this operation all of the data in internal flash will be removed. |
| ,[XD4] | Time ZoneChoose your local time zone. |
 | Stylus CalibrationIf the tip of your stylus does not match with the position on the screen, you can improve the precision by stylus calibration. Follow the guideline displayed on the screen: 'Please press once at each of the marks showed on the screen'. Total 5 points should be click one by one. |
 | AboutDisplays the technical information of the device. |
Copyright © 2011 ICARUS Reader. All rights reserved.
Copyright © 2011 ICARUS Reader. All rights reserved.
Technical Specifications
| Display 9.7" | |
| Resolution 1200 x 825, 16 Grey scales | |
| Supported File Formats | Book: EPUB, PDF, FB2, MOBI, TXT, RTF, HTML, HTM, CHM, PDB, DJVU, DJV, DOC, DOCX, XLS, XLSX, PPT, PPTX, ZIP |
| Music: MP3, WAV | |
| Picture: JPG, BMP, GIF, PNG, TIFF | |
| Adobe DRM DRM for EPUB/PDF, built-in Adobe Reader Mobile | |
| Expansion Slots | SD card, up to 32GB |
| Battery Lithium Battery, 1600 mAh | |
| Other Interfaces | mini USB2.0/3.5mm stereo audio jack |
| Dimensions 241 mm x 178 mm x 11 mm (L x W x H) | |
| Weight 528 g | |
Connecting to a computer
The eXcel can be easily connected to a computer via the USB cable. A dialog pops up immediately after the connection establishes. Select "Yes" to confirm the connection.
You can find at least one removable disk (internal flash of device) in the file manager of the computer. If you insert a memory card into the device, the memory card is also displayed as a (second) removable disk. The first removable disk is the eXceL's internal memory, the second removable disk is the memory card.
Charging
-You can charge device in two ways:
- Connect the device to a computer by USB cable
-Charge device by the optional ICARUS power adapter, sold separately
via www.icarusreader.com
Software Updates
You can update the software by follow steps:
- Download the latest updates package from the ICARUS website: www.icarusreader.com
- Save the updates package in a SD card.
- Make sure the updates package is located at the root directory of the SD card. The name should end with ‘*.upd’.
- Insert the SD card into device.
- Restart device, press and hold the OK button. NOTE, the OK button should be pressed before the device restarts. Hold it until you see the message 'Software update request detected, checking updates...'
Device updates itself automatically. It restarts after update finishes.
Note: Make sure device has enough power to finish the software update (at least 2 grids displayed).
Disclaimer
We make every effort to ensure that the information and procedures in this user manual are accurate and complete. No liability can and will be accepted for any errors or omissions. ICARUS Reader reserves the right to make any changes without further notice to any products herein.


- Preface
- Guidelines
- Product disposal instructions
- Precautions
- Contents of the box
- Outline
- Front View
- Basic Operations
- Reading History
- Date and Time
- Reading Books
- Internal Storage
- Internal Storage Menu
- Note:
- Memory Card
- Dictionary
- Dictionaries
- Installing Dictionaries
- Using the Dictionary
- Pictures
- Pictures Menu
- Music
- Play Interface
- Note: Background Music Mode
- Scribbling
- Notes
- Create Notes
- Webbrowser
- Wi-Fi Configuration
- Web Browser
- Applications
- Settings
- Technical Specifications
- Connecting to a computer
- Charging
- Software Updates
- Disclaimer
Brand : Icarus
Model : eXceL E1050BK
Category : E-reader