
DO7274S - Vacuum Cleaner DOMO - Free user manual and instructions
Find the device manual for free DO7274S DOMO in PDF.


| Product type | Canister vacuum cleaner |
| Brand | DOMO |
| Model | DO7274S |
| Dimensions (W x D x H) | 40 x 30 x 25 cm |
| Weight | 5 kg |
| Power supply | Mains, 220-240 V, 50 Hz |
| Rated power | 700 W |
| Filter type | Washable HEPA |
| Tank capacity | 1.5 L |
| Power cord | 5 m |
| Operating radius | 7 m |
| Noise level | 75 dB |
| Main functions | Vacuuming floors and carpets, multi-surface brush |
| Included accessories | Crevice tool, upholstery brush |
| Care and cleaning | Empty tank after each use, clean filter monthly |
| Safety | Unplug before maintenance, do not immerse |
| Spare parts and repairability | Available through DOMO after-sales service |
| Warranty | 2 years |
| General information | Versatile vacuum cleaner for domestic use |
Frequently Asked Questions - DO7274S DOMO
User questions about DO7274S DOMO
0 question about this device. Answer the ones you know or ask your own.
Ask a new question about this device
Download the instructions for your Vacuum Cleaner in PDF format for free! Find your manual DO7274S - DOMO and take your electronic device back in hand. On this page are published all the documents necessary for the use of your device. DO7274S by DOMO.
USER MANUAL DO7274S DOMO
natural_image
Black vacuum cleaner with attached pipe and control panel (no visible text or symbols)GARANTIEVOORWAARDEN
CONDITIONS DE GARANTIE
This appliance has a two year warranty period. During this period the manufacturer is responsible for any failures that are the direct result of construction failure. When these failures occur the appliance will be repaired or replaced if necessary. The warranty will not be valid when the damage to the appliance is caused by wrong use, not following the instructions or repairs executed by a third party. The warranty will only be valid if the warranty application has been completed by the dealer at the time of purchase. All parts, which are subject to wear, are excluded from the warranty.
CONDICIONES DE GARANTÍA
RECYCLAGE-INFORMATIE
natural_image
Symbol of a trash bin crossed with no text or numbers, representing waste sorting or disposal (no text present)RECYCLING INFORMATIONEN
natural_image
Recycling symbol icon with three arrows forming a triangle (no text or labels)RECYCLING INFORMATION
This symbol on the product or on its packaging indicates that this product may not be treated as household waste. Instead it must be brought to the applicable collection point for recycling of electrical and electronic equipment. By ensuring this product is disposed of correctly, you will help prevent potential negative consequences for the environment and human health, which could otherwise be caused by inappropriate waste handling of this product. For more detailed information about recycling of this product, please contact your local city office, your household waste disposal service or the shop where you purchased the product.
The packaging is recyclable. Please treat package ecologically.

natural_image
Symbol of a trash bin crossed out by two diagonal lines (no text or labels)
natural_image
Recycling symbol composed of three chasing arrows forming a triangle (no text or labels)From now on, accessories and parts of Domo appliances can also be ordered online from the Domo webshop*:
http://webshop.domo-elektro.be
You can reach the webshop through the Domo website as well: www.domo-elektro.be. The accessories and parts can also still be obtained at the store where you bought the appliance.

natural_image
Simple black line drawing of a plug with a curved cable (no text or symbols)If the supply cord is damaged, it must be replaced by the manufacturer, its service agent or a similarly qualified person in order to avoid a hazard.
natural_image
Close-up of a black vacuum cleaner with a metallic tool inserted, showing internal components (no visible text or symbols)Telescopische buis
natural_image
Illustration of hands holding a flexible hose with a coiled tube, labeled with number 123 (no text or symbols on the diagram itself)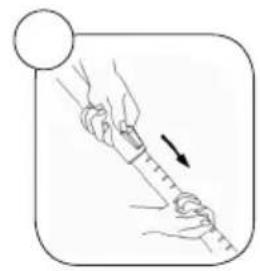
natural_image
Illustration of a hand holding a syringe with an arrow indicating motion (no text or symbols)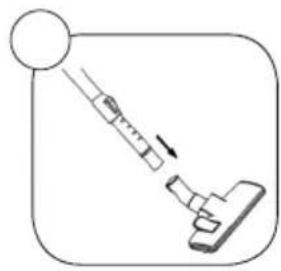
natural_image
Simple line drawing of a medical or laboratory procedure showing a tool interacting with a device (no text or symbols)Accessoires
natural_image
Close-up of a mechanical component with numbered callouts (1 and 2), showing internal parts like a valve or connector (no text or symbols visible)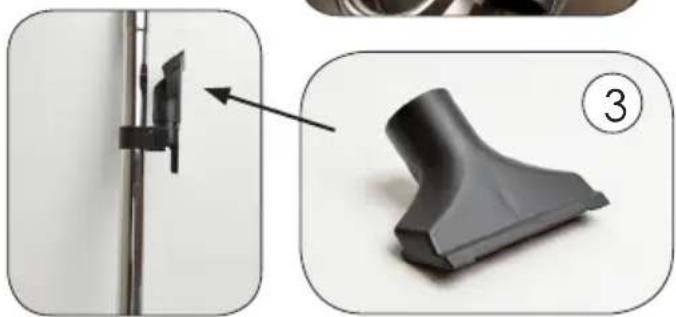
natural_image
Two-step diagram showing a mechanical component being inserted into a vertical rod, with an arrow pointing to the part and a numbered label (3) in the corner.GEBRUIK

natural_image
Technical line drawing of a mechanical component with labeled parts A and B (no text or symbols beyond labels)ONDERHOUD
natural_image
Close-up of a white computer mouse with a black handle and circular head, labeled with number 2 (no text or symbols on the mouse itself)natural_image
Close-up of a beige electronic device with a square component and a circular hole, labeled with number 3 (no text or symbols on the device itself)De luchtfilter of HEPA-filter schoonmaken
natural_image
Close-up of a beige office chair with a mesh grille and three black arrows pointing to the side (no visible text or symbols)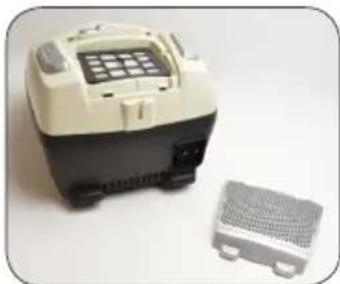
natural_image
Exterior view of a portable electronic device with a grid screen and a mesh grille (no text or symbols visible)PRÉCAUTIONS
natural_image
Close-up of a black vacuum cleaner with a metallic probe inserted (no visible text or symbols)Tube télescopique
natural_image
Illustration of a hand holding a flexible hose with a coiled tube, labeled with number 123 (no text or symbols on the diagram itself)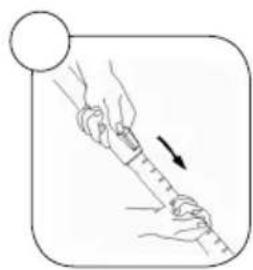
natural_image
Illustration of hands holding a measuring tool with an arrow indicating direction (no text or symbols)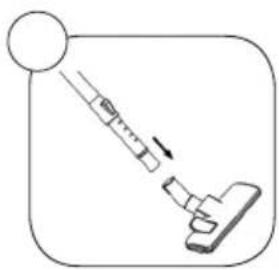
natural_image
Simple line drawing of a mechanical device with a circular head and lever, no text or symbols presentAccessoires
natural_image
Close-up of a mechanical device with labeled parts (1 and 2), showing internal components like tubing and a plastic component (no readable text or symbols)natural_image
Two-step diagram showing a mechanical component being inserted into a spring, with an arrow pointing to the component (no text or symbols present)UTILISATION

natural_image
Technical line drawing of a mechanical component with labeled parts A and B (no text or symbols beyond labels)ENTRETIEN
natural_image
Close-up of a white electric heater with a mesh grille and two black arrows pointing to its side (no text or symbols visible)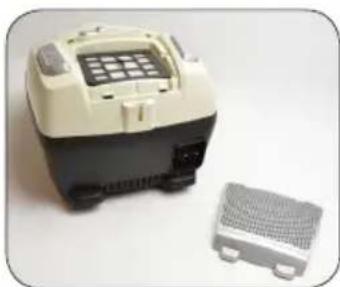
natural_image
Exterior view of a beige and black electronic device next to a gray grid-patterned base (no text or symbols visible)natural_image
Close-up of a black vacuum cleaner's head with a metallic screw and a white arrow pointing to the component (no visible text or symbols)Teleskoprohr
natural_image
Illustration of a hand holding a flexible hose with a coiled tube, labeled with number 123 (no text or symbols on the diagram itself)
natural_image
Illustration of a hand holding a syringe with an arrow indicating motion (no text or symbols)
natural_image
Simple line drawing of a medical or laboratory procedure with a syringe and clamp, no text or symbols presentZubehör
natural_image
Close-up of a mechanical component with numbered callouts (1 and 2), showing internal parts like a valve or connector (no text or symbols visible)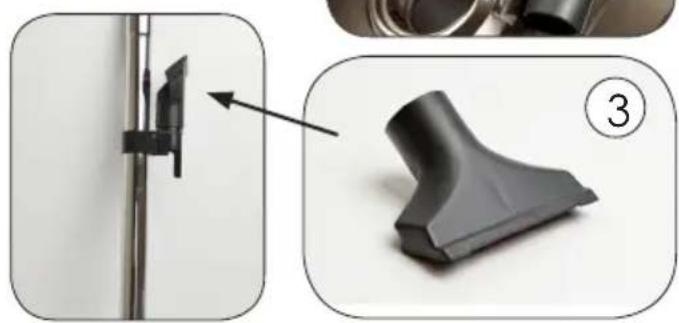
natural_image
Two-step diagram showing a mechanical component being inserted into a vertical rod, with the final part highlighted (no text or symbols present)BENUTZUNG
natural_image
Technical line drawing of a mechanical component with labeled parts A and B (no text or symbols beyond labels)natural_image
Close-up of a white computer mouse with a black handle, labeled with number 2 (no text or symbols on the mouse itself)
natural_image
Close-up of a device component with a square base and circular opening, showing a white arrow pointing to the center (no text or symbols visible)
natural_image
Close-up of a black plastic fan component with an arrow pointing to it, labeled with number 4 (no text or symbols on the fan itself)natural_image
Close-up of a white electronic device with a mesh grille and two ports, no visible text or symbols.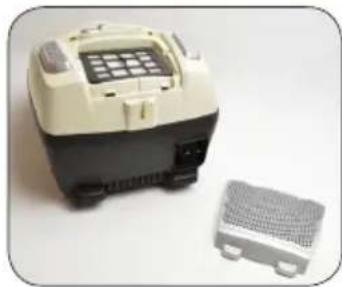
natural_image
Exterior view of a beige and black electronic device with a grid screen, alongside a small gray textured component (no visible text or symbols)SAFETY INSTRUCTIONS
This appliance may be used by children from the age of 8 and up, and also by persons with a physical or sensory limitation, as well as mentally limited persons or persons with a lack of experience and knowledge. But only on the condition that these persons have received the necessary instructions on how to use this appliance in a safe way and know the dangers that can occur by using this appliance.
Children cannot be allowed to play with the appliance. Maintenance and cleaning of the appliance may not be done by children, unless they are older than 8 years old and are under supervision.
Keep the appliance out of reach of children younger than 8 years old.
This appliance is suitable to be used in a household environment and in similar surroundings such as:
- Kitchen for personnel of shops, offices or other similar professional surroundings
- Farms
- Hotel or motel rooms and other surroundings with a residential character
- Guest rooms or similar
Attention: This appliance cannot be used with an external timer or a separate remote control.
WHEN USING AN ELECTRICAL APPLIANCE, SEVERAL BASIC PRECAUTIONS SHOULD BE CONSIDERED. READ AND FOLLOW ALL INSTRUCTIONS IN THIS MANUAL TO REDUCE THE RISK OF FIRE, ELECTRICAL SHOCK OR INJURIES.
- Do not leave the vacuum cleaner unattended when the plug is still plugged in. Unplug the vacuum cleaner when it is not in use and before carrying out any maintenance or cleaning.
- Do not use the appliance outdoors or on wet surfaces. Keep the appliance away from heat sources.
- Only use the vacuum cleaner as described in this instruction manual.
- Only use accessories that have been recommended by the manufacturer.
- This appliance is not a toy. Strict supervision is necessary when the vacuum cleaner is being used near children.
- Do not use the appliance when the cord or plug has been damaged. If the vacuum cleaner does not seem to function properly or if it has been dropped, damaged, left outside or dropped in water, take your appliance to a service center.
- Do not carry the appliance by the cord, do not use the cord as a handle, do not close a door on the cord or do not wrap the cord around sharp edges or corners. Do not run the vacuum cleaner over the cord. Keep the cord away from hot surfaces.
- Do not pull the plug out of the socket by pulling the cord. Always pull the plug itself.
- Do not use the appliance or the plug with wet hands.
- Do not put any objects into the openings of the vacuum cleaner. Do not use the vacuum cleaner when an opening
is blocked. Keep the openings in the appliance free of dust, lint, hair and other objects that may reduce the air flow.
- Immediately switch off the vacuum cleaner when the air supply, the floor brush or the telescopic tube is blocked. Remove the objects that cause the blockage before turning your vacuum cleaner back on.
- Keep hair, loose clothes, fingers and other body parts away from any openings and moving parts.
- Switch off the appliance before removing the plug from the socket.
- Be extra careful when cleaning stairs.
- Never use the vacuum cleaner to pick up any combustible or inflammable liquids like gasoline, or do not use the appliance in places where such substances might be present.
- Remove large and sharp objects from the floor before vacuuming it to prevent possible damage.
- Hold the plug while rewinding the cord onto the cord reel. Do not let the plug whip back and forth during rewinding.
- Unplug the appliance before connecting the hose.
- Do not pick up any burning or smoking objects, like cigarettes, matches or hot ashes.
- Do not use the vacuum cleaner without dust bag and/or filter.
- Before use, remove all packaging materials and any promotional stickers.
SAVE THESE INSTRUCTIONS
PARTS
- Floor nozzle
- Button to pull out or retract brushes
- Slide button to set length of tube
- Telescopic tube
- Hose
- Connection for hose
- Handle
-
Handle lid dust bag compartment
-
Storage space for 2 accessories
- Full dust bag indicator
- Button for automatic cord rewinding
- Button to set the suction power
- On/off button
- HEPA filter underneath grid
- Dust bag: 41
- Dust bag frame

ASSEMBLY
Always unplug the vacuum cleaner before (dis)assembling any parts.
Hose
Assembly: Put the hose into the hose connection in the vacuum cleaner. Push the hose in until it clicks into place.
Disassembly: Unplug the vacuum cleaner. Push the ribbed release buttons to pull the hose out of the hose connection.

natural_image
Close-up of a black vacuum cleaner's head with a metallic screw and a white arrow pointing to the nozzle (no visible text or symbols)Telescopic tube
- Put the handle of the hose into the telescopic tube.
- Set the telescopic tube to the desired length. To do this, push the slide button forward and pull out the bottom part of the tube to make it longer. Release the slide button and let the tube snap into place.
- Attach the floor nozzle to the telescopic tube by firmly sliding the tube into the nozzle.

natural_image
Illustration of a hand holding a flexible hose with a coiled tube, labeled with number 123 (no text or symbols on the diagram itself)
natural_image
Illustration of hands holding a rope with a measuring tape and an arrow indicating direction (no text or symbols)
natural_image
Simple line drawing of a mechanical device with a circular head and lever mechanism (no text or symbols)Accessories
The vacuum cleaner comes with 2 accessories that can be stored in the storage space inside the vacuum cleaner itself.
-
Crevice nozzle: for hard to reach areas like radiators, crevices, corners, in between pillows,...
-
Dust brush: for furniture, shelves,...
Extra accessories
- Small floor nozzle

natural_image
Close-up of a mechanical component with numbered callouts (1 and 2), showing internal parts like a valve or connector (no text or symbols visible)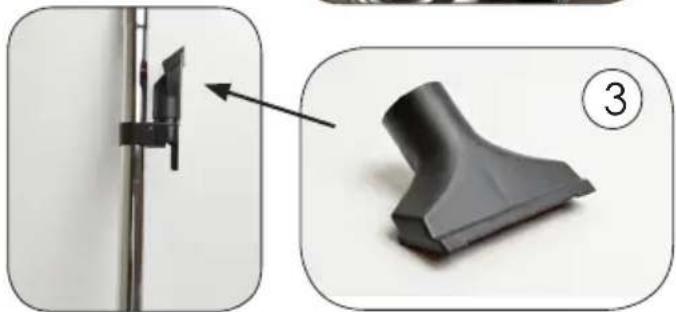
natural_image
Two-step diagram showing a mechanical component being inserted into a vertical rod, with an arrow pointing to the part and a numbered label (3) in the corner.USE
-
Unwind the cord to a substantial length and plug in the vacuum cleaner. The yellow label on the cord indicates the maximum length (6m) of the cord, that should not be exceeded.
-
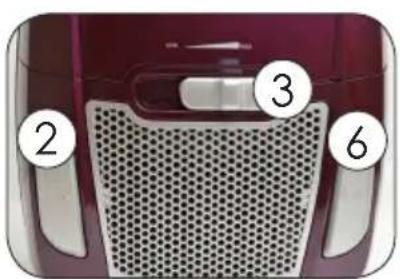
To turn the vacuum cleaner on and off, press the foot pedal with the Ⓐ symbol.
-
To set the suction power, slide the suction power button to the left or right in between the MIN and MAX indicators. For delicate materials it is best to use the minimum power level, a medium power is recommended for mattresses, furniture and carpets and the maximum power level should be used for tiles, wood and other hard floors.
-
When you want to clean hard floors, make sure that the brushes in the floor nozzle are down.
-
When you want to clean carpet, make sure that the brushes in the floor nozzle are retracted.
-
When you have finished vacuuming, unplug the vacuum cleaner and automatically rewind the cord by pressing the foot pedal with the symbol. Make sure that the plug does not whip back and forth while rewinding the cord, by guiding the cord with your hand. This to prevent possible damage.

natural_image
Technical line drawing of a mechanical component with labeled parts A and B (no text or symbols beyond labels)MAINTENANCE
Check the hose, dust bag and filter regularly. Empty the hose when it is clogged, replace the dust bag when it is full and clean the filter when it is dirty.
Disposable dust bags and filters
The dust bag and the motor filter play a very important roll in the efficiency of the vacuum cleaner. The purpose of the dust bag is to capture dirt, but at the same time the filter needs to be porous enough to allow air to pass through. If the bag or motor filter get clogged, no air can pass through the cleaner and no cleaning can take place regardless of how powerful the unit is.
To keep the cleaner operating at maximum efficiency, change the dust bag frequently and clean the filter when needed. Some fine particles can restrict the air flow very quickly and will decrease the performance even before the bag appears to be full. For that reason, the bag and filter may need to be changed more often when vacuuming carpet fresheners or cleaners, powder, plaster dust or similar fine substances.
Replacing the dust bag and cleaning the motor filter
Be sure to turn off and unplug the vacuum cleaner before replacing the dust bag or cleaning the filter. Never vacuum without the dust bag or filter in place.
- Turn off and unplug the vacuum cleaner.
- Remove the hose from the hose connection and open the dust bag compartment by pushing the handle upwards and lifting the lid.
- Slide the dust bag out of the frame and remove the dust bag from the dust bag compartment.
- If at this point you want to clean the motor filter, take out the filter in its frame by pressing the frame down a bit. Remove the filter from its plastic frame by pulling apart the front and back side of the frame at the top. Clean the filter by rinsing it under warm water. Let the filter dry completely before reinstalling it. Reinstall

natural_image
Close-up of a white computer mouse with a black arrow pointing to the handle (no text or symbols visible)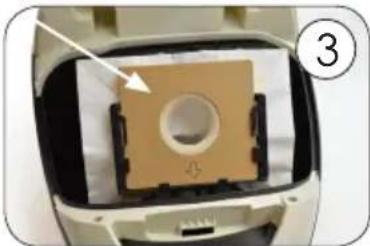
natural_image
Close-up of a beige electronic device with a square component and a circular hole, labeled with number 3 (no text or symbols on the device itself)the filter before placing the dust bag into the dust bag compartment.
-
Slide a new dust bag (4 l) in the dust bag frame.
-
Close the dust bag compartment and push the lid back into place. The spring on the dust bag frame will make sure that the opening of the dust bag is pushed into the right position when closing the lid.
natural_image
Close-up of a car's front panel showing internal fan structure (no text or symbols visible)Cleaning the air filter or HEPA filter
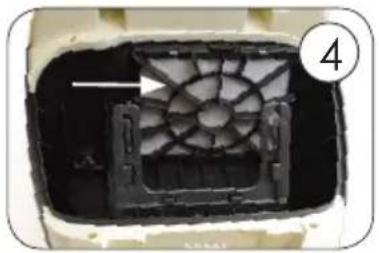
The exhaust air filter or HEPA filter cleans the air a final time before it leaves the vacuum cleaner. This filter and the grid that covers the filter should be cleaned regularly. You can clean the filter as follows:
- Turn off and unplug the vacuum cleaner. Always pull the plug itself, never pull the cord.
- Open the grid that covers the filter by lifting up the two clips on the grid, one by one. The filter is visible when the grid is removed.
- Take out the filter.
- Rinse the filter under cold water and let it dry completely.
- Put the filter back into place or replace the filter by a new one. Make sure that the filter is placed properly.
- Seal with the grid. Make sure that the grid clicks into place.

natural_image
Close-up of a white office chair with a mesh grille and two side handles, no visible text or symbols.
natural_image
Two electronic devices: a beige and black device with a grid screen and a gray mesh component, both on a plain background (no text or symbols visible)PRECAUCIONES IMPORTANTES
MONTAJE
natural_image
Close-up of a black vacuum cleaner with a metallic screw inserted, showing internal components (no text or symbols visible)Tubo telescópico
natural_image
Illustration of a hand holding a flexible hose with a coiled tube, labeled with number 123 (no text or symbols on the diagram itself)
natural_image
Illustration of a hand holding a syringe with an arrow indicating motion (no text or symbols)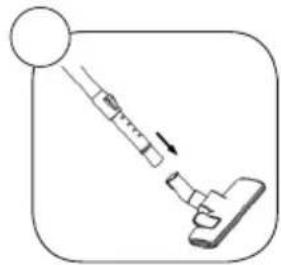
natural_image
Simple line drawing of a medical or laboratory procedure with a tool and device (no text or symbols)Accesorios
natural_image
Close-up of a mechanical device with labeled parts (1, 2), showing internal components like tubing and a connector (no text or symbols beyond labels)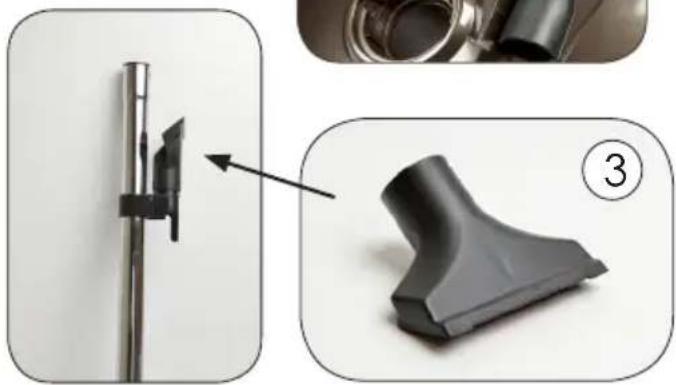
natural_image
Close-up of a mechanical component with a close-up view showing a tip and part, no text or symbols present.Uso

natural_image
Technical line drawing of a handheld device with labeled parts A and B (no text or symbols beyond labels)MANTENIMIENTO
natural_image
Close-up of a beige computer mouse with a circular head and handle, labeled with number 2 (no text or symbols on the mouse itself)del recipiente del polvo.
natural_image
Close-up of a beige electronic device with a circular component and a white arrow pointing to it, labeled with number 3 (no text or symbols on the device itself)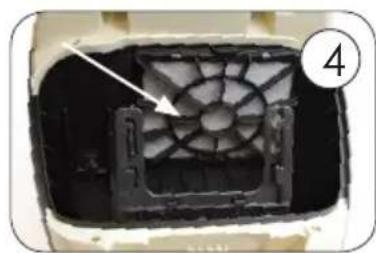
natural_image
Close-up of a mechanical component with a fan-like structure and an arrow pointing to it, no visible text or symbols.natural_image
Close-up of a beige electronic device with a mesh grille and two black arrows pointing to the ports (no visible text or symbols)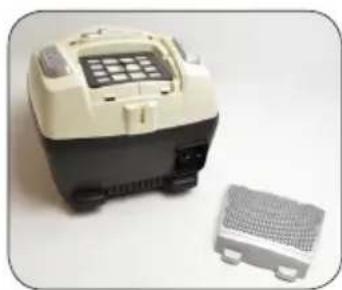
natural_image
Exterior view of a beige and black electronic device next to a gray grid-patterned component (no text or symbols visible)DŮLEŽITÉ
PŘÍSLUŠENSTVÍ
natural_image
Close-up of a black vacuum cleaner with a metallic screw and cable inserted (no visible text or symbols)natural_image
Line drawing of a hand holding a flexible hose with a coiled tube, no text or symbols present
natural_image
Illustration of a hand holding a syringe with an arrow indicating motion (no text or symbols)
natural_image
Simple line drawing of a syringe and clamp with an arrow indicating motion (no text or symbols)Příslušenství
natural_image
Close-up of a mechanical component with labeled parts (1 and 2), showing internal components like a valve or connector (no text or symbols beyond labels)
natural_image
Close-up of a mechanical component with a close-up view showing a part being adjusted (no text or symbols visible)POUŽITÍ

natural_image
Technical line drawing of a mechanical component with labeled parts A and B (no text or symbols beyond labels)ÚDRŽBA
natural_image
Close-up of a white computer mouse with a black handle and circular head, labeled with number 2 (no text or symbols on the mouse itself)natural_image
Close-up of a device's internal component with a square base and circular hole, labeled with number 3 (no text or symbols on the object itself)
natural_image
Close-up of a black plastic fan component with a white body, showing internal structure and a numbered circle (4) in the corner.natural_image
Close-up of a white electronic device with a mesh grille and two black arrows pointing to the ports (no visible text or symbols)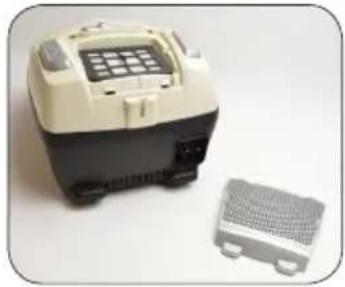
natural_image
Two electronic devices: a beige portable device with a grid and a gray meshed base (no visible text or symbols)DOMOWebshop
Stofzakken op? Antikalkcassette nodig?
Out of dust bags? Need an anti-scale cartridge?
You can now also order our accessories and parts in the
Domo Webshop
Webshop Domo
Domo- Webshop
Domo Webshop
Surf naar:
Rendez-vous sur:
Einfach unter:
Surf to:
webshop.domo-elektro.be
of scan hier:
ou scannez ici:
oder hier scannen:
or scan here:



- GARANTIEVOORWAARDEN
- CONDITIONS DE GARANTIE
- CONDICIONES DE GARANTÍA
- RECYCLAGE-INFORMATIE
- RECYCLING INFORMATIONEN
- RECYCLING INFORMATION
- Telescopische buis
- Accessoires
- GEBRUIK
- ONDERHOUD
- De luchtfilter of HEPA-filter schoonmaken
- PRÉCAUTIONS
- Tube télescopique
- UTILISATION
- ENTRETIEN
- Teleskoprohr
- Zubehör
- BENUTZUNG
- SAFETY INSTRUCTIONS
- SAVE THESE INSTRUCTIONS
- PARTS
- ASSEMBLY
- Hose
- Telescopic tube
- Accessories
- USE
- MAINTENANCE
- Disposable dust bags and filters
- Replacing the dust bag and cleaning the motor filter
- Cleaning the air filter or HEPA filter
- PRECAUCIONES IMPORTANTES
- MONTAJE
- Tubo telescópico
- Accesorios
- Uso
- MANTENIMIENTO
- DŮLEŽITÉ
- PŘÍSLUŠENSTVÍ
- POUŽITÍ
- ÚDRŽBA
- DOMOWebshop
- webshop.domo-elektro.be
Brand : DOMO
Model : DO7274S
Category : Vacuum Cleaner