
AC4081 - Air purifier PHILIPS - Free user manual and instructions
Find the device manual for free AC4081 PHILIPS in PDF.


| Product Type | Air Purifier |
| Brand | Philips |
| Model | AC4081 |
| Color | White/Silver |
| Dimensions (W x D x H) | 200 x 200 x 400 mm |
| Weight | 3.0 kg |
| Power Supply | AC 220-240V, 50 Hz |
| Power Consumption | 20 W (max) |
| Air Cleaner CADR (Smoke) | 150 m³/h |
| Filtration Stages | Pre-filter, HEPA, Carbon |
| Filter Type | HEPA H13 |
| Noise Level (max) | 50 dB |
| Noise Level (night mode) | 30 dB |
| Room Size (max) | 20 m² |
| Air Quality Sensor | Yes (PM2.5) |
| Auto Mode | Yes |
| Night Mode | Yes |
| Timer | 1-8 hours |
| Filter Replacement Indicator | Yes |
| Filter Replacement Interval | 6 months |
| Maintenance | Clean pre-filter monthly |
| Safety Features | Child lock, cover-off shut down |
| Spare Parts | AC4081 Filter (HEPA/Carbon) |
| Repairability Index | 7.5/10 |
Frequently Asked Questions - AC4081 PHILIPS
User questions about AC4081 PHILIPS
0 question about this device. Answer the ones you know or ask your own.
Ask a new question about this device
Download the instructions for your Air purifier in PDF format for free! Find your manual AC4081 - PHILIPS and take your electronic device back in hand. On this page are published all the documents necessary for the use of your device. AC4081 by PHILIPS.
USER MANUAL AC4081 PHILIPS
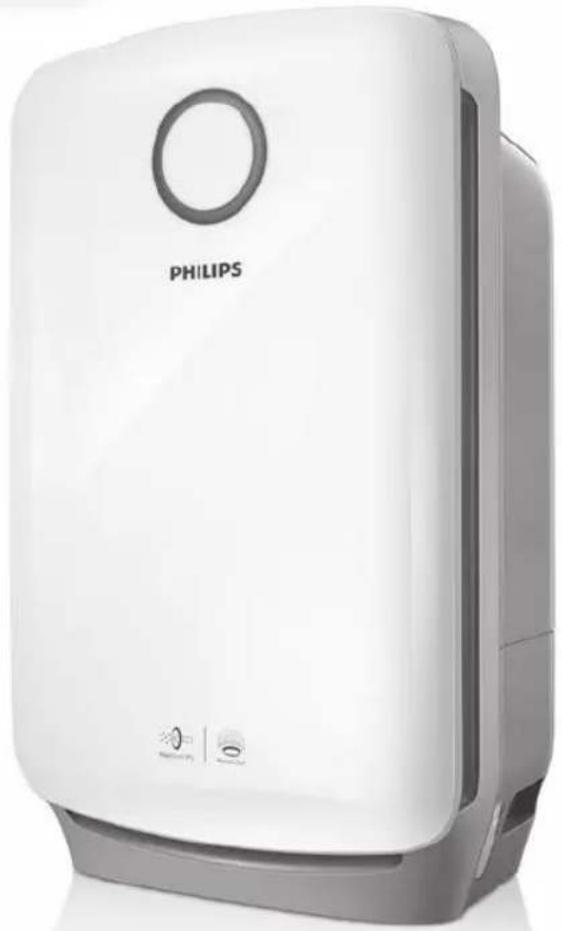
natural_image
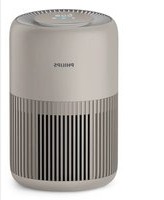
White Philips air purifier device with circular top and control buttons (no visible text or symbols on body)EN User manual 3
Prepare for humidification 10
4 Using the appliance 12
Understand the air quality light 12
Switch on and off the appliance 12
Change the working mode 13
Set the child lock 17
Water level 17
5 Cleaning 18
Cleaning schedule 18
Clean the body of the appliance 18
Clean the air quality sensor 18
Clean the water tank and humidification filter 19
Clean the pre-filter and descale the humidification filter 20
6 Replacing the filters 22
Understand the healthy air protect lock 22
Replace filter 2 22
Replace the humidification filter 23
7 Resetting the filter lifetime counter 25
8 Troubleshooting 26
9 Guarantee and service 28
Order parts or accessories 28
10 Notices 29
Electromagnetic fields (EMF) 29
Recycling 29
1 Important
Safety
Read this user manual carefully before you use the appliance, and save it for future reference.
Danger
- Do not let water or any other liquid or flammable detergent enter the appliance to avoid electric shock and/or a fire hazard.
- Do not clean the appliance with water, any other liquid, or a (flammable) detergent to avoid electric shock and/or a fire hazard.
- Do not spray any flammable materials such as insecticides or fragrance around the appliance.
- The water in the water tank is not suitable for drinking. Do not drink this water and do not use it to feed animals or to water plants. When you empty the water tank, pour the water down the drain.
Warning
- Check if the voltage indicated on the bottom indicated at the rear of the appliance corresponds to the local power voltage before you connect the appliance.
- If the power cord is damaged, you must have it replaced by Philips, a service center authorized by Philips, or similarly qualified persons in order to avoid a hazard.
- Do not use the appliance if the plug, the power cord, or the appliance itself is damaged.
- This appliance can be used by children aged from 8 years and above and persons with reduced physical, sensory or mental capabilities or lack of experiences and knowledge if they have been given supervision or instruction concerning use of the appliance in a safe way and understand the hazards involved. Children shall not play with the appliance. Cleaning and
user maintenance shall not be made by children without supervision.
- Do not block the air inlet and outlet, e.g. by placing items on the air outlet or in front of the air inlet.
Caution
- This appliance is not a substitute for proper ventilation, regular vacuum cleaning, or use of an extractor hood or fan while cooking.
- If the power socket used to power the appliance has poor connections, the plug of the appliance becomes hot. Make sure that you plug the appliance into a properly connected power socket.
· Always place and use the appliance on a dry, stable, level, and horizontal surface.
- Leave at least 20cm free space behind and on both sides of the appliance and leave at least 30cm free space above the appliance.
- Do not place anything on top of the appliance and do not sit on the appliance.
- Do not place the appliance directly below an air conditioner to prevent condensation from dripping onto the appliance.
• Make sure all filters are properly installed before you switch on the appliance.
- Only use the original Philips filters specially intended for this appliance. Do not use any other filters.
- Avoid knocking against the appliance (the air inlet and outlet in particular) with hard objects.
• Always lift or move the appliance by both handles at the sides of the appliance.
- Do not insert your fingers or objects into the air outlet or the air inlet to prevent physical injury or malfunctioning of the appliance.
- Do not use this appliance when you have used indoor smoke-type insect repellents or in places with oily residues, burning incense, or chemical fumes.
- Do not use the appliance near gas appliances, heating devices or fireplaces.
· Always unplug the appliance after use and before filling water, cleaning, or carrying out other maintenance.
- Do not use the appliance in a room with major temperature changes, as this may cause condensation inside the appliance.
• To prevent interference, place the appliance at least 2m away from electrical appliances that use airborne radio waves such as TVs, radios, and radio-controlled clocks.
- When the appliance is not used for a long time, bacteria may grow on the filters. Check the filters after a long period of
disuse. If the filters are very dirty, replace them (see the chapter ‘Replace the filters’).
• The appliance is only intended for household use under normal operating conditions.
- Do not use the appliance in wet surroundings or in surroundings with high ambient temperatures, such as the bathroom, toilet, or kitchen.
- The appliance does not remove carbon monoxide (CO) or radon (Rn). It cannot be used a safety device in case of accidents with combustion processes and hazardous chemicals.
- Clean the water tank every day to keep it clean.
- Only fill the water tank with cold tap water. Do not use ground water or hot water.
- Do not put any substance other than water in the water tank. Do not put fragrance in the water tank.
- If you do not use the humidification function for a long time, clean the water tank and humidification filter tray. Dry the humidification filter.
- If you need to move the appliance, disconnect the appliance from the power supply first. Then empty the water tank. Carry the appliance horizontally by both handles on the sides of the appliance.
- Unplug the appliance during filling and cleaning.
2 Your combi air purifier and humidifier
Congratulations on your purchase, and welcome to Philips!
To fully benefit from the support that Philips offers, register your product at www.philips.com/welcome.
Philips VitaShield IPS technology and NanoCloud technology ensures you "Healthy air always".
VitaShield IPS technology effectively remove pollutants (ultrafine particles, allergens, bacteria and viruses) with size >0.02 micron including bacteria and virus*.
NanoCloud technology, using a special humidification filter adds H2O molecules to the dry air, and produces healthy humid air without formation of water mist. Its humidification filter retains bacteria, calcium and other particles from the water.
*According to 2008 Microbiological Risk Assessment Report of the World Health Organization (WHO), the avian influenza, human influenza viruses, Legionella, Hepatitis viruses and SARS coronavirus are larger than 0.02 micron.
Read this user manual carefully before you use the appliance, and save it for future reference.

3 Getting started
Install filters
The appliance comes with all filters fitted inside. Remove the packaging of the filters before you can use the appliance. Remove all filters, unpack them, and place them back into the appliance described as follows:

Tip
- When you remove or insert filters, place the appliance against a wall for more stability.

Note
- Insert the filters in the correct position. - Make sure that you place filter 2 in the appliance first and then the pre-filter. - Make sure that the side with the tag is pointing towards you.
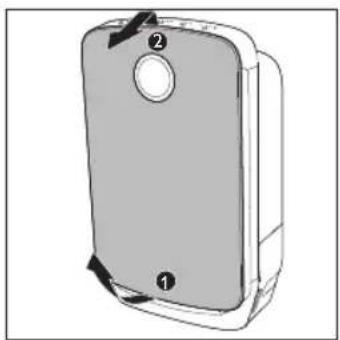
1 Unlock the bottom of the front panel from the appliance, then gently pull the top part of the front panel towards you.
natural_image
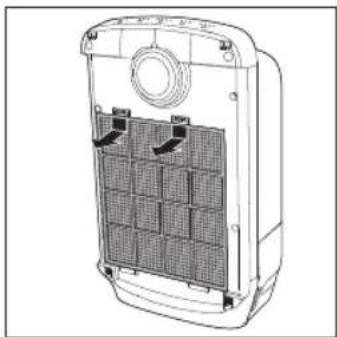
Diagram of a gray rectangular device with a circular top and labeled parts (1 and 2), no readable text or symbols present.2 To remove the pre-filter, press the two clips down and pull the filter towards you.
natural_image
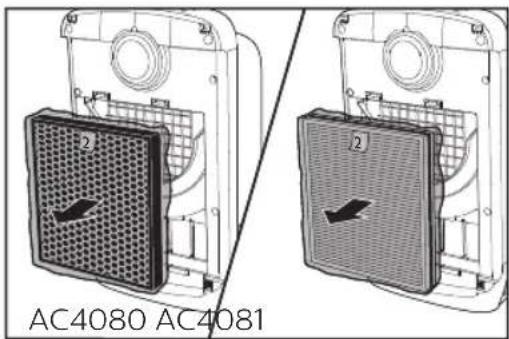
Technical line drawing of a device interior with ventilation grilles and mounting holes (no text or symbols)3 Remove filter 2 from the appliance.

natural_image
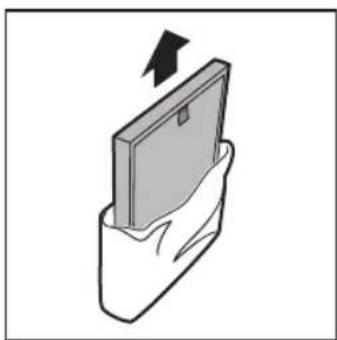
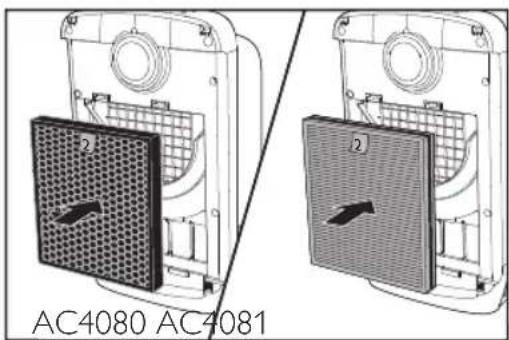
Technical diagram of two labeled electronic device units (AC4080 and AC4081) showing internal components and mounting points (no text or symbols beyond labels)4 Remove the packaging materials of filter 2.
natural_image
Illustration of a hand holding a rectangular object with an arrow indicating upward motion (no text or symbols)5 Put the unpacked filter 2 back into the appliance.

natural_image
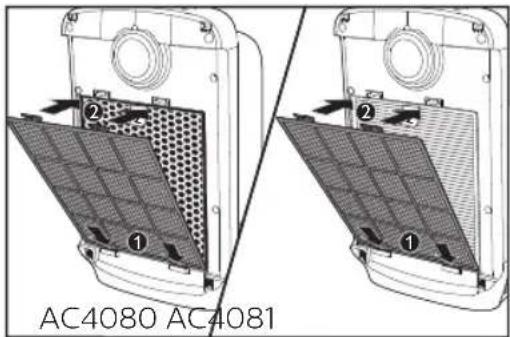
Technical line drawing of two electronic device modules labeled AC4080 and AC4081, showing internal components without any text or symbols.6 Put the pre-filter back into the appliance.


Note
• Make sure that the side with the two clips is pointing towards you, and that all hooks of the pre-filter are properly attached to the purifier.
7 To reattach the front panel, mount the panel onto the top of the appliance first (1). Then, gently place the panel against the body of the appliance (2).

natural_image
Diagram of a device interior showing a lid and internal compartments (no text or symbols)Prepare for humidification
1 Remove all packaging materials of the humidification filter.
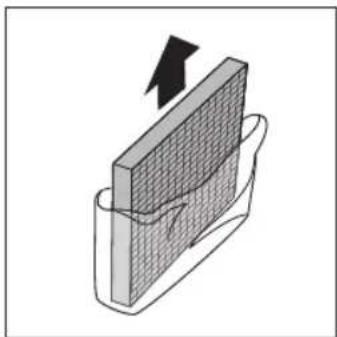
natural_image
Diagram showing a 3D grid structure with an arrow indicating direction, no text or symbols present2 Pull out the water tank from the side of the appliance.

natural_image
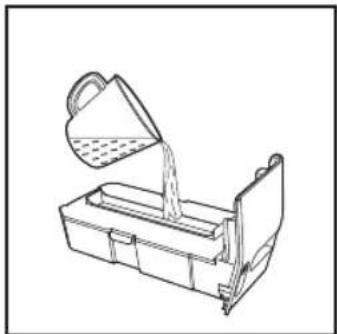
Line drawing of a portable electronic device with a handle and top panel (no text or symbols)3 Fill the water tank with cold tap water.
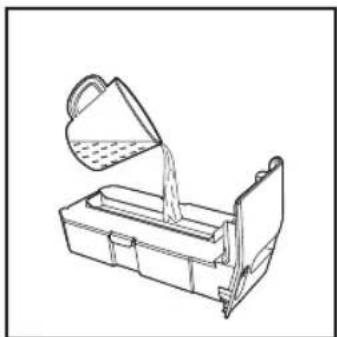
natural_image
Line drawing of a container pouring liquid into a container (no text or symbols)
Note
- When pouring water into the water tank, make sure not to exceed the MAX water level indication.
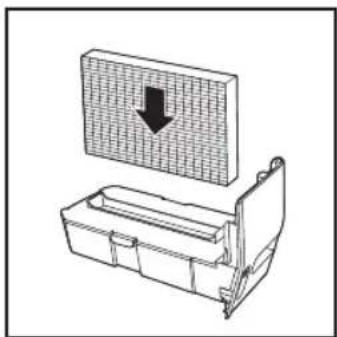
4 Put the humidification filter into the water tank.

natural_image
Diagram of a mechanical component with a grid-patterned block and an arrow indicating direction (no text or symbols)5 Push the water tank back into the appliance.
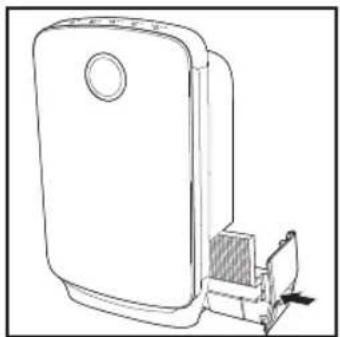
natural_image
Line drawing of a portable air conditioner unit with a handle and vent, no text or symbols present4 Using the appliance
Understand the air quality light
| Color of the air quality light | Air quality level |
| Blue Good | |
| Purple Fair | |
| Red Bad |
The air quality light automatically goes on when the appliance is switched on, and shows all colors repeatedly. In a short while the air quality light selects the color that corresponds to the ambient air quality.

Note
- The built-in air quality sensor measures the air quality and automatically selects the appropriate color of the air quality light. When the air is clean, the color of the air quality light is in blue. When the air quality deteriorates, the color of the air quality light changes to purple or red.
Switch on and off the appliance
The appliance operates under air purification combined with humidification by default.
1 Put the plug into the wall socket. →All lights go on once and then go out again.
2 Press do switch on the appliance.
→ The PURIFY and HUMIDIFY lights are on.
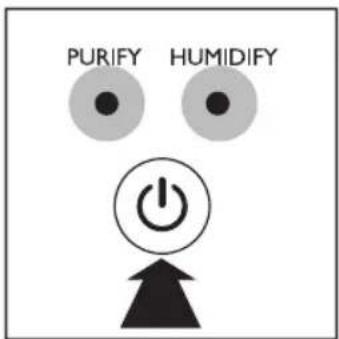
→After measuring the air quality for a short while, the air quality sensor automatically selects the appropriate color of the air quality light.
The appliance enters AUTO mode, and the target humidity level is 50% by default.

3 Press for 2 seconds to switch off the appliance.


Note
- After the appliance is switched off by the on/off button ⏻ if the plug is still in the power socket, the appliance will resume working based on the last settings when it is switched on again.
Change the working mode
Besides operating under air purification combined with humidification, the appliance can also work under air purification only mode.
1 Empty the water tank.
2 After the appliance is switched on, press ⏻ once.
→The HUMIDIFY and humidity level indicators go out.
→The humidification function is deactivated. The appliance works under air purification only mode.
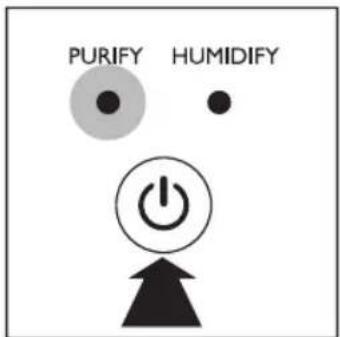
3 Press (again to activate the humidification function.

Note
- In air purification only mode, the humidification button Ⓞ does not respond.
• The appliance cannot work under humidification only mode.
Set the sensitivity of the air quality sensor
This appliance allows you to adjust the sensitivity of the air quality sensor. There are three sensitivity levels:
- standard (default setting)
- sensitive
- extra sensitive
You can adjust the sensitivity of the air quality sensor in the following way:

Note
- When the appliance is set to a higher sensitivity, the purifier becomes more allergic to the pollutants in the air. When the purifier is in AUTO mode, it is more likely to choose a higher fan speed than the standard mode. The air quality sensor selects the appropriate color of the air quality light in accordance with the higher sensitivity.
1 Unplug the appliance.
2 After a short while, put the plug in the wall socket again.
3 Press and hold the fan speed button ⚙ and humidifier button ⚙ simultaneously for 3 seconds.
→One or more fan speed lights flash to show the current sensitivity level of the air quality sensor.

| Fan speed light Sensitivity level | |
| ~ + ≈standard | |
| ≈ | sensitive |
| ~ | extra sensitive |
4 Press the fan speed button to adjust the sensitivity level of the air quality sensor.

5 Press and hold for 2 seconds to save the setting and switch off the appliance.

Note
- When you are changing the sensitivity level, if you do not change any settings, or if you do not press for 2 seconds after you have changed any settings, the appliance will resume normal work without saving any changes.
• After the sensitivity is changed and saved, the appliance automatically starts operating at the preset sensitivity level whenever you switch on the appliance.
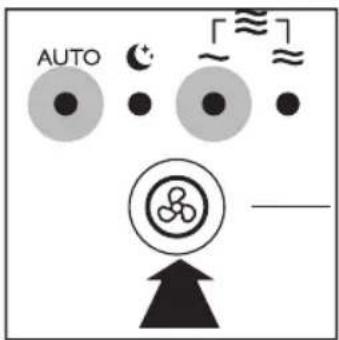
In AUTO mode, the appliance selects the appropriate fan speed in accordance with the ambient air quality.
- Press the fan speed button to select AUTO mode.
- AUTO and one of the fan speed indicators (\~ or) light up.

Note
- In AUTO mode, when the air quality reaches the target (air purification only mode), or when the air quality and humidity reach the target simultaneously (combi mode), the appliance will work with a lower fan speed, and the fan speed indicator ( ) goes out.
Manual
You can manually select the desired fan speed.
- Press the fan speed button once or more times to select the desired fan speed (\~, ≈or) ≈


Note
- Fan speed ≈s available for AC4081 only.
- In Manual mode, when the air quality reaches the target (air purification only mode), or when the air quality and humidity reach the target simultaneously (combi mode), the appliance will continue to work with the selected fan speed.

Tip
- If the air quality light is in blue color, this means the air quality is good, and you can select a lower fan speed.
- On the other hand, if the air quality light is in red or purple color, this means the air quality is bad or fair. You can select a higher fan speed to clean the air quickly.
Sleep mode
In sleep mode, the appliance operates very quietly.
- Press the fan speed button to select the sleep mode. →The sleep indicator lights up.
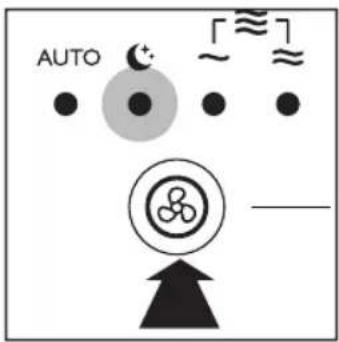
To change to another fan speed, press the fan speed button Ⓜ.

Note
- When the appliance switches to sleep mode, the indicators goes out after 1 minute, and the appliance keeps working.
Set the timer
With the timer function, you can let the appliance operate for a set number of hours. When the set time has elapsed, the appliance automatically switches off.
1 Press the timer button to activate the timer.
→The timer light (IH 4H) goes on.

2 Press the timer button repeatedly to choose the number of hours you want the appliance to operate. The corresponding timer light goes on. To deactivate the timer function, press the timer button repeatedly until the timer light (1H, 4H or ) goes out.
Set the humidity level

Note
- Make sure that the water tank is filled with water when you want to use the humidification function (see the chapter "Get started", section "Prepare for humidification").
- Press the humidity button once or more times to set the desired air humidity to 40%, 50% or 60%.
→The corresponding humidity light (40%, 50% or 60%) starts to flash.

→When the appliance reaches the target humidity level, the humidity level indicator remains on.

Note
- If you want to increase the humidity level in shorter time, you can select a higher fan speed.
Set the child lock

Note
- Child lock is only applicable for AC4081.
- Press and hold the fan speed button Ⓤ and timer button ⏱ simultaneously for 3 seconds to activate child lock.

→When the child lock is on, all buttons are not responsive.
- Press and hold the fan speed button Ⓧ and timer button ⏱ simultaneously for 3 seconds again to deactivate child lock.


Note
- When the child lock is on, the appliance will not respond when you press any button.
Water level
The water level in the water tank is visible through the water level window on the side of the appliance. When there is not enough water in the water tank, ◆ flashes to indicate that you have to refill the water tank.

natural_image
Simple line drawing of a test tube inside a container with an inset showing liquid (no text or symbols)

Note
- When there is no water in the water tank, the refill water light remains on, and the humidification indicator flashes to remind users the humidification function is not working. When the water tank is refilled with water, the humidification function will be resumed.
- The refill water light does not light up under air purification only mode.
5 Cleaning

Note
• Always unplug the appliance before you clean it.
- Never immerse the appliance in water or any other liquid.
- Never use abrasive, aggressive, or flammable cleaning agents such as bleach or alcohol to clean any part of the appliance.
- Only the pre-filter and humidification filter are washable. The air purifier filter is not washable nor vacuum cleanable.
Cleaning schedule
| Frequency C | Cleaning method |
| When necessary | Wipe the surface of the appliance with a soft dry cloth. |
| Every week R | Rinse the humidification filter. |
| Rinse the water tank. | |
| When the filter replace indicator 1 / 3 lights up | Clean the pre-filter. |
| Descale the humidification filter with the vinegar-water mixture. | |
| Every two months | Clean the air quality sensor and air humidity sensor with a dry cotton swab. |
Clean the body of the appliance
Regularly clean the inside and outside of the appliance to prevent dust from collecting.
1 Wipe away dust with a soft dry cloth from the body of the appliance.
2 Clean the air inlet and the air outlet with a soft dry cloth.
Clean the air quality sensor
Clean the air quality sensor every two months for optimal functioning of the appliance. Clean it more frequently if you use the appliance in a dusty environment.

Note
- When the humidity level in the room is very high, it is possible that condensation develops on the air quality sensor. As a result, the air quality light may indicate that the air quality is bad even though the air quality is good. In this case you have to clean the air quality sensor or use one of the manual speed settings.
1 Clean the inlet and outlet of the air quality sensor with a soft brush.

natural_image
Diagram showing a brush applying material to a device component (no text or symbols visible)2 Remove the cover of the air quality sensor.

natural_image
Diagram showing a vehicle or road with a directional arrow pointing to a rectangular area, no text or symbols present.3 Clean the sensor, the dust inlet and the dust outlet with a lightly moistened cotton swab.

natural_image
Pure electrical circuit lines without any symbols4 Dry them with a dry cotton swab.
5 Reattach the sensor cover.
Clean the water tank and humidification filter
Clean the water tank and humidification filter every week to keep them hygienic.
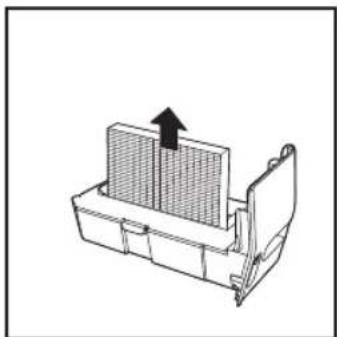
1 Pull the water tank from the side of the appliance.

natural_image
Line drawing of a portable electronic device with a handle and control panel (no text or symbols)2 Remove the humidification filter from the water tank.
natural_image
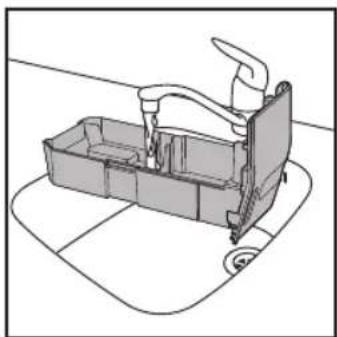
Technical line drawing of a mechanical component with an arrow indicating upward motion (no text or symbols)3 Rinse the humidification filter under a running tap.

natural_image
Line drawing of a kitchen sink with a toothbrush and baseplate (no text or symbols)
Note
- Do not scrub the humidification filter, nor place it under direct sunlight.
4 Unfasten the locks on the edge of the water tank lid, and remove it from the water tank.

5 Rinse the water tank under a running tap.

natural_image
Line drawing of a mechanical device with handle and base plate (no text or symbols)
Note
- If necessary, use a mild detergent to clean the water tank. In this case, rinse the water tank thoroughly.
6 Dry the water tank and its lid with a soft, dry cloth.
7 Put the lid back onto the water tank and fasten the locks.
8 Put the humidification filter back into the water tank.

natural_image
Technical line drawing of a mechanical component with a grid-patterned panel and an arrow indicating downward motion (no text or symbols)9 Put the water tank back into the appliance.
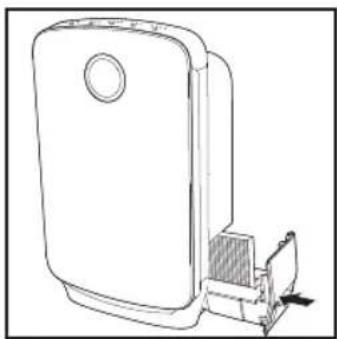
natural_image
Line drawing of a portable electronic device with a circular top and adjacent mechanical component (no text or symbols)Clean the pre-filter and descale the humidification filter
| Filter alert light status | Follow this |
| Filter light 1 / 3 goes on | Clean the pre-filter and descale the humidification filter |

Note
- Only the pre-filter and humidification filter are washable. Filter 2 is not washable.
- Filter light 1 goes on approximately once every month.

1 Wash the pre-filter under a running tap. If the pre-filter is very dirty, use a soft brush to brush away the dust.

natural_image
Diagram of a robotic arm interacting with a grid-based platform, showing a black arrow pointing to the screen (no text or symbols present)2 Air dry the pre-filter.

Note
• Make sure that the pre-filter is completely dry. If it is still wet, bacteria may multiply in it and shorten the lifetime of the pre-filter.
3 Mix the white vinegar with an equal amount of tap water in a container that is large enough to soak the humidification filter in.

Note
- White vinegar has 5 % acetic acid. - If there are white deposits (limescale) on the filter, make sure that the side with the white deposits is immersed in the water.
4 Let the humidification filter soak in the solution for one hour.

5 Discard the water-vinegar solution.
6 Rinse the humidification filter under the tap to rinse away vinegar residues. During rinsing, turn the humidification filter so that both the front and back sides are rinsed.

natural_image
Line drawing of a kitchen sink with a drain and handle, placed on a surface (no text or symbols)7 Let excess water drip off the humidification filter and let it air dry.
8 After the pre-filter and humidification filter are put back in the appliance, reset the filter lifetime counter. (Refer to chapter 7 "Resetting the filter lifetime counter")
6 Replacing the filters
Understand the healthy air protect lock
This appliance is equipped with the healthy air protect lock to make sure that the filters are in optimal condition when the appliance is operating. When the filter is almost full and has to be replaced, the specific filter light (2 / 3) start to flash.
When you do not replace the filter in time:
→The appliance stops operating and it is locked.
→The specific filter light (2 / 3) illuminate continuously.

Note
• The appliance is locked after the filter light has flashed for approximately 2 weeks.
Replace filter 2

Note
- Filter 2 is not washable nor vacuum cleanable.
Replace filter 2 when the filter light ^2 starts flashing.

1 Remove the filters using the tag on the filter. Take the filters by both sides and gently deposit them into the house hold trash bin.

natural_image
Technical diagram of two labeled electronic device modules (AC4080 and AC4081), showing internal components without any text or symbols.
Note
- Do not touch the pleated filter surface, or smell the filter as it has collected pollutants from the air.
- Wash your hands after disposing of the used filters.
2 Remove all packaging material from the new filter 2.

natural_image
Illustration of a folder with an arrow indicating upward motion (no text or symbols)3 Put the new filter 2 into the appliance.

4 After the pre-filter is put back in the appliance, reset the filter 2 lifetime counter. (Refer to chapter 7 "Resetting the filter lifetime counter")
Replace the humidification filter
Replace the humidification filter when filter light 3 starts flashing.

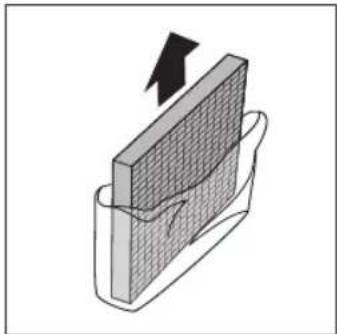
1 Remove the used humidification filter from the water tank.

natural_image
Diagram of a mechanical component with a grid-like structure and an upward arrow, no text or symbols present.2 Remove all packaging material from the new humidification filter.

natural_image
Diagram showing a 3D object with a grid pattern and an arrow indicating upward motion (no text or symbols)3 Put the new humidification filter in the water tank.
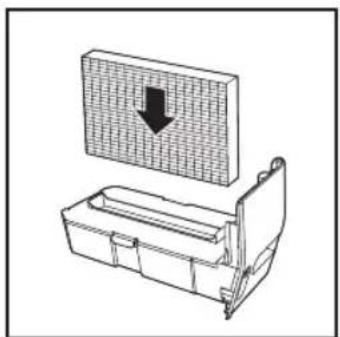
natural_image
Technical line drawing of a mechanical component with a grid-patterned panel and an arrow indicating downward motion (no text or symbols)4 Put the water tank back into the appliance.
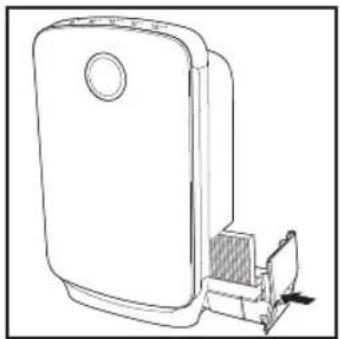
natural_image
Line drawing of a portable air conditioner unit with a handle and vent, no text or symbols present5 Reset the humidification filter lifetime counter. (Refer to chapter 7 "Resetting the filter lifetime counter")
7 Resetting the filter lifetime counter
When you replace the filters, it is important that you also reset the filter lifetime counter afterwards. This allows the appliance to be in sync with the filter lifetime.
1 Press and hold the reset button for 3 seconds, the filter light goes out, and the appliance resumes work automatically in the default settings (combi mode with AUTO as the fan speed).

8 Troubleshooting
This chapter summarizes the most common problems you could encounter with the appliance. If you are unable to solve the problem with the information below, contact the Consumer Care Center in your country.
| Problem Possible solution | |
| The appliance does not work even though it is plugged in. | · The filter replacement light has been on continuously but you did not replace the corresponding filter, it is now locked. In this case, replace the filter and reset the filter time.· The water refill lightflashes. Make sure the water tank is properly installed. |
| The appliance does not work even though it is switched on. | The appliance is working but the buttons are not responsive. Check is the child lock is on (for AC4081 only). |
| The water tank leaks. It is normal that the lid of the water tank is slightly wet when you remove it from the appliance. However, if water drops keep dripping from the bottom of the water tank, contact the Consumer Care Center in your country. | |
| There are some white deposits on the humidification filter. | The white deposits are called limescale and they consist of minerals from the water. Limescale on the humidification filter affects the humidifying performance. Therefore you have to descale the humidification filter when the filter light 1/3flashes (See the chapter "Clean the pre-filter and descale the humidification filter"). |
| No air comes out of the air outlet. | Plug the appliance into the power supply and switch on. |
| The airflow that comes out of the air outlet is significantly weaker than before. | · The pre-filter is dirty. Clean the pre-filter (see the chapter "Clean the pre-filter and descale the humidification filter").· Make sure that you have removed all packaging material from the filters. |
| The air quality does not improve, even though the appliance has been operating for a long time. | One of the filters has not been placed in the appliance.Make sure that all filters are properly installed in the following order, starting with the innermost filter:1) filter 2; 2) pre-filter.The air quality sensor is wet. The humidity level in your room is high and causes condensation. Make sure that the air quality sensor is clean and dry (see the chapter "Clean the air quality sensor"). |
| The color of the air quality light always stays the same. | The air quality sensor is dirty. Clean the air quality sensor (see the chapter "Clean the air quality sensor").There is not enough ventilation in the room. Open a window, to improve the air circulation. |
| I do not see water vapor coming out of the appliance. Is it working? | When water vapor is very fine, it is invisible. With the NanoCloud humidification technology, the appliance produces healthy humid air from the outlet area without formation of water mist. |
| The appliance produces a strange smell. | The first few times you use the appliance, it may produce a plastic smell. This is normal. However, if the appliance produces a burnt smell, contact your Philips dealer or an authorized Philips service centre. The appliance may also produce an unpleasant smell when one of the filters is dirty. In this case, clean or replace the filter concerned. |
| I need cleaner air because I have an allergy. | You can change the air quality sensor sensitivity (see the chapter "Use the appliance, section "Set the sensitivity of the air quality sensor") to make the appliance clean the air even better. |
| The appliance is extra loud. | Please check if you have removed all the packaging material from the filters.If the appliance is still too loud, you can change the fan speed to a lower fan speed level. |
| The appliance still indicates that I need to replace a filter, but I already did. | Perhaps you did not press the reset button properly. Plug in the appliance, press the button to switch on and press and hold the reset button for 3 seconds. |
9 Guarantee and service
If you need information or if you have a problem, please visit the Philips website at www.philips.com or contact the Philips Consumer Care Center in your country (you find its phone number in the worldwide guarantee leaflet). If there is no Consumer Care Centre in your country, go to your local Philips dealer.
Order parts or accessories
If you have to replace a part or want to purchase an additional part, go to your Philips dealer or visit www.philips.com/support.
If you have problems obtaining the parts, please contact the Philips Consumer Care Center in your country (you can find its phone number in the worldwide guarantee leaflet).
10 Notices
Electromagnetic fields (EMF)
This Philips appliance complies with all applicable standards and regulations regarding exposure to electromagnetic fields.
Compliance with EMF
Koninklijke Philips N.V. manufactures and sells many products targeted at consumers, which, like any electronic apparatus, in general have the ability to emit and receive electromagnetic signals.
One of Philips' leading Business Principles is to take all necessary health and safety measures for our products, to comply with all applicable legal requirements and to stay well within the EMF standards applicable at the time of producing the products.
Philips is committed to develop, produce and market products that cause no adverse health effects. Philips confirms that if its products are handled properly for their intended use, they are safe to use according to scientific evidence available today.
Philips plays an active role in the development of international EMF and safety standards, enabling Philips to anticipate further developments in standardization for early integration in its products.
Recycling
Never dispose of your product with other household waste. Please inform yourself about the local rules on the separate collection of electrical and electronic products. The correct disposal of your old product helps prevent potentially negative consequences on the environment and human health.


Daftar isi
1 Penting 32
Pengaman 32
natural_image
Diagram of a gray rectangular device with a circular button and labeled parts (1, 2), no readable text or symbols present.natural_image
Technical line drawing of a device interior with ventilation grilles and mounting brackets (no text or symbols)natural_image
Technical line drawing of two electronic device modules labeled AC4080 and AC4081, showing internal components without any text or symbols.natural_image
Illustration of a hand holding a rectangular object with an arrow indicating upward motion (no text or symbols)natural_image
Diagram of a refrigerator interior showing the lid and side panel with numbered components (no text or symbols)natural_image
Diagram of a mechanical component with a grid pattern and an arrow indicating direction (no text or symbols)natural_image
Line drawing of a portable air purifier with a handle and control panel (no text or symbols)3 Pasang filter pelembap ke dalam tangki air.

natural_image
Technical line drawing of a mechanical component with a grid-patterned upper section and a cutaway view showing internal structure (no text or symbols)natural_image
Line drawing of a container with liquid being poured into it, no text or symbols present
Catatan
natural_image
Line drawing of a portable air conditioner unit with a handle and vent, no text or symbols present4 Menggunakan alat
Pahami lampu kualitas udara
| Lampu kecepatankipas | Tingkat kepekaan |
| ~ + ≈standar | |
| ≈ | sensitif |
| ~ | ekstra sensitif |

Catatan
natural_image
Simple line drawing of a test tube inside a container with an inset showing liquid (no text or symbols)

Catatan
natural_image
Diagram showing a paintbrush applying black paint to a device panel (no text or symbols visible)natural_image
Pure electrical circuit lines without any symbolsnatural_image
Line drawing of a portable electronic device with a handle and ventilation slots (no text or symbols)natural_image
Diagram of a mechanical device with a grid block and directional arrow (no text or symbols)natural_image
Diagram of a kitchen sink with a bath and a pressure gauge (no text or symbols)
Catatan
- Jangan menggosok filter pelembap atau meletakkannya langsung di bawah sinar matahari.
5 Bilas tangki air di bawah air keran yang mengalir.
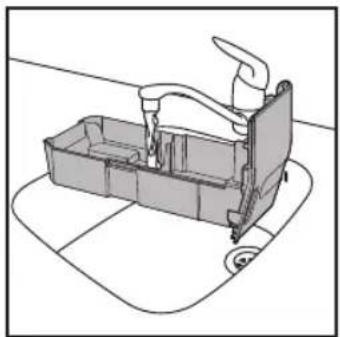
natural_image
Line drawing of a car interior with handle and seat (no text or symbols)
Catatan
natural_image
Technical line drawing of a mechanical component with a grid-patterned panel and an arrow indicating direction (no text or symbols)natural_image
Line drawing of a portable electronic device with a circular top and adjacent mechanical bracket (no text or symbols)natural_image
Diagram of a grid-based mechanical or electrical component with a tool and arrow pointing to a grid pattern (no text or symbols)2 Angin-anginkan pra-filter hingga kering.

Catatan
natural_image
Line drawing of a faucet on a sink with a textured base and circular base (no text or symbols)Ganti filter 2 saat lampu filter mulai berkedip.

natural_image
Illustration of a box being inserted into a bag with an arrow indicating direction (no text or symbols)natural_image
Technical diagram of two labeled electronic devices (AC4080 and AC4081) showing internal components and mounting points (no text or symbols on the devices themselves)Ganti filter pelembap bila lampu filter mulai berkedip.

natural_image
Diagram of a mechanical component with a grid-like structure and an arrow indicating upward motion (no text or symbols)natural_image
Diagram of a mechanical component with a grid pattern and an arrow indicating direction (no text or symbols)3 Letakkan filter pelembap baru di tangki air.
natural_image
Technical diagram of a mechanical assembly with a grid-patterned component and an arrow indicating direction (no text or symbols)natural_image
Line drawing of a portable electronic device with a circular top and adjacent mechanical bracket (no text or symbols)5 Menyetel ulang penghitung masa pakai filter. (Lihat bab 7 "Menyetel ulang penghitung masa pakai filter")
7 Menyetel ulang penghitung masa pakai filter
8 Pemecahan Masalah
natural_image
3D diagram of a rectangular device with labeled components (no text or symbols)natural_image
Technical line drawing of a device interior with grid panels and ventilation slots (no text or symbols)natural_image
Technical diagram of two electronic device enclosures labeled AC4080 and AC4081, showing internal components without any text or symbols beyond labels.natural_image
Illustration of a hand holding a rectangular object with an arrow indicating upward motion (no text or symbols)natural_image
Technical diagram of two electronic device modules labeled AC4080 and AC4081, showing internal components without any readable text or symbols.natural_image
Diagram of a device interior showing a lid and internal compartments with arrows indicating rotation (no text or symbols present)natural_image
Diagram of a mechanical component with a downward arrow indicating force or direction (no text or symbols)natural_image
Line drawing of a portable air purifier device with a handle attachment (no text or symbols)natural_image
Line drawing of a container pouring liquid into a container (no text or symbols)หมายเหตุ
natural_image
Diagram of a mechanical component with a grid pattern and a downward arrow indicating force or direction (no text or symbols present)natural_image
Line drawing of a portable air purifier with a handle and vent, no text or symbols present4 การใช้งาน
chemical
Diagram showing molecular orbital positions with 0°, 50°, and 60° labels and a central symbol labeled AUTOflowchart
graph TD
    A["Lock Icon"] --> B["Arrow to Lock Icon"]
    C["Clock Icon"] --> D["Clock Icon"]
    E["Arrow to Clock Icon"] --> F["Clock Icon"]
    G["Arrow to Clock Icon"] --> H["Clock Icon"]
    I["Arrow to Clock Icon"] --> J["Clock Icon"]
    K["Arrow to Clock Icon"] --> L["Clock Icon"]
    M["Arrow to Clock Icon"] --> N["Clock Icon"]
    O["Arrow to Clock Icon"] --> P["Clock Icon"]
    Q["Arrow to Clock Icon"] --> R["Clock Icon"]
    S["Arrow to Clock Icon"] --> T["Clock Icon"]
    U["Arrow to Clock Icon"] --> V["Clock Icon"]
    W["Arrow to Clock Icon"] --> X["Clock Icon"]

หมายเหตุ
natural_image
Simple line drawing of a test tube inside a container with liquid, no text or symbols present

หมายเหตุ
natural_image
Diagram showing a paintbrush applying black paint to a device component (no text or symbols visible)natural_image
Pure electrical circuit lines without any symbolsnatural_image
Line drawing of a device with a circular top and mechanical component attached (no text or symbols)natural_image
Diagram of a mechanical component with a grid structure and an upward arrow, no text or symbols presentnatural_image
Line drawing of a kitchen sink with faucet and baseplate (no text or symbols)
หมายเหตุ
natural_image
Line drawing of a mechanical device with handle and base plate (no text or symbols)
หมายเหตุ
natural_image
Technical line drawing of a mechanical component with a grid-patterned upper section and a downward arrow indicating a force or direction (no text or symbols present)natural_image
Line drawing of a portable air conditioner unit with a handle and vent, no text or symbols presentnatural_image
Diagram showing a tool interacting with a grid-based platform, with a black arrow pointing to a cluster of dots (no text or symbols present)natural_image
Diagram of a kitchen sink with a toothbrush and mouth buffer, placed on a surface (no text or symbols)Taking place it is a time to get the time
natural_image
Technical diagram of two electronic device modules labeled AC4080 and AC4081, showing internal components without any text or symbols.
หมายเหตุ
natural_image
Illustration of a device being lifted into a bag, showing an upward arrow (no text or symbols)natural_image
Technical line drawing of a mechanical component with an arrow indicating upward motion (no text or symbols)natural_image
Diagram of a mechanical component with a grid pattern and an upward arrow, no text or symbols presentnatural_image
Technical line drawing of a mechanical component with a grid-patterned panel and directional arrow (no text or symbols)natural_image
Line drawing of a portable air conditioner unit with a handle and vent, no text or symbols present8 การแก้ไขปัญหา
natural_image
Diagram of a gray rectangular device with a circular button and labeled parts (1 and 2), showing no text or symbols beyond labels.natural_image
Technical line drawing of a device interior with grid and panel components (no text or symbols)3 從產品移除過濾網 2。
natural_image
Technical diagram of two labeled electronic device modules (AC4080 and AC4081) with internal grid structures and a directional arrow indicator (no text or symbols on the devices themselves)4 拆除過濾網 2 的包裝物料。

natural_image
Illustration of a folder with an arrow indicating upward motion (no text or symbols)5 將拆開的過濾網 2 放回產品中。

natural_image
Technical diagram of two electronic device modules labeled AC4080 and AC4081, showing internal components without any readable text or symbols.6 將預過濾網放回本產品內。
提示
natural_image
Diagram of a device interior showing a lid and internal compartments (no text or symbols)準備加濕
1 拆除加濕過濾網的所有包裝物料。
natural_image
Diagram of a mechanical component with a grid pattern and an arrow indicating direction (no text or symbols)2 從產品側面拉出水箱。

natural_image
Line drawing of a portable electronic device with a handle and top panel (no text or symbols)3 將冷自來水注入水箱。
natural_image
Line drawing of a container with liquid being poured into it, no text or symbols present提示
natural_image
Technical line drawing of a mechanical component with a grid-patterned panel and a downward arrow indicating a feature (no text or symbols present)5 將水箱推回產品。

natural_image
Line drawing of a portable electronic device with a circular top and adjacent mechanical bracket (no text or symbols)4 使用本產品
認識空氣質素燈

提示
natural_image
Simple line drawing of a test tube inside a container with liquid, no text or symbols present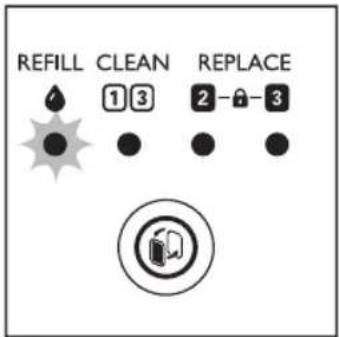

提示
natural_image
Diagram showing a tool interacting with a device panel (no text or symbols visible)2 移除空氣質素感應器蓋。

natural_image
Diagram showing a directional arrow pointing to a rectangular object with multiple small boxes inside, next to a curved line (no text or symbols)natural_image
Pure electrical circuit lines without any symbolsnatural_image
Line drawing of a white electronic device with a circular top and internal components, showing no text or symbols.2 從水箱移除加濕過濾網。

natural_image
Technical line drawing of a mechanical component with an arrow indicating upward motion (no text or symbols)3 以自來水沖洗加濕過濾網。

natural_image
Line drawing of a kitchen sink with faucet and baseplate (no text or symbols)
提示
5 以自來水沖洗水箱。
natural_image
Line drawing of a car interior with handle and seat (no text or symbols)
提示
natural_image
Diagram of a mechanical device with a grid-patterned panel and an arrow indicating direction (no text or symbols)9 將水箱放回到產品中。

natural_image
Line drawing of a portable air conditioner unit with a handle and vent, no text or symbols present清潔預過濾網並除去加濕過濾網的水垢
natural_image
Diagram of a robotic arm interacting with a grid-based platform, showing a black arrow pointing to a cluster of dots (no text or symbols present)2 吹乾預過濾網。

提示
natural_image
Line drawing of a kitchen sink with faucet and baseplate (no text or symbols)natural_image
Technical diagram of two electronic device modules labeled AC4080 and AC4081, showing internal components without any readable text or symbols.
提示
natural_image
Illustration of a hand holding a rectangular object with an arrow indicating upward motion (no text or symbols)3 將新的過濾網 2 放入產品中。
natural_image
Technical diagram of two labeled electronic devices (AC4080 and AC4081) showing internal components and mounting features (no text or symbols on the devices themselves)1 從水箱移除使用過的加濕過濾網。
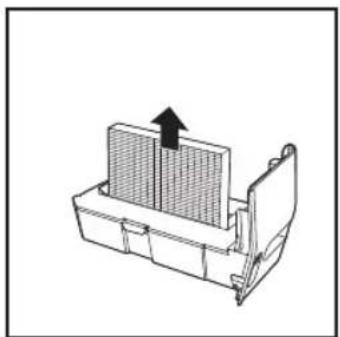
natural_image
Technical line drawing of a mechanical component with an arrow indicating upward motion (no text or symbols)natural_image
Diagram of a mechanical or structural component with a grid pattern and an upward arrow, no text or symbols present.3 將新的加濕過濾網放入水箱。

natural_image
Technical line drawing of a mechanical component with a grid-patterned inset and a downward arrow indicating a detail (no text or symbols)4 將水箱放回到產品中。

natural_image
Line drawing of a portable air conditioner unit with a handle and vent, no text or symbols present8 疑難排解
- Using the appliance 12
- Cleaning 18
- Replacing the filters 22
- Resetting the filter lifetime counter 25
- Troubleshooting 26
- Guarantee and service 28
- Notices 29
- Important
- Safety
- Danger
- Warning
- Caution
- Your combi air purifier and humidifier
- Getting started
- Install filters
- Tip
- Note
- Prepare for humidification
- Using the appliance
- Switch on and off the appliance
- Change the working mode
- Set the sensitivity of the air quality sensor
- Manual
- Sleep mode
- Set the timer
- Set the humidity level
- Set the child lock
- Water level
- Cleaning
- Clean the body of the appliance
- Clean the air quality sensor
- Clean the water tank and humidification filter
- Clean the pre-filter and descale the humidification filter
- Replacing the filters
- Understand the healthy air protect lock
- Replace filter 2
- Replace the humidification filter
- Resetting the filter lifetime counter
- Troubleshooting
- Guarantee and service
- Order parts or accessories
- Notices
- Electromagnetic fields (EMF)
- Compliance with EMF
- Recycling
- Daftar isi
- Penting 32
- Catatan
- Menggunakan alat
- Menyetel ulang penghitung masa pakai filter
- Pemecahan Masalah
- หมายเหตุ
- การใช้งาน
- Taking place it is a time to get the time
- การแก้ไขปัญหา
- 提示
- 準備加濕
- 使用本產品
- 清潔預過濾網並除去加濕過濾網的水垢
- 疑難排解
Brand : PHILIPS
Model : AC4081
Category : Air purifier